
Creating an Interactive Graphical User Interface in MQL5 (Part 1): Making the Panel
Introduction
Welcome to the first installment of our comprehensive guide on building custom graphical user interface (GUI) panels in MetaQuotes Language 5 (MQL5)! As traders and developers, we understand the importance of efficient and user-friendly interfaces for our trading tools. In this series, we’ll dive into the world of MQL5 and explore how to create powerful GUI panels that enhance your trading experience.
In this initial part, we’ll cover the basics: setting up the project, designing the panel layout, and adding essential controls. In the next part, we will make the panel live, interactive, and responsive. Whether you’re a seasoned MQL5 programmer or just starting, this article will provide step-by-step instructions to help you create a functional and visually appealing GUI panel. We will achieve the above via the following topics:
- Elements Illustration
- GUI Panel Assembly in MQL5
- Conclusion
On this journey, we will extensively use MetaQuotes Language 5 (MQL5) as our base Integrated Development Environment (IDE) coding environment, and execute the files on the MetaTrader 5 (MT5) trading terminal. Thus, having the versions mentioned above will be of prime importance. Let's get started.
Elements Illustration
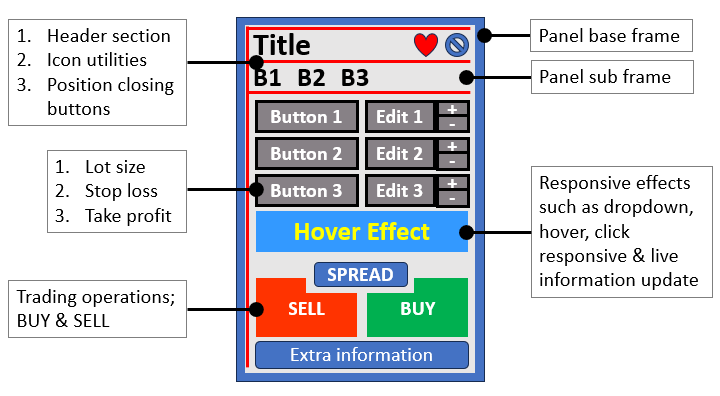
We will create a GUI panel that features the most common utility tools that any trader may need, and thus we want to outline and cover everything in this series. Thus the number of elements that need to be covered is extensive but we will confine them together for easy understanding. We will use 4 elements for our GUI development and it is through this that we will create it. The panel will feature the creation of trading buttons, sharp rectangles, live updates, the use of emojis, different font styles, labels, movable panel parts, and hover effects. To illustrate the whole of this, we have used an example below.
GUI Panel Assembly in MQL5
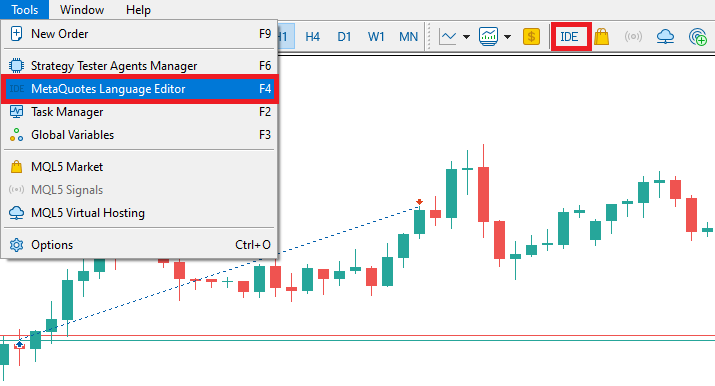
To create the panel, we will base it on an expert advisor. To create an expert advisor (EA), on your MetaTrader 5 terminal, click the Tools tab and check MetaQuotes Language Editor, or simply press F4 on your keyboard. Alternatively, you can click the IDE (Integrated Development Environment) icon on the tools bar. This will open the MetaQuotes Language Editor environment, which allows the writing of trading robots, technical indicators, scripts, and libraries of functions.
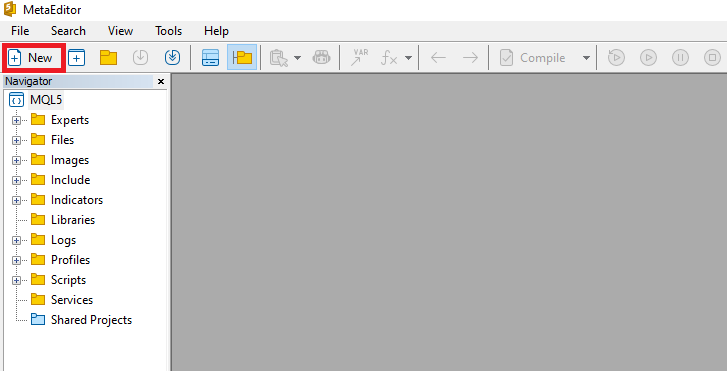
Once the MetaEditor is opened, on the tools bar, navigate to the File tab and check New File, or simply press CTRL + N, to create a new document. Alternatively, you can click on the New icon on the tools tab. This will result in a MQL Wizard pop-up.
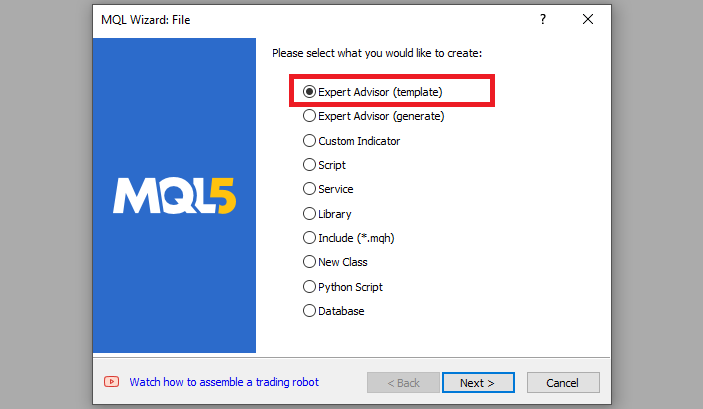
On the Wizard that pops, check Expert Advisor (template) and click Next.
On the general properties of the Expert Advisor, under the name section, provide your expert's file name. Note that to specify or create a folder if it doesn't exist, you use the backslash before the name of the EA. For example, here we have "Experts\" by default. That means that our EA will be created in the Experts folder and we can find it there. The other sections are pretty much straightforward, but you can follow the link at the bottom of the Wizard to know how to precisely undertake the process.
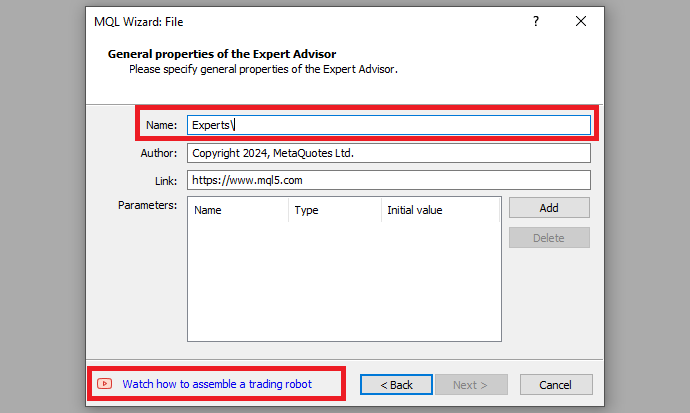
After providing your desired Expert Advisor file name, click on Next, click Next, and then click Finish. After doing all that, we are now ready to code and program our GUI panel.
First, we will need to create functions for the 4 elements that we will need, that is, the rectangle label, the button, the edit field, and the text labels. This will be of great use since it will enable us to reuse the same function when creating similar features rather than having to repeat the whole process when creating similar objects. It also will save us a lot of time and space making the process quick, straightforward, and code snippets short.
To create the rectangle label, we will create a function that takes 10 arguments or parameters.
//+------------------------------------------------------------------+
//|     Function to create rectangle label                           |
//+------------------------------------------------------------------+

bool createRecLabel(string objName, int xD, int yD, int xS, int yS,
                    color clrBg, int widthBorder, color clrBorder = clrNONE,
                    ENUM_BORDER_TYPE borderType = BORDER_FLAT, ENUM_LINE_STYLE borderStyle = STYLE_SOLID) {

...
}
The function signature illustrates everything. It is a boolean function that has the name "createRecLabel", meaning that it will return two boolean flags, true or false, in case of success or failure respectively. To easily understand its parameters, let us outline and explain them individually below.
- objName: This parameter represents the unique name of the rectangle label object. It serves as an identifier for the graphical element being created.
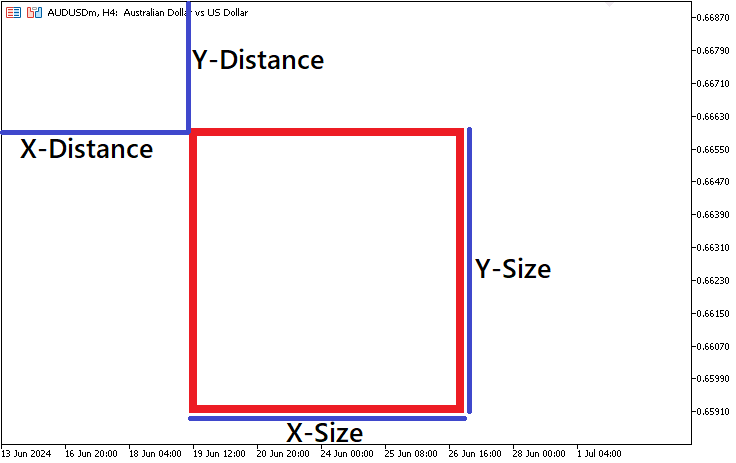
- xD and yD: These parameters determine the X and Y distances from the corner where the rectangle label will be positioned. Think of them as the coordinates that define the top-left corner of the rectangle relative to the chart.
- xS and yS: These parameters specify the width and height of the rectangle. The xS value determines how wide the rectangle will be horizontal, while yS controls its vertical height.
- clrBg: The clrBg parameter represents the background color of the rectangle label. Choose a color that contrasts well with the chart background or complements other elements.
- widthBorder: This parameter defines the width of the border around the rectangle. If you want a border, set a positive value; otherwise, use zero for no border.
- clrBorder: Optional parameter for the border color. If you want a border, specify a color (e.g., clrNONE for no border color).
- borderType: Specify the type of border for the rectangle. Options include flat, raised, or other styles. For a simple flat border, use BORDER_FLAT.
- borderStyle: If you choose a flat border, this parameter determines the line style (e.g., solid, dashed). Use STYLE_SOLID for a continuous line.
On the function signature, you should have noticed that some of the arguments are already initialized to some value. The initialization value represents the default value that will be assigned to that parameter in case it is ignored during the function call. For example, our default border color is none, meaning that if the color value is not specified during the function call, no color will be applied to the border of our rectangle label.
Inside the function body, housed by the curly brackets ({}), we define our object creation procedures.
    // Create a rectangle label object
    if (!ObjectCreate(0, objName, OBJ_RECTANGLE_LABEL, 0, 0, 0)) {
        Print(__FUNCTION__, ": failed to create rec label! Error code = ", _LastError);
        return (false); // Return false if object creation fails
    }
We start by using an if statement to check whether the object is not created. ObjectCreate function, a boolean which takes 6 arguments, is used. This function creates an object with the specified name, type, and initial coordinates in the specified chart subwindow. First, we specify the chart window, 0 means the object is to be created on the main window. Then, we provide the object name. This is the name that will be uniquely assigned to a specific object. The type of object we want to create is of type "OBJ_RECTANGLE_LABEL", signifying an object for creating and designing the custom graphical interface. We then proceed to provide the subwindow, 0 for the current subwindow. Finally, we provide the time and price values as zero (0) since we will not be attaching them to the chart but rather to the chart window coordinates. Pixels are used to set the mapping.
If the creation of the object fails, ultimately the "ObjectCreate" function returns false, clearly there is no point proceeding, we return with an error. In this case, we inform of the error by printing it to the journal beside the error code and returning false. There could be a previous error, and thus to get the latest error, we need to clear the previous error. This is achieved by calling the "ResetLastError" function, which is an in-built MQL5 function, just before our object creation logic.
ResetLastError(); // Reset any previous error codes
The purpose of the function is to set the value of the predefined variable "_LastError", which stores the error code of the last operation that encountered an error, to zero. By calling it, we ensure that any previous error codes are cleared before proceeding with the next operations. This step is essential because it allows us to handle fresh errors independently without interference from previous error states.
If we do not return up to this point, it means we created the object, and thus we can continue with the property update of the object. An in-built function "ObjectSet..." sets the value of the corresponding object property. The object property must be of the datetime, integer, color, boolean, or character type.
    // Set properties for the rectangle label
    ObjectSetInteger(0, objName, OBJPROP_XDISTANCE, xD); // X distance from the corner
    ObjectSetInteger(0, objName, OBJPROP_YDISTANCE, yD); // Y distance from the corner
    ObjectSetInteger(0, objName, OBJPROP_XSIZE, xS); // Width of the rectangle
    ObjectSetInteger(0, objName, OBJPROP_YSIZE, yS); // Height of the rectangle
    ObjectSetInteger(0, objName, OBJPROP_CORNER, CORNER_LEFT_UPPER); // Positioning corner
    ObjectSetInteger(0, objName, OBJPROP_BGCOLOR, clrBg); // Rectangle background color
    ObjectSetInteger(0, objName, OBJPROP_BORDER_TYPE, borderType); // Border type
    ObjectSetInteger(0, objName, OBJPROP_STYLE, borderStyle); // Border style (only if borderType is flat)
    ObjectSetInteger(0, objName, OBJPROP_WIDTH, widthBorder); // Border width (only if borderType is flat)
    ObjectSetInteger(0, objName, OBJPROP_COLOR, clrBorder); // Border color (only if borderType is flat)
    ObjectSetInteger(0, objName, OBJPROP_BACK, false); // Not a background object
    ObjectSetInteger(0, objName, OBJPROP_STATE, false); // Not selectable
    ObjectSetInteger(0, objName, OBJPROP_SELECTABLE, false); // Not selectable
    ObjectSetInteger(0, objName, OBJPROP_SELECTED, false); // Not selected
Let us concentrate on the first property logic.
ObjectSetInteger(0, objName, OBJPROP_XDISTANCE, xD); // X distance from the corner
Here, we use the in-built "ObjectSetInteger" function and pass the parameters respectively. The parameters are as described below.
- Chart id: This is the chart identifier. "0" refers to the current chart (chart ID). We’re adjusting the properties of an object within this chart.
- Name: This is the name of the object. "objName" represents the unique name assigned to the rectangle label object.
- Property id: This is the ID of the object property and its value can be one of the values of the "ENUM_OBJECT_PROPERTY_INTEGER" enumeration. "OBJPROP_XDISTANCE" specifies that we’re modifying the X distance property.
- Property value: This is the value of the property. The value assigned to "xD" determines how far to the right (or left, if negative) the top-left corner of our rectangle label will be positioned horizontally from the left edge of the chart.
Similarly, we set the other properties using the same format. "OBJPROP_YDISTANCE" configures the Y distance property of the rectangle label. The "yD" value determines how far the top-left corner of the rectangle label will be positioned vertically from the upper edge of the chart. In other words, it controls the vertical placement of the label within the chart area. This sets the Y distance from the corner. The "OBJPROP_XSIZE" and "OBJPROP_YSIZE" sets the width and height of the rectangle respectively.
To position our object, we use the "OBJPROP_CORNER" property to determine the corner that we want our object to be on the chart window.
ObjectSetInteger(0, objName, OBJPROP_CORNER, CORNER_LEFT_UPPER); // Positioning corner
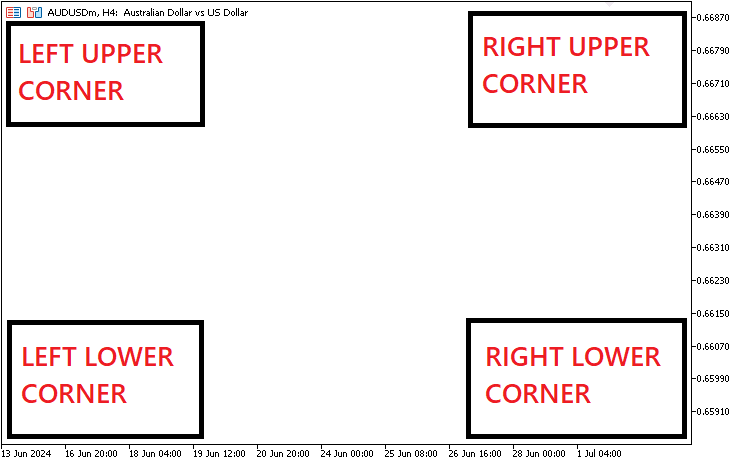
The property can only be of 4 types:
- CORNER_LEFT_UPPER: Center of coordinates is in the upper left corner of the chart.
- CORNER_LEFT_LOWER: Center of coordinates is in the lower left corner of the chart.
- CORNER_RIGHT_LOWER: Center of coordinates is in the lower right corner of the chart.
- CORNER_RIGHT_UPPER: Center of coordinates is in the upper right corner of the chart.
In a photographic representation, this is what we have.
The rest of the properties are straightforward. We added comments to them for easier understanding. Then, we just redraw the chart to make changes take effect automatically without having to wait for a change in price quotes or chart events.
ChartRedraw(0); // Redraw the chart
Finally, we return true signifying that the creation and update of the object properties was a success.
return (true); // Return true if object creation and property settings are successful
The full function code responsible for the creation of a rectangle object on the chart window is as below.
bool createRecLabel(string objName, int xD, int yD, int xS, int yS,
                    color clrBg, int widthBorder, color clrBorder = clrNONE,
                    ENUM_BORDER_TYPE borderType = BORDER_FLAT, ENUM_LINE_STYLE borderStyle = STYLE_SOLID) {
    ResetLastError(); // Reset any previous error codes

    // Create a rectangle label object
    if (!ObjectCreate(0, objName, OBJ_RECTANGLE_LABEL, 0, 0, 0)) {
        Print(__FUNCTION__, ": failed to create rec label! Error code = ", _LastError);
        return (false); // Return false if object creation fails
    }

    // Set properties for the rectangle label
    ObjectSetInteger(0, objName, OBJPROP_XDISTANCE, xD); // X distance from the corner
    ObjectSetInteger(0, objName, OBJPROP_YDISTANCE, yD); // Y distance from the corner
    ObjectSetInteger(0, objName, OBJPROP_XSIZE, xS); // Width of the rectangle
    ObjectSetInteger(0, objName, OBJPROP_YSIZE, yS); // Height of the rectangle
    ObjectSetInteger(0, objName, OBJPROP_CORNER, CORNER_LEFT_UPPER); // Positioning corner
    ObjectSetInteger(0, objName, OBJPROP_BGCOLOR, clrBg); // Rectangle background color
    ObjectSetInteger(0, objName, OBJPROP_BORDER_TYPE, borderType); // Border type
    ObjectSetInteger(0, objName, OBJPROP_STYLE, borderStyle); // Border style (only if borderType is flat)
    ObjectSetInteger(0, objName, OBJPROP_WIDTH, widthBorder); // Border width (only if borderType is flat)
    ObjectSetInteger(0, objName, OBJPROP_COLOR, clrBorder); // Border color (only if borderType is flat)
    ObjectSetInteger(0, objName, OBJPROP_BACK, false); // Not a background object
    ObjectSetInteger(0, objName, OBJPROP_STATE, false); // Not selectable
    ObjectSetInteger(0, objName, OBJPROP_SELECTABLE, false); // Not selectable
    ObjectSetInteger(0, objName, OBJPROP_SELECTED, false); // Not selected

    ChartRedraw(0); // Redraw the chart

    return (true); // Return true if object creation and property settings are successful
}
To create a button object, the same function approach is used. The code to create a custom button function is as below.
//+------------------------------------------------------------------+
//|     Function to create button                                    |
//+------------------------------------------------------------------+

bool createButton(string objName, int xD, int yD, int xS, int yS,
                  string txt = "", color clrTxt = clrBlack, int fontSize = 12,
                  color clrBg = clrNONE, color clrBorder = clrNONE,
                  string font = "Arial Rounded MT Bold") {
    // Reset any previous errors
    ResetLastError();

    // Attempt to create the button object
    if (!ObjectCreate(0, objName, OBJ_BUTTON, 0, 0, 0)) {
        // Print an error message if creation fails
        Print(__FUNCTION__, ": failed to create the button! Error code = ", _LastError);
        return (false);
    }

    // Set properties for the button
    ObjectSetInteger(0, objName, OBJPROP_XDISTANCE, xD); // X distance from the corner
    ObjectSetInteger(0, objName, OBJPROP_YDISTANCE, yD); // Y distance from the corner
    ObjectSetInteger(0, objName, OBJPROP_XSIZE, xS); // Width of the button
    ObjectSetInteger(0, objName, OBJPROP_YSIZE, yS); // Height of the button
    ObjectSetInteger(0, objName, OBJPROP_CORNER, CORNER_LEFT_UPPER); // Positioning corner
    ObjectSetString(0, objName, OBJPROP_TEXT, txt); // Text displayed on the button
    ObjectSetInteger(0, objName, OBJPROP_COLOR, clrTxt); // Text color
    ObjectSetInteger(0, objName, OBJPROP_FONTSIZE, fontSize); // Font size
    ObjectSetString(0, objName, OBJPROP_FONT, font); // Font name
    ObjectSetInteger(0, objName, OBJPROP_BGCOLOR, clrBg); // Background color
    ObjectSetInteger(0, objName, OBJPROP_BORDER_COLOR, clrBorder); // Border color
    ObjectSetInteger(0, objName, OBJPROP_BACK, false); // Transparent background
    ObjectSetInteger(0, objName, OBJPROP_STATE, false); // Button state (not pressed)
    ObjectSetInteger(0, objName, OBJPROP_SELECTABLE, false); // Not selectable
    ObjectSetInteger(0, objName, OBJPROP_SELECTED, false); // Not selected

    // Redraw the chart to display the button
    ChartRedraw(0);

    return (true); // Button creation successful
}
The differences in the code are that a rectangle object could not take a text in it but a button does include a descriptive text of the button functionality in case it is required. Therefore, for the input parameters, we consider text properties, in our case the text value, color, font size, and font name. The border type for our button is static and thus we get rid of its properties and keep just the border color.
The object type that we create is "OBJ_BUTTON", signifying that we create a button graphical object. Its anchor points are set in pixels. The border property that we keep is the border color and replace the rest with the text input properties.
To create the edit field button the same logic is used.
//+------------------------------------------------------------------+
//|     Function to create edit field                                |
//+------------------------------------------------------------------+

bool createEdit(string objName, int xD, int yD, int xS, int yS,
                string txt = "", color clrTxt = clrBlack, int fontSize = 12,
                color clrBg = clrNONE, color clrBorder = clrNONE,
                string font = "Arial Rounded MT Bold") {
    // Reset any previous errors
    ResetLastError();

    // Attempt to create the edit object
    if (!ObjectCreate(0, objName, OBJ_EDIT, 0, 0, 0)) {
        // Print an error message if creation fails
        Print(__FUNCTION__, ": failed to create the edit! Error code = ", _LastError);
        return (false);
    }

    // Set properties for the edit field
    ObjectSetInteger(0, objName, OBJPROP_XDISTANCE, xD); // X distance from the corner
    ObjectSetInteger(0, objName, OBJPROP_YDISTANCE, yD); // Y distance from the corner
    ObjectSetInteger(0, objName, OBJPROP_XSIZE, xS); // Width of the edit field
    ObjectSetInteger(0, objName, OBJPROP_YSIZE, yS); // Height of the edit field
    ObjectSetInteger(0, objName, OBJPROP_CORNER, CORNER_LEFT_UPPER); // Positioning corner
    ObjectSetString(0, objName, OBJPROP_TEXT, txt); // Default text in the edit field
    ObjectSetInteger(0, objName, OBJPROP_COLOR, clrTxt); // Text color
    ObjectSetInteger(0, objName, OBJPROP_FONTSIZE, fontSize); // Font size
    ObjectSetString(0, objName, OBJPROP_FONT, font); // Font name
    ObjectSetInteger(0, objName, OBJPROP_BGCOLOR, clrBg); // Background color
    ObjectSetInteger(0, objName, OBJPROP_BORDER_COLOR, clrBorder); // Border color
    ObjectSetInteger(0, objName, OBJPROP_ALIGN, ALIGN_LEFT); // Text alignment (left-aligned)
    ObjectSetInteger(0, objName, OBJPROP_READONLY, false); // Edit field is not read-only
    ObjectSetInteger(0, objName, OBJPROP_BACK, false); // Transparent background
    ObjectSetInteger(0, objName, OBJPROP_STATE, false); // Edit field state (not active)
    ObjectSetInteger(0, objName, OBJPROP_SELECTABLE, false); // Not selectable
    ObjectSetInteger(0, objName, OBJPROP_SELECTED, false); // Not selected

    // Redraw the chart to display the edit field
    ChartRedraw(0);

    return (true); // Edit field creation successful
}
The major difference in the code as compared to that of creating a button function is firstly the object type. We use "OBJ_EDIT" to signify we want to create an editable button. Then to the field properties, we add horizontal text alignment property, which can either be to the right, left, or center. In our case, we choose to align the text horizontally to the left.
ObjectSetInteger(0, objName, OBJPROP_ALIGN, ALIGN_LEFT); // Text alignment (left-aligned)
The final difference is the property to enables the ability to edit the text in the object. To enable the edit, we set the property "OBJPROP_READONLY" value to false.
ObjectSetInteger(0, objName, OBJPROP_READONLY, false); // Edit field is not read-only
The rest of the arguments remain.
Finally, we need the last element's function which is the text label. The text label eliminates the need for a background object and thus its implementation is quite easier than the rest of the functions. We just need the text and thus we concentrate on the text properties. Its code is as below.
//+------------------------------------------------------------------+
//|     Function to create text label                                |
//+------------------------------------------------------------------+

bool createLabel(string objName, int xD, int yD,
                 string txt, color clrTxt = clrBlack, int fontSize = 12,
                 string font = "Arial Rounded MT Bold") {
    // Reset any previous errors
    ResetLastError();

    // Attempt to create the label object
    if (!ObjectCreate(0, objName, OBJ_LABEL, 0, 0, 0)) {
        // Print an error message if creation fails
        Print(__FUNCTION__, ": failed to create the label! Error code = ", _LastError);
        return (false);
    }

    // Set properties for the label
    ObjectSetInteger(0, objName, OBJPROP_XDISTANCE, xD); // X distance from the corner
    ObjectSetInteger(0, objName, OBJPROP_YDISTANCE, yD); // Y distance from the corner
    ObjectSetInteger(0, objName, OBJPROP_CORNER, CORNER_LEFT_UPPER); // Positioning corner
    ObjectSetString(0, objName, OBJPROP_TEXT, txt); // Text displayed on the label
    ObjectSetInteger(0, objName, OBJPROP_COLOR, clrTxt); // Text color
    ObjectSetInteger(0, objName, OBJPROP_FONTSIZE, fontSize); // Font size
    ObjectSetString(0, objName, OBJPROP_FONT, font); // Font name
    ObjectSetInteger(0, objName, OBJPROP_BACK, false); // Transparent background
    ObjectSetInteger(0, objName, OBJPROP_STATE, false); // Label state (not active)
    ObjectSetInteger(0, objName, OBJPROP_SELECTABLE, false); // Not selectable
    ObjectSetInteger(0, objName, OBJPROP_SELECTED, false); // Not selected

    // Redraw the chart to display the label
    ChartRedraw(0);

    return (true); // Label creation successful
}
The major differences in this code structure from the button's function are the object size and border properties. On the function signature, we get rid of the object sizes as well as the border properties. We define our object type as "OBJ_LABEL" to signify that we draw labels as per the defined label coordinates to the chart window. Finally, we get rid of the size and border parameters and that is all. As easy as that.
Now that we have the functions that we need to create a GUI, let us use them to create the panel. We will need names of the object and to easily manage the interaction of the object names, it is much easier to define macros.
#define MAIN_REC "MAIN_REC"
We use the #define keyword to define a macro named "MAIN_REC" with the value "MAIN_REC" to easily store our main rectangle base name, instead of having to repeatedly retype the name on every instance we create the level, significantly saving us time and reducing the chances of wrongly providing the name. So basically, macros are used for text substitution during compilation.
Our code will be majorly based on the expert initialization section since we want to create the panel at the initialization instance. Thus, the OnInit event handler will house most of the code structure.
//+------------------------------------------------------------------+
//| Expert initialization function                                   |
//+------------------------------------------------------------------+

int OnInit(){

   ...

   return(INIT_SUCCEEDED);
}
The OnInit function is an event handler that is called on the expert initialization instance to do necessary initializations if necessary.
We then call the function to create a rectangle label by typing its name and providing its parameters.
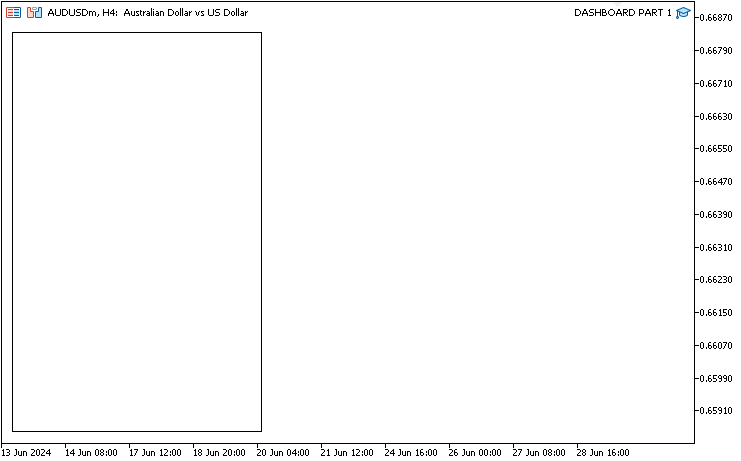
createRecLabel(MAIN_REC,10,30,250,400,clrWhite,1,clrBlack);
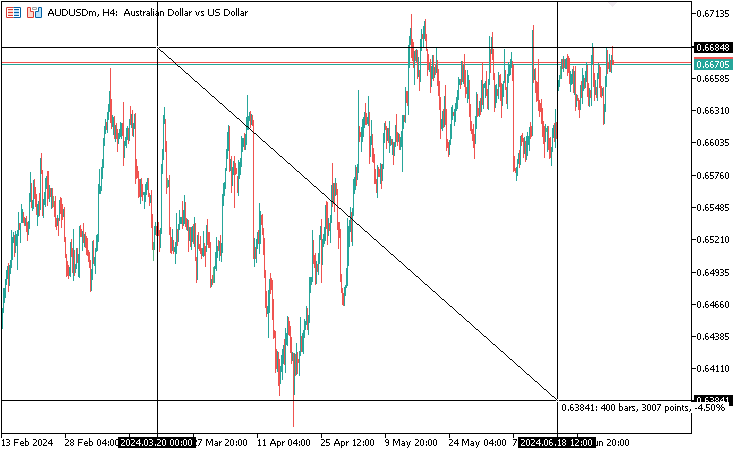
Here, our rectangle name is "MAIN_REC" as from the macro definition. Our distance along the x-axis, the time and date scale, from the left upper corner of the chart window is 10 pixels, and the distance along the y-axis, the price scale, is 30 pixels. The width is 250 pixels and the height is 400 pixels respectively. We choose our background color to be white, with a border width being 1 and a border color of black. To get the pixels to range approximately, you can scale down the chart to 0 and the number of bars between two cross-hair coordinates is equal to the number of pixels on the horizontal scale. In an example, here is what we mean.
The other parameters have been left out meaning that the default values will be applied automatically, that is, the border type will be flat, and the line style will be a continuous solid line. Upon compilation, this is what we currently have.
Even if we had all the parameters with the default values as below, the results would always be the same.
createRecLabel(MAIN_REC,10,30,250,400,clrWhite,1,clrBlack,BORDER_FLAT,STYLE_SOLID);
To create a subframe, we again declare a macro for the same explicitly.
#define MAIN_SUB_REC "MAIN_SUB_REC"
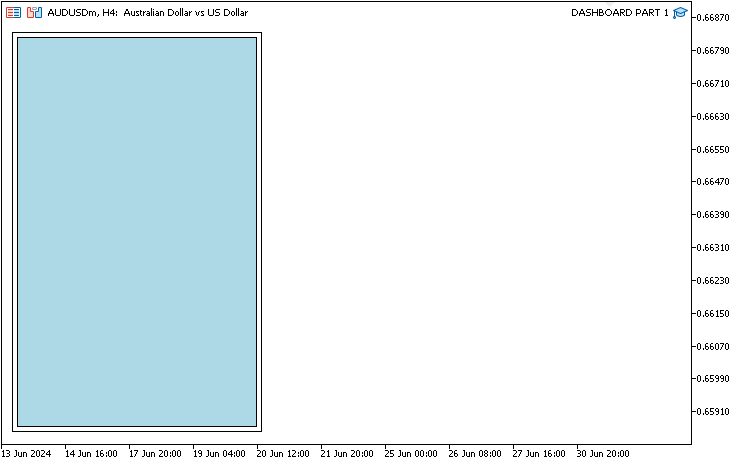
Then we call the same function to create the subframe. We want our frame to be inside the base panel's frame and thus will require we use a slightly different color. To accomplish this, we used a light blue color and a margin of 5 pixels.
createRecLabel(MAIN_SUB_REC,15,35,240,390,clrLightBlue,1,clrNONE);
Since we want a margin of 5 pixels, we push from the left by 5 pixels and at the top by 5 pixels. Thus, the x-axis distance will be the initial 10, plus a margin of 5, which equals 15 pixels. The same is done for the y-axis scale. This means that the size will also need to be reduced by 5 pixels, but hold on a second, we also require a margin of 5 pixels too to the right of the panel. Therefore, a reduction of 5 pixels on each side, for two sides, is needed. Thus the total number of pixels required is 5 multiplied by 2 which equates to 10 pixels. Thus a reduction of 10 pixels on the sizes of the sub-rectangle will give 250 - 10 = 240 pixels as the width and 400 - 10 = 390 pixels as the height of the sub-frame rectangle. Here are the results we get.
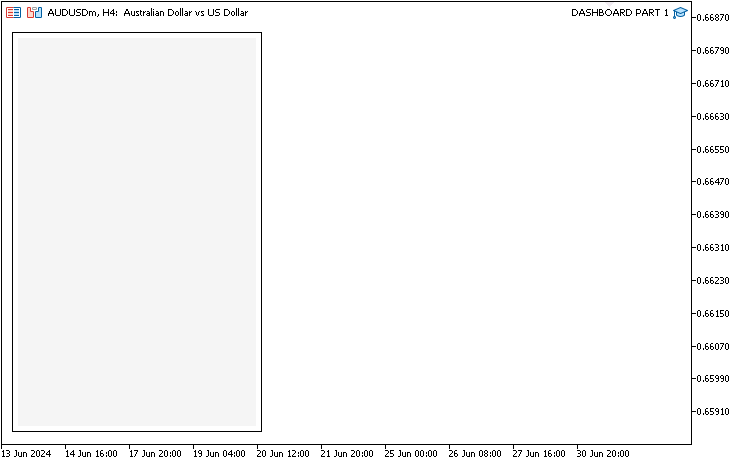
The light blue color is not as appealing to the eyes, so we go with a darker color. To gain more control over the color used, we represent the background color in literals. This will take the format "C'000,000,000'" where the triple zeros can be any numeral from 0 to 255. The format adopted is RGB (Red, Green, Blue) form. The three values represent the red, green, and blue components, respectively, on a scale from 0 to 255. Thus, 245,245,245 translates to an almost white shade.
createRecLabel(MAIN_SUB_REC,15,35,240,390,C'245,245,245',1,clrNONE);
We set the border color to none to create a more appealing color blending. It is always recommended to compile the program and check the result each time you add a new GUI element. Below are the results we get.
To create vertical and horizontal boundary lines, we define more two macros.
#define MAIN_LINE_UP "MAIN_LINE_UP"
#define MAIN_LINE_DN "MAIN_LINE_DN"
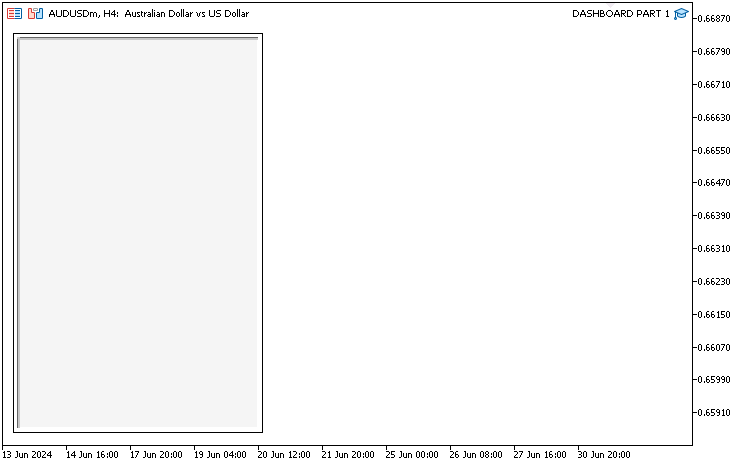
The same structure is used but this time round we use a raised border type. Thus will ignore the use of border color and result in a boundary illusion.
   createRecLabel(MAIN_LINE_UP,15,35,240,1,C'245,245,245',1,clrNONE,BORDER_RAISED);
   createRecLabel(MAIN_LINE_DN,15,35-1,1,390+1,C'245,245,245',1,clrNONE,BORDER_RAISED);
Here is what we get.
Up to this point, the setup of our frames, margins, and boundaries for our GUI panel is complete. We then proceed to add the other panel utilities such as responsive buttons, titles, edit fields, and labels besides their properties and effects.
To begin with, let us give a title to the panel.
#define LABEL_NAME "LABEL_NAME"
...
   createLabel(LABEL_NAME,25,35,"DashBoard v1.0",clrBlue,14,"Cooper Black");
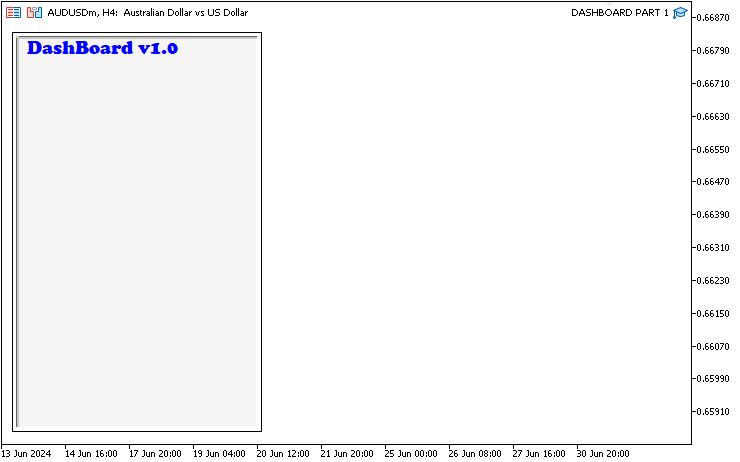
First, we define a macro for the title name and call the function responsible for creating labels by typing its name. We then provide the x-axis and y-axis distances as 25 and 35 pixels respectively. The text input we choose is "DashBoard v1.0" signifying the panel type and the version as first. Concurrently, we provide the text color to be blue with a font size of 14 and the font type to be "Cooper Black". As for the font type, the value is not case-sensitive. Either upper case or lower case or a mixture of the cases will have no effect. It could be "cooper black" or "COOPER BLACK" as well. All that matters is that you need to provide the correct font name. Open the compilation, we get the below results.
You did notice that the font type can change. Let us add sugar to the music and see how the tune plays out. Some font types do contain icons and emojis. Now MQL5 does accept and incorporate some of them. Examples of the fonts are "Webdings", "Wingdings", "Wingdings 2" and "Wingdings 3". There are many more but we choose to use the aforementioned ones. This means that we can make the panel fancy by using these icons and emoji fonts. These are as below.
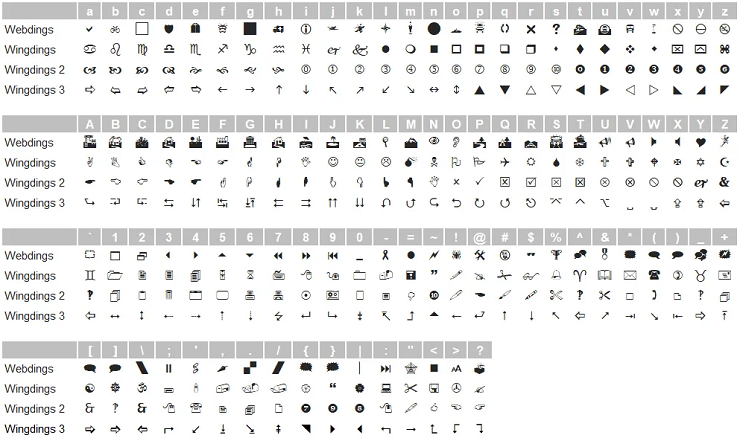
We add three icons preceeding the name of the panel, a heart, a tool fix, and an ambulance icon. Of course, you can choose these as per your liking. That requires a definition of three macros again to hold our icon names and later on use them in the creation of the icons. Here is the logic.
#define ICON_HEART "ICON_HEART"
#define ICON_TOOL "ICON_TOOL"
#define ICON_CAR "ICON_CAR"

...
   createLabel(ICON_HEART,190,35,"Y",clrRed,15,"Webdings");
The same function is used, with the axis distances, color, and font size. However, you can notice that our font name is now changed to "Webdings", and our text value is uppercase "Y". This does not mean that we will display "Y" as our output. We display the respective icon that corresponds to that certain character. As for the font, the icon under the character is as below, the heart icon.
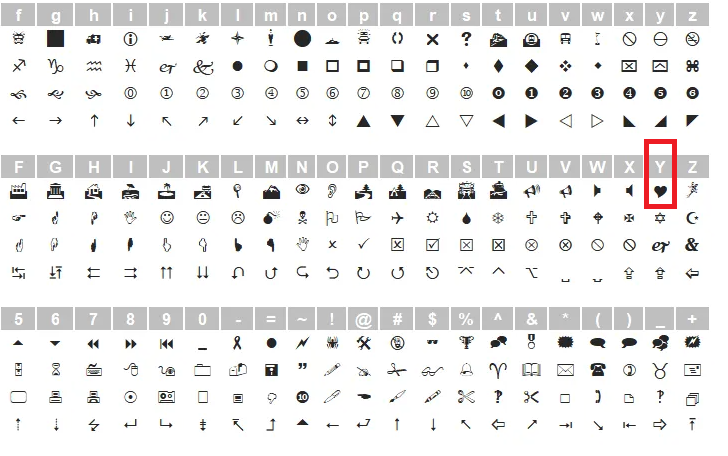
The value of the text is case sensitive because as you can see, the icon under lowercase "y" is different from that of uppercase "Y". Upon compilation, this is what we get.
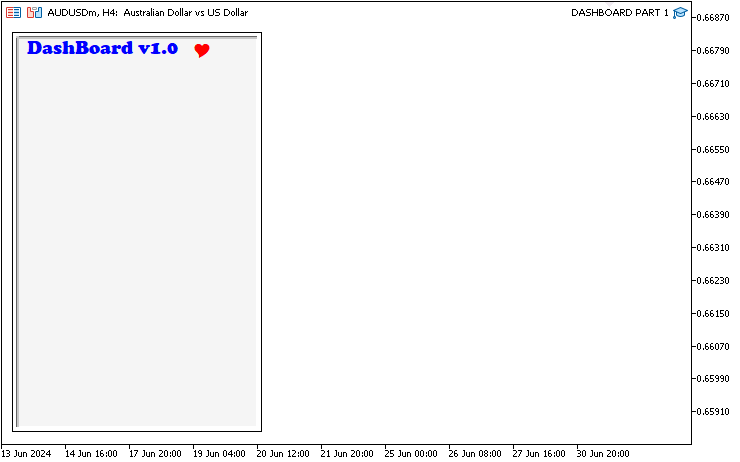
The other two icons can now be added in the same way as the previous icon.
   createLabel(ICON_TOOL,210,35,"@",clrBlue,15,"Webdings");
   createLabel(ICON_CAR,230,35,"h",clrBlack,15,"Webdings");
The same implementation is then used to add the other utility objects to the chart. Below is the logic.
#define LINE1 "LINE1"
#define BTN_CLOSE "BTN_CLOSE"
#define BTN_MARKET "BTN_MARKET"
#define BTN_PROFIT "BTN_PROFIT"
#define BTN_LOSS "BTN_LOSS"
#define BTN_PENDING "BTN_PENDING"
#define LINE2 "LINE2"

...

   createRecLabel(LINE1,15+10,60,240-10,1,C'245,245,245',1,clrNONE,BORDER_RAISED);
   createLabel(BTN_CLOSE,25,65,"Close",clrBlack,13,"Impact");
   createLabel(BTN_MARKET,70,65,"Market",clrDarkRed,13,"Impact");
   createLabel(BTN_PROFIT,125,65,"Profit",clrGreen,13,"Impact");
   createLabel(BTN_LOSS,170,65,"Loss",clrRed,13,"Impact");
   createLabel(BTN_PENDING,205,65,"Pend'n",clrDarkGray,13,"Impact");
   createRecLabel(LINE2,15+10,87,240-10,1,C'245,245,245',1,clrNONE,BORDER_RAISED);
We define the object macro names and call the respective custom functions to create the objects. An instance of two vertical boundary lines is created and sandwiches the label utility buttons. The labels are Close, Market, Profit, Loss, and Pending, adapted to "Pend'n" to accommodate the wording within the frame boundaries. These are intended to close all the market and pending orders, close the market orders only, close the positions that are in profit only, close the positions that are in loss only, and delete pending orders respectively. Upon compilation, we get this result.
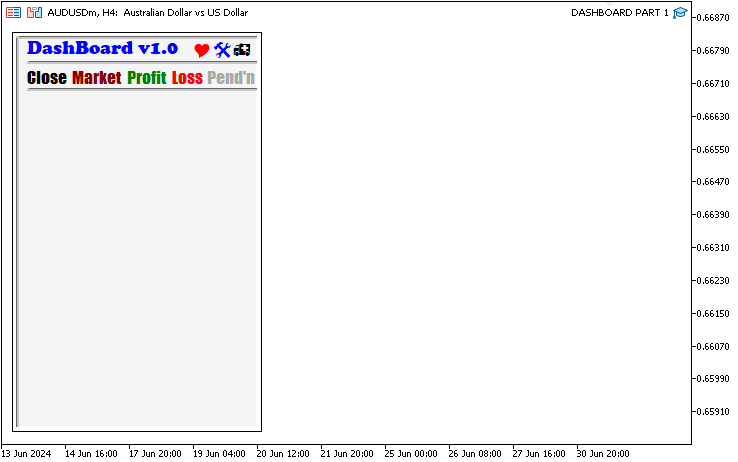
Up to this point, we have successfully created the header section of our panel. We now proceed to create the button utilities. First, let us concentrate on the trading volume button. Our button will have a label and a dropdown cap.
#define BTN_LOTS "BTN_LOTS"
#define LABEL_LOTS "LABEL_LOTS"
#define ICON_DROP_DN1 "ICON_DROP_DN1"
The definition of the macros is done. Afterwards, we create a button by calling the button function.
createButton(BTN_LOTS,25,95,130,25,"",clrBlack,12,C'210,210,210',C'150,150,150');
Again, we provide the button x and y distances with a size of 130 pixels and 25 pixels as width and height respectively. As for the text, we could provide a value but chose not to as we wanted to gain control of the text positioning, thus it was left blank or null. Literal color representations are finally used to set the background as well as the border of the button. Since we did choose to omit the default button label, we created a new text label that is to be in the button proximities via the below function.
createLabel(LABEL_LOTS,25+10,95+5,"LotSize",clrBlack,9);
The function is now familiar to you and you now know the parameters that are passed. For the drop-down icon, we use a font type that provides the icon.
createLabel(ICON_DROP_DN1,130,95+5,CharToString(240),C'070,070,070',20,"Wingdings 3");
You can notice that on the text argument, we convert a character to a string, which is another way of providing the corresponding character code instead of the string, this is helpful if you know the symbol code already. To create the edit field button, the same procedure is adopted.
#define EDIT_LOTS "EDIT_LOTS"
#define BTN_P1 "BTN_P1"
#define BTN_M1 "BTN_M1"

...

   createEdit(EDIT_LOTS,165,95,60,25,"0.01",clrBlack,14,clrWhite,C'100,100,100',"Callibri");
   createButton(BTN_P1,225,95,20,12,"5",clrBlack,12,clrLightGray,C'100,100,100',"Webdings");
   createButton(BTN_M1,225,95+12,20,12,"6",clrBlack,12,clrLightGray,C'100,100,100',"Webdings");
We define the macro names as usual and call functions. To create the edit button, the size of 60 and 25 pixels as width and height respectively is used. The default text is set to 0.01 with a black text color, a font size of 14, and a font type "Callibri". The button background is set to white with a near-to-dark shade color as the border color. For the trading volume increment and decrement volumes, we use the "Webdings" font type and text values "5" and "6" respectively. On compilation, here is the milestone that we have.
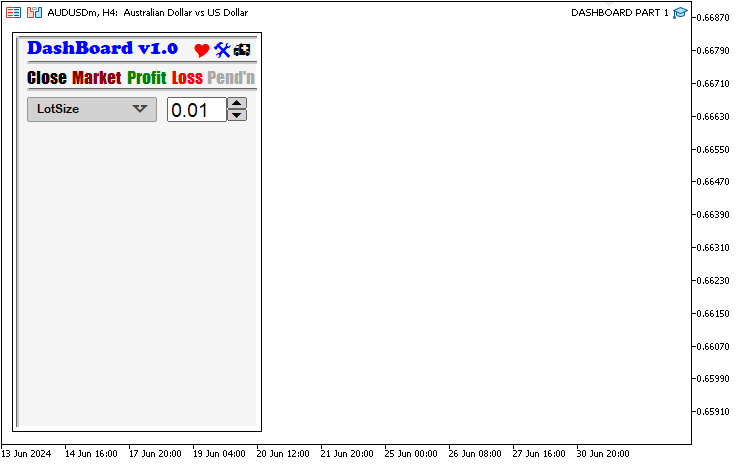
This is a good progress. To create the other stop loss and take profit button utilities, the same logic applies via the code below.
#define BTN_SL "BTN_SL"
#define LABEL_SL "LABEL_SL"
#define ICON_DROP_DN2 "ICON_DROP_DN2"
#define EDIT_SL "EDIT_SL"
#define BTN_P2 "BTN_P2"
#define BTN_M2 "BTN_M2"

#define BTN_TP "BTN_TP"
#define LABEL_TP "LABEL_TP"
#define ICON_DROP_DN3 "ICON_DROP_DN3"
#define EDIT_TP "EDIT_TP"
#define BTN_P3 "BTN_P3"
#define BTN_M3 "BTN_M3"

...

   createButton(BTN_SL,25,95+30,130,25,"",clrBlack,12,C'210,210,210',C'150,150,150');
   createLabel(LABEL_SL,35,95+30,"SL Pips",clrBlack,14);
   createLabel(ICON_DROP_DN2,130,100+30,CharToString(240),C'070,070,070',20,"Wingdings 3");
   createEdit(EDIT_SL,165,95+30,60,25,"100.0",clrBlack,13,clrWhite,C'100,100,100',"Callibri");
   createButton(BTN_P2,225,95+30,20,12,"5",clrBlack,12,clrLightGray,C'100,100,100',"Webdings");
   createButton(BTN_M2,225,107+30,20,12,"6",clrBlack,12,clrLightGray,C'100,100,100',"Webdings");

   createButton(BTN_TP,25,95+30+30,130,25,"",clrBlack,12,C'210,210,210',C'150,150,150');
   createLabel(LABEL_TP,35,95+30+30,"TP Pips",clrBlack,14);
   createLabel(ICON_DROP_DN3,130,100+30+30,CharToString(240),C'070,070,070',20,"Wingdings 3");
   createEdit(EDIT_TP,165,95+30+30,60,25,"100.0",clrBlack,13,clrWhite,C'100,100,100',"Callibri");
   createButton(BTN_P3,225,95+30+30,20,12,"5",clrBlack,12,clrLightGray,C'100,100,100',"Webdings");
   createButton(BTN_M3,225,107+30+30,20,12,"6",clrBlack,12,clrLightGray,C'100,100,100',"Webdings");
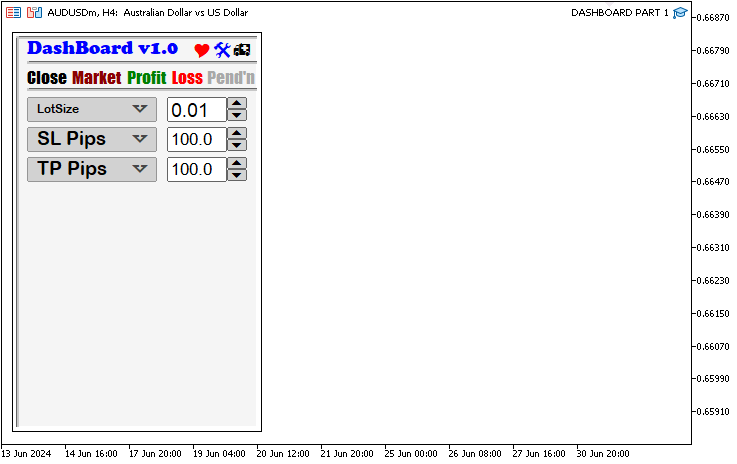
Utility macros are defined and the respective functions called for the creation of them. This code does not differ in logic from the initial that we used to create the trading volume buttons. When you compile, you should get this result.
#define BTN_BUY "BTN_BUY"
#define LABEL_BUY "LABEL_BUY"
#define LABEL_BUY_PRICE "LABEL_BUY_PRICE"
#define BTN_OVERLAY "BTN_OVERLAY"
#define BTN_SPREAD "BTN_SPREAD"

#define BTN_SELL "BTN_SELL"
#define LABEL_SELL "LABEL_SELL"
#define LABEL_SELL_PRICE "LABEL_SELL_PRICE"

#define BTN_CONTACT "BTN_CONTACT"

...


   createRecLabel(BTN_SELL,25,335,105,60,clrRed,1,clrNONE);
   createLabel(LABEL_SELL,35,335,"Sell",clrWhite,15,"ARIAL black");
   createLabel(LABEL_SELL_PRICE,35,335+30,DoubleToString(Bid(),_Digits),clrWhite,13,"ARIAL black");
   createRecLabel(BTN_BUY,140,335,105,60,clrGreen,1,clrNONE);
   createLabel(LABEL_BUY,150+35,335,"Buy",clrWhite,15,"ARIAL black");
   createLabel(LABEL_BUY_PRICE,150,335+30,DoubleToString(Ask(),_Digits),clrWhite,13,"ARIAL black");
   createRecLabel(BTN_OVERLAY,90,335,90,25,C'245,245,245',0,clrNONE);
   createButton(BTN_SPREAD,95,335,80,20,(string)Spread(),clrBlack,13,clrWhite,clrBlack);
   createButton(BTN_CONTACT,25,335+62,230-10,25,"https://t.me/Forex_Algo_Trader",clrBlack,10,clrNONE,clrBlack);
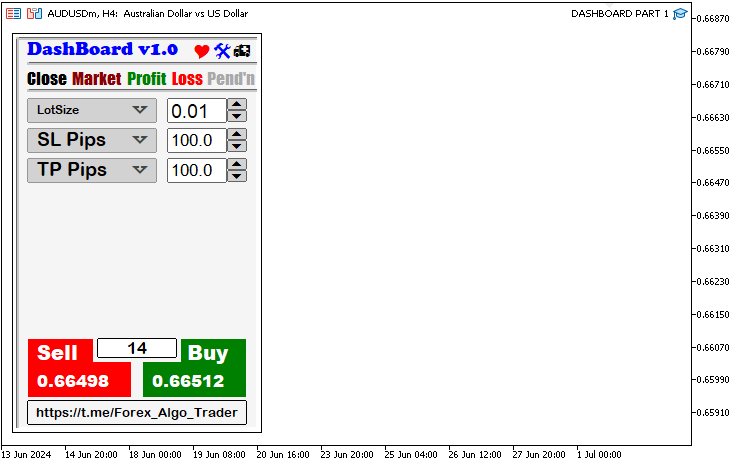
To create the button to buy, sell, overlay, an extra information button, and a spread button, the above code is implemented. The only extra thing that changes is the text for sell and buy prices as well as spread value. Extra custom functions, Bid, Ask and Spread, are called to fill the values. The bid and ask functions return a double data type value, and thus to convert the double to string, an in-built "DoubleToString" function is called. For the spread, we typecast the integer value to the string directly. The custom functions are as below.
double Ask(){return(NormalizeDouble(SymbolInfoDouble(_Symbol,SYMBOL_ASK),_Digits));}
double Bid(){return(NormalizeDouble(SymbolInfoDouble(_Symbol,SYMBOL_BID),_Digits));}
int Spread(){return((int)SymbolInfoInteger(_Symbol,SYMBOL_SPREAD));}
The functions return the respective symbol symbol information data types. Upon compilation, we get the following result.
Now we proceed to create some extra buttons that we will use for illustration of how a sharp-edged button can be created and a duplicate of that that we will use to automate the hover effect.
#define BTN_SHARP "BTN_SHARP"
#define LABEL_SHARP "LABEL_SHARP"
#define BTN_HOVER "BTN_HOVER"
#define LABEL_HOVER "LABEL_HOVER"

...

   createRecLabel(BTN_SHARP,25,190,220,35,C'220,220,220',2,C'100,100,100');
   createLabel(LABEL_SHARP,25+20,190+5,"Sharp Edged Button",clrBlack,12,"ARIAL black");
   //createRecLabel(BTN_HOVER,25,230,220,35,C'220,220,220',3,C'050,050,255');
   createRecLabel(BTN_HOVER,25,230,220,35,C'220,220,220',3,C'100,100,100');
   createLabel(LABEL_HOVER,25+50,230+5,"Hover Effect",clrBlack,12,"ARIAL black");
Below is the milestone.
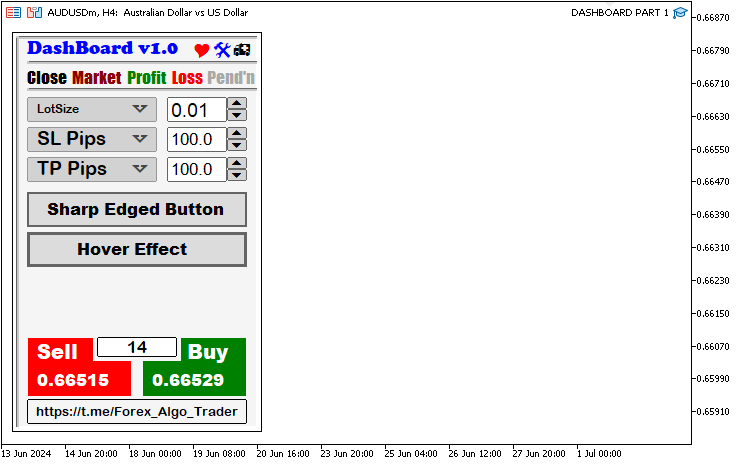
There is some extra space that can be used for other utilities but let us fill it with some emoji and icon characters.
#define LABEL_EXTRA1 "LABEL_EXTRA1"
#define LABEL_EXTRA2 "LABEL_EXTRA2"
#define LABEL_EXTRA3 "LABEL_EXTRA3"
#define LABEL_EXTRA4 "LABEL_EXTRA4"

...

   createLabel(LABEL_EXTRA1,25,290,"_",clrBlack,25,"WEBDINGS");
   createLabel(LABEL_EXTRA2,25+40,290,"J",clrBlack,25,"WINGDINGS");
   createLabel(LABEL_EXTRA3,25+40+40,290,"{",clrBlack,25,"WINGDINGS 2");
   createLabel(LABEL_EXTRA4,25+40+40+40,290,"G",clrBlack,25,"WINGDINGS 3");
Once the trading volume button is clicked, we want to have some instances for the creation of a dropdown list from which we can choose different options. We need to have 3 options as well as an icon to maybe drag the list elsewhere away from the initial creation point. The same logic is used.
#define BTN_DROP_DN "BTN_DROP_DN"
#define LABEL_OPT1 "LABEL_OPT1"
#define LABEL_OPT2 "LABEL_OPT2"
#define LABEL_OPT3 "LABEL_OPT3"
#define ICON_DRAG "ICON_DRAG"

...

void createDropDown(){
   createRecLabel(BTN_DROP_DN,25,95+25,130,70,clrWhite,2,clrBlack);
   createLabel(LABEL_OPT1,25+10,95+25,"LotSize",clrBlack,12,"stencil");
   createLabel(LABEL_OPT2,25+10,95+25+20,"Risk Percent %",clrBlack,12,"calibri Italic");
   createLabel(LABEL_OPT3,25+10,95+25+20+20,"Money Balance",clrBlack,12,"Arial bold");
   createLabel(ICON_DRAG,25+10+95,95+25,"d",clrRoyalBlue,15,"webdings");
}
Here, we create the buttons and labels in a custom function so that we will call the function once the trading volume is clicked. However, to display the positions of the utilities, we call the function but will later comment out the called function.
createDropDown();
The final milestone is as below.
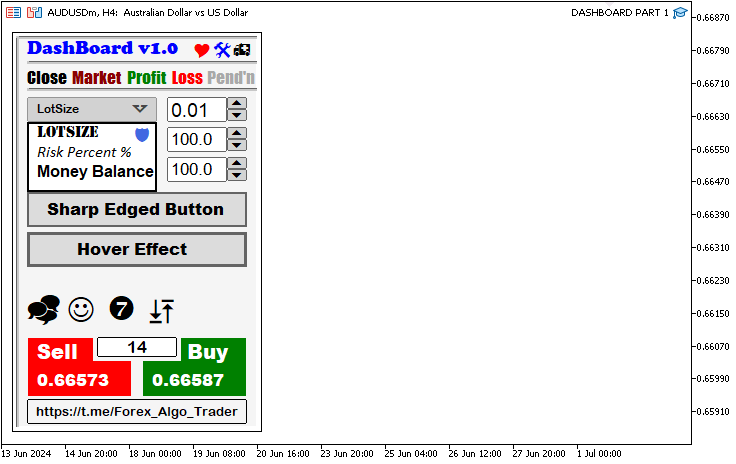
Finally, we need to destroy and delete the created objects once the expert advisor is removed from the chart. To achieve this, another function is created to delete the objects created.
void destroyPanel(){
   ObjectDelete(0,MAIN_REC);
   ObjectDelete(0,MAIN_SUB_REC);
   ObjectDelete(0,MAIN_LINE_UP);

   //... other objects

   ChartRedraw(0);
}
A void custom function is used signifying that it does not return anything. The built-in function "ObjectDelete" is used to delete the respective objects as passed. It takes two arguments, the chart ID, 0 for the current chart, and the name of the object to be deleted. This is called during the expert de-initialization function.
//+------------------------------------------------------------------+
//| Expert deinitialization function                                 |
//+------------------------------------------------------------------+
void OnDeinit(const int reason){
//---
   destroyPanel();
}
The following is the full source code responsible for the creation of the GUI panel as illustrated in MQL5 for MetaTrader 5 (MT5).
//+------------------------------------------------------------------+
//|                                             DASHBOARD PART 1.mq5 |
//|                                  Copyright 2024, MetaQuotes Ltd. |
//|                                             https://www.mql5.com |
//+------------------------------------------------------------------+
#property copyright "Copyright 2024, MetaQuotes Ltd."
#property link      "https://www.mql5.com"
#property version   "1.00"

//--- DEFINE MACRO PROPERTIES

#define MAIN_REC "MAIN_REC"
#define MAIN_SUB_REC "MAIN_SUB_REC"
#define MAIN_LINE_UP "MAIN_LINE_UP"
#define MAIN_LINE_DN "MAIN_LINE_DN"
#define LABEL_NAME "LABEL_NAME"
#define ICON_HEART "ICON_HEART"
#define ICON_TOOL "ICON_TOOL"
#define ICON_CAR "ICON_CAR"
#define LINE1 "LINE1"
#define BTN_CLOSE "BTN_CLOSE"
#define BTN_MARKET "BTN_MARKET"
#define BTN_PROFIT "BTN_PROFIT"
#define BTN_LOSS "BTN_LOSS"
#define BTN_PENDING "BTN_PENDING"
#define LINE2 "LINE2"

#define BTN_LOTS "BTN_LOTS"
#define LABEL_LOTS "LABEL_LOTS"
#define ICON_DROP_DN1 "ICON_DROP_DN1"
#define EDIT_LOTS "EDIT_LOTS"
#define BTN_P1 "BTN_P1"
#define BTN_M1 "BTN_M1"

#define BTN_SL "BTN_SL"
#define LABEL_SL "LABEL_SL"
#define ICON_DROP_DN2 "ICON_DROP_DN2"
#define EDIT_SL "EDIT_SL"
#define BTN_P2 "BTN_P2"
#define BTN_M2 "BTN_M2"

#define BTN_TP "BTN_TP"
#define LABEL_TP "LABEL_TP"
#define ICON_DROP_DN3 "ICON_DROP_DN3"
#define EDIT_TP "EDIT_TP"
#define BTN_P3 "BTN_P3"
#define BTN_M3 "BTN_M3"

#define BTN_BUY "BTN_BUY"
#define LABEL_BUY "LABEL_BUY"
#define LABEL_BUY_PRICE "LABEL_BUY_PRICE"
#define BTN_OVERLAY "BTN_OVERLAY"
#define BTN_SPREAD "BTN_SPREAD"

#define BTN_SELL "BTN_SELL"
#define LABEL_SELL "LABEL_SELL"
#define LABEL_SELL_PRICE "LABEL_SELL_PRICE"

#define BTN_CONTACT "BTN_CONTACT"

#define BTN_SHARP "BTN_SHARP"
#define LABEL_SHARP "LABEL_SHARP"
#define BTN_HOVER "BTN_HOVER"
#define LABEL_HOVER "LABEL_HOVER"

#define LABEL_EXTRA1 "LABEL_EXTRA1"
#define LABEL_EXTRA2 "LABEL_EXTRA2"
#define LABEL_EXTRA3 "LABEL_EXTRA3"
#define LABEL_EXTRA4 "LABEL_EXTRA4"

#define BTN_DROP_DN "BTN_DROP_DN"
#define LABEL_OPT1 "LABEL_OPT1"
#define LABEL_OPT2 "LABEL_OPT2"
#define LABEL_OPT3 "LABEL_OPT3"
#define ICON_DRAG "ICON_DRAG"

//+------------------------------------------------------------------+
//| Expert initialization function                                   |
//+------------------------------------------------------------------+

int OnInit(){

   createRecLabel(MAIN_REC,10,30,250,400,clrWhite,1,clrBlack);
   createRecLabel(MAIN_SUB_REC,15,35,240,390,C'245,245,245',1,clrNONE);
   createRecLabel(MAIN_LINE_UP,15,35,240,1,C'245,245,245',1,clrNONE,BORDER_RAISED);
   createRecLabel(MAIN_LINE_DN,15,35-1,1,390+1,C'245,245,245',1,clrNONE,BORDER_RAISED);

   createLabel(LABEL_NAME,25,35,"DashBoard v1.0",clrBlue,14,"Cooper Black");

   createLabel(ICON_HEART,190,35,"Y",clrRed,15,"Webdings");
   createLabel(ICON_TOOL,210,35,"@",clrBlue,15,"Webdings");
   createLabel(ICON_CAR,230,35,"h",clrBlack,15,"Webdings");
   createRecLabel(LINE1,15+10,60,240-10,1,C'245,245,245',1,clrNONE,BORDER_RAISED);
   createLabel(BTN_CLOSE,25,65,"Close",clrBlack,13,"Impact");
   createLabel(BTN_MARKET,70,65,"Market",clrDarkRed,13,"Impact");
   createLabel(BTN_PROFIT,125,65,"Profit",clrGreen,13,"Impact");
   createLabel(BTN_LOSS,170,65,"Loss",clrRed,13,"Impact");
   createLabel(BTN_PENDING,205,65,"Pend'n",clrDarkGray,13,"Impact");
   createRecLabel(LINE2,15+10,87,240-10,1,C'245,245,245',1,clrNONE,BORDER_RAISED);

   createButton(BTN_LOTS,25,95,130,25,"",clrBlack,12,C'210,210,210',C'150,150,150');
   createLabel(LABEL_LOTS,25+10,95+5,"LotSize",clrBlack,9);
   //createLabel(ICON_DROP_DN1,150,75,CharToString(100),clrBlack,12,"Wingdings");
   createLabel(ICON_DROP_DN1,130,95+5,CharToString(240),C'070,070,070',20,"Wingdings 3");
   createEdit(EDIT_LOTS,165,95,60,25,"0.01",clrBlack,14,clrWhite,C'100,100,100',"Callibri");
   createButton(BTN_P1,225,95,20,12,"5",clrBlack,12,clrLightGray,C'100,100,100',"Webdings");
   createButton(BTN_M1,225,95+12,20,12,"6",clrBlack,12,clrLightGray,C'100,100,100',"Webdings");

   createButton(BTN_SL,25,95+30,130,25,"",clrBlack,12,C'210,210,210',C'150,150,150');
   createLabel(LABEL_SL,35,95+30,"SL Pips",clrBlack,14);
   createLabel(ICON_DROP_DN2,130,100+30,CharToString(240),C'070,070,070',20,"Wingdings 3");
   createEdit(EDIT_SL,165,95+30,60,25,"100.0",clrBlack,13,clrWhite,C'100,100,100',"Callibri");
   createButton(BTN_P2,225,95+30,20,12,"5",clrBlack,12,clrLightGray,C'100,100,100',"Webdings");
   createButton(BTN_M2,225,107+30,20,12,"6",clrBlack,12,clrLightGray,C'100,100,100',"Webdings");

   createButton(BTN_TP,25,95+30+30,130,25,"",clrBlack,12,C'210,210,210',C'150,150,150');
   createLabel(LABEL_TP,35,95+30+30,"TP Pips",clrBlack,14);
   createLabel(ICON_DROP_DN3,130,100+30+30,CharToString(240),C'070,070,070',20,"Wingdings 3");
   createEdit(EDIT_TP,165,95+30+30,60,25,"100.0",clrBlack,13,clrWhite,C'100,100,100',"Callibri");
   createButton(BTN_P3,225,95+30+30,20,12,"5",clrBlack,12,clrLightGray,C'100,100,100',"Webdings");
   createButton(BTN_M3,225,107+30+30,20,12,"6",clrBlack,12,clrLightGray,C'100,100,100',"Webdings");

   createRecLabel(BTN_SELL,25,335,105,60,clrRed,1,clrNONE);
   createLabel(LABEL_SELL,35,335,"Sell",clrWhite,15,"ARIAL black");
   createLabel(LABEL_SELL_PRICE,35,335+30,DoubleToString(Bid(),_Digits),clrWhite,13,"ARIAL black");
   createRecLabel(BTN_BUY,140,335,105,60,clrGreen,1,clrNONE);
   createLabel(LABEL_BUY,150+35,335,"Buy",clrWhite,15,"ARIAL black");
   createLabel(LABEL_BUY_PRICE,150,335+30,DoubleToString(Ask(),_Digits),clrWhite,13,"ARIAL black");
   createRecLabel(BTN_OVERLAY,90,335,90,25,C'245,245,245',0,clrNONE);
   createButton(BTN_SPREAD,95,335,80,20,(string)Spread(),clrBlack,13,clrWhite,clrBlack);
   createButton(BTN_CONTACT,25,335+62,230-10,25,"https://t.me/Forex_Algo_Trader",clrBlack,10,clrNONE,clrBlack);

   createRecLabel(BTN_SHARP,25,190,220,35,C'220,220,220',2,C'100,100,100');
   createLabel(LABEL_SHARP,25+20,190+5,"Sharp Edged Button",clrBlack,12,"ARIAL black");
   //createRecLabel(BTN_HOVER,25,230,220,35,C'220,220,220',3,C'050,050,255');
   createRecLabel(BTN_HOVER,25,230,220,35,C'220,220,220',3,C'100,100,100');
   createLabel(LABEL_HOVER,25+50,230+5,"Hover Effect",clrBlack,12,"ARIAL black");

   createLabel(LABEL_EXTRA1,25,290,"_",clrBlack,25,"WEBDINGS");
   createLabel(LABEL_EXTRA2,25+40,290,"J",clrBlack,25,"WINGDINGS");
   createLabel(LABEL_EXTRA3,25+40+40,290,"{",clrBlack,25,"WINGDINGS 2");
   createLabel(LABEL_EXTRA4,25+40+40+40,290,"G",clrBlack,25,"WINGDINGS 3");

   // createDropDown();

   return(INIT_SUCCEEDED);
}

double Ask(){return(NormalizeDouble(SymbolInfoDouble(_Symbol,SYMBOL_ASK),_Digits));}
double Bid(){return(NormalizeDouble(SymbolInfoDouble(_Symbol,SYMBOL_BID),_Digits));}
int Spread(){return((int)SymbolInfoInteger(_Symbol,SYMBOL_SPREAD));}

//+------------------------------------------------------------------+
//| Expert deinitialization function                                 |
//+------------------------------------------------------------------+
void OnDeinit(const int reason){
//---
   destroyPanel();
}
//+------------------------------------------------------------------+
//| Expert tick function                                             |
//+------------------------------------------------------------------+
void OnTick(){

}
//+------------------------------------------------------------------+


//+------------------------------------------------------------------+
//|     Function to create rectangle label                           |
//+------------------------------------------------------------------+

bool createRecLabel(string objName, int xD, int yD, int xS, int yS,
                    color clrBg, int widthBorder, color clrBorder = clrNONE,
                    ENUM_BORDER_TYPE borderType = BORDER_FLAT, ENUM_LINE_STYLE borderStyle = STYLE_SOLID) {
    ResetLastError(); // Reset any previous error codes

    // Create a rectangle label object
    if (!ObjectCreate(0, objName, OBJ_RECTANGLE_LABEL, 0, 0, 0)) {
        Print(__FUNCTION__, ": failed to create rec label! Error code = ", _LastError);
        return (false); // Return false if object creation fails
    }

    // Set properties for the rectangle label
    ObjectSetInteger(0, objName, OBJPROP_XDISTANCE, xD); // X distance from the corner
    ObjectSetInteger(0, objName, OBJPROP_YDISTANCE, yD); // Y distance from the corner
    ObjectSetInteger(0, objName, OBJPROP_XSIZE, xS); // Width of the rectangle
    ObjectSetInteger(0, objName, OBJPROP_YSIZE, yS); // Height of the rectangle
    ObjectSetInteger(0, objName, OBJPROP_CORNER, CORNER_LEFT_UPPER); // Positioning corner
    ObjectSetInteger(0, objName, OBJPROP_BGCOLOR, clrBg); // Rectangle background color
    ObjectSetInteger(0, objName, OBJPROP_BORDER_TYPE, borderType); // Border type
    ObjectSetInteger(0, objName, OBJPROP_STYLE, borderStyle); // Border style (only if borderType is flat)
    ObjectSetInteger(0, objName, OBJPROP_WIDTH, widthBorder); // Border width (only if borderType is flat)
    ObjectSetInteger(0, objName, OBJPROP_COLOR, clrBorder); // Border color (only if borderType is flat)
    ObjectSetInteger(0, objName, OBJPROP_BACK, false); // Not a background object
    ObjectSetInteger(0, objName, OBJPROP_STATE, false); // Not selectable
    ObjectSetInteger(0, objName, OBJPROP_SELECTABLE, false); // Not selectable
    ObjectSetInteger(0, objName, OBJPROP_SELECTED, false); // Not selected

    ChartRedraw(0); // Redraw the chart

    return (true); // Return true if object creation and property settings are successful
}

//+------------------------------------------------------------------+
//|     Function to create button                                    |
//+------------------------------------------------------------------+

bool createButton(string objName, int xD, int yD, int xS, int yS,
                  string txt = "", color clrTxt = clrBlack, int fontSize = 12,
                  color clrBg = clrNONE, color clrBorder = clrNONE,
                  string font = "Arial Rounded MT Bold") {
    // Reset any previous errors
    ResetLastError();

    // Attempt to create the button object
    if (!ObjectCreate(0, objName, OBJ_BUTTON, 0, 0, 0)) {
        // Print an error message if creation fails
        Print(__FUNCTION__, ": failed to create the button! Error code = ", _LastError);
        return (false);
    }

    // Set properties for the button
    ObjectSetInteger(0, objName, OBJPROP_XDISTANCE, xD); // X distance from the corner
    ObjectSetInteger(0, objName, OBJPROP_YDISTANCE, yD); // Y distance from the corner
    ObjectSetInteger(0, objName, OBJPROP_XSIZE, xS); // Width of the button
    ObjectSetInteger(0, objName, OBJPROP_YSIZE, yS); // Height of the button
    ObjectSetInteger(0, objName, OBJPROP_CORNER, CORNER_LEFT_UPPER); // Positioning corner
    ObjectSetString(0, objName, OBJPROP_TEXT, txt); // Text displayed on the button
    ObjectSetInteger(0, objName, OBJPROP_COLOR, clrTxt); // Text color
    ObjectSetInteger(0, objName, OBJPROP_FONTSIZE, fontSize); // Font size
    ObjectSetString(0, objName, OBJPROP_FONT, font); // Font name
    ObjectSetInteger(0, objName, OBJPROP_BGCOLOR, clrBg); // Background color
    ObjectSetInteger(0, objName, OBJPROP_BORDER_COLOR, clrBorder); // Border color
    ObjectSetInteger(0, objName, OBJPROP_BACK, false); // Transparent background
    ObjectSetInteger(0, objName, OBJPROP_STATE, false); // Button state (not pressed)
    ObjectSetInteger(0, objName, OBJPROP_SELECTABLE, false); // Not selectable
    ObjectSetInteger(0, objName, OBJPROP_SELECTED, false); // Not selected

    // Redraw the chart to display the button
    ChartRedraw(0);

    return (true); // Button creation successful
}

//+------------------------------------------------------------------+
//|     Function to create edit field                                |
//+------------------------------------------------------------------+

bool createEdit(string objName, int xD, int yD, int xS, int yS,
                string txt = "", color clrTxt = clrBlack, int fontSize = 12,
                color clrBg = clrNONE, color clrBorder = clrNONE,
                string font = "Arial Rounded MT Bold") {
    // Reset any previous errors
    ResetLastError();

    // Attempt to create the edit object
    if (!ObjectCreate(0, objName, OBJ_EDIT, 0, 0, 0)) {
        // Print an error message if creation fails
        Print(__FUNCTION__, ": failed to create the edit! Error code = ", _LastError);
        return (false);
    }

    // Set properties for the edit field
    ObjectSetInteger(0, objName, OBJPROP_XDISTANCE, xD); // X distance from the corner
    ObjectSetInteger(0, objName, OBJPROP_YDISTANCE, yD); // Y distance from the corner
    ObjectSetInteger(0, objName, OBJPROP_XSIZE, xS); // Width of the edit field
    ObjectSetInteger(0, objName, OBJPROP_YSIZE, yS); // Height of the edit field
    ObjectSetInteger(0, objName, OBJPROP_CORNER, CORNER_LEFT_UPPER); // Positioning corner
    ObjectSetString(0, objName, OBJPROP_TEXT, txt); // Default text in the edit field
    ObjectSetInteger(0, objName, OBJPROP_COLOR, clrTxt); // Text color
    ObjectSetInteger(0, objName, OBJPROP_FONTSIZE, fontSize); // Font size
    ObjectSetString(0, objName, OBJPROP_FONT, font); // Font name
    ObjectSetInteger(0, objName, OBJPROP_BGCOLOR, clrBg); // Background color
    ObjectSetInteger(0, objName, OBJPROP_BORDER_COLOR, clrBorder); // Border color
    ObjectSetInteger(0, objName, OBJPROP_ALIGN, ALIGN_LEFT); // Text alignment (left-aligned)
    ObjectSetInteger(0, objName, OBJPROP_READONLY, false); // Edit field is not read-only
    ObjectSetInteger(0, objName, OBJPROP_BACK, false); // Transparent background
    ObjectSetInteger(0, objName, OBJPROP_STATE, false); // Edit field state (not active)
    ObjectSetInteger(0, objName, OBJPROP_SELECTABLE, false); // Not selectable
    ObjectSetInteger(0, objName, OBJPROP_SELECTED, false); // Not selected

    // Redraw the chart to display the edit field
    ChartRedraw(0);

    return (true); // Edit field creation successful
}

//+------------------------------------------------------------------+
//|     Function to create text label                                |
//+------------------------------------------------------------------+

bool createLabel(string objName, int xD, int yD,
                 string txt, color clrTxt = clrBlack, int fontSize = 12,
                 string font = "Arial Rounded MT Bold") {
    // Reset any previous errors
    ResetLastError();

    // Attempt to create the label object
    if (!ObjectCreate(0, objName, OBJ_LABEL, 0, 0, 0)) {
        // Print an error message if creation fails
        Print(__FUNCTION__, ": failed to create the label! Error code = ", _LastError);
        return (false);
    }

    // Set properties for the label
    ObjectSetInteger(0, objName, OBJPROP_XDISTANCE, xD); // X distance from the corner
    ObjectSetInteger(0, objName, OBJPROP_YDISTANCE, yD); // Y distance from the corner
    ObjectSetInteger(0, objName, OBJPROP_CORNER, CORNER_LEFT_UPPER); // Positioning corner
    ObjectSetString(0, objName, OBJPROP_TEXT, txt); // Text displayed on the label
    ObjectSetInteger(0, objName, OBJPROP_COLOR, clrTxt); // Text color
    ObjectSetInteger(0, objName, OBJPROP_FONTSIZE, fontSize); // Font size
    ObjectSetString(0, objName, OBJPROP_FONT, font); // Font name
    ObjectSetInteger(0, objName, OBJPROP_BACK, false); // Transparent background
    ObjectSetInteger(0, objName, OBJPROP_STATE, false); // Label state (not active)
    ObjectSetInteger(0, objName, OBJPROP_SELECTABLE, false); // Not selectable
    ObjectSetInteger(0, objName, OBJPROP_SELECTED, false); // Not selected

    // Redraw the chart to display the label
    ChartRedraw(0);

    return (true); // Label creation successful
}

//+------------------------------------------------------------------+
//|     Function to create the drop down utilities                   |
//+------------------------------------------------------------------+

void createDropDown(){
   createRecLabel(BTN_DROP_DN,25,95+25,130,70,clrWhite,2,clrBlack);
   createLabel(LABEL_OPT1,25+10,95+25,"LotSize",clrBlack,12,"stencil");
   createLabel(LABEL_OPT2,25+10,95+25+20,"Risk Percent %",clrBlack,12,"calibri Italic");
   createLabel(LABEL_OPT3,25+10,95+25+20+20,"Money Balance",clrBlack,12,"Arial bold");
   createLabel(ICON_DRAG,25+10+95,95+25,"d",clrRoyalBlue,15,"webdings");
}

//+------------------------------------------------------------------+
//|    Function to destroy the entire GUI Panel                      |
//+------------------------------------------------------------------+

void destroyPanel(){
   ObjectDelete(0,MAIN_REC);
   ObjectDelete(0,MAIN_SUB_REC);
   ObjectDelete(0,MAIN_LINE_UP);
   ObjectDelete(0,MAIN_LINE_DN);
   ObjectDelete(0,BTN_LOTS);
   ObjectDelete(0,LABEL_NAME);
   ObjectDelete(0,LABEL_LOTS);
   ObjectDelete(0,ICON_HEART);
   ObjectDelete(0,ICON_TOOL);
   ObjectDelete(0,ICON_CAR);
   ObjectDelete(0,ICON_DROP_DN1);
   ObjectDelete(0,LINE1);
   ObjectDelete(0,BTN_CLOSE);
   ObjectDelete(0,BTN_MARKET);
   ObjectDelete(0,BTN_PROFIT);
   ObjectDelete(0,BTN_LOSS);
   ObjectDelete(0,BTN_PENDING);
   ObjectDelete(0,LINE2);
   ObjectDelete(0,EDIT_LOTS);
   ObjectDelete(0,BTN_P1);
   ObjectDelete(0,BTN_M1);

   ObjectDelete(0,BTN_SL);
   ObjectDelete(0,LABEL_SL);
   ObjectDelete(0,ICON_DROP_DN2);
   ObjectDelete(0,EDIT_SL);
   ObjectDelete(0,BTN_P2);
   ObjectDelete(0,BTN_M2);

   ObjectDelete(0,BTN_TP);
   ObjectDelete(0,LABEL_TP);
   ObjectDelete(0,ICON_DROP_DN3);
   ObjectDelete(0,EDIT_TP);
   ObjectDelete(0,BTN_P3);
   ObjectDelete(0,BTN_M3);

   ObjectDelete(0,BTN_BUY);
   ObjectDelete(0,LABEL_BUY);
   ObjectDelete(0,LABEL_BUY_PRICE);
   ObjectDelete(0,BTN_OVERLAY);
   ObjectDelete(0,BTN_SPREAD);

   ObjectDelete(0,BTN_SELL);
   ObjectDelete(0,LABEL_SELL);
   ObjectDelete(0,LABEL_SELL_PRICE);

   ObjectDelete(0,BTN_CONTACT);

   ObjectDelete(0,BTN_SHARP);
   ObjectDelete(0,LABEL_SHARP);
   ObjectDelete(0,BTN_HOVER);
   ObjectDelete(0,LABEL_HOVER);

   ObjectDelete(0,LABEL_EXTRA1);
   ObjectDelete(0,LABEL_EXTRA2);
   ObjectDelete(0,LABEL_EXTRA3);
   ObjectDelete(0,LABEL_EXTRA4);

   ObjectDelete(0,BTN_DROP_DN);
   ObjectDelete(0,LABEL_OPT1);
   ObjectDelete(0,LABEL_OPT2);
   ObjectDelete(0,LABEL_OPT3);
   ObjectDelete(0,ICON_DRAG);

   ChartRedraw(0);
}
Conclusion
In conclusion, you can see that the creation of GUI panels is not as complex as perceived. The process involves a series of steps from the definition of panel dimensions, that is, deciding the position, size, and appearance of the panel which can use absolute coordinates or chart-relative coordinates, through the creation of various graphical objects such as buttons, labels, edit fields, and rectangle labels specifying their properties (color, text, font, etc.), to implementation in event handlers for creation of the panels and user interactions.
This first part has featured the successful creation of the panel successfully. The second part will bring the panel to life by making it responsive. For example, we will make the buttons to be responsive during clicks, update the price quotes on every tick, make the drop-down list draggable, add hover effects to the buttons, and so much more. We hope you found this article useful in the creation of GUI panels, and the knowledge illustrated here can be used to create more complex and fancy GUI panels.
 Neural networks made easy (Part 78): Decoder-free Object Detector with Transformer (DFFT)
 MQL5 Wizard Techniques you should know (Part 26): Moving Averages and the Hurst Exponent
 Neural networks made easy (Part 79): Feature Aggregated Queries (FAQ) in the context of state
 Sentiment Analysis and Deep Learning for Trading with EA and Backtesting with Python
- Free trading apps
- Over 8,000 signals for copying
- Economic news for exploring financial markets
You agree to website policy and terms of use
Great tutorials...Good job
@Isaac Amo I appreciate the feedback and recognition. Am flattered. Thank you.
Check out the new article: Creating an Interactive Graphical User Interface in MQL5 (Part 1): Making the Panel.
Author: Allan Munene Mutiiria
Wow very nice of you to share this article. Lucky find
Wow very nice of you to share this article. Lucky find
Thank you @Malcolm Campbell for the kind review and feedback.