Creating an MQL5-Telegram Integrated Expert Advisor (Part 3): Sending Chart Screenshots with Captions from MQL5 to Telegram

Introduction
In the previous article, the second part of our series, we carefully examined the process of merging MetaQuotes Language 5 (MQL5) with Telegram for signal generation and relay. The outcome was clear; it allowed us to send trading signals to Telegram and, of course, the necessity to use the trading signals for the whole thing to be worthwhile. So, why must we take the next step in the integration process? What we do in this third part of the series is very much a "next step" in illustrating the potential of merging MQL5 with Telegram in terms of sending trading signals. However, instead of sending just the text portion of the trading signal, we send a screenshot of the chart of the trading signal. It is sometimes better to not only receive a signal that one can act upon but also see the signal setup like price action setups on the chart in a visual representation, in this case, the chart screenshot.
Thus, in this article, we will focus on the specifics of converting image data into a compatible format for embedding in HyperText Transfer Protocol Secure (HTTP) requests. This conversion must happen if we are to include images in our Telegram bot. We'll work through the details of the process that gets us from a chart in MQL5, through the MetaTrader 5 trading terminal to an artfully arranged bot-message with a caption and a chart image as the visually impressive part of our trading notification. This article will be organized into four parts.
To start, we will give a basic rundown of how image encoding and transmission over HTTPS work. In this first section, we will explain the fundamental concepts involved and the techniques used to accomplish this task. Next, we will dive into the implementation process in MQL5, which is the programming language used to write trading programs for the MetaTrader 5 platform. We will detail how to use the image encoding and transmission methods. After that, we will test the implemented program to verify that it works correctly. We will then conclude the article with a summary to hit the high points again and describe the benefits of doing this work in trading systems. Here are the topics that we will follow to create the Expert Advisor (EA):
- Overview of Image Encoding and Transmission over HTTPS
- Implementation in MQL5
- Testing the Integration
- Conclusion
By the end, we will have crafted an Expert Advisor that sends chart screenshots and images with trading information like signals that have been generated and the orders placed from the trading terminal to the specified Telegram chat. Let’s get started.
Overview of Image Encoding and Transmission over HTTPS
Sending images over the Internet and, particularly, integrating with Application Programming Interfaces (APIs) or messaging platforms requires the image data first to be encoded and then sent without undue delay or compromise to effect or security. A direct image file sends far too many bits and bytes to work smoothly through the kinds of commands, effectively, that let an Internet user access a particular website, platform, or service. For an API like Telegram, which acts as a go-between for an Internet user and a particular service (like a web-based interface for various kinds of tasks), sending an image requires that the image file first be encoded and then sent as a part of the payload of a command from user to service or vice versa, and this is especially achieved through protocols like HTTP or HTTPS.
The most frequent approach for converting images for sending is to transform the picture into a Base64-encoded string. The encoding of Base64 takes the binary data of an image and creates a text representation. This is done using characters from a specific set that makes the so-called "encoded image" function properly when sent by text protocols. To create the Base64-encoded image, its raw data (the actual file, before any "reading" operations) are read byte-by-byte. The reading bytes are then represented via Base64 symbols. Once this is achieved, the file can then proceed to be sent via a text protocol.
After the image data is encoded, it is sent over HTTPS, which is a secure form of HTTP. Unlike HTTP, which sends data in plain text, HTTPS uses the Secure Socket Layer (SSL)/ Transport Layer Security (TLS) encryption protocol to ensure that the data passed to and from a server remains private and secure. The importance of HTTPS for the protection of trading signals and other finance-related communication can hardly be overstated. An unscrupulous third party that gets its hands on trading signals, for example, can use that information to make trades and manipulate the market to the detriment of the innocent victims of the trade's signals and to the advantage of the party that intercepted the signal. The process visualization is as follows:

To summarize, the picture coding and sending method converts picture files into a text-based format that is suitable for web communications. It also ensures secure delivery over HTTPS. It is vital to understand these two concepts if one wants to integrate picture data into applications. An obvious example is trading systems that automate notifications through Telegram—a platform that does an outstanding job of delivering messages quickly and reliably.
Implementation in MQL5
The implementation of image relay in MQL5 will begin with the process of capturing a screenshot of the current trading chart within an MQL5 Expert Advisor (EA). We will encode the screenshot and send it via Telegram. We implement this functionality primarily in the OnInit event handler, which executes when the EA is initialized. As we have said, the purpose of the OnInit event handler is to prepare and set up the EA's necessary components, ensuring that everything is configured correctly before the main logic of the trading operation is executed. First, we define our screenshot image file name.
   //--- Get ready to take a chart screenshot of the current chart

   #define SCREENSHOT_FILE_NAME "Our Chart ScreenShot.jpg"
Here, we take the initial step in the workflow which is to establish a constant for the name of the screenshot file. We achieve this with the #define directive, which allows us to assign a constant value that can be referred to throughout the code. Here, we create a constant named "SCREENSHOT_FILE_NAME", which stores the value "Our Chart ScreenShot.jpg". And we're doing this for a very good reason: If we ever need the file name to load or save something, it can just use this constant. If we need to change the file name or format, we only have to change it in this one place. You can realize that we have chosen our image type to be a Joint Photographic Experts Group (JPEG). You can choose any that you deem fit, such as Portable Network Graphics (PNG). However, you should bear in mind that there are significant differences in the image formats. For example, JPG uses a lossy compression algorithm which means that some of the image data is lost but the image size is reduced. An example of the formats that you can use is as visualized below:

We integrate the screenshot function into the OnInit handler. This ensures that the system is set to capture and save the chart's state as soon as the Expert Advisor kicks off. We have declared a constant "SCREENSHOT_FILE_NAME", that serves as a stand-in for the actual name of the chart image file. Using this placeholder, we (mostly) avoid the pitfall of trying to save two files with the same name at roughly the same time. By taking this step, we ensure that the chart image file has the same basic structure it would need when we actively encode and transmit the image at this point.
This step is essential because it sets the file naming convention and guarantees that we will be able to grab the image of the chart when the EA is first initialized. From this moment forward, we can concentrate on seizing the data from the chart, encoding it in a form fit for human eyes, and dispatching it to our chosen Telegram channel.
Next, to prevent the instance where we try to overwrite and create a file with a similar name, we need to delete the existing one, if available, and create a fresh one. This is achieved via the following code snippet.
   //--- First delete an instance of the screenshot file if it already exists
   if(FileIsExist(SCREENSHOT_FILE_NAME)){
      FileDelete(SCREENSHOT_FILE_NAME);
      Print("Chart Screenshot was found and deleted.");
      ChartRedraw(0);
   }
Here, we start by making sure that no instances of the screenshot file exist before we capture a new one. This is important because we want to avoid any confusion between the current state of the chart and previously saved screenshots. To achieve this, we check to see if a file with the name stored in the "SCREENSHOT_FILE_NAME" constant exists on the system. We do this using the FileIsExist function, which checks the specified directory and returns true if the file is present. If the file does exist, we delete it using the FileDelete function. By ensuring that the specified directory is devoid of our old screenshot, we make space for the new one we will create later in the process.
Following the deletion, we send a message to the terminal using the Print function to indicate that the screenshot of the chart has been found and successfully eradicated. This little bit of feedback can be very handy for debugging because it doubles as a confirmation that the system is correctly handling the purging of prior screenshots. After all, we wouldn't want to get in the habit of "deleting" nonexistent files. We also immediately redraw the chart (we call this function ChartRedraw) to ensure that we're working with an up-to-date visual state of the chart. After this clean-up, we can now proceed to take the screenshot.
ChartScreenShot(0,SCREENSHOT_FILE_NAME,1366,768,ALIGN_RIGHT);
Here, we capture the chart screenshot by using the ChartScreenShot function, which takes a snapshot of the specified chart and saves it as an image file. In our case, we pass the parameters "0", "SCREENSHOT_FILE_NAME", "1366", "768", and "ALIGN_RIGHT" to the function to control how the screenshot is taken and saved.
- The first parameter, "0", specifies the chart ID from which we want to take the screenshot. A value of 0 refers to the currently active chart. If we wanted to capture a different chart, we would need to pass the specific chart ID.
- The second parameter, "SCREENSHOT_FILE_NAME", is the name of the file where the screenshot will be saved. In our case, this is the constant "Our Chart ScreenShot.jpg". This file will be created in the terminal's "Files" directory, and if it does not already exist, it will be generated after the screenshot is taken.
- The third and fourth parameters, 1366 and 768, define the dimensions of the screenshot in pixels. Here, 1366 represents the width of the screenshot, and 768 represents the height. These values can be adjusted based on the user's preferences or the size of the screen being captured.
- The final parameter, ALIGN_RIGHT, specifies how the screenshot should be aligned within the chart window. By using ALIGN_RIGHT, we align the screenshot to the right side of the chart. Other alignment options, such as ALIGN_LEFT or ALIGN_CENTER, could be used depending on the desired outcome.
For some reasons, however very insignificant, the screenshot could delay to be saved. Thus, to leave every stone turned, we need to initiate an iteration where we can wait for some seconds for the screenshot to be saved.
   // Wait for 30 secs to save screenshot if not yet saved
   int wait_loops = 60;
   while(!FileIsExist(SCREENSHOT_FILE_NAME) && --wait_loops > 0){
      Sleep(500);
   }
Here, we implement a while loop that waits for the screenshot file to successfully save, ensuring that it has been saved to the correct location and with the correct name before we continue. The wait itself is long enough that, under normal circumstances, the screenshot file should readily be found on the filesystem (if it indeed was meant to be saved during the test). We start with the integer variable "wait_loops" initialized to 60. Each iteration of the loop, if it proceeds without finding the file, introduces a half-second (500 milliseconds (ms)) wait—amounting to 30 seconds (60 iterations * 500 ms) from the start of the loop to its end if it doesn’t find the file.
In each iteration, we also decrement the "wait_loops" counter to prevent the loop from running indefinitely if the file is not created in the specified time. Furthermore, we use the Sleep function to create a 500-millisecond delay between each check. This prevents us from checking too frequently and overwhelming our system with too many file existence requests.
Finally, we need to check for the existence of the file afterward, and if it is not in existence, there is no point in continuing further, since our entire algorithm and logic depends on the image file. If it does exist, we can then proceed with the next steps.
   if(!FileIsExist(SCREENSHOT_FILE_NAME)){
      Print("THE SPECIFIED SCREENSHOT DOES NOT EXIST (WAS NOT SAVED). REVERTING NOW!");
      return (INIT_FAILED);
   }
Here, we define a mechanism for handling errors to check whether the screenshot file was saved successfully. After waiting some time for the file to be created, we check for the presence of the file using the function FileIsExist. If the check returns false, meaning the file is not present, we issue the following message: "THE SPECIFIED SCREENSHOT DOES NOT EXIST (WAS NOT SAVED). REVERTING NOW!" This message indicates that we were not able to save the screenshot file. Following the issuing of this error message, the program cannot go on because we entirely need that image file as our base for the program logic. Therefore, we exit with a return value of "INIT_FAILED", indicating that the initialization could not be completed successfully. If the screenshot was saved, we go ahead and inform of the instance as well.
   else if(FileIsExist(SCREENSHOT_FILE_NAME)){
      Print("THE CHART SCREENSHOT WAS SAVED SUCCESSFULLY TO THE DATA-BASE.");
   }
Upon running the code, these are the results:

Here, you can see that we were able to successfully delete an initial existence of the image file and save another one. To access the image on your computer, right-click on the file's name, choose open containing folder, and locate the file in the files folder.

Alternatively, you could directly access the image file by opening the navigator, expanding it, right-clicking on the files tab, and choosing "Open Folder".

This opens the files folder where the image file was registered.

Here, you can see that the exact image name is registered. Let us finally check the file size and type to see if the correct information as specified is taken into account.

We can see that the file type is JPG and the width and the height of the screenshot is 1366 by 768 pixels respectively just as specified. If, for example, one wanted to have a different file type, let us say PNG, just only the file type needs to be changed as below:
#define SCREENSHOT_FILE_NAME "Our Chart ScreenShot.png"
When we compile and run this code snippet, we create another image of the PNG type as visualized below in a Graphics Interchange Format (GIF) image format:

Up to this point, it is evident that we successfully took the chart snapshot and saved it to the files directly. We thus are clear to proceed with encoding the image file so that it can be transmitted over HTTPS. First, we will need to open the image file and read it.
   int screenshot_Handle = INVALID_HANDLE;
   screenshot_Handle = FileOpen(SCREENSHOT_FILE_NAME,FILE_READ|FILE_BIN);
   if(screenshot_Handle == INVALID_HANDLE){
      Print("INVALID SCREENSHOT HANDLE. REVERTING NOW!");
      return(INIT_FAILED);
   }
In the above code snippet, we focus on file operations in MQL5 to manipulate a screenshot file that we saved earlier. We declare an integer variable named "screenshot_Handle" and initialize it with the value "INVALID_HANDLE". The "screenshot_Handle" serves as a reference to the file, and the "INVALID_HANDLE" value acts as a placeholder that lets us know no valid file has been opened yet. Holding this value ensures that we can reference a file through its handle and that we can handle any errors that arise from the file operations in the event something goes wrong.
Next, we try to use the FileOpen function to open up our saved screenshot. We give it the name of the screenshot, which contains the path to the screenshot file. We also give it two flags: FILE_READ and FILE_BIN. The first flag tells the system that we want to read the file. The second flag, which is probably the more important of the two, tells the system that the file contains binary data (which should not be confused with the screenshot being a series of ones and zeros). Since the screenshot is an image, and the image is in a somewhat standard format (transform that format to something really "standard," "easy," or "natural" to work with, and the image becomes a series of ones and zeros—no formatting, no structure, just flat-out math—a different series of ones and zeros, and the image looks completely different, although that's not our concern here), we expect to find a series of bytes that correspond, somehow, to the image.
The "FileOpen" function either returns a valid handle or "INVALID_HANDLE" after we try to open the file. We check the validity of the handle with an if statement. An invalid handle means the file did not open successfully. We print an error message that says the screenshot handle is invalid. So, either the screenshot wasn't saved or it can't be accessed, which signals to us that the program hit a wall. We don't push any further, and instead, we return "INIT_FAILED" since there is no point in continuing if we are unable to read the image file. If the handle ID is indeed valid, we inform the user of the success.
   else if (screenshot_Handle != INVALID_HANDLE){
      Print("SCREENSHOT WAS SAVED & OPENED SUCCESSFULLY FOR READING.");
      Print("HANDLE ID = ",screenshot_Handle,". IT IS NOW READY FOR ENCODING.");
   }
Here, we add another verification step to ensure that the screenshot file opened correctly. After checking that "screenshot_Handle" is valid (not equal to "INVALID_HANDLE"), we print a couple of messages that indicate the file has opened properly. This is just another way to affirm that the "screenshot_Handle" is good and that we're ready to move forward. We use the Print function for the first message, which tells the same thing as the second message: that the screenshot was saved successfully and opened for reading. Both of these statements serve the purpose of confirming the successful completion of the current step in our workflow.
We then display the handle ID, which uniquely identifies the file and permits subsequent operations (which will be reading, writing, and encoding) to be performed on the file. The handle ID is also useful for debugging. It confirms that the system has obtained and allocated resources to manage this particular file. We conclude with a print statement that informs us that the system is now ready to perform the next operation, which is to encode the screenshot so that it may be transmitted over the network using the HTTPS protocol.
Next, we can check and verify that the handle is indeed recorded and stored and that it has valid content.
   int screenshot_Handle_Size = (int)FileSize(screenshot_Handle);
   if (screenshot_Handle_Size > 0){
      Print("CHART SCREENSHOT FILE SIZE = ",screenshot_Handle_Size);
   }
Here, we obtain and verify the size of the screenshot file opened earlier with its handle. We call the FileSize function on the screenshot handle, which returns the size of the file in bytes. We then assign this value to an integer variable named "screenshot_Handle_Size". If the size is greater than zero, which indicates that the file contains some sort of data, we print the file size to the log. This step is nice to have because it lets us know that, before we encode and send the file over HTTP, the screenshot is saved properly and has valid content.
If the handle indeed has valid content, it then means that we have the correct file open and we can prepare to read the binary data of the screenshot file into an array for decoding.
   uchar photoArr_Data[];
   ArrayResize(photoArr_Data,screenshot_Handle_Size);
   FileReadArray(screenshot_Handle,photoArr_Data,0,screenshot_Handle_Size);
   if (ArraySize(photoArr_Data) > 0){
      Print("READ SCREENSHOT FILE DATA SIZE = ",ArraySize(photoArr_Data));
   }
We start by declaring a uchar array called "photoArr_Data" that will hold the binary data. We then resize this array to match the size of the screenshot file by calling the ArrayResize function. Next, we read the contents of the screenshot file into the "photoArr_Data array", starting from index 0 and going to the end of the file (the screenshot_Handle_Size) by use of the FileReadArray function. We then check the size of the "photoArr_Data" array after loading it and if it is greater than 0, meaning that it is not empty, we log its size. Typically, this is the part of the code that handles the reading and processing of the screenshot file, so that it can be used for encoding and transmitting.
After reading the file contents and storing them, we now need to close the image file. This is done by its handle.
FileClose(screenshot_Handle);
Here, we finally close the screenshot file after successfully reading its data into the storage array. We invoke the function FileClose to release the handle associated with the screenshot file. This frees up system resources that were allocated when the file was opened. It is crucial to ensure that the file is closed before we attempt to carry out any other operations on the file, such as accessing, reading, or writing it in any way. The function signals that we have completed all access operations on the file, and we are now moving along to the next stage of the process: encoding the screenshot data and preparing it for transmission. Once we run this, we get the following result:

You can see that we read and store the image binary data correctly in the storage array. To get to see the data, we can print it to the log by use of the ArrayPrint function as follows:
ArrayPrint(photoArr_Data);
Upon printing, this is the data that we get:

It is evident that we read, copy, and store the full data, that is, up to 320894.
Next, we need to prepare the photo data for transmission over HTTP by encoding it in Base64 format. Since binary data like images cannot be directly transmitted over HTTP, we need to use Base64 encoding to convert the binary data into an ASCII string format. This ensures that the data can be safely included in the HTTP request. This is achieved via the following code snippet.
   //--- create boundary: (data -> base64 -> 1024 bytes -> md5)
   //Encodes the photo data into base64 format
   //This is part of preparing the data for transmission over HTTP.
   uchar base64[];
   uchar key[];
   CryptEncode(CRYPT_BASE64,photoArr_Data,key,base64);
   if (ArraySize(base64) > 0){
      Print("Transformed BASE-64 data = ",ArraySize(base64));
      //Print("The whole data is as below:");
      //ArrayPrint(base64);
   }
To start with, we set up two arrays. The first one is "base64". This holds the encoded data. The second array is "key". We never use "key" in this context, but the encoding function requires it. The function that does the work of Base64 encoding is called CryptEncode. This takes four parameters: the type of encoding ("CRYPT_BASE64"), the source binary data ("photoArr_Data"), the encryption key ("key"), and the output array ("base64"). This CryptEncode function does the actual work of converting the binary data into Base64 format and storing the result in the "base64" array. When we check the size of "base64" with the ArraySize function, if "base64" contains any elements at all, that is, if it is greater than 0, it means that the encoding was successful.
To print this data to the journal, we use the ArrayPrint function.
      Print("Transformed BASE-64 data = ",ArraySize(base64));
      Print("The whole data is as below:");
      ArrayPrint(base64);
We get the following result:

We can see that there is a significant deviation between the original data binary of size 320894 and the newly converted data size of 427860. This deviation is a result of data transformation and encoding.
Next, we need to prepare a subset of the Base64-encoded data to ensure that we handle a manageable portion of it for the next steps in our process. Specifically, we need to focus on copying the first 1024 bytes of the encoded data into a temporary array for further use.
   //Copy the first 1024 bytes of the base64-encoded data into a temporary array
   uchar temporaryArr[1024]= {0};
   ArrayCopy(temporaryArr,base64,0,0,1024);
To begin with, we set up a temporary array, "temporaryArr", that has a size of 1024 bytes. We initialize all of its values to zero. We use this array to hold the first segment of the Base64-encoded data. Because the initialization value is zero, we avoid any potential issues with residual information in the memory where the temporary array is stored.
Then, we use the ArrayCopy function to move the first 1024 bytes from "base64" to "temporaryArr". That handles the copy operation cleanly and efficiently. The reasons for that and the details of the copy operation are their own story, but I’ll mention just a couple of things. The side effect of the initialization is removing any concerns you might have about the first portion of the Base64-encoded data if you visualize it as some kind of random gibberish. Let us log the empty temporary array. We achieve this via the following code.
   Print("FILLED TEMPORARY ARRAY WITH ZERO (0) IS AS BELOW:");
   ArrayPrint(temporaryArr);
Upon compilation, this is what we have:

We can see that the temporary array is filled with pure zeros. These zeros are then replaced with the first 1024 values of the originally formatted data. We can view this data via a similar logic again.
   Print("FIRST 1024 BYTES OF THE ENCODED DATA IS AS FOLLOWS:");
   ArrayPrint(temporaryArr);
The filled temporary data presentation is as below:

After getting this temporary data, we need to generate a Message-Digest algorithm 5 (MD5) hash from the first 1024 bytes of the Base64-encoded data. This MD5 hash will be used as part of the boundary in a multipart/form-data structure, which is often employed in HTTP POST requests to handle file uploads.
   //Create an MD5 hash of the temporary array
   //This hash will be used as part of the boundary in the multipart/form-data
   uchar md5[];
   CryptEncode(CRYPT_HASH_MD5,temporaryArr,key,md5);
   if (ArraySize(md5) > 0){
      Print("SIZE OF MD5 HASH OF TEMPORARY ARRAY = ",ArraySize(md5));
      Print("MD5 HASH boundary in multipart/form-data is as follows:");
      ArrayPrint(md5);
   }
To start, we declare an array named "md5" to store the result of the MD5 hash. The MD5 algorithm (where "MD" stands for "Message Digest") is a cryptographic hash function that produces a 128-bit hash value. The hash is most commonly represented as a string of 32 hexadecimal digits.
In this case, we use the MQL5 in-built function CryptEncode with the CRYPT_HASH_MD5 parameter to compute the hash. We pass to the function a temporary array named "temporaryArr", which holds the first 1024 bytes of the Base64-encoded data. The "key" parameter is typically used for additional cryptographic operations but is not needed for MD5 and is set to an empty array in this context. The result of the hashing operation is stored in the "md5" array.
After computing the hash, we check the "md5" array for non-emptiness by verifying the number of elements in the array using the ArraySize function. If the array has any elements, we log the size of the MD5 hash and then the actual hash value. That hash value is used to create a boundary string in the multipart/form-data format that helps separate the different parts of the HTTP request being transmitted. The MD5 algorithm is used here strictly for its commonality and the unique value it produces, not because it's the best or most secure algorithm to use. Once we run this, we get the following data:

Here, you can see that we get the MD5 hash data in numeral form. Thus, we need to convert the MD5 hash into a hexadecimal string and then truncate it to meet a specific length requirement for use as a boundary in multipart/form-data HTTP requests, which is typically 16.
   //Format MD5 hash as a hexadecimal string &
   //truncate it to 16 characters to create the boundary.
   string HexaDecimal_Hash=NULL;//Used to store the hexadecimal representation of MD5 hash
   int total=ArraySize(md5);
   for(int i=0; i<total; i++){
      HexaDecimal_Hash+=StringFormat("%02X",md5[i]);
   }
   Print("Formatted MD5 Hash String is: \n",HexaDecimal_Hash);
   HexaDecimal_Hash=StringSubstr(HexaDecimal_Hash,0,16);//truncate HexaDecimal_Hash string to its first 16 characters
   //done to comply with a specific length requirement for the boundary
   //in the multipart/form-data of the HTTP request.
   Print("Final Truncated (16 characters) MD5 Hash String is: \n",HexaDecimal_Hash);
To begin with, we declare a string variable, "HexaDecimal_Hash", to hold the hexadecimal form of the MD5 hash. This string will serve as a boundary marker to separate different parts of our HTTP request payload.
Next, we loop through each byte of the hash stored in the md5 array. We convert each byte into a two-character string, using the format specifier "%02X". The "%0" part of the specifier indicates that the string should be padded with leading zeroes if necessary, to ensure that each byte is represented with two characters. The "02" indicates two characters (in a minimum) for the representation; the "X" indicates that the characters should be hexadecimal numerals (with uppercase letters if necessary).
Once again, these hexadecimal characters are appended to the "HexaDecimal_Hash" string. Finally, we output the contents of the string to the log to verify that it has been formed correctly. A run of the program results in the following information:

This was a success. Next, we need to construct and prepare the file data for a multipart/form-data HTTP POST request, which will be used to send the photo to the Telegram chat via the Telegram API. This will involve preparing the request body to include both form fields and the file data in a format that the server can correctly process. We achieve this via the following code snippet.
   //--- WebRequest
   char DATA[];
   string URL = NULL;
   URL = TG_API_URL+"/bot"+botTkn+"/sendPhoto";
   //--- add chart_id
   //Append a carriage return and newline character sequence to the DATA array.
   //In the context of HTTP, \r\n is used to denote the end of a line
   //and is often required to separate different parts of an HTTP request.
   ArrayAdd(DATA,"\r\n");
   //Append a boundary marker to the DATA array.
   //Typically, the boundary marker is composed of two hyphens (--)
   //followed by a unique hash string and then a newline sequence.
   //In multipart/form-data requests, boundaries are used to separate
   //different pieces of data.
   ArrayAdd(DATA,"--"+HexaDecimal_Hash+"\r\n");
   //Add a Content-Disposition header for a form-data part named chat_id.
   //The Content-Disposition header is used to indicate that the following data
   //is a form field with the name chat_id.
   ArrayAdd(DATA,"Content-Disposition: form-data; name=\"chat_id\"\r\n");
   //Again, append a newline sequence to the DATA array to end the header section
   //before the value of the chat_id is added.
   ArrayAdd(DATA,"\r\n");
   //Append the actual chat ID value to the DATA array.
   ArrayAdd(DATA,chatID);
   //Finally, Append another newline sequence to the DATA array to signify
   //the end of the chat_id form-data part.
   ArrayAdd(DATA,"\r\n");
We start by setting up the "DATA" array and the "URL" for the HTTP request. The "URL" is constructed from three parts: the base URL for the API ("TG_API_URL"); the token for the bot, which identifies the bot to the API ("botTkn"); and the endpoint for sending a photo to a chat ("/sendPhoto"). This URL specifies to what "remote server" we are sending our "payload" — the photo we want to send and the information we want to attach to the photo. The endpoint URL does not change; it is the same for each request we make. Our requests will go to the same place whether we are sending one photo or several, whether we're sending photos to different chats, and so forth.
After that, we add a boundary marker to the edge of our data chunk. It is composed of two hyphens (--) and our unique boundary hash ("HexaDecimal_Hash"). In all, it appears thus: "--HexaDecimal_Hash". This boundary marker appears at the beginning of the data chunk for the next part of the request, which is a "chart_id" form field. The Content-Disposition header specifies that the next part (the next data chunk) of the multipart/form-data request is a form field and gives the name of that field ("chart_id").
We add this header and a newline character ("/r/n") to indicate the end of the header section. After the header section, we add the "chartID" value to the DATA array, followed by another newline character ("/r/n") to indicate the end of the "chart_id" form-data part. This process guarantees that the form field is correctly formatted and separated from the other parts of the request to ensure that Telegram's API correctly receives and processes the data.
You may have noticed that we did use two "overloading functions" in the code. Let us have their code snippet below.
//+------------------------------------------------------------------+
// ArrayAdd for uchar Array
void ArrayAdd(uchar &destinationArr[],const uchar &sourceArr[]){
   int sourceArr_size=ArraySize(sourceArr);//get size of source array
   if(sourceArr_size==0){
      return;//if source array is empty, exit the function
   }
   int destinationArr_size=ArraySize(destinationArr);
   //resize destination array to fit new data
   ArrayResize(destinationArr,destinationArr_size+sourceArr_size,500);
   // Copy the source array to the end of the destination array.
   ArrayCopy(destinationArr,sourceArr,destinationArr_size,0,sourceArr_size);
}

//+------------------------------------------------------------------+
// ArrayAdd for strings
void ArrayAdd(char &destinationArr[],const string text){
   int length = StringLen(text);// get the length of the input text
   if(length > 0){
      uchar sourceArr[]; //define an array to hold the UTF-8 encoded characters
      for(int i=0; i<length; i++){
         // Get the character code of the current character
         ushort character = StringGetCharacter(text,i);
         uchar array[];//define an array to hold the UTF-8 encoded character
         //Convert the character to UTF-8 & get size of the encoded character
         int total = ShortToUtf8(character,array);

         //Print("text @ ",i," > "text); // @ "B", IN ASCII TABLE = 66 (CHARACTER)
         //Print("character = ",character);
         //ArrayPrint(array);
         //Print("bytes = ",total) // bytes of the character

         int sourceArr_size = ArraySize(sourceArr);
         //Resize the source array to accommodate the new character
         ArrayResize(sourceArr,sourceArr_size+total);
         //Copy the encoded character to the source array
         ArrayCopy(sourceArr,array,sourceArr_size,0,total);
      }
      //Append the source array to the destination array
      ArrayAdd(destinationArr,sourceArr);
   }
}
Here, we define two custom functions to handle the addition of data to arrays in MQL5, specifically designed for handling both uchar and string types. These functions facilitate the construction of HTTP request data by appending various pieces of information to an existing array, ensuring that the final data format is correct and suitable for transmission. We added comments to the functions for easier understanding but let us briefly go through the code explanation again.
The first function, "ArrayAdd", applies to arrays of unsigned characters (uchar). It is set up to append data from a source array to a destination array. First, it determines how many elements are in the source array. That is accomplished by calling the simple function ArraySize on the source array. With that piece of information, we check to see if the source array contains any data. If it does not, we avoid the ridiculousness of continuing by exiting the function early. If it does contain data, we move on to the next step, which is resizing the destination array to accept that data. We do this by calling the function ArrayResize on the destination array, which now, however, we can call with confidence since we know it will work correctly.
The other function, which adds strings to a char array, works as follows: It computes the length of the input string. If the input string isn't empty, it takes each character of the string, obtains its code, and appends it to the destination array, converting it to UTF-8 in the process. To convert the string and append it to the destination array, this function resizes the source array for intermediate storage of the string data to be added. It ensures that the string's UTF-8 representation, as well as the string itself, are correctly stored in the final data array that will be used for constructing HTTP request bodies or other kinds of data structures.
To view what we did, let us implement a logic that will print the resulting data related to the chat ID that will be sent in the HTTP request.
   Print("CHAT ID DATA:");
   ArrayPrint(DATA);
   string chatID_Data = CharArrayToString(DATA,0,WHOLE_ARRAY,CP_UTF8);
   Print("SIMPLE CHAT ID DATA IS AS FOLLOWS:",chatID_Data);
To begin with, we employ the ArrayPrint function to present the raw data array. The function prints out the contents of the array for us. We then perform the conversion of the "DATA" array from a character array to a string format. The function that we use is CharArrayToString, which translates the raw byte data in "DATA" into a UTF-8 encoded string. The parameters used here specify that we want to convert the entire array ("WHOLE_ARRAY") and that the character encoding is UTF-8 (CP_UTF8). This conversion is necessary because the HTTP request requires the data to be in a string format.
In conclusion, what we have is a string, "chatID_Data", whose final format is such that it will be included in the HTTP request. By using the Print function, we can see what the eventual output will look like in the request.

We can see that we can correctly add the correct chat ID data to the array. Via the same logic, we can add the image's data as well to construct the multipart/form-data request body for sending the photo via HTTP to the Telegram API.
   ArrayAdd(DATA,"--"+HexaDecimal_Hash+"\r\n");
   ArrayAdd(DATA,"Content-Disposition: form-data; name=\"photo\"; filename=\"Upload_ScreenShot.jpg\"\r\n");
   ArrayAdd(DATA,"\r\n");
   ArrayAdd(DATA,photoArr_Data);
   ArrayAdd(DATA,"\r\n");
   ArrayAdd(DATA,"--"+HexaDecimal_Hash+"--\r\n");
To begin with, we insert the boundary marker for the photograph part of the multipart/form data. We do this with the line ArrayAdd(DATA,"--"+HexaDecimal_Hash+"\r\n"). The boundary marker, made up of two hyphens and the "HexaDecimal_Hash", serves to separate the different parts of the multipart request. The "HexaDecimal_Hash", a unique identifier for the boundary, is a guarantee that each part of the request is unmistakably divided from the next.
We then include the Content-Disposition header for the photo portion of the form data. We add it using the ArrayAdd function, as follows: ArrayAdd(DATA, "Content-Disposition: form-data; name=\" photo\"; filename=\"Upload_ScreenShot.jpg\"\r\n"). This header indicates that the data which follows is a file, specifically, the file named "Upload_ScreenShot.jpg". Because we have specified, via the name=\" photo\" portion of the header, that the form data field we are currently working with has the name \" photo,\" the server knows to expect the file "Upload_ScreenShot.jpg" as part of that field when it processes the incoming request. The file is just an identifier and you can change it to something else of your liking.
After this, we use ArrayAdd(DATA, "\r\n") to append a newline sequence to the headers of the request. This indicates the end of the header section and the beginning of the actual file data. We then use ArrayAdd(DATA, photoArr_Data) to append the actual photo data to the DATA array. This line of code appends the binary data of the screenshot (previously base64-encoded) to the request body. The multipart/form-data payload now contains the photo data.
Finally, we add another newline sequence with ArrayAdd(DATA, "\r\n") and the boundary marker to close the photo part with ArrayAdd(DATA, "--" + HexaDecimal_Hash + "--\r\n"). The -- at the end of the boundary marker indicates the end of the multipart section. This final boundary ensures that the server correctly identifies the end of the photo data section within the request. To view the data being sent, let us again print it to the log section via a similar function as the previous one.
   Print("FINAL FULL PHOTO DATA BEING SENT:");
   ArrayPrint(DATA);
   string final_Simple_Data = CharArrayToString(DATA,0,WHOLE_ARRAY,CP_ACP);
   Print("FINAL FULL SIMPLE PHOTO DATA BEING SENT:",final_Simple_Data);
These are the results we get:

Finally, we construct the HTTP request headers needed for sending a multipart/form-data request to the Telegram API.
   string HEADERS = NULL;
   HEADERS = "Content-Type: multipart/form-data; boundary="+HexaDecimal_Hash+"\r\n";
We start by defining a "HEADERS" string, which is initialized as "NULL". This string holds the HTTP headers we need to set for the request. The header we absolutely must set is Content-Type. The Content-Type header conveys the type of data being sent and how it is formatted.
We assign the string with the correct Content-Type value. The crucial part here is the "HEADERS" string itself. We must understand the "format" for the HTTP request if we want to comprehend why this particular assignment to the "HEADERS" string is necessary. The format for the request says that the request is sent using the "Content-Type: multipart/form-data" header. After doing all this, we can now initiate the web request. First, let us inform the user by sending the request below.
Print("SCREENSHOT SENDING HAS BEEN INITIATED SUCCESSFULLY.");
From the initial code, we comment out the unnecessary WebRequest parameters and switch to the latest ones.
   //char data[];  // Array to hold data to be sent in the web request (empty in this case)
   char res[];  // Array to hold the response data from the web request
   string resHeaders;  // String to hold the response headers from the web request
   //string msg = "EA INITIALIZED ON CHART " + _Symbol;  // Message to send, including the chart symbol

   //const string url = TG_API_URL + "/bot" + botTkn + "/sendmessage?chat_id=" + chatID +
   //   "&text=" + msg;

   // Send the web request to the Telegram API
   int send_res = WebRequest("POST",URL,HEADERS,10000, DATA, res, resHeaders);
Here, we only append to the function the new URL, headers, and image-file data to be sent. The response logic remains intact and unchanged as below:
   // Check the response status of the web request
   if (send_res == 200) {
      // If the response status is 200 (OK), print a success message
      Print("TELEGRAM MESSAGE SENT SUCCESSFULLY");
   } else if (send_res == -1) {
      // If the response status is -1 (error), check the specific error code
      if (GetLastError() == 4014) {
         // If the error code is 4014, it means the Telegram API URL is not allowed in the terminal
         Print("PLEASE ADD THE ", TG_API_URL, " TO THE TERMINAL");
      }
      // Print a general error message if the request fails
      Print("UNABLE TO SEND THE TELEGRAM MESSAGE");
   } else if (send_res != 200) {
      // If the response status is not 200 or -1, print the unexpected response code and error code
      Print("UNEXPECTED RESPONSE ", send_res, " ERR CODE = ", GetLastError());
   }
When we run the program, this is what we get:
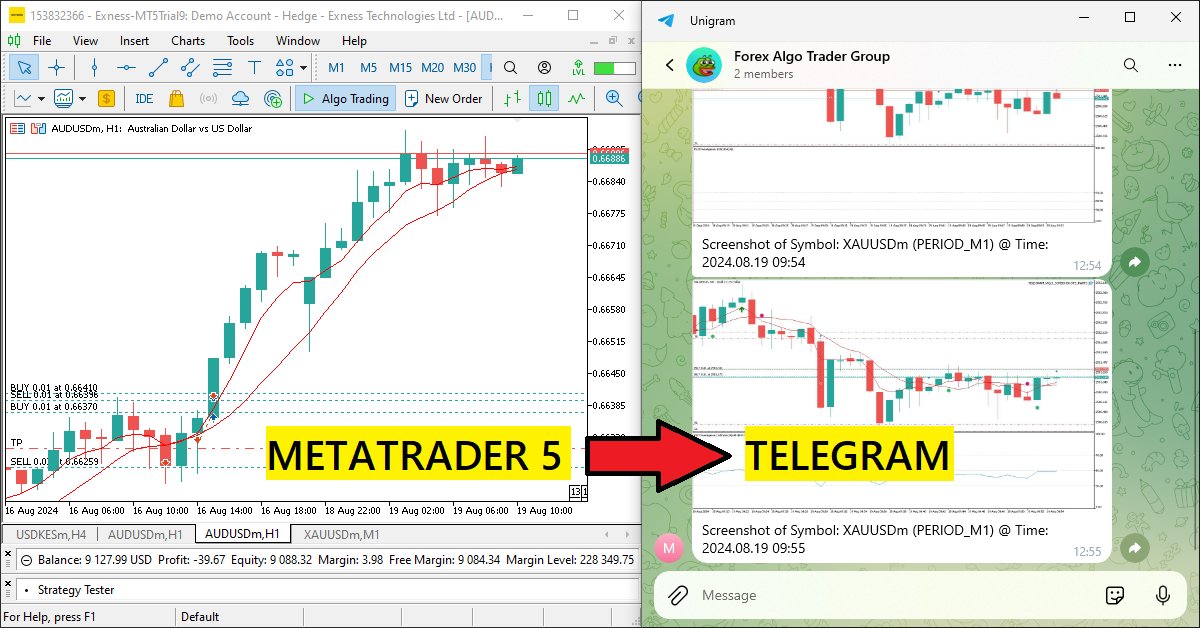
On MetaTrader 5:

On Telegram:

Now it is evident that we successfully sent the image file from MetaTrader 5 trading terminal to Telegram chat. However, we just sent an empty screenshot. To add a caption to the image file, we implement the following logic which adds an optional caption to the multipart/form-data request, which will be sent along with the chart screenshot to the Telegram API.
   //--- Caption
   string CAPTION = NULL;
   CAPTION = "Screenshot of Symbol: "+Symbol()+
             " ("+EnumToString(ENUM_TIMEFRAMES(_Period))+
             ") @ Time: "+TimeToString(TimeCurrent());
   if(StringLen(CAPTION) > 0){
      ArrayAdd(DATA,"--"+HexaDecimal_Hash+"\r\n");
      ArrayAdd(DATA,"Content-Disposition: form-data; name=\"caption\"\r\n");
      ArrayAdd(DATA,"\r\n");
      ArrayAdd(DATA,CAPTION);
      ArrayAdd(DATA,"\r\n");
   }
   //---
We begin by initializing the "CAPTION" string as "NULL" and then constructing it with relevant details. The caption includes the trading symbol, the timeframe of the chart, and the current time, formatted as a string. We then check if the "CAPTION" string has a length greater than zero. If it does, we proceed to add the caption to the "DATA" array, which is used to build the multipart form data. This involves appending a boundary marker, specifying the form-data part as a caption, and including the caption content itself. When we run this, we get the following results:

That was a success. We can see that we not only receive the image file but also a descriptive caption that shows the symbol name, the period, and the time of the chart that is in question.
Up to this point, we get the screenshot of the chart where the program is attached. In case one wants to open and modify a different chart, we need to implement a different logic for that.
   long chart_id=ChartOpen(_Symbol,_Period);
   ChartSetInteger(chart_id,CHART_BRING_TO_TOP,true);
   // update chart
   int wait=60;
   while(--wait>0){//decrease the value of wait by 1 before loop condition check
      if(SeriesInfoInteger(_Symbol,_Period,SERIES_SYNCHRONIZED)){
         break; // if prices up to date, terminate the loop and proceed
      }
   }

   ChartRedraw(chart_id);
   ChartSetInteger(chart_id,CHART_SHOW_GRID,false);
   ChartSetInteger(chart_id,CHART_SHOW_PERIOD_SEP,false);
   ChartSetInteger(chart_id,CHART_COLOR_CANDLE_BEAR,clrRed);
   ChartSetInteger(chart_id,CHART_COLOR_CANDLE_BULL,clrBlue);
   ChartSetInteger(chart_id,CHART_COLOR_BACKGROUND,clrLightSalmon);

   ChartScreenShot(chart_id,SCREENSHOT_FILE_NAME,1366,768,ALIGN_RIGHT);
   //Sleep(10000); // sleep for 10 secs to see the opened chart
   ChartClose(chart_id);
//---
Here, we begin by opening a new chart for the given symbol and timeframe by use of the ChartOpen function, using the pre-defined variable _Symbol, and _Period. We assign the ID of the new chart to the variable "chart_id". We then use "chart_id" to make sure that the new chart is visible at the front of the MetaTrader environment and is not covered up by any previous charts.
After that, we start a loop that can run for a maximum of 60 iterations. Within that loop, we keep checking to see if the chart is synchronized. To test the synchronization, we use the function SeriesInfoInteger with the parameters _Symbol, _Period, and SERIES_SYNCHRONIZED. If we find that the chart is synchronized, we break out of the loop. Once we confirm that the chart is in sync, we use the function ChartRedraw with the parameter "chart_id" to refresh the chart.
We customize various chart settings to adjust the chart to our liking. We use the function ChartSetInteger to set colors for the chart's background and bearish and bullish candles. The colors we set provide visual clarity, helping us easily distinguish between the different elements of the chart. We also make the chart less visually cluttered by disabling the grid and the period separators. You can modify your chart as you deem fit at this point. Finally, we take a screenshot of the chart for use in transmission. We don't want the chart left open unnecessarily, so we close it after taking the screenshot. For this, we use the ChartClose function. When we run the program, we get the following results:

It is clear that we open a chart, modify it to our liking, and close it at the end after taking a snapshot of it. To visualize the chart open and close process, let us have a 10-second delay to see the chart.
Sleep(10000); // sleep for 10 secs to see the opened chart
Here, we just leave the chart open for 10 seconds to allow us to see what is going on in the background of our program. Upon compilation, this is what we have:

The full source code responsible for taking screenshots, encoding, encrypting, and sending them from the trading terminal to the telegram chat is as follows:
//+------------------------------------------------------------------+
//| Expert initialization function                                   |
//+------------------------------------------------------------------+
int OnInit() {

   //--- Get ready to take a chart screenshot of the current chart

   #define SCREENSHOT_FILE_NAME "Our Chart ScreenShot.jpg"

   //--- First delete an instance of the screenshot file if it already exists
   if(FileIsExist(SCREENSHOT_FILE_NAME)){
      FileDelete(SCREENSHOT_FILE_NAME);
      Print("Chart Screenshot was found and deleted.");
      ChartRedraw(0);
   }

//---
   long chart_id=ChartOpen(_Symbol,_Period);
   ChartSetInteger(chart_id,CHART_BRING_TO_TOP,true);
   // update chart
   int wait=60;
   while(--wait>0){//decrease the value of wait by 1 before loop condition check
      if(SeriesInfoInteger(_Symbol,_Period,SERIES_SYNCHRONIZED)){
         break; // if prices up to date, terminate the loop and proceed
      }
   }

   ChartRedraw(chart_id);
   ChartSetInteger(chart_id,CHART_SHOW_GRID,false);
   ChartSetInteger(chart_id,CHART_SHOW_PERIOD_SEP,false);
   ChartSetInteger(chart_id,CHART_COLOR_CANDLE_BEAR,clrRed);
   ChartSetInteger(chart_id,CHART_COLOR_CANDLE_BULL,clrBlue);
   ChartSetInteger(chart_id,CHART_COLOR_BACKGROUND,clrLightSalmon);

   ChartScreenShot(chart_id,SCREENSHOT_FILE_NAME,1366,768,ALIGN_RIGHT);
   Print("OPENED CHART PAUSED FOR 10 SECONDS TO TAKE SCREENSHOT.")
   Sleep(10000); // sleep for 10 secs to see the opened chart
   ChartClose(chart_id);
//---

   //ChartScreenShot(0,SCREENSHOT_FILE_NAME,1366,768,ALIGN_RIGHT);

   // Wait for 30 secs to save screenshot if not yet saved
   int wait_loops = 60;
   while(!FileIsExist(SCREENSHOT_FILE_NAME) && --wait_loops > 0){
      Sleep(500);
   }

   if(!FileIsExist(SCREENSHOT_FILE_NAME)){
      Print("THE SPECIFIED SCREENSHOT DOES NOT EXIST (WAS NOT SAVED). REVERTING NOW!");
      return (INIT_FAILED);
   }
   else if(FileIsExist(SCREENSHOT_FILE_NAME)){
      Print("THE CHART SCREENSHOT WAS SAVED SUCCESSFULLY TO THE DATA-BASE.");
   }

   int screenshot_Handle = INVALID_HANDLE;
   screenshot_Handle = FileOpen(SCREENSHOT_FILE_NAME,FILE_READ|FILE_BIN);
   if(screenshot_Handle == INVALID_HANDLE){
      Print("INVALID SCREENSHOT HANDLE. REVERTING NOW!");
      return(INIT_FAILED);
   }

   else if (screenshot_Handle != INVALID_HANDLE){
      Print("SCREENSHOT WAS SAVED & OPENED SUCCESSFULLY FOR READING.");
      Print("HANDLE ID = ",screenshot_Handle,". IT IS NOW READY FOR ENCODING.");
   }

   int screenshot_Handle_Size = (int)FileSize(screenshot_Handle);
   if (screenshot_Handle_Size > 0){
      Print("CHART SCREENSHOT FILE SIZE = ",screenshot_Handle_Size);
   }
   uchar photoArr_Data[];
   ArrayResize(photoArr_Data,screenshot_Handle_Size);
   FileReadArray(screenshot_Handle,photoArr_Data,0,screenshot_Handle_Size);
   if (ArraySize(photoArr_Data) > 0){
      Print("READ SCREENSHOT FILE DATA SIZE = ",ArraySize(photoArr_Data));
   }
   FileClose(screenshot_Handle);

   //ArrayPrint(photoArr_Data);

   //--- create boundary: (data -> base64 -> 1024 bytes -> md5)
   //Encodes the photo data into base64 format
   //This is part of preparing the data for transmission over HTTP.
   uchar base64[];
   uchar key[];
   CryptEncode(CRYPT_BASE64,photoArr_Data,key,base64);
   if (ArraySize(base64) > 0){
      Print("Transformed BASE-64 data = ",ArraySize(base64));
      //Print("The whole data is as below:");
      //ArrayPrint(base64);
   }

   //Copy the first 1024 bytes of the base64-encoded data into a temporary array
   uchar temporaryArr[1024]= {0};
   //Print("FILLED TEMPORARY ARRAY WITH ZERO (0) IS AS BELOW:");
   //ArrayPrint(temporaryArr);
   ArrayCopy(temporaryArr,base64,0,0,1024);
   //Print("FIRST 1024 BYTES OF THE ENCODED DATA IS AS FOLLOWS:");
   //ArrayPrint(temporaryArr);

   //Create an MD5 hash of the temporary array
   //This hash will be used as part of the boundary in the multipart/form-data
   uchar md5[];
   CryptEncode(CRYPT_HASH_MD5,temporaryArr,key,md5);
   if (ArraySize(md5) > 0){
      Print("SIZE OF MD5 HASH OF TEMPORARY ARRAY = ",ArraySize(md5));
      Print("MD5 HASH boundary in multipart/form-data is as follows:");
      ArrayPrint(md5);
   }

   //Format MD5 hash as a hexadecimal string &
   //truncate it to 16 characters to create the boundary.
   string HexaDecimal_Hash=NULL;//Used to store the hexadecimal representation of MD5 hash
   int total=ArraySize(md5);
   for(int i=0; i<total; i++){
      HexaDecimal_Hash+=StringFormat("%02X",md5[i]);
   }
   Print("Formatted MD5 Hash String is: \n",HexaDecimal_Hash);
   HexaDecimal_Hash=StringSubstr(HexaDecimal_Hash,0,16);//truncate HexaDecimal_Hash string to its first 16 characters
   //done to comply with a specific length requirement for the boundary
   //in the multipart/form-data of the HTTP request.
   Print("Final Truncated (16 characters) MD5 Hash String is: \n",HexaDecimal_Hash);

   //--- WebRequest
   char DATA[];
   string URL = NULL;
   URL = TG_API_URL+"/bot"+botTkn+"/sendPhoto";
   //--- add chart_id
   //Append a carriage return and newline character sequence to the DATA array.
   //In the context of HTTP, \r\n is used to denote the end of a line
   //and is often required to separate different parts of an HTTP request.
   ArrayAdd(DATA,"\r\n");
   //Append a boundary marker to the DATA array.
   //Typically, the boundary marker is composed of two hyphens (--)
   //followed by a unique hash string and then a newline sequence.
   //In multipart/form-data requests, boundaries are used to separate
   //different pieces of data.
   ArrayAdd(DATA,"--"+HexaDecimal_Hash+"\r\n");
   //Add a Content-Disposition header for a form-data part named chat_id.
   //The Content-Disposition header is used to indicate that the following data
   //is a form field with the name chat_id.
   ArrayAdd(DATA,"Content-Disposition: form-data; name=\"chat_id\"\r\n");
   //Again, append a newline sequence to the DATA array to end the header section
   //before the value of the chat_id is added.
   ArrayAdd(DATA,"\r\n");
   //Append the actual chat ID value to the DATA array.
   ArrayAdd(DATA,chatID);
   //Finally, Append another newline sequence to the DATA array to signify
   //the end of the chat_id form-data part.
   ArrayAdd(DATA,"\r\n");

   // EXAMPLE OF USING CONVERSIONS
   //uchar array[] = { 72, 101, 108, 108, 111, 0 }; // "Hello" in ASCII
   //string output = CharArrayToString(array,0,WHOLE_ARRAY,CP_ACP);
   //Print("EXAMPLE OUTPUT OF CONVERSION = ",output); // Hello

   Print("CHAT ID DATA:");
   ArrayPrint(DATA);
   string chatID_Data = CharArrayToString(DATA,0,WHOLE_ARRAY,CP_UTF8);
   Print("SIMPLE CHAT ID DATA IS AS FOLLOWS:",chatID_Data);


   //--- Caption
   string CAPTION = NULL;
   CAPTION = "Screenshot of Symbol: "+Symbol()+
             " ("+EnumToString(ENUM_TIMEFRAMES(_Period))+
             ") @ Time: "+TimeToString(TimeCurrent());
   if(StringLen(CAPTION) > 0){
      ArrayAdd(DATA,"--"+HexaDecimal_Hash+"\r\n");
      ArrayAdd(DATA,"Content-Disposition: form-data; name=\"caption\"\r\n");
      ArrayAdd(DATA,"\r\n");
      ArrayAdd(DATA,CAPTION);
      ArrayAdd(DATA,"\r\n");
   }
   //---

   ArrayAdd(DATA,"--"+HexaDecimal_Hash+"\r\n");
   ArrayAdd(DATA,"Content-Disposition: form-data; name=\"photo\"; filename=\"Upload_ScreenShot.jpg\"\r\n");
   ArrayAdd(DATA,"\r\n");
   ArrayAdd(DATA,photoArr_Data);
   ArrayAdd(DATA,"\r\n");
   ArrayAdd(DATA,"--"+HexaDecimal_Hash+"--\r\n");

   Print("FINAL FULL PHOTO DATA BEING SENT:");
   ArrayPrint(DATA);
   string final_Simple_Data = CharArrayToString(DATA,0,WHOLE_ARRAY,CP_ACP);
   Print("FINAL FULL SIMPLE PHOTO DATA BEING SENT:",final_Simple_Data);

   string HEADERS = NULL;
   HEADERS = "Content-Type: multipart/form-data; boundary="+HexaDecimal_Hash+"\r\n";

   Print("SCREENSHOT SENDING HAS BEEN INITIATED SUCCESSFULLY.");

   //char data[];  // Array to hold data to be sent in the web request (empty in this case)
   char res[];  // Array to hold the response data from the web request
   string resHeaders;  // String to hold the response headers from the web request
   //string msg = "EA INITIALIZED ON CHART " + _Symbol;  // Message to send, including the chart symbol

   //const string url = TG_API_URL + "/bot" + botTkn + "/sendmessage?chat_id=" + chatID +
   //   "&text=" + msg;

   // Send the web request to the Telegram API
   int send_res = WebRequest("POST",URL,HEADERS,10000, DATA, res, resHeaders);

   // Check the response status of the web request
   if (send_res == 200) {
      // If the response status is 200 (OK), print a success message
      Print("TELEGRAM MESSAGE SENT SUCCESSFULLY");
   } else if (send_res == -1) {
      // If the response status is -1 (error), check the specific error code
      if (GetLastError() == 4014) {
         // If the error code is 4014, it means the Telegram API URL is not allowed in the terminal
         Print("PLEASE ADD THE ", TG_API_URL, " TO THE TERMINAL");
      }
      // Print a general error message if the request fails
      Print("UNABLE TO SEND THE TELEGRAM MESSAGE");
   } else if (send_res != 200) {
      // If the response status is not 200 or -1, print the unexpected response code and error code
      Print("UNEXPECTED RESPONSE ", send_res, " ERR CODE = ", GetLastError());
   }


   return(INIT_SUCCEEDED);  // Return initialization success status
}
It is now clear that we have achieved our third objective, that is, sending chart screenshot image files and captions from the trading terminal to the Telegram chat or group. This is a success and cheers to us! What we now need to do is test the integration to ensure it works correctly and pinpoint any arising issues. This is done in the next section.
Testing the Integration
To ensure that our Expert Advisor (EA) correctly sends screenshots from the MetaTrader 5 trading terminal to Telegram, we need to test the integration thoroughly. To couple things, let us have the testing logic in a GIF format.

In the provided GIF above," we demonstrate the seamless interaction between MetaTrader 5 and Telegram, showcasing the process of sending a chart screenshot. The GIF begins by showing the MetaTrader 5 platform where a chart window is opened, brought to the foreground, and then paused for 10 seconds, allowing time for any final adjustments. During this pause, the Journal tab in MetaTrader 5 logs messages indicating the progress of the operation, such as the chart being redrawn and the screenshot being captured. The chart is then automatically closed, and the screenshot is packaged and sent to Telegram. On the Telegram side, we see the screenshot arrive in the chat, confirming that the integration works as intended. This GIF visually reinforces how the automated system operates in real-time, from chart preparation to successful delivery of the image in Telegram.
Conclusion
To conclude, this article described, step by step, how to send a chart screenshot from the MetaTrader 5 trading platform to a chat on Telegram. We first generated the chart screenshot using MetaTrader 5. We configured the chart's settings to ensure it was clear and then captured it using the ChartScreenShot function to get the image in a file. After saving the file to our computer, we opened the file and read its binary content. We then sent the chart, encoded in Base64 format, to an HTTP request that Telegram's API could understand. By doing so, we could get the image into a chat on Telegram in real time.
Encoding the image for transmission revealed the intricacies involved in sending raw binary data over the HTTP protocol, especially when the destination is a messaging platform such as Telegram. The first thing to understand is that sending binary data directly just isn't feasible. Instead, Telegram (and many other services) require that the data be sent in a text format. We met this requirement handily by using a widely known algorithm to convert the raw binary image data to Base64. After that, we inserted the Base64 image into a multipart/form-data HTTP request. This demonstration not only underscored the power of the MetaTrader 5 platform as a means for creating custom automation but also highlighted how to integrate an external service—Telegram in this case—into a trading strategy.
Looking ahead to Part 4, we will take the code from this article and shape it into reusable components. We will do this so that we can create multiple instances of the Telegram integration, which will allow us, in the next parts of the tutorial, to send different messages and screenshots to Telegram at our whim and fancy—not just as we please but also when and how we please—without having to rely on a single function call to do so. By putting the code into classes, we will make the system more modular and scalable. We will also do it to integrate the code more easily into the different trading scenarios we outlined in Part 1. This is important because the integration of the Telegram mechanism should work dynamically and flexibly with our Expert Advisors, allowing multiple strategies and account scenarios to send a variety of messages and images at critical points during a trade or at the end of a trading day. Stay tuned as we continue to build and refine this integrated system.
 Features of Experts Advisors
- Free trading apps
- Over 8,000 signals for copying
- Economic news for exploring financial markets
You agree to website policy and terms of use