
Creating an Interactive Graphical User Interface in MQL5 (Part 2): Adding Controls and Responsiveness
Introduction
In our previous article, we laid the foundation by assembling the graphical elements of our MetaQuotes Language 5 (MQL5) graphical user interface (GUI) panel. If you recall, the iteration was a static assembly of GUI elements - a mere snapshot frozen in time, lacking responsiveness. It was static and unyielding. Now, let’s unfreeze that snapshot and infuse it with life. In this eagerly anticipated continuation, we’re taking our panel to the next level. Buckle up as we explore how to breathe life into our interface:
- Layout and Responsiveness: Forget static components! We’ll embrace relative positioning, flexible layouts, and clickable, responsive, and editable components, making our panel responsive to user interactions.
- Dynamic Updates: Real-time data is the heartbeat of any trading application. We’ll dive into fetching live price feeds and ensuring our panel reflects the latest market information.
- Component Mobility: Imagine draggable elements-panels that respond to a user’s touch. We’ll explore how to make certain components movable, enhancing user experience.
The following topics will guide us on how to achieve a responsive and interactive panel:
- Illustration of Elements to be Automated
- GUI Automation in MQL5
- Conclusion
Illustration of Elements to be Automated
Seven components are to be automated. The first component is the closure of the panel when the closing button is clicked. We intend to delete all the panel elements when this button is clicked. Second, when the position management buttons are clicked, the buttons will close their respective positions and orders as instructed. For example, when we click the "Profit" button or label, we close all the positions that are in profit only. The third automation will be on the trading volume component. Once the entity is clicked, a dropdown list of options will be created for the user to choose a trading option.
The fourth automation will be on the increase or decrease buttons beside the respective trading buttons to increment or decrease the values in the edit fields, instead of just typing them. In case the user wants to input the desired values directly, the edit field will need to capture the inputted values, and this makes our fifth automation step. Then, the sixth step will be the creation of a hover effect on the hovered button. That is, when the mouse is within the hovered button area, the button will grow indicating that the mouse is within the button proximity, and when the mouse moves away from the button area, reset the button to default features. Finally, we will update the price quotes to real-time values on every price tick.
To easily aid in understanding these automation processes and components, below is a detailed description of them featuring the previous milestone.
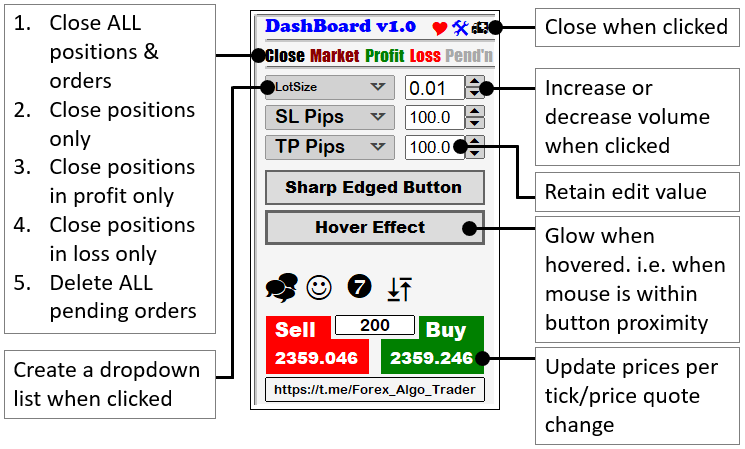
With the insight of what we will be doing, let us start the automation right away. Please refer to the previous article where we created the static assembly of the GUI elements if you still have not gone through it so that you will be on the right track with us. Let's do it.
GUI Automation in MQL5
We will go from simple to complex processes so that our structure is arranged in chronological order. Thus, we will update the prices on each tick or price quote change. To achieve this, we will need the OnTick event handler, an in-built MQL5 function that is typically called when the price quotes change. The function is a void data type which means that it handles executions directly and does not have to return any output. Your function should resemble this as below.
//+------------------------------------------------------------------+
//| Expert tick function                                             |
//+------------------------------------------------------------------+
void OnTick(){

  ...

}
//+------------------------------------------------------------------+
This is the event handler that is responsible for price updates and thus the heart of our logic. We will add the control logic to this function as below:
    // --- Update price quotes ---

    // Set the text of the "SELL PRICE" label to the current Bid price
    ObjectSetString(0, LABEL_SELL_PRICE, OBJPROP_TEXT, Bid());
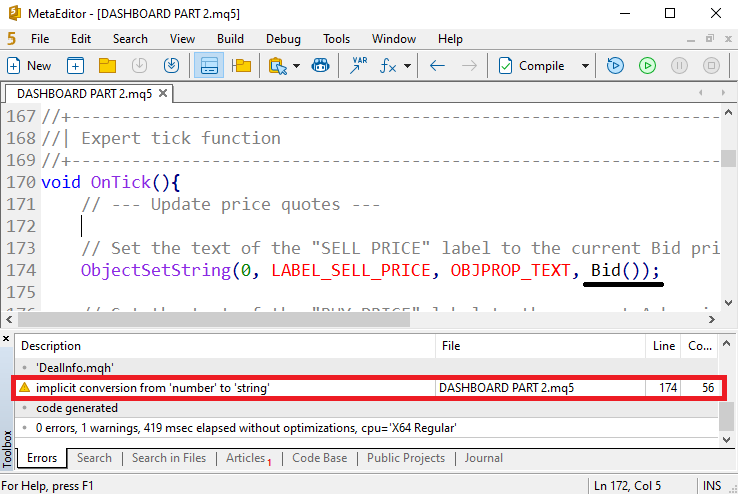
We use the ObjectSetString to set the property of the object, text in this case, since we need to alter to text input of the button label. We provide the window chart ID as 0 for the current chart, or you could also provide "ChartID()", a function that will provide the chart identification index for the current chart window. Then, we provide "LABEL_SELL_PRICE" as the target object name to update the selling button label, and "OBJPROP_TEXT", to signify that the object property we are updating is the text string value of the object. Finally, we provide the text value. The bid price is the value that we need to update, and thus we fill it in, but that is not all. The property type that we need to fill in is a string data value, and our bid price is in the double format. Thus, we need to convert the double type value to a string type value, else we will receive a warning upon compilation - implicit conversion from 'number' to 'string'.
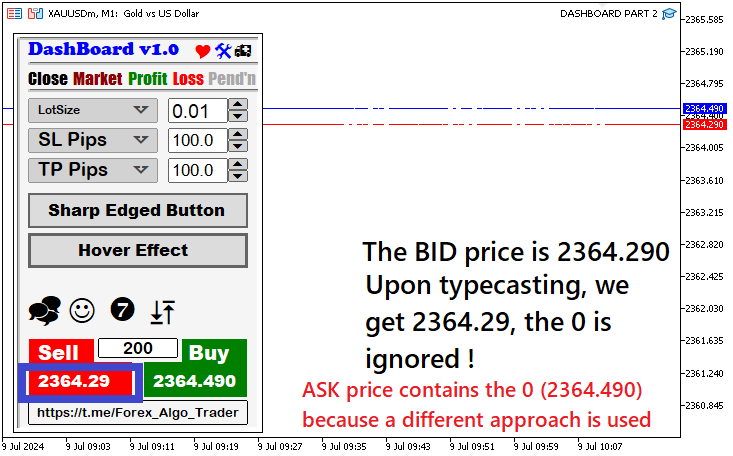
At this point, we could typecast the double value to a string directly as shown below, but that is not usually recommended as it should be used thoughtfully.
    // --- Update price quotes ---

    // Set the text of the "SELL PRICE" label to the current Bid price
    ObjectSetString(0, LABEL_SELL_PRICE, OBJPROP_TEXT, (string)Bid());
Typecasting in MQL5, like converting a numeric value to a string has some nuances. One of the most common is precision loss. For example, our bid price value is a floating-point value, and for example, when its price is 11.77900, the last two zeros will be ignored and the final output value will be 11.779. Technically, there is no logical difference in the two values, but visually, there is a mathematical difference in that one contains 5 digits and the other has 3 digits. Here is an example of what we mean.
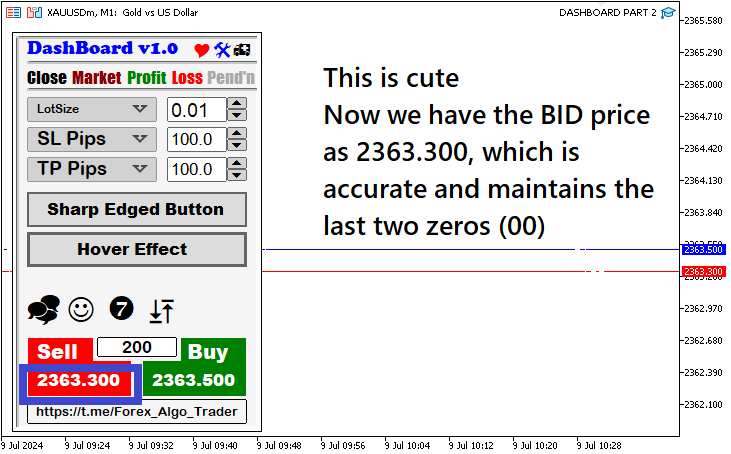
As we have seen, typecasting will get rid of the warning but it is not the best approach to use when precision matters. Thus, another function will be needed. We use the DoubleToString in-built MQL5 function to do the conversion. This function is used to convert a numeric value with a floating point into a text string. It takes two input parameters or arguments, the target floating point value and the accuracy format. In our case, we use the bid price as the target value and the accuracy format as _Digits, a variable that stores the number of digits after a decimal point, which defines the price accuracy of the symbol of the current chart. You may also use the Digits() function. This would be any arbitrary number within the range of 0 to 8, and if left out it would assume a value of 8 digits. For example, our symbol is GOLD, (XAUUSD), with 3 digits. So we would have 3 as our digit value, but for automation and to make the code adaptible to the currency pairs, we use the function to automatically retrieve the number of digits of the particular currency pair. However, if you want a fixed range of decimal places, use a static value. Here is the final code for this bid price setting.
    // --- Update price quotes ---

    // Set the text of the "SELL PRICE" label to the current Bid price
    ObjectSetString(0, LABEL_SELL_PRICE, OBJPROP_TEXT, DoubleToString(Bid(), _Digits));
Since we now have the correct conversion logic, thanks to MQL5 developers for the beautiful function, we will have the results below.
To set the buy button asking price and the spread, the same logic prevails. Here is the code for that.
    // --- Update price quotes ---

    // Set the text of the "SELL PRICE" label to the current Bid price
    ObjectSetString(0, LABEL_SELL_PRICE, OBJPROP_TEXT, DoubleToString(Bid(), _Digits));

    // Set the text of the "BUY PRICE" label to the current Ask price
    ObjectSetString(0, LABEL_BUY_PRICE, OBJPROP_TEXT, DoubleToString(Ask(), _Digits));

    // Set the text of the "SPREAD" button to the current spread value
    ObjectSetString(0, BTN_SPREAD, OBJPROP_TEXT, (string)Spread());
You should have noticed that for the spread, we directly typecast its string value, even though we did criticize that approach before in maintaining accuracy. Here, the spread function is an integer data type, and thus accuracy is not of top priority, either way, we will have the correct format. However, you could also use the IntegerToString function to do the conversion, which would result in the same value.
    // Set the text of the "SPREAD" button to the current spread value
    ObjectSetString(0, BTN_SPREAD, OBJPROP_TEXT, IntegerToString(Spread()));
The function takes three arguments, but only the target value is enough as it does not specify the accuracy format. Now you can get the difference. In a Graphic Interchange Format (GIF), here is what we currently achieved.
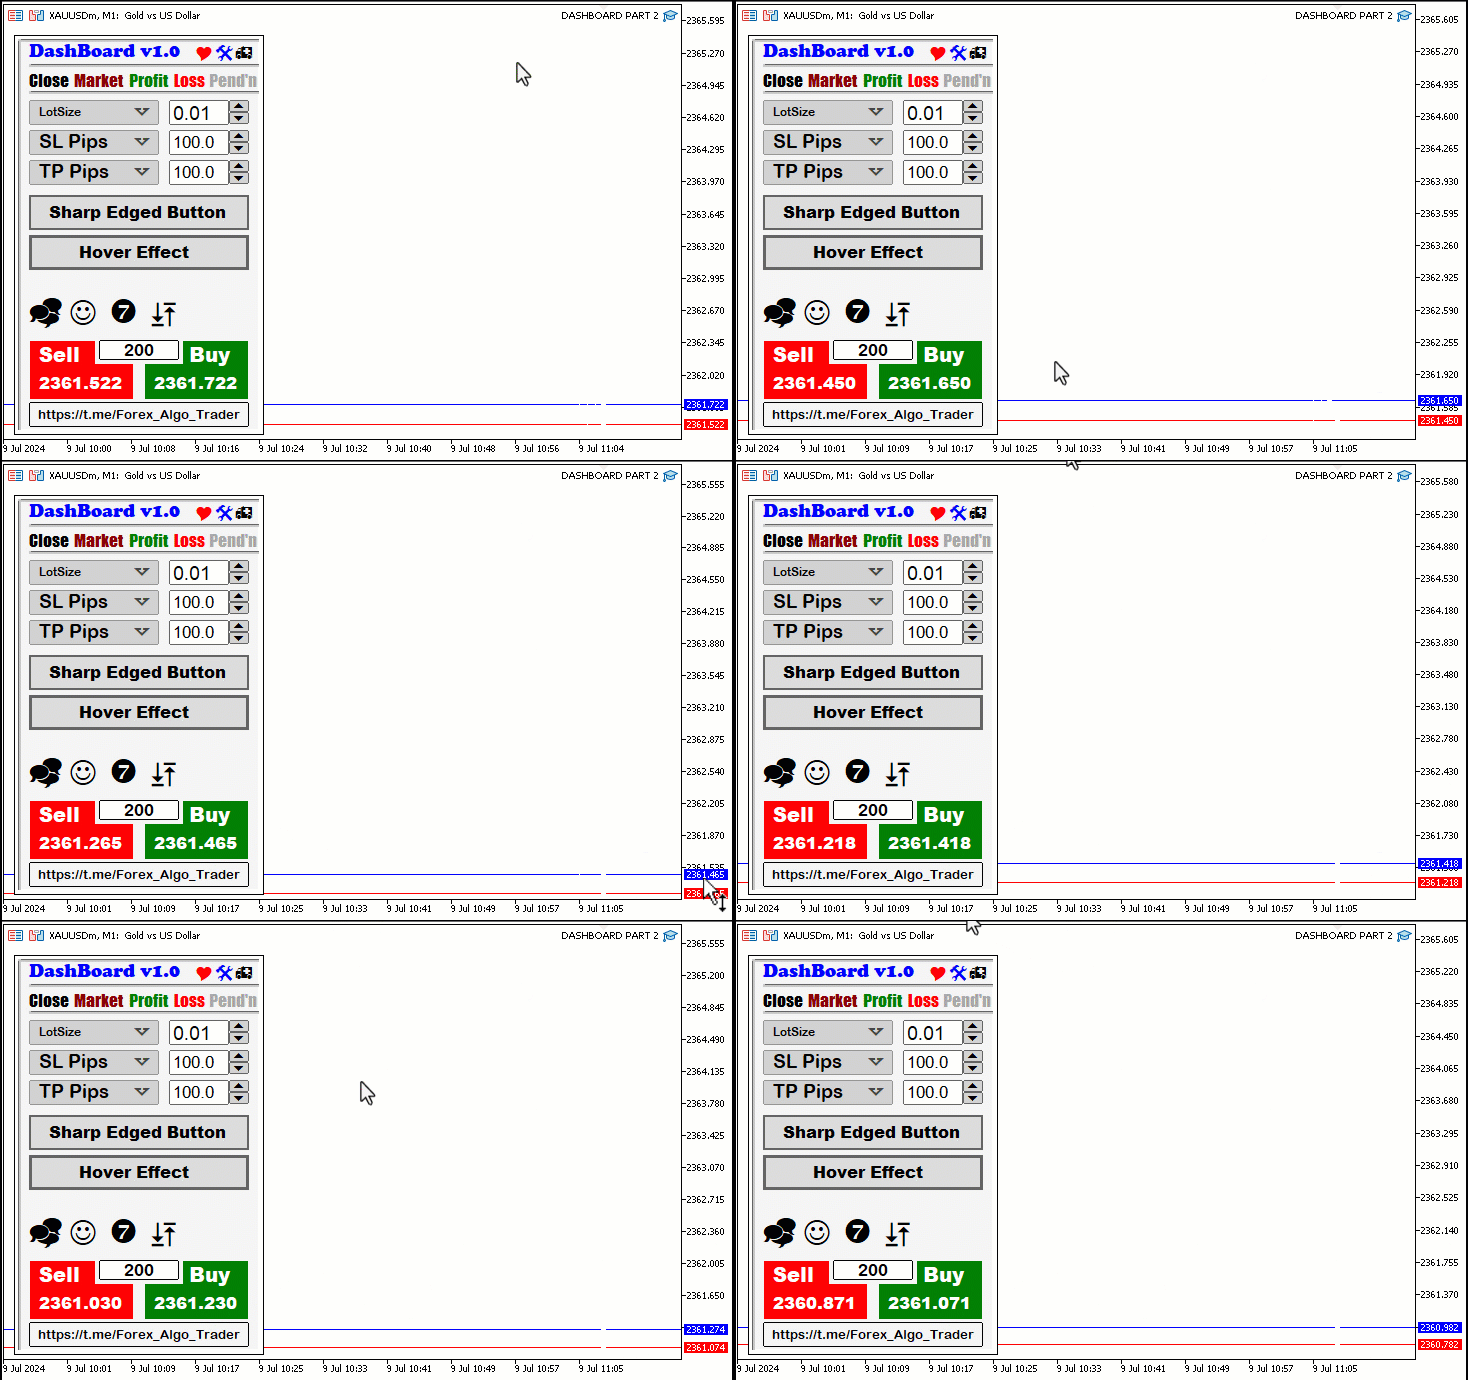
That is all that we need to do on the event handler and the full source code that is responsible for updating the prices is as below:
//+------------------------------------------------------------------+
//| Expert tick function                                             |
//+------------------------------------------------------------------+
void OnTick(){
    // --- Update price quotes ---

    // Set the text of the "SELL PRICE" label to the current Bid price
    ObjectSetString(0, LABEL_SELL_PRICE, OBJPROP_TEXT, DoubleToString(Bid(), _Digits));

    // Set the text of the "BUY PRICE" label to the current Ask price
    ObjectSetString(0, LABEL_BUY_PRICE, OBJPROP_TEXT, DoubleToString(Ask(), _Digits));

    // Set the text of the "SPREAD" button to the current spread value
    ObjectSetString(0, BTN_SPREAD, OBJPROP_TEXT, IntegerToString(Spread()));
}
//+------------------------------------------------------------------+
Now, the first automation component is done. That was easy, right? We proceed to the other components of our GUI panel then. The automation of the rest elements will be done inside the OnChartEvent function handler, so let us take a deeper view of its input parameters as well as its functions.
void OnChartEvent(const int id,
                  const long &lparam,
                  const double &dparam,
                  const string &sparam)
{

        ...

}
The purpose of the function is to handle chart changes made by either a user or an MQL5 program. Thus, the interactions that the user will be making such as moving the mouse, editing the button fields, and clicking labels and buttons will be captured and handled by this event handler. Let’s break down its arguments for more interpretation:
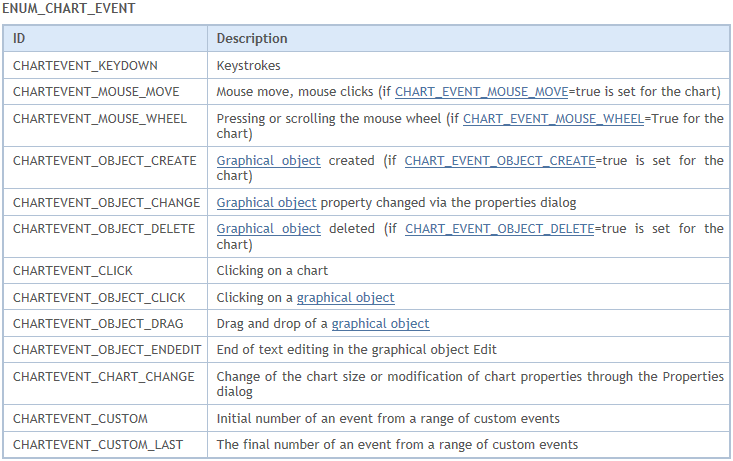
- id: This parameter represents the event ID and corresponds to one of the 11 predefined event types. These include events like key presses, mouse movements, object creation, chart changes, and custom events. For custom events, you can use IDs from CHARTEVENT_CUSTOM to CHARTEVENT_CUSTOM_LAST. The 11 event types are as shown below;
- lparam: A long-type event parameter. Its value depends on the specific event being handled. For example, it could represent a key code during a key press event.
- dparam: A double-type event parameter. Similar to lparam, its value varies based on the event type. For instance, during a mouse movement event, it might convey the mouse cursor’s position.
- sparam: A string-type event parameter. Again, its meaning depends on the event. For instance, during object creation, it could hold the name of the newly created object.
To easily showcase this more understandably, inside the function, let us have a printout that contains all four arguments to the journal.
// Print the 4 function parameters
Print("ID = ",id,", LPARAM = ",lparam,", DPARAM = ",dparam,", SPARAM = ",sparam);
This function will print the chart event ID, its long-type event value, double-type event value, and the string-type value. Let us have a look at the following GIF for easier referencing.
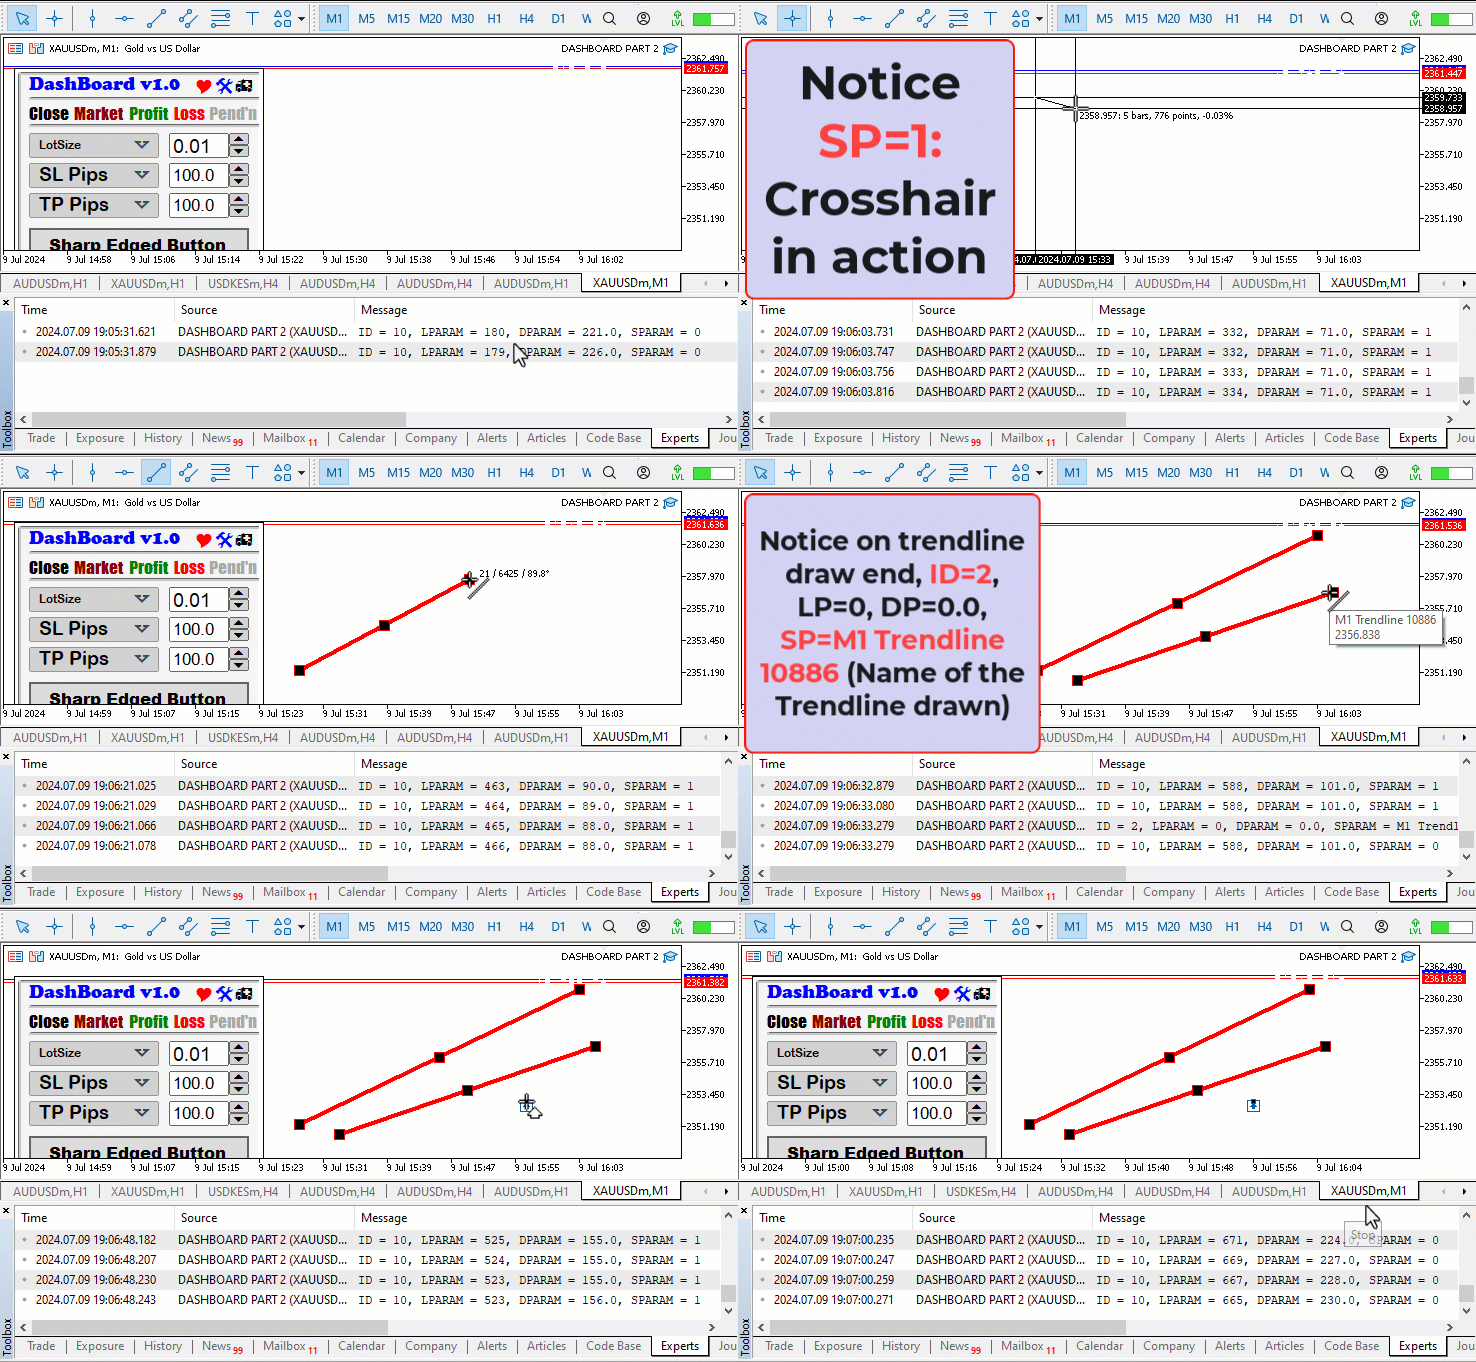
From the GIF provided, everything should now be clear. We now graduate to capturing chart click events on the GUI panel elements. Thus, our ID will be "CHARTEVENT_OBJECT_CLICK".
   //Print("ID = ",id,", LPARAM = ",lparam,", DPARAM = ",dparam,", SPARAM = ",sparam);

   if (id==CHARTEVENT_OBJECT_CLICK){

        ...

   }
We first comment out the previous line of code because we do not want to spam our journal with irrelevant information. The two slashes (//) used are called single-line comments and comment out a code from their start and continue until the end of the line, hence their name 'single-line' comment. Comments are particularly ignored by the computer during execution. We use the if statement to check out whether there was an object click. This is achieved by equating chart event ID to the object click enumerations. If we did click an object, let us print the arguments and see what we get. The following code is used.
   if (id==CHARTEVENT_OBJECT_CLICK){
      Print("ID = ",id,", LM = ",lparam,", DM = ",dparam,", SPARAM = ",sparam);

      ...

   }
In the printout function, we just changed the "LPARAM" to "LP" and "DPARAM" to "DP" so that we can only concentrate on the chart event ID and the name of the clicked object, from there we will get the object's ID and take action if necessary. Below is an illustration of the logic:
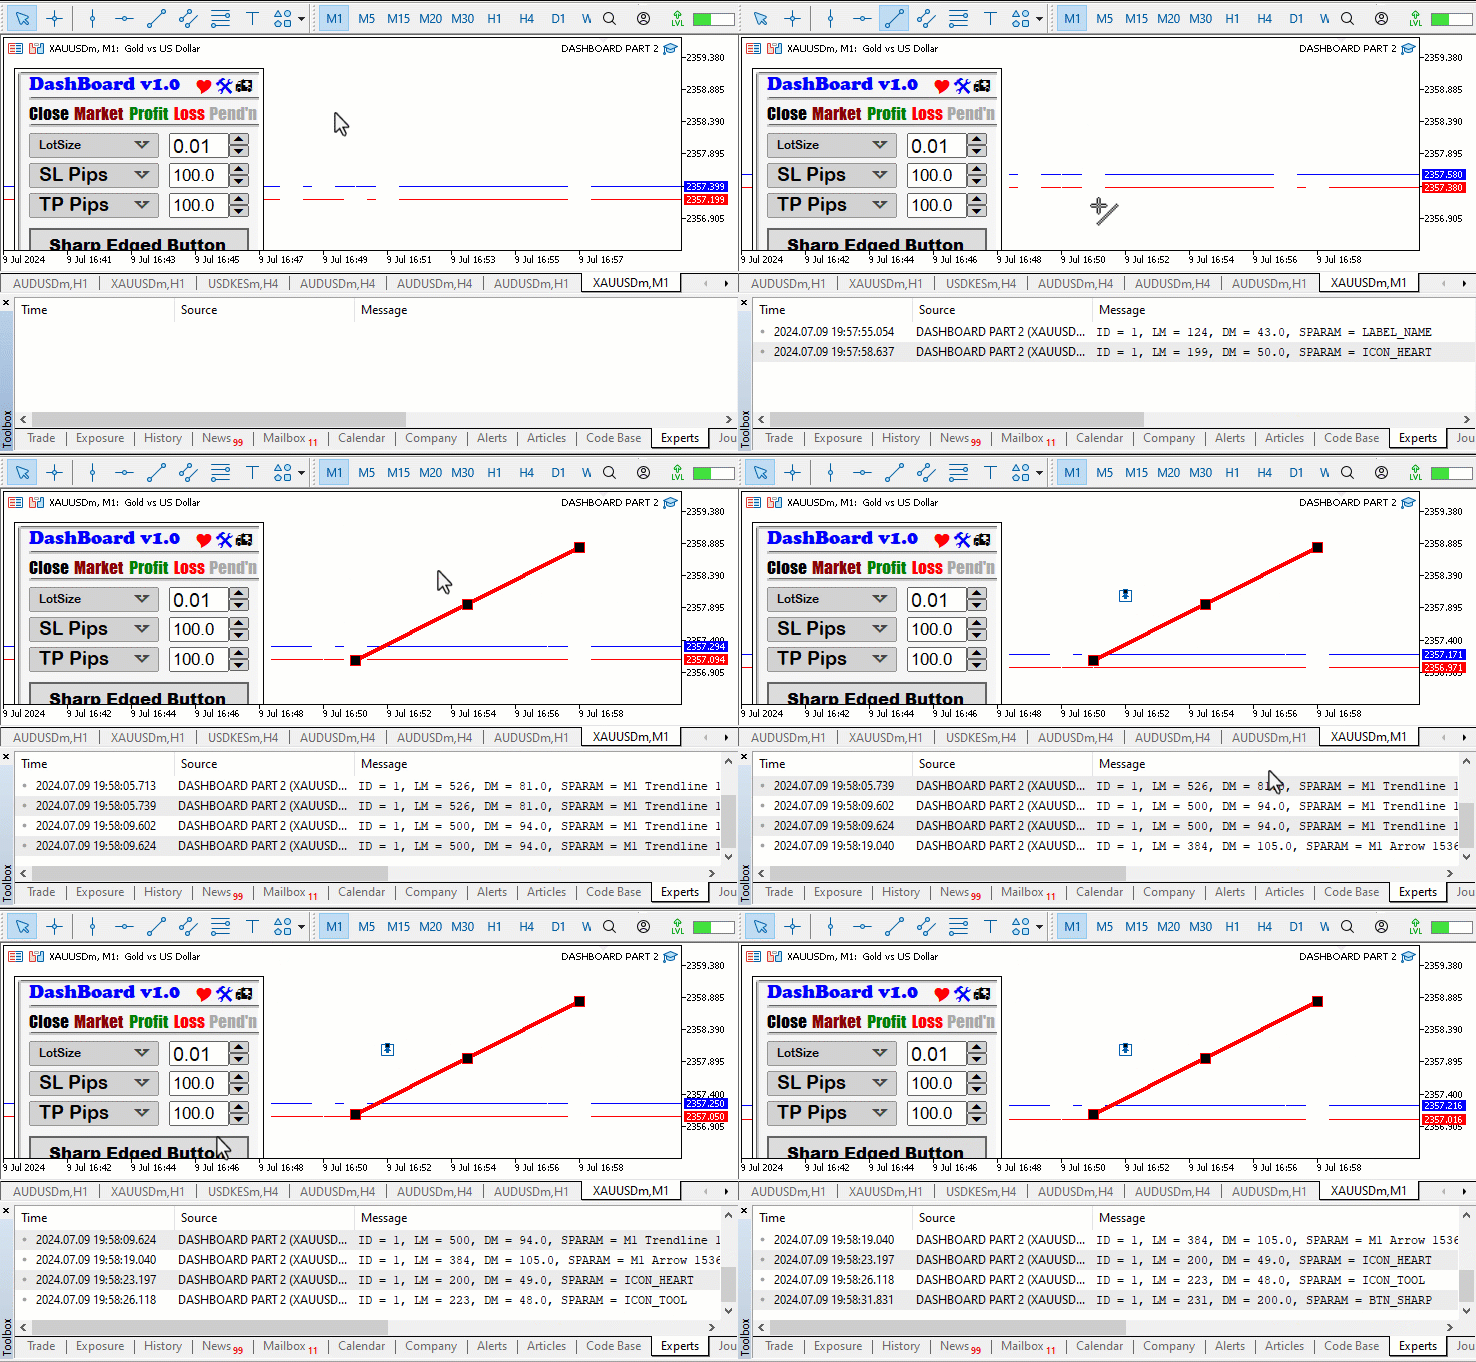
The first component automation feature will be on the destruction of the GUI panel when the ambulance icon is clicked. From the above GIF, you can see that once an object is clicked, the name of the object is stored in the string-event type variable. Thus, from this variable, we can get the name of the clicked object and check whether it is our desired object and if so, we can take action, in our case destroy the panel.
      //--- if icon car is clicked, destroy the panel
      if (sparam==ICON_CAR){
         Print("BTN CAR CLICKED. DESTROY PANEL NOW");
         destroyPanel();
         ChartRedraw(0);
      }
Another if statement is used to check the instance where the car icon is clicked and if that is the case, we inform of the instance that it was clicked and the destruction of the panel can be done since it is the right icon for the job. We afterward call the "destroyPanel" function, whose objective is to delete every element of our panel. This function should be familiar to you already as we used it in our previous article, which is part 1. Finally, we call the ChartRedraw function. The function is used to force a redrawing of a specified chart. When you modify chart properties or objects (such as indicators, lines, or shapes) programmatically, the changes might not be immediately reflected on the chart. By calling it, you ensure that the chart updates and displays the latest changes. In a visual representation, here are the results we get.
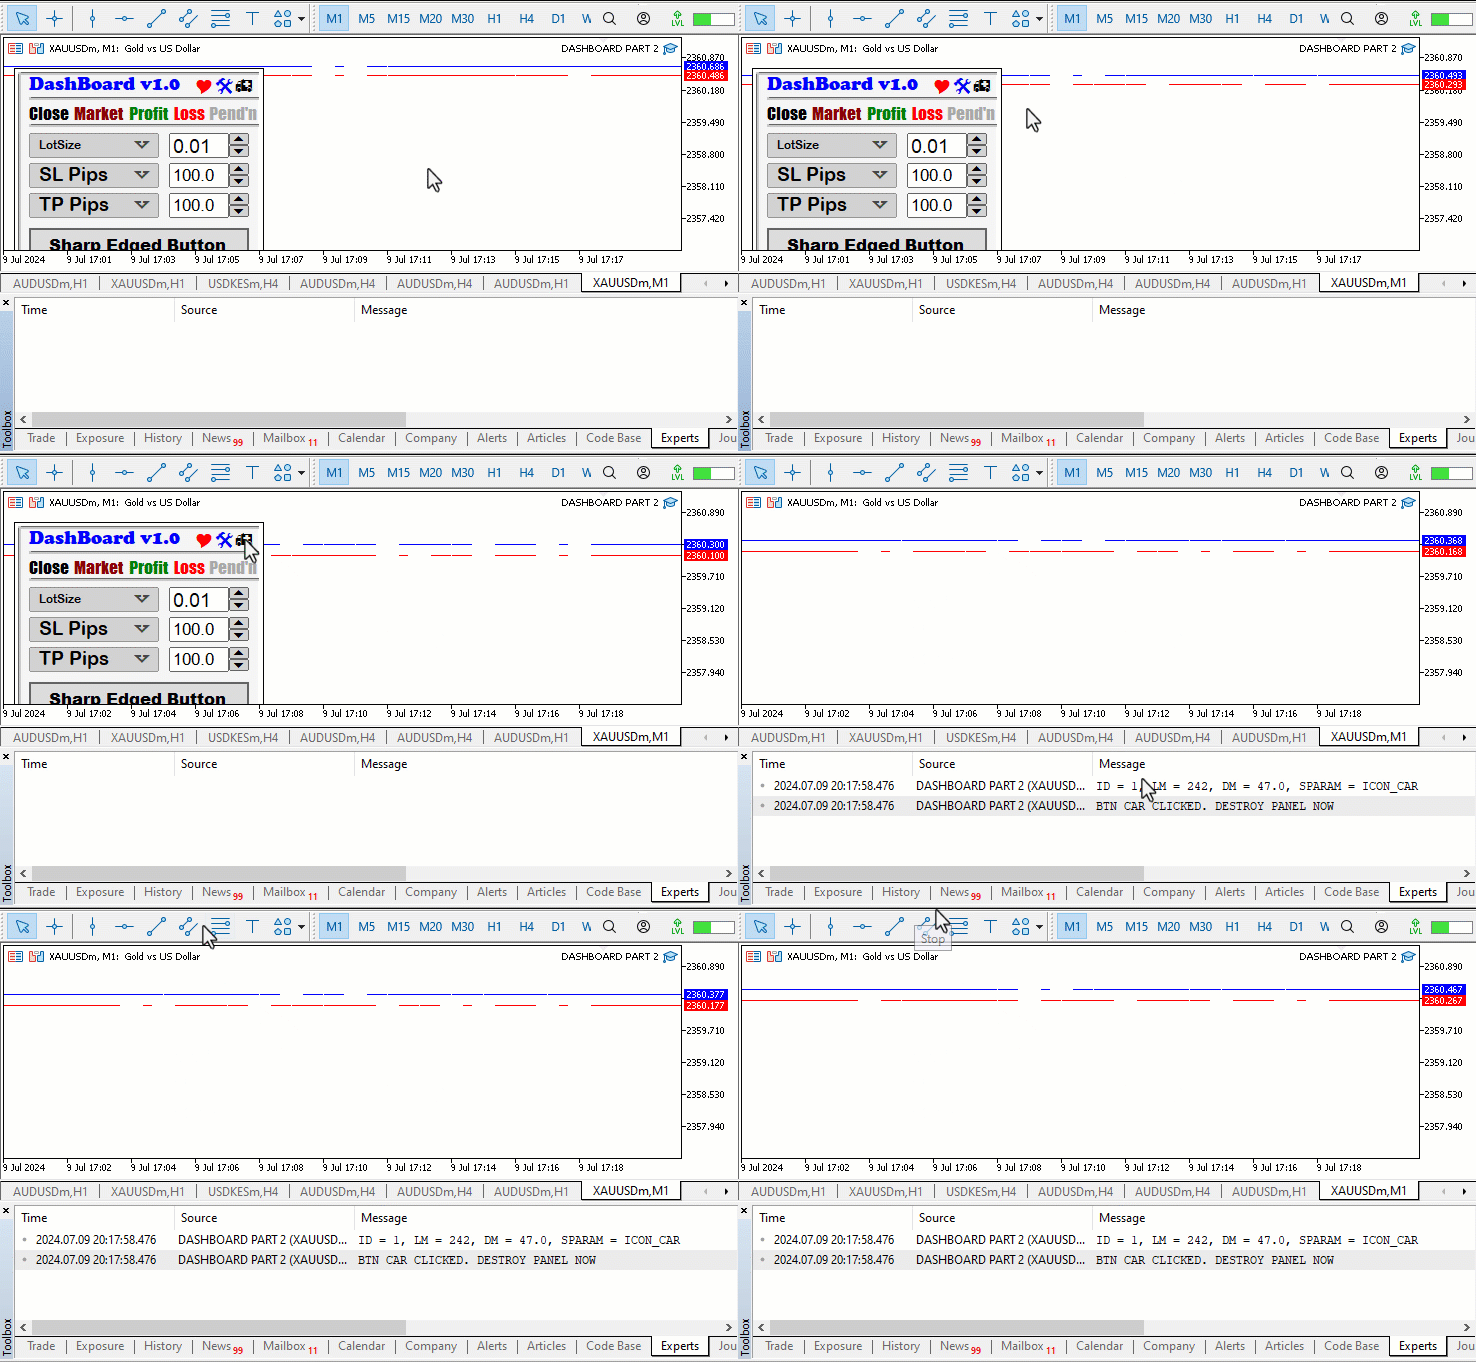
You can see the logic is quite simple. The same method is to be employed in the other object clicks. Let us now proceed to the event when the close button label is clicked. When this happens, we need to close all open positions and delete all pending orders. This will ensure that we do not have any market orders. An else-if statement will be needed to check the condition whether the close button was clicked.
      else if (sparam == BTN_CLOSE) {
          // Button "Close" clicked. Close all orders and positions now.
          Print("BTN CLOSE CLICKED. CLOSE ALL ORDERS & POSITIONS NOW");

          // Store the original color of the button
          long originalColor = ObjectGetInteger(0, BTN_CLOSE, OBJPROP_COLOR);

          // Change the button color to red (for visual feedback)
          ObjectSetInteger(0, BTN_CLOSE, OBJPROP_COLOR, clrRed);

          ...

      }
Here, we want to add a little tweak to the event instance. We want that when the button is clicked, we change the color of the button indicating that the button was clicked so the process to close the market orders should be initiated. After complete closure, we will need to reset the button color to its default color property. To get the original color of the button label, we declare a long data type variable named "originalColor" and in it store the default color of the button. To retrieve the button's color, we use the ObjectGetInteger function, pass in the chart ID, button name, and the button property, color in our case. After storing the original color, we can now tamper with the color of the button label as we already have a reserve of its original value. We use the ObjectSetInteger to set the color of the object to red. While in that state, we initiate the order closure process.
          // Iterate through all open positions
          for (int i = 0; i <= PositionsTotal(); i++) {
              ulong ticket = PositionGetTicket(i);
              if (ticket > 0) {
                  if (PositionSelectByTicket(ticket)) {
                      // Check if the position symbol matches the current chart symbol
                      if (PositionGetString(POSITION_SYMBOL) == _Symbol) {
                          obj_Trade.PositionClose(ticket); // Close the position
                      }
                  }
              }
          }
We use a for loop to iterate through all open positions and close them. To get all the open positions, we use an in-built MQL5 function PositionsTotal. This function will return the number of open positions in that particular trading account. We then get the ticket of that position by providing the index of the position in the PositionGetTicket function and store it in the ulong data type variable named "ticket". The function returns the ticket of the specified position and in case of a failure, it returns 0. For us to proceed, we need to make sure that we have a ticket. This is achieved by using the if statement to make sure that the value of the ticket is greater than 0. If that is the case, it means that we have a ticket and we continue to select the ticket so we can work with it. If we successfully select the ticket, we can retrieve the position's information. Since there could be a couple of positions in that particular trading account, we make sure that we only close positions associated with that particular currency pair. Finally, we close that position by the ticket number and proceed to do the same for other open positions if any.
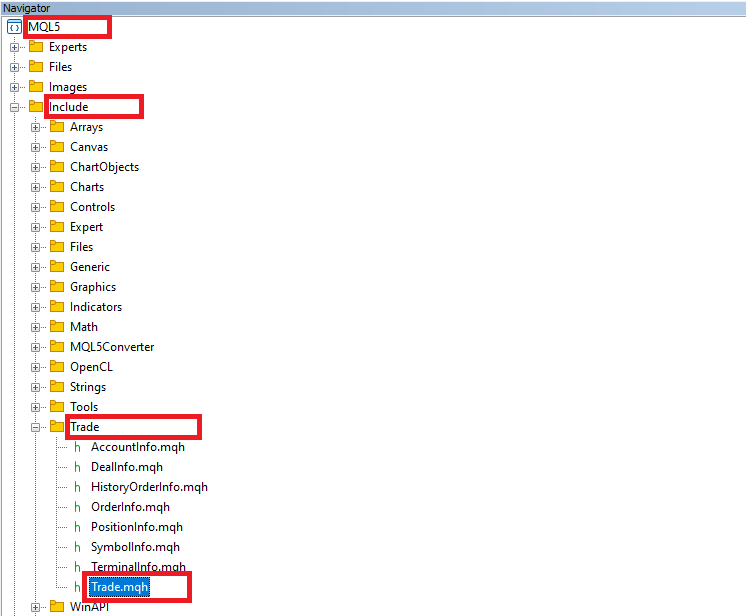
However, to close the position we use "obj_Trade" followed by a dot operator. This is called a class object. To easily do the position closure operation, we need to include a class instance that aids the process. Thus, we include a trade instance by using #include at the beginning of the source code. This gives us access to the CTrade class, which we use to create a trade object. This is crucial as we need it to do the trade operations.
#include <Trade/Trade.mqh>
CTrade obj_Trade;
The preprocessor will replace the line #include <Trade/Trade.mqh> with the content of the file Trade.mqh. Angle brackets indicate that the Trade.mqh file will be taken from the standard directory (usually it is terminal_installation_directory\MQL5\Include). The current directory is not included in the search. The line can be placed anywhere in the program, but usually, all inclusions are placed at the beginning of the source code, for a better code structure and easier reference. Declaration of the obj_Trade object of the CTrade class will give us access to the methods contained in that class easily, thanks to the MQL5 developers.
To delete the pending orders, the same iteration logic is used.
          // Iterate through all pending orders
          for (int i = 0; i <= OrdersTotal(); i++) {
              ulong ticket = OrderGetTicket(i);
              if (ticket > 0) {
                  if (OrderSelect(ticket)) {
                      // Check if the order symbol matches the current chart symbol
                      if (OrderGetString(ORDER_SYMBOL) == _Symbol) {
                          obj_Trade.OrderDelete(ticket); // Delete the order
                      }
                  }
              }
          }
The major difference in the iteration logic is that to get the total orders, we use the OrdersTotal function and everything else is associated with orders. After all positions are closed and orders deleted, we will need to reset the button label color to its original color.
          // Reset the button color to its original value
          Print("Resetting button to original color");
          ObjectSetInteger(0, BTN_CLOSE, OBJPROP_COLOR, originalColor);

          // Force a redrawing of the chart to reflect the changes
          ChartRedraw(0);
The "ObjectSetInteger" function is used by passing in the chart ID, the button's name, the color property, and the original color. This is where now our prior variable kicks in very handy. We do not have to always cram the original color of an object while we can store and retrieve it automatically. The full code responsible for closing all open positions and deleting all open orders is as below:
      else if (sparam == BTN_CLOSE) {
          // Button "Close" clicked. Close all orders and positions now.
          Print("BTN CLOSE CLICKED. CLOSE ALL ORDERS & POSITIONS NOW");

          // Store the original color of the button
          long originalColor = ObjectGetInteger(0, BTN_CLOSE, OBJPROP_COLOR);

          // Change the button color to red (for visual feedback)
          ObjectSetInteger(0, BTN_CLOSE, OBJPROP_COLOR, clrRed);

          // Iterate through all open positions
          for (int i = 0; i <= PositionsTotal(); i++) {
              ulong ticket = PositionGetTicket(i);
              if (ticket > 0) {
                  if (PositionSelectByTicket(ticket)) {
                      // Check if the position symbol matches the current chart symbol
                      if (PositionGetString(POSITION_SYMBOL) == _Symbol) {
                          obj_Trade.PositionClose(ticket); // Close the position
                      }
                  }
              }
          }

          // Iterate through all pending orders
          for (int i = 0; i <= OrdersTotal(); i++) {
              ulong ticket = OrderGetTicket(i);
              if (ticket > 0) {
                  if (OrderSelect(ticket)) {
                      // Check if the order symbol matches the current chart symbol
                      if (OrderGetString(ORDER_SYMBOL) == _Symbol) {
                          obj_Trade.OrderDelete(ticket); // Delete the order
                      }
                  }
              }
          }

          // Reset the button color to its original value
          Print("Resetting button to original color");
          ObjectSetInteger(0, BTN_CLOSE, OBJPROP_COLOR, originalColor);

          // Force a redrawing of the chart to reflect the changes
          ChartRedraw(0);
      }
It is always recommended that after every addition of logic to a panel, compile and run the code to make sure that everything is working out as anticipated before graduation to another control logic. This is what we have achieved so far.
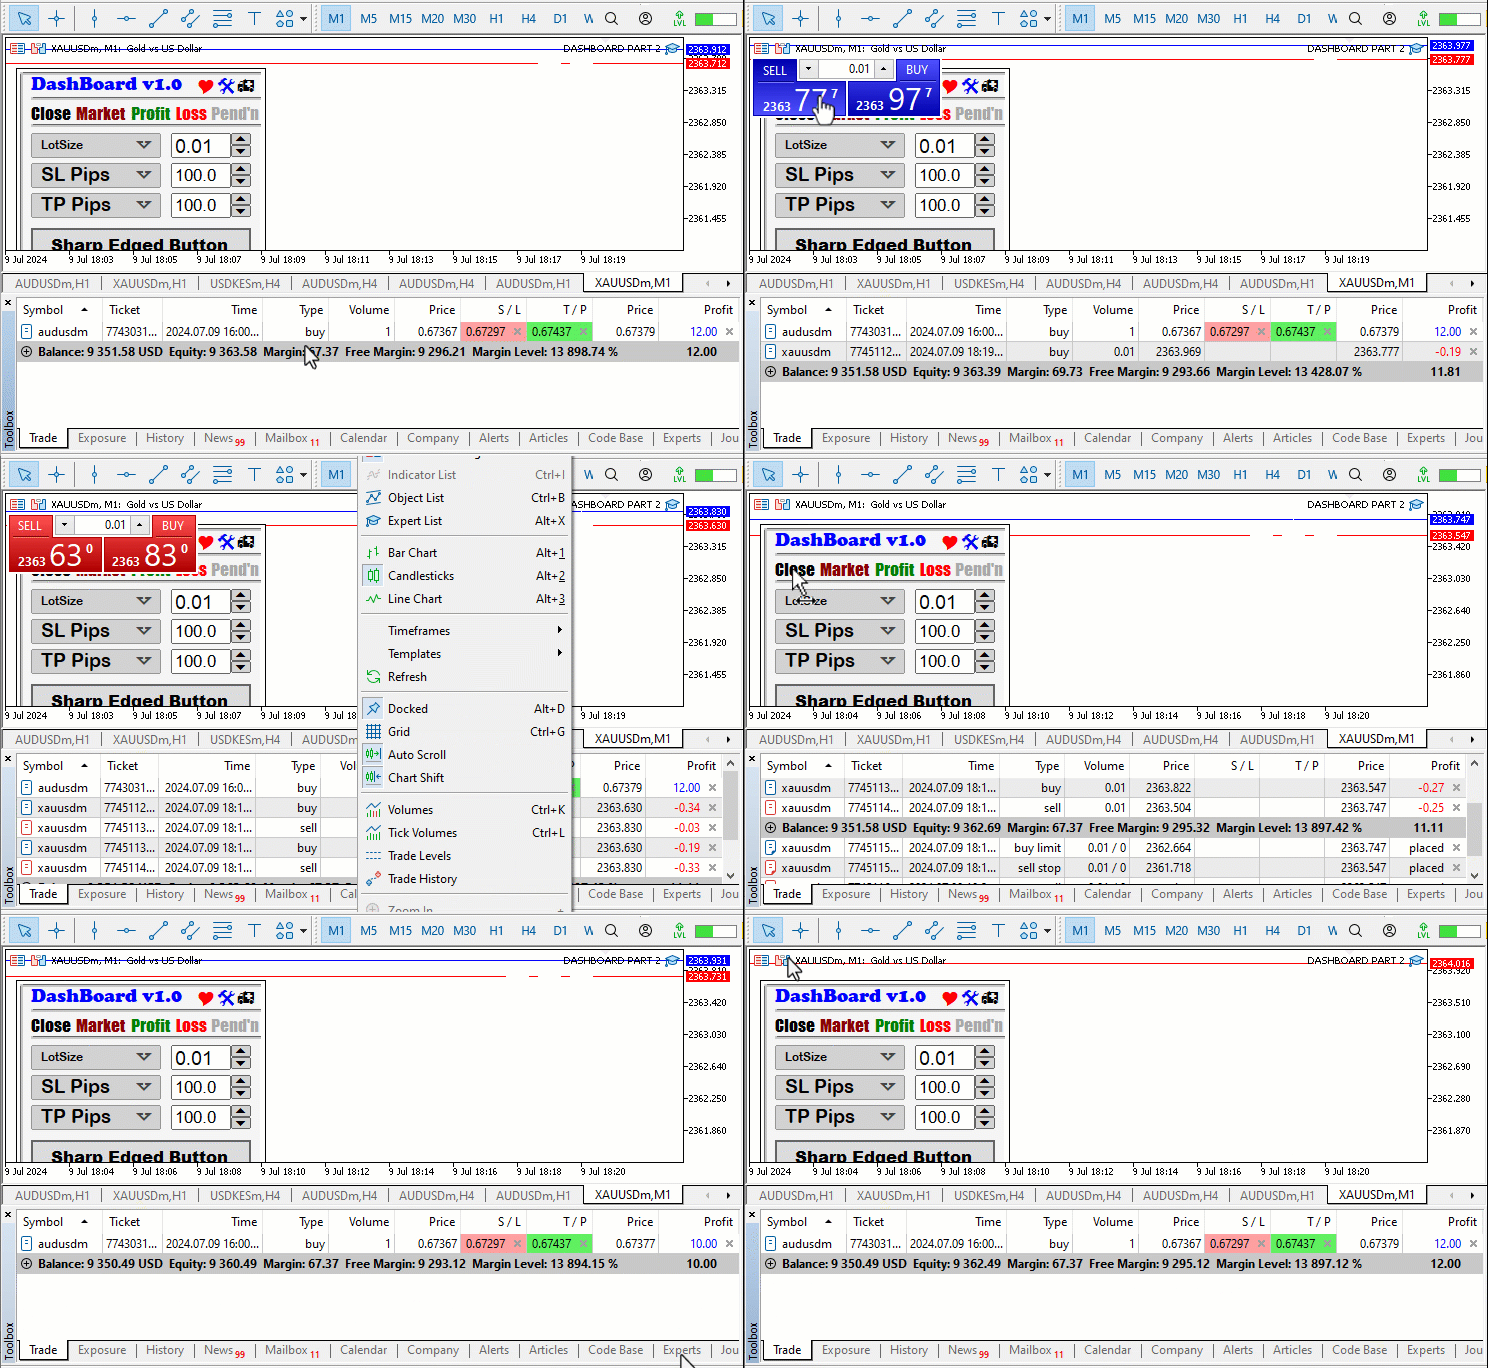
Now we can close all the positions and orders successfully. Notice how when the close button is clicked, while positions are being closed, the button's label color remains red until all are closed and finally resumes its original color. Again, you can notice that we do not close the "AUDUSD" buy position because the Expert Advisor (EA) is currently attached to the Gold symbol. Now the same logic can be used to set the other button labels' responsiveness.
      else if (sparam == BTN_MARKET) {
          // Button "Market" clicked. Close all positions related to the current chart symbol.
          Print(sparam + " CLICKED. CLOSE ALL POSITIONS NOW");

          // Iterate through all open positions
          for (int i = 0; i <= PositionsTotal(); i++) {
              ulong ticket = PositionGetTicket(i);
              if (ticket > 0) {
                  if (PositionSelectByTicket(ticket)) {
                      // Check if the position symbol matches the current chart symbol
                      if (PositionGetString(POSITION_SYMBOL) == _Symbol) {
                          obj_Trade.PositionClose(ticket); // Close the position
                      }
                  }
              }
          }

          // Force a redrawing of the chart to reflect the changes
          ChartRedraw(0);
      }
The difference in this code from the close button's code is that we get rid of the order closure iteration since we want to only close all the opened positions. To close all the positions that are in profit, the code snippet below is employed.
      else if (sparam == BTN_PROFIT) {
          // Button "Profit" clicked. Close all positions in profit now.
          Print(sparam + " CLICKED. CLOSE ALL POSITIONS IN PROFIT NOW");

          // Iterate through all open positions
          for (int i = 0; i <= PositionsTotal(); i++) {
              ulong ticket = PositionGetTicket(i);
              if (ticket > 0) {
                  if (PositionSelectByTicket(ticket)) {
                      // Check if the position symbol matches the current chart symbol
                      if (PositionGetString(POSITION_SYMBOL) == _Symbol) {
                          double profit_or_loss = PositionGetDouble(POSITION_PROFIT);
                          if (profit_or_loss > 0) {
                              obj_Trade.PositionClose(ticket); // Close the position
                          }
                      }
                  }
              }
          }

          // Force a redrawing of the chart to reflect the changes
          ChartRedraw(0);
      }
The major difference in this code snippet from the previous one which is supposed to close all the opened positions, is that we add an extra logic to check whether the position's profit is above zero, meaning that we close only the positions that are in profit. Below is the specific logic:
                          double profit_or_loss = PositionGetDouble(POSITION_PROFIT);
                          if (profit_or_loss > 0) {
                              obj_Trade.PositionClose(ticket); // Close the position
                          }
We define a double data type variable named "profit_or_loss" and in it store the current floating profit or loss of the selected position. If the value is greater than 0, we close the position since it is already in profit. The same logic is transferred to the loss button as below, where we only close a position if it is in a loss.
      else if (sparam == BTN_LOSS) {
          // Button "Loss" clicked. Close all positions in loss now.
          Print(sparam + " CLICKED. CLOSE ALL POSITIONS IN LOSS NOW");

          // Iterate through all open positions
          for (int i = 0; i <= PositionsTotal(); i++) {
              ulong ticket = PositionGetTicket(i);
              if (ticket > 0) {
                  if (PositionSelectByTicket(ticket)) {
                      // Check if the position symbol matches the current chart symbol
                      if (PositionGetString(POSITION_SYMBOL) == _Symbol) {
                          double profit_or_loss = PositionGetDouble(POSITION_PROFIT);
                          if (profit_or_loss < 0) {
                              obj_Trade.PositionClose(ticket); // Close the position
                          }
                      }
                  }
              }
          }

          // Force a redrawing of the chart to reflect the changes
          ChartRedraw(0);
      }
Finally, to close the pending orders when the pending button label is clicked, the orders iteration is utilized and its code is as below.
      else if (sparam == BTN_PENDING) {
          // Button "Pending" clicked. Delete all pending orders related to the current chart symbol.
          Print(sparam + " CLICKED. DELETE ALL PENDING ORDERS NOW");

          // Iterate through all pending orders
          for (int i = 0; i <= OrdersTotal(); i++) {
              ulong ticket = OrderGetTicket(i);
              if (ticket > 0) {
                  if (OrderSelect(ticket)) {
                      // Check if the order symbol matches the current chart symbol
                      if (OrderGetString(ORDER_SYMBOL) == _Symbol) {
                          obj_Trade.OrderDelete(ticket); // Delete the order
                      }
                  }
              }
          }

          // Force a redrawing of the chart to reflect the changes
          ChartRedraw(0);
      }
Below is the milestone visualization.
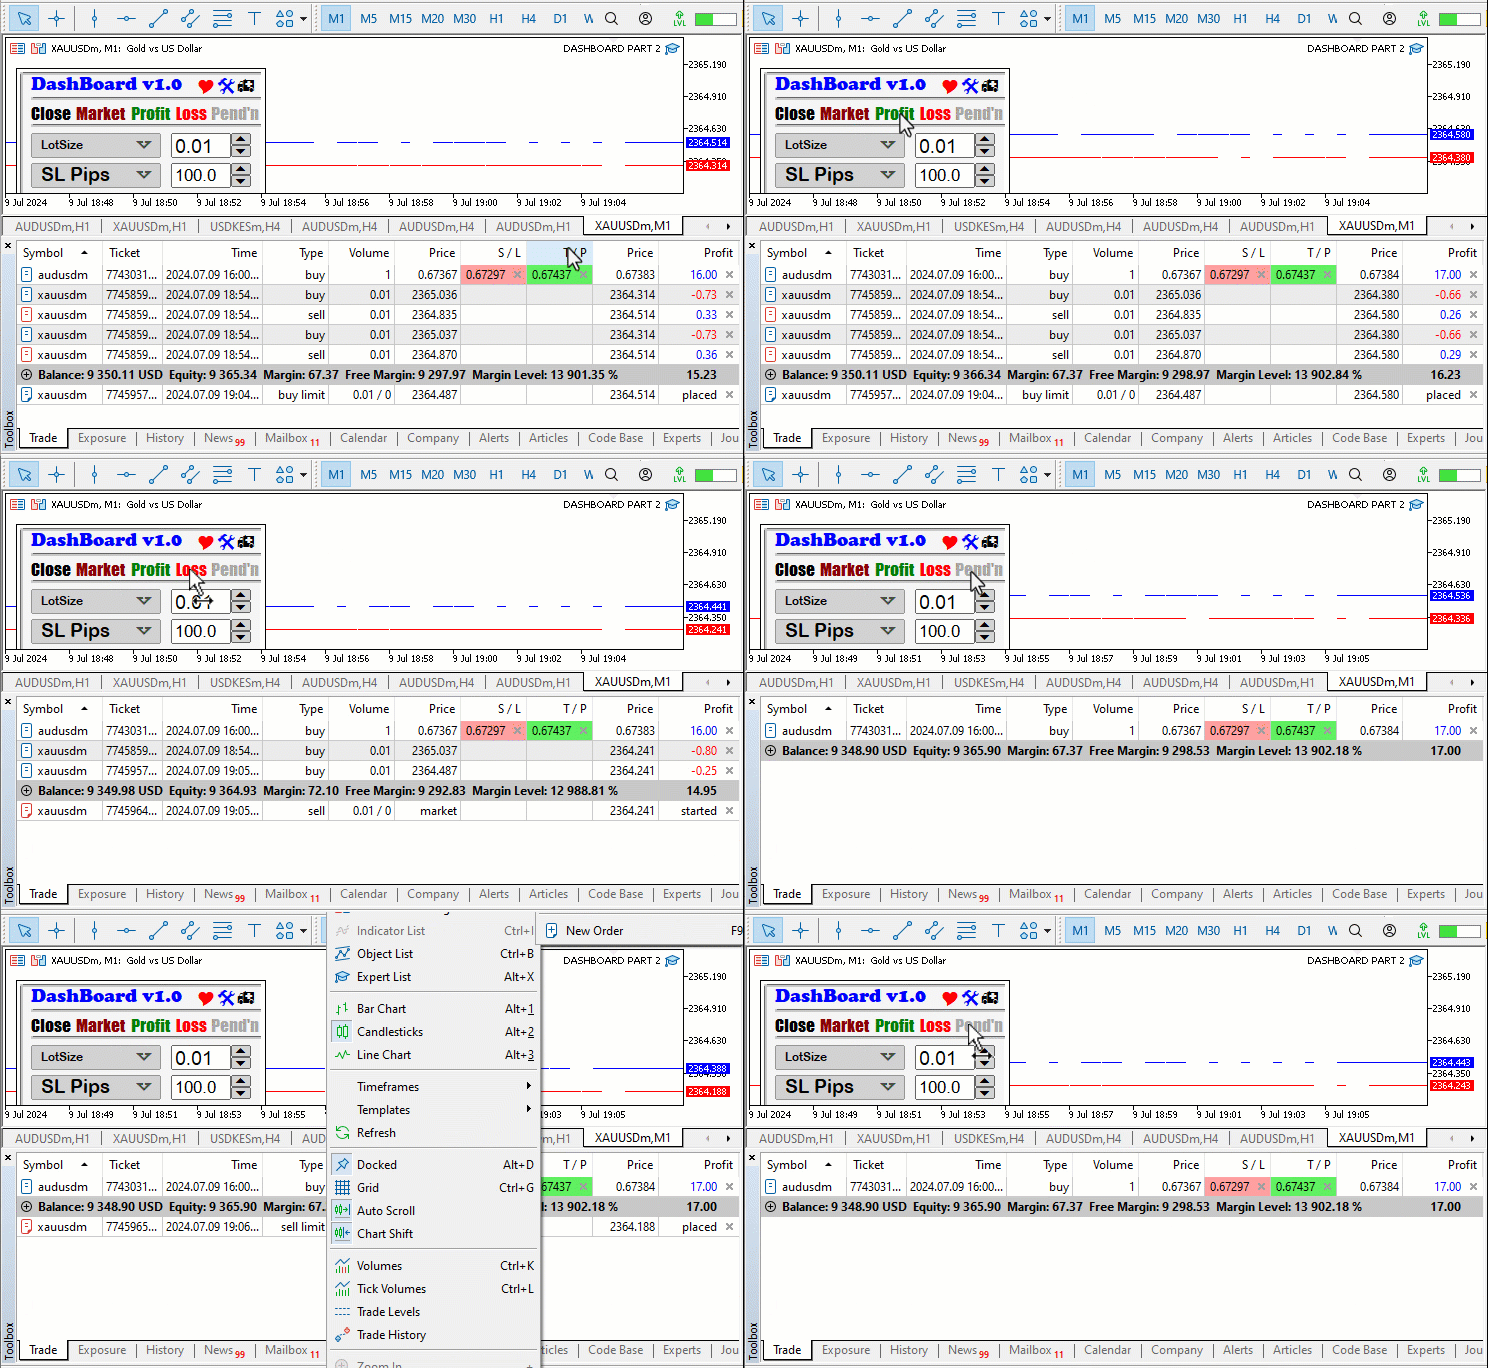
As illustrated, it is evident that our panel header buttons are now responsive when clicked. We now graduate to adding life to the trading volume button. We want that when either the button or the label itself is clicked or when the drop-down icon is clicked, we create another sub-panel with the various list of options the user can choose from. Below is the logic:
      else if (sparam == BTN_LOTS || sparam == LABEL_LOTS || sparam == ICON_DROP_DN1) {
          // Button "Lots," label "Lots," or dropdown icon clicked. Create a dropdown list.
          Print(sparam + " CLICKED. CREATE A DROPDOWN LIST");

          // Enable the button for dropdown functionality
          ObjectSetInteger(0, BTN_LOTS, OBJPROP_STATE, true);

          // Create the dropdown list
          createDropDown();

          // Redraw the chart to reflect the changes
          ChartRedraw(0);
      }
Once the button is clicked, we inform of the instance and set the button's state to true. This makes the button turn darker indicating that the button has been clicked. Once this happens, we create the dropdown list by calling the custom "createDropDown" function, whose code snippet was earlier on provided in the first article. Once the creation is done, the user will have to choose among the options. Thus, if an option is chosen by clicking on it, we will have to capture and set the button's label to the user's choice as well as destroy the drop-down list of the options panel. We achieve this by using the code snippet below.
      else if (sparam == LABEL_OPT1) {
          // Label "Lots" clicked.
          Print("LABEL LOTS CLICKED");

          // Get the text from LABEL_OPT1
          string text = ObjectGetString(0, LABEL_OPT1, OBJPROP_TEXT);

          // Get the state of the button (enabled or disabled)
          bool btnState = ObjectGetInteger(0, BTN_LOTS, OBJPROP_STATE);

          // Set the text of LABEL_LOTS to match LABEL_OPT1
          ObjectSetString(0, LABEL_LOTS, OBJPROP_TEXT, text);

          // Destroy the dropdown list
          destroyDropDown();

          // If the button was previously enabled, disable it
          if (btnState == true) {
              ObjectSetInteger(0, BTN_LOTS, OBJPROP_STATE, false);
          }

          // Redraw the chart
          ChartRedraw(0);
      }
First, we check if the first option was clicked. If so, we get the text value of the selected option and set it to the text value of the trading volume button. We use a custom "destroyDropDown" function to get rid of the created sup-panel after setting the user's selected choice to the button's state, whose code snippet is as below.
//+------------------------------------------------------------------+
//|    Function to destroy dropdown                                  |
//+------------------------------------------------------------------+

void destroyDropDown(){
   ObjectDelete(0,BTN_DROP_DN);
   ObjectDelete(0,LABEL_OPT1);
   ObjectDelete(0,LABEL_OPT2);
   ObjectDelete(0,LABEL_OPT3);
   ObjectDelete(0,ICON_DRAG);
   ChartRedraw(0);
}
Finally, we check if the state of the button was previously enabled, that is, in clicked mode, and if so, we disable it by setting the state property to false. The same logic is used in the options as well. Their code snippet is provided below:
      else if (sparam==LABEL_OPT2){
         Print("LABEL RISK % CLICKED");
         string text = ObjectGetString(0,LABEL_OPT2,OBJPROP_TEXT);
         bool btnState = ObjectGetInteger(0,BTN_LOTS,OBJPROP_STATE);
         ObjectSetString(0,LABEL_LOTS,OBJPROP_TEXT,text);
         destroyDropDown();
         if (btnState==true){
            ObjectSetInteger(0,BTN_LOTS,OBJPROP_STATE,false);
         }
         ChartRedraw(0);
      }
      else if (sparam==LABEL_OPT3){
         Print("LABEL MONEY CLICKED");
         string text = ObjectGetString(0,LABEL_OPT3,OBJPROP_TEXT);
         bool btnState = ObjectGetInteger(0,BTN_LOTS,OBJPROP_STATE);
         ObjectSetString(0,LABEL_LOTS,OBJPROP_TEXT,text);
         destroyDropDown();
         if (btnState==true){
            ObjectSetInteger(0,BTN_LOTS,OBJPROP_STATE,false);
         }
         ChartRedraw(0);
      }
When the side buttons, that is the increase and decrease buttons, are clicked, we need to make them responsive by increasing or decreasing the respective edit field's value. To start with, let us have a look at the trading volume increment button.
      else if (sparam == BTN_P1) {
          // Button "P1" clicked. Increase trading volume.
          Print(sparam + " CLICKED. INCREASE TRADING VOLUME");

          // Get the current trading volume from EDIT_LOTS
          double trade_lots = (double)ObjectGetString(0, EDIT_LOTS, OBJPROP_TEXT);

          // Increment the trading volume by 0.01
          trade_lots += 0.01;

          // Update the value in EDIT_LOTS
          ObjectSetString(0, EDIT_LOTS, OBJPROP_TEXT, DoubleToString(trade_lots, 2));

          // Redraw the chart
          ChartRedraw(0);
      }
If the trading volume increment button is clicked, we inform of the instance and get ready to increase the value of the lots field by getting its current value. To the retrieved trading volume, we add 0.01 to it as an incremental step value. Operator "+=" is used to ease the process. What it typically does is that it increases the value of lot size by 0.01. It is the same as saying (trade_lots = trade_lots + 0.01). The result is then passed to the lot's field. The double value is converted to a string and an accuracy of 2 digits is applied. The same logic prevails for the decrease button, only that we need to subtract 0.01 from the value.
      else if (sparam == BTN_M1) {
          // Button "M1" clicked. Decrease trading volume.
          Print(sparam + " CLICKED. DECREASE TRADING VOLUME");

          // Get the current trading volume from EDIT_LOTS
          double trade_lots = (double)ObjectGetString(0, EDIT_LOTS, OBJPROP_TEXT);

          // Decrease the trading volume by 0.01
          trade_lots -= 0.01;

          // Update the value in EDIT_LOTS
          ObjectSetString(0, EDIT_LOTS, OBJPROP_TEXT, DoubleToString(trade_lots, 2));

          // Redraw the chart
          ChartRedraw(0);
      }
The same logic applies to the other similar buttons.
      else if (sparam==BTN_P2){
         Print(sparam+" CLICKED. INCREASE STOP LOSS POINTS");
         double sl_points = (double)ObjectGetString(0,EDIT_SL,OBJPROP_TEXT);
         sl_points+=10.0;
         ObjectSetString(0,EDIT_SL,OBJPROP_TEXT,DoubleToString(sl_points,1));
         ChartRedraw(0);
      }
      else if (sparam==BTN_M2){
         Print(sparam+" CLICKED. DECREASE STOP LOSS POINTS");
         double sl_points = (double)ObjectGetString(0,EDIT_SL,OBJPROP_TEXT);
         sl_points-=10.0;
         ObjectSetString(0,EDIT_SL,OBJPROP_TEXT,DoubleToString(sl_points,1));
         ChartRedraw(0);
      }

      else if (sparam==BTN_P3){
         Print(sparam+" CLICKED. INCREASE STOP LOSS POINTS");
         double tp_points = (double)ObjectGetString(0,EDIT_TP,OBJPROP_TEXT);
         tp_points+=10.0;
         ObjectSetString(0,EDIT_TP,OBJPROP_TEXT,DoubleToString(tp_points,1));
         ChartRedraw(0);
      }
      else if (sparam==BTN_M3){
         Print(sparam+" CLICKED. DECREASE STOP LOSS POINTS");
         double tp_points = (double)ObjectGetString(0,EDIT_TP,OBJPROP_TEXT);
         tp_points-=10.0;
         ObjectSetString(0,EDIT_TP,OBJPROP_TEXT,DoubleToString(tp_points,1));
         ChartRedraw(0);
      }
Here, we specify our step to be 10 points for the stop loss and take profit values. To ascertain that we are on the right track, we compile and visualize the results below.
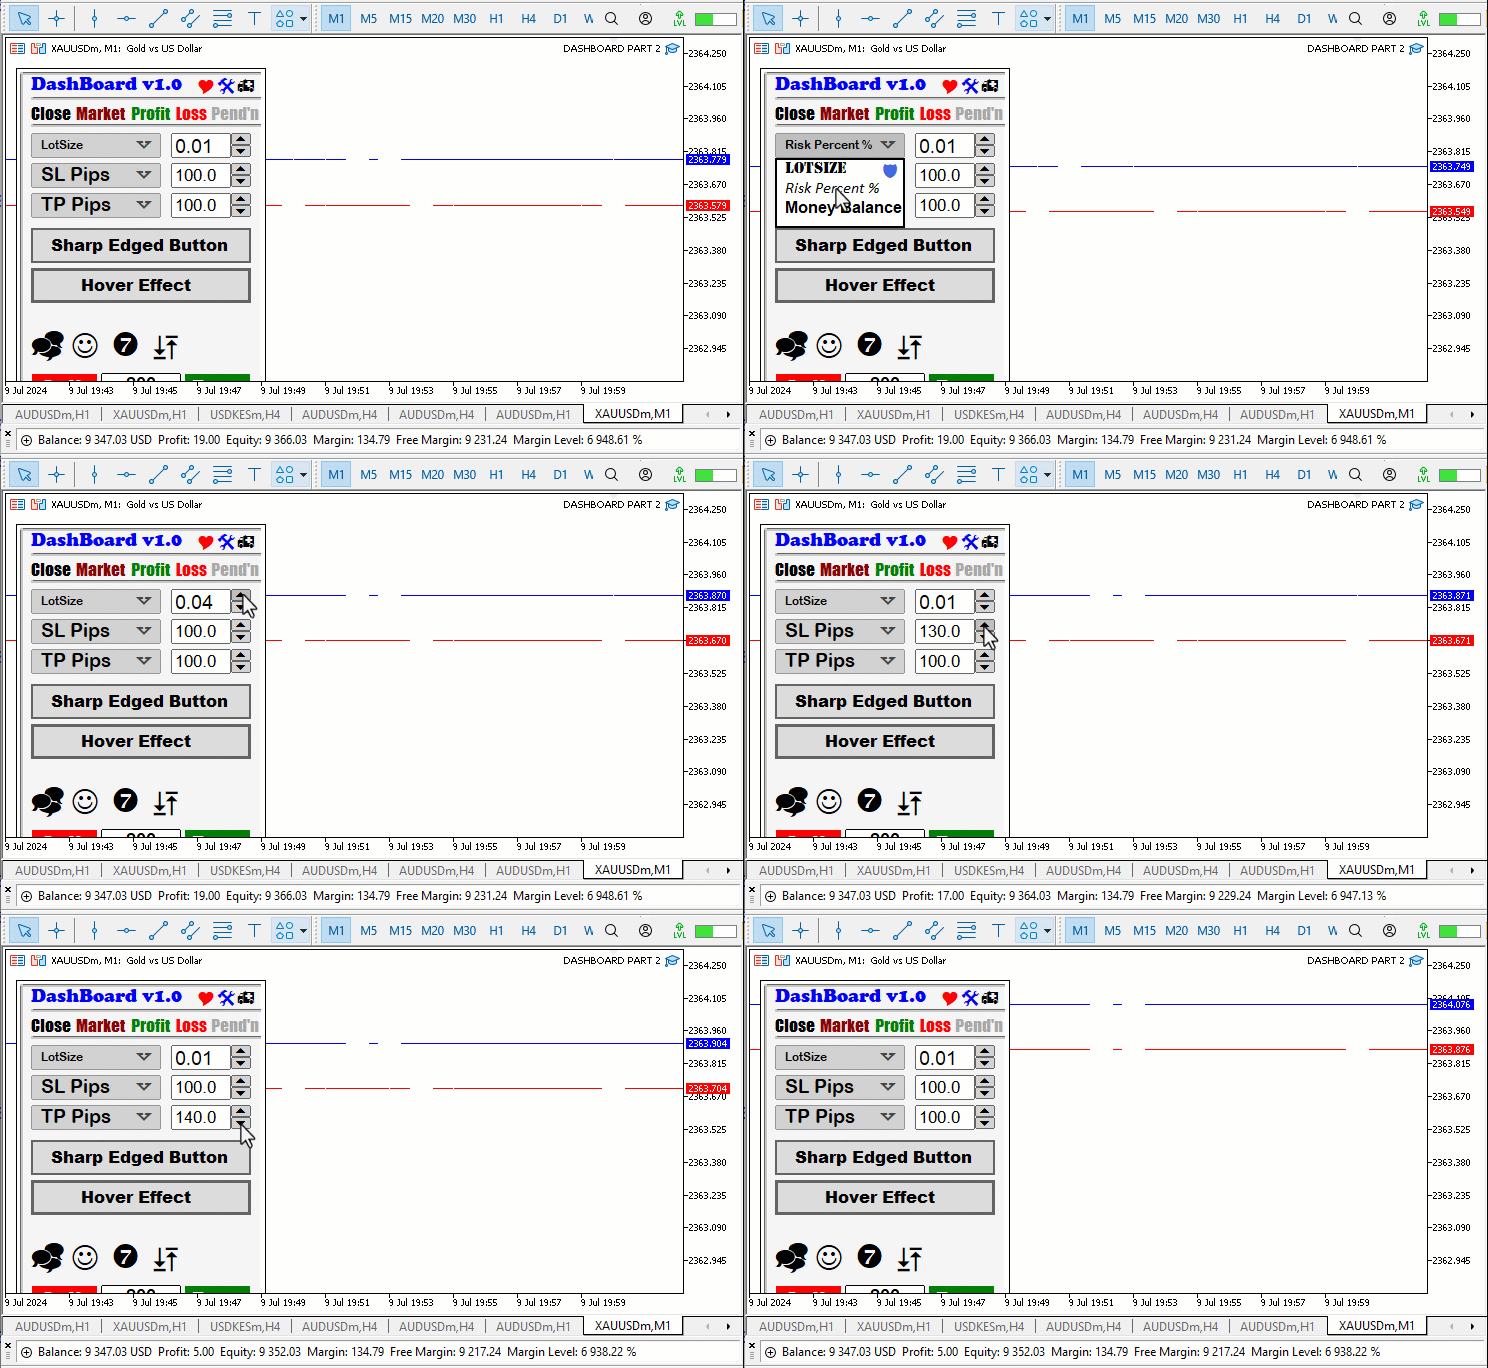
Up to this point, the progress is good. The other remaining buttons are the sell and buy buttons. Their logic is also quite simple and follows the previous logic. For the sell button, we have the following logic.
      else if (sparam==BTN_SELL){
         Print("BTN SELL CLICKED");
         ObjectSetInteger(0,BTN_SELL,OBJPROP_STATE,false);
         double trade_lots = (double)ObjectGetString(0,EDIT_LOTS,OBJPROP_TEXT);
         double sell_sl = (double)ObjectGetString(0,EDIT_SL,OBJPROP_TEXT);
         sell_sl = Ask()+sell_sl*_Point;
         sell_sl = NormalizeDouble(sell_sl,_Digits);
         double sell_tp = (double)ObjectGetString(0,EDIT_TP,OBJPROP_TEXT);
         sell_tp = Ask()-sell_tp*_Point;
         sell_tp = NormalizeDouble(sell_tp,_Digits);

         Print("Lots = ",trade_lots,", SL = ",sell_sl,", TP = ",sell_tp);
         obj_Trade.Sell(trade_lots,_Symbol,Bid(),sell_sl,sell_tp);
         ChartRedraw();
      }
If the click event is on the sell button, we inform of the instance, and set the button's state to false, indicating that we have enabled the click option. To open a sell position, we will need the trading volume, the stop loss points, and the take profit points. We get these values and store them in designated variables for easier retrieval. To compute the stop loss, we take the stop loss points and convert them to compatible currency pair's point format by multiplying the with _Point, and adding the resulting value to the current asking price. Later on, we normalize the double output value to the symbol's digits for accuracy and precision. The same is done for the take profit level, and finally, we open a sell position, passing in the trade lots, the bid quote as the selling price, the stop loss, and the take profit. The same logic applies to a buy position, and its logic is as below.
      else if (sparam==BTN_BUY){
         Print("BTN BUY CLICKED");
         ObjectSetInteger(0,BTN_BUY,OBJPROP_STATE,false);
         double trade_lots = (double)ObjectGetString(0,EDIT_LOTS,OBJPROP_TEXT);
         double buy_sl = (double)ObjectGetString(0,EDIT_SL,OBJPROP_TEXT);
         buy_sl = Bid()-buy_sl*_Point;
         buy_sl = NormalizeDouble(buy_sl,_Digits);
         double buy_tp = (double)ObjectGetString(0,EDIT_TP,OBJPROP_TEXT);
         buy_tp = Bid()+buy_tp*_Point;
         buy_tp = NormalizeDouble(buy_tp,_Digits);

         Print("Lots = ",trade_lots,", SL = ",buy_sl,", TP = ",buy_tp);
         obj_Trade.Buy(trade_lots,_Symbol,Ask(),buy_sl,buy_tp);
         ChartRedraw();
      }
Upon testing, here are the results:
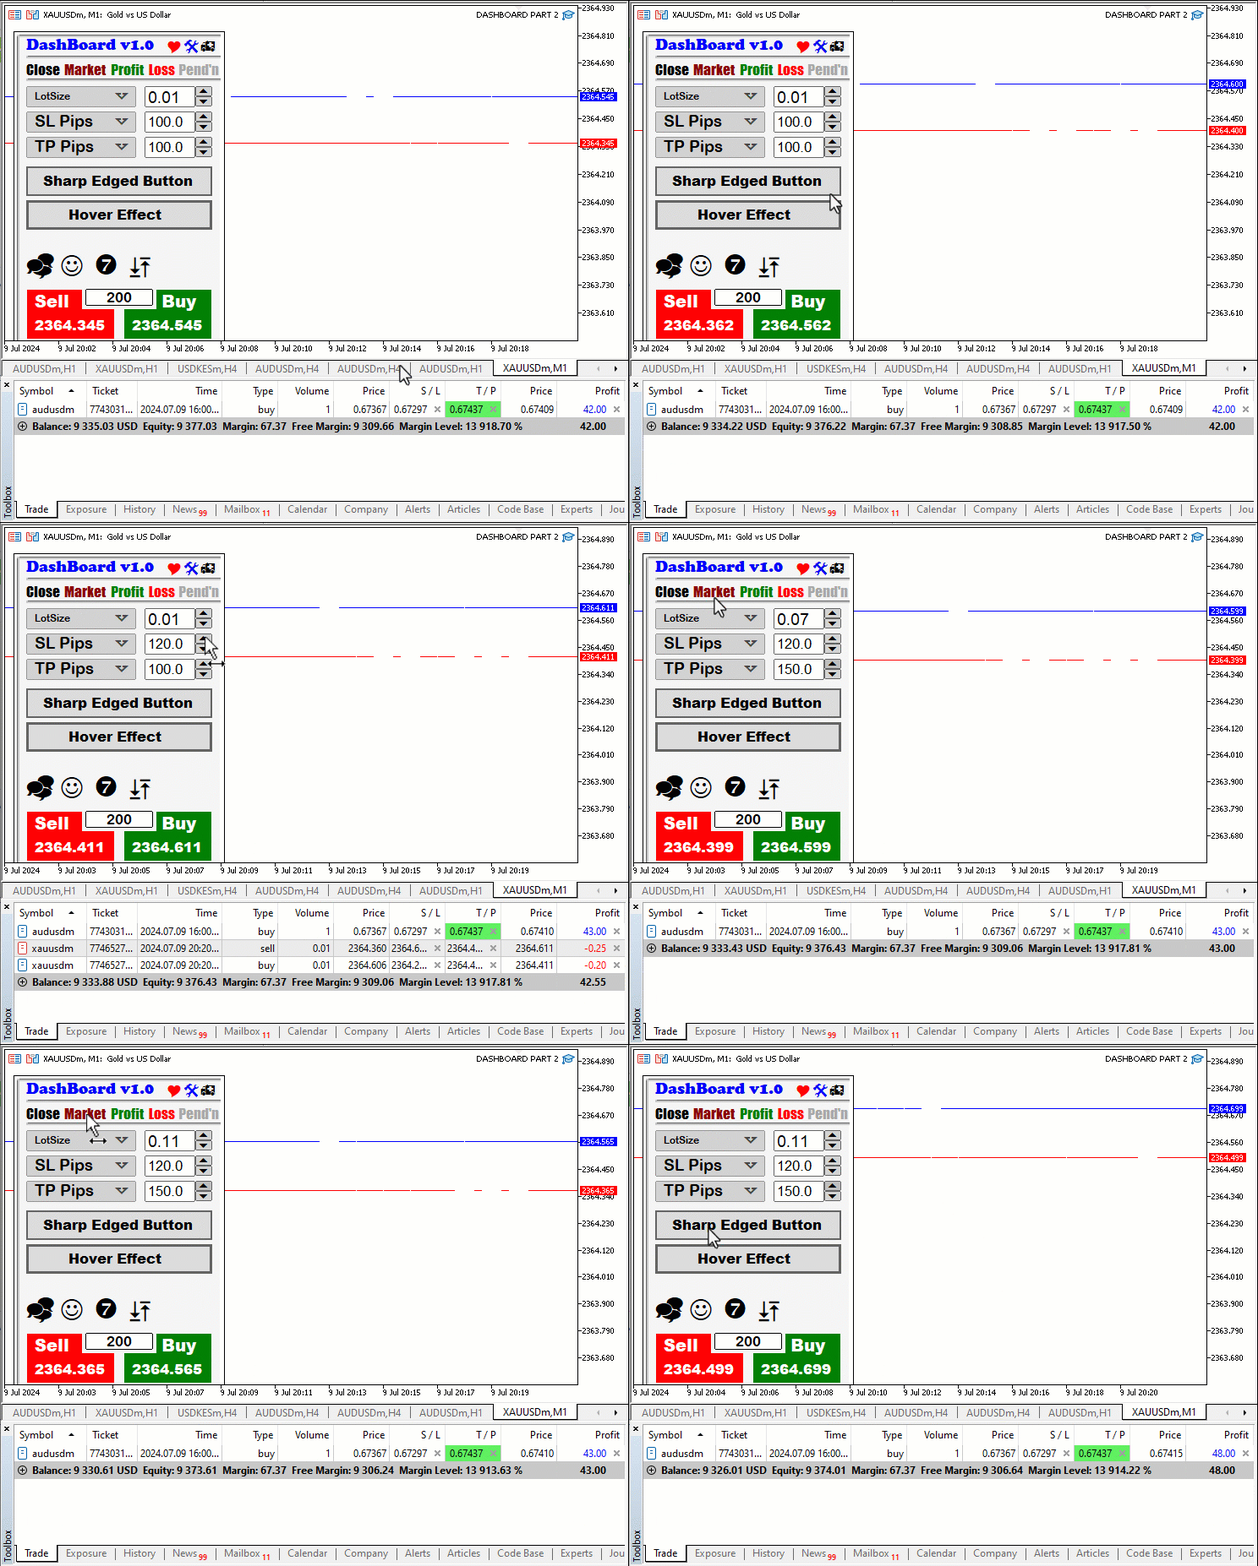
Up to this point, everything is working out as anticipated. The user could choose to not use the increase and decrease buttons but instead make use of the edit options in the edit button fields directly. During this process, unforeseen mistakes could happen while editing, which would lead to operations being ignored. For example, the user could input a lot size of "0.Q7". Technically, this value is not entirely a numeral because it does contain the letter "Q". As a result, there will be no trading operation done under the lot size. Thus, let us make sure that the value is valid always, and if not so, prompt an instance of the error to be corrected. To achieve this, another chart event ID "CHARTEVENT_OBJECT_ENDEDIT" is used.
   else if (id==CHARTEVENT_OBJECT_ENDEDIT){
      if (sparam==EDIT_LOTS){
         Print(sparam+" WAS JUST EDITED. CHECK FOR ANY UNFORESEEN ERRORS");
         string user_lots = ObjectGetString(0,EDIT_LOTS,OBJPROP_TEXT);

         ...

      }
   }
First, we check if the chart event ID is an end edit of an edit field. If so, we check whether the edit field is the trading volume button and if so, we inform of the instance and retrieve the user input value for further analysis of potential unforeseen errors. The input is stored in a string variable named "user_lots". For analysis, we will need to split the lot size into parts, where our boundary will be defined by the period (.) character - often called full stop, point, or dot.
         string lots_Parts_Array[];
         int splitCounts = StringSplit(user_lots,'.',lots_Parts_Array);//rep '.' = 'a'

         Print("User lots split counts = ",splitCounts);ArrayPrint(lots_Parts_Array,0,"<&> ");
We define a dynamic storage array of the split parts as a string data type variable named "lots_Parts_Array". Then, we split the user input with the aid of the StringSplit function, which takes 3 arguments. We provide the target string value which is to be split, user lot size input in this case, then provide period as a separator and finally a storage array of the resulting substrings. The function will return the number of substrings in the storage array. If the specified separator is not found in the passed string, only one source string will be placed in the array. These split counts will be stored in the split count variable. Finally, we print the result of the split counts as well as the array values, that is the resulting substrings. If we edit the lot size to 0.05, here is what we get:
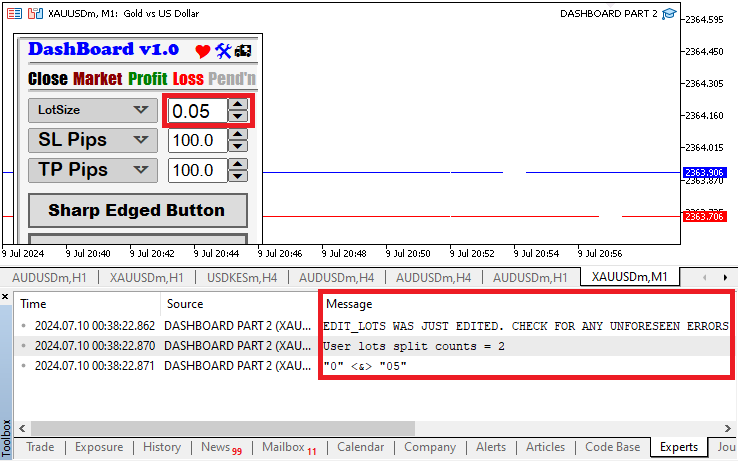
For the input value to be valid, there should be a period separator which should result in two split counts. If so, it then means that the input has a single-period separator.
         if (splitCounts == 2){

            ...

         }
In the case when the split counts equal 1, it indicates that the input lacks a period, and thus cannot be accepted. In this case, we inform of the error and set a boolean variable named "isInputValid" to false.
         else if (splitCounts == 1){
            Print("ERROR: YOUR INPUT MUST CONTAIN DECIMAL POINTS");
            isInputValid = false;
         }
If neither of the conditions is so far met, it then means that the input has more than 1-period separator, which is wrong, and thus we proceed to inform of the error and set the input valid flag to false.
         else {
            Print("ERROR: YOU CAN NOT HAVE MORE THAN ONE DECIMAL POINT IN INPUT");
            isInputValid = false;
         }
If we input a non-valid value with 2-period separators, this is the output we get to the expert's journal.
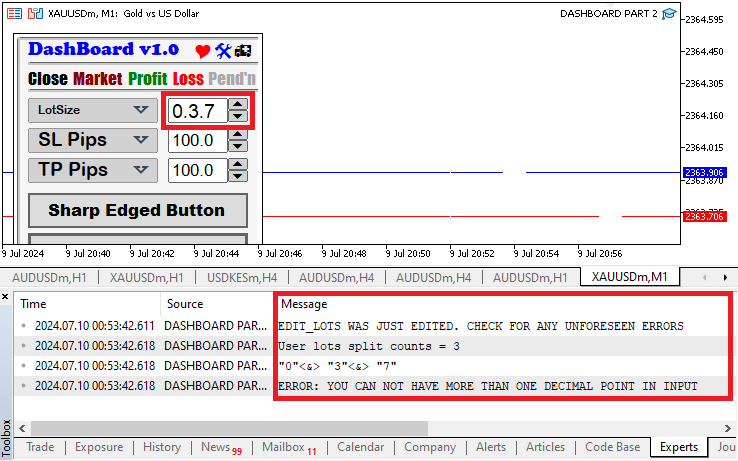
To check for non-numeral characters in the input, we will have to loop through each of the two splits and assess each character individually. A for loop will be needed to achieve this with ease.
            if (StringLen(lots_Parts_Array[0]) > 0){

               //
...

            }
First, we make sure that the first string, at index 0 in the storage array, is not empty, the case when its string length is greater than 0. A StringLen function is used to get the number of symbols in the string. If the number of symbols in the string is less than or equal to 0, it means that that substring is empty, and that input value is already invalid.
            else {
               Print("ERROR: PART 1 (LEFT HAND SIDE) IS EMPTY");
               isInputValid = false;
            }
For visualization of the error, below is what we get if we leave the left part of the separator empty.
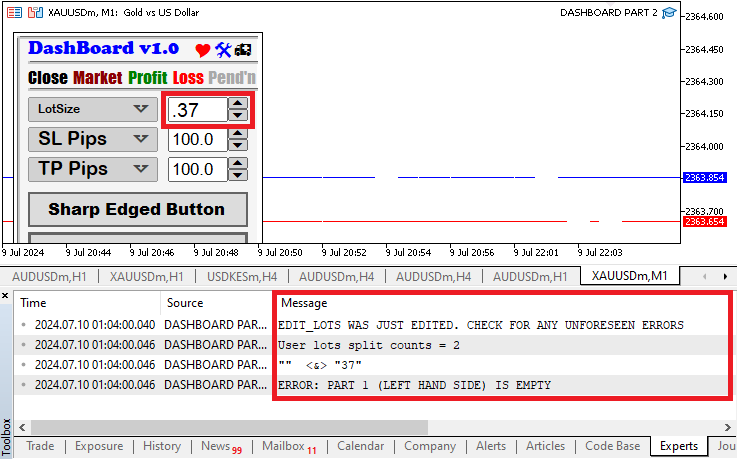
To check for non-numeral characters, we utilize a for loop as below.
               string split = lots_Parts_Array[0];
               for (int i=0; i<StringLen(split); i++){
                  ushort symbol_code = StringGetCharacter(split,i);
                  string character = StringSubstr(split,i,1);
                  if (!(symbol_code >= 48 && symbol_code <= 57)){
                     Print("ERROR: @ index ",i+1," (",character,") is NOT a numeral. Code = ",symbol_code);
                     isInputValid = false;
                     break;
                  }
               }
We define a string variable named "split" which is where we store our first substring in the storage array. We then iterate via all the characters in the substring. For the selected character, we get the character code by using the StringGetCharacter function, a function which returns the value of a symbol, located in the specified position of a string, and stores the symbol code in an unsigned short variable named "symbol_code". To get the actual symbol character, we use the string substring function. Finally, we use an if statement to check whether the resulting code is among the numeral codes, and if not so, it then means that we have a non-numeral character. So we inform of the error, set the input validity flag to false, and break out of the loop prematurely. If not, it means that the characters are all numeral values and our input validity will still be true, as the initialized to.
bool isInputValid = true;
You could have noticed the numeral range between 48 and 57 is considered to be a numeral symbol code range. Well, let us see why. As per the ASCII table, these numeral symbols have a decimal numbering system starting with 48 for the symbol "0" and spanning to 57 for the symbol "9".
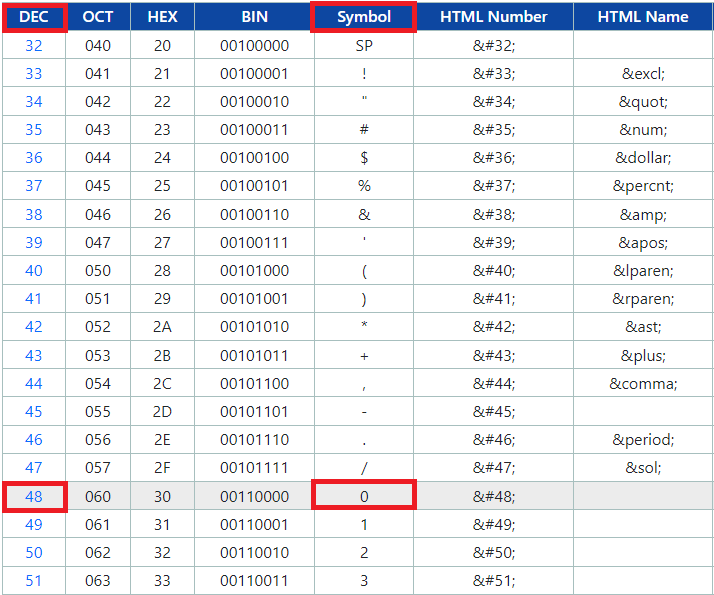
A continuation is as below.
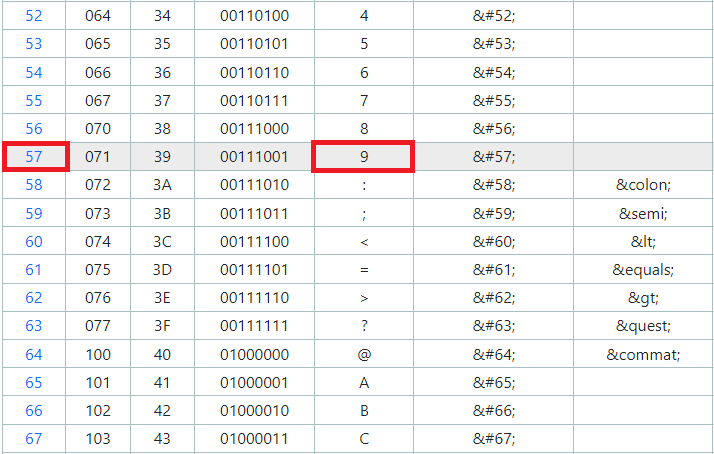
The same logic applies to the second part of the split string, that is, the substring on the right of the separator. Its source code is as below.
            if (StringLen(lots_Parts_Array[1]) > 0){
               string split = lots_Parts_Array[1];
               for (int i=0; i<StringLen(split); i++){
                  ushort symbol_code = StringGetCharacter(split,i);
                  string character = StringSubstr(split,i,1);
                  if (!(symbol_code >= 48 && symbol_code <= 57)){
                     Print("ERROR: @ index ",i+1," (",character,") is NOT a numeral. Code = ",symbol_code);
                     isInputValid = false;
                     break;
                  }
               }

            }
            else {
               Print("ERROR: PART 2 (RIGHT HAND SIDE) IS EMPTY");
               isInputValid = false;
            }
To ascertain that we can differentiate between a numeral and a non-numerical symbol character, let us have an illustration.
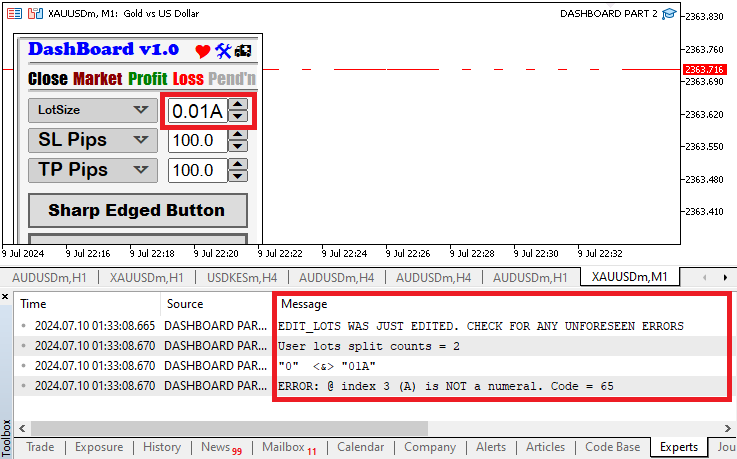
You can see that when we add an uppercase letter "A", whose code is 65, we return an error, an indication that the input is invalid. We used "A" in this example since its symbol code can be easily referenced in the provided images. It could be anything else. Now we proceed again to use our input validity flag to set the valid text value to the edit field in question.
         if (isInputValid == true){
            Print("SUCCESS: INPUT IS VALID.");
            ObjectSetString(0,EDIT_LOTS,OBJPROP_TEXT,user_lots);
            ObjectSetInteger(0,EDIT_LOTS,OBJPROP_COLOR,clrBlack);
            ObjectSetInteger(0,EDIT_LOTS,OBJPROP_BGCOLOR,clrWhite);
            ChartRedraw(0);
         }
In case the input validity flag is equal to true, we inform of the success and set the text value as the original user input since it does not have any discrepancies. We again set the color of the text to black and the button's background color to white. These are typically the original properties of the edit field. If the output is false, it then means that the user input value had faults, and it cannot be used for trading operations.
         else if (isInputValid == false){
            Print("ERROR: INPUT IS INVALID. ENTER A VALID INPUT!");
            ObjectSetString(0,EDIT_LOTS,OBJPROP_TEXT,"Error");
            ObjectSetInteger(0,EDIT_LOTS,OBJPROP_COLOR,clrWhite);
            ObjectSetInteger(0,EDIT_LOTS,OBJPROP_BGCOLOR,clrRed);
            ChartRedraw(0);
         }
We therefore inform of the error and set the text value to "Error". To capture the ultimate attention of the user, we set the text color to white and the background color to red, a shouting color combination that the user cannot will easily notice the indication of the error. Upon compilation, the following results are what we get.
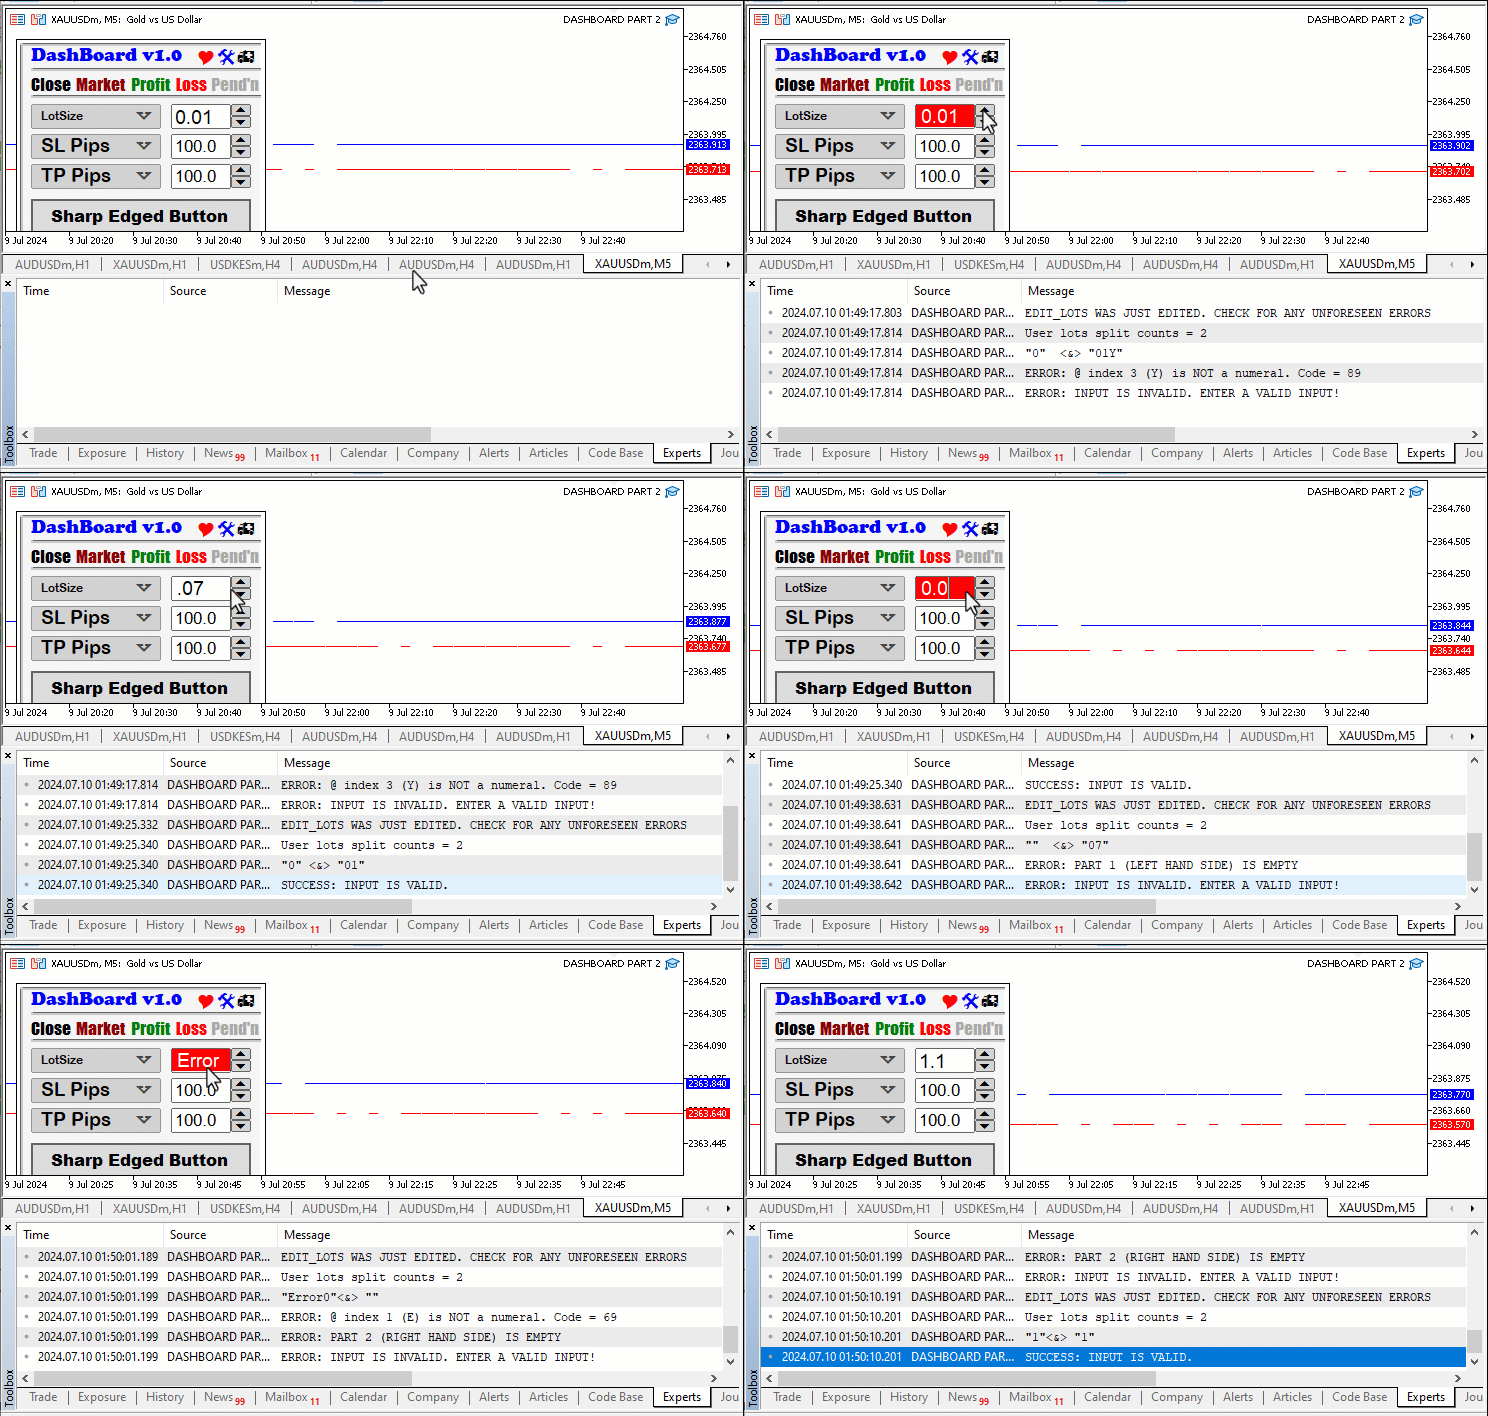
Up to this point, the automation of most of the panel components is complete. The only ones that remain unaccounted for are the movement of the drop-down list and the hover effect of the mouse on a button. All these need to be considered when there is a mouse movement on the chart, and thus "CHARTEVENT_MOUSE_MOVE" event ID will be considered. To track the movement of the mouse, we will need to enable the mouse move detection logic on the chart on the expert initialization instance, and this is achieved via the logic below.
   //--- enable CHART_EVENT_MOUSE_MOVE detection
   ChartSetInteger(0,CHART_EVENT_MOUSE_MOVE,true);
Let us first start with the easiest one, which is the hover effect. We get the event when the mouse moves in the chart after enabling its detection.
   else if (id==CHARTEVENT_MOUSE_MOVE){

      ...

   }
To detect the mouse location within the chart, we will need to get its ordinates, that is its location along the x and y-axis respectively, as well as its state, that is, when moving and when static.
      int mouse_X = (int)lparam;    // mouseX   >>> mouse coordinates
      int mouse_Y = (int)dparam;    // mouseY   >>> mouse coordinates
      int mouse_State = (int)sparam; // Get the mouse state (0 = mouse moving)
Here, we declare an integer data type variable "mouse_X" to store the distance of the mouse along the x-axis, or rather along the date and time scale. Again, we get the double parameter and store its value on the "mouse_Y" parameter and finally the string parameter in the "mouse_State" variable. We typecast them to integers at the end. We will need the target element's initial coordinates, and thus we define them via the code snippet below.
      //GETTING THE INITIAL DISTANCES AND SIZES OF BUTTON

      int XDistance_Hover_Btn = (int)ObjectGetInteger(0,BTN_HOVER,OBJPROP_XDISTANCE);
      int YDistance_Hover_Btn = (int)ObjectGetInteger(0,BTN_HOVER,OBJPROP_YDISTANCE);
      int XSize_Hover_Btn = (int)ObjectGetInteger(0,BTN_HOVER,OBJPROP_XSIZE);
      int YSize_Hover_Btn = (int)ObjectGetInteger(0,BTN_HOVER,OBJPROP_YSIZE);
We get the respective button distances and sizes and store them in the respective integer variables. Typecasting format is used to convert the value to integer formats. To keep track of the mouse coordinates about the button in question, we will need some variables to hold the logic.
      static bool prevMouseInside = false;
      bool isMouseInside = false;
The static "prevMouseInside" boolean variable is declared to keep track of whether the mouse was previously inside the button area. The "isMouseInside" boolean variable will store our current mouse state about the button, and all the variables are initialized to a false flag. To determine whether the mouse is inside the button area, we use a conditional statement.
      if (mouse_X >= XDistance_Hover_Btn && mouse_X <= XDistance_Hover_Btn + XSize_Hover_Btn &&
          mouse_Y >= YDistance_Hover_Btn && mouse_Y <= YDistance_Hover_Btn + YSize_Hover_Btn){
         isMouseInside = true;
      }
The conditional check determines whether the mouse cursor is currently inside the button area. If so, "isMouseInside" is set to true, indicating that the mouse is inside the cursor, else, the boolean variable will be false if the conditions are not met. Technically, four conditions must be met for the mouse cursor to be considered to be inside the button area. Let us disintegrate each condition for further understanding.
- mouse_X >= XDistance_Hover_Btn: This checks if the X-coordinate of the mouse (mouse_X) is greater than or equal to the left boundary of the button (XDistance_Hover_Btn).
- mouse_X <= XDistance_Hover_Btn + XSize_Hover_Btn: This checks if the X-coordinate of the mouse is less than or equal to the right boundary of the button (sum of XDistance_Hover_Btn and button width XSize_Hover_Btn).
- mouse_Y >= YDistance_Hover_Btn: Similarly, this checks if the Y-coordinate of the mouse (mouse_Y) is greater than or equal to the top boundary of the button (YDistance_Hover_Btn).
- mouse_Y <= YDistance_Hover_Btn + YSize_Hover_Btn: This checks if the Y-coordinate of the mouse is less than or equal to the bottom boundary of the button (sum of YDistance_Hover_Btn and button height YSize_Hover_Btn).
If all the conditions are met, we set the "isMouseInside" variable to true. With the resulting value, we can then check whether the mouse is inside the button. The following logic is implemented.
if (isMouseInside != prevMouseInside) { Here, we check whether the current state of the mouse (inside or outside the button area) has changed since the last check. It ensures that the subsequent actions are only performed when there’s a change in mouse position relative to the button. Again we will need to check whether the conditions were met.
         // Mouse entered or left the button area
         if (isMouseInside) {
            Print("Mouse entered the Button area. Do your updates!");
            //createRecLabel(BTN_HOVER,25,230,220,35,C'220,220,220',3,C'050,050,255');

            ObjectSetInteger(0, BTN_HOVER, OBJPROP_COLOR, C'050,050,255');
            ObjectSetInteger(0, BTN_HOVER, OBJPROP_BGCOLOR, clrLightBlue);
         }
If the boolean variable is true, it means that the mouse entered the button area. We inform of the instance via a print statement. Then, we change the button label color as well as its background. Else if the variable is false, it then means that the mouse cursor was previously inside the button area and just left. Thus, we reset the colors to defaults. Below is the code snippet responsible for that logic.
         else if (!isMouseInside) {
            Print("Mouse left Btn proximities. Return default properties.");
            //createRecLabel(BTN_HOVER,25,230,220,35,C'220,220,220',3,C'100,100,100');
            // Reset button properties when mouse leaves the area
            ObjectSetInteger(0, BTN_HOVER, OBJPROP_COLOR, C'100,100,100');
            ObjectSetInteger(0, BTN_HOVER, OBJPROP_BGCOLOR, C'220,220,220');
         }
After any changes to the button properties, the "ChartRedraw" function is called to refresh the chart display and reflect the updated button appearance. Finally, the "prevMouseInside" variable is updated to match the current state of the mouse ("isMouseInside"). This ensures that the next time the event is triggered, the program can compare the new state with the previous one.
         ChartRedraw(0);//// Redraw the chart to reflect the changes
         prevMouseInside = isMouseInside;
The full code responsible for creating a button hover effect is as below:
   else if (id==CHARTEVENT_MOUSE_MOVE){
      int mouse_X = (int)lparam;    // mouseX   >>> mouse coordinates
      int mouse_Y = (int)dparam;    // mouseY   >>> mouse coordinates
      int mouse_State = (int)sparam; // Get the mouse state (0 = mouse moving)

      //GETTING THE INITIAL DISTANCES AND SIZES OF BUTTON

      int XDistance_Hover_Btn = (int)ObjectGetInteger(0,BTN_HOVER,OBJPROP_XDISTANCE);
      int YDistance_Hover_Btn = (int)ObjectGetInteger(0,BTN_HOVER,OBJPROP_YDISTANCE);
      int XSize_Hover_Btn = (int)ObjectGetInteger(0,BTN_HOVER,OBJPROP_XSIZE);
      int YSize_Hover_Btn = (int)ObjectGetInteger(0,BTN_HOVER,OBJPROP_YSIZE);

      static bool prevMouseInside = false;
      bool isMouseInside = false;

      //Print("Mouse STATE = ",mouse_State); // 0 = mouse moving

      if (mouse_X >= XDistance_Hover_Btn && mouse_X <= XDistance_Hover_Btn + XSize_Hover_Btn &&
          mouse_Y >= YDistance_Hover_Btn && mouse_Y <= YDistance_Hover_Btn + YSize_Hover_Btn){
         isMouseInside = true;
      }

      if (isMouseInside != prevMouseInside) {
         // Mouse entered or left the button area
         if (isMouseInside) {
            Print("Mouse entered the Button area. Do your updates!");
            //createRecLabel(BTN_HOVER,25,230,220,35,C'220,220,220',3,C'050,050,255');

            ObjectSetInteger(0, BTN_HOVER, OBJPROP_COLOR, C'050,050,255');
            ObjectSetInteger(0, BTN_HOVER, OBJPROP_BGCOLOR, clrLightBlue);
         }
         else if (!isMouseInside) {
            Print("Mouse left Btn proximities. Return default properties.");
            //createRecLabel(BTN_HOVER,25,230,220,35,C'220,220,220',3,C'100,100,100');
            // Reset button properties when mouse leaves the area
            ObjectSetInteger(0, BTN_HOVER, OBJPROP_COLOR, C'100,100,100');
            ObjectSetInteger(0, BTN_HOVER, OBJPROP_BGCOLOR, C'220,220,220');
         }
         ChartRedraw(0);//// Redraw the chart to reflect the changes
         prevMouseInside = isMouseInside;
      }
   }
Upon compilation, here is what we get:
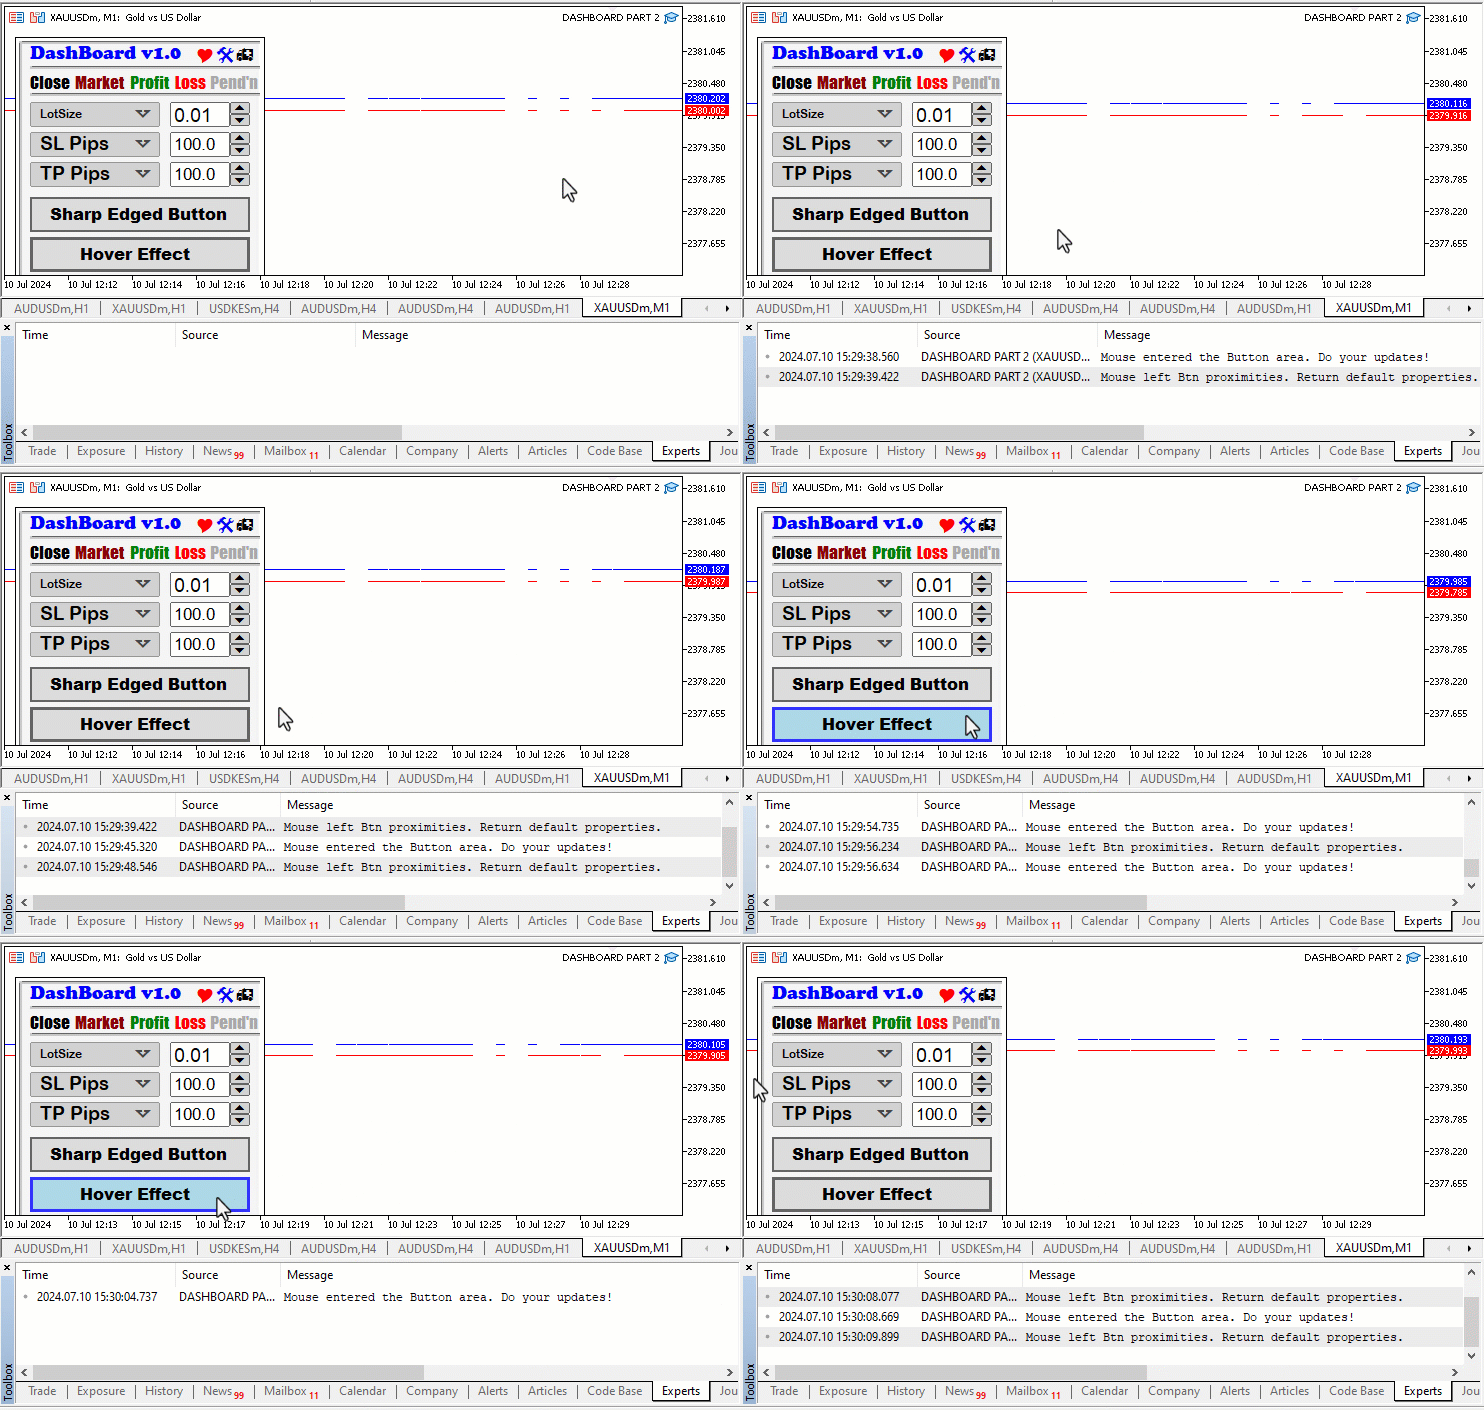
That is excellent. We now graduate to the final part which is not only tracking the mouse cursor movement but also moving objects or components along with it. Again, we declare a static integer variable to detect when the mouse is clicked and a boolean variable to store the mouse cursor movement state. This is achieved via the code snippet below.
      // CREATE MOVEMENT
      static int prevMouseClickState = false; // false = 0, true = 1;
      static bool movingState = false;
We will then need to initialize variables that will hold our object sizes and distances.
      // INITIALIZE VARIBALES TO STORE INITIAL SIZES AND DISTANCES OF OBJECTS
      // MLB = MOUSE LEFT BUTTON
      static int mlbDownX = 0; // Stores the X-coordinate of the mouse left button press
      static int mlbDownY = 0; // Stores the Y-coordinate of the mouse left button press

      static int mlbDownX_Distance = 0; // Stores the X-distance of an object
      static int mlbDownY_Distance = 0; // Stores the Y-distance of an object

      static int mlbDownX_Distance_BTN_DROP_DN = 0; // Stores X-distance for a specific button (BTN_DROP_DN)
      static int mlbDownY_Distance_BTN_DROP_DN = 0; // Stores Y-distance for the same button

      static int mlbDownX_Distance_LABEL_OPT1 = 0; // Stores X-distance for a label (LABEL_OPT1)
      static int mlbDownY_Distance_LABEL_OPT1 = 0; // Stores Y-distance for the same label

      static int mlbDownX_Distance_LABEL_OPT2 = 0; // Stores X-distance for another label (LABEL_OPT2)
      static int mlbDownY_Distance_LABEL_OPT2 = 0; // Stores Y-distance for the same label

      static int mlbDownX_Distance_LABEL_OPT3 = 0; // Stores X-distance for yet another label (LABEL_OPT3)
      static int mlbDownY_Distance_LABEL_OPT3 = 0; // Stores Y-distance for the same label

      static int mlbDownX_Distance_ICON_DRAG = 0; // Stores X-distance for an icon (ICON_DRAG)
      static int mlbDownY_Distance_ICON_DRAG = 0; // Stores Y-distance for the same icon
To initialize the storage variables, we declare static data-type variables and initialize them to 0 as above. They are declared static since we need to store the respective sizes and distances for reference when the panel components are in motion. Again, we will need the initial element distances and that is achieved via the code snippet below.
      //GET THE INITIAL DISTANCES AND SIZES OF BUTTON

      int XDistance_DropDn_Btn = (int)ObjectGetInteger(0,BTN_DROP_DN,OBJPROP_XDISTANCE);
      int YDistance_DropDn_Btn = (int)ObjectGetInteger(0,BTN_DROP_DN,OBJPROP_YDISTANCE);
      //int XSize_DropDn_Btn = (int)ObjectGetInteger(0,BTN_DROP_DN,OBJPROP_XSIZE);
      //int YSize_DropDn_Btn = (int)ObjectGetInteger(0,BTN_DROP_DN,OBJPROP_YSIZE);

      int XDistance_Opt1_Lbl = (int)ObjectGetInteger(0,LABEL_OPT1,OBJPROP_XDISTANCE);
      int YDistance_Opt1_Lbl = (int)ObjectGetInteger(0,LABEL_OPT1,OBJPROP_YDISTANCE);

      int XDistance_Opt2_Lbl = (int)ObjectGetInteger(0,LABEL_OPT2,OBJPROP_XDISTANCE);
      int YDistance_Opt2_Lbl = (int)ObjectGetInteger(0,LABEL_OPT2,OBJPROP_YDISTANCE);

      int XDistance_Opt3_Lbl = (int)ObjectGetInteger(0,LABEL_OPT3,OBJPROP_XDISTANCE);
      int YDistance_Opt3_Lbl = (int)ObjectGetInteger(0,LABEL_OPT3,OBJPROP_YDISTANCE);

      int XDistance_Drag_Icon = (int)ObjectGetInteger(0,ICON_DRAG,OBJPROP_XDISTANCE);
      int YDistance_Drag_Icon = (int)ObjectGetInteger(0,ICON_DRAG,OBJPROP_YDISTANCE);
      int XSize_Drag_Icon = (int)ObjectGetInteger(0,ICON_DRAG,OBJPROP_XSIZE);
      int YSize_Drag_Icon = (int)ObjectGetInteger(0,ICON_DRAG,OBJPROP_YSIZE);
Here, we just use the ObjectGetInteger function to retrieve the distances of the elements to be moved along with the cursor. However, notice that we also get the size of the icon that is to be used in the panel movement. The reason why we need the sizes, just as we did in the hover effect logic, is that we can determine when the mouse cursor is clicked within the icon area so that we can begin the movement. We then need to capture the initial mouse click information and store the distances of the objects to be moved.
if (prevMouseClickState == false && mouse_State == 1) {
    // Check if the left mouse button was clicked and the mouse is in the pressed state

    // Initialize variables to store initial distances and sizes of objects
    mlbDownX = mouse_X; // Store the X-coordinate of the mouse click
    mlbDownY = mouse_Y; // Store the Y-coordinate of the mouse click

    // Store distances for specific objects
    mlbDownX_Distance = XDistance_Drag_Icon; // Distance of the drag icon (X-axis)
    mlbDownY_Distance = YDistance_Drag_Icon; // Distance of the drag icon (Y-axis)

    mlbDownX_Distance_BTN_DROP_DN = XDistance_DropDn_Btn; // Distance of a specific button (BTN_DROP_DN)
    mlbDownY_Distance_BTN_DROP_DN = YDistance_DropDn_Btn;

    mlbDownX_Distance_LABEL_OPT1 = XDistance_Opt1_Lbl; // Distance of a label (LABEL_OPT1)
    mlbDownY_Distance_LABEL_OPT1 = YDistance_Opt1_Lbl;

    mlbDownX_Distance_LABEL_OPT2 = XDistance_Opt2_Lbl; // Distance of another label (LABEL_OPT2)
    mlbDownY_Distance_LABEL_OPT2 = YDistance_Opt2_Lbl;

    mlbDownX_Distance_LABEL_OPT3 = XDistance_Opt3_Lbl; // Distance of yet another label (LABEL_OPT3)
    mlbDownY_Distance_LABEL_OPT3 = YDistance_Opt3_Lbl;

    // Check if the mouse is within the drag icon area
    if (mouse_X >= XDistance_Drag_Icon && mouse_X <= XDistance_Drag_Icon + XSize_Drag_Icon &&
        mouse_Y >= YDistance_Drag_Icon && mouse_Y <= YDistance_Drag_Icon + YSize_Drag_Icon) {
        movingState = true; // Set the moving state to true
    }
}
We use a conditional statement to check for two conditions. One, "prevMouseClickState == false" to ensure that the left mouse button was not previously clicked, and two, "mouse_State == 1" to check if the mouse is currently in the pressed state (button down). If the two conditions are met, we store the X and Y coordinates of the mouse as well as the object distances. Finally, we check whether the mouse is within the drag icon area, and if so, we set the moving state to true, an indication that we can begin the panel components movement. To easily understand this, let us break down the four conditions:
- mouse_X >= XDistance_Drag_Icon: This verifies that the X-coordinate of the mouse (mouse_X) is greater than or equal to the left boundary of the drag icon area (XDistance_Drag_Icon).
- mouse_X <= XDistance_Drag_Icon + XSize_Drag_Icon: Similarly, it ensures that the X-coordinate is less than or equal to the right boundary of the drag icon area (sum of XDistance_Drag_Icon and the icon’s width, XSize_Drag_Icon).
- mouse_Y >= YDistance_Drag_Icon: This checks if the Y-coordinate of the mouse (mouse_Y) is greater than or equal to the top boundary of the drag icon area (YDistance_Drag_Icon).
- mouse_Y <= YDistance_Drag_Icon + YSize_Drag_Icon: Likewise, it verifies that the Y-coordinate is less than or equal to the bottom boundary of the drag icon area (sum of YDistance_Drag_Icon and the icon’s height, YSize_Drag_Icon).
If all four conditions are met (i.e., the mouse is within the defined drag icon area), we set the "movingState" variable to true. To this point, if the moving state is true, we move the designated objects.
      if (movingState){
         ChartSetInteger(0,CHART_MOUSE_SCROLL,false);

         ObjectSetInteger(0,ICON_DRAG,OBJPROP_XDISTANCE,mlbDownX_Distance + mouse_X - mlbDownX);
         ObjectSetInteger(0,ICON_DRAG,OBJPROP_YDISTANCE,mlbDownY_Distance + mouse_Y - mlbDownY);

         ...

         ChartRedraw(0);
      }
Here, we use the ChartSetInteger function to disable the chart scroll flag. This will ensure that when the mouse is moving, the chart will not scroll horizontally. Thus, only the mouse cursor will move along with the designated objects. Finally, we set the new object distances, concerning the current mouse coordinates, and redraw the chart for the changes to take effect. In a nutshell, this is what we have:
![]()
Now you can see that we can drag the icon. However, we also need to drag it together with the other panel components. Thus, the same logic applies.
         ObjectSetInteger(0,BTN_DROP_DN,OBJPROP_XDISTANCE,mlbDownX_Distance_BTN_DROP_DN + mouse_X - mlbDownX);
         ObjectSetInteger(0,BTN_DROP_DN,OBJPROP_YDISTANCE,mlbDownY_Distance_BTN_DROP_DN + mouse_Y - mlbDownY);

         ObjectSetInteger(0,LABEL_OPT1,OBJPROP_XDISTANCE,mlbDownX_Distance_LABEL_OPT1 + mouse_X - mlbDownX);
         ObjectSetInteger(0,LABEL_OPT1,OBJPROP_YDISTANCE,mlbDownY_Distance_LABEL_OPT1 + mouse_Y - mlbDownY);

         ObjectSetInteger(0,LABEL_OPT2,OBJPROP_XDISTANCE,mlbDownX_Distance_LABEL_OPT2 + mouse_X - mlbDownX);
         ObjectSetInteger(0,LABEL_OPT2,OBJPROP_YDISTANCE,mlbDownY_Distance_LABEL_OPT2 + mouse_Y - mlbDownY);

         ObjectSetInteger(0,LABEL_OPT3,OBJPROP_XDISTANCE,mlbDownX_Distance_LABEL_OPT3 + mouse_X - mlbDownX);
         ObjectSetInteger(0,LABEL_OPT3,OBJPROP_YDISTANCE,mlbDownY_Distance_LABEL_OPT3 + mouse_Y - mlbDownY);
The addition of the other elements drag logic will ensure that while the drag icon is moving, the other panel components move also. Upon compilation, this is what we get:
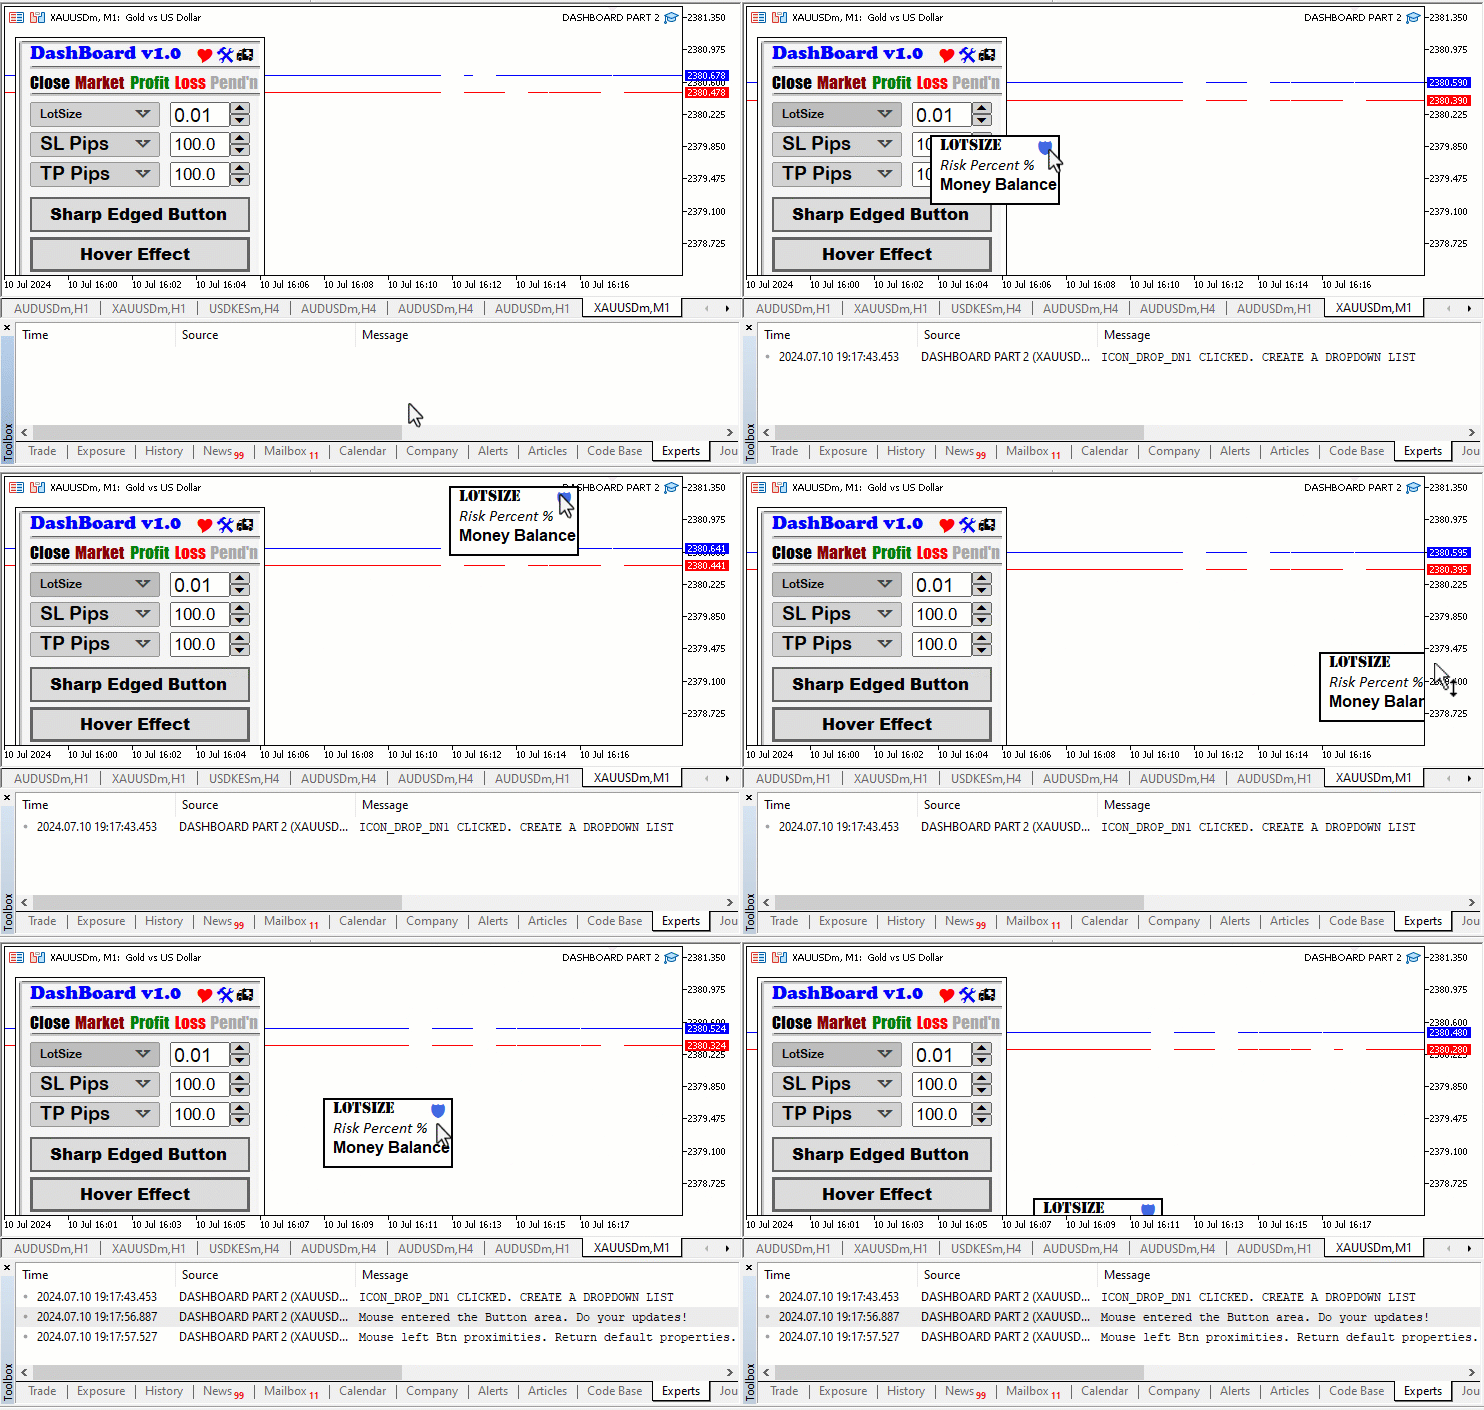
That was a success. You can see that all of the panel components move along with the mouse cursor. However, there is a small glitch that we need to take care of. When the mouse is released, that is not in pressed mode, the components continue to move as the cursor moves. To release the panel from the moving state state, we need to set the state to false in the event the mouse is not pressed.
      if (mouse_State == 0){
         movingState = false;
         ChartSetInteger(0,CHART_MOUSE_SCROLL,true);
      }
If the mouse state is equal to zero, it means that the left mouse button is released and thus we set the moving state to false, indicating that we do not need to move the panel components any further. Later, we enable the scrolling event of the chart by setting the flag to true. Finally, we set the previous mouse state to the current mouse state.
prevMouseClickState = mouse_State;
The final source code responsible for the automation of the hover effect and movement of the panel is as below:
   else if (id==CHARTEVENT_MOUSE_MOVE){
      int mouse_X = (int)lparam;    // mouseX   >>> mouse coordinates
      int mouse_Y = (int)dparam;    // mouseY   >>> mouse coordinates
      int mouse_State = (int)sparam; // Get the mouse state (0 = mouse moving)

      //GETTING THE INITIAL DISTANCES AND SIZES OF BUTTON

      int XDistance_Hover_Btn = (int)ObjectGetInteger(0,BTN_HOVER,OBJPROP_XDISTANCE);
      int YDistance_Hover_Btn = (int)ObjectGetInteger(0,BTN_HOVER,OBJPROP_YDISTANCE);
      int XSize_Hover_Btn = (int)ObjectGetInteger(0,BTN_HOVER,OBJPROP_XSIZE);
      int YSize_Hover_Btn = (int)ObjectGetInteger(0,BTN_HOVER,OBJPROP_YSIZE);

      static bool prevMouseInside = false;
      bool isMouseInside = false;

      //Print("Mouse STATE = ",mouse_State); // 0 = mouse moving

      if (mouse_X >= XDistance_Hover_Btn && mouse_X <= XDistance_Hover_Btn + XSize_Hover_Btn &&
          mouse_Y >= YDistance_Hover_Btn && mouse_Y <= YDistance_Hover_Btn + YSize_Hover_Btn){
         isMouseInside = true;
      }

      if (isMouseInside != prevMouseInside) {
         // Mouse entered or left the button area
         if (isMouseInside) {
            Print("Mouse entered the Button area. Do your updates!");
            //createRecLabel(BTN_HOVER,25,230,220,35,C'220,220,220',3,C'050,050,255');

            ObjectSetInteger(0, BTN_HOVER, OBJPROP_COLOR, C'050,050,255');
            ObjectSetInteger(0, BTN_HOVER, OBJPROP_BGCOLOR, clrLightBlue);
         }
         else if (!isMouseInside) {
            Print("Mouse left Btn proximities. Return default properties.");
            //createRecLabel(BTN_HOVER,25,230,220,35,C'220,220,220',3,C'100,100,100');
            // Reset button properties when mouse leaves the area
            ObjectSetInteger(0, BTN_HOVER, OBJPROP_COLOR, C'100,100,100');
            ObjectSetInteger(0, BTN_HOVER, OBJPROP_BGCOLOR, C'220,220,220');
         }
         ChartRedraw(0);//// Redraw the chart to reflect the changes
         prevMouseInside = isMouseInside;
      }

      // CREATE MOVEMENT
      static int prevMouseClickState = false; // false = 0, true = 1;
      static bool movingState = false;

      // INITIALIZE VARIBALES TO STORE INITIAL SIZES AND DISTANCES OF OBJECTS
      // MLB = MOUSE LEFT BUTTON
      static int mlbDownX = 0; // Stores the X-coordinate of the mouse left button press
      static int mlbDownY = 0; // Stores the Y-coordinate of the mouse left button press

      static int mlbDownX_Distance = 0; // Stores the X-distance of an object
      static int mlbDownY_Distance = 0; // Stores the Y-distance of an object

      static int mlbDownX_Distance_BTN_DROP_DN = 0; // Stores X-distance for a specific button (BTN_DROP_DN)
      static int mlbDownY_Distance_BTN_DROP_DN = 0; // Stores Y-distance for the same button

      static int mlbDownX_Distance_LABEL_OPT1 = 0; // Stores X-distance for a label (LABEL_OPT1)
      static int mlbDownY_Distance_LABEL_OPT1 = 0; // Stores Y-distance for the same label

      static int mlbDownX_Distance_LABEL_OPT2 = 0; // Stores X-distance for another label (LABEL_OPT2)
      static int mlbDownY_Distance_LABEL_OPT2 = 0; // Stores Y-distance for the same label

      static int mlbDownX_Distance_LABEL_OPT3 = 0; // Stores X-distance for yet another label (LABEL_OPT3)
      static int mlbDownY_Distance_LABEL_OPT3 = 0; // Stores Y-distance for the same label

      static int mlbDownX_Distance_ICON_DRAG = 0; // Stores X-distance for an icon (ICON_DRAG)
      static int mlbDownY_Distance_ICON_DRAG = 0; // Stores Y-distance for the same icon


      //GET THE INITIAL DISTANCES AND SIZES OF BUTTON

      int XDistance_DropDn_Btn = (int)ObjectGetInteger(0,BTN_DROP_DN,OBJPROP_XDISTANCE);
      int YDistance_DropDn_Btn = (int)ObjectGetInteger(0,BTN_DROP_DN,OBJPROP_YDISTANCE);
      //int XSize_DropDn_Btn = (int)ObjectGetInteger(0,BTN_DROP_DN,OBJPROP_XSIZE);
      //int YSize_DropDn_Btn = (int)ObjectGetInteger(0,BTN_DROP_DN,OBJPROP_YSIZE);

      int XDistance_Opt1_Lbl = (int)ObjectGetInteger(0,LABEL_OPT1,OBJPROP_XDISTANCE);
      int YDistance_Opt1_Lbl = (int)ObjectGetInteger(0,LABEL_OPT1,OBJPROP_YDISTANCE);

      int XDistance_Opt2_Lbl = (int)ObjectGetInteger(0,LABEL_OPT2,OBJPROP_XDISTANCE);
      int YDistance_Opt2_Lbl = (int)ObjectGetInteger(0,LABEL_OPT2,OBJPROP_YDISTANCE);

      int XDistance_Opt3_Lbl = (int)ObjectGetInteger(0,LABEL_OPT3,OBJPROP_XDISTANCE);
      int YDistance_Opt3_Lbl = (int)ObjectGetInteger(0,LABEL_OPT3,OBJPROP_YDISTANCE);

      int XDistance_Drag_Icon = (int)ObjectGetInteger(0,ICON_DRAG,OBJPROP_XDISTANCE);
      int YDistance_Drag_Icon = (int)ObjectGetInteger(0,ICON_DRAG,OBJPROP_YDISTANCE);
      int XSize_Drag_Icon = (int)ObjectGetInteger(0,ICON_DRAG,OBJPROP_XSIZE);
      int YSize_Drag_Icon = (int)ObjectGetInteger(0,ICON_DRAG,OBJPROP_YSIZE);

      if (prevMouseClickState == false && mouse_State == 1) {
          // Check if the left mouse button was clicked and the mouse is in the pressed state

          // Initialize variables to store initial distances and sizes of objects
          mlbDownX = mouse_X; // Store the X-coordinate of the mouse click
          mlbDownY = mouse_Y; // Store the Y-coordinate of the mouse click

          // Store distances for specific objects
          mlbDownX_Distance = XDistance_Drag_Icon; // Distance of the drag icon (X-axis)
          mlbDownY_Distance = YDistance_Drag_Icon; // Distance of the drag icon (Y-axis)

          mlbDownX_Distance_BTN_DROP_DN = XDistance_DropDn_Btn; // Distance of BTN_DROP_DN
          mlbDownY_Distance_BTN_DROP_DN = YDistance_DropDn_Btn;

          mlbDownX_Distance_LABEL_OPT1 = XDistance_Opt1_Lbl; // Distance of LABEL_OPT1
          mlbDownY_Distance_LABEL_OPT1 = YDistance_Opt1_Lbl;

          mlbDownX_Distance_LABEL_OPT2 = XDistance_Opt2_Lbl; // Distance of LABEL_OPT2
          mlbDownY_Distance_LABEL_OPT2 = YDistance_Opt2_Lbl;

          mlbDownX_Distance_LABEL_OPT3 = XDistance_Opt3_Lbl; // Distance of LABEL_OPT3
          mlbDownY_Distance_LABEL_OPT3 = YDistance_Opt3_Lbl;

          // Check if the mouse is within the drag icon area
          if (mouse_X >= XDistance_Drag_Icon && mouse_X <= XDistance_Drag_Icon + XSize_Drag_Icon &&
              mouse_Y >= YDistance_Drag_Icon && mouse_Y <= YDistance_Drag_Icon + YSize_Drag_Icon) {
              movingState = true; // Set the moving state to true
          }
      }

      if (movingState){
         ChartSetInteger(0,CHART_MOUSE_SCROLL,false);

         ObjectSetInteger(0,ICON_DRAG,OBJPROP_XDISTANCE,mlbDownX_Distance + mouse_X - mlbDownX);
         ObjectSetInteger(0,ICON_DRAG,OBJPROP_YDISTANCE,mlbDownY_Distance + mouse_Y - mlbDownY);

         ObjectSetInteger(0,BTN_DROP_DN,OBJPROP_XDISTANCE,mlbDownX_Distance_BTN_DROP_DN + mouse_X - mlbDownX);
         ObjectSetInteger(0,BTN_DROP_DN,OBJPROP_YDISTANCE,mlbDownY_Distance_BTN_DROP_DN + mouse_Y - mlbDownY);

         ObjectSetInteger(0,LABEL_OPT1,OBJPROP_XDISTANCE,mlbDownX_Distance_LABEL_OPT1 + mouse_X - mlbDownX);
         ObjectSetInteger(0,LABEL_OPT1,OBJPROP_YDISTANCE,mlbDownY_Distance_LABEL_OPT1 + mouse_Y - mlbDownY);

         ObjectSetInteger(0,LABEL_OPT2,OBJPROP_XDISTANCE,mlbDownX_Distance_LABEL_OPT2 + mouse_X - mlbDownX);
         ObjectSetInteger(0,LABEL_OPT2,OBJPROP_YDISTANCE,mlbDownY_Distance_LABEL_OPT2 + mouse_Y - mlbDownY);

         ObjectSetInteger(0,LABEL_OPT3,OBJPROP_XDISTANCE,mlbDownX_Distance_LABEL_OPT3 + mouse_X - mlbDownX);
         ObjectSetInteger(0,LABEL_OPT3,OBJPROP_YDISTANCE,mlbDownY_Distance_LABEL_OPT3 + mouse_Y - mlbDownY);

         ChartRedraw(0);
      }

      if (mouse_State == 0){
         movingState = false;
         ChartSetInteger(0,CHART_MOUSE_SCROLL,true);
      }
      prevMouseClickState = mouse_State;
   }
In a nutshell, this is what we have achieved.
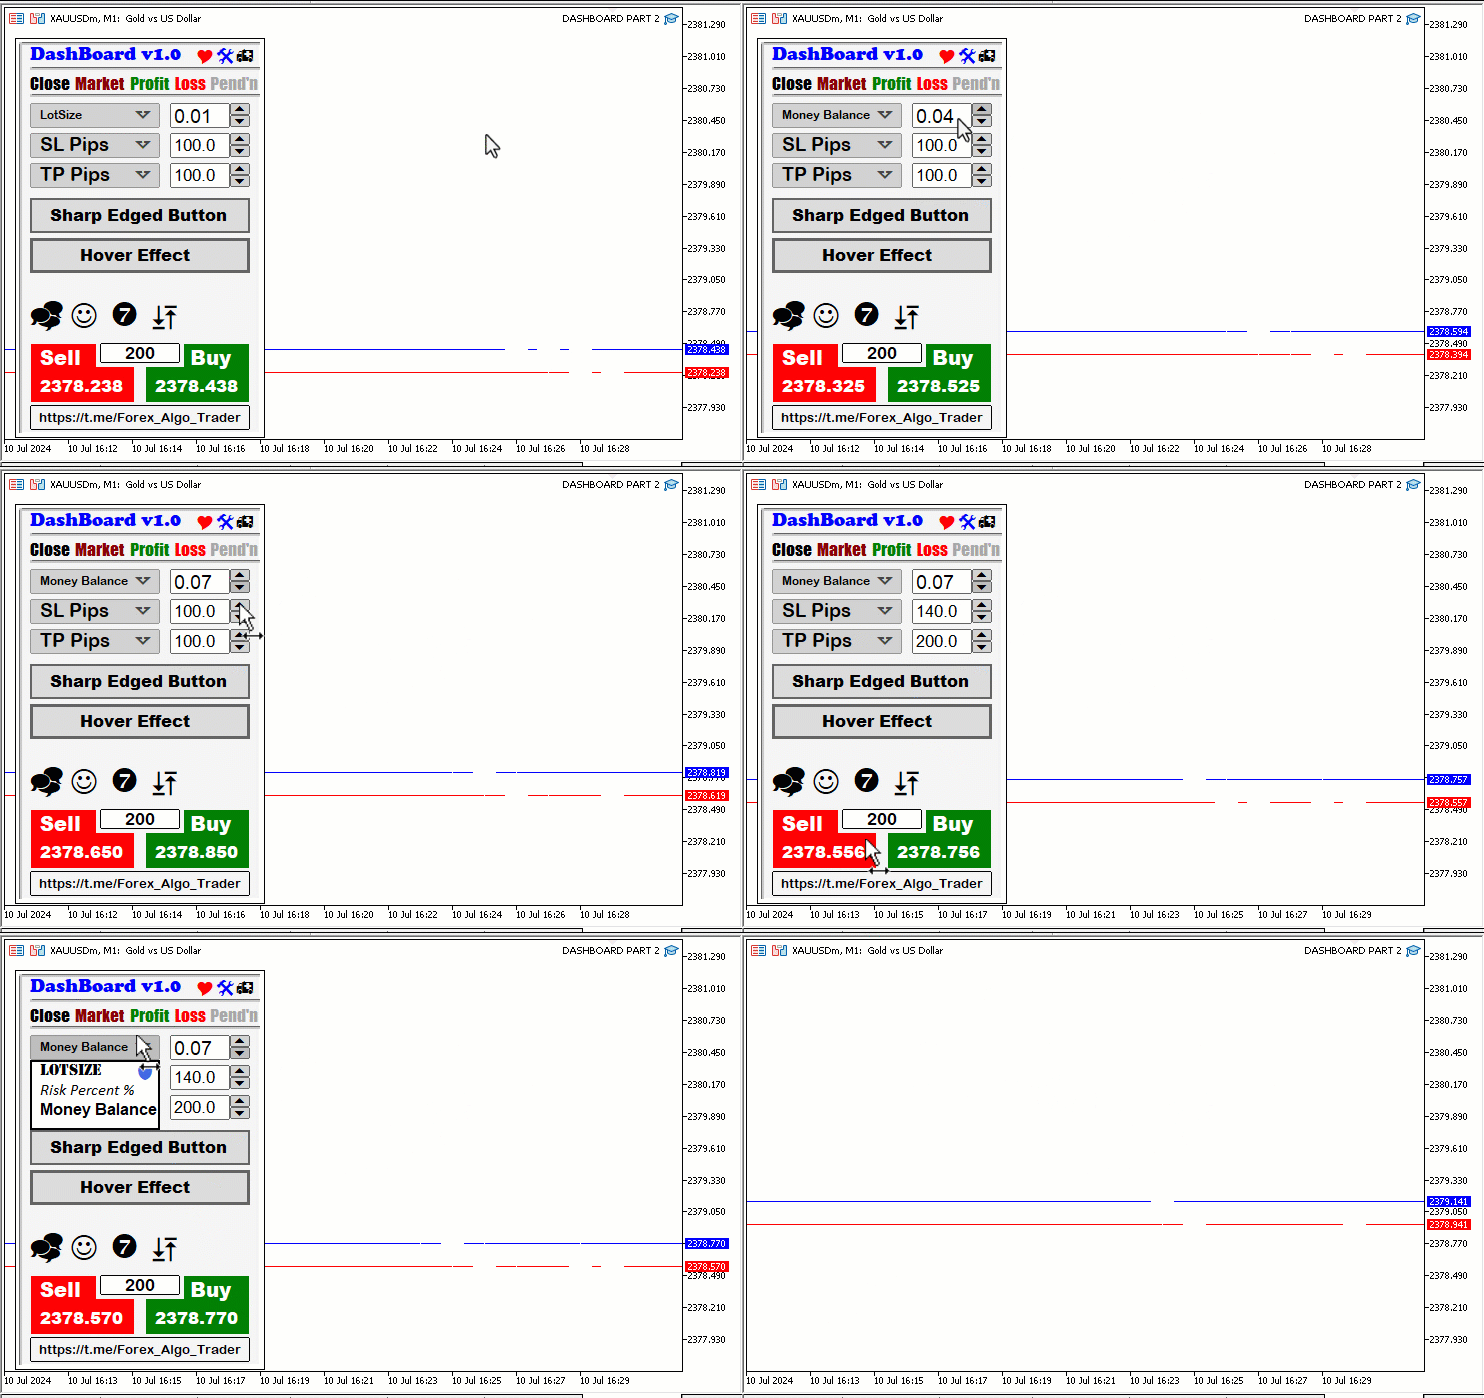
This was great. We just did add life to our GUI panel and now our panel is interactible and responsive. It does have hover effects, button clicks, live data updates, and is responsive to mouse movements.
Conclusion
In conclusion, from the article's implementation, we can say that integrating dynamic features into a MetaQuotes Language 5 (MQL5) GUI panel significantly enhances the user experience by making it more interactive and functional. Adding button hover effects creates a visually engaging interface that responds intuitively to user actions. Real-time updates of bid and ask prices ensure traders have the most current market information, enabling them to make informed decisions quickly. Clickable buttons for executing buy and sell orders, as well as a position and order closure feature, streamline trading operations, allowing users to react promptly to market changes.
Furthermore, the implementation of movable subpanels and dropdown lists adds a layer of customization and flexibility to the interface. Traders can organize their workspace according to their preferences, improving their overall efficiency. The dropdown list functionality provides a convenient way to access various options without cluttering the main interface, contributing to a cleaner and more organized trading environment. Overall, these enhancements transform the MQL5 GUI panel into a robust and user-friendly tool that caters to the needs of modern traders, ultimately improving their trading experience and effectiveness. Traders can use the knowledge illustrated to create more complex and appealing GUI panels that improve their trading experience. We do hope that you found the article detailed, objectively explained, and easy to follow and learn. Cheers!
 Price Driven CGI Model: Theoretical Foundation
 Using JSON Data API in your MQL projects
 Cascade Order Trading Strategy Based on EMA Crossovers for MetaTrader 5
 MQL5 Wizard Techniques you should know (Part 27): Moving Averages and the Angle of Attack
- Free trading apps
- Over 8,000 signals for copying
- Economic news for exploring financial markets
You agree to website policy and terms of use
Excellent job, thank you!
@Clemence Benjamin thank you for the feedback and recognition. It's very kind of you. Welcome.