
Implementing a Bollinger Bands Trading Strategy with MQL5: A Step-by-Step Guide

Introduction
In the dynamic world of financial trading using of technical indicators can be of big impact. Bollinger Bands are one such effective technique that traders can use to determine possible entry and exit points based on price volatility and trend strength. This article explores automating trading choices with a Bollinger Bands trading technique utilizing the MQL5 programming language in MetaTrader 5.
Traders may build an Expert Advisor (EA) that uses Bollinger Bands to execute buy and sell orders based on particular market conditions by following this step-by-step tutorial. Important topics including configuring the Bollinger Bands indicator, controlling trading positions, and addressing order execution and error management will all be covered. Regardless of your level of experience with development or familiarity with algorithmic trading, this tutorial will give traders a solid basis on which to design and improve their trading methods.
This journey will cover the following topics:
- Definition of Bollinger Bands strategy
- Bollinger Bands strategy description
- Step-by-step Implementation with MQL5
- Conclusion
Definition of Bollinger Band strategy
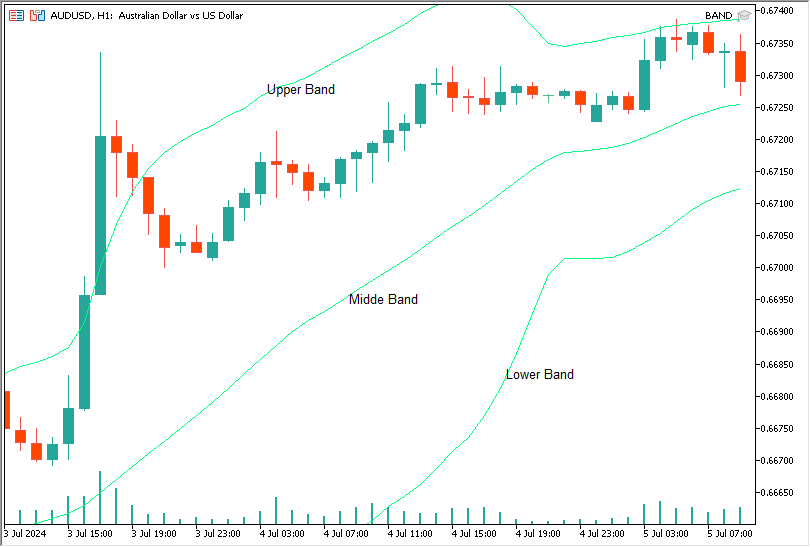
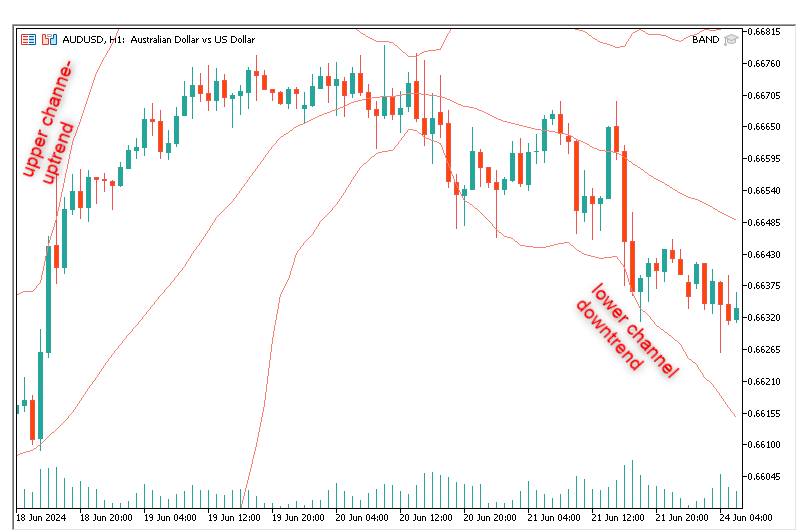
The Bollinger Bands strategy is a technical analysis method that uses a set of bands plotted around a moving average to determine utility and possible trading opportunities. Three bands make up the strategy: a lower band (middle band minus a multiple of the standard deviation), an upper band (middle band plus a multiple of the standard deviation), and a middle band (simple moving average). Based on how the price interacts with the bands, traders can use this setup to identify overbought or oversold situations, identify possible buy or sell signals and predict price breakouts or reversals.
Bollinger Bands strategy description
A popular technical analysis tool that traders use to evaluate market volatility and spot possible trading opportunities is the Bollinger Bands strategy. John Bollinger created this tactic, which is made up of three main parts:
- Middle Band(SMA): This is the simple moving average (SMA) of the closing prices of the asset for a given period. It represents the average price during the specified period and serves as the band's core point of reference.
- Upper Band: This band is computed by multiplying the standard deviation by the SMA and is shown above the middle band. It denotes the top bound of the price range and is indicative of conditions that are overbought or more volatile. It is provided by : [{Upper Band} = {Middle Band} + {Standard Deviation} {Band Deviation&}]
- Lower Band: This band is computed by deducting a multiple of the standard deviation from the SMA and is shown beneath the middle band. As a result of decreased volatility or oversold circumstances, it denotes the lower bound of the price range. It is provided by: [{Lower Band} = {Middle Band} - {Standard Deviation}]
Key Aspects of the Strategy:
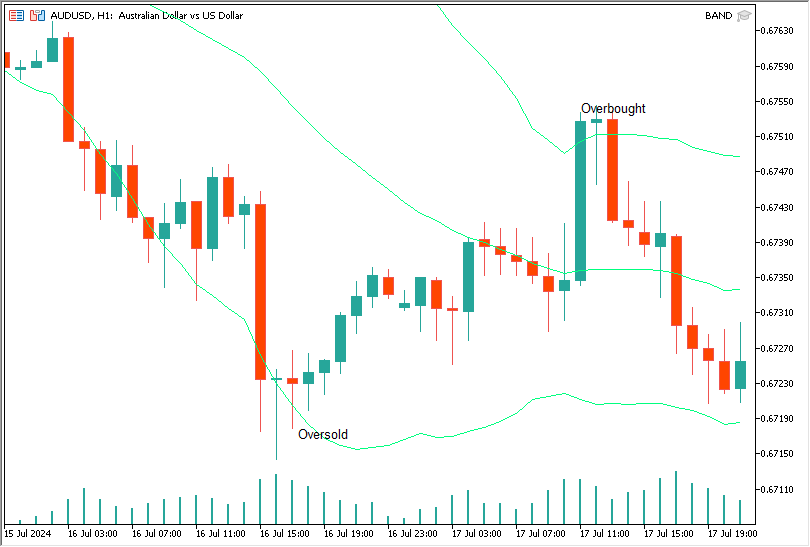
Price Movement and Band Interaction: Prices are often regarded as oversold when they approach or touch the lower band, and as overbought when they come near or touch the upper band. Trader identification of possible buy or sell signals can be aided by this interaction.
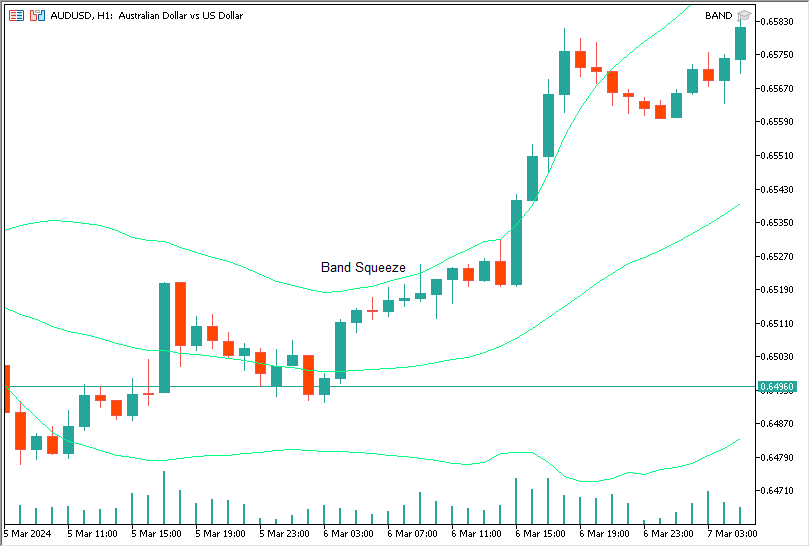
- Band Squeeze: The "band squeeze," which happens as the bands constrict and converge closer together, is a key idea in Bollinger Bands. This suggests a time of low volatility and may also portend the impending occurrence of a big price move or breakout. Traders keep an eye out for possible trading chances during these squeezes
- Trend confirmation: Bollinger Bands are useful for trend confirmation when combined with other indicators. For example, a strong uptrend may be confirmed if the price breaks above the top band with substantial volume, whereas a downtrend may be confirmed if the price breaks below the lower band.
Application of the Strategy:
By using price levels about the bands, traders can make well-informed decisions by utilizing the Bollinger Bands strategy. Buying when the price touches or crosses the lower band, assuming a rebound, and selling when the price touches or crosses the upper band, assuming a pullback, is a typical strategy. The strategy also assists in spotting spikes in volatility and possible trend reversals.
Step-by-Step Implementation with MQL5
We start by setting up trade operations. Order placement and management are trading operations that must be handled to implement a Bollinger Band strategy with MQL5. These operations are made easier by the built-in trade library of the MQL5 language. Let's discuss on trade library's initialization and how it supports the main trading logic.
#include<Trade\Trade.mqh> // Include the trade library
We must build an instance of the CTrade class to utilize the functions offered by the trade library.
CTrade trade; // Create an instance of the CTrade class We may use its methods for trading operations, such as opening, closing, and changing orders, by adding the trade library and initializing the CTrade object. The CTrade object offers multiple ways to carry out deals. We utilize it in our Bollinger Bands EA to initiate buy and sell orders by the trading circumstances specified in the onTick function. The trade object is used to open buy and sell orders. An order to purchase is opened by the EA when the price drops below the lower Bollinger Band.
With this configuration, we can effectively oversee trading activities and concentrate on creating strong trading logic. The traders may improve the way their EA reacts to market conditions and executed trades by learning how to use the {CTrade{methods for placing orders.}
We now configure inputs by customizing the trading strategy. The input and const declarations in MQL5 let traders modify and set up different aspects of their trading strategy. Depending on the state of the market and trading preferences, these inputs can be changed. Let's discuss the importance of these parameters and how the Bollinger Bands trading method is affected by them.
Variables inputs can be changed from the MetaTrader terminal without requiring alterations to code. The input keyword is used to declare them. The Bollinger Bands EA uses the following input parameters:
 // Input parameters for the Bollinger Bands strategy
 input int BandPeriod = 30;
 input double BandDeviation = 2.0;
 input double LotSize = 0.2;
 input int Slippage = 3;
 const double StopLoss = 70;
 const double TakeProfit = 140;
BandPeriod is the number of periods utilized in the Bollinger Band computation. While a lower time increases the band's sensitivity to price fluctuations, a bigger period smoothes the bands and may decrease trade signals. Modify this to account for the volatility of the market or the needs of the trading plan.
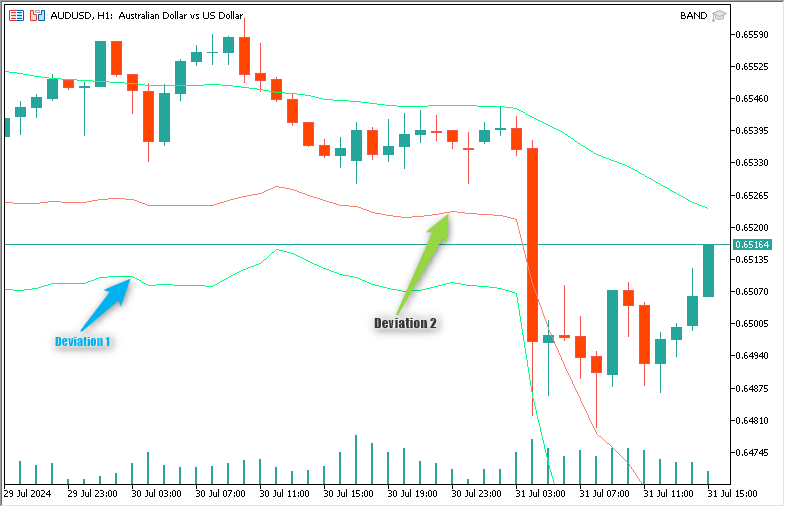
BandDeviation, the upper and lower bands are determined by counting the standard deviations deviating from the moving average. Wider and less likely touched bands result from a bigger deviation which may lessen trading signals. A smaller divergence makes the bands narrower and the signal's frequency higher. Adjust this value to regulate the bands' responsibilities to changes in pricing.
LotSize is the trading volume of the asset. Establishes each trade's volume. Greater lot sizes boost prospective earnings but, they also modify this according to the size of your account and your level of risk tolerance.
Slippage is the highest amount of slippage permitted when affecting the order of points. Assists in ensuring that orders are filled near the intended price, accounting for small price variations between order placements. Adjust based on the state of the market and the asset's liquidity.
Constants are unchangeable values that are set at compile time and cannot be altered during runtime. The const keyword is used to define them:
const double StopLoss = 70;
const double TakeProfit = 140;
Stop Loss the point difference between the stop loss and the opening price. If the market moves against you by the specified points, you can limit your possible losses by closing the deal. Based on market volatility and your risk management guidelines, this figure should be determined.
Take profit, the point difference between the take profit and the opening price between the entImpactacto and take-profit levels. Preserves earnings by exiting the transaction when the market turns around. Several points for customization. Adjust based on your desired level of profit and the state of the market.
Traders can adjust the Bollinger Bands trading method to their trading style and the state of the market by configuring input and constant parameters. They can fine-tune their EA's performance and match it to their trading objectives by modifying parameters. It is essential to comprehend these factors and how they affect the strategy to maximize trading performance and efficiently manage risk.
Afterward, we look at an integer variable. Throughout the script, this handle is necessary for referring to and interacting with the indication.
int Bb_Handle; // Handle for the Bollinger Bands indicator
This handle is an essential part of dealing with MQL5's Bollinger Bands indicator. It guarantees that the trading strategy can run smoothly and effectively by streamlining the management of indicator data and resources.
We now graduate to the OnInit function of an EA that bases its trading logic on the Bollinger Bands in this tutorial. When EA is reinitialized or attached to a chart, the OnInit function is invoked once. This function creates any necessary handles for indicators and sets up the starting parameters.
The EA defines several used cost unusable input parameters before the OnInit function. These parameters include the period, deviation of the Bollinger Bands, lot size, slippage, and stop.
Making a handle for the Bollinger Bands indicator is the primary responsibility of the OnInit function. This is done using the iBands function.
int OnInit()
  {
   Bb_Handle = iBands(_Symbol, _Period, BandPeriod, BandDeviation, 0, PRICE_CLOSE);
Here we are trying to create the Bollinger Bands indicator with the specified parameter and assigning the handle to be Bb_Handle.
Verifying that the handle creation was successful is crucial. In the event the handle is invalid, the indication was not made to properly manage this problem, the EA should return INIT_FAILED and print an error message.
if(Bb_Handle == INVALID_HANDLE)
     {
      Print("Error creating Bollinger Bands indicator");
      return(INIT_FAILED);
     }
The OnInit function should return INIT_SUCCEEDED to show that the initialization procedure was successfully finished if the indicator handle is valid.
return(INIT_SUCCEEDED);
  }
Combining all the steps the OnInit function looks as shown below:
//+------------------------------------------------------------------+
//| Expert initialization function                                   |
//+------------------------------------------------------------------+
int OnInit()
  {
   // Create the Bollinger Bands indicator handle
   Bb_Handle = iBands(_Symbol, _Period, BandPeriod, BandDeviation, 0, PRICE_CLOSE);
    {
    if(Bb_Handle == INVALID_HANDLE)
     {
      Print("Error creating Bollinger Bands indicator");
      return(INIT_FAILED);
     }
   return(INIT_SUCCEEDED);
  }
The OnInit function is essential for configuring the elements that make up an EA. The algorithm makes sure that it is prepared to carry out its trading logic by establishing a handle for the Bollinger Bands indicator and managing any risk.
Next, we look at the OnDeinit function, this function is crucial to algorithmic as the fundamental trading logic. Making sure that your Expert Advisor cleans up the resources might avert problems and keep the trading stable. When the EA is deleted from a chart or the platform is closed, the OnDeinit function is triggered. Its responsibility is to release any resources like indicator handles that were assigned during the EA's operations. This guarantees that the platform's performance is not impacted by memory leaks or persistent processes.
//+------------------------------------------------------------------+
//| Expert deinitialization function                                 |
//+------------------------------------------------------------------+
void OnDeinit(const int reason)
  {
   // Release the Bollinger Bands indicator hande
   IndicatorRelease(Bb_Handle);
  }
Releasing the handle of the Bollinger Bands indicator is the main responsibility of the OnDeinit function in our Expert Advisor. The IndicatorRelease function is used.
Next, we move to the OnTick function which is the heart of our Expert Advisor. It is triggered each time the price update for the current chart symbol receives a new tick. The fundamental trading logic that controls the EA's response to market conditions is contained in this function.
//+------------------------------------------------------------------+
//| Expert tick function                                             |
//+------------------------------------------------------------------+
void OnTick()
  {
    double upperBand[], lowerBand[], middleBand[];

    // Copy the Bollinger Bands values into arrays
    if(CopyBuffer(Bb_Handle, 0, 0, 1, upperBand) <= 0||
      (CopyBuffer(Bb_Handle, 1, 0, 1, middleBand) <= 0||
      (CopyBuffer(Bb_Handle, 2, 0, 1, lowerBand) <= 0||
   {
     Print("Error copying band values");
     return;

     double upper = upperBand[0];
     double lower = lowerBand[0];
     double middle = middleBand[0];
     double price = Close[0];
     double Ask = SymbolInfoDouble(_Symbol, SYMBOL_ASK);
     double Bid = SymbolInfoDouble(_Symbol, SYMBOL_BID);

     // Buy signal: price is below the lower band and no open positions
    if(price < lower && ! IsPositionOpen(_symbol))
      {
       double sl, tp;
       CalculateSLTP(sl, tp, price, true);
      if(trade.Buy(LotSize, _symbol, Ask, sl, tp, "Buy Order"))
        Print("Buy order opened at price: ", price);
      else
      {
       Print("Error opening BUY order:", trade.ResultRetcode());
     }
      // Sell signal: price is above the upper band no open positions
      else if(price > upper && ! IsPositionOpen(_symbol))
       {
        double sl, tp;
        CalculateSLTP(sl, tp, price, false);
       if(trade.Sell(LotSize, _Symbol, Bid, sl, tp, "Sell Order"));
         Print("Sell order opened at price:", Price);
      else
         print("Error opening SELL order:", trade.ResultRetcode())
    }
  }
Here is the detailed breakdown of the OnTick function for easy understanding:
Define and retrieve Bollinger Bands values: Retrieving the Bollinger Bands' current values is the first task. The CopyBuffer function is utilized for this purpose, copying the indicator values into arrays.
double upperBand[], lowerBand[], middleBand[];

    // Copy the Bollinger Bands values into arrays
    if(CopyBuffer(Bb_Handle, 0, 0, 1, upperBand) <= 0||
      (CopyBuffer(Bb_Handle, 1, 0, 1, middleBand) <= 0||
      (CopyBuffer(Bb_Handle, 2, 0, 1, lowerBand) <= 0||
   {
     Print("Error copying band values");
     return;
Assign Band values to variables: The values from the arrays are then assigned to variables for simpler reference.
     double upper = upperBand[0];
     double lower = lowerBand[0];
     double middle = middleBand[0];
     double price = Close[0];
Retrieve current Ask and Bid prices: This is where we need the current Ask and Bid prices to place trades.
     double Ask = SymbolInfoDouble(_Symbol, SYMBOL_ASK);
     double Bid = SymbolInfoDouble(_Symbol, SYMBOL_BID);
Trading logic based on Bollinger Bands: The price of the tBuy conditions is the basis of the trading logic.
- Buy condition: place a purchase order if there is no open position and the price is below the lower band.
   // Buy signal: price is below the lower band and no open positions
    if(price < lower && ! IsPositionOpen(_symbol))
      {
       double sl, tp;
       CalculateSLTP(sl, tp, price, true);
      if(trade.Buy(LotSize, _symbol, Ask, sl, tp, "Buy Order"))
        Print("Buy order opened at price: ", price);
      else
      {
       Print("Error opening BUY order:", trade.ResultRetcode());
     }
- Sell condition: Put a sell order there is no open position and the price is over the top band.
 // Sell signal: price is above the upper band no open positions
      else if(price > upper && ! IsPositionOpen(_symbol))
       {
        double sl, tp;
        CalculateSLTP(sl, tp, price, false);
       if(trade.Sell(LotSize, _Symbol, Bid, sl, tp, "Sell Order"));
         Print("Sell order opened at price:", Price);
      else
         print("Error opening SELL order:", trade.ResultRetcode())
    }
  }
In our Bollinger Band trading strategy, the true operations take place in the OnTick function. We can develop a reliable and automated trading strategy by carefully obtaining the Bollinger Bands values and basing trading decisions on them. Every aspect of this function facilitates more efficient debugging and improvements, guaranteeing that our EA operates at peak efficiency across a range of market scenarios.
In addition to the main OnTick function our expert advisor relies on helping functions to manage positions, determine take-profit, and stop-loss levels and guarantee seamless trading operations. The support functions are essential to preserving the trading strategy's resilience and effectiveness. We will go over the helping functions utilized in our step-by-step Bollinger Bands EA.
The first helping function is checking for open positions. The isPositionOpen function determines whether the supplied symbol had an open position at this time. This is necessary to make sure that the EA doesn't simultaneously open several places for the same symbol.
//+------------------------------------------------------------------+
//| Check if there's an open position for a symbol                   |
//+------------------------------------------------------------------+

   bool IsPositionOpen(string symbol)
   }
    for(int i = 0;  i< PositionsTotal(); i++)
    }
     if(PositionSelectByIndex(i) && PositionGetString(POSITION_SYMBOL) == symbol)
       return true;
     {
      return false;
    }
Step-by-step breakdown of the checking for open position function:
- Loop through all positions:
for(int i = 0;  i< PositionsTotal(); i++)
    }
Provides the total number of available positions. Iterates through all positions using its index.
- Selecting position by index:
if(PositionSelectByIndex(i) && PositionGetString(POSITION_SYMBOL) == symbol)
This function chooses the index i location. Gets the symbol of the selected position using PositionGetString.
- Check the symbol and return true if match:
if(PositionSelectByIndex(i) && PositionGetString(POSITION_SYMBOL) == symbol)
       return true;
Compares the position's symbol with the input symbol. If a match is found it returns true.
- Returns false if no match is found.
return false;
    }
After looping through every position, returns false if no open position for the symbol is identified.
The second helping function of our EA is closing all positions for a symbol. For the given symbol, the CloseAllPositions function closes all open positions. For risk management or strategy modifications, this can be helpful.
//+------------------------------------------------------------------+
//|Close all positions for a symbol                                  |
//+------------------------------------------------------------------+
   void CloseAllPositions(string symbol)
  {
   for(int i = PositionsTotal() - 1; i >= 0; i--)
   {
    if(PositionSelectByIndex(i) && PositionGetString(POSITION_SYMBOL) == symbol)
     {
      ulong ticket = PositionGetInteger(POSITION_TICKET);
    if(PositionGetInteger(POSITION_TYPE) == POSITION_TYPE_BUY)
         trade.sell(LotSize, symbol, symbolInfoDouble(symbol, SYMBOL_BID), Slippage, 0, "Close Buy");
     {
     if(PositionGetInteger(POSITION_TYPE) == POSITION_TYPE_SELL)
          trade.Buy(LotSize, symbol, SymbolInfoDouble(symbol, SYMBOL_ASK), Slippage, 0, "Close Sell");
          // Wait for order to be processed before continuing
            Sleep(1000);
           }
          }
         }
Step-by-step breakdown for closing all positions for as symbol function:
- Loop through all positions in reverse
for(int i = 0; i< PositionsTotal(); i++)
Returns to the starting point after making a loop. Assures that closing position doesn't change the index order.
- Selecting position by index and check symbol:
if(PositionSelectByIndex(i) && PositionGetString(POSITION_SYMBOL) == symbol
Chooses the location and determines whether the input symbol and the symbol match.
- Get the position ticket and type:
ulong ticket = PositionGetInteger(POSITION_TICKET);
Retrieves the position's ticket number.
- Close buy or sell positions:
if(PositionGetInteger(POSITION_TYPE) == POSITION_TYPE_BUY)
        trade.Sell(LotSize, symbol, SymbolInfoDouble(symbol, SYMBOL_BID), Slippage, 0, "Close Buy");
  else if(PositionGetInteger(POSITION_TYPE) == POSITION_TYPE_SELL)
        trade.Buy(LotSize, symbol, SymbolInfoDouble(symbol, SYMBOL_ASK), Slippage, 0, "Close Sell");
Closes buy positions through sales and sell positions through sales and sell positions through purchases. Makes use of the Ask and Bid prices as of right now.
- Pause to allow order processing:
      // Wait for order to be processed before continuing
            Sleep(1000);
           }
          }
         }
Before proceeding to the next slot pauses for a moment to make sure the order has been processed.
Next is our last helping function which is calculating the levels of Stop Loss and Take Profit. The Stop Loss (SL) and Take Profit (TP) levels are determined by the CalculateSLTP function using the current price and the buy/sell status of the trade.
//+------------------------------------------------------------------+
//| Calculate Stop Loss and Take Profit levels                       |
//+------------------------------------------------------------------+
   void CalculateSLTP(double &sl, double &tp, double price, bool isBuy)
   {
    if(isBuy)
     {
      sl = price - StopLoss *_Point;
      tp = price + TakeProfit *_Point;
     }
     else
      {
       sl = price + StopLoss *_Point;
       tp = price - TakeProfit *_Point;
      }
     }
The step-by-step breakdown for calculating the levels of the Stop Loss and Take Profit function:
- Define the parameters of the function:
void CalculateSLTP(double &sl, double &tp, double price, bool isBuy)
- sl: Stop Loss level is mentioned.
- tp: The Take Profit threshold.
- price: The actual rate.
- sBuy: Boolean indicating whether the trade purchase (true) or sale (false).
Determine SL and TP when opening a buy order:
if(isBuy)
  {
    sl = price - StopLoss * _Point;
    tp = price + TakeProfit * _Point;
  }
Stop Loss: subtracts the defined StopLoss (in points) from the current Take profit.
Take Profit: Adds the defined TakeProfit (in points) to the current price. Calculate SL and TP for sell trades.
else
  {
    sl = price + StopLoss * _Point;
    tp = price - TakeProfit * _Point;
  }
}
Stop Loss: Increases the current price by StopLoss (in points).
Take Profit: Subtracts the specified TakeProfit (in points) from the current price.
The full code for the helping functions is as below:
//+------------------------------------------------------------------+
//| Check if there's an open position for a symbol                   |
//+------------------------------------------------------------------+

   bool IsPositionOpen(string symbol)
   }
    for(int i = 0;  i< PositionsTotal(); i++)
    }
     if(PositionSelectByIndex(i) && PositionGetString(POSITION_SYMBOL) == symbol)
       return true;
     {
      return false;
    }
//+------------------------------------------------------------------+
//|Close all positions for a symbol                                  |
//+------------------------------------------------------------------+
   void CloseAllPositions(string symbol)
  {
   for(int i = PositionsTotal() - 1; i >= 0; i--)
   {
    if(PositionSelectByIndex(i) && PositionGetString(POSITION_SYMBOL) == symbol)
     {
      ulong ticket = PositionGetInteger(POSITION_TICKET);
    if(PositionGetInteger(POSITION_TYPE) == POSITION_TYPE_BUY)
         trade.sell(LotSize, symbol, symbolInfoDouble(symbol, SYMBOL_BID), Slippage, 0, "Close Buy");
     {
     if(PositionGetInteger(POSITION_TYPE) == POSITION_TYPE_SELL)
          trade.Buy(LotSize, symbol, SymbolInfoDouble(symbol, SYMBOL_ASK), Slippage, 0, "Close Sell");
          // Wait for order to be processed before continuing
            Sleep(1000);
           }
          }
         }

//+------------------------------------------------------------------+
//| Calculate Stop Loss and Take Profit levels                       |
//+------------------------------------------------------------------+
   void CalculateSLTP(double &sl, double &tp, double price, bool isBuy)
   {
    if(isBuy)
     {
      sl = price - StopLoss *_Point;
      tp = price + TakeProfit *_Point;
     }
     else
      {
       sl = price + StopLoss *_Point;
       tp = price - TakeProfit *_Point;
      }
     }
We are managing and organizing our Expert Advisor basic logic using the helping functions. This is making sure that the EA runs smoothly, manages positions accurately, and computers risk management levels in our Bollinger Bands trading strategy. Through comprehension and application of these helping functions, you can improve the dependability and efficiency of your MQL5 trading algorithms.
The full code of our article is as below:
//+------------------------------------------------------------------+
//|                                               BollingerBands.mq5 |
//|                                  Copyright 2024, MetaQuotes Ltd. |
//|                                             https://www.mql5.com |
//+------------------------------------------------------------------+
#property copyright "Copyright 2024, MetaQuotes Ltd."
#property link      "https://www.mql5.com"
#property version   "1.00"

 #include<Trade\Trade.mqh> // Include the trade library
 CTrade trade; // Create an instance of the CTrade class

 // Input parameters for the Bollinger Bands strategy
 input int BandPeriod = 30;
 input double BandDeviation = 2.0;
 input double LotSize = 0.2;
 input int Slippage = 3;
 const double StopLoss = 70;
 const double TakeProfit = 140;

 int Bb_Handle; // Handle for the Bollinger Bands indicator

//+------------------------------------------------------------------+
//| Expert initialization function                                   |
//+------------------------------------------------------------------+
int OnInit()
  {
   // Create the Bollinger Bands indicator handle
   Bb_Handle = iBands(_Symbol, _Period, BandPeriod, BandDeviation, 0, PRICE_CLOSE);
    {
    if(Bb_Handle == INVALID_HANDLE)
     {
      Print("Error creating Bollinger Bands indicator");
      return(INIT_FAILED);
     }
   return(INIT_SUCCEEDED);
  }

//+------------------------------------------------------------------+
//| Expert deinitialization function                                 |
//+------------------------------------------------------------------+
void OnDeinit(const int reason)
  {
   // Release the Bollinger Bands indicator hande
   IndicatorRelease(Bb_Handle);
  }
//+------------------------------------------------------------------+
//| Expert tick function                                             |
//+------------------------------------------------------------------+
void OnTick()
  {
    double upperBand[], lowerBand[], middleBand[];

    // Copy the Bollinger Bands values into arrays
    if(CopyBuffer(Bb_Handle, 0, 0, 1, upperBand) <= 0||
      (CopyBuffer(Bb_Handle, 1, 0, 1, middleBand) <= 0||
      (CopyBuffer(Bb_Handle, 2, 0, 1, lowerBand) <= 0||
   {
     Print("Error copying band values");
     return;

     double upper = upperBand[0];
     double lower = lowerBand[0];
     double middle = middleBand[0];
     double price = Close[0];
     double Ask = SymbolInfoDouble(_Symbol, SYMBOL_ASK);
     double Bid = SymbolInfoDouble(_Symbol, SYMBOL_BID);

     // Buy signal: price is below the lower band and no open positions
    if(price < lower && ! IsPositionOpen(_symbol))
      {
       double sl, tp;
       CalculateSLTP(sl, tp, price, true);
      if(trade.Buy(LotSize, _symbol, Ask, sl, tp, "Buy Order"))
        Print("Buy order opened at price: ", price);
      else
      {
       Print("Error opening BUY order:", trade.ResultRetcode());
     }
      // Sell signal: price is above the upper band no open positions
      else if(price > upper && ! IsPositionOpen(_symbol))
       {
        double sl, tp;
        CalculateSLTP(sl, tp, price, false);
       if(trade.Sell(LotSize, _Symbol, Bid, sl, tp, "Sell Order"));
         Print("Sell order opened at price:", Price);
      else
         print("Error opening SELL order:", trade.ResultRetcode())
    }
  }

//+------------------------------------------------------------------+
//| Check if there's an open position for a symbol                   |
//+------------------------------------------------------------------+

   bool IsPositionOpen(string symbol)
   }
    for(int i = 0;  i< PositionsTotal(); i++)
    }
     if(PositionSelectByIndex(i) && PositionGetString(POSITION_SYMBOL) == symbol)
       return true;
     {
      return false;
    }
//+------------------------------------------------------------------+
//|Close all positions for a symbol                                  |
//+------------------------------------------------------------------+
   void CloseAllPositions(string symbol)
  {
   for(int i = PositionsTotal() - 1; i >= 0; i--)
   {
    if(PositionSelectByIndex(i) && PositionGetString(POSITION_SYMBOL) == symbol)
     {
      ulong ticket = PositionGetInteger(POSITION_TICKET);
    if(PositionGetInteger(POSITION_TYPE) == POSITION_TYPE_BUY)
         trade.sell(LotSize, symbol, symbolInfoDouble(symbol, SYMBOL_BID), Slippage, 0, "Close Buy");
     {
     if(PositionGetInteger(POSITION_TYPE) == POSITION_TYPE_SELL)
          trade.Buy(LotSize, symbol, SymbolInfoDouble(symbol, SYMBOL_ASK), Slippage, 0, "Close Sell");
          // Wait for order to be processed before continuing
            Sleep(1000);
           }
          }
         }

//+------------------------------------------------------------------+
//| Calculate Stop Loss and Take Profit levels                       |
//+------------------------------------------------------------------+
   void CalculateSLTP(double &sl, double &tp, double price, bool isBuy)
   {
    if(isBuy)
     {
      sl = price - StopLoss *_Point;
      tp = price + TakeProfit *_Point;
     }
     else
      {
       sl = price + StopLoss *_Point;
       tp = price - TakeProfit *_Point;
      }
     }
Cheer to us! Now we did create a smart money trading concept system Bollinger Bands trading strategy to generate trading signals.
Backtest results
After the testing on the strategy tester, below are the results:
Graph:
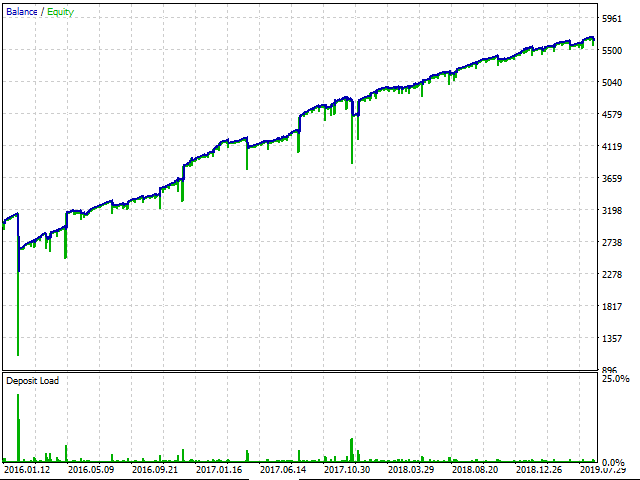
Results:
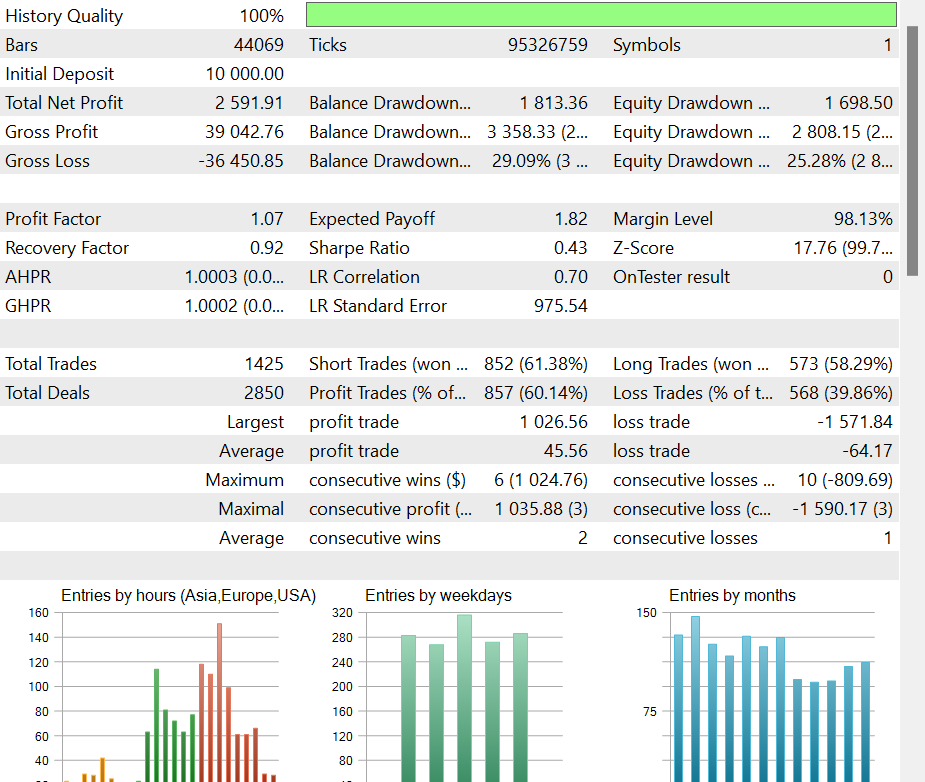
From 2016 to 2019, the strategy executed 1425 trades, 857 closed with a profit which is 20.28% more than the loss trades.
The parameters that have been used are default hence traders can adjust them to fit their trading systems. Below are the parameters that have been used:
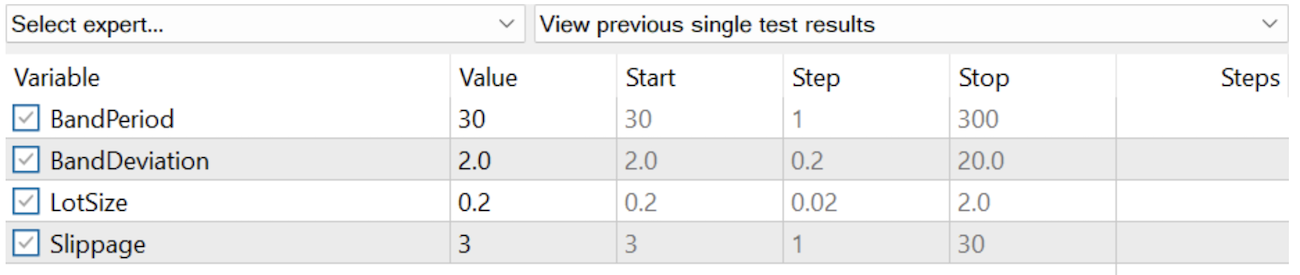
Here are the settings that we have used to carry out our test:
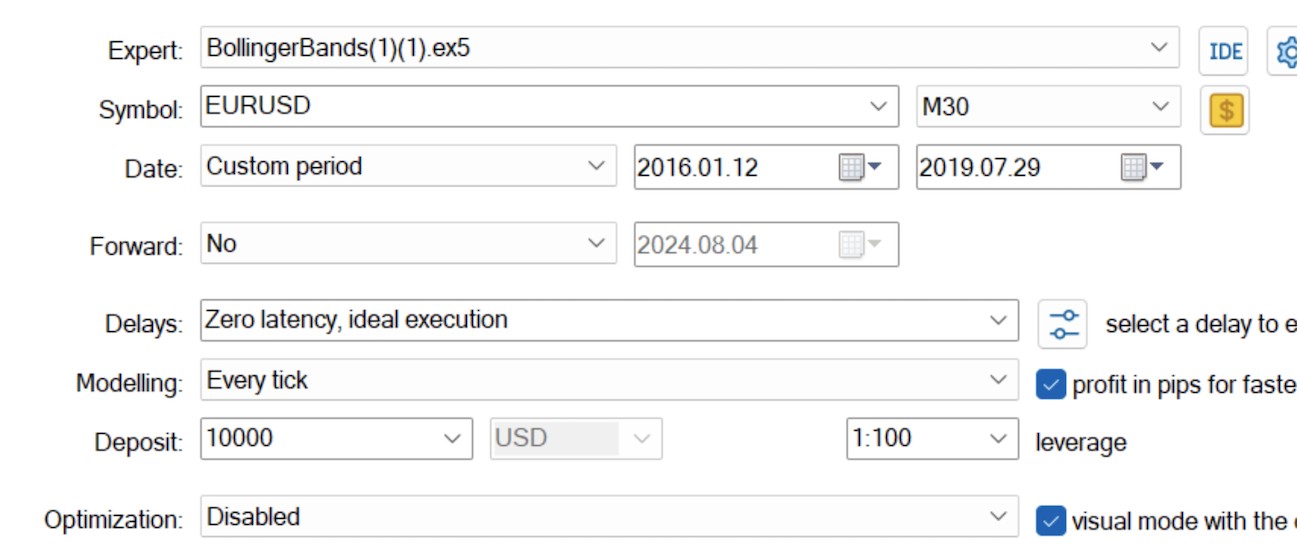
Conclusion
In this article, we have looked at the basic steps that need to be implemented towards the automation of the Bollinger Bands Trading strategy in MQL5. We have the basic definition and description of the strategy and shown how it can be implemented in MQL5. Traders can now use the knowledge shown to develop a more complex Bollinger Bands strategy that can be optimized to produce better results in the end.
Disclaimer: The code in this article is for purely educational purposes and should not be taken as professional investment advice. Thus carefully implement the knowledge to create and optimize your systems to fit your trading styles.
We do hope you find it useful and a stepping stone towards creating a better-optimized Bollinger Bands strategy. We have attached the necessary files to provide the examples that we used to demonstrate these examples. Study the code and apply it to your specific strategy to obtain optimal results.
- Free trading apps
- Over 8,000 signals for copying
- Economic news for exploring financial markets
You agree to website policy and terms of use
We are in 2024 and your backtest stops in 2019.
Is it because it does not work after 2019?
Here is one code that at least compiles in MT5 :)
That code has too many errors. I've fixed the errors and I am posting the updated code here. You are welcome!