
Automating Trading Strategies in MQL5 (Part 2): The Kumo Breakout System with Ichimoku and Awesome Oscillator
Introduction
In the previous article (Part 1 of the series) we demonstrated how to automate the Profitunity System (Trading Chaos by Will Williams). In this article (Part 2), we demonstrate how to transform the Kumo Breakout Strategy into a fully functional Expert Advisor (EA) in MetaQuotes Language 5 (MQL5). The Kumo Breakout Strategy uses the Ichimoku Kinko Hyo indicator to identify potential market reversals and trend continuations, with price movements relative to the Kumo (cloud)—a dynamic support and resistance zone formed by the Senkou Span A and Senkou Span B lines. By incorporating the Awesome Oscillator indicator as a trend confirmation tool, we can filter out false signals and increase the accuracy of trade entries and exits. This strategy is widely used by traders looking to capitalize on strong momentum-driven market movements.
We walk through the process of coding the strategy logic, managing trades, and enhancing risk control with trailing stops. By the end of this article, you'll have a clear understanding of how to automate the strategy, test its performance using the MQL5 Strategy Tester, and refine it for optimal results. We have divided the process into sections as follows for easier understanding.
- Overview of the Kumo Breakout Strategy
- Implementation of the Kumo Breakout Strategy in MQL5
- Testing and Optimization of the Strategy
- Conclusion
Overview of the Kumo Breakout Strategy
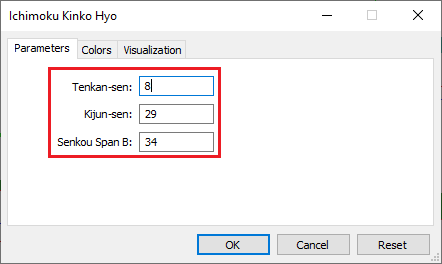
The Kumo Breakout Strategy is a trend-following approach that seeks to capitalize on price movements beyond the boundaries of the Kumo cloud. The Kumo, also called Kumo cloud, is a shaded area between the Senkou Span A and Senkou Span B lines of the Ichimoku Kinko Hyo indicator, which acts as dynamic support and resistance levels. When the price breaks out above the Kumo, it signals a potential bullish trend, while a breakout below indicates a possible bearish trend. As for the indicator, the parameters used for its settings are Tenkan-sen = 8, Kijun-sen = 29, and Senkou-span B = 34. Here are the settings:
To filter out false signals, the strategy also integrates the Awesome Oscillator indicator to provide additional confirmation for trade entries. The Awesome Oscillator identifies momentum shifts by measuring the difference between a 34-period and a 5-period simple moving average, plotted on the median price. Buy signals are validated when the oscillator crosses from negative to positive, and sell signals are confirmed when it crosses from positive to negative. By combining Kumo breakouts with momentum confirmation from the Awesome Oscillator, the strategy aims to reduce false signals and increase the probability of successful trades.
When fully combined, it depicts the one shown below on the chart.
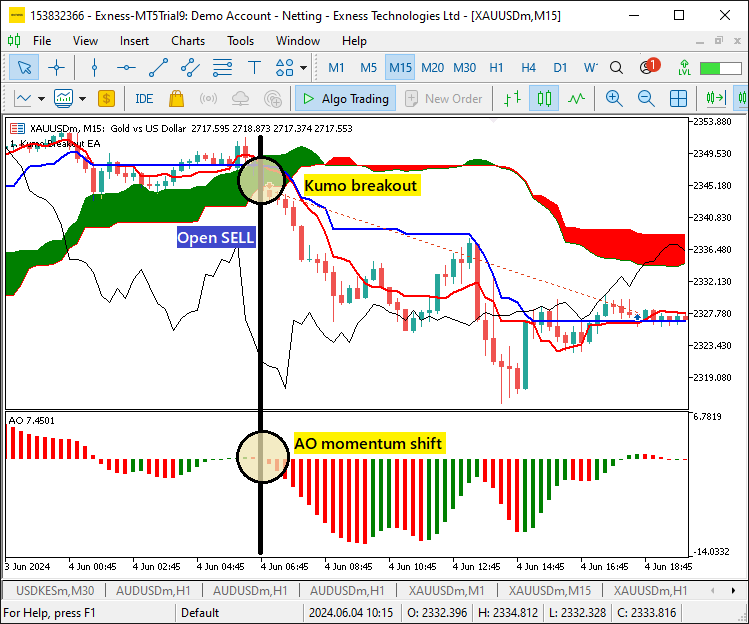
To exit the positions, we use momentum shifts logic. When the oscillator crosses from positive to negative, it indicates a change in bullish momentum and we close the existing buy positions. Similarly, when the oscillator crosses from negative to positive, we close the existing sell positions. Here is an illustration.
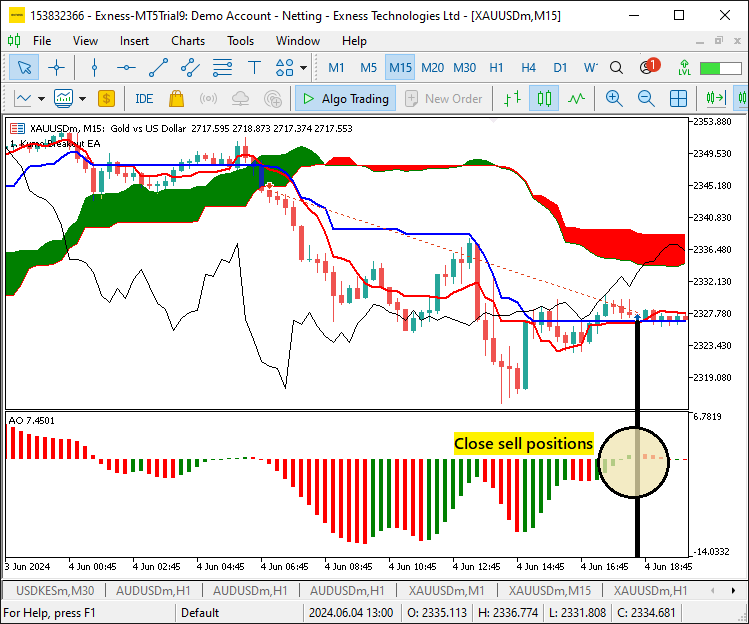
This approach is particularly effective in trending markets where momentum is strong. However, during periods of consolidation, the strategy may generate false signals due to the choppy nature of price action within the Kumo and oscillator. As a result, we can apply additional filters or risk management techniques such as trailing stops to mitigate potential drawdowns. Understanding these core principles is essential for successfully implementing the strategy as an automated Expert Advisor.
Implementation of the Kumo Breakout Strategy in MQL5
After learning all the theories about the Kumo breakout trading strategy, let us then automate the theory and craft an Expert Advisor (EA) in MetaQuotes Language 5 (MQL5) for MetaTrader 5.
To create an expert advisor (EA), on your MetaTrader 5 terminal, click the Tools tab and check MetaQuotes Language Editor, or simply press F4 on your keyboard. Alternatively, you can click the IDE (Integrated Development Environment) icon on the tools bar. This will open the MetaQuotes Language Editor environment, which allows the writing of trading robots, technical indicators, scripts, and libraries of functions. Once the MetaEditor is opened, on the tools bar, navigate to the File tab and check New File, or simply press CTRL + N, to create a new document. Alternatively, you can click on the New icon on the tools tab. This will result in a MQL Wizard pop-up.
On the Wizard that pops, check Expert Advisor (template) and click Next. On the general properties of the Expert Advisor, under the name section, provide your expert's file name. Note that to specify or create a folder if it doesn't exist, you use the backslash before the name of the EA. For example, here we have "Experts\" by default. That means that our EA will be created in the Experts folder and we can find it there. The other sections are pretty much straightforward, but you can follow the link at the bottom of the Wizard to know how to precisely undertake the process.
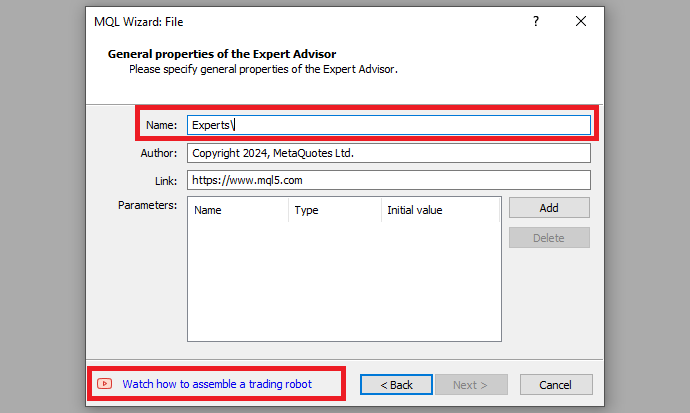
After providing your desired Expert Advisor file name, click on Next, click Next, and then click Finish. After doing all that, we are now ready to code and program our strategy.
First, we start by defining some metadata about the Expert Advisor (EA). This includes the name of the EA, the copyright information, and a link to the MetaQuotes website. We also specify the version of the EA, which is set to "1.00".
//+------------------------------------------------------------------+
//|                                          1. Kumo Breakout EA.mq5 |
//|                                  Copyright 2024, MetaQuotes Ltd. |
//|                                             https://www.mql5.com |
//+------------------------------------------------------------------+
#property copyright "Copyright 2024, MetaQuotes Ltd."
#property link      "https://www.mql5.com"
#property version   "1.00"
This will display the system metadata when loading the program. We can then move on to adding some global variables that we will use within the program. First, we include a trade instance by using #include at the beginning of the source code. This gives us access to the "CTrade class", which we will use to create a trade object. This is crucial as we need it to open trades.
#include <Trade/Trade.mqh>
CTrade obj_Trade;
The preprocessor will replace the line #include <Trade/Trade.mqh> with the content of the file Trade.mqh. Angle brackets indicate that the Trade.mqh file will be taken from the standard directory (usually it is terminal_installation_directory\MQL5\Include). The current directory is not included in the search. The line can be placed anywhere in the program, but usually, all inclusions are placed at the beginning of the source code, for a better code structure and easier reference. Declaration of the obj_Trade object of the CTrade class will give us access to the methods contained in that class easily, thanks to the MQL5 developers.
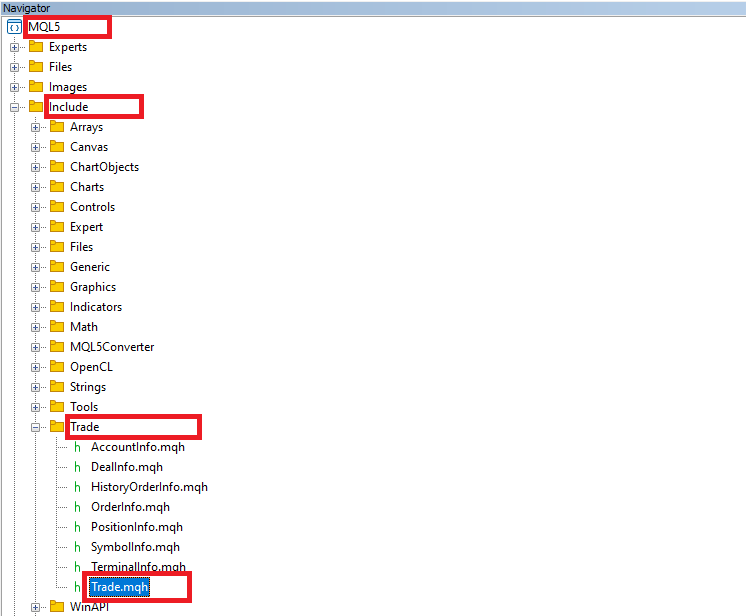
After that, we need to declare several important indicator handles that we will use in the trading system.
int handle_Kumo = INVALID_HANDLE;                   //--- Initialize the Kumo indicator handle to an invalid state
int handle_AO = INVALID_HANDLE;                     //--- Initialize the Awesome Oscillator handle to an invalid state
Here, we declare two integer variables, "handle_Kumo" and "handle_AO", which we use to store the handles for the Kumo (Ichimoku) indicator and the Awesome Oscillator (AO) indicator, respectively. We initialize both variables with the value INVALID_HANDLE, a predefined constant in MQL5 that represents an invalid or uninitialized handle. This is important because when we create an indicator, the system returns a handle that allows us to interact with the indicator. If the handle is "INVALID_HANDLE", the indicator creation has failed or hasn't been initialized correctly. By setting the handles to INVALID_HANDLE initially, we ensure that we can later check for initialization issues and handle errors appropriately.
Next, we need to initialize arrays where we store the retrieved values.
double senkouSpan_A[];                              //--- Array to store Senkou Span A values
double senkouSpan_B[];                              //--- Array to store Senkou Span B values

double awesome_Oscillator[];                        //--- Array to store Awesome Oscillator values
Again on the global scope, we declare three arrays: "senkouSpan_A", "senkouSpan_B", and "awesome_Oscillator", which we use to store the values of the Senkou Span A, Senkou Span B, and the Awesome Oscillator, respectively. We define these arrays as double types, meaning they will hold floating-point values, which is suitable for storing the results of indicator calculations. We use the "senkouSpan_A" and "senkouSpan_B" arrays to store the values of the Senkou Span A and B components of the Ichimoku indicator. In contrast, the "awesome_Oscillator" array stores the values calculated by the Awesome Oscillator. By declaring these arrays, we prepare to store the indicator values so that we can later access and use them in our trading logic.
Those are all the variables we need on the global scope. We can now initialize the indicator handles on the OnInit event handler, which is a function that handles the initialization loop.
//+------------------------------------------------------------------+
//| Expert initialization function                                   |
//+------------------------------------------------------------------+
int OnInit(){
   //---

   return(INIT_SUCCEEDED);                          //--- Return successful initialization
}
This is an event handler that is called whenever the indicator is initialized for whatever reason. Within it, we initialize the indicator handles. We start with the Kumo handle.
//--- Initialize the Ichimoku Kumo indicator
handle_Kumo = iIchimoku(_Symbol,_Period,8,29,34);

if (handle_Kumo == INVALID_HANDLE){              //--- Check if Kumo indicator initialization failed
   Print("ERROR: UNABLE TO INITIALIZE THE KUMO INDICATOR HANDLE. REVERTING NOW!"); //--- Log error
   return (INIT_FAILED);                         //--- Return initialization failure
}
Here, we initialize the "handle_Kumo" by calling the iIchimoku function, which creates an instance of the Ichimoku Kumo indicator for the current symbol (_Symbol) and period (_Period). We use the specific parameters for the Ichimoku indicator: the 8, 29, and 34 periods for the Tenkan-sen, Kijun-sen, and Senkou Span B, respectively, as earlier illustrated.
After calling iIchimoku, the function returns a handle, which we store in "handle_Kumo". We then check if "handle_Kumo" is equal to INVALID_HANDLE, which would indicate that the initialization of the indicator failed. If the handle is invalid, we log an error message with the "Print" function that specifies the failure reason and return the INIT_FAILED constant, signaling that the initialization process was unsuccessful. Similarly, we initialize the oscillator indicator.
//--- Initialize the Awesome Oscillator
handle_AO = iAO(_Symbol,_Period);

if (handle_AO == INVALID_HANDLE){                //--- Check if AO indicator initialization failed
   Print("ERROR: UNABLE TO INITIALIZE THE AO INDICATOR HANDLE. REVERTING NOW!"); //--- Log error
   return (INIT_FAILED);                         //--- Return initialization failure
}
To initialize the oscillator, we call the iAO function and pass only the symbol and period as default parameters. We then continue with the rest of the initialization logic using the same format as the Kumo handle. After the initialization is done, we can then move on to setting the storage arrays as time series.
ArraySetAsSeries(senkouSpan_A,true);             //--- Set Senkou Span A array as a time series
ArraySetAsSeries(senkouSpan_B,true);             //--- Set Senkou Span B array as a time series
ArraySetAsSeries(awesome_Oscillator,true);       //--- Set Awesome Oscillator array as a time series
We use the ArraySetAsSeries function to set the arrays "senkouSpan_A", "senkouSpan_B", and "awesome_Oscillator" as time series arrays. By setting these arrays as time series, we ensure that the most recent values are stored at the beginning of the array, with older values moving toward the end. This is important because, in MQL5, time series data is typically organized in such a way that the latest values are accessed first (at index 0), making it easier to retrieve the most recent data for trading decisions.
We call ArraySetAsSeries on each array, passing true as the second argument to enable this time series behavior. This allows us to work with the data in a way that aligns with typical trading strategies, where we often need to access the most recent values first. Finally, when all the initialization passes, we can print a message to the journal to indicate the readiness.
Print("SUCCESS. ",__FILE__," HAS BEEN INITIALIZED."); //--- Log successful initialization
After successful initialization, we use the Print function to log a message indicating that the initialization process has been successful. The message includes the string "SUCCESS.", followed by the special predefined variable __FILE__, which represents the name of the current source code file. By using __FILE__, we can dynamically insert the file name into the log message, which can help debug or track the initialization process in larger projects with multiple files. The message will be printed to the terminal or log file, confirming that the initialization has been completed successfully. This step helps ensure that we have proper feedback about the status of the initialization process, making it easier to identify potential issues in the code.
The full initialization code snippet is as follows:
//+------------------------------------------------------------------+
//| Expert initialization function                                   |
//+------------------------------------------------------------------+
int OnInit(){
   //--- Initialize the Ichimoku Kumo indicator
   handle_Kumo = iIchimoku(_Symbol,_Period,8,29,34);

   if (handle_Kumo == INVALID_HANDLE){              //--- Check if Kumo indicator initialization failed
      Print("ERROR: UNABLE TO INITIALIZE THE KUMO INDICATOR HANDLE. REVERTING NOW!"); //--- Log error
      return (INIT_FAILED);                         //--- Return initialization failure
   }

   //--- Initialize the Awesome Oscillator
   handle_AO = iAO(_Symbol,_Period);

   if (handle_AO == INVALID_HANDLE){                //--- Check if AO indicator initialization failed
      Print("ERROR: UNABLE TO INITIALIZE THE AO INDICATOR HANDLE. REVERTING NOW!"); //--- Log error
      return (INIT_FAILED);                         //--- Return initialization failure
   }

   ArraySetAsSeries(senkouSpan_A,true);             //--- Set Senkou Span A array as a time series
   ArraySetAsSeries(senkouSpan_B,true);             //--- Set Senkou Span B array as a time series
   ArraySetAsSeries(awesome_Oscillator,true);       //--- Set Awesome Oscillator array as a time series

   Print("SUCCESS. ",__FILE__," HAS BEEN INITIALIZED."); //--- Log successful initialization

   //---
   return(INIT_SUCCEEDED);                          //--- Return successful initialization
}
This gives the following output.

Since we have initialized data storage arrays and handles, we don't want to retain them once we deinitialize the program, since we will have occupied unnecessary resources. We handle this on the OnDeinit event handler, which is called whenever the program is deinitialized, whatever the reason is.
//+------------------------------------------------------------------+
//| Expert deinitialization function                                 |
//+------------------------------------------------------------------+
void OnDeinit(const int reason){
   //--- Free memory allocated for Senkou Span A and B arrays
   ArrayFree(senkouSpan_A);
   ArrayFree(senkouSpan_B);

   //--- Free memory allocated for the Awesome Oscillator array
   ArrayFree(awesome_Oscillator);
}
Inside the OnDeinit function, we perform cleanup tasks to free any memory that was allocated during the initialization process. Specifically, we use the ArrayFree function to deallocate the memory for the arrays "senkouSpan_A", "senkouSpan_B", and "awesome_Oscillator". These arrays were previously used to store the values of the Ichimoku Kumo indicator and the Awesome Oscillator, and now that they are no longer needed, we free the memory to prevent resource leaks. By doing this, we ensure that the program efficiently manages system resources and avoids unnecessary memory usage after the expert advisor is no longer active.
All that remains now is handling the trading logic, where we retrieve the indicator values and analyze them to make trading decisions. We handle this on the OnTick event handler, which is called whenever there is a new tick or simply price changes. The first step that we need to do is to retrieve data points from the indicator handles and store them for further analysis.
//--- Copy data for Senkou Span A from the Kumo indicator
if (CopyBuffer(handle_Kumo,SENKOUSPANA_LINE,0,2,senkouSpan_A) < 2){
   Print("ERROR: UNABLE TO COPY REQUESTED DATA FROM SENKOUSPAN A LINE. REVERTING NOW!"); //--- Log error
   return;                                        //--- Exit if data copy fails
}
//--- Copy data for Senkou Span B from the Kumo indicator
if (CopyBuffer(handle_Kumo,SENKOUSPANB_LINE,0,2,senkouSpan_B) < 2){
   Print("ERROR: UNABLE TO COPY REQUESTED DATA FROM SENKOUSPAN B LINE. REVERTING NOW!"); //--- Log error
   return;                                        //--- Exit if data copy fails
}
Here, we use the CopyBuffer function to copy data from the Kumo (Ichimoku) indicator's Senkou Span A and Senkou Span B lines into the "senkouSpan_A" and "senkouSpan_B" arrays, respectively. The first argument passed to CopyBuffer is the indicator handle "handle_Kumo", which refers to the initialized Kumo indicator. The second argument specifies which data line to copy: "SENKOUSPANA_LINE" for Senkou Span A and "SENKOUSPANB_LINE" for Senkou Span B. The third argument is the starting index from which to begin copying, which is set to 0 to start from the most recent data. The fourth argument specifies the number of data points to copy, which is 2 in this case. The last argument is the array where the data will be stored, "senkouSpan_A" or "senkouSpan_B".
After calling CopyBuffer, we check if the function returns a value smaller than 2, which indicates that the requested data was not copied successfully. If this happens, we log an error message with the Print function, specifying that the data could not be copied from the respective Senkou Span line, and then we exit the function using return. This ensures that if the data copy fails, we handle the error gracefully by logging the issue and stopping further execution of the function.
We use the same logic to retrieve the oscillator values.
//--- Copy data from the Awesome Oscillator
if (CopyBuffer(handle_AO,0,0,3,awesome_Oscillator) < 3){
   Print("ERROR: UNABLE TO COPY REQUESTED DATA FROM AWESOME OSCILLATOR. REVERTING NOW!"); //--- Log error
   return;                                        //--- Exit if data copy fails
}
We use the CopyBuffer function to copy data from the Awesome Oscillator (AO) indicator into the "awesome_Oscillator" array. The first argument passed to the CopyBuffer function is the indicator handle "handle_AO", which refers to the initialized Awesome Oscillator. The second argument specifies the data line or buffer index to copy, which is 0 in this case, as the Awesome Oscillator has a single data buffer. The third argument is the starting index, set to 0 to begin copying from the most recent data. The fourth argument specifies the number of data points to copy, which is set to 3 in this case, meaning we want to copy the most recent three values. The last argument is the array "awesome_Oscillator" where the copied data will be stored. If the retrieved data is less than the requested, we log an error message and return it.
If we have all the data required, we can continue to process it. The first thing we need to do is define a logic that we will use to make sure we analyze the data once whenever there is a new complete bar generated and not on every tick. We incorporate that logic in a function.
//+------------------------------------------------------------------+
//|   IS NEW BAR FUNCTION                                            |
//+------------------------------------------------------------------+
bool isNewBar(){
   static int prevBars = 0;                         //--- Store previous bar count
   int currBars = iBars(_Symbol,_Period);           //--- Get current bar count for the symbol and period
   if (prevBars == currBars) return (false);        //--- If bars haven't changed, return false
   prevBars = currBars;                             //--- Update previous bar count
   return (true);                                   //--- Return true if new bar is detected
}
We define a boolean "isNewBar" function, which is used to detect if a new bar has appeared on the chart for the specified symbol and period. Inside this function, we declare a static variable "prevBars", which stores the count of bars from the previous check. The static keyword ensures that the variable retains its value between function calls.
We then use the iBars function to get the current number of bars on the chart for the given symbol (_Symbol) and period (_Period). The result is stored in the "currBars" variable. If the number of bars has not changed (i.e., "prevBars" is equal to "currBars"), we return false, indicating that no new bar has appeared. If the number of bars has changed, we update "prevBars" with the current bar count and return true, signaling that a new bar has been detected. Armed with this function, we can call it inside the tick event handler and analyze it.
//--- Check if a new bar has formed
if (isNewBar()){
   //--- Determine if the AO has crossed above or below zero
   bool isAO_Above = awesome_Oscillator[1] > 0 && awesome_Oscillator[2] < 0;
   bool isAO_Below = awesome_Oscillator[1] < 0 && awesome_Oscillator[2] > 0;

//---
}
Here, we check if a new bar has formed by calling the "isNewBar" function. If a new bar is detected (i.e., "isNewBar" returns true), we proceed to determine the behavior of the Awesome Oscillator (AO).
We define two boolean variables: "isAO_Above" and "isAO_Below". The variable "isAO_Above" is set to true if the previous value of the Awesome Oscillator (awesome_Oscillator[1]) is greater than zero, and the value before that (awesome_Oscillator[2]) is less than zero. This condition checks if the AO has crossed above zero, indicating a potential bullish signal. Similarly, "isAO_Below" is set to true if the previous AO value (awesome_Oscillator[1]) is less than zero and the value before that (awesome_Oscillator[2]) is greater than zero, indicating the AO has crossed below zero, which could signal a bearish move. We can then use the same method to set the other logic.
//--- Determine if the Kumo is bullish or bearish
bool isKumo_Above = senkouSpan_A[1] > senkouSpan_B[1];
bool isKumo_Below = senkouSpan_A[1] < senkouSpan_B[1];

//--- Determine buy and sell signals based on conditions
bool isBuy_Signal = isAO_Above && isKumo_Below && getClosePrice(1) > senkouSpan_A[1] && getClosePrice(1) > senkouSpan_B[1];
bool isSell_Signal = isAO_Below && isKumo_Above && getClosePrice(1) < senkouSpan_A[1] && getClosePrice(1) < senkouSpan_B[1];
Here, we determine the conditions for a bullish or bearish Kumo (Ichimoku) setup. First, we define two boolean variables: "isKumo_Above" and "isKumo_Below". The variable "isKumo_Above" is set to true if the previous value of Senkou Span A (senkouSpan_A[1]) is greater than the previous value of Senkou Span B (senkouSpan_B[1]), indicating a bullish Kumo (bullish market sentiment). On the other hand, "isKumo_Below" is set to true if Senkou Span A is less than Senkou Span B, indicating a bearish Kumo (bearish market sentiment).
Next, we define the conditions for potential buy and sell signals. The buy signal ("isBuy_Signal") is set to true if the following conditions are met: the Awesome Oscillator has crossed above zero (isAO_Above), the Kumo is bearish (isKumo_Below), and the close price of the previous bar is above both Senkou Span A and Senkou Span B. This suggests a potential upward price movement despite the bearish Kumo. The sell signal ("isSell_Signal") is set to true if the Awesome Oscillator has crossed below zero (isAO_Below), the Kumo is bullish (isKumo_Above), and the close price of the previous bar is below both Senkou Span A and Senkou Span B. This indicates a potential downward price movement despite the bullish Kumo.
You might have noticed that we have used a new function to get the close prices. Here is the logic of all the functions that we will need.
//+------------------------------------------------------------------+
//|        FUNCTION TO GET CLOSE PRICES                              |
//+------------------------------------------------------------------+
double getClosePrice(int bar_index){
   return (iClose(_Symbol, _Period, bar_index));    //--- Retrieve the close price of the specified bar
}

//+------------------------------------------------------------------+
//|        FUNCTION TO GET ASK PRICES                                |
//+------------------------------------------------------------------+
double getAsk(){
   return (NormalizeDouble(SymbolInfoDouble(_Symbol, SYMBOL_ASK), _Digits)); //--- Get and normalize the Ask price
}

//+------------------------------------------------------------------+
//|        FUNCTION TO GET BID PRICES                                |
//+------------------------------------------------------------------+
double getBid(){
   return (NormalizeDouble(SymbolInfoDouble(_Symbol, SYMBOL_BID), _Digits)); //--- Get and normalize the Bid price
}
Here, we define three functions to retrieve different types of price data:
- "getClosePrice" function: This function retrieves the close price of a specified bar. It takes a parameter "bar_index", which represents the index of the bar for which we want to get the close price. The function calls the built-in iClose function, passing the symbol (_Symbol), period (_Period), and the bar index to get the close price of the specified bar. The retrieved price is returned as a double.
- "getAsk" function: This function retrieves the current Ask price for the given symbol. It uses the SymbolInfoDouble function with the SYMBOL_ASK constant to get the Ask price. The result is then normalized using the NormalizeDouble function to ensure the price is rounded to the correct number of decimal places based on the symbol's _Digits property. This function returns the normalized Ask price as a double.
- "getBid" function: This function retrieves the current Bid price for the given symbol. Similar to the "getAsk" function, it uses SymbolInfoDouble with the SYMBOL_BID constant to get the Bid price, and then normalizes it using the NormalizeDouble function to ensure it matches the correct precision defined by the symbol's _Digits property. This function returns the normalized Bid price as a double.
These functions provide an easy way to retrieve and normalize the relevant prices for trading decisions within the program. We can then use the calculated trade signals and open respective positions for the existing signals.
if (isBuy_Signal){                            //--- If buy signal is generated
   Print("BUY SIGNAL GENERATED @ ",iTime(_Symbol,_Period,1),", PRICE: ",getAsk()); //--- Log buy signal
   obj_Trade.Buy(0.01,_Symbol,getAsk());      //--- Execute a buy trade
}
else if (isSell_Signal){                      //--- If sell signal is generated
   Print("SELL SIGNAL GENERATED @ ",iTime(_Symbol,_Period,1),", PRICE: ",getBid()); //--- Log sell signal
   obj_Trade.Sell(0.01,_Symbol,getBid());     //--- Execute a sell trade
}
We check whether a buy or sell signal has been generated and execute the corresponding trade. If the "isBuy_Signal" is true, indicating that a buy signal has occurred, we first log the event using the Print function. We include the timestamp of the previous bar, which is retrieved with the iTime function, and the current Ask price, obtained from the "getAsk" function. This log provides a record of the buy signal and the price at which it occurred. After logging, we execute the buy trade by calling "obj_Trade.Buy(0.01, _Symbol, getAsk())", which places a buy order for 0.01 lots at the current Ask price.
Similarly, if the "isSell_Signal" is true, indicating a sell signal, we log the event with the Print function, which includes the timestamp of the previous bar and the current Bid price from the "getBid" function. After logging, we place a sell trade using "obj_Trade.Sell(0.01, _Symbol, getBid())", which executes a sell order for 0.01 lots at the current Bid price. This ensures that trades are placed whenever the conditions for buy or sell signals are met, and we maintain a clear record of those actions.
Finally, we just need to check momentum shifts and close the respective positions. Here is the logic.
if (isAO_Above || isAO_Below){                //--- If AO crossover occurs
   if (PositionsTotal() > 0){                 //--- If there are open positions
      for (int i=PositionsTotal()-1; i>=0; i--){ //--- Loop through open positions
         ulong posTicket = PositionGetTicket(i); //--- Get the position ticket
         if (posTicket > 0){                  //--- If ticket is valid
            if (PositionSelectByTicket(posTicket)){ //--- Select position by ticket
               ENUM_POSITION_TYPE posType = (ENUM_POSITION_TYPE)PositionGetInteger(POSITION_TYPE); //--- Get position type
               if (posType == POSITION_TYPE_BUY){ //--- If position is a buy
                  if (isAO_Below){            //--- If AO indicates bearish crossover
                     Print("CLOSING THE BUY POSITION WITH #",posTicket); //--- Log position closure
                     obj_Trade.PositionClose(posTicket); //--- Close the buy position
                  }
               }
               else if (posType == POSITION_TYPE_SELL){ //--- If position is a sell
                  if (isAO_Above){            //--- If AO indicates bullish crossover
                     Print("CLOSING THE SELL POSITION WITH #",posTicket); //--- Log position closure
                     obj_Trade.PositionClose(posTicket); //--- Close the sell position
                  }
               }
            }
         }
      }
   }
}
Here, we check for an Awesome Oscillator (AO) crossover (either above or below zero) and manage open positions accordingly. If either "isAO_Above" or "isAO_Below" is true, indicating that an AO crossover has occurred, we proceed to check if there are any open positions by calling the PositionsTotal function. If there are open positions (i.e., "PositionsTotal" returns a value greater than 0), we loop through all open positions, starting from the most recent one (PositionsTotal()-1) and moving backward.
Within the loop, we retrieve the position ticket using the PositionGetTicket function. If the position ticket is valid (i.e., greater than 0), we select the position using the PositionSelectByTicket function. We then determine the position type by calling PositionGetInteger. If the position is a buy (POSITION_TYPE_BUY), we check if "isAO_Below" is true, indicating a bearish crossover. If true, we log the closure of the buy position using the Print function and close the position with "obj_Trade.PositionClose(posTicket)".
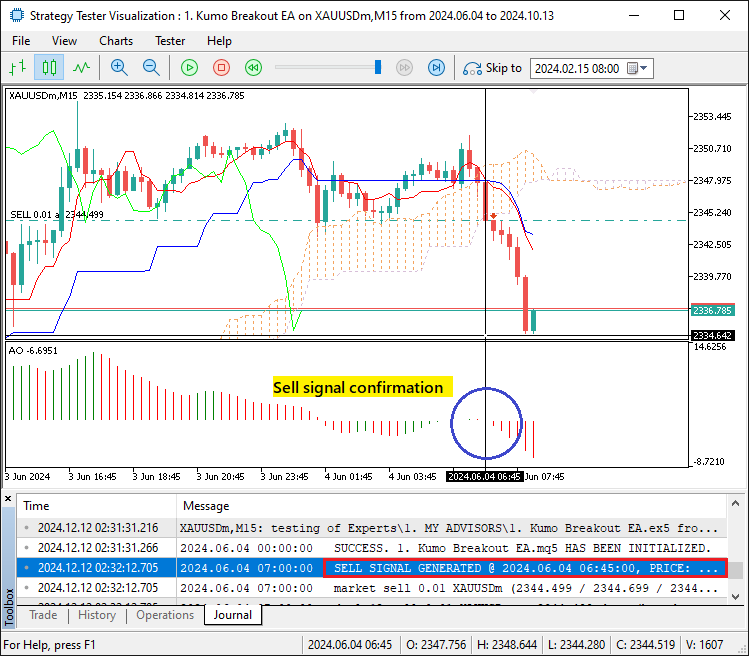
Similarly, if the position is a sell (POSITION_TYPE_SELL), we check if "isAO_Above" is true, indicating a bullish crossover. If true, we log the closure of the sell position and close it using "obj_Trade.PositionClose(posTicket)". This ensures that we manage open positions effectively, closing them when the conditions for an AO crossover signal a shift in market momentum. Upon running the program, we have the following output.
Sell position confirmation.
Sell position exit confirmation on market momentum shift:
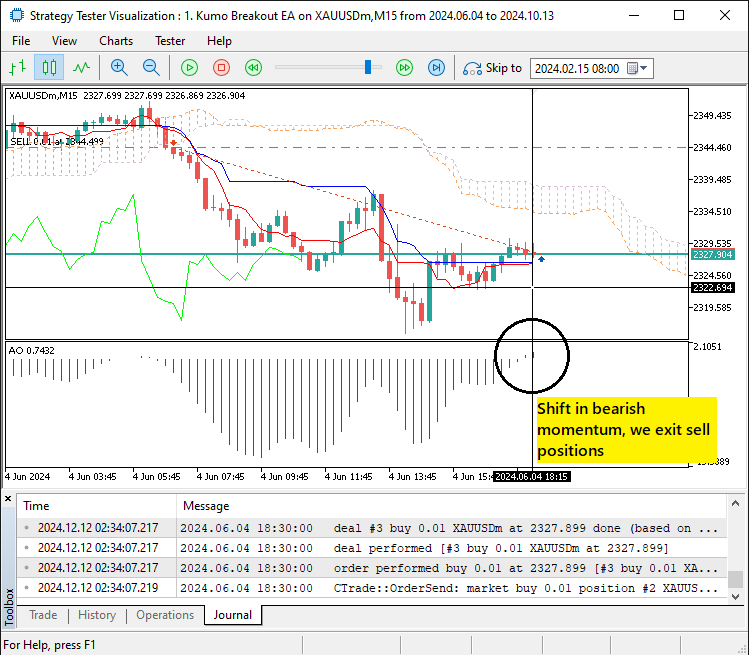
From the above illustrations, we can be certain that we have achieved our desired objectives. We can now proceed to test and optimize the program. That is handled in the next section.
Testing and Optimization of the Strategy
In this section, we test the strategy and optimize it to work better on various market conditions. The alteration that we will do is on the risk management sector, where we can add a trailing stop to lock in profits when we are already in profit instead of waiting for the market to make a full decision on the market momentum shift. To handle that efficiently, we will construct a dynamic function to handle the trailing stop logic.
//+------------------------------------------------------------------+
//|        FUNCTION TO APPLY TRAILING STOP                           |
//+------------------------------------------------------------------+
void applyTrailingSTOP(double slPoints, CTrade &trade_object,int magicNo=0){
   double buySL = NormalizeDouble(SymbolInfoDouble(_Symbol,SYMBOL_BID)-slPoints,_Digits); //--- Calculate SL for buy positions
   double sellSL = NormalizeDouble(SymbolInfoDouble(_Symbol,SYMBOL_ASK)+slPoints,_Digits); //--- Calculate SL for sell positions

   for (int i = PositionsTotal() - 1; i >= 0; i--){ //--- Iterate through all open positions
      ulong ticket = PositionGetTicket(i);          //--- Get position ticket
      if (ticket > 0){                              //--- If ticket is valid
         if (PositionGetString(POSITION_SYMBOL) == _Symbol &&
            (magicNo == 0 || PositionGetInteger(POSITION_MAGIC) == magicNo)){ //--- Check symbol and magic number
            if (PositionGetInteger(POSITION_TYPE) == POSITION_TYPE_BUY &&
               buySL > PositionGetDouble(POSITION_PRICE_OPEN) &&
               (buySL > PositionGetDouble(POSITION_SL) ||
               PositionGetDouble(POSITION_SL) == 0)){ //--- Modify SL for buy position if conditions are met
               trade_object.PositionModify(ticket,buySL,PositionGetDouble(POSITION_TP));
            }
            else if (PositionGetInteger(POSITION_TYPE) == POSITION_TYPE_SELL &&
               sellSL < PositionGetDouble(POSITION_PRICE_OPEN) &&
               (sellSL < PositionGetDouble(POSITION_SL) ||
               PositionGetDouble(POSITION_SL) == 0)){ //--- Modify SL for sell position if conditions are met
               trade_object.PositionModify(ticket,sellSL,PositionGetDouble(POSITION_TP));
            }
         }
      }
   }
}
Here, we implement a function to apply a trailing stop to open positions. The function is called "applyTrailingSTOP", and it takes three parameters: "slPoints", which represents the number of points to set for the stop-loss; "trade_object", which is a reference to the trade object used to modify positions; and an optional "magicNo", which is used to identify specific positions by their magic number. First, we calculate the stop-loss (SL) levels for buy and sell positions. For buy positions, the stop-loss is set at the Bid price minus the specified "slPoints", and for sell positions, the stop-loss is set at the Ask price plus the specified "slPoints". Both SL values are normalized using the NormalizeDouble function to match the decimal precision of the symbol, which is defined by the variable _Digits.
Next, we loop through all open positions using the PositionsTotal function, iterating from the most recent position to the oldest. For each position, we retrieve the position ticket using the PositionGetTicket function and ensure it is valid. We then check if the position's symbol matches the current symbol (_Symbol) and if the position's magic number matches the provided "magicNo" unless the magic number is set to 0, in which case all positions are considered.
If the position is a buy position (POSITION_TYPE_BUY), we check if the calculated buy stop-loss ("buySL") is above the open price of the position (POSITION_PRICE_OPEN) and if it is greater than the current stop-loss (POSITION_SL) or if the current stop-loss is not set ("POSITION_SL" == 0). If these conditions are met, we update the position's stop-loss by calling "trade_object.PositionModify(ticket, buySL, PositionGetDouble(POSITION_TP))", which modifies the position's stop-loss while keeping the take-profit ("POSITION_TP") unchanged.
If the position is a sell position (POSITION_TYPE_SELL), we apply a similar logic. We check if the calculated sell stop-loss ("sellSL") is below the open price of the position (POSITION_PRICE_OPEN) and if it is less than the current stop-loss (POSITION_SL) or if the current stop-loss is not set. If these conditions are met, we update the position's stop-loss using "trade_object.PositionModify(ticket, sellSL, PositionGetDouble(POSITION_TP))".
After defining the function, we just need to call it on the tick function so that execution can be done. We achieve that by calling it and passing the respective parameters as follows.
if (PositionsTotal() > 0){                       //--- If there are open positions
   applyTrailingSTOP(3000*_Point,obj_Trade,0);  //--- Apply a trailing stop
}
If there are any positions in existence, we call the "applyTrailingSTOP" function to apply a trailing stop to these open positions. The function is called with three arguments:
- Trailing Stop Points: The stop-loss distance is calculated as "3000 * _Point", where _Point represents the smallest possible price movement for the current symbol. This means the stop-loss is set at 3000 points away from the current market price.
- Trade Object: We pass "obj_Trade", which is an instance of the trade object used to modify the position's stop-loss and take-profit levels.
- Magic Number: The third argument is set to 0, meaning the function will apply the trailing stop to all open positions, regardless of their magic number.
After the application of the trailing stop, we get the following output.
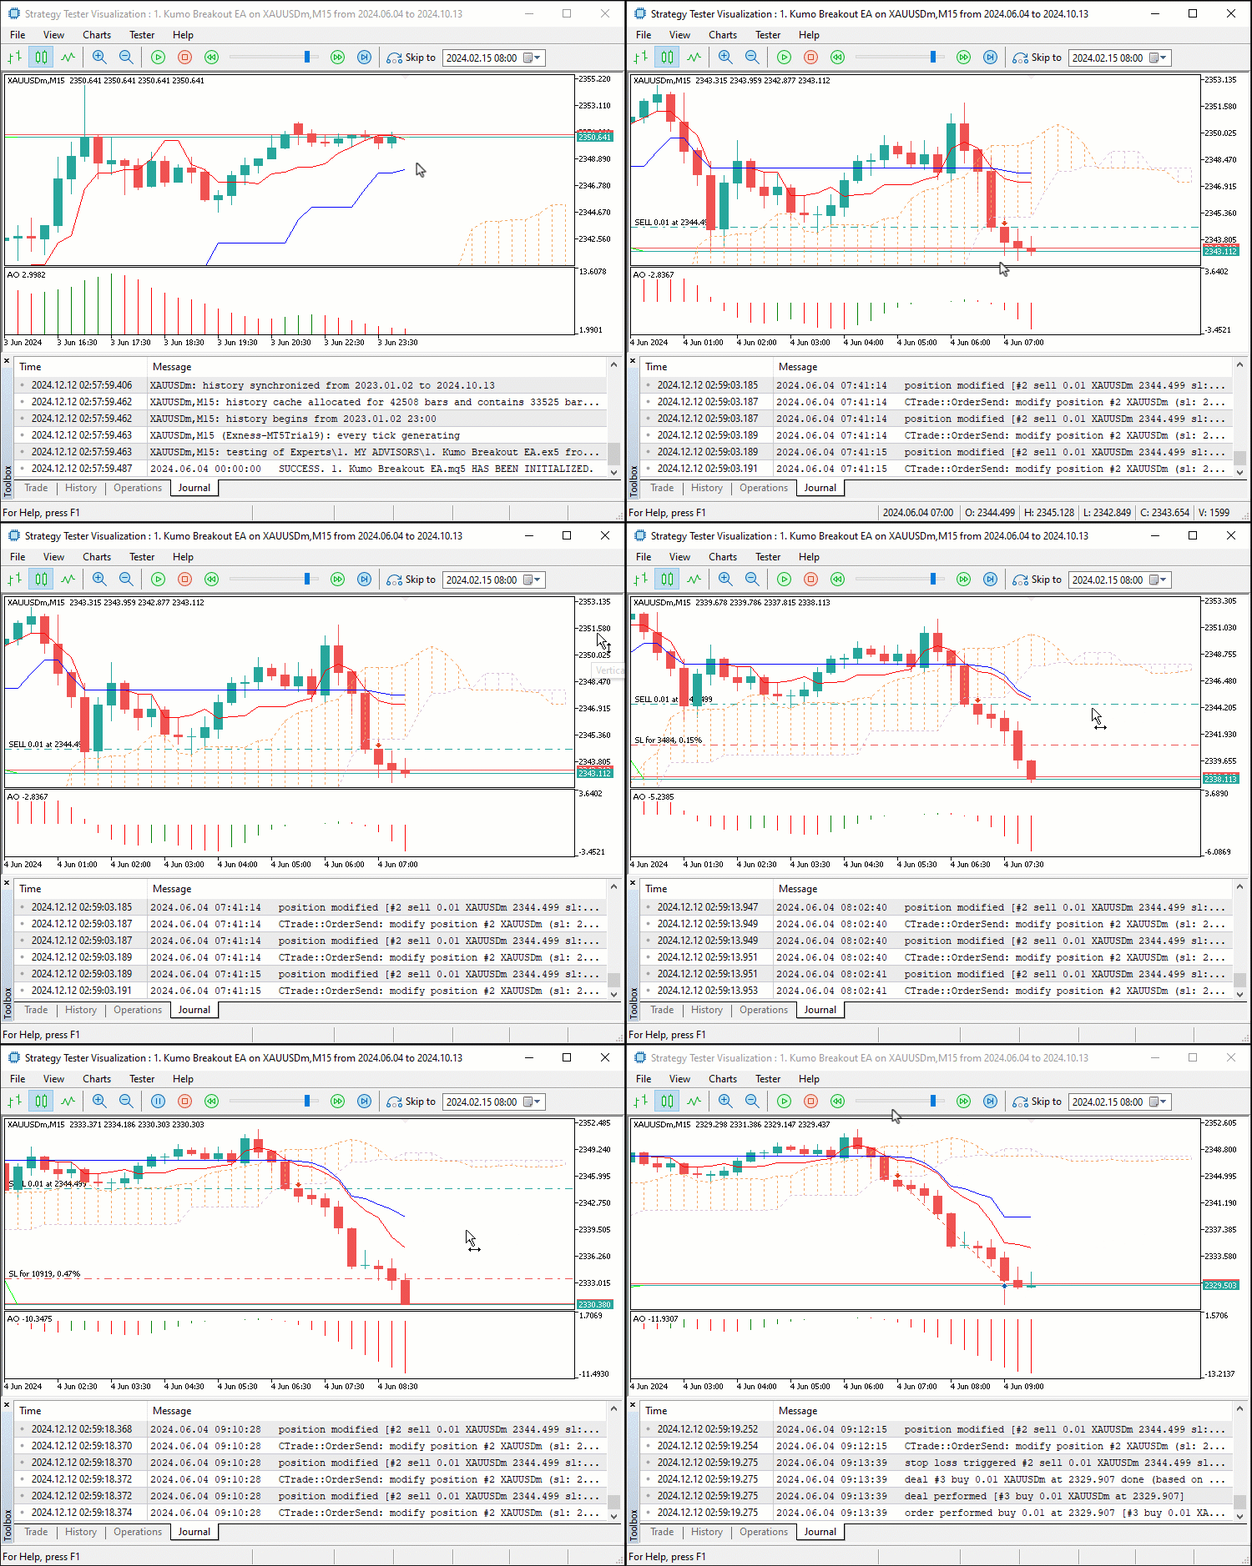
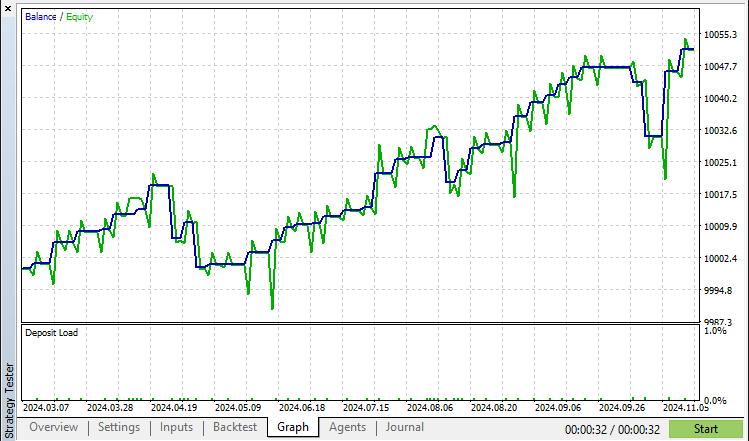
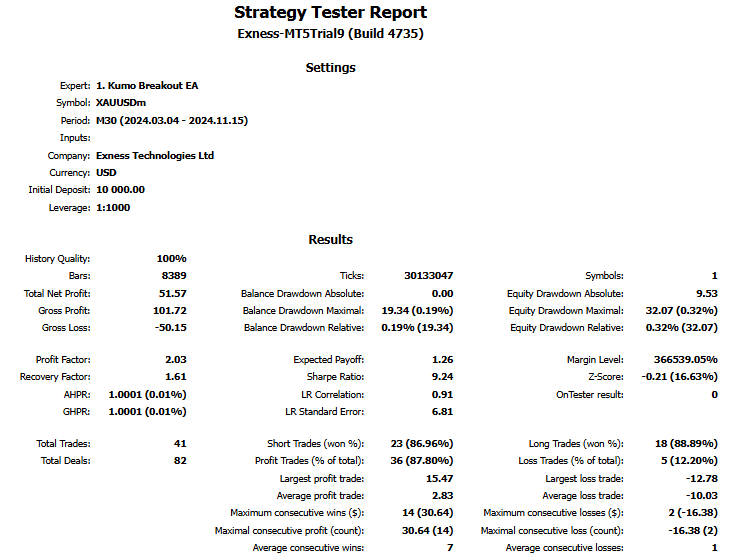
From the visualization, we can see that instead of waiting for the shift in market momentum, we lock in our profits and maximize the gains by moving the stop loss level every time the market advances in our direction. The final strategy tester results are as below.
Tester Graph:
Conclusion
In conclusion, this article demonstrated how to build an MQL5 Expert Advisor (EA) using the Kumo Breakout system. By integrating the Ichimoku Kumo indicator and the Awesome Oscillator (AO), we created a framework to detect market momentum shifts and breakout signals. Key steps included configuring indicator handles, extracting key values, and automating trade execution with trailing stops and position management, resulting in a strategy-driven EA with robust trading logic.
Disclaimer: This article is an educational guide for developing MQL5 EAs based on indicator-driven trade signals. While the Kumo Breakout system is a popular strategy, its effectiveness is not guaranteed in all market conditions. Trading involves financial risk, and past performance does not guarantee future results. Thorough testing and proper risk management are essential before live trading.
By following this guide, you can enhance your MQL5 development skills and create more sophisticated trading systems. The concepts of indicator integration, signal logic, and trade automation demonstrated here can be applied to other strategies, encouraging further exploration and innovation in algorithmic trading. Happy coding and successful trading!
 How to build and optimize a volume-based trading system (Chaikin Money Flow - CMF)
 Build Self Optimizing Expert Advisors in MQL5 (Part 2): USDJPY Scalping Strategy
 Integrating MQL5 with data processing packages (Part 4): Big Data Handling
 Across Neighbourhood Search (ANS)
- Free trading apps
- Over 8,000 signals for copying
- Economic news for exploring financial markets
You agree to website policy and terms of use
Good one man!
Thanks very much. I really appreciate your kind feedback.