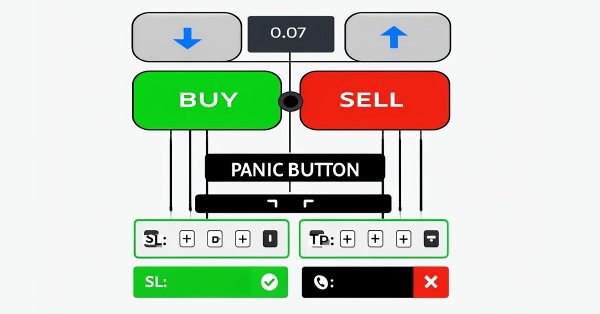
Manual Backtesting Made Easy: Building a Custom Toolkit for Strategy Tester in MQL5
Introduction
Backtesting trading strategies is a cornerstone of successful trading, but automating every idea can feel restrictive, while manual testing often lacks structure and precision. What if you could combine the control of manual trading with the power of MetaTrader 5’s Strategy Tester? In this article, we introduce a custom MetaQuotes Language 5 (MQL5) Expert Advisor (EA) that transforms manual backtesting into an intuitive, efficient process—equipping you with a toolkit to test strategies on your terms. We’ll cover these steps in this order:
- The Plan: Designing a Manual Backtesting Toolkit
- Implementation in MQL5: Bringing the Toolkit to Life
- Backtesting in Action: Using the Toolkit
- Conclusion
By the end, you’ll have a practical solution to backtest and refine your trading ideas quickly and confidently in the Strategy Tester.
The Plan: Designing a Manual Backtesting Toolkit
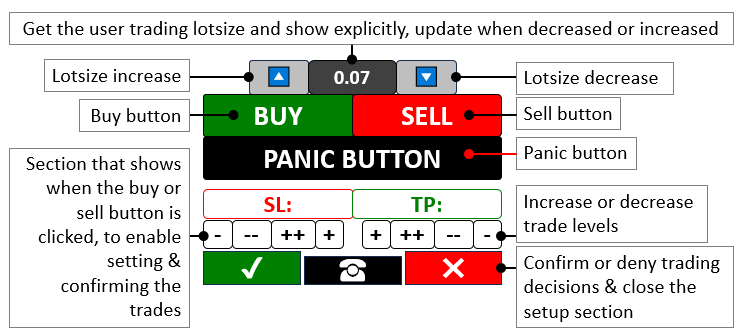
We aim to create a toolkit that merges manual control with the Strategy Tester’s fast backtesting speed in MetaTrader 5, sidestepping the slow real-time ticks of traditional manual testing. We will design the program with on-chart buttons to trigger Buy or Sell trades, adjust lot sizes, set Stop Loss (SL) and Take Profit (TP) levels, and close all positions via a Panic Button—fully integrable with any strategy, from indicators and Japanese candlestick patterns to price action, all working at the Tester’s accelerated pace. This flexible setup will let us test any trading approach interactively with speed and precision, streamlining strategy refinement in a simulated environment. In a nutshell, here is a visualization of what we are aiming for:
Implementation in MQL5: Bringing the Toolkit to Life
To create the program in MQL5, we will need to define the program metadata, and then define some user input parameters, and lastly, we include some library files that will enable us to do the trading activity.
//+------------------------------------------------------------------+
//|                       Manual backtest toolkit in Strategy Tester |
//|                        Copyright 2025, Forex Algo-Trader, Allan. |
//|                                 "https://t.me/Forex_Algo_Trader" |
//+------------------------------------------------------------------+
#property copyright "Forex Algo-Trader, Allan"
#property link      "https://t.me/Forex_Algo_Trader"
#property version   "1.00"
#property description "This EA Enables manual backtest in the strategy tester"
#property strict //--- Enforce strict coding rules to catch errors early

#define BTN_BUY "BTN BUY" //--- Define the name for the Buy button
#define BTN_SELL "BTN SELL" //--- Define the name for the Sell button
#define BTN_P "BTN P" //--- Define the name for the button that increase lot size
#define BTN_M "BTN M" //--- Define the name for the button that decrease lot size
#define BTN_LOT "BTN LOT" //--- Define the name for the lot size display button
#define BTN_CLOSE "BTN CLOSE" //--- Define the name for the button that close all positions
#define BTN_SL "BTN SL" //--- Define the name for the Stop Loss display button
#define BTN_SL1M "BTN SL1M" //--- Define the name for the button that slightly lower Stop Loss
#define BTN_SL2M "BTN SL2M" //--- Define the name for the button that greatly lower Stop Loss
#define BTN_SL1P "BTN SL1P" //--- Define the name for the button that slightly raise Stop Loss
#define BTN_SL2P "BTN SL2P" //--- Define the name for the button that greatly raise Stop Loss
#define BTN_TP "BTN TP" //--- Define the name for the Take Profit display button
#define BTN_TP1M "BTN TP1M" //--- Define the name for the button that slightly lower Take Profit
#define BTN_TP2M "BTN TP2M" //--- Define the name for the button that greatly lower Take Profit
#define BTN_TP1P "BTN TP1P" //--- Define the name for the button that slightly raise Take Profit
#define BTN_TP2P "BTN TP2P" //--- Define the name for the button that greatly raise Take Profit
#define BTN_YES "BTN YES" //--- Define the name for the button that confirm a trade
#define BTN_NO "BTN NO" //--- Define the name for the button that cancel a trade
#define BTN_IDLE "BTN IDLE" //--- Define the name for the idle button between Yes and No
#define HL_SL "HL SL" //--- Define the name for the Stop Loss horizontal line
#define HL_TP "HL TP" //--- Define the name for the Take Profit horizontal line

#include <Trade/Trade.mqh> //--- Bring in the Trade library needed for trading functions
CTrade obj_Trade; //--- Create a trading object to handle trade operations

bool tradeInAction = false; //--- Track whether a trade setup is currently active
bool isHaveTradeLevels = false; //--- Track whether Stop Loss and Take Profit levels are shown

input double init_lot = 0.03;
input int slow_pts = 10;
input int fast_pts = 100;
Here, we start by defining a set of interactive buttons like "BTN_BUY" and "BTN_SELL" using #define keyword to kick off trades whenever we want, giving us direct control over entry points, while "BTN_P" and "BTN_M" let us tweak the "init_lot" size—set initially at 0.03—up or down to match our risk appetite. We also include "BTN_CLOSE" as our emergency exit, a quick way to shut down all positions in a snap, and we rely on "tradeInAction" to keep tabs on whether we’re in the middle of setting up a trade and "isHaveTradeLevels" to signal when Stop Loss and Take Profit visuals are active.
We then tap into the "CTrade" class from "<Trade/Trade.mqh>" to create an "obj_Trade" object to handle trade execution smoothly and efficiently. To give us even more flexibility, we add adjustable inputs like "slow_pts" at 10 and "fast_pts" at 100, so we can fine-tune our Stop Loss and Take Profit levels on the fly, ensuring our toolkit adapts to whatever strategy we’re testing. Now, since we will need to create the panel buttons, let us create a function with all the possible inputs for reusability and customization.
//+------------------------------------------------------------------+
//| Create button function                                           |
//+------------------------------------------------------------------+
void CreateBtn(string objName,int xD,int yD,int xS,int yS,string txt,
               int fs=13,color clrTxt=clrWhite,color clrBg=clrBlack,
               color clrBd=clrBlack,string font="Calibri"){
   ObjectCreate(0,objName,OBJ_BUTTON,0,0,0); //--- Create a new button object on the chart
   ObjectSetInteger(0,objName,OBJPROP_XDISTANCE, xD); //--- Set the button's horizontal position
   ObjectSetInteger(0,objName,OBJPROP_YDISTANCE, yD); //--- Set the button's vertical position
   ObjectSetInteger(0,objName,OBJPROP_XSIZE, xS); //--- Set the button's width
   ObjectSetInteger(0,objName,OBJPROP_YSIZE, yS); //--- Set the button's height
   ObjectSetInteger(0,objName,OBJPROP_CORNER, CORNER_LEFT_UPPER); //--- Position the button from the top-left corner
   ObjectSetString(0,objName,OBJPROP_TEXT, txt); //--- Set the text displayed on the button
   ObjectSetInteger(0,objName,OBJPROP_FONTSIZE, fs); //--- Set the font size of the button text
   ObjectSetInteger(0,objName,OBJPROP_COLOR, clrTxt); //--- Set the color of the button text
   ObjectSetInteger(0,objName,OBJPROP_BGCOLOR, clrBg); //--- Set the background color of the button
   ObjectSetInteger(0,objName,OBJPROP_BORDER_COLOR,clrBd); //--- Set the border color of the button
   ObjectSetString(0,objName,OBJPROP_FONT,font); //--- Set the font style of the button text

   ChartRedraw(0); //--- Refresh the chart to show the new button
}
Here, we define the "CreateBtn" function to build every button—like "BTN_BUY" or "BTN_SELL"—on the chart, taking inputs such as "objName" for the button’s identity, "xD" and "yD" for its horizontal and vertical positions, "xS" and "yS" for its width and height, and "txt" for the label we want to display, like “BUY” or “SELL.” To make this happen, we use the ObjectCreate function to place a new OBJ_BUTTON object on the chart, setting its base at coordinates (0,0,0) for simplicity. Then, we position it precisely with ObjectSetInteger to adjust "OBJPROP_XDISTANCE" to "xD" and "OBJPROP_YDISTANCE" to "yD," ensuring it sits exactly where we need it, and we size it using "OBJPROP_XSIZE" for "xS" and "OBJPROP_YSIZE" for "yS" to fit our design.
We anchor it to the top-left corner with "OBJPROP_CORNER" set to CORNER_LEFT_UPPER, making the layout consistent, and we use ObjectSetString to assign "OBJPROP_TEXT" as "txt" so the button shows its purpose clearly. For style, we tweak "OBJPROP_FONTSIZE" to "fs" (defaulting to 13), "OBJPROP_COLOR" to "clrTxt" (defaulting to white) for text, OBJPROP_BGCOLOR to "clrBg" (defaulting to black) for the background, and "OBJPROP_BORDER_COLOR" to "clrBd" (defaulting to black) for the outline, while "OBJPROP_FONT" gets "font" (defaulting to "Calibri") for a clean look. Finally, we use the ChartRedraw function to refresh the chart with "0" as the window ID, instantly displaying our new button so we can interact with it in the Strategy Tester. We can now call the function whenever we want to create a button, and we will start by calling it in the OnInit event handler.
//+------------------------------------------------------------------+
//| Expert initialization function                                   |
//+------------------------------------------------------------------+
int OnInit(){
   CreateBtn(BTN_P,150,45,40,25,CharToString(217),15,clrBlack,clrWhite,clrBlack,"Wingdings"); //--- Make the button to increase lot size with an up arrow
   CreateBtn(BTN_LOT,190,45,60,25,string(init_lot),12,clrWhite,clrGray,clrBlack); //--- Make the button showing the current lot size
   CreateBtn(BTN_M,250,45,40,25,CharToString(218),15,clrBlack,clrWhite,clrBlack,"Wingdings"); //--- Make the button to decrease lot size with a down arrow
   CreateBtn(BTN_BUY,110,70,110,30,"BUY",15,clrWhite,clrGreen,clrBlack); //--- Make the Buy button with a green background
   CreateBtn(BTN_SELL,220,70,110,30,"SELL",15,clrWhite,clrRed,clrBlack); //--- Make the Sell button with a red background
   CreateBtn(BTN_CLOSE,110,100,220,30,"PANIC BUTTON (X)",15,clrWhite,clrBlack,clrBlack); //--- Make the emergency button to close all trades

   return(INIT_SUCCEEDED); //--- Tell the system the EA start up successfully
}
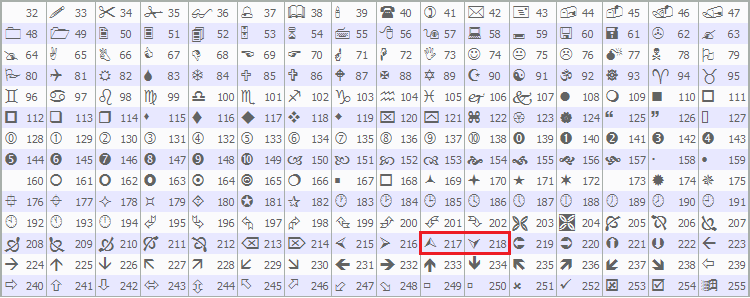
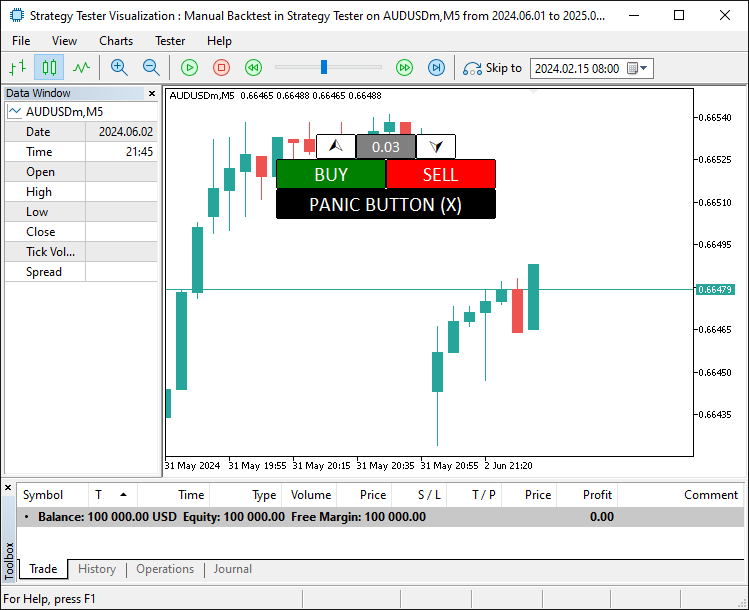
Here, we kick off our manual backtesting toolkit with the OnInit event handler, setting up its interface in the Strategy Tester. We use the "CreateBtn" function to place "BTN_P" at "xD" 150, "yD" 45 with an up arrow from CharToString(217) in "Wingdings," "BTN_LOT" at "xD" 190 showing "init_lot," and "BTN_M" at "xD" 250 with a down arrow from "CharToString(218)"—all styled for lot size control. Then, we add "BTN_BUY" at "xD" 110, "yD" 70 with "BUY" on "clrGreen," "BTN_SELL" at "xD" 220 with "SELL" on "clrRed," and "BTN_CLOSE" at "xD" 110, "yD" 100 as "PANIC BUTTON (X)" on "clrBlack," before signaling success with "return" and INIT_SUCCEEDED. The Wingdings font we use for the icons from the MQL5 already defined table for characters, which is as below.
When we run the program, we get the following output.
Since we have set the foundational background, we need to read the button states and the values so we can use them for trading purposes. Thus, we need some functions for that too.
int GetState(string Name){return (int)ObjectGetInteger(0,Name,OBJPROP_STATE);} //--- Get whether a button is pressed or not
string GetValue(string Name){return ObjectGetString(0,Name,OBJPROP_TEXT);} //--- Get the text shown on an object
double GetValueHL(string Name){return ObjectGetDouble(0,Name,OBJPROP_PRICE);} //--- Get the price level of a horizontal line
Here, we define the "GetState" function to check button clicks, where we use the ObjectGetInteger function with "OBJPROP_STATE" to return if "Name" is pressed, "GetValue" to fetch text from "Name" using "ObjectGetString" with "OBJPROP_TEXT," and "GetValueHL" to grab price levels of "Name" with ObjectGetDouble using OBJPROP_PRICE for precise trade control. We can now use the functions to get the button states in the OnTick event handler since we can't directly use the OnChartEvent event handler in the Strategy Tester. Here is how we achieve that.
//+------------------------------------------------------------------+
//| Expert tick function                                             |
//+------------------------------------------------------------------+
void OnTick(){
   double Ask = NormalizeDouble(SymbolInfoDouble(_Symbol,SYMBOL_ASK),_Digits); //--- Get the current Ask price and adjust it to the right decimal places
   double Bid = NormalizeDouble(SymbolInfoDouble(_Symbol,SYMBOL_BID),_Digits); //--- Get the current Bid price and adjust it to the right decimal places

   if (GetState(BTN_BUY)==true || GetState(BTN_SELL)){ //--- Check if either the Buy or Sell button is clicked
      tradeInAction = true; //--- Set trade setup to active
   }
}
Here, we use the OnTick event handler to drive our toolkit’s real-time actions in the Strategy Tester, where we use the NormalizeDouble function with SymbolInfoDouble to set "Ask" to the current "SYMBOL_ASK" price and "Bid" to the SYMBOL_BID price, both adjusted to _Digits for accuracy and if "GetState" shows "BTN_BUY" or "BTN_SELL" as true, we set "tradeInAction" to true to start our trade setup. This is the point we need to extra trade levels to enable us to set the levels and adjust dynamically. Let us have a function for that.
//+------------------------------------------------------------------+
//| Create high low function                                         |
//+------------------------------------------------------------------+
void createHL(string objName,datetime time1,double price1,color clr){
   if (ObjectFind(0,objName) < 0){ //--- Check if the horizontal line doesn’t already exist
      ObjectCreate(0,objName,OBJ_HLINE,0,time1,price1); //--- Create a new horizontal line at the specified price
      ObjectSetInteger(0,objName,OBJPROP_TIME,time1); //--- Set the time property (though not critical for HLINE)
      ObjectSetDouble(0,objName,OBJPROP_PRICE,price1); //--- Set the price level of the horizontal line
      ObjectSetInteger(0,objName,OBJPROP_COLOR,clr); //--- Set the color of the line (red for SL, green for TP)
      ObjectSetInteger(0,objName,OBJPROP_STYLE,STYLE_DASHDOTDOT); //--- Set the line style to dash-dot-dot
      ChartRedraw(0); //--- Refresh the chart to display the new line
   }
}
First, we define the "createHL" function to draw horizontal lines for our toolkit in the Strategy Tester, where we use the ObjectFind function to check if "objName" exists and, if it’s less than 0, we use the ObjectCreate function to make an "OBJ_HLINE" at "time1" and "price1," we use the ObjectSetInteger function to set "OBJPROP_TIME" to "time1" and "OBJPROP_COLOR" to "clr" and "OBJPROP_STYLE" to "STYLE_DASHDOTDOT," we use the ObjectSetDouble function to set "OBJPROP_PRICE" to "price1," and we use the ChartRedraw function to refresh the chart with "0" to display it. Then, we integrate this function into another function for creating the trade levels seamlessly as below.
//+------------------------------------------------------------------+
//| Create trade levels function                                     |
//+------------------------------------------------------------------+
void CreateTradeLevels(){
   double Ask = NormalizeDouble(SymbolInfoDouble(_Symbol,SYMBOL_ASK),_Digits); //--- Get unnoticed the current Ask price, adjusted for digits
   double Bid = NormalizeDouble(SymbolInfoDouble(_Symbol,SYMBOL_BID),_Digits); //--- Get the current Bid price, adjusted for digits

   string level_SL,level_TP; //--- Declare variables to hold SL and TP levels as strings
   if (GetState(BTN_BUY)==true){ //--- Check if the Buy button is active
      level_SL = string(Bid-100*_Point); //--- Set initial Stop Loss 100 points below Bid for Buy
      level_TP = string(Bid+100*_Point); //--- Set initial Take Profit 100 points above Bid for Buy
   }
   else if (GetState(BTN_SELL)==true){ //--- Check if the Sell button is active
      level_SL = string(Ask+100*_Point); //--- Set initial Stop Loss 100 points above Ask for Sell
      level_TP = string(Ask-100*_Point); //--- Set initial Take Profit 100 points below Ask for Sell
   }

   createHL(HL_SL,0,double(level_SL),clrRed); //--- Create a red Stop Loss line at the calculated level
   createHL(HL_TP,0,double(level_TP),clrGreen); //--- Create a green Take Profit line at the calculated level

   CreateBtn(BTN_SL,110,135,110,23,"SL: "+GetValue(HL_SL),13,clrRed,clrWhite,clrRed); //--- Make a button showing the Stop Loss level
   CreateBtn(BTN_TP,220,135,110,23,"TP: "+GetValue(HL_TP),13,clrGreen,clrWhite,clrGreen); //--- Make a button showing the Take Profit level

   CreateBtn(BTN_SL1M,110,158,27,20,"-",17,clrBlack,clrWhite,clrGray); //--- Make a button to slightly lower Stop Loss
   CreateBtn(BTN_SL2M,137,158,27,20,"--",17,clrBlack,clrWhite,clrGray); //--- Make a button to greatly lower Stop Loss
   CreateBtn(BTN_SL2P,164,158,27,20,"++",17,clrBlack,clrWhite,clrGray); //--- Make a button to greatly raise Stop Loss
   CreateBtn(BTN_SL1P,191,158,27,20,"+",17,clrBlack,clrWhite,clrGray); //--- Make a button to slightly raise Stop Loss

   CreateBtn(BTN_TP1P,222,158,27,20,"+",17,clrBlack,clrWhite,clrGray); //--- Make a button to slightly raise Take Profit
   CreateBtn(BTN_TP2P,249,158,27,20,"++",17,clrBlack,clrWhite,clrGray); //--- Make a button to greatly raise Take Profit
   CreateBtn(BTN_TP2M,276,158,27,20,"--",17,clrBlack,clrWhite,clrGray); //--- Make a button to greatly lower Take Profit
   CreateBtn(BTN_TP1M,303,158,27,20,"-",17,clrBlack,clrWhite,clrGray); //--- Make a button to slightly lower Take Profit

   CreateBtn(BTN_YES,110,178,70,30,CharToString(254),20,clrWhite,clrDarkGreen,clrWhite,"Wingdings"); //--- Make a green checkmark button to confirm the trade
   CreateBtn(BTN_NO,260,178,70,30,CharToString(253),20,clrWhite,clrDarkRed,clrWhite,"Wingdings"); //--- Make a red X button to cancel the trade
   CreateBtn(BTN_IDLE,180,183,80,25,CharToString(40),20,clrWhite,clrBlack,clrWhite,"Wingdings"); //--- Make a neutral button between Yes and No
}
Here, we define the "CreateTradeLevels" function to set up our trade levels, where we use the NormalizeDouble function with SymbolInfoDouble to set "Ask" to "SYMBOL_ASK" and "Bid" to "SYMBOL_BID," adjusted by _Digits, and declare "level_SL" and "level_TP" as strings. If "GetState" shows "BTN_BUY" as true, we set "level_SL" to "Bid-100_Point" and "level_TP" to "Bid+100_Point," but if "BTN_SELL" is true, we set "level_SL" to "Ask+100_Point" and "level_TP" to "Ask-100_Point".
We use the "createHL" function to draw "HL_SL" at "double(level_SL)" in "clrRed" and "HL_TP" at "double(level_TP)" in "clrGreen," then use the "CreateBtn" function to make buttons like "BTN_SL" with "GetValue(HL_SL)" text, "BTN_TP" with "GetValue(HL_TP)," and adjustment buttons "BTN_SL1M," "BTN_SL2M," "BTN_SL2P," "BTN_SL1P," "BTN_TP1P," "BTN_TP2P," "BTN_TP2M," and "BTN_TP1M" with symbols like "-" and "+," plus "BTN_YES," "BTN_NO," and "BTN_IDLE" using CharToString for confirm, cancel, and neutral options in "Wingdings". With the function, we can call it when the buy or sell buttons are clicked to initialize the trade level setup.
if (!isHaveTradeLevels){ //--- Check if trade levels aren't already on the chart
   CreateTradeLevels(); //--- Add Stop Loss and Take Profit levels and controls to the chart
   isHaveTradeLevels = true; //--- Mark that trade levels are now present
}
Here, we set up a check, where we test if "isHaveTradeLevels" is false with "!isHaveTradeLevels," and when it is, we use the "CreateTradeLevels" function to place Stop Loss and Take Profit controls on the chart, then update "isHaveTradeLevels" to true to show they’re active. Upon compilation, we have the following outcome.
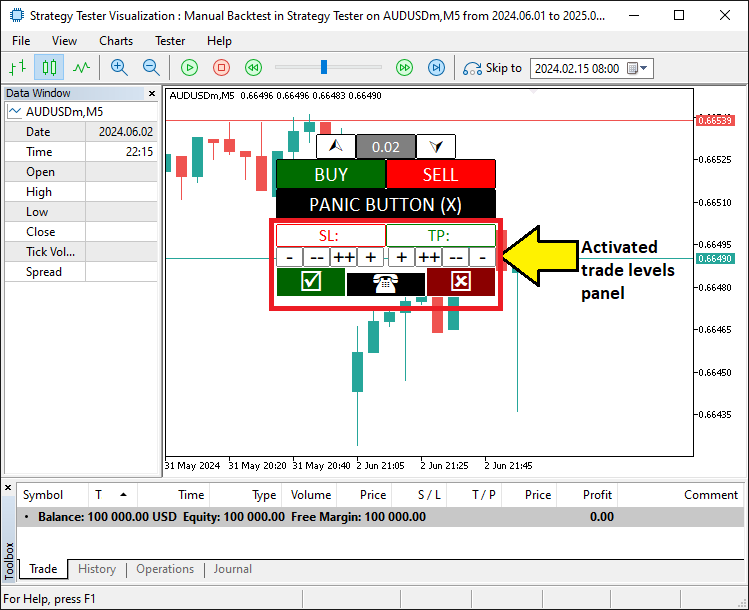
Next, we need to bring the buttons for the trade levels to life by making them responsive and doing what they need to do. Here is how we achieve that.
if (tradeInAction){ //--- Continue if a trade setup is active

   // SL SLOW/FAST BUTTONS
   if (GetState(BTN_SL1M)){ //--- Check if the small Stop Loss decrease button is clicked
      ObjectSetDouble(0,HL_SL,OBJPROP_PRICE,GetValueHL(HL_SL)-slow_pts*_Point); //--- Move the Stop Loss down by a small amount
      ObjectSetInteger(0,BTN_SL1M,OBJPROP_STATE,false); //--- Turn off the button press state
      ChartRedraw(0); //--- Refresh the chart to show the change
   }
   if (GetState(BTN_SL2M)){ //--- Check if the large Stop Loss decrease button is clicked
      ObjectSetDouble(0,HL_SL,OBJPROP_PRICE,GetValueHL(HL_SL)-fast_pts*_Point); //--- Move the Stop Loss down by a large amount
      ObjectSetInteger(0,BTN_SL2M,OBJPROP_STATE,false); //--- Turn off the button press state
      ChartRedraw(0); //--- Refresh the chart to show the change
   }
   if (GetState(BTN_SL1P)){ //--- Check if the small Stop Loss increase button is clicked
      ObjectSetDouble(0,HL_SL,OBJPROP_PRICE,GetValueHL(HL_SL)+slow_pts*_Point); //--- Move the Stop Loss up by a small amount
      ObjectSetInteger(0,BTN_SL1P,OBJPROP_STATE,false); //--- Turn off the button press state
      ChartRedraw(0); //--- Refresh the chart to show the change
   }
   if (GetState(BTN_SL2P)){ //--- Check if the large Stop Loss increase button is clicked
      ObjectSetDouble(0,HL_SL,OBJPROP_PRICE,GetValueHL(HL_SL)+fast_pts*_Point); //--- Move the Stop Loss up by a large amount
      ObjectSetInteger(0,BTN_SL2P,OBJPROP_STATE,false); //--- Turn off the button press state
      ChartRedraw(0); //--- Refresh the chart to show the change
   }

   // TP SLOW/FAST BUTTONS
   if (GetState(BTN_TP1M)){ //--- Check if the small Take Profit decrease button is clicked
      ObjectSetDouble(0,HL_TP,OBJPROP_PRICE,GetValueHL(HL_TP)-slow_pts*_Point); //--- Move the Take Profit down by a small amount
      ObjectSetInteger(0,BTN_TP1M,OBJPROP_STATE,false); //--- Turn off the button press state
      ChartRedraw(0); //--- Refresh the chart to show the change
   }
   if (GetState(BTN_TP2M)){ //--- Check if the large Take Profit decrease button is clicked
      ObjectSetDouble(0,HL_TP,OBJPROP_PRICE,GetValueHL(HL_TP)-fast_pts*_Point); //--- Move the Take Profit down by a large amount
      ObjectSetInteger(0,BTN_TP2M,OBJPROP_STATE,false); //--- Turn off the button press state
      ChartRedraw(0); //--- Refresh the chart to show the change
   }
   if (GetState(BTN_TP1P)){ //--- Check if the small Take Profit increase button is clicked
      ObjectSetDouble(0,HL_TP,OBJPROP_PRICE,GetValueHL(HL_TP)+slow_pts*_Point); //--- Move the Take Profit up by a small amount
      ObjectSetInteger(0,BTN_TP1P,OBJPROP_STATE,false); //--- Turn off the button press state
      ChartRedraw(0); //--- Refresh the chart to show the change
   }
   if (GetState(BTN_TP2P)){ //--- Check if the large Take Profit increase button is clicked
      ObjectSetDouble(0,HL_TP,OBJPROP_PRICE,GetValueHL(HL_TP)+fast_pts*_Point); //--- Move the Take Profit up by a large amount
      ObjectSetInteger(0,BTN_TP2P,OBJPROP_STATE,false); //--- Turn off the button press state
      ChartRedraw(0); //--- Refresh the chart to show the change
   }

}
Here, we manage Stop Loss and Take Profit adjustments in our toolkit when "tradeInAction" is true, where we use the "GetState" function to check if buttons like "BTN_SL1M," "BTN_SL2M," "BTN_SL1P," or "BTN_SL2P" are clicked and adjust "HL_SL" by "slow_pts_Point" or "fast_pts_Point" using the ObjectSetDouble function with "OBJPROP_PRICE" and "GetValueHL," then use the ObjectSetInteger function to reset OBJPROP_STATE to false and the ChartRedraw function to update the chart, and similarly handle "BTN_TP1M," "BTN_TP2M," "BTN_TP1P," or "BTN_TP2P" for "HL_TP" adjustments. Finally, once the levels are set, we can confirm the placement and open respective positions, and then clean off the trade level setup, but first, we will need to get a function to delete the levels setup panel.
//+------------------------------------------------------------------+
//| Delete objects function                                          |
//+------------------------------------------------------------------+
void DeleteObjects_SLTP(){
   ObjectDelete(0,HL_SL); //--- Remove the Stop Loss line from the chart
   ObjectDelete(0,HL_TP); //--- Remove the Take Profit line from the chart
   ObjectDelete(0,BTN_SL); //--- Remove the Stop Loss display button
   ObjectDelete(0,BTN_TP); //--- Remove the Take Profit display button
   ObjectDelete(0,BTN_SL1M); //--- Remove the small Stop Loss decrease button
   ObjectDelete(0,BTN_SL2M); //--- Remove the large Stop Loss decrease button
   ObjectDelete(0,BTN_SL1P); //--- Remove the small Stop Loss increase button
   ObjectDelete(0,BTN_SL2P); //--- Remove the large Stop Loss increase button
   ObjectDelete(0,BTN_TP1P); //--- Remove the small Take Profit increase button
   ObjectDelete(0,BTN_TP2P); //--- Remove the large Take Profit increase button
   ObjectDelete(0,BTN_TP2M); //--- Remove the large Take Profit decrease button
   ObjectDelete(0,BTN_TP1M); //--- Remove the small Take Profit decrease button
   ObjectDelete(0,BTN_YES); //--- Remove the confirm trade button
   ObjectDelete(0,BTN_NO); //--- Remove the cancel trade button
   ObjectDelete(0,BTN_IDLE); //--- Remove the idle button

   ChartRedraw(0); //--- Refresh the chart to show all objects removed
}
Here, we handle cleanup in our toolkit with the "DeleteObjects_SLTP" function, where we use the ObjectDelete function to remove "HL_SL," "HL_TP," "BTN_SL," "BTN_TP," "BTN_SL1M," "BTN_SL2M," "BTN_SL1P," "BTN_SL2P," "BTN_TP1P," "BTN_TP2P," "BTN_TP2M," "BTN_TP1M," "BTN_YES," "BTN_NO," and "BTN_IDLE" from the chart, then use the ChartRedraw function with "0" to refresh and show everything cleared. We can now use this function in our order placement logic.
// BUY ORDER PLACEMENT
if (GetState(BTN_BUY) && GetState(BTN_YES)){ //--- Check if both Buy and Yes buttons are clicked
   obj_Trade.Buy(double(GetValue(BTN_LOT)),_Symbol,Ask,GetValueHL(HL_SL),GetValueHL(HL_TP)); //--- Place a Buy order with set lot size, SL, and TP
   DeleteObjects_SLTP(); //--- Remove all trade level objects from the chart
   isHaveTradeLevels = false; //--- Mark that trade levels are no longer present
   ObjectSetInteger(0,BTN_YES,OBJPROP_STATE,false); //--- Turn off the Yes button press state
   ObjectSetInteger(0,BTN_BUY,OBJPROP_STATE,false); //--- Turn off the Buy button press state
   tradeInAction = false; //--- Mark the trade setup as complete
   ChartRedraw(0); //--- Refresh the chart to reflect changes
}
// SELL ORDER PLACEMENT
else if (GetState(BTN_SELL) && GetState(BTN_YES)){ //--- Check if both Sell and Yes buttons are clicked
   obj_Trade.Sell(double(GetValue(BTN_LOT)),_Symbol,Bid,GetValueHL(HL_SL),GetValueHL(HL_TP)); //--- Place a Sell order with set lot size, SL, and TP
   DeleteObjects_SLTP(); //--- Remove all trade level objects from the chart
   isHaveTradeLevels = false; //--- Mark that trade levels are no longer present
   ObjectSetInteger(0,BTN_YES,OBJPROP_STATE,false); //--- Turn off the Yes button press state
   ObjectSetInteger(0,BTN_SELL,OBJPROP_STATE,false); //--- Turn off the Sell button press state
   tradeInAction = false; //--- Mark the trade setup as complete
   ChartRedraw(0); //--- Refresh the chart to reflect changes
}
else if (GetState(BTN_NO)){ //--- Check if the No button is clicked to cancel
   DeleteObjects_SLTP(); //--- Remove all trade level objects from the chart
   isHaveTradeLevels = false; //--- Mark that trade levels are no longer present
   ObjectSetInteger(0,BTN_NO,OBJPROP_STATE,false); //--- Turn off the No button press state
   ObjectSetInteger(0,BTN_BUY,OBJPROP_STATE,false); //--- Turn off the Buy button press state
   ObjectSetInteger(0,BTN_SELL,OBJPROP_STATE,false); //--- Turn off the Sell button press state
   tradeInAction = false; //--- Mark the trade setup as canceled
   ChartRedraw(0); //--- Refresh the chart to reflect changes
}
We execute trades in our toolkit within the Strategy Tester, where we use the "GetState" function to check if "BTN_BUY" and "BTN_YES" are true and then use the "obj_Trade.Buy" method with "double(GetValue(BTN_LOT))", _Symbol, "Ask", "GetValueHL(HL_SL)", and "GetValueHL(HL_TP)" to place a Buy order, or if "BTN_SELL" and "BTN_YES" are true, we use "obj_Trade.Sell" with "Bid" instead, and in either case, we use the "DeleteObjects_SLTP" function to clear objects, set "isHaveTradeLevels" and "tradeInAction" to false, use the ObjectSetInteger function to reset OBJPROP_STATE on "BTN_YES", "BTN_BUY", or "BTN_SELL" to false, and use the ChartRedraw function to update the chart, but if "BTN_NO" is true, we cancel by clearing objects and resetting states similarly. Similarly, we handle the increase or decrease of the trading volume buttons as follows.
if (GetState(BTN_P)==true){ //--- Check if the lot size increase button is clicked
   double newLot = (double)GetValue(BTN_LOT); //--- Get the current lot size as a number
   double lotStep = SymbolInfoDouble(_Symbol,SYMBOL_VOLUME_STEP); //--- Get the minimum lot size change allowed
   newLot += lotStep; //--- Increase the lot size by one step
   newLot = NormalizeDouble(newLot,2); //--- Round the new lot size to 2 decimal places
   newLot = newLot > 0.1 ? lotStep : newLot; //--- Ensure lot size doesn't exceed 0.1, otherwise reset to step
   ObjectSetString(0,BTN_LOT,OBJPROP_TEXT,string(newLot)); //--- Update the lot size display with the new value
   ObjectSetInteger(0,BTN_P,OBJPROP_STATE,false); //--- Turn off the increase button press state
   ChartRedraw(0); //--- Refresh the chart to show the new lot size
}
if (GetState(BTN_M)==true){ //--- Check if the lot size decrease button is clicked
   double newLot = (double)GetValue(BTN_LOT); //--- Get the current lot size as a number
   double lotStep = SymbolInfoDouble(_Symbol,SYMBOL_VOLUME_STEP); //--- Get the minimum lot size change allowed
   newLot -= lotStep; //--- Decrease the lot size by one step
   newLot = NormalizeDouble(newLot,2); //--- Round the new lot size to 2 decimal places
   newLot = newLot < lotStep ? lotStep : newLot; //--- Ensure lot size doesn't go below minimum, otherwise set to step
   ObjectSetString(0,BTN_LOT,OBJPROP_TEXT,string(newLot)); //--- Update the lot size display with the new value
   ObjectSetInteger(0,BTN_M,OBJPROP_STATE,false); //--- Turn off the decrease button press state
   ChartRedraw(0); //--- Refresh the chart to show the new lot size
}
Here, we adjust lot sizes starting with the increase where we use the "GetState" function to check if "BTN_P" is true, then use "GetValue" to set "newLot" from "BTN_LOT," use SymbolInfoDouble to get "lotStep" from SYMBOL_VOLUME_STEP, add "lotStep" to "newLot," and use NormalizeDouble to round it to 2 decimals, capping it at "lotStep" if over 0.1 before using ObjectSetString to update "BTN_LOT"’s "OBJPROP_TEXT" and "ObjectSetInteger" to reset "BTN_P"’s "OBJPROP_STATE" to false, followed by ChartRedraw to refresh.
For the decrease, we use "GetState" to check "BTN_M," subtract "lotStep" from "newLot" after fetching it the same way, keep it at least "lotStep," and apply the same ObjectSetString, "ObjectSetInteger," and "ChartRedraw" function steps to update "BTN_LOT" and reset "BTN_M". As for the panic button, we will need to define a function to close all the open positions when it is clicked.
//+------------------------------------------------------------------+
//| Close all positions function                                     |
//+------------------------------------------------------------------+
void closeAllPositions(){
   for (int i=PositionsTotal()-1; i>=0; i--){ //--- Loop through all open positions, starting from the last one
      ulong ticket = PositionGetTicket(i); //--- Get the ticket number of the current position
      if (ticket > 0){ //--- Check if the ticket is valid
         if (PositionSelectByTicket(ticket)){ //--- Select the position by its ticket number
            if (PositionGetString(POSITION_SYMBOL)==_Symbol){ //--- Check if the position is for the current chart symbol
               obj_Trade.PositionClose(ticket); //--- Close the selected position
            }
         }
      }
   }
}
We handle closing all positions with the "closeAllPositions" function, where we use the PositionsTotal function to loop from "i" as the last position minus 1 down to 0, use the PositionGetTicket function to get "ticket" for each index "i," and if "ticket" is valid, we use PositionSelectByTicket to select it, then use PositionGetString to check if POSITION_SYMBOL matches _Symbol before using "obj_Trade.PositionClose" method to close the position with "ticket". Then we can call this function when the panic button is clicked to close all the positions.
if (GetState(BTN_CLOSE)==true){ //--- Check if the close all positions button is clicked
   closeAllPositions(); //--- Close all open trades
   ObjectSetInteger(0,BTN_CLOSE,OBJPROP_STATE,false); //--- Turn off the close button press state
   ChartRedraw(0); //--- Refresh the chart to reflect closed positions
}
To manage the closing all trades, we use the "GetState" function to check if "BTN_CLOSE" is true, and if so, we use the "closeAllPositions" function to shut down all open positions, then use the ObjectSetInteger function to set "BTN_CLOSE"’s OBJPROP_STATE to false and the ChartRedraw function with "0" to update the chart. Upon compilation and running the program, we have the following outcome.
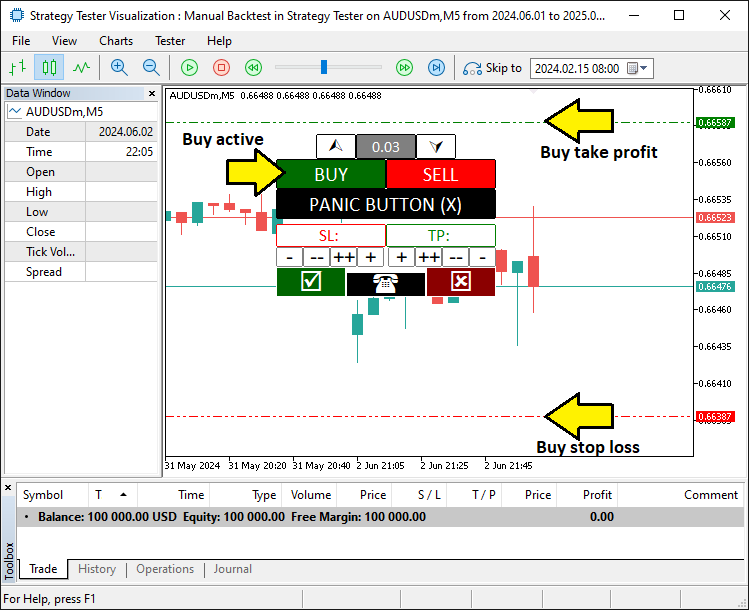
From the image, we can see that we set the trade levels and we can open positions dynamically, achieving our objective. What now remains is testing the program thoroughly, and that is handled in the next topic below.
Backtesting in Action: Using the Toolkit
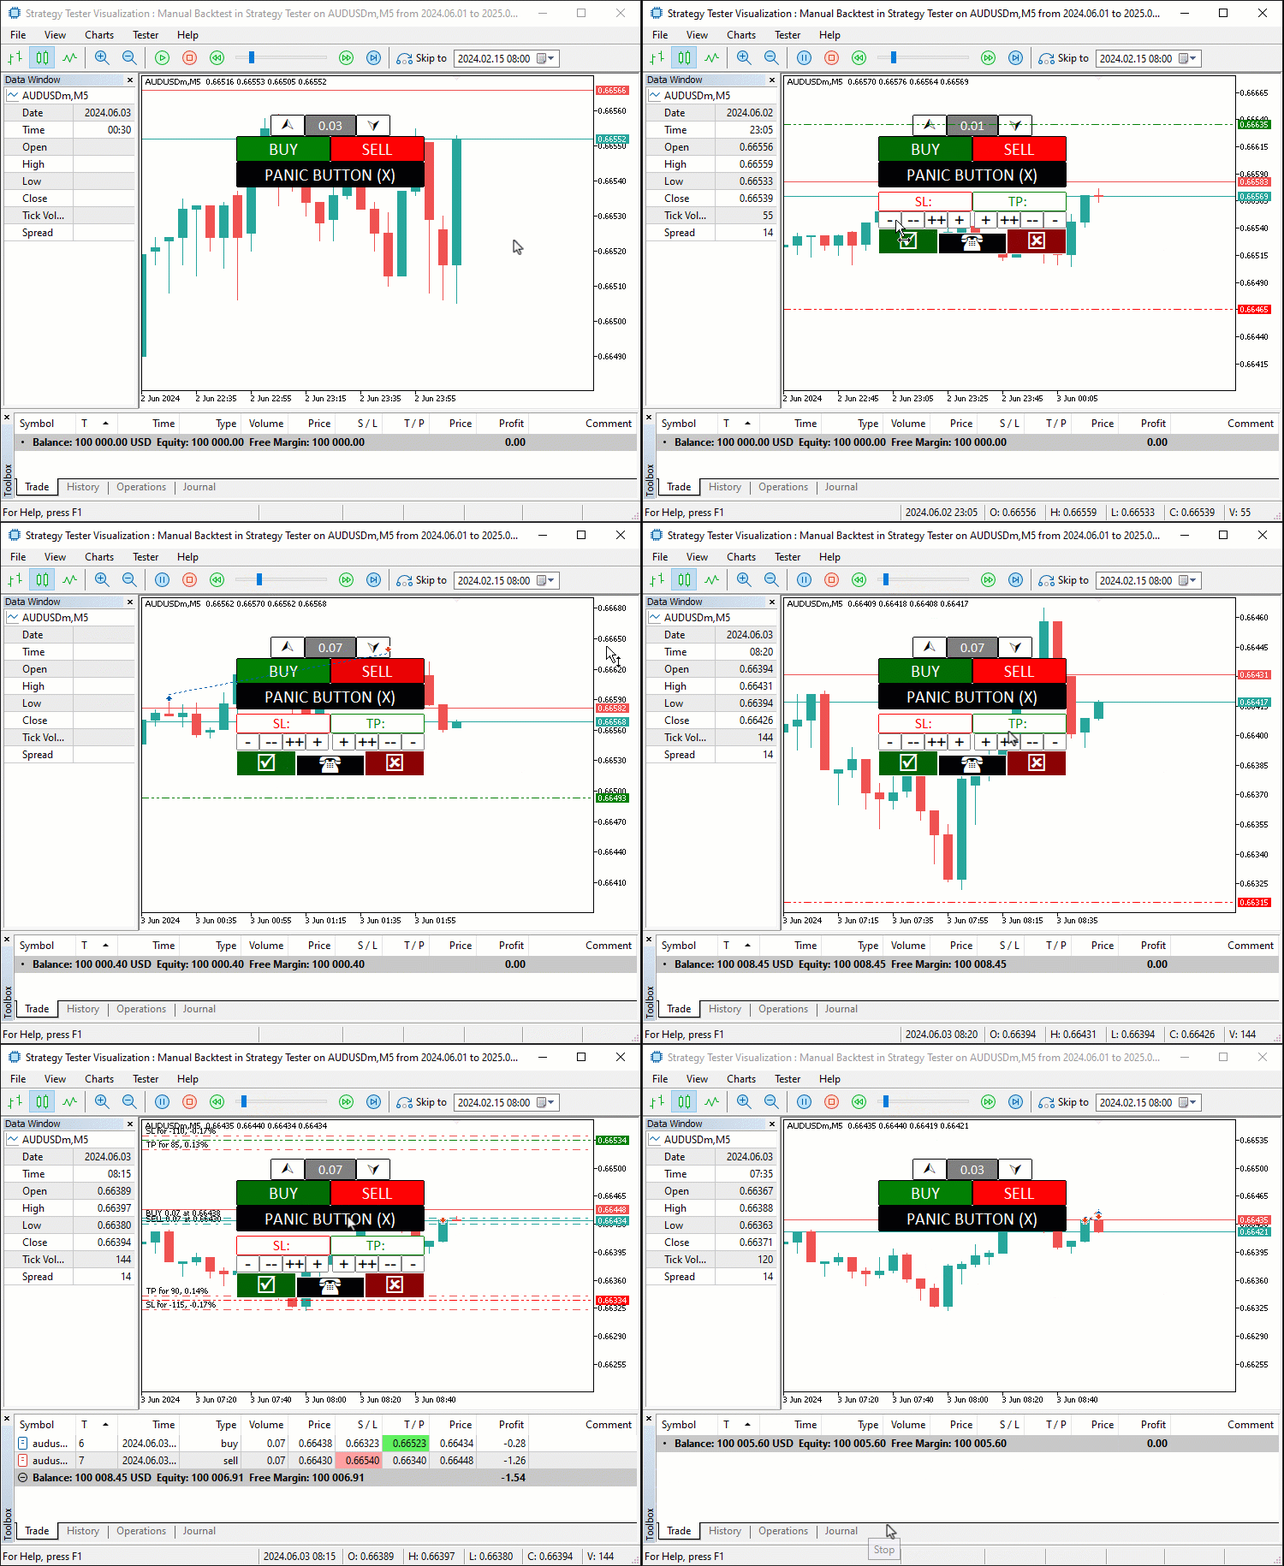
We test our toolkit in MetaTrader 5’s Strategy Tester by loading the program, selecting our settings, and starting it—watch the Graphics Interchange Format (GIF) below to see Buy, Sell, and Adjustment buttons in action at lightning speed. Click Buy or Sell, tweak Stop Loss, Take Profit, and lot size, then confirm with Yes or cancel with No, with the Panic Button ready to close all trades fast. Here it is.
Conclusion
In conclusion, we’ve crafted a manual backtesting toolkit that merges hands-on control with the Strategy Tester’s speed in MQL5, simplifying how we test trading ideas. We’ve shown how to design it, code it, and use it to adjust trades with buttons—all tailored for quick, precise simulations. You can adapt this toolkit to your needs and enhance your backtesting experience with it.
Warning: All rights to these materials are reserved by MetaQuotes Ltd. Copying or reprinting of these materials in whole or in part is prohibited.
This article was written by a user of the site and reflects their personal views. MetaQuotes Ltd is not responsible for the accuracy of the information presented, nor for any consequences resulting from the use of the solutions, strategies or recommendations described.
 Feature Engineering With Python And MQL5 (Part IV): Candlestick Pattern Recognition With UMAP Regression
 Mastering Log Records (Part 6): Saving logs to database
 Formulating Dynamic Multi-Pair EA (Part 2): Portfolio Diversification and Optimization
 Developing a Replay System (Part 64): Playing the service (V)
- Free trading apps
- Over 8,000 signals for copying
- Economic news for exploring financial markets
You agree to website policy and terms of use
What about different timeframes
Hello. Currently just one timeframe. Maybe try that in the near future.
Thank you its a useful tool
Sure. Welcome and thanks too for the feedback.
was wondering how to convert mq4 indicator to mq5
Check out the new article: Manual Backtesting Made Easy: Building a Custom Toolkit for Strategy Tester in MQL5.
Author: Allan Munene Mutiiria