
Creating an MQL5-Telegram Integrated Expert Advisor (Part 5): Sending Commands from Telegram to MQL5 and Receiving Real-Time Responses
Introduction
In this article, part 5 of our series, we continue integrating MetaQuotes Language 5 (MQL5) with Telegram, focusing on refining the interaction between MetaTrader 5 (MT5) and Telegram. Previously, in part 4 of the series, we laid the groundwork for sending complex messages and chart images from MQL5 to Telegram, establishing the communication bridge between these platforms. Now, we aim to expand on that foundation by enabling the Expert Advisor to receive and interpret commands directly from Telegram users. Instead of the Expert Advisor controlling itself by generating signals, opening market positions, and sending predefined messages to our Telegram chat, we will control it from the Telegram chat by relaying commands to the Advisor which will, in turn, decode the commands, interpret them, and send back intellectual and appropriate request replies and responses.
We will begin by setting up the necessary environment to facilitate this communication, ensuring everything is in place for seamless interaction. The core of this article will involve creating classes that automatically retrieve chat updates from JavaScript Object Notation (JSON) data, which are the Telegram commands and requests in this case, which will allow the Expert Advisor to understand and process user commands from Telegram. This step is crucial in establishing a dynamic two-way communication where the bot not only sends messages but also intelligently responds to user inputs.
Additionally, we will focus on decoding and interpreting the incoming data, ensuring that the Expert Advisor can effectively manage various types of commands from the Telegram Application Programming Interface (API). To demonstrate this process, we have provided a detailed visual guide that illustrates the flow of communication between Telegram, MetaTrader 5, and the MQL5 code editor, making it easier to understand how these components work together.
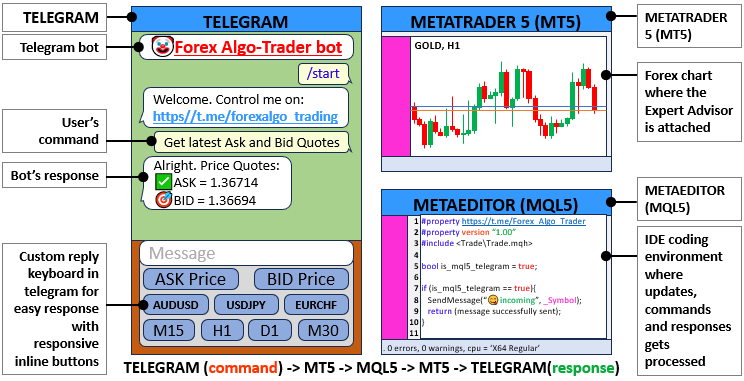
The provided illustration should be clear to showcase the integration components. Thus, the flow will be as follows: Telegram sends commands to the trading terminal where the Expert Advisor is attached, the Advisor sends the commands to MQL5 which decodes, interprets the messages, and prepares the respective responses, which in turn sends them to the trading terminal and Telegram as responses. For easier understanding, we will subdivide the whole process into topics as follows:
- Setting up the Environment
- Creating Classes to Get Chat Updates from JSON
- Decoding and Parsing Data from the Telegram API
- Handling Responses
- Testing the Implementation
- Conclusion
By the end of the article, we will have a fully integrated Expert Advisor that sends commands and requests from Telegram to MQL5 and gets supervised replies as responses in Telegram chat. Let's get started then.
Setting up the Environment
It's fundamental to establish an environment that allows our Expert Advisor (EA) to interface with Telegram before beginning the actual work of creating classes and functions. Our EA will need to access several essential libraries that facilitate the management of trades, arrays, and strings in MQL5. By making these essential libraries available, we ensure our EA has access to a well-stocked function and class library that significantly smooths the way ahead for the implementation of our EA. This is as shown below:
#include <Trade/Trade.mqh>
#include <Arrays/List.mqh>
#include <Arrays/ArrayString.mqh>
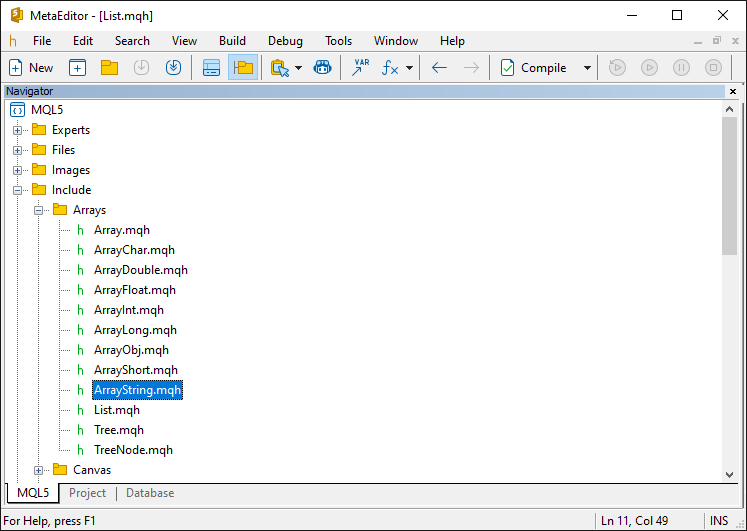
Here, the library "<Trade/Trade.mqh>" provides a complete set of trading functions. This library allows the EA to execute trades, manage positions, and perform other trading-related tasks. It's a critical component of any EA that aims to interact with the market. The libraries "<Arrays/List.mqh>" and "<Arrays/ArrayString.mqh>" that follow are included to facilitate the management of data structures. The first of these two libraries is for managing dynamic lists. The second is for working with arrays of strings. Both of these libraries are particularly useful when dealing with the trading signals we receive from Telegram. That was a lot of jargon, we know. The following chapters will unpack this a bit, and we'll try to explain in more detail what all these components do. To access the "Arrays" library, open the navigator, expand the includes' folder, and check either of the two as illustrated below.
Finally, we need to define the Telegram base URL, the timeout, and the bot's token as shown below.
#define TELEGRAM_BASE_URL  "https://api.telegram.org"
#define WEB_TIMEOUT        5000
//#define InpToken "7456439661:AAELUurPxI1jloZZl3Rt-zWHRDEvBk2venc"
#define InpToken "7456439661:AAELUurPxI1jloZZl3Rt-zWHRDEvBk2venc"
After including the libraries and compiling your program, you are all set with the necessary environment that is required for handling complex data structures received from Telegram commands and we can now proceed with the implementation.
Creating Classes to Get Chat Updates from JSON
This is the section where we focus on developing the core functionality that allows our Expert Advisor (EA) to receive updates from Telegram in real-time. Specifically, we'll need to create classes that parse JSON data returned by the Telegram API and extract the necessary information, such as chat updates and user commands. This step is crucial for establishing a responsive communication loop between Telegram and MetaTrader 5. First, let us simulate the process. We will again load the default function to get chat updates as below in our browser so that we get the data structure we need to implement the classes.

Upon loading, we return true, indicating that the process was a success but the data structure is empty. This is because there are no messages sent from the Telegram chat within the last 24 hours. We thus need to send a message to get an update. For this, we send an initialization message from the Telegram chat as shown below.
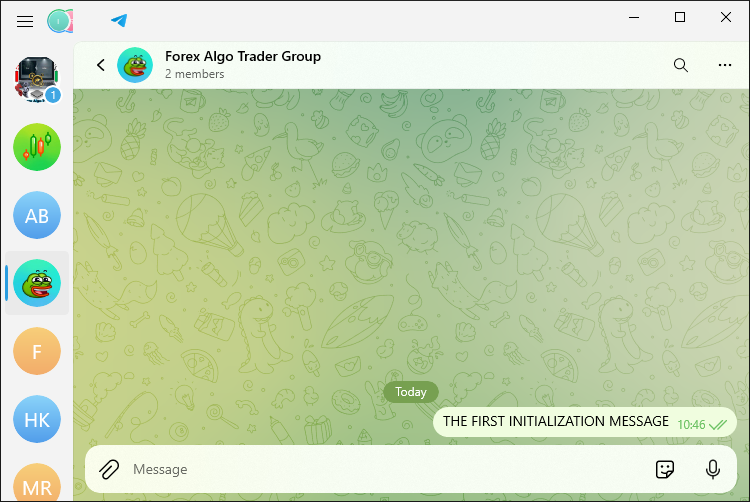
Once we send the message, we now have an update and we can reload the browser link to get the structure of the data sent.
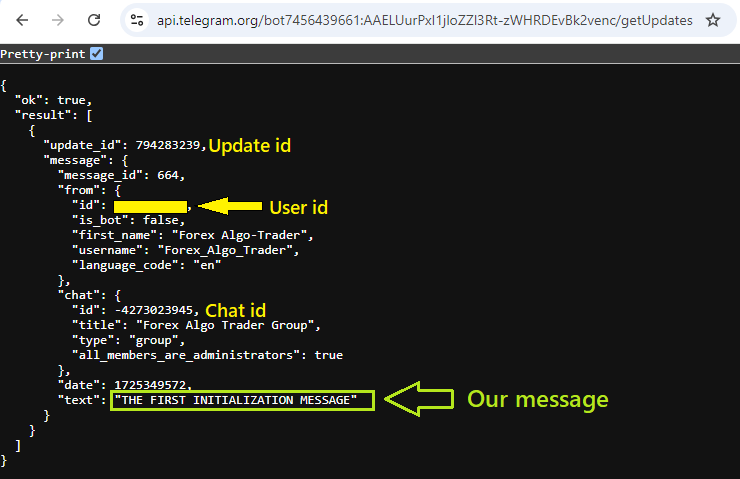
From the above image, we can see the correct details in the data structure which is constructed from the message we send. This is exactly the data that we need to copy into our classes and loop through it every time we send a new message update. Thus, let us construct a class that will contain all the member variables. Let us first construct the general class blueprint.
//+------------------------------------------------------------------+
//|        Class_Message                                             |
//+------------------------------------------------------------------+
class Class_Message : public CObject{//Defines a class named Class_Message that inherits from CObject.
   public:
      Class_Message(); // constructor
      ~Class_Message(){}; // Declares a destructor for the class, which is empty.
};
Let us concentrate on the class prototype we have declared above so everything we flow smoothly later. To declare a class, we use the keyword "class" followed by the class name, in our case it is "Class_Message". Since we will be getting lots of similar data structures, we inherit another class named "CObject", and make the inherited members of the foreign class public by using the keyword "public". We then declare the first members of the class to be "public". Before we continue further, let us explain in detail what all these mean. The keyword is one of the 4 qualifiers, commonly called access specifiers, and they define how the compiler can access variables, members of structures, or classes. The four of them are: public, protected, private, and virtual.
Let us break them down and explain each separately.
- Public: Members declared under the "public" access specifier are accessible from any part of the code where the class is visible. This means that functions, variables, or other objects outside the class can directly access and use public members. They are often used for functions or variables that need to be accessed by other classes, functions, or scripts.
- Protected: Members declared under the "protected" access specifier are not accessible from outside the class, but they are accessible within the class itself, by derived classes (i.e., subclasses that inherit from this class), and by friend classes/functions. This is useful for encapsulating data that should be available to subclasses but not to the rest of the program. They are typically used to allow subclasses to access or modify certain variables or functions of the base class while still hiding those members from the rest of the program.
- Private: Members declared under the "private" access specifier are only accessible within the class itself. Neither derived classes nor any other part of the program can directly access or modify private members. This is the most restrictive access level and is typically used for variables and helper functions that should not be accessible or modifiable from outside the class. They are commonly used to implement data hiding, ensuring that the internal state of an object can only be modified through well-defined public interfaces (methods).
- Virtual: Applies only to class methods (but not to methods of structures) and tells the compiler that this method should be placed in the table of virtual functions of the class.
From the above-provided syntaxes, only the first three are commonly used. Now getting back to our class prototype, let us break down what everything does.
- Class Declaration:
class Class_Message : public CObject{...};: Here, we declare new class named "Class_Message". This class derives from "CObject", which is a base class in MQL5 and is used to create custom objects. Thus, "Class_Message" can use the features provided by the MQL5 framework, such as memory management and other benefits of object-oriented programming, to display messages handily in our program.
- Constructor:
Class_Message();: The "Class_Message" class's constructor is declared here. A constructor is a special function that is called automatically when an instance (or object) of the class is created. The constructor's job is to initialize the class's member variables and to carry out any setup that must be done when the object is created. In Class_Message's case, it initializes the member variables.
- Destructor:
~Class_Message(){};: The "Class_Message" class declares a destructor. A destructor is automatically called when an instance of a class is explicitly deleted or goes out of scope. Usually, a destructor is defined to perform cleanup and is conceptually the opposite of a constructor, which is called when an instance of a class is created. In this case, the destructor for the "Class_Message" class does not do anything (it does not perform any cleanup tasks) because that's not necessary for now.
Note that both the constructor and destructor contain the same name as the base class, only that the destructor has a tide (~) as its prefix. With that, we can now continue to define the members of our class. These members are the same as received in our data structure, thus, we will visualize the data structure and the members that we need to extract from it as below.
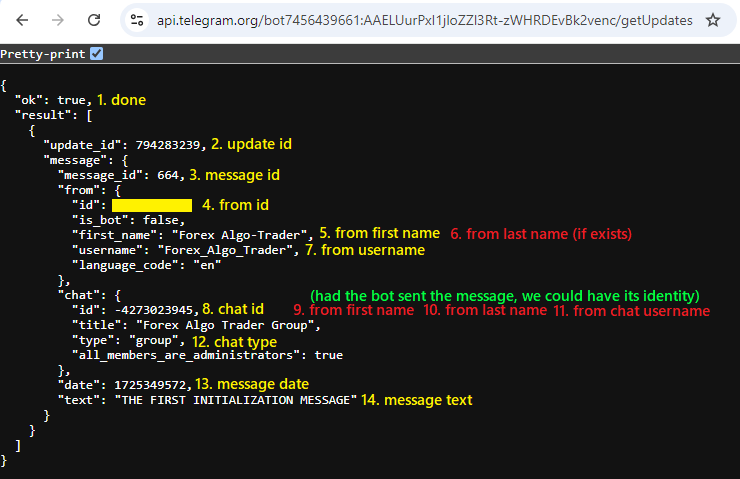
From the above image, we can see that we need a minimum of 14 members in our class. We define them as below:
      bool              done; //A boolean member variable TO INDICATE if a message has been processed.
      long              update_id; //Store the update ID from Telegram.
      long              message_id;//Stores the message ID.
      //---
      long              from_id;//Stores the sender’s ID.
      string            from_first_name;
      string            from_last_name;
      string            from_username;
      //---
      long              chat_id;
      string            chat_first_name;
      string            chat_last_name;
      string            chat_username;
      string            chat_type;
      //---
      datetime          message_date;
      string            message_text;
We now have the full class members that we need. The final class structure looks like the one below. We have added comments to make everything self-explanatory in the process.
//+------------------------------------------------------------------+
//|        Class_Message                                             |
//+------------------------------------------------------------------+
class Class_Message : public CObject{//--- Defines a class named Class_Message that inherits from CObject.
   public:
      Class_Message(); //--- Constructor declaration.
      ~Class_Message(){}; //--- Declares an empty destructor for the class.

      //--- Member variables to track the status of the message.
      bool              done; //--- Indicates if a message has been processed.
      long              update_id; //--- Stores the update ID from Telegram.
      long              message_id; //--- Stores the message ID.

      //--- Member variables to store sender-related information.
      long              from_id; //--- Stores the sender’s ID.
      string            from_first_name; //--- Stores the sender’s first name.
      string            from_last_name; //--- Stores the sender’s last name.
      string            from_username; //--- Stores the sender’s username.

      //--- Member variables to store chat-related information.
      long              chat_id; //--- Stores the chat ID.
      string            chat_first_name; //--- Stores the chat first name.
      string            chat_last_name; //--- Stores the chat last name.
      string            chat_username; //--- Stores the chat username.
      string            chat_type; //--- Stores the chat type.

      //--- Member variables to store message-related information.
      datetime          message_date; //--- Stores the date of the message.
      string            message_text; //--- Stores the text of the message.
};
After defining the messages class, we need to initialize its members so that they get ready to receive data. We do this by calling the class constructor.
//+------------------------------------------------------------------+
//|      Constructor to initialize class members                     |
//+------------------------------------------------------------------+
Class_Message::Class_Message(void){
   //--- Initialize the boolean 'done' to false, indicating the message is not processed.
   done = false;

   //--- Initialize message-related IDs to zero.
   update_id = 0;
   message_id = 0;

   //--- Initialize sender-related information.
   from_id = 0;
   from_first_name = NULL;
   from_last_name = NULL;
   from_username = NULL;

   //--- Initialize chat-related information.
   chat_id = 0;
   chat_first_name = NULL;
   chat_last_name = NULL;
   chat_username = NULL;
   chat_type = NULL;

   //--- Initialize the message date and text.
   message_date = 0;
   message_text = NULL;
}
We first call the base class and define the constructor by using the "scope operator" (::). We then initialize the member variables to their default values. The "done" boolean is set to "false", meaning that the message hasn't been processed yet. Both "message_id" and "update_id" are initialized to 0, which represents the default IDs for the message and update. For sender-related information, "from_id" is set to 0, and the variables "from_first_name", "from_last_name", and "from_username" are initialized to NULL, meaning that the sender's details aren't set. Similarly, variables related to the chat, that is, "chat_id", "chat_first_name", "chat_last_name", "chat_username", and "chat_type", are also initialized to 0 or NULL to their data types, meaning that chat information isn't available yet. Finally, "message_date" is set to 0, and "message_text" is initialized to NULL, which means that the content of the message and the message's date aren't specified yet. Technically, we initialize "integer" data type variables to 0 and "strings" to NULL.
Similarly, we need to define another class instance that will be used to hold individual Telegram chats. We will use this data to make a comparison between the data parsed and the data received from Telegram. For example, when we send a command "get Ask price", we will parse the data, get updates from the JSON, and check if any of the received data that is stored in the JSON matches our command, and if so, take the necessary action. We hope this clarifies some things, but it will get more clear as we proceed. The class code snippet is as below:
//+------------------------------------------------------------------+
//|        Class_Chat                                                |
//+------------------------------------------------------------------+
class Class_Chat : public CObject{
   public:
      Class_Chat(){}; //Declares an empty constructor.
      ~Class_Chat(){}; // deconstructor
      long              member_id;//Stores the chat ID.
      int               member_state;//Stores the state of the chat.
      datetime          member_time;//Stores the time related to the chat.
      Class_Message     member_last;//An instance of Class_Message to store the last message.
      Class_Message     member_new_one;//An instance of Class_Message to store the new message.
};
We define a class named "Class_Chat" to handle and keep the information of individual Telegram chats. This class contains an empty constructor and destructor, and several members: "member_id" stores the unique ID of the chat; "member_state" indicates the state of the chat; and "member_time" holds whatever information relates to the timing of the chat. The class has two instances of the base class we have already defined, "Class_Message", which holds the last and the new messages respectively. We need these to store the messages and process them individually when the user sends multiple commands. To illustrate this, we will send an initialization message as below:
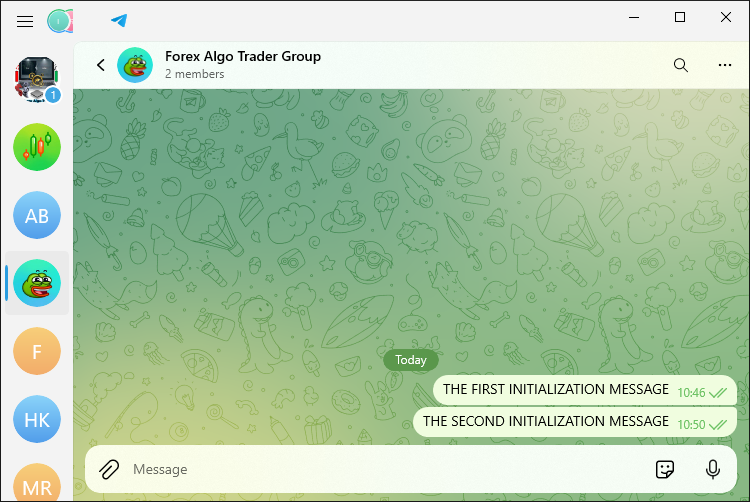
Upon reading our chat updates, we get the following data structure.
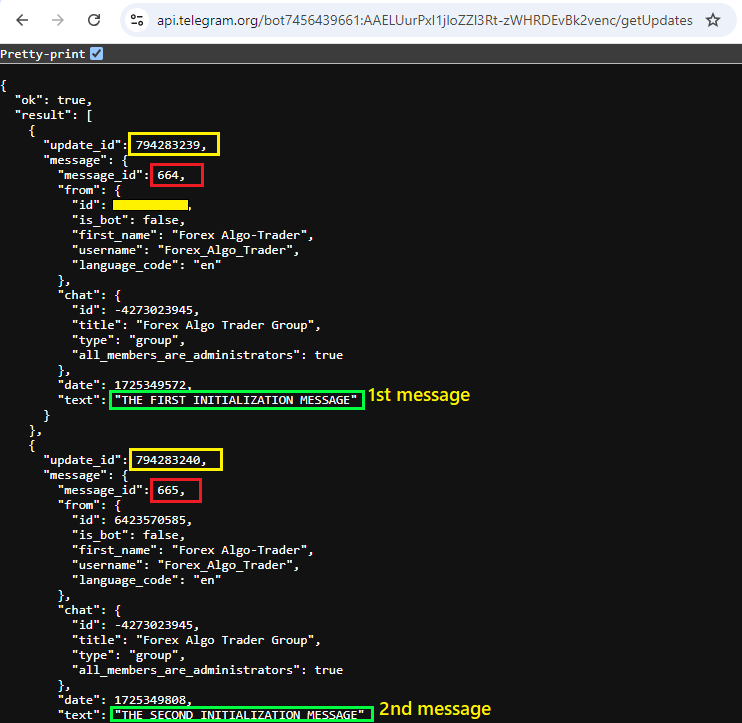
From the second message data structure received, we can see that the update and message IDs for the first message are 794283239 and 664 respectively, while the second message has 794283240 and 665, making a difference of 1. We hope that clarifies the need for a different class. We now can proceed to create the last default class that we will use to control the interaction flow seamlessly. Its structure is as below.
//+------------------------------------------------------------------+
//|   Class_Bot_EA                                                    |
//+------------------------------------------------------------------+
class Class_Bot_EA{
   private:
      string            member_token;         //--- Stores the bot’s token.
      string            member_name;          //--- Stores the bot’s name.
      long              member_update_id;     //--- Stores the last update ID processed by the bot.
      CArrayString      member_users_filter;  //--- An array to filter users.
      bool              member_first_remove;  //--- A boolean to indicate if the first message should be removed.

   protected:
      CList             member_chats;         //--- A list to store chat objects.

   public:
      void Class_Bot_EA();   //--- Declares the constructor.
      ~Class_Bot_EA(){};    //--- Declares the destructor.
      int getChatUpdates(); //--- Declares a function to get updates from Telegram.
      void ProcessMessages(); //--- Declares a function to process incoming messages.
};
We define a class called "Class_Bot_EA" to manage interactions between the Telegram bot and the MQL5 environment. It has several private members as "member_token", which stores the authentication token for the bot, and "member_name", which contains the name of the bot. Another member is the "member_update_id", which keeps track of the last update processed. Several other members manage and filter user interactions. The class has a protected member, "member_chats", which maintains a list of chat objects. Among its public members, the most notable are the constructor and the destructor, which do the necessary initialization and cleanup of instances. There are also two notable functions among the public members: "getChatUpdates", which retrieves updates from Telegram, and "ProcessMessages", which handles the processing of incoming messages. This are the most crucial functions that we will use to get the chat updates and process the received commands. We will initialize these members using a similar format as we did with the first class as below.
void Class_Bot_EA::Class_Bot_EA(void){ //--- Constructor
   member_token=NULL; //--- Initialize the bot's token as NULL.
   member_token=getTrimmedToken(InpToken); //--- Assign the trimmed bot token from InpToken.
   member_name=NULL; //--- Initialize the bot's name as NULL.
   member_update_id=0; //--- Initialize the last update ID to 0.
   member_first_remove=true; //--- Set the flag to remove the first message to true.
   member_chats.Clear(); //--- Clear the list of chat objects.
   member_users_filter.Clear(); //--- Clear the user filter array.
}
Here, we invoke the constructor for the "Class_Bot_EA" class and initialize the member variables to set the bot's environment. Initially, the "member_token" is set to NULL as a placeholder. Then we assign it the trimmed version of "InpToken". This value is very important as it governs the authentication of the bot. If the trimmed placeholder is left in the code, the bot simply will not work. The "member_name" is also initialized to NULL, and the "member_update_id" is set to 0, which indicates that no updates have yet been processed. The "member_first_remove" variable is set to true. This means that the bot is configured to remove the first message it processes. Finally, both "member_chats" and "member_users_filter" are cleared, to ensure they start up empty. You might have noticed that we used a different function to get the bot's token. The function is as below.
//+------------------------------------------------------------------+
//|        Function to get the Trimmed Bot's Token                   |
//+------------------------------------------------------------------+
string getTrimmedToken(const string bot_token){
   string token=getTrimmedString(bot_token); //--- Trim the bot_token using getTrimmedString function.
   if(token==""){ //--- Check if the trimmed token is empty.
      Print("ERR: TOKEN EMPTY"); //--- Print an error message if the token is empty.
      return("NULL"); //--- Return "NULL" if the token is empty.
   }
   return(token); //--- Return the trimmed token.
}

//+------------------------------------------------------------------+
//|        Function to get a Trimmed string                          |
//+------------------------------------------------------------------+
string getTrimmedString(string text){
   StringTrimLeft(text); //--- Remove leading whitespace from the string.
   StringTrimRight(text); //--- Remove trailing whitespace from the string.
   return(text); //--- Return the trimmed string.
}
Here, we define two functions that work hand in hand to clean and validate the bot's token string. The first function, "getTrimmedToken", accesses the "bot_token" as input. It then calls another function, "getTrimmedString," to remove any leading or trailing whitespace from the token. After trimming, the function checks if the token is empty. If the token is empty after trimming, an error message is printed, and the function returns "NULL" to indicate that the bot cannot go any further with this token. On the other hand, if the token is not empty, it is returned as a valid, trimmed token.
The second function, "getTrimmedString," does the actual work of trimming the whitespace from both ends of a given string. It uses StringTrimLeft to remove leading whitespace and StringTrimRight to remove trailing whitespace, then returns the trimmed string as a token that passes the validity test.
Up to this point, we already have the necessary data structures to organize the received metadata. We then need to proceed to get the chat updates and process them simultaneously. To ensure clear communication, we will first call the class functions. At first, to access the class members, we will have to create an object based on the class to give us the required access. This is achieved as below:
Class_Bot_EA obj_bot; //--- Create an instance of the Class_Bot_EA class
After we declare the class object as "obj_bot", we can access the class's members by using the dot operator. We will need the check for updates and process the messages on a designated time interval. Thus, instead of using the OnTick event handler which will be time-consuming to count the number of ticks that might take computer resources, we opt for the OnTimer function which automatically does the counting for us. To use the event handler, we will need to set and initialize it on the OnInit event handler as below.
//+------------------------------------------------------------------+
//| Expert initialization function                                   |
//+------------------------------------------------------------------+
int OnInit(){
   EventSetMillisecondTimer(3000); //--- Set a timer event to trigger every 3000 milliseconds (3 seconds)
   OnTimer(); //--- Call OnTimer() immediately to get the first update
   return(INIT_SUCCEEDED); //--- Return initialization success
}
Here, we initialize the Expert Advisor by setting up a timer event using the EventSetMillisecondTimer function to trigger every 3000 milliseconds (3 seconds). This ensures that the Expert Advisor continuously checks for updates at regular intervals. We then immediately call the OnTimer event handler to get the first update right after initialization, ensuring that the process starts without delay. Finally, we return "INIT_SUCCEEDED" to indicate that the initialization was successful. Then since we set the timer, once the program is deinitialized, we need to destroy the set timer to free the computer resources as well.
//+------------------------------------------------------------------+
//| Expert deinitialization function                                 |
//+------------------------------------------------------------------+
void OnDeinit(const int reason){
   EventKillTimer(); //--- Kill the timer event to stop further triggering
   ChartRedraw(); //--- Redraw the chart to reflect any changes
}
Here, when the Expert Advisor is removed or halted, the first thing we do in the OnDeinit event handler is to stop the timer event. This is done using the EventKillTimer function, which is the logical counterpart to EventSetMillisecondTimer. We would not want the timer to keep running if the Expert Advisor is no longer functioning. After stopping the timer, we call the ChartRedraw function. Calling this function is not strictly necessary, but it can help in some circumstances where you need to refresh the chart for changes made to apply. Finally, we call the timer event handler to take care of the counting process.
//+------------------------------------------------------------------+
//| Timer function                                                   |
//+------------------------------------------------------------------+
void OnTimer(){
   obj_bot.getChatUpdates(); //--- Call the function to get chat updates from Telegram
   obj_bot.ProcessMessages(); //--- Call the function to process incoming messages
}
Finally, we call the OnTimer event handler. Inside it, we call our two crucial functions that are necessary to get the chart updates and process the messages respectively by using the object "obj_bot" we created and using the "dot operator" to get access to class functions. Up to this point, everything is a success and we can now concentrate on the functions. This is done in the next sections.
Decoding and Parsing Data from the Telegram API
The first thing we need to do is get the chat updates which we will use to make a comparison with the text received from Telegram and if there's a match, make the necessary response. Thus, we will do this on the function responsible for getting the updates.
//+------------------------------------------------------------------+
int Class_Bot_EA::getChatUpdates(void){

//--- ....

}
After calling the function, the first thing we do is make sure we have a valid token, and if not so, we print an error message to the log and return -1, indicating that we can't proceed further without the token. This is as shown below.
   //--- Check if the bot token is NULL
   if(member_token==NULL){
      Print("ERR: TOKEN EMPTY"); //--- Print an error message if the token is empty
      return(-1); //--- Return with an error code
   }
If the token is not empty, we can proceed to prepare a request to send to the Telegram API for retrieving updates from a specified chat.
   string out; //--- Variable to store the response from the request
   string url=TELEGRAM_BASE_URL+"/bot"+member_token+"/getUpdates"; //--- Construct the URL for the Telegram API request
   string params="offset="+IntegerToString(member_update_id); //--- Set the offset parameter to get updates after the last processed ID

   //--- Send a POST request to get updates from Telegram
   int res=postRequest(out, url, params, WEB_TIMEOUT);
We begin by declaring a variable named "out" to hold the response returned from the API request. To build the URL for the request, we combine the base API URL ("TELEGRAM_BASE_URL"), the bot's token ("member_token"), and the method we want to call ("/getUpdates"). This method retrieves updates sent to the bot by users, allowing us to see what has happened since the last time we checked for updates. We then include a single parameter in our request. The parameter "offset" ensures that we only get updates that occurred after the last retrieved update. Finally, we issue a POST request to the API, with the result of the request stored in the "out" variable and indicated by the "res" field in the response. We did use a custom function "postRequest". Here is its code snippet and breakdown. It is similar to what we have been doing in the prior parts but we have added comments to explain the variables used.
//+------------------------------------------------------------------+
//| Function to send a POST request and get the response             |
//+------------------------------------------------------------------+
int postRequest(string &response, const string url, const string params,
                const int timeout=5000){
   char data[]; //--- Array to store the data to be sent in the request
   int data_size=StringLen(params); //--- Get the length of the parameters
   StringToCharArray(params, data, 0, data_size); //--- Convert the parameters string to a char array

   uchar result[]; //--- Array to store the response data
   string result_headers; //--- Variable to store the response headers

   //--- Send a POST request to the specified URL with the given parameters and timeout
   int response_code=WebRequest("POST", url, NULL, NULL, timeout, data, data_size, result, result_headers);
   if(response_code==200){ //--- If the response code is 200 (OK)
      //--- Remove Byte Order Mark (BOM) if present
      int start_index=0; //--- Initialize the starting index for the response
      int size=ArraySize(result); //--- Get the size of the response data array
      // Loop through the first 8 bytes of the 'result' array or the entire array if it's smaller
      for(int i=0; i<fmin(size,8); i++){
         // Check if the current byte is part of the BOM
         if(result[i]==0xef || result[i]==0xbb || result[i]==0xbf){
            // Set 'start_index' to the byte after the BOM
            start_index=i+1;
         }
         else {break;}
      }
      //--- Convert the response data from char array to string, skipping the BOM
      response=CharArrayToString(result, start_index, WHOLE_ARRAY, CP_UTF8);
      //Print(response); //--- Optionally print the response for debugging

      return(0); //--- Return 0 to indicate success
   }
   else{
      if(response_code==-1){ //--- If there was an error with the WebRequest
         return(_LastError); //--- Return the last error code
      }
      else{
         //--- Handle HTTP errors
         if(response_code>=100 && response_code<=511){
            response=CharArrayToString(result, 0, WHOLE_ARRAY, CP_UTF8); //--- Convert the result to string
            Print(response); //--- Print the response for debugging
            Print("ERR: HTTP"); //--- Print an error message indicating an HTTP error
            return(-1); //--- Return -1 to indicate an HTTP error
         }
         return(response_code); //--- Return the response code for other errors
      }
   }
   return(0); //--- Return 0 in case of an unexpected error
}
Here, we take care of sending a POST request and processing the reply. We start by taking the input parameters and converting them into a form that they can be sent in—using StringToCharArray to create a character array from the parameters string. We then define two arrays that will capture the response data and the response headers. Finally, we use the WebRequest function to send the POST request to the URL to which it must go, with the parameters that it must use and a timeout setting.
When our request is successful (which we determine based on receiving a 200 response code), we make sure there's nothing that could interfere with processing at the very beginning of our response data. Specifically, we check for any Byte Order Mark (BOM). If we find one, we treat it like a substring that shouldn't be there, and we take steps to avoid including it in the data that we eventually use. After that, we convert the data from a character array to a string. If we make it through all these steps without hitting a snag, we return a 0 to indicate that everything went smoothly.
When our request doesn't succeed, we deal with the error by checking the code that came back with the response. If the problem lies with the WebRequest function, we tell the user which error code was last set—that's the only way we can figure out what the problem is. If we're dealing with an HTTP error, we do our best to interpret the error message that came with the HTTP response, and we tell the user what we found. Finally, for any other response codes we might get, we just hand back the code.
Before we proceed further, we can verify the data being sent by checking the response and printing the data. We achieve this by using the following logic.
   //--- If the request was successful
   if(res==0){
      Print(out); //--- Optionally print the response
   }
Here, we check if the result of the post is equal to zero and if so, we print the data for debugging and verification. Upon run, we have the below results.
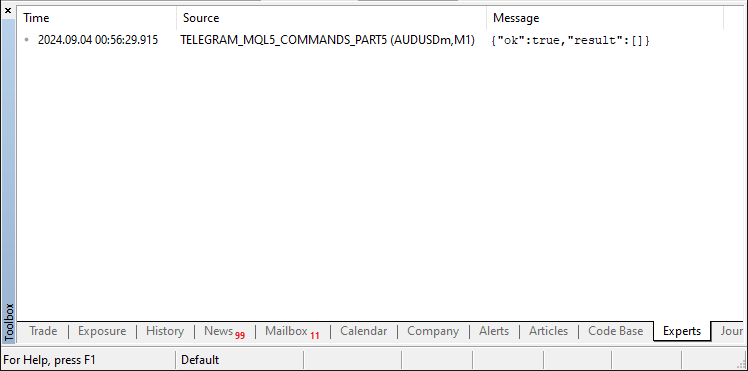
Here, we can see that the response is true, which means that the process to get the updates was a success. Now we need to get the data response, and to retrieve it, we will need to use a JSON parse. We will not get too deep into the code responsible for parsing but we will include it as a file and as well as add it to the global scope of our program. Upon its addition, we proceed to create a JSON object as below.
      //--- Create a JSON object to parse the response
      CJSONValue obj_json(NULL, jv_UNDEF);
After creating the object, we use it to deserialize the response as below.
      //--- Deserialize the JSON response
      bool done=obj_json.Deserialize(out);
We declare a boolean variable "done" to store the results. This is where we store the flags for either the response we correctly parsed or not. We can print it for debugging purposes as below.
Print(done);
Upon the printout, we get the following response.

Here, we can see that we correctly parsed the response. We need the response to be true for us to proceed. In the case where the response is the latter, we need to halt the process and return since we will not access the rest of the message updates. For that reason then, we make sure that if the response is negative, we terminate the process.
      if(!done){
         Print("ERR: JSON PARSING"); //--- Print an error message if parsing fails
         return(-1); //--- Return with an error code
      }
Here, we check whether the JSON parsing was successful by evaluating the boolean variable "done". If the parsing fails (i.e., "done" is false), we print an error message "ERR: JSON PARSING" to indicate that there was an issue with interpreting the JSON response. Following this, we return -1 to signal that an error occurred during the JSON parsing process. Next, we make sure the response is processed successfully via the following logic.
      //--- Check if the 'ok' field in the JSON is true
      bool ok=obj_json["ok"].ToBool();
      //--- If 'ok' is false, there was an error in the response
      if(!ok){
         Print("ERR: JSON NOT OK"); //--- Print an error message if 'ok' is false
         return(-1); //--- Return with an error code
      }
First, we verify the value of the 'ok' field in the JSON that is retrieved from the response. This lets us know if the request was processed successfully. We extract this field and store it in a boolean named "ok". If the value of "ok" is false, it indicates that there was an error or some sort of issue with the response, even though the request itself was successful. In this case, we print "ERR: JSON NOT OK" to signal that there was some sort of problem and return -1 to indicate that there also was some sort of problem in processing the JSON response. If all was a success, it means we have message updates and we can proceed to retrieve them. Thus, we will need to declare an object based on the messages class as follows:
      //--- Create a message object to store message details
      Class_Message obj_msg;
We can now loop via all the message updates and store them in the class using the object created. First, we need to get the total number of updates, which is achieved via the following logic.
      //--- Get the total number of updates in the JSON array 'result'
      int total=ArraySize(obj_json["result"].m_elements);
      //--- Loop through each update
      for(int i=0; i<total; i++){

      }
On each iteration, we need to retrieve an individual update item from the JSON response for which we work.
         //--- Get the individual update item as a JSON object
         CJSONValue obj_item=obj_json["result"].m_elements[i];
We then can proceed to get the individual chat updates. First, let us have the message updates.
         //--- Extract message details from the JSON object
         obj_msg.update_id=obj_item["update_id"].ToInt(); //--- Get the update ID
         obj_msg.message_id=obj_item["message"]["message_id"].ToInt(); //--- Get the message ID
         obj_msg.message_date=(datetime)obj_item["message"]["date"].ToInt(); //--- Get the message date

         obj_msg.message_text=obj_item["message"]["text"].ToStr(); //--- Get the message text
         obj_msg.message_text=decodeStringCharacters(obj_msg.message_text); //--- Decode any HTML entities in the message text
Here, we take the details of the individual message from the update item indicated by "obj_item". We begin by pulling the update ID from the JSON object and stashing it in "obj_msg.update_id". After that, we pull the message ID and park it in "obj_msg.message_id". The message's date, which comes in a not-so-human-readable format, is also included in the item, and we store it as a "datetime" object in "obj_msg.message_date", which we "typecast" into a human-readable format. Then we look at the message's text. For the most part, we can just grab the text and put it in "obj_msg.message_text". However, sometimes, its HTML entities are encoded; other times, it has special characters that are also encoded. For those instances, we handle them in a function called "decodeStringCharacters". This is a function that we had earlier explained, we'll just call it to do its thing. Then, in a similar format, we extract the sender details.
         //--- Extract sender details from the JSON object
         obj_msg.from_id=obj_item["message"]["from"]["id"].ToInt(); //--- Get the sender's ID
         obj_msg.from_first_name=obj_item["message"]["from"]["first_name"].ToStr(); //--- Get the sender's first name
         obj_msg.from_first_name=decodeStringCharacters(obj_msg.from_first_name); //--- Decode the first name
         obj_msg.from_last_name=obj_item["message"]["from"]["last_name"].ToStr(); //--- Get the sender's last name
         obj_msg.from_last_name=decodeStringCharacters(obj_msg.from_last_name); //--- Decode the last name
         obj_msg.from_username=obj_item["message"]["from"]["username"].ToStr(); //--- Get the sender's username
         obj_msg.from_username=decodeStringCharacters(obj_msg.from_username); //--- Decode the username
After extracting the sender details, we extract the chat details as well in a similar manner.
         //--- Extract chat details from the JSON object
         obj_msg.chat_id=obj_item["message"]["chat"]["id"].ToInt(); //--- Get the chat ID
         obj_msg.chat_first_name=obj_item["message"]["chat"]["first_name"].ToStr(); //--- Get the chat's first name
         obj_msg.chat_first_name=decodeStringCharacters(obj_msg.chat_first_name); //--- Decode the first name
         obj_msg.chat_last_name=obj_item["message"]["chat"]["last_name"].ToStr(); //--- Get the chat's last name
         obj_msg.chat_last_name=decodeStringCharacters(obj_msg.chat_last_name); //--- Decode the last name
         obj_msg.chat_username=obj_item["message"]["chat"]["username"].ToStr(); //--- Get the chat's username
         obj_msg.chat_username=decodeStringCharacters(obj_msg.chat_username); //--- Decode the username
         obj_msg.chat_type=obj_item["message"]["chat"]["type"].ToStr(); //--- Get the chat type
Up to this point, you should have noticed that the structure is just the same as the one that we provided on the data structure from the browser. We then can proceed to update the update ID to make sure that the next request for updates from Telegram starts at the right point.
         //--- Update the ID for the next request
         member_update_id=obj_msg.update_id+1;
Here, we update the "member_update_id" to make sure that the next request for updates from Telegram starts at the right spot. By assigning the value "obj_msg.update_id + 1", we set the offset so that the next request doesn't include the current update and, in effect, only gets new updates that happen after this ID. This is important because we don't want to handle the same update more than once, and we also want to keep the bot as responsive as possible. Next, we check for new updates.
         //--- If it's the first update, skip processing
         if(member_first_remove){
            continue;
         }
Here, we determine whether the current update is the first post-initialization update being processed by checking the flag "member_first_remove". If "member_first_remove" is true, it indicates that we are processing the first update - the initial update - after everything has been initialized. We then skip processing this update by simply continuing to the next one. Finally, we filter and manage chat messages based on whether a username filter is applied.
         //--- Filter messages based on username
         if(member_users_filter.Total()==0 || //--- If no filter is applied, process all messages
            (member_users_filter.Total()>0 && //--- If a filter is applied, check if the username is in the filter
            member_users_filter.SearchLinear(obj_msg.from_username)>=0)){

            //--- Find the chat in the list of chats
            int index=-1;
            for(int j=0; j<member_chats.Total(); j++){
               Class_Chat *chat=member_chats.GetNodeAtIndex(j);
               if(chat.member_id==obj_msg.chat_id){ //--- Check if the chat ID matches
                  index=j;
                  break;
               }
            }

            //--- If the chat is not found, add a new chat to the list
            if(index==-1){
               member_chats.Add(new Class_Chat); //--- Add a new chat to the list
               Class_Chat *chat=member_chats.GetLastNode();
               chat.member_id=obj_msg.chat_id; //--- Set the chat ID
               chat.member_time=TimeLocal(); //--- Set the current time for the chat
               chat.member_state=0; //--- Initialize the chat state
               chat.member_new_one.message_text=obj_msg.message_text; //--- Set the new message text
               chat.member_new_one.done=false; //--- Mark the new message as not processed
            }
            //--- If the chat is found, update the chat message
            else{
               Class_Chat *chat=member_chats.GetNodeAtIndex(index);
               chat.member_time=TimeLocal(); //--- Update the chat time
               chat.member_new_one.message_text=obj_msg.message_text; //--- Update the message text
               chat.member_new_one.done=false; //--- Mark the new message as not processed
            }
         }
First, we determine whether a username filter is active by checking the "member_users_filter.Total()". If there is no filter ("Total() == 0"), we handle all messages as usual. If there is a filter ("Total() > 0"), we ascertain whether the sender's username ("obj_msg.from_username") is in the filter, using "member_users_filter.SearchLinear()". If we find the username, we go ahead and handle the message.
We then search for the chat in the "member_chats" list by iterating through it and comparing the chat ID ("obj_msg.chat_id"). If the chat isn't found (index == -1), we add a new "Class_Chat" object to the list. We initialize the object with the chat ID, the current time, an initial state of 0, and the text of the new message. We also mark the new message as not done (done = false).
If the chat is already in the list, we update the existing chat object with the new text of the message and the current time, marking the message as unprocessed. This guarantees that the latest message in each chat is recorded and updated properly. After all is done, we set the first update flag to false.
      //--- After the first update, set the flag to false
      member_first_remove=false;
Finally, we return the result of the post request.
   //--- Return the result of the POST request
   return(res);
Armed with this function, we can be sure that we retrieve the chat updates and store them at every set time interval, and thus we can process them whenever we need to. The processing of the messages is done in the next section.
Handling Responses
After getting the chat updates, we can proceed to access the retrieved messages, make comparisons, and send responses back to Telegram. This is achieved via the use of the class's "ProcessMessages" function.
void Class_Bot_EA::ProcessMessages(void){

//---

}
The first thing that we need to do is process the individual chats.
   //--- Loop through all chats
   for(int i=0; i<member_chats.Total(); i++){
      Class_Chat *chat=member_chats.GetNodeAtIndex(i); //--- Get the current chat
      if(!chat.member_new_one.done){ //--- Check if the message has not been processed yet
         chat.member_new_one.done=true; //--- Mark the message as processed
         string text=chat.member_new_one.message_text; //--- Get the message text

         //---

      }
   }
Here, we iterate through the "member_chats" collection and retrieve the corresponding chat object for each chat using the index variable, "i", from "member_chats". For every chat, we check the current chat's associated message to see if it has been processed yet by evaluating the done flag in the "member_new_one" structure. If the message has not been processed yet, we set this flag to true, marking the message as handled to prevent duplicate processing. Finally, we extract the text of the message from the "member_new_one" structure. We will utilize the text to determine what kind of response or action, if any, should be taken based on the content of the message. First, let us define an instance where the user sends a greeting text "Hello" from Telegram.
         //--- Process the command based on the message text

         //--- If the message is "Hello"
         if(text=="Hello"){
            string message="Hello world! You just sent a 'Hello' text to MQL5 and has been processed successfully.";

         }
Here, we verify whether the message text says, "Hello." If it does, we craft a response that lets the user know the system received and processed the "Hello" text. This reply serves as a confirmation that the input was correctly handled by the MQL5 code. We then send this acknowledgment back to the user to let them know their input was successfully processed. To send the response, we will need to craft another function to handle the replies.
//+------------------------------------------------------------------+
//| Send a message to Telegram                                      |
//+------------------------------------------------------------------+
int sendMessageToTelegram(const long chat_id,const string text,
                const string reply_markup=NULL){
   string output; //--- Variable to store the response from the request
   string url=TELEGRAM_BASE_URL+"/bot"+getTrimmedToken(InpToken)+"/sendMessage"; //--- Construct the URL for the Telegram API request

   //--- Construct parameters for the API request
   string params="chat_id="+IntegerToString(chat_id)+"&text="+UrlEncode(text); //--- Set chat ID and message text
   if(reply_markup!=NULL){ //--- If a reply markup is provided
      params+="&reply_markup="+reply_markup; //--- Add reply markup to parameters
   }
   params+="&parse_mode=HTML"; //--- Set parse mode to HTML (can also be Markdown)
   params+="&disable_web_page_preview=true"; //--- Disable web page preview in the message

   //--- Send a POST request to the Telegram API
   int res=postRequest(output,url,params,WEB_TIMEOUT); //--- Call postRequest to send the message
   return(res); //--- Return the response code from the request
}
Here, we define the function "sendMessageToTelegram", which sends a message to a specified Telegram chat using the Telegram Bot API. Firstly, we construct the URL for the API request by combining the base URL for Telegram, the bot token (retrieved using "getTrimmedToken"), and the specific method for sending messages ("sendMessage"). This URL is essential for directing the API request to the correct endpoint. Next, we build the query parameters for the request. These parameters include:
- chat_id: The ID of the chat where the message will be sent.
- text: The content of the message, which is URL-encoded to ensure it is transmitted correctly.
If a custom reply keyboard markup ("reply_markup") is provided, it is appended to the parameters. This allows for interactive buttons in the message. Additional parameters include:
- parse_mode=HTML: Specifies that the message should be interpreted as HTML, allowing for formatted text.
- disable_web_page_preview=true: Ensures that any web page previews are disabled in the message.
Finally, the function sends the request using the "postRequest" function, which handles the actual communication with the Telegram API. The response code from this request is returned to indicate whether the message was successfully sent or if an error occurred.
We can then call this function with the respective parameters as below to send the response.
            //--- Send the response message
            sendMessageToTelegram(chat.member_id,message,NULL);
            continue;
Here, we first utilize the "sendMessageToTelegram" function to dispatch the response message to the appropriate Telegram chat. We call the function with the "chat.member_id" that targets the right chat for the right content message. The "reply_markup" parameter is set to NULL, meaning that the message sent has no keyboard or interactive elements accompanying it. After sending the message, we use the "continue" statement. It skips any remaining code in the loop currently processing and moves to the next iteration of that loop. The logic here is straightforward: We handle and forward the response to the current message. After that, we pretty much move on, not processing any further code for the current chat or message in the current iteration. Upon compilation, this is what we get.
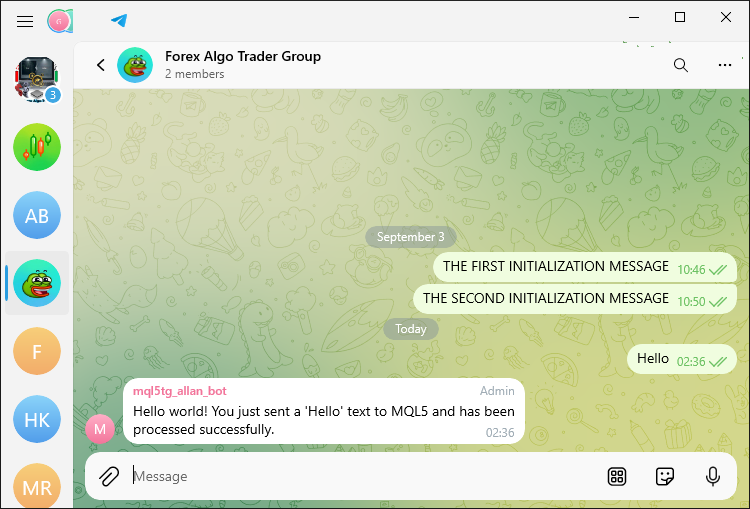
We can see that the message was received and processed within seconds. Let us then move on to adding a custom reply keyboard to our function.
//+------------------------------------------------------------------+
//| Create a custom reply keyboard markup for Telegram               |
//+------------------------------------------------------------------+
string customReplyKeyboardMarkup(const string keyboard, const bool resize,
                           const bool one_time){
   // Construct the JSON string for the custom reply keyboard markup.
   // 'keyboard' specifies the layout of the custom keyboard.
   // 'resize' determines whether the keyboard should be resized to fit the screen.
   // 'one_time' specifies if the keyboard should disappear after being used once.

   // 'resize' > true: Resize the keyboard to fit the screen.
   // 'one_time' > true: The keyboard will disappear after the user has used it once.
   // 'selective' > false: The keyboard will be shown to all users, not just specific ones.

   string result = "{"
                   "\"keyboard\": " + UrlEncode(keyboard) + ", " //--- Encode and set the keyboard layout
                   "\"one_time_keyboard\": " + convertBoolToString(one_time) + ", " //--- Set whether the keyboard should disappear after use
                   "\"resize_keyboard\": " + convertBoolToString(resize) + ", " //--- Set whether the keyboard should be resized to fit the screen
                   "\"selective\": false" //--- Keyboard will be shown to all users
                   "}";

   return(result); //--- Return the JSON string for the custom reply keyboard
}
Here, we define the function "customReplyKeyboardMarkup", which creates a custom reply keyboard for Telegram. This function takes three parameters: keyboard, resize, and one_time. The keyboard parameter specifies the layout of the custom keyboard in JSON format. The resize parameter determines whether the keyboard will be resized to fit the screen of the user's device. If the resize parameter is set to true, the keyboard will be resized to fit the screen of the user's device. The one_time parameter specifies whether the keyboard will become a "one-time" keyboard, disappearing after the user has interacted with it.
Within the function, a JSON string is constructed that represents the custom reply keyboard markup. To ensure that the keyboard parameter is formatted correctly for the API request, we use "UrlEncode" function to encode it. Next, we rely on the "convertBoolToString" function to change the boolean values for resize and one_time (which determine whether these values should be considered true or false) into their string representations. Finally, the constructed string is returned from the function and can be put to use in API requests to Telegram. The custom function we use is as follows.
//+------------------------------------------------------------------+
//| Convert boolean value to string                                 |
//+------------------------------------------------------------------+
string convertBoolToString(const bool _value){
   if(_value)
      return("true"); //--- Return "true" if the boolean value is true
   return("false"); //--- Return "false" if the boolean value is false
}
Finally, to hide and force-reply on the custom keyboards, we use the following functions.
//+------------------------------------------------------------------+
//| Create JSON for hiding custom reply keyboard                    |
//+------------------------------------------------------------------+
string hideCustomReplyKeyboard(){
   return("{\"hide_keyboard\": true}"); //--- JSON to hide the custom reply keyboard
}

//+------------------------------------------------------------------+
//| Create JSON for forcing a reply to a message                    |
//+------------------------------------------------------------------+
string forceReplyCustomKeyboard(){
   return("{\"force_reply\": true}"); //--- JSON to force a reply to the message
}
Here, the functions "hideCustomReplyKeyboard" and "forceReplyCustomKeyboard" generate JSON strings that specify particular actions to be taken by Telegram's custom keyboard feature.
For the function "hideCustomReplyKeyboard", the JSON string it generates reads: "{\"hide_keyboard\": true}". This JSON configuration tells Telegram to hide the reply keyboard after the user sends a message. In essence, this function serves to make the keyboard disappear once a message has been sent.
For the function "forceReplyCustomKeyboard", the JSON string it generates reads: "{\"force_reply\": true}". This string tells Telegram to require a response from the user before they can interact with any other UI element in the chat. This string serves to keep the user interacting singularly with the message that was just sent.
Armed with the custom reply keyboard function, let us then call the function to have the reply keyboard constructed in Telegram.
         //--- If the message is "Hello"
         if(text=="Hello"){
            string message="Hello world! You just sent a 'Hello' text to MQL5 and has been processed successfully.";

            //--- Send the response message
            sendMessageToTelegram(chat.member_id,message,customReplyKeyboardMarkup("[[\"Hello\"]]",false,false));
            continue;
         }
When we send the message in Telegram, we get the following result.
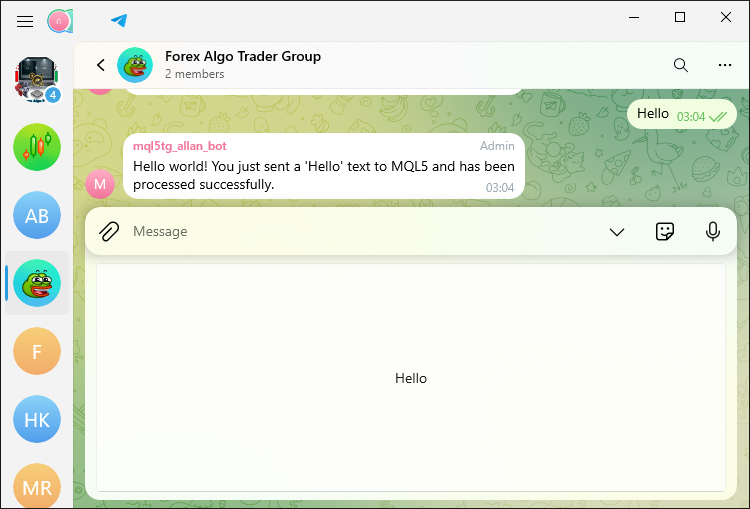
We can see that that was a success. Now, we can send the message by just clicking on the button. It is however pretty large. We can add several buttons now. First, let us add buttons in rows format.
            string message="Hello world! You just sent a 'Hello' text to MQL5 and has been processed successfully.";
            string buttons_rows = "[[\"Hello 1\"],[\"Hello 2\"],[\"Hello 3\"]]";
            //--- Send the response message
            sendMessageToTelegram(chat.member_id,message,customReplyKeyboardMarkup(buttons_rows,false,false));
            continue;
Here, we define a custom reply keyboard layout with the variable "buttons_rows". This string "[[\"Hello 1\"],[\"Hello 2\"],[\"Hello 3\"]]" represents a keyboard with three buttons, each labeled "Hello 1", "Hello 2", and "Hello 3". The format of this string is JSON, which is used by Telegram to render the keyboard. Upon run, we have the following results.
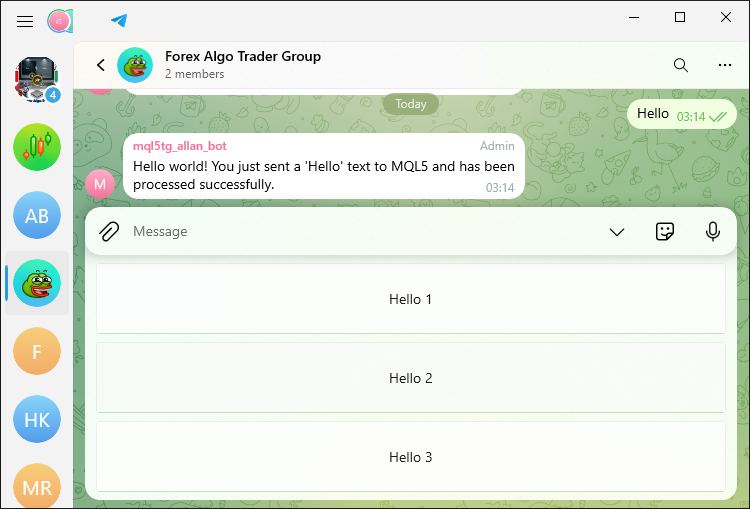
To visualize the keyboard layout in column format, we implement the following logic.
            string message="Hello world! You just sent a 'Hello' text to MQL5 and has been processed successfully.";
            string buttons_rows = "[[\"Hello 1\",\"Hello 2\",\"Hello 3\"]]";
            //--- Send the response message
            sendMessageToTelegram(chat.member_id,message,customReplyKeyboardMarkup(buttons_rows,false,false));
Upon running the program, we receive the following output.
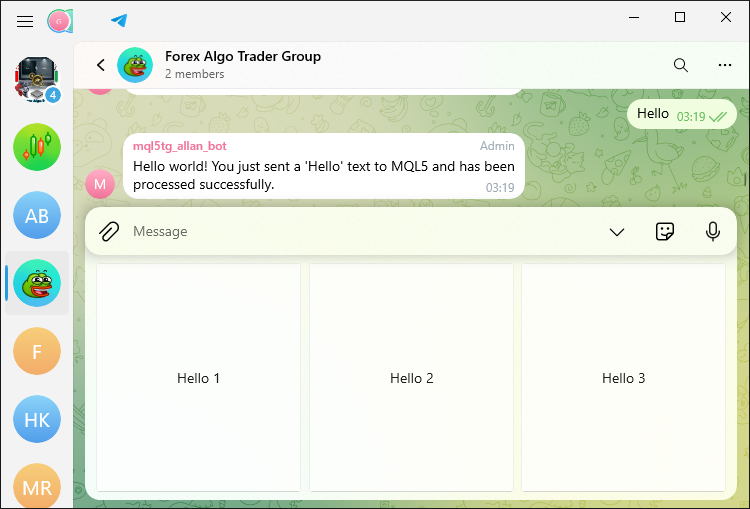
We can see that the layout we received is in columnar format, which means that the process was a success. We can now continue to create more complex commands. At first, let us have a custom list of commands that the user can quickly process.
         //--- If the message is "/start", "/help", "Start", or "Help"
         if(text=="/start" || text=="/help" || text=="Start" || text=="Help"){
            //chat.member_state=0; //--- Reset the chat state
            string message="I am a BOT \xF680 and I work with your MT5 Forex trading account.\n";
            message+="You can control me by sending these commands \xF648 :\n";
            message+="\nInformation\n";
            message+="/name - get EA name\n";
            message+="/info - get account information\n";
            message+="/quotes - get quotes\n";
            message+="/screenshot - get chart screenshot\n";
            message+="\nTrading Operations\n";
            message+="/buy - open buy position\n";
            message+="/close - close a position\n";
            message+="\nMore Options\n";
            message+="/contact - contact developer\n";
            message+="/join - join our MQL5 community\n";

            //--- Send the response message with the main keyboard
            sendMessageToTelegram(chat.member_id,message,customReplyKeyboardMarkup(KEYB_MAIN,false,false));
            continue;
         }
Here, we verify whether the incoming message is among the predetermined commands of "/start," "/help," "Start," and "Help." If it is one of these commands, we prepare a welcoming missive that introduces the bot to the user and provides a list of commands that can be sent to the bot to interact with it. We elide parts of this list and categorize other parts of it to give the user an overview of what they can do with the bot. Finally, we send this message along with a custom keyboard back to the user that's better suited to interact with the bot than the command line is. We have also defined the custom keyboard as follows.
   #define EMOJI_CANCEL "\x274C" //--- Cross mark emoji
   #define KEYB_MAIN    "[[\"Name\"],[\"Account Info\"],[\"Quotes\"],[\"More\",\"Screenshot\",\""+EMOJI_CANCEL+"\"]]" //--- Main keyboard layout
We use the macro #define to define two elements that will be used in the Telegram bot's user interface. First, we define "EMOJI_CANCEL" as a cross-mark emoji using its Unicode representation "\x274C". We will use this emoji in the keyboard layout to indicate a "Cancel" option. The emoji's Unicode representation is as shown below:
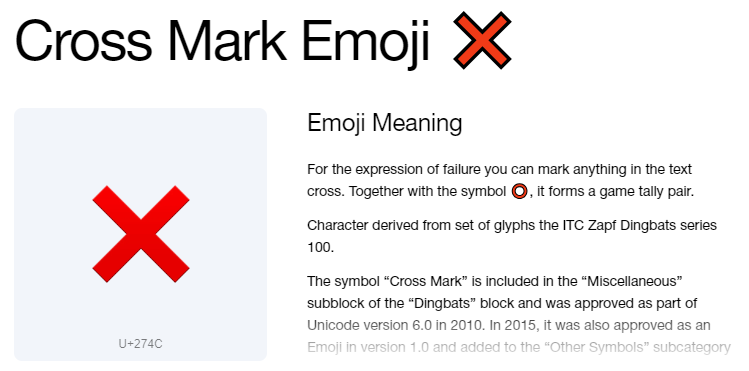
Next, we define "KEYB_MAIN", which represents the main keyboard layout for the bot. The keyboard is structured as a JSON array with rows of buttons. The layout includes options that are contained in the commands' list which are "Name," "Account Info," "Quotes," and a row with "More," "Screenshot," and the "Cancel" button represented by the "EMOJI_CANCEL". This keyboard will be displayed to the user, allowing them to interact with the bot by pressing these buttons instead of typing commands manually. When we run the program, we get the following output.
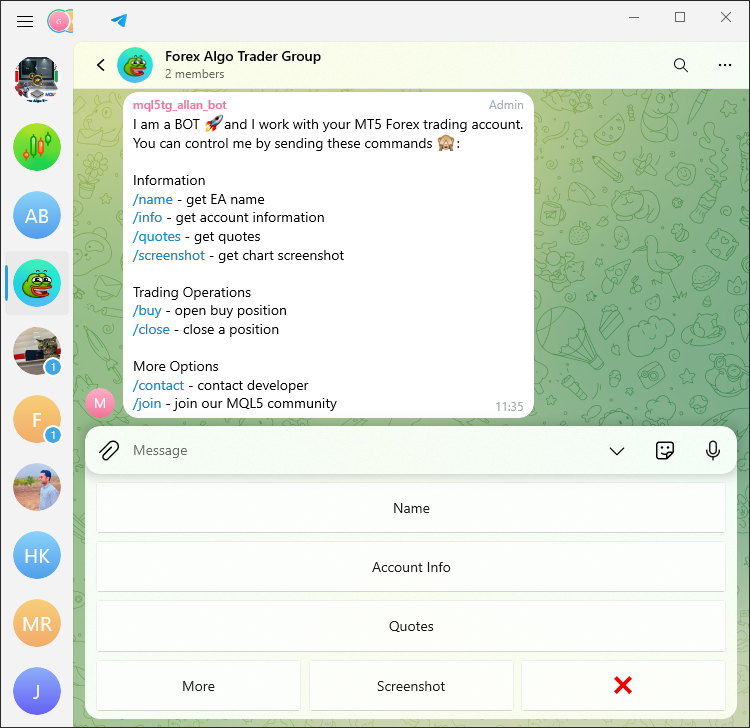
We now have the JSON-formatted custom keyboard and the list of commands that we can send to the bot. What now remains is the crafting of the respective responses as per the received commands from Telegram. We will begin by replying to the "/name" command.
         //--- If the message is "/name" or "Name"
         if (text=="/name" || text=="Name"){
            string message = "The file name of the EA that I control is:\n";
            message += "\xF50B"+__FILE__+" Enjoy.\n";
            sendMessageToTelegram(chat.member_id,message,NULL);
         }
Here, we verify whether the message received from the user is either "/name" or "Name". On the occasion that this check yields a positive result, we set to work on constructing a reply to the user that contains the name of the Expert Advisor (EA) file that is currently being used. We initialize a string variable called "message", which begins with the text "The file name of the EA that I control is:\n". We follow this initial declaration with a book emoji (represented by the code "\xF50B") and the name of the EA file.
We use the built-in MQL5 macro "__FILE__" to get the name of the file. The macro returns the file's name and path. We then construct a message to be sent to the user. The message consists of the name of the EA file and the path to it. We send the constructed message using the "sendMessageToTelegram" function. This function takes three parameters: the first is the chat ID of the user to whom we want to send the message; the second is the message itself; and the third parameter, which is set to "NULL", indicates that we are not sending any custom keyboard or button commands along with our message. This is important since we don't want to create an additional keyboard. When we click on either the "/name" command or its button, we receive the respective response as below.
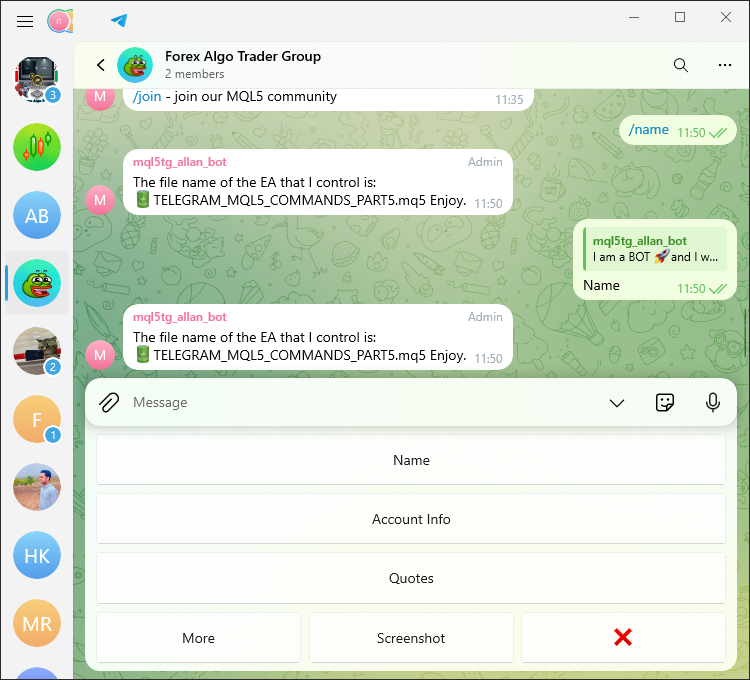
That was a success. Similarly, we craft the respective responses to account information and price quote commands. This is achieved via the following code snippet.
         //--- If the message is "/info" or "Account Info"
         ushort MONEYBAG = 0xF4B0; //--- Define money bag emoji
         string MONEYBAGcode = ShortToString(MONEYBAG); //--- Convert emoji to string
         if(text=="/info" || text=="Account Info"){
            string currency=AccountInfoString(ACCOUNT_CURRENCY); //--- Get the account currency
            string message="\x2733\Account No: "+(string)AccountInfoInteger(ACCOUNT_LOGIN)+"\n";
            message+="\x23F0\Account Server: "+AccountInfoString(ACCOUNT_SERVER)+"\n";
            message+=MONEYBAGcode+"Balance: "+(string)AccountInfoDouble(ACCOUNT_BALANCE)+" "+currency+"\n";
            message+="\x2705\Profit: "+(string)AccountInfoDouble(ACCOUNT_PROFIT)+" "+currency+"\n";

            //--- Send the response message
            sendMessageToTelegram(chat.member_id,message,NULL);
            continue;
         }

         //--- If the message is "/quotes" or "Quotes"
         if(text=="/quotes" || text=="Quotes"){
            double Ask = SymbolInfoDouble(_Symbol,SYMBOL_ASK); //--- Get the current ask price
            double Bid = SymbolInfoDouble(_Symbol,SYMBOL_BID); //--- Get the current bid price
            string message="\xF170 Ask: "+(string)Ask+"\n";
            message+="\xF171 Bid: "+(string)Bid+"\n";

            //--- Send the response message
            sendMessageToTelegram(chat.member_id,message,NULL);
            continue;
         }
For the trading operation commands, more particularly opening a buy position, we use the following logic.
         //--- If the message is "/buy" or "Buy"
         if (text=="/buy" || text=="Buy"){
            CTrade obj_trade; //--- Create a trade object
            double Ask = SymbolInfoDouble(_Symbol,SYMBOL_ASK); //--- Get the current ask price
            double Bid = SymbolInfoDouble(_Symbol,SYMBOL_BID); //--- Get the current bid price
            obj_trade.Buy(0.01,NULL,0,Bid-300*_Point,Bid+300*_Point); //--- Open a buy position
            double entry=0,sl=0,tp=0,vol=0;
            ulong ticket = obj_trade.ResultOrder(); //--- Get the ticket number of the new order
            if (ticket > 0){
               if (PositionSelectByTicket(ticket)){ //--- Select the position by ticket
                  entry=PositionGetDouble(POSITION_PRICE_OPEN); //--- Get the entry price
                  sl=PositionGetDouble(POSITION_SL); //--- Get the stop loss price
                  tp=PositionGetDouble(POSITION_TP); //--- Get the take profit price
                  vol=PositionGetDouble(POSITION_VOLUME); //--- Get the volume
               }
            }
            string message="\xF340\Opened BUY Position:\n";
            message+="Ticket: "+(string)ticket+"\n";
            message+="Open Price: "+(string)entry+"\n";
            message+="Lots: "+(string)vol+"\n";
            message+="SL: "+(string)sl+"\n";
            message+="TP: "+(string)tp+"\n";

            //--- Send the response message
            sendMessageToTelegram(chat.member_id,message,NULL);
            continue;
         }
Here, we handle a scenario where the user sends the message "/buy" or "Buy". Our first step is to create a CTrade object named "obj_trade", which we will use to carry out the trading operation. We then obtain the current ask and bid prices by calling the SymbolInfoDouble function. To open our buy position, we use the Buy function of the CTrade object. We set the volume of the trade at 0.01 lots. For our SL (stop loss) and TP (take profit), we set the bid price minus 300 points and the bid price plus 300 points, respectively.
Once the position is opened, we ascertain the new order's ticket number via the "ResultOrder" function. With the ticket in hand, we use the function PositionGetInteger to select the position by ticket. We then retrieve vital statistics like the entry price, volume, stop loss, and take profit. Using these numbers, we construct a message that will inform the user they have opened a buy position. To handle the position closure and contact command, we use the following similar logic.
         //--- If the message is "/close" or "Close"
         if (text=="/close" || text=="Close"){
            CTrade obj_trade; //--- Create a trade object
            int totalOpenBefore = PositionsTotal(); //--- Get the total number of open positions before closing
            obj_trade.PositionClose(_Symbol); //--- Close the position for the symbol
            int totalOpenAfter = PositionsTotal(); //--- Get the total number of open positions after closing
            string message="\xF62F\Closed Position:\n";
            message+="Total Positions (Before): "+(string)totalOpenBefore+"\n";
            message+="Total Positions (After): "+(string)totalOpenAfter+"\n";

            //--- Send the response message
            sendMessageToTelegram(chat.member_id,message,NULL);
            continue;
         }

         //--- If the message is "/contact" or "Contact"
         if (text=="/contact" || text=="Contact"){
            string message="Contact the developer via link below:\n";
            message+="https://t.me/Forex_Algo_Trader";

            //--- Send the contact message
            sendMessageToTelegram(chat.member_id,message,NULL);
            continue;
         }
It is now clear we can respond to commands sent from Telegram. Up to this point, we just send plain text messages. Let us be a bit more fancy and format our text messages using the Hypertext Markup Language (HTML) entity, which could also be Markdown. Your choice!
         //--- If the message is "/join" or "Join"
         if (text=="/join" || text=="Join"){
            string message="You want to be part of our MQL5 Community?\n";
            message+="Welcome! <a href=\"https://t.me/forexalgo_trading\">Click me</a> to join.\n";
            message+="<s>Civil Engineering</s> Forex AlgoTrading\n";//strikethrough
            message+="<pre>This is a sample of our MQL5 code</pre>\n";//preformat
            message+="<u><i>Remember to follow community guidelines!\xF64F\</i></u>\n";//italic, underline
            message+="<b>Happy Trading!</b>\n";//bold

            //--- Send the join message
            sendMessageToTelegram(chat.member_id,message,NULL);
            continue;
         }
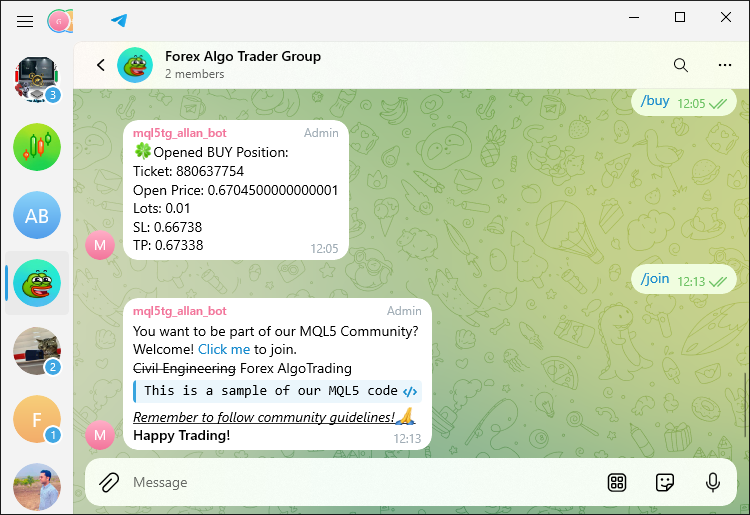
Here, we respond to the user when they send the message "/join" or "Join". We start by crafting a message that invites the user to join the MQL5 Community. The message includes a hyperlink that users can click to join the community, as well as several examples of how text can be formatted using HTML tags in Telegram:
- Strike-through Text: We use the <s> tag to strike through the words "Civil Engineering" and emphasize that we focus on "Forex AlgoTrading."
- Preformatted Text: The <pre> tag is used to show a sample of MQL5 code in a preformatted text block.
- Italic and Underlined Text: The <u> and <i> tags are combined to underline and italicize a reminder for users to follow community guidelines, adding a Unicode emoji for emphasis.
- Bold Text: The <b> tag is used to bold the closing statement "Happy Trading!"
Finally, we send this formatted message to the user via Telegram using the "sendMessageToTelegram" function, ensuring the user receives a well-formatted and engaging invitation to join the MQL5 community. Upon run, we get the following output.
Now that we have depleted the command lists, let us continue to modify the reply keyboard and generate a new one once the "more" button is clicked. The following logic is implemented.
         //--- If the message is "more" or "More"
         if (text=="more" || text=="More"){
            chat.member_state=1; //--- Update chat state to show more options
            string message="Choose More Options Below:";

            //--- Send the more options message with the more options keyboard
            sendMessageToTelegram(chat.member_id,message,customReplyKeyboardMarkup(KEYB_MORE,false,true));
            continue;
         }
When we receive the message "more" or "More" from the user, we take it as a signal to update the current conversation's context. In the world of chatbots, the message indicates that the user is not satisfied with the current number of options or has not found what they are looking for so far. Our response to the user must therefore provide a different variety of selections. In practical terms, this means that we send the user a new message with a new keyboard layout. The "KEYB_MORE" is as shown below:
   #define EMOJI_UP    "\x2B06" //--- Upwards arrow emoji
   #define KEYB_MORE "[[\""+EMOJI_UP+"\"],[\"Buy\",\"Close\",\"Next\"]]" //--- More options keyboard layout
When we run the program we get the following output.
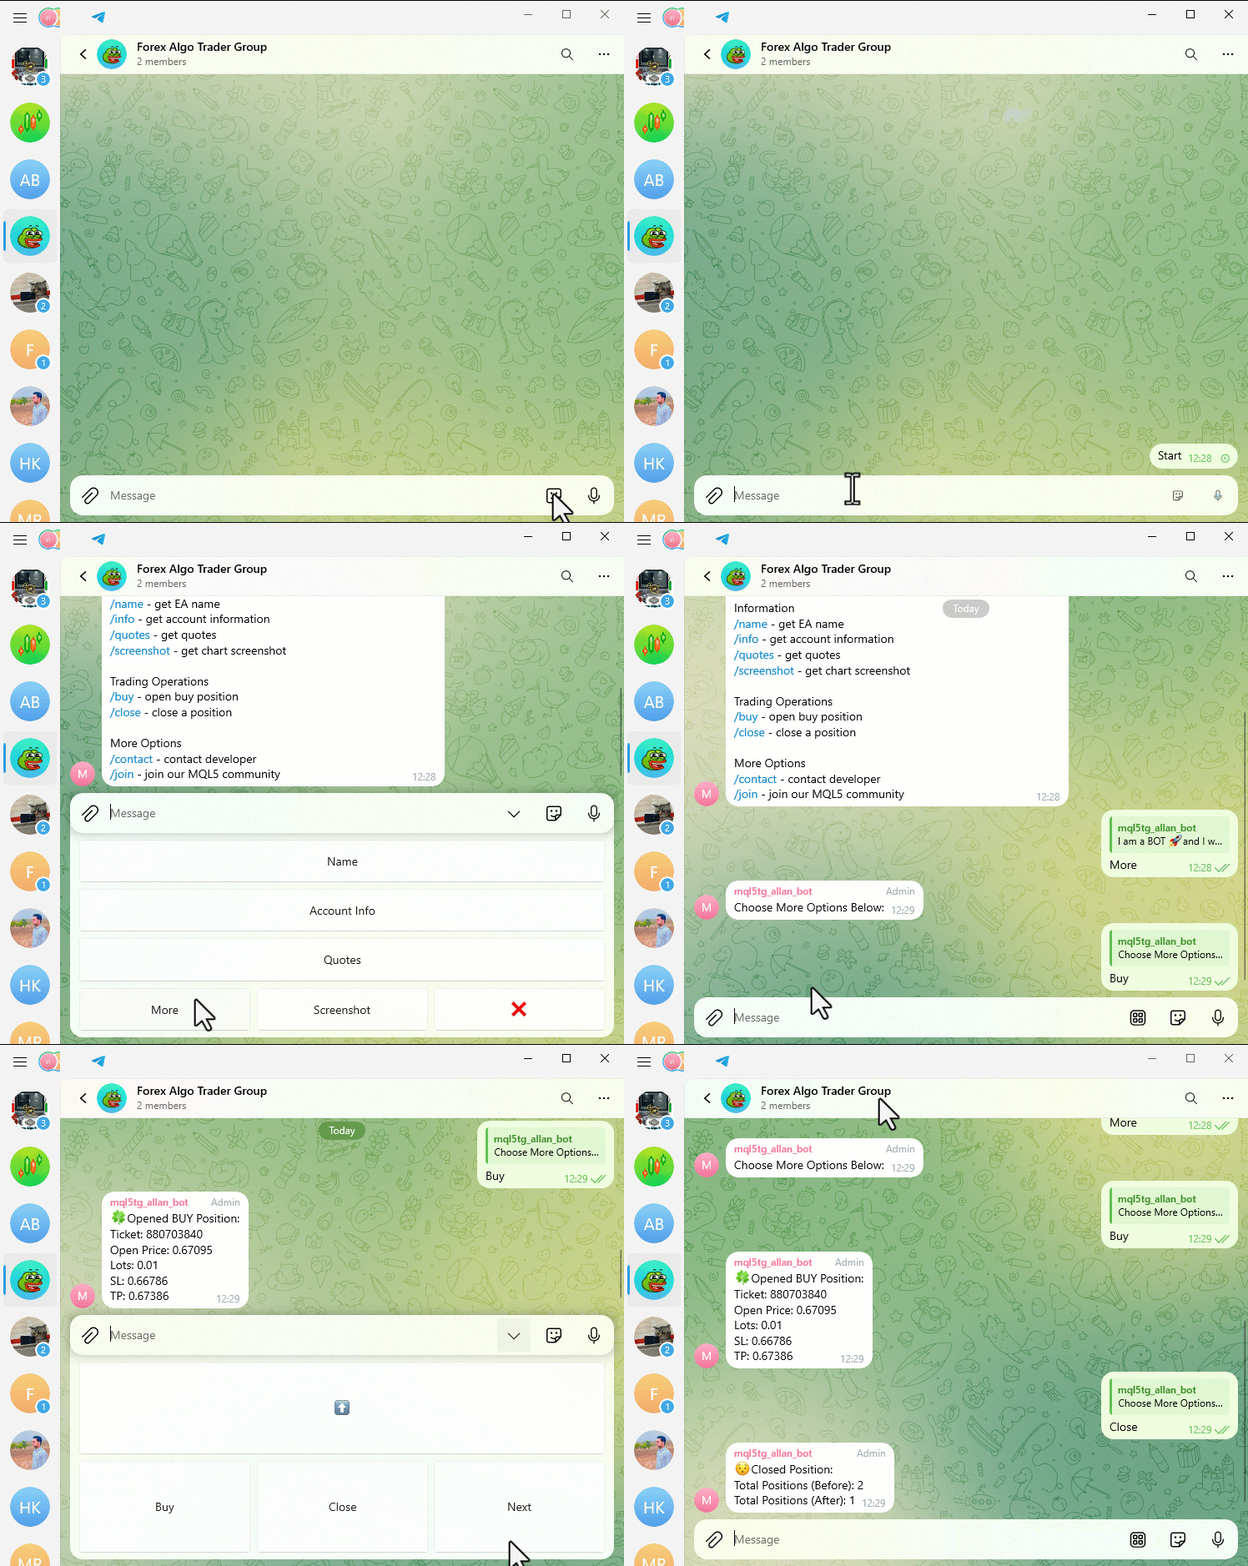
That was a success. We can similarly handle the other commands.
         //--- If the message is the up emoji
         if(text==EMOJI_UP){
            chat.member_state=0; //--- Reset chat state
            string message="Choose a menu item:";

            //--- Send the message with the main keyboard
            sendMessageToTelegram(chat.member_id,message,customReplyKeyboardMarkup(KEYB_MAIN,false,false));
            continue;
         }

         //--- If the message is "next" or "Next"
         if(text=="next" || text=="Next"){
            chat.member_state=2; //--- Update chat state to show next options
            string message="Choose Still More Options Below:";

            //--- Send the next options message with the next options keyboard
            sendMessageToTelegram(chat.member_id,message,customReplyKeyboardMarkup(KEYB_NEXT,false,true));
            continue;
         }

         //--- If the message is the pistol emoji
         if (text==EMOJI_PISTOL){
            if (chat.member_state==2){
               chat.member_state=1; //--- Change state to show more options
               string message="Choose More Options Below:";

               //--- Send the message with the more options keyboard
               sendMessageToTelegram(chat.member_id,message,customReplyKeyboardMarkup(KEYB_MORE,false,true));
            }
            else {
               chat.member_state=0; //--- Reset chat state
               string message="Choose a menu item:";

               //--- Send the message with the main keyboard
               sendMessageToTelegram(chat.member_id,message,customReplyKeyboardMarkup(KEYB_MAIN,false,false));
            }
            continue;
         }

         //--- If the message is the cancel emoji
         if (text==EMOJI_CANCEL){
            chat.member_state=0; //--- Reset chat state
            string message="Choose /start or /help to begin.";

            //--- Send the cancel message with hidden custom reply keyboard
            sendMessageToTelegram(chat.member_id,message,hideCustomReplyKeyboard());
            continue;
         }
Here, we deal with diverse user messages to control the chat interface. When a user sends the up emoji, we take that as a signal and reset the chat state to 0, prompting the user to once again choose a menu item, accompanied by the main keyboard layout. When a user sends "next" or "Next," we update the chat state to 2 and instruct the user to once again choose a menu item, this time from a keyboard layout that presents additional options.
For the pistol emoji, we adjust the chat state based on its current value: if the state is 2, we switch it to 1 and present the more options keyboard; if the state is different, we switch it to 0 and present the main menu keyboard. For the cancel emoji, we reset the chat state to 0 and send the user a message that tells them to choose either "/start" or "/help" to begin. We send this message with the hidden custom reply keyboard to clear any active custom keyboards for the user. The extra custom layouts used are as below:
   #define EMOJI_PISTOL   "\xF52B" //--- Pistol emoji
   #define KEYB_NEXT "[[\""+EMOJI_UP+"\",\"Contact\",\"Join\",\""+EMOJI_PISTOL+"\"]]" //--- Next options keyboard layout
Up to this point, everything is complete. We just have to handle the screenshot commands and that will be all. The following logic is implemented to handle the mode of receipt of the chart images. The keyboard layout will be used for this purpose rather than having to type manually.
         //--- If the message is "/screenshot" or "Screenshot"
         static string symbol = _Symbol; //--- Default symbol
         static ENUM_TIMEFRAMES period = _Period; //--- Default period
         if (text=="/screenshot" || text=="Screenshot"){
            chat.member_state = 10; //--- Set state to screenshot request
            string message="Provide a symbol like 'AUDUSDm'";

            //--- Send the message with the symbols keyboard
            sendMessageToTelegram(chat.member_id,message,customReplyKeyboardMarkup(KEYB_SYMBOLS,false,false));
            continue;
         }

         //--- Handle state 10 (symbol selection for screenshot)
         if (chat.member_state==10){
            string user_symbol = text; //--- Get the user-provided symbol
            if (SymbolSelect(user_symbol,true)){ //--- Check if the symbol is valid
               chat.member_state = 11; //--- Update state to period request
               string message = "CORRECT: Symbol is found\n";
               message += "Now provide a Period like 'H1'";
               symbol = user_symbol; //--- Update symbol

               //--- Send the message with the periods keyboard
               sendMessageToTelegram(chat.member_id,message,customReplyKeyboardMarkup(KEYB_PERIODS,false,false));
            }
            else {
               string message = "WRONG: Symbol is invalid\n";
               message += "Provide a correct symbol name like 'AUDUSDm' to proceed.";

               //--- Send the invalid symbol message with the symbols keyboard
               sendMessageToTelegram(chat.member_id,message,customReplyKeyboardMarkup(KEYB_SYMBOLS,false,false));
            }
            continue;
         }

         //--- Handle state 11 (period selection for screenshot)
         if (chat.member_state==11){
            bool found=false; //--- Flag to check if period is valid
            int total=ArraySize(periods); //--- Get the number of defined periods
            for(int k=0; k<total; k++){
               string str_tf=StringSubstr(EnumToString(periods[k]),7); //--- Convert period enum to string
               if(StringCompare(str_tf,text,false)==0){ //--- Check if period matches
                  ENUM_TIMEFRAMES user_period=periods[k]; //--- Set user-selected period
                  period = user_period; //--- Update period
                  found=true;
                  break;
               }
            }
            if (found){
               string message = "CORRECT: Period is valid\n";
               message += "Screenshot sending process initiated \xF60E";

               //--- Send the valid period message with the periods keyboard
               sendMessageToTelegram(chat.member_id,message,customReplyKeyboardMarkup(KEYB_PERIODS,false,false));
               string caption = "Screenshot of Symbol: "+symbol+
                                " ("+EnumToString(ENUM_TIMEFRAMES(period))+
                                ") @ Time: "+TimeToString(TimeCurrent());

               //--- Send the screenshot to Telegram
               sendScreenshotToTelegram(chat.member_id,symbol,period,caption);
            }
            else {
               string message = "WRONG: Period is invalid\n";
               message += "Provide a correct period like 'H1' to proceed.";

               //--- Send the invalid period message with the periods keyboard
               sendMessageToTelegram(chat.member_id,message,customReplyKeyboardMarkup(KEYB_PERIODS,false,false));
            }
            continue;
         }
Here, we deal with the user's requests for a screenshot of a chart by managing the different states of the chat flow. When the user sends the command "/screenshot" or "Screenshot," we set the chat state to 10 and prompt the user for a symbol by displaying a keyboard with the available symbols. It is important to note here that the chat state can be any numeral, even 1000. It just acts as an identifier or quantifier to store the state that we remember during the response processing. If the user provides a symbol, we check its validity. If it's valid, we ask the user for a period (a valid "time" for the chart) by displaying a keyboard with the available options for periods. If the user provides an invalid symbol, we notify them and prompt them to give us a valid one.
When the user inputs a time frame, we check to see if it’s valid. If the time frame is one of the predefined valid options, we move on to update the chat state and forward the user’s request for a screenshot of the symbol given in the last valid caption, with the just-in-time fulfillment details necessary for the implied "if-then" statement we started with—and initiate the screenshot process in our backend. If, on the other hand, the user provides a time frame that doesn’t match one of the valid predefined options, we just let the user know that the input was erroneous, repeating the valid options we showed in line with the initial input request. The custom reply keyboards for the symbols and periods and the timeframe array we use are defined below.
   #define KEYB_SYMBOLS "[[\""+EMOJI_UP+"\",\"AUDUSDm\",\"AUDCADm\"],[\"EURJPYm\",\"EURCHFm\",\"EURUSDm\"],[\"USDCHFm\",\"USDCADm\",\""+EMOJI_PISTOL+"\"]]" //--- Symbol selection keyboard layout
   #define KEYB_PERIODS "[[\""+EMOJI_UP+"\",\"M1\",\"M15\",\"M30\"],[\""+EMOJI_CANCEL+"\",\"H1\",\"H4\",\"D1\"]]" //--- Period selection keyboard layout

   //--- Define timeframes array for screenshot requests
   const ENUM_TIMEFRAMES periods[] = {PERIOD_M1,PERIOD_M15,PERIOD_M30,PERIOD_H1,PERIOD_H4,PERIOD_D1};
Up to this point, we are now all set with our fully customized keyboard and replies. To ascertain this, we run the program. Here are the output results we get.
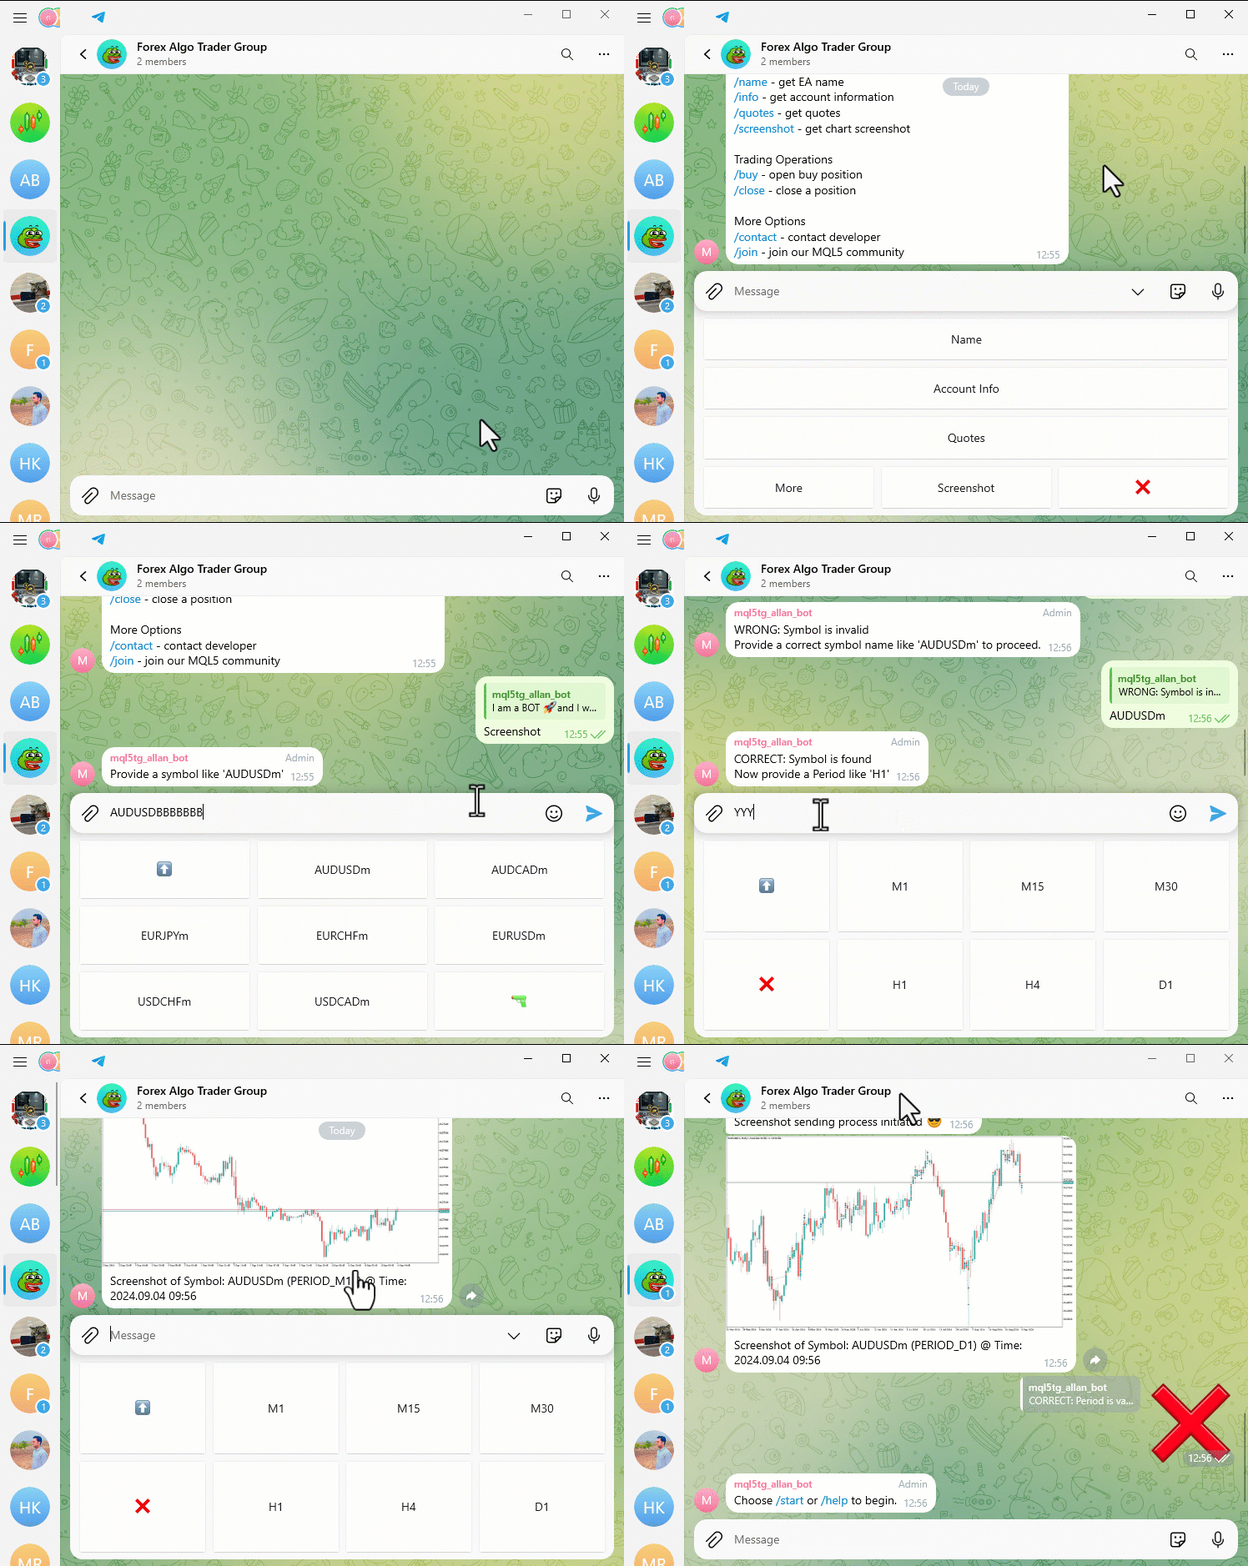
Here, we can see that the screenshot-sending process is initiated and accomplished. Any invalid commands or inputs are handled in a manner that ensures that only valid commands are sent by the user. To ascertain that everything works out as intended and pinpoint any resulting limitations, we will need to test the implementation thoroughly. This is done in the next section.
Testing the Implementation
Testing is a crucial phase in validating that our created program functions as intended. Thus, we will need to check if it works correctly. The first thing we do is enable the webpage preview in our link responses. Allowing web page previews in links lets users glimpse the content before they click through. They see a title and image that often convey a good sense of what the linked page is about. This is great from a user experience standpoint, especially when you consider that it’s often hard to judge a link’s quality just from the text of the link itself. Thus, we will turn on the disabled preview to false as follows.
//+------------------------------------------------------------------+
//| Send a message to Telegram                                      |
//+------------------------------------------------------------------+
int sendMessageToTelegram( ... ){

   //--- ...

   params+="&disable_web_page_preview=false"; //--- Enable web page preview in the message

   //--- ...

}
Once we run this, we get the following output.
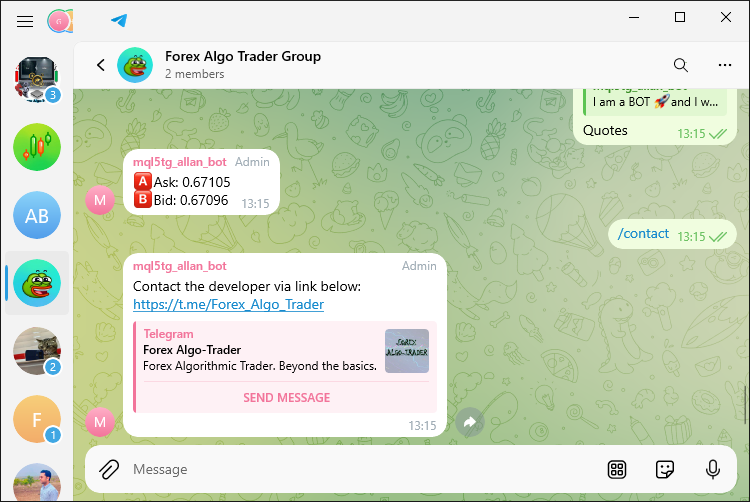
We can now receive the web page previews as shown. That was a success. We can then move to changing the formatting entity or parse mode from Hypertext Markup Language (HTML) to Markdown as follows:
//+------------------------------------------------------------------+
//| Send a message to Telegram                                      |
//+------------------------------------------------------------------+
int sendMessageToTelegram( ... ){

   //--- ...

   params+="&parse_mode=Markdown"; //--- Set parse mode to Markdown (can also be HTML)

   //--- ...

}
In markdown parse mode, we will need to change the whole formatting structure of our initial code with markdown entities. The correct form will be as below.
      //--- If the message is "/join" or "Join"
      if (text=="/join" || text=="Join"){
         string message = "You want to be part of our MQL5 Community?\n";
         message += "Welcome! [Click me](https://t.me/forexalgo_trading) to join.\n"; // Link
         message += "~Civil Engineering~ Forex AlgoTrading\n"; // Strikethrough
         message += "```\nThis is a sample of our MQL5 code\n```"; // Preformatted text
         message += "*_Remember to follow community guidelines! \xF64F_*"; // Italic and underline
         message += "**Happy Trading!**\n"; // Bold

         //--- Send the join message
         sendMessageToTelegram(chat.member_id, message, NULL);
         continue;
      }
Here's what we changed:
- Link: In Markdown, links are created with [text](URL) instead of <a href="URL">text</a>.
- Strike-through: Use ~text~ for strike-through instead of <s>text</s>.
- Preformatted text: Use triple backticks (```) to format preformatted text instead of <pre>text</pre>.
- Italic and underline: Markdown does not natively support underline. The closest you can get is italic with *text* or _text_. The underline effect from HTML is not directly supported in Markdown, so it is included with a placeholder if needed.
- Bold: Use double asterisks **text** for bold instead of <b>text</b>.
When we run the program, we receive the following output.
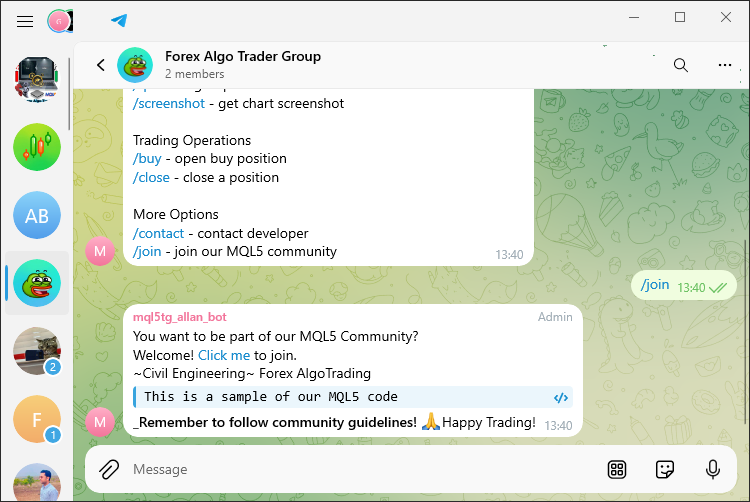
To demonstrate the testing process, we have prepared a video that showcases the program in action. This video illustrates the different test cases we ran and highlights how the program responded to various inputs and how well it performed its necessary tasks. When you watch this video, you'll get a very clear picture of the testing process and will be able to see, without any doubt, that the implementation meets the expected requirements. The video is presented below.
In summary, the successful execution and verification of the implementation, as demonstrated in the attached video, affirm that the program is functioning as intended.
Conclusion
To sum up, the Expert Advisor that we created integrates the MetaQuotes Language 5 (MQL5) language—along with the MetaTrader 5 trading platform—with the Telegram messaging app, allowing users to quite literally talk to their trading robots. And why not? Telegram has emerged as a powerful, user-friendly way of controlling automated trading systems. Using it, one can send commands and receive responses from the system in real-time.
In our case, we have made sure that instead of waiting for the Expert Advisor to communicate with the Telegram bot which relays the communication to the user, we connect the two bots and communicate with the Expert Advisor whenever we want without having to wait for a signal generation. We set up a series of conversations between the user and the bot. We made sure that the MQL5 commands that the user sent through Telegram were interpreted correctly. After a lot of testing, we can confidently say that our Expert Advisor is both reliable and robust.
 Formulating Dynamic Multi-Pair EA (Part 1): Currency Correlation and Inverse Correlation
 Developing a multi-currency Expert Advisor (Part 9): Collecting optimization results for single trading strategy instances
 MQL5 Wizard Techniques you should know (Part 37): Gaussian Process Regression with Linear and Matérn Kernels
 Introduction to MQL5 (Part 9): Understanding and Using Objects in MQL5
- Free trading apps
- Over 8,000 signals for copying
- Economic news for exploring financial markets
You agree to website policy and terms of use
Very impressive work!!
This enables the following functions to be realized:
Tradingview alert to telegram
telengram to MQL5
THX!
Very impressive work!!
This enables the following functions to be realized:
Tradingview alert to telegram
telengram to MQL5
THX!
Hello Allan, thanks for this great article.
Unfortunately, the code seems to be broken from line 1384 when extracting message details from the JSON object. The first code on line 1383
works well when printed to the journal. the update id returns a valid id. but the message_id, message_date and all other in instances return an empty value. Because of these issues, nothing seem to work in the code as should be expected.
Can you please help resolve this issues?
Thanks again for taking your time to provide this article.
Hello Allan, I finally found the issue to be from my end. Thanks for this excellent piece!
Hello Allan, I finally found the issue to be from my end. Thanks for this excellent piece!