
Creating an MQL5-Telegram Integrated Expert Advisor (Part 4): Modularizing Code Functions for Enhanced Reusability
Introduction
In the preceding article of this series, we delved into the process of sending chart snapshots with captions from MetaTrader 5 to Telegram. Our approach, while effective, was rather straightforward and somewhat inflexible. We chained together the components necessary to capture a screenshot, convert or encode it into a message-friendly form, and send it along to Telegram. Although this setup worked, it resulted in a fair bit of code that was repetitive and not all that manageable. So, what can we do to improve this implementation? Move to a more modular codebase! This is the first step toward both a more flexible and a more maintainable system.
In this fourth part of our series, we will focus on enhancing the reusability of our program through code modularization. We will undertake a detailed discussion on the principles of code modularization and, more specifically, how these principles apply to our project. Following that, we will present step-by-step instructions for reorganizing our existing mql5 script into separate, well-defined functions. In the end, you will have the choice of using the old, monolithic program or a new, modular Expert Advisor (EA) with the same output.
Following this, we will methodically change our current code so that it will occupy a new space in the embodiment of our program. We will break the code into discrete functions, each of which will carry out a single task: sending messages, taking screenshots, and encoding data into the necessary form for transmission. We will demonstrate the way each piece fits together in the new structure and, more importantly, how each function carries out its task without unnecessary repetition and in a way that will allow us to update and expand the program easily.
In conclusion, we will talk about the testing and verification processes for the modularized strategy code. This will include checking for the correct operation of each function and the overall system performance and comparing results with the old code. Although we are using the term modularization, we are just talking about making our Expert Advisors more comprehensible and maintainable. By the end of this article, you will know why this is an important step in development and will have a clear picture of how we did it and what benefits we expect to gain. Here are the topics that we will follow to create the Expert Advisor (EA):
- Understanding the Need for Modularization
- Refactoring the Message-Sending Code
- Modularizing Screenshot Functions
- Testing and Implementing Modular Functions
- Conclusion
By the end, we will have produced a tidy and efficient MetaQuotes Language 5 (MQL5)-Telegram Expert Advisor. This modular and well-structured code allows for easy integration, is highly flexible, and requires far less effort to update and add new features than if the code were written in the usual way. It not only handles message-sending tasks but also takes care of the screenshot-capturing and data-holding functions, doing so in a manageable and scalable manner, thereby laying down a solid foundation for future enhancements. Let us get started then.
Understanding the Need for Modularization
We will examine the idea of code modularization, which is a fundamental software engineering technique for organizing and managing large codebases. When a program is modularized, it is broken down into smaller, manageable parts that are nearly self-contained. Each of these parts (or modules) performs a specific function and interacts with other modules in a well-defined way. Of course, the bulk of the program still needs to be written, so we will also look at some basic principles and concepts that govern how one can go about making a program modular.
Both the development and maintenance phases show the paybacks of modularization. When it comes time to write the code, developers can concentrate on one module at a time. The code in each module is implemented, tested, and debugged before moving on to the next one. Once the system is in operation, if a change is needed, that change can usually be made in just one module. Changes in one module have very little effect on other modules. The overall result is a much more stable system with a lower cost for changes or repairs. As an illustration, our MQL5 Expert Advisor can send messages when certain events occur. One of our modules does that. Another module can take screenshots and save them. If we wanted to extend the screenshot function, we could do it without messing up the module that sends messages.
Ensuring the maintainability of a program is deceptively simple; it can seem simple because it is actually about keeping everything that makes a program work in a clean, well-organized order. Almost everything we have said so far is a prelude to this essential paragraph, for nothing is more conducive to maintainability than making modules that contain all the pieces required to keep parties happy—a piece for you, a piece for me, and a piece for that function over there. By ensuring all this, we also ensure reusability, for once a module does what it’s supposed to do, it’s as good as it gets.
We will demonstrate the code modularization of the MQL5 Expert Advisor by dividing it into well-defined functions and classes. We will look at how to stitch these modules together to accomplish well-specified jobs, like sending text messages, taking screenshots, and restructuring the data we feed into our system so that it does what we want. By the end, we hope to understand how these changes make our Expert Advisor more efficient, maintainable, and scalable.
Refactoring the Message-Sending Code
The first thing that we will do is create a custom function or module where we can input the logic which we will encapsulate and organize for maximum reuse. The first function will be responsible for sending a simple message.
//+------------------------------------------------------------------+
//|    FUNCTION TO SEND SIMPLE MESSAGE                               |
//+------------------------------------------------------------------+

void sendSimpleMessage(){

//...

}
Here, we encapsulate the process of sending a Telegram message within a function called "sendSimpleMessage". This modular structure simplifies maintenance, management, and reuse of the code within the Expert Advisor (EA). We use a void function; that is, a function that does not return a value. Instead, it operates by sending a message to Telegram. The function is also capable of handling the success and failure of the operation "under the hood," so the code doesn't get too messy with all sorts of if statements. This encapsulation allows the main program to call the function when it wants to send a message, without getting bogged down in how to do it with the Telegram API.
To enable flexibility in the message-sending operation, we need to include parameters that we can automatically reuse to allow different texts to be sent whenever needed and the API URL, bot's token, and the chat ID.
void sendSimpleMessage(string custom_message,const string api_url,
                       const string bot_token,const string chat_id,
                       int timeout=10000){

//...

}
Here, we define a void function named "sendSimpleMessage", which reflects its purpose: to send a plain message to Telegram without any complex attachments or data processing. It is then filled with four mandatory input parameters: "custom_message", "api_url", "bot_token", and "chat_id", and one optional input parameter: "timeout". Let us break the parameters in a structured manner for easier understanding.
- custom_message: This is a string parameter that holds the actual text message we want to send to Telegram.
- api_url: This is a string parameter that contains the base URL of the Telegram Bot API. This URL is used to request the correct API endpoint.
- bot_token: Another string parameter that holds the bot's unique token, which is required for authenticating the bot and authorizing it to send messages.
- chat_id: This string parameter specifies the unique identifier of the Telegram chat or channel where the message will be sent.
- timeout: This is an optional int parameter that sets the amount of time (in milliseconds) the function should wait for a response from the Telegram API before considering the request as timed out. The default value is set to 10,000 milliseconds (10 seconds), but the user can provide a custom timeout value if needed.
You might have noticed that we use the keyword const in some of the input arguments. It means that the values passed are final and cannot be changed, altered, or replaced inside the function's body, which ensures that there are no overwriting errors in the function. Next, we just need to transfer the code snippets that are responsible for sending simple messages from the default form to the function.
   char data[];  // Array to hold data to be sent in the web request (empty in this case)
   char res[];  // Array to hold the response data from the web request
   string resHeaders;  // String to hold the response headers from the web request

   string message = custom_message;

   const string url = api_url + "/bot" + bot_token + "/sendmessage?chat_id=" + chat_id +
      "&text=" + message;

   // Send the web request to the Telegram API
   int send_res = WebRequest("POST", url, "", timeout, data, res, resHeaders);
We start by declaring a pair of arrays: "data" and "res". The "data" array is empty, as we are not sending anybody data in our web request—we are sending only the message as a URL parameter. The "res" array will hold the response data from the server after we make the request. Also, we declare a string called "resHeaders", which will hold any response headers sent back by the Telegram API.
Next, we take the "custom_message" from the input parameter and assign it to the message variable. This essentially gives us the ability to work with or pass along the message within the function if we need to do that.
We build the API request URL by stringing together several components: the basic "api_url", the "/bot" endpoint, the authentication "bot_token", and the recipient chat's "chat_id". To that, we add the message text as a URL parameter: "&text=". The result is a complete URL that contains all the requisite data for the API call.
At last, we pass the web request logic to the WebRequest function. This function is responsible for sending an HTTP POST request to the Telegram API. It uses the URL we just built for the API. The request's timeout value, defaulting to 10 seconds (or another value specified by the user), determines how long the request will wait for a response before it gives up and moves on with its life. The request is sent with an empty data array (which could also be just an empty object in JavaScript Object Notation (JSON) format), and any response the API sends back to us is stored in the result array and the result headers string.
Finally, we just add the check logic for the response status of the web request.
   // Check the response status of the web request
   if (send_res == 200) {
      // If the response status is 200 (OK), print a success message
      Print("TELEGRAM MESSAGE SENT SUCCESSFULLY");
   }
   else if (send_res == -1) {
      // If the response status is -1 (error), check the specific error code
      if (GetLastError() == 4014) {
         // If the error code is 4014, it means the Telegram API URL is not allowed in the terminal
         Print("PLEASE ADD THE ", api_url, " TO THE TERMINAL");
      }
      // Print a general error message if the request fails
      Print("UNABLE TO SEND THE TELEGRAM MESSAGE");
   }
   else if (send_res != 200) {
      // If the response status is not 200 or -1, print the unexpected response code and error code
      Print("UNEXPECTED RESPONSE ", send_res, " ERR CODE = ", GetLastError());
   }
The final function code to send a simple message from MetaTrader 5 to Telegram is as follows:
//+------------------------------------------------------------------+
//|    FUNCTION TO SEND SIMPLE MESSAGE                               |
//+------------------------------------------------------------------+

void sendSimpleMessage(string custom_message,const string api_url,
                       const string bot_token,const string chat_id,
                       int timeout=10000){

   char data[];  // Array to hold data to be sent in the web request (empty in this case)
   char res[];  // Array to hold the response data from the web request
   string resHeaders;  // String to hold the response headers from the web request

   string message = custom_message;

   const string url = api_url + "/bot" + bot_token + "/sendmessage?chat_id=" + chat_id +
      "&text=" + message;

   // Send the web request to the Telegram API
   int send_res = WebRequest("POST", url, "", timeout, data, res, resHeaders);

   // Check the response status of the web request
   if (send_res == 200) {
      // If the response status is 200 (OK), print a success message
      Print("TELEGRAM MESSAGE SENT SUCCESSFULLY");
   }
   else if (send_res == -1) {
      // If the response status is -1 (error), check the specific error code
      if (GetLastError() == 4014) {
         // If the error code is 4014, it means the Telegram API URL is not allowed in the terminal
         Print("PLEASE ADD THE ", api_url, " TO THE TERMINAL");
      }
      // Print a general error message if the request fails
      Print("UNABLE TO SEND THE TELEGRAM MESSAGE");
   }
   else if (send_res != 200) {
      // If the response status is not 200 or -1, print the unexpected response code and error code
      Print("UNEXPECTED RESPONSE ", send_res, " ERR CODE = ", GetLastError());
   }

}
To ascertain that this works perfectly, let us go to the OnInit event handler, comment out the unnecessary code snippets, and call the function. Calling the function will involve typing its name and providing the necessary parameters.
   string msg = "EA INITIALIZED ON CHART " + _Symbol;  // Message to send, including the chart symbol
   sendSimpleMessage(msg,TG_API_URL,botTkn,chatID,10000);
Here, we invoke the "sendSimpleMessage" function to deliver a message to the chat on Telegram. We first construct a string, "msg", which is a mere concatenation of the words "EA INITIALIZED ON CHART" with the current chart's symbol (_Symbol). The forthcoming recipient of this message will be notified that the Expert Advisor has been initialized on some particular chart.
Once we have defined the text message that we want to send, we call the function "sendSimpleMessage". We pass the four arguments of the function. The first argument is just the text message we want to send, so it's named "msg." The second argument is a constant named "TG_API_URL", which is the base URL for the Telegram Bot API. The third argument is the bot's access token ("botTkn"), and the fourth argument ("chatID") is the ID for the chat or channel in Telegram where the bot will send the message. Finally, we specify a timeout value of 10 seconds (10000 milliseconds). If the Telegram server doesn't respond after that long, we consider it a failure, and the function will return an error code. On testing, we receive the following message:
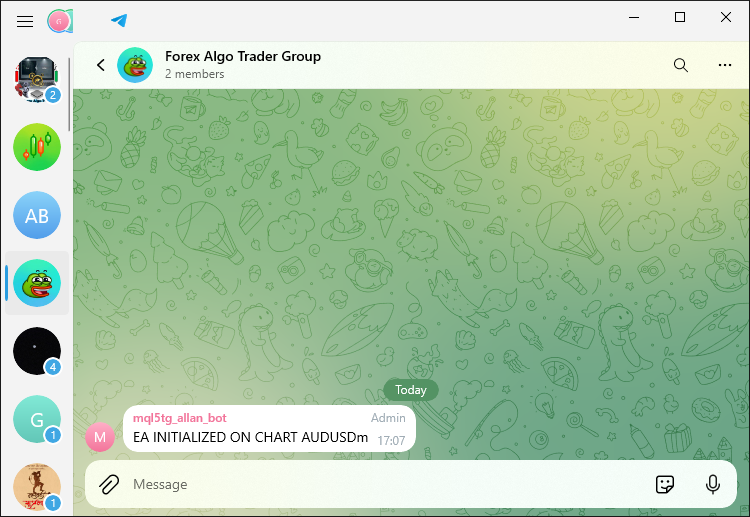
That was a success. You can now see that we don't need too long code snippets to perform similar actions. All we need is just call the responsible function and pass the respective arguments. Let us send another simple message that informs the user of the chart's timeframe or period.
   string new_msg = "THE CURRENT TIMEFRAME IS "+EnumToString(_Period);
   sendSimpleMessage(new_msg,TG_API_URL,botTkn,chatID,10000);
Here, we define a new string variable named "new_msg". The new variable is established by merging the text "THE CURRENT TIMEFRAME IS " with the string version of the value of _Period (the current chart's timeframe). This is done using the EnumToString function, which translates the value of _Period into human-readable form. For instance, if the chart is set to a 1-hour timeframe, "new_msg" will contain the text "THE CURRENT TIMEFRAME IS PERIOD_H1". Afterward, the same function to send simple messages is called and that is all. You can see how easy this is. Upon running a test, we have the following output:
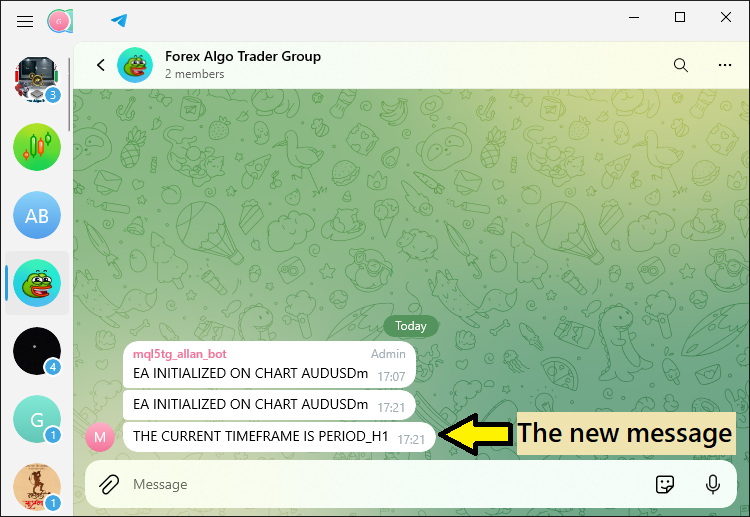
We can see how easy sending the code was. We used just two lines of code to accomplish that. Next, we now graduate to sending a complex encoded message. There won't be much change in the function. It inherits the same logic. However, since we are sending complex messages, we want to handle errors that might result. Thus, instead of just declaring a void function, we will have an integer data type function, that will return specific codes that illustrate a failure or a success upon calling the function. Thus, on the global scope, we'll have to define the error codes.
#define FAILED_CODE -1
#define SUCCEEDED_CODE +1
Here, we define two constants, "FAILED_CODE" and "SUCCEEDED_CODE", using the #define preprocessor directive. We assign the constants specific integer values to represent the outcomes of operations: "FAILED_CODE" is set to -1 and represents a failure, while "SUCCEEDED_CODE" is set to +1 and represents a successful outcome. These constants could be anything you deem fit. After their declaration, we then proceed to construct our function.
int sendEncodedMessage(string custom_message,const string api_url,
                       const string bot_token,const string chat_id,
                       int timeout=10000){

//...

}
Here, we define an integer function named "sendEncodedMessage", meaning the function will return integer values. The web request data will remain the same. However, we will need to check for success or failure in the response status and take necessary actions.
   // Check the response status of the web request
   if (send_res == 200) {
      // If the response status is 200 (OK), print a success message
      Print("TELEGRAM MESSAGE SENT SUCCESSFULLY");
      return (SUCCEEDED_CODE);
   }
Here, if the response status is a success and the message was successfully sent, we return the "SUCCEEDED_CODE". Else, if the response status is a failure, we return the "FAILED_CODE".
   else if (send_res == -1) {
      // If the response status is -1 (error), check the specific error code
      if (GetLastError() == 4014) {
         // If the error code is 4014, it means the Telegram API URL is not allowed in the terminal
         Print("PLEASE ADD THE ", api_url, " TO THE TERMINAL");
      }
      // Print a general error message if the request fails
      Print("UNABLE TO SEND THE TELEGRAM MESSAGE");
      return (FAILED_CODE);
   }
   else if (send_res != 200) {
      // If the response status is not 200 or -1, print the unexpected response code and error code
      Print("UNEXPECTED RESPONSE ", send_res, " ERR CODE = ", GetLastError());
      return (FAILED_CODE);
   }
Finally, we need to return the succeeded code if everything passes up to this point as follows:
return (SUCCEEDED_CODE);
The return of success at the end is very important since there could be a possibility where none of the sub-functions are checked, and the function needs to return an integer. If we try to compile the program without the return code, we receive an error as below:
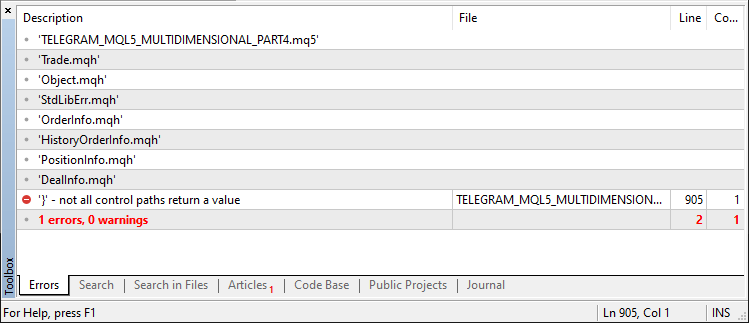
Thus, the full function code responsible for sending complex messages is as follows:
//+------------------------------------------------------------------+
//|    FUNCTION TO SEND ENCODED MESSAGE                              |
//+------------------------------------------------------------------+

//#define FAILED_CODE -1
//#define SUCCEEDED_CODE +1

int sendEncodedMessage(string custom_message,const string api_url,
                       const string bot_token,const string chat_id,
                       int timeout=10000){
   char data[];  // Array to hold data to be sent in the web request (empty in this case)
   char res[];  // Array to hold the response data from the web request
   string resHeaders;  // String to hold the response headers from the web request

   string message = custom_message;

   const string url = api_url + "/bot" + bot_token + "/sendmessage?chat_id=" + chat_id +
      "&text=" + message;

   // Send the web request to the Telegram API
   int send_res = WebRequest("POST", url, "", timeout, data, res, resHeaders);

   // Check the response status of the web request
   if (send_res == 200) {
      // If the response status is 200 (OK), print a success message
      Print("TELEGRAM MESSAGE SENT SUCCESSFULLY");
      return (SUCCEEDED_CODE);
   }
   else if (send_res == -1) {
      // If the response status is -1 (error), check the specific error code
      if (GetLastError() == 4014) {
         // If the error code is 4014, it means the Telegram API URL is not allowed in the terminal
         Print("PLEASE ADD THE ", api_url, " TO THE TERMINAL");
      }
      // Print a general error message if the request fails
      Print("UNABLE TO SEND THE TELEGRAM MESSAGE");
      return (FAILED_CODE);
   }
   else if (send_res != 200) {
      // If the response status is not 200 or -1, print the unexpected response code and error code
      Print("UNEXPECTED RESPONSE ", send_res, " ERR CODE = ", GetLastError());
      return (FAILED_CODE);
   }

   return (SUCCEEDED_CODE);
}
Let us now send the account information in segments concatenated with emoji characters to Telegram and see the response. The same code structure will be adopted for this but we will explain briefly what we exactly do.
   ////--- Account Status Update:
   double accountEquity = AccountInfoDouble(ACCOUNT_EQUITY);
   double accountFreeMargin = AccountInfoDouble(ACCOUNT_MARGIN_FREE);
   string complex_msg = "\xF680 EA INITIALIZED ON CHART " + _Symbol + "\xF680"
                +"\n\xF4CA Account Status \xF4CA"
                +"\nEquity: $"
                +DoubleToString(accountEquity,2)
                +"\nFree Margin: $"
                +DoubleToString(accountFreeMargin,2);

   string encloded_msg = UrlEncode(complex_msg);
   complex_msg = encloded_msg;
   sendEncodedMessage(complex_msg,TG_API_URL,botTkn,chatID,10000);
We begin by accessing the account equity and the free margin, using AccountInfoDouble and passing the arguments ACCOUNT_EQUITY and ACCOUNT_MARGIN_FREE respectively. These retrieve the account equity and the free margin in real time. We construct a detailed message, "complex_msg", in which we use the chart's symbol, along with account equity and free margin, and we format this with emojis. We send the message using the Telegram API, but first, we have to ensure that it's safe for transmission over HTTP. We do this by encoding the message with the "UrlEncode" function. After we send the message, this is what we get in the Telegram app.
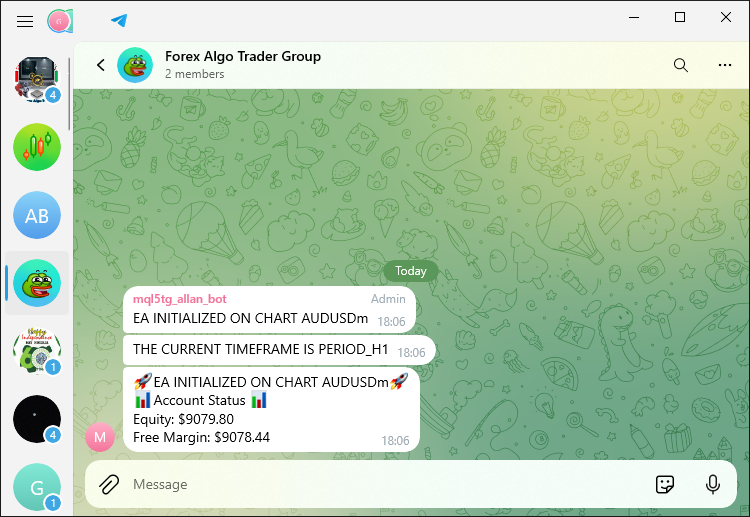
You can see that we have the complex message successfully received in Telegram. We then are completely done with message-sending functions. It is somewhat clear that by encapsulating the prior functionality within a function, we make the code cleaner and allow the message-sending process to be reused effortlessly in multiple locations. This will prove particularly useful as we proceed to further modularize the code, such as when adding functions for sending images and handling errors. This is done in the next section.
Modularizing Screenshot Functions
Here, we need to construct a function that takes the necessary parameters and sends the chart images to Telegram. Its code structure will be identical to the one we used for sending encoded messages.
int sendScreenShot(string screenshot_name,const string telegram_url,
                   const string bot_token,const string chat_id,
                   string caption=""){

//...

}
We declare an integer function named "sendScreenShot", meaning that it will return an integer value. The function takes in several parameters, ensuring flexibility and modularity.
- The "screenshot_name" parameter refers to the name of the screenshot file that will be sent, allowing us to specify different screenshots.
- "telegram_url", "bot_token", and "chat_id" are the core inputs necessary for communicating with the Telegram API, making the function adaptable to various bot configurations and Telegram accounts.
- An optional parameter, "caption", allows us to attach descriptive text to the screenshot, enhancing the functionality by enabling us to annotate the screenshots before sending them.
Since the same code structure remains maintained, we will concentrate on the return logic only. The first will be on the instance where we try to open and read the image contents.
   int screenshot_Handle = INVALID_HANDLE;
   screenshot_Handle = FileOpen(screenshot_name,FILE_READ|FILE_BIN);
   if(screenshot_Handle == INVALID_HANDLE){
      Print("INVALID SCREENSHOT HANDLE. REVERTING NOW!");
      return(FAILED_CODE);
   }
Here, if we are unable to open the screenshot data to be sent to Telegram, we return "FAILED_CODE" from the function, signaling that the operation to send the screenshot cannot proceed due to the file access issue. Next, we just inherit the same logic for checking the response status and the respective message logs and status codes as below:
   // Send the web request to the Telegram API
   int send_res = WebRequest("POST",URL,HEADERS,10000, DATA, res, resHeaders);

   // Check the response status of the web request
   if (send_res == 200) {
      // If the response status is 200 (OK), print a success message
      Print("TELEGRAM SCREENSHOT FILE SENT SUCCESSFULLY");
      return (SUCCEEDED_CODE);
   }
   else if (send_res == -1) {
      // If the response status is -1 (error), check the specific error code
      if (GetLastError() == 4014) {
         // If the error code is 4014, it means the Telegram API URL is not allowed in the terminal
         Print("PLEASE ADD THE ", telegram_url, " TO THE TERMINAL");
      }
      // Print a general error message if the request fails
      Print("UNABLE TO SEND THE TELEGRAM SCREENSHOT FILE");
      return (FAILED_CODE);
   }
   else if (send_res != 200) {
      // If the response status is not 200 or -1, print the unexpected response code and error code
      Print("UNEXPECTED RESPONSE ", send_res, " ERR CODE = ", GetLastError());
      return (FAILED_CODE);
   }
   return (SUCCEEDED_CODE);
The full function responsible for sending chart screenshot files is as below:
//+------------------------------------------------------------------+
//|    FUNCTION TO SEND CHART SCREENSHOT FILES                       |
//+------------------------------------------------------------------+

int sendScreenShot(string screenshot_name,const string telegram_url,
                   const string bot_token,const string chat_id,
                   string caption=""){

   int screenshot_Handle = INVALID_HANDLE;
   screenshot_Handle = FileOpen(screenshot_name,FILE_READ|FILE_BIN);
   if(screenshot_Handle == INVALID_HANDLE){
      Print("INVALID SCREENSHOT HANDLE. REVERTING NOW!");
      return(FAILED_CODE);
   }

   else if (screenshot_Handle != INVALID_HANDLE){
      Print("SCREENSHOT WAS SAVED & OPENED SUCCESSFULLY FOR READING.");
      Print("HANDLE ID = ",screenshot_Handle,". IT IS NOW READY FOR ENCODING.");
   }

   int screenshot_Handle_Size = (int)FileSize(screenshot_Handle);
   if (screenshot_Handle_Size > 0){
      Print("CHART SCREENSHOT FILE SIZE = ",screenshot_Handle_Size);
   }
   uchar photoArr_Data[];
   ArrayResize(photoArr_Data,screenshot_Handle_Size);
   FileReadArray(screenshot_Handle,photoArr_Data,0,screenshot_Handle_Size);
   if (ArraySize(photoArr_Data) > 0){
      Print("READ SCREENSHOT FILE DATA SIZE = ",ArraySize(photoArr_Data));
   }
   FileClose(screenshot_Handle);

   //ArrayPrint(photoArr_Data);

   //--- create boundary: (data -> base64 -> 1024 bytes -> md5)
   //Encodes the photo data into base64 format
   //This is part of preparing the data for transmission over HTTP.
   uchar base64[];
   uchar key[];
   CryptEncode(CRYPT_BASE64,photoArr_Data,key,base64);
   if (ArraySize(base64) > 0){
      Print("Transformed BASE-64 data = ",ArraySize(base64));
      //Print("The whole data is as below:");
      //ArrayPrint(base64);
   }

   //Copy the first 1024 bytes of the base64-encoded data into a temporary array
   uchar temporaryArr[1024]= {0};
   //Print("FILLED TEMPORARY ARRAY WITH ZERO (0) IS AS BELOW:");
   //ArrayPrint(temporaryArr);
   ArrayCopy(temporaryArr,base64,0,0,1024);
   //Print("FIRST 1024 BYTES OF THE ENCODED DATA IS AS FOLLOWS:");
   //ArrayPrint(temporaryArr);

   //Create an MD5 hash of the temporary array
   //This hash will be used as part of the boundary in the multipart/form-data
   uchar md5[];
   CryptEncode(CRYPT_HASH_MD5,temporaryArr,key,md5);
   if (ArraySize(md5) > 0){
      Print("SIZE OF MD5 HASH OF TEMPORARY ARRAY = ",ArraySize(md5));
      Print("MD5 HASH boundary in multipart/form-data is as follows:");
      ArrayPrint(md5);
   }

   //Format MD5 hash as a hexadecimal string &
   //truncate it to 16 characters to create the boundary.
   string HexaDecimal_Hash=NULL;//Used to store the hexadecimal representation of MD5 hash
   int total=ArraySize(md5);
   for(int i=0; i<total; i++){
      HexaDecimal_Hash+=StringFormat("%02X",md5[i]);
   }
   Print("Formatted MD5 Hash String is: \n",HexaDecimal_Hash);
   HexaDecimal_Hash=StringSubstr(HexaDecimal_Hash,0,16);//truncate HexaDecimal_Hash string to its first 16 characters
   //done to comply with a specific length requirement for the boundary
   //in the multipart/form-data of the HTTP request.
   Print("Final Truncated (16 characters) MD5 Hash String is: \n",HexaDecimal_Hash);

   //--- WebRequest
   char DATA[];
   string URL = NULL;
   URL = telegram_url+"/bot"+bot_token+"/sendPhoto";
   //--- add chart_id
   //Append a carriage return and newline character sequence to the DATA array.
   //In the context of HTTP, \r\n is used to denote the end of a line
   //and is often required to separate different parts of an HTTP request.
   ArrayAdd(DATA,"\r\n");
   //Append a boundary marker to the DATA array.
   //Typically, the boundary marker is composed of two hyphens (--)
   //followed by a unique hash string and then a newline sequence.
   //In multipart/form-data requests, boundaries are used to separate
   //different pieces of data.
   ArrayAdd(DATA,"--"+HexaDecimal_Hash+"\r\n");
   //Add a Content-Disposition header for a form-data part named chat_id.
   //The Content-Disposition header is used to indicate that the following data
   //is a form field with the name chat_id.
   ArrayAdd(DATA,"Content-Disposition: form-data; name=\"chat_id\"\r\n");
   //Again, append a newline sequence to the DATA array to end the header section
   //before the value of the chat_id is added.
   ArrayAdd(DATA,"\r\n");
   //Append the actual chat ID value to the DATA array.
   ArrayAdd(DATA,chat_id);
   //Finally, Append another newline sequence to the DATA array to signify
   //the end of the chat_id form-data part.
   ArrayAdd(DATA,"\r\n");

   // EXAMPLE OF USING CONVERSIONS
   //uchar array[] = { 72, 101, 108, 108, 111, 0 }; // "Hello" in ASCII
   //string output = CharArrayToString(array,0,WHOLE_ARRAY,CP_ACP);
   //Print("EXAMPLE OUTPUT OF CONVERSION = ",output); // Hello

   Print("CHAT ID DATA:");
   ArrayPrint(DATA);
   string chatID_Data = CharArrayToString(DATA,0,WHOLE_ARRAY,CP_UTF8);
   Print("SIMPLE CHAT ID DATA IS AS FOLLOWS:",chatID_Data);


   //--- Caption
   string CAPTION_STRING = NULL;
   CAPTION_STRING = caption;
   if(StringLen(CAPTION_STRING) > 0){
      ArrayAdd(DATA,"--"+HexaDecimal_Hash+"\r\n");
      ArrayAdd(DATA,"Content-Disposition: form-data; name=\"caption\"\r\n");
      ArrayAdd(DATA,"\r\n");
      ArrayAdd(DATA,CAPTION_STRING);
      ArrayAdd(DATA,"\r\n");
   }
   //---

   ArrayAdd(DATA,"--"+HexaDecimal_Hash+"\r\n");
   ArrayAdd(DATA,"Content-Disposition: form-data; name=\"photo\"; filename=\"Upload_ScreenShot.jpg\"\r\n");
   ArrayAdd(DATA,"\r\n");
   ArrayAdd(DATA,photoArr_Data);
   ArrayAdd(DATA,"\r\n");
   ArrayAdd(DATA,"--"+HexaDecimal_Hash+"--\r\n");

   Print("FINAL FULL PHOTO DATA BEING SENT:");
   ArrayPrint(DATA);
   string final_Simple_Data = CharArrayToString(DATA,0,WHOLE_ARRAY,CP_ACP);
   Print("FINAL FULL SIMPLE PHOTO DATA BEING SENT:",final_Simple_Data);

   string HEADERS = NULL;
   HEADERS = "Content-Type: multipart/form-data; boundary="+HexaDecimal_Hash+"\r\n";

   Print("SCREENSHOT SENDING HAS BEEN INITIATED SUCCESSFULLY.");

   //char data[];  // Array to hold data to be sent in the web request (empty in this case)
   char res[];  // Array to hold the response data from the web request
   string resHeaders;  // String to hold the response headers from the web request
   //string msg = "EA INITIALIZED ON CHART " + _Symbol;  // Message to send, including the chart symbol

   //const string url = TG_API_URL + "/bot" + botTkn + "/sendmessage?chat_id=" + chatID +
   //   "&text=" + msg;

   // Send the web request to the Telegram API
   int send_res = WebRequest("POST",URL,HEADERS,10000, DATA, res, resHeaders);

   // Check the response status of the web request
   if (send_res == 200) {
      // If the response status is 200 (OK), print a success message
      Print("TELEGRAM SCREENSHOT FILE SENT SUCCESSFULLY");
      return (SUCCEEDED_CODE);
   }
   else if (send_res == -1) {
      // If the response status is -1 (error), check the specific error code
      if (GetLastError() == 4014) {
         // If the error code is 4014, it means the Telegram API URL is not allowed in the terminal
         Print("PLEASE ADD THE ", telegram_url, " TO THE TERMINAL");
      }
      // Print a general error message if the request fails
      Print("UNABLE TO SEND THE TELEGRAM SCREENSHOT FILE");
      return (FAILED_CODE);
   }
   else if (send_res != 200) {
      // If the response status is not 200 or -1, print the unexpected response code and error code
      Print("UNEXPECTED RESPONSE ", send_res, " ERR CODE = ", GetLastError());
      return (FAILED_CODE);
   }
   return (SUCCEEDED_CODE);
}
We now have the function to send a screenshot but we don't have a function to get the screenshot files. First, we will craft a function to get the image file of the chart where the program is attached since it will not require many parameters.
//+------------------------------------------------------------------+
//|    FUNCTION TO GET SCREENSHOT OF CURRENT CHART                   |
//+------------------------------------------------------------------+

int getScreenshot_of_Current_Chart(string screenshot_name){

   //--- First delete an instance of the screenshot file if it already exists
   if(FileIsExist(screenshot_name)){
      FileDelete(screenshot_name);
      Print("Chart Screenshot was found and deleted.");
      ChartRedraw(0);
   }

   ChartScreenShot(0,screenshot_name,1366,768,ALIGN_RIGHT);

   // Wait for 30 secs to save screenshot if not yet saved
   int wait_loops = 60;
   while(!FileIsExist(screenshot_name) && --wait_loops > 0){
      Sleep(500);
   }

   if(!FileIsExist(screenshot_name)){
      Print("THE SPECIFIED SCREENSHOT DOES NOT EXIST (WAS NOT SAVED). REVERTING NOW!");
      return (FAILED_CODE);
   }
   else if(FileIsExist(screenshot_name)){
      Print("THE CHART SCREENSHOT WAS SAVED SUCCESSFULLY TO THE DATA-BASE.");
      return (SUCCEEDED_CODE);
   }
   return (SUCCEEDED_CODE);
}
Here, we declare an integer function, "getScreenshot_of_Current_Chart", to carry out the process of capturing and saving a screenshot of the current chart in MetaTrader 5. The function takes one parameter, "screenshot_name", which contains the desired name of the file to which the screenshot will be saved. We begin the function by checking if a file already exists with the name "screenshot_name". If it does, we delete the pre-existing file. This step is crucial because if we did not delete the pre-existing file, we would inevitably have an overwriting issue—a situation where a saved screenshot would end up with the same name as a file that had been just recently deleted.
We also invoke the function ChartRedraw to refresh the chart display before we take the screenshot. Then, to get the screenshot of the chart in its current state, we call the function ChartScreenShot, telling it the name we want to give to the file, the desired dimensions, and the alignment we want. Following this, we had to use a while loop to check for the file's existence. We waited for up to 30 seconds for the file to appear before continuing to our next step, and we in no way wanted to slow down the process for the appearance of a screenshot in our next step.
Should the file continue to not exist after this interval, we produce an error message that communicates the screenshot was not saved and return a definite "FAILED_CODE". If, however, the file is found, we emit a success message and return a clear "SUCCEEDED_CODE". In essence, we allow two possible outcomes for our operation and label them unambiguously. The function to open a custom chart and take a snapshot inherits the same logic.
//+------------------------------------------------------------------+
//|    FUNCTION TO GET SCREENSHOT OF A NEW CHART                     |
//+------------------------------------------------------------------+

int getScreenshot_of_New_Chart(string screenshot_name,string symbol_name,
                               ENUM_TIMEFRAMES period_name){

   //--- First delete an instance of the screenshot file if it already exists
   if(FileIsExist(screenshot_name)){
      FileDelete(screenshot_name);
      Print("Chart Screenshot was found and deleted.");
      ChartRedraw(0);
   }

   long chart_id=ChartOpen(symbol_name,period_name);
   ChartSetInteger(chart_id,CHART_BRING_TO_TOP,true);
   // update chart
   int wait=60;
   while(--wait>0){//decrease the value of wait by 1 before loop condition check
      if(SeriesInfoInteger(symbol_name,period_name,SERIES_SYNCHRONIZED)){
         break; // if prices up to date, terminate the loop and proceed
      }
   }

   ChartRedraw(chart_id);
   ChartSetInteger(chart_id,CHART_SHOW_GRID,false);
   ChartSetInteger(chart_id,CHART_SHOW_PERIOD_SEP,false);
   ChartSetInteger(chart_id,CHART_COLOR_CANDLE_BEAR,clrRed);
   ChartSetInteger(chart_id,CHART_COLOR_CANDLE_BULL,clrBlue);
   ChartSetInteger(chart_id,CHART_COLOR_BACKGROUND,clrLightSalmon);

   ChartScreenShot(chart_id,screenshot_name,1366,768,ALIGN_RIGHT);
   Print("OPENED CHART PAUSED FOR 10 SECONDS TO TAKE SCREENSHOT.");
   Sleep(10000); // sleep for 10 secs to see the opened chart
   ChartClose(chart_id);

   // Wait for 30 secs to save screenshot if not yet saved
   int wait_loops = 60;
   while(!FileIsExist(screenshot_name) && --wait_loops > 0){
      Sleep(500);
   }

   if(!FileIsExist(screenshot_name)){
      Print("THE SPECIFIED SCREENSHOT DOES NOT EXIST (WAS NOT SAVED). REVERTING NOW!");
      return (FAILED_CODE);
   }
   else if(FileIsExist(screenshot_name)){
      Print("THE CHART SCREENSHOT WAS SAVED SUCCESSFULLY TO THE DATA-BASE.");
      return (SUCCEEDED_CODE);
   }
   return (SUCCEEDED_CODE);
}
Here, we declare an integer function that takes 3 parameters: the image name, the symbol name, and the period of the chart to be opened. Up to this point, we have the functions that we need to get screenshots and send them to Telegram. Let us proceed to get and send the screenshot of the current chart and see what we get. To achieve that, the following code snippet will apply.
   getScreenshot_of_Current_Chart(SCREENSHOT_FILE_NAME);
   sendScreenShot(SCREENSHOT_FILE_NAME,TG_API_URL,botTkn,chatID,NULL);
Here, we just call the two functions responsible for getting and sending the saved screenshot respectively, and passing the required input parameters. You can see how small the logic is now. Just two lines of code are enough to do the wonders. Upon compilation, we get the following output.
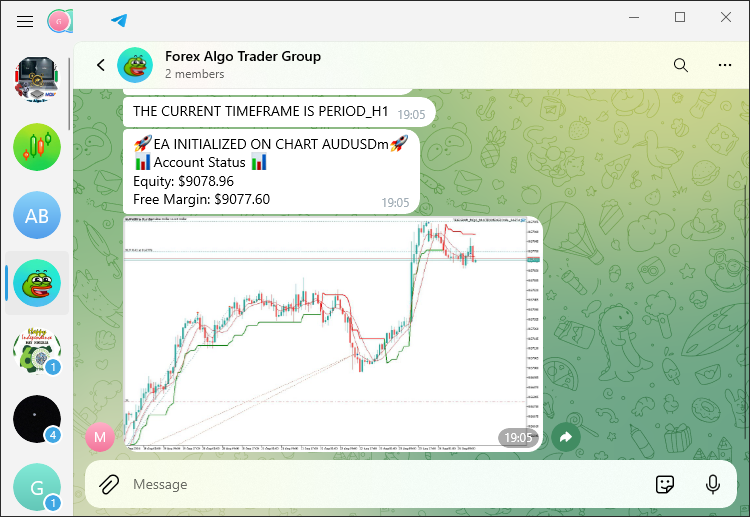
We can see that we can receive the screenshot file of the current chart to Telegram chat. Up to this point, almost everything necessary is covered and thus we can see how the return codes can be used to counter the failure or success of the functions. For this practice, we will use the fresh chart logic.
   int get_screenshot_new_chart_result = getScreenshot_of_New_Chart(SCREENSHOT_FILE_NAME,_Symbol,_Period);
   if (get_screenshot_new_chart_result == FAILED_CODE){
      string result_msg = "NEW CHART SCREENSHOT COULDN'T BE SAVED. REVERT NOW.";
      Print(result_msg);
      sendSimpleMessage(result_msg,TG_API_URL,botTkn,chatID,10000);
      return (INIT_FAILED);
   }
   else if (get_screenshot_new_chart_result == SUCCEEDED_CODE){
      string result_msg = "SUCCESS. NEW CHART SCREENSHOT WAS SAVED. CONTINUE NOW.";
      Print(result_msg);
      sendSimpleMessage(result_msg,TG_API_URL,botTkn,chatID,10000);
      string sending_msg = "\x2705\SCREENSHOT SENDING HAS BEEN INITIATED SUCCESSFULLY.";
      sending_msg += "\n\x270C\YOU SHOULD RECEIVE THE IMAGE FILE WITHIN 10 SECONDS";
      string encoded_sending_msg = UrlEncode(sending_msg);
      Print(encoded_sending_msg);
      sendEncodedMessage(encoded_sending_msg,TG_API_URL,botTkn,chatID,10000);

   }
Here, we manage the output from the function "getScreenshot_of_New_Chart". This function carries out the work of taking a screenshot of the new chart and saving it. We call the function with clear parameters: the name we want for the screenshot file, the current symbol of the chart, and the timeframe. The function's result is stored in a variable we call "get_screenshot_new_chart_result". If this result is a success, we move on to the next part of our program. If it fails, we handle the failure in a way that seems sensible.
When we receive a result of "FAILED_CODE," it indicates that saving the screenshot has failed. In this situation, we generate an error message that makes it clear to the user that something in the screenshot-saving process has gone amiss. This message is printed out to the terminal and also sent along to our Telegram chat using the "sendSimpleMessage" function. We then return "INIT_FAILED" as our return code, letting the user know that the operation didn't succeed and that the next operation should not even be attempted. This terminates the initialization process.
On the other hand, if the outcome is "SUCCEEDED_CODE," it means that the screenshot was saved successfully. We prepare and print a message that says the terminal sent a success command after taking the screenshot. We then proceed to utilize the "sendSimpleMessage" function to inform the user that their screenshot has been saved and that they should expect to receive the file soon. The process of sending the message to the user is clear, concise, and executed properly. The command for sending the screenshot to the user was successful, and they should receive the file in about 10 seconds. To the journal, we get the following log:
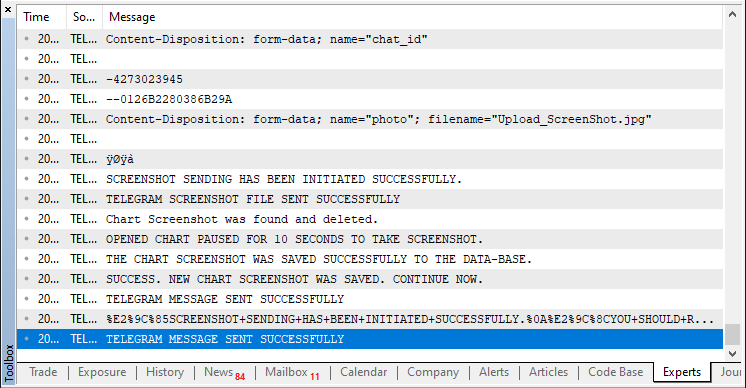
In the Telegram chat, we receive the following output:
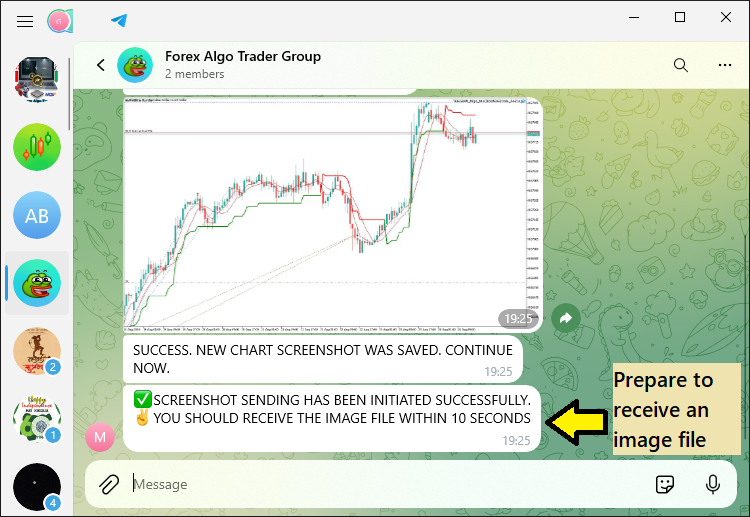
You can see that right now, it is easy to send multiple instances of messages to the Telegram to chat effortlessly. All we have to do now is call the function for screenshot-sending logic to convey the image file. This is achieved via the logic below:
sendScreenShot(SCREENSHOT_FILE_NAME,TG_API_URL,botTkn,chatID,NULL);
Upon running the code, we get the following results:
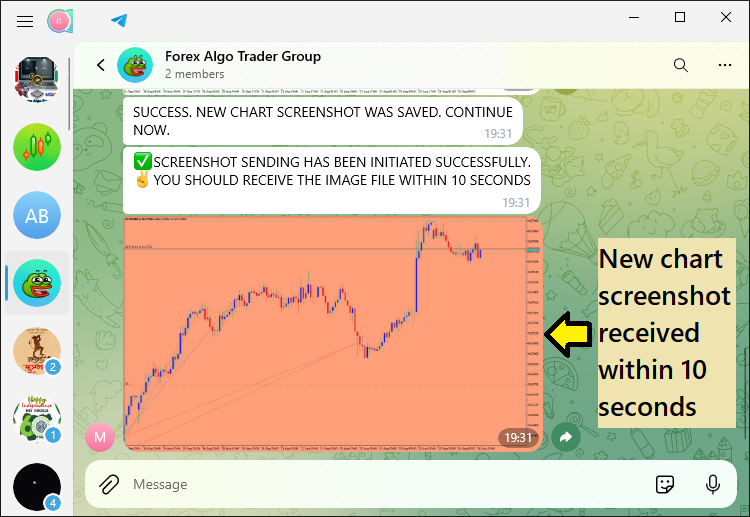
That was a success. You can notice that the image we receive does not have a caption. That is so because we chose to have the caption field as NULL, which means that no caption will be considered. To include the caption we just have to define the caption field and pass it to the function. Our default caption will be used for the illustration as below:
   //--- Caption
   string CAPTION = NULL;
   CAPTION = "Screenshot of Symbol: "+Symbol()+
             " ("+EnumToString(ENUM_TIMEFRAMES(_Period))+
             ") @ Time: "+TimeToString(TimeCurrent());

   sendScreenShot(SCREENSHOT_FILE_NAME,TG_API_URL,botTkn,chatID,CAPTION);
Upon compilation, we receive a screenshot of the newly opened custom chart with the default parameters just as described, but more importantly, with a caption that illustrates the screenshot's symbol, timeframe, and the time when it was captured and conveyed to Telegram.
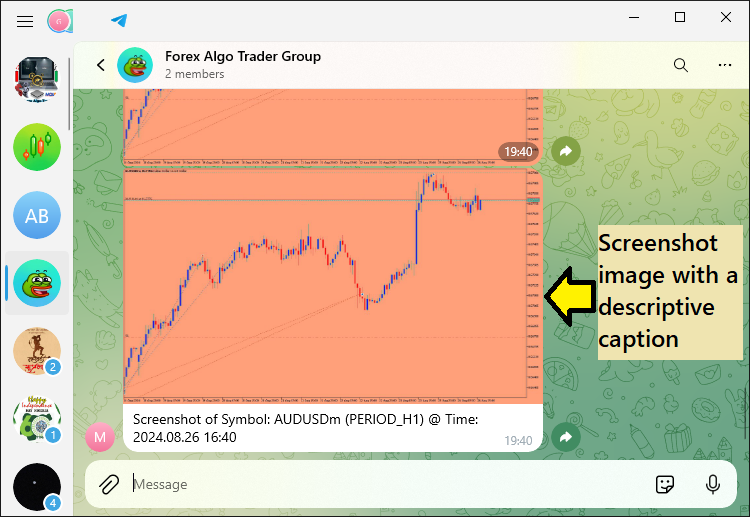
That was a success. We now have a fully functioning program that utilizes functions to communicate with the Telegram chat. We now just have to do some testing and implementation of the modular functions that we have crafted to send trading signals based on Moving Average crossovers from the MetaTrader 5 platform to Telegram chats. This is to be explicitly covered in the next section.
Testing and Implementing Modular Functions
In this section, we will shift the focus from the construction of individual functions to the application of those functions in genuine trading situations, where signal confirmations elicit specific responses. Our purpose now is to verify that the functions we modularized—like the ones for capturing screenshots or sending messages—will work together in the larger framework we are building. By putting the logic of our Expert Advisor (EA) into reusable functions, we can better serve the purpose of sending chart screenshots or updating account statuses, in a way that maintains the logic of the EA—an EA that works on the principle of triggering certain functions when specific conditions are met.
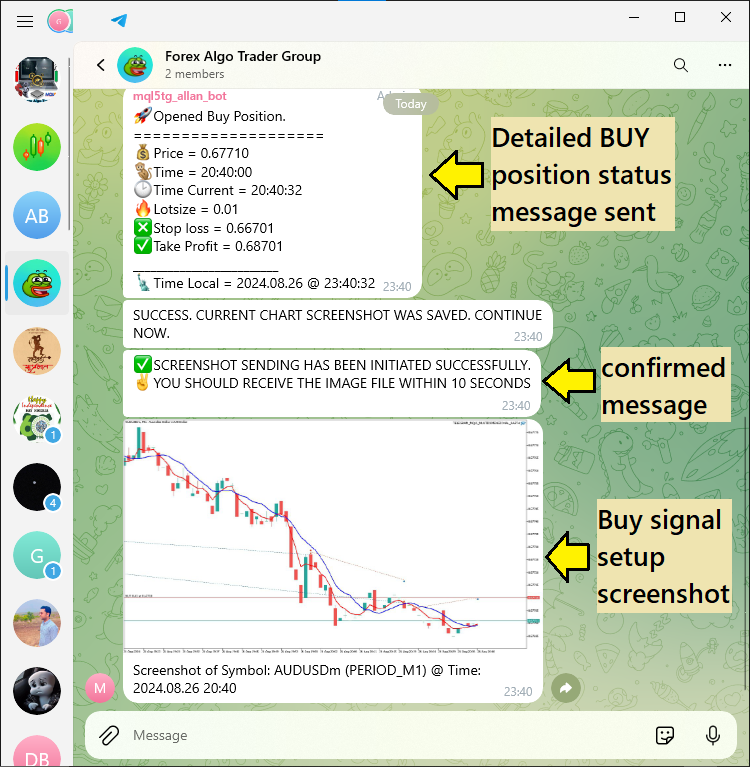
This subject will show how we summon these modular functions when trading signals are confirmed, assuring that all components work efficiently in real-world scenarios. We will rigorously check the reliability of these functions, run them through the breadboard of repeated executions, and see whether they can withstand the rigors of error management while still accomplishing their primary task of sending signal-confirmation messages to Telegram in an accurate and timely manner. In doing this, we will not only verify our code's functionality but also use it as a step toward creating a trading signal management system that's almost completely robust and handles error conditions gracefully. So now we just have to shift the initialization code snippet to the signal generation section. For a buy signal, its code snippet will be as follows:
      // BUY POSITION OPENED. GET READY TO SEND MESSAGE TO TELEGRAM
      Print("BUY POSITION OPENED. SEND MESSAGE TO TELEGRAM NOW.");

      //char data[];  // Array to hold data to be sent in the web request (empty in this case)
      //char res[];  // Array to hold the response data from the web request
      //string resHeaders;  // String to hold the response headers from the web request


      ushort MONEYBAG = 0xF4B0;
      string MONEYBAG_Emoji_code = ShortToString(MONEYBAG);
      string msg =  "\xF680 Opened Buy Position."
             +"\n===================="
             +"\n"+MONEYBAG_Emoji_code+"Price = "+DoubleToString(openPrice,_Digits)
             +"\n\xF412\Time = "+TimeToString(iTime(_Symbol,_Period,0),TIME_SECONDS)
             +"\n\xF551\Time Current = "+TimeToString(TimeCurrent(),TIME_SECONDS)
             +"\n\xF525 Lotsize = "+DoubleToString(lotSize,2)
             +"\n\x274E\Stop loss = "+DoubleToString(stopLoss,_Digits)
             +"\n\x2705\Take Profit = "+DoubleToString(takeProfit,_Digits)
             +"\n_________________________"
             +"\n\xF5FD\Time Local = "+TimeToString(TimeLocal(),TIME_DATE)
             +" @ "+TimeToString(TimeLocal(),TIME_SECONDS)
             ;
      string encloded_msg = UrlEncode(msg);
      msg = encloded_msg;

      sendEncodedMessage(msg,TG_API_URL,botTkn,chatID,10000);

      int get_screenshot_current_chart_result = getScreenshot_of_Current_Chart(SCREENSHOT_FILE_NAME);
      if (get_screenshot_current_chart_result == FAILED_CODE){
         string result_msg = "CURRENT CHART SCREENSHOT COULDN'T BE SAVED. REVERT NOW.";
         Print(result_msg);
         sendSimpleMessage(result_msg,TG_API_URL,botTkn,chatID,10000);
         return;
      }
      else if (get_screenshot_current_chart_result == SUCCEEDED_CODE){
         string result_msg = "SUCCESS. CURRENT CHART SCREENSHOT WAS SAVED. CONTINUE NOW.";
         Print(result_msg);
         sendSimpleMessage(result_msg,TG_API_URL,botTkn,chatID,10000);
         string sending_msg = "\x2705\SCREENSHOT SENDING HAS BEEN INITIATED SUCCESSFULLY.";
         sending_msg += "\n\x270C\YOU SHOULD RECEIVE THE IMAGE FILE WITHIN 10 SECONDS";
         string encoded_sending_msg = UrlEncode(sending_msg);
         Print(encoded_sending_msg);
         sendEncodedMessage(encoded_sending_msg,TG_API_URL,botTkn,chatID,10000);

      }

      //--- Caption
      string CAPTION = NULL;
      CAPTION = "Screenshot of Symbol: "+Symbol()+
                " ("+EnumToString(ENUM_TIMEFRAMES(_Period))+
                ") @ Time: "+TimeToString(TimeCurrent());

      sendScreenShot(SCREENSHOT_FILE_NAME,TG_API_URL,botTkn,chatID,CAPTION);
Here, we just concentrate on informing about the signal generated and sending a screenshot of the current chart, showing the trading levels. For a sell signal confirmation, a similar logic is adapted as follows:
      // SELL POSITION OPENED. GET READY TO SEND MESSAGE TO TELEGRAM
      Print("SELL POSITION OPENED. SEND MESSAGE TO TELEGRAM NOW.");

      //char data[];  // Array to hold data to be sent in the web request (empty in this case)
      //char res[];  // Array to hold the response data from the web request
      //string resHeaders;  // String to hold the response headers from the web request

      ushort MONEYBAG = 0xF4B0;
      string MONEYBAG_Emoji_code = ShortToString(MONEYBAG);
      string msg =  "\xF680 Opened Sell Position."
             +"\n===================="
             +"\n"+MONEYBAG_Emoji_code+"Price = "+DoubleToString(openPrice,_Digits)
             +"\n\xF412\Time = "+TimeToString(iTime(_Symbol,_Period,0),TIME_SECONDS)
             +"\n\xF551\Time Current = "+TimeToString(TimeCurrent(),TIME_SECONDS)
             +"\n\xF525 Lotsize = "+DoubleToString(lotSize,2)
             +"\n\x274E\Stop loss = "+DoubleToString(stopLoss,_Digits)
             +"\n\x2705\Take Profit = "+DoubleToString(takeProfit,_Digits)
             +"\n_________________________"
             +"\n\xF5FD\Time Local = "+TimeToString(TimeLocal(),TIME_DATE)
             +" @ "+TimeToString(TimeLocal(),TIME_SECONDS)
             ;
      string encloded_msg = UrlEncode(msg);
      msg = encloded_msg;

      sendEncodedMessage(msg,TG_API_URL,botTkn,chatID,10000);

      int get_screenshot_current_chart_result = getScreenshot_of_Current_Chart(SCREENSHOT_FILE_NAME);
      if (get_screenshot_current_chart_result == FAILED_CODE){
         string result_msg = "CURRENT CHART SCREENSHOT COULDN'T BE SAVED. REVERT NOW.";
         Print(result_msg);
         sendSimpleMessage(result_msg,TG_API_URL,botTkn,chatID,10000);
         return;
      }
      else if (get_screenshot_current_chart_result == SUCCEEDED_CODE){
         string result_msg = "SUCCESS. CURRENT CHART SCREENSHOT WAS SAVED. CONTINUE NOW.";
         Print(result_msg);
         sendSimpleMessage(result_msg,TG_API_URL,botTkn,chatID,10000);
         string sending_msg = "\x2705\SCREENSHOT SENDING HAS BEEN INITIATED SUCCESSFULLY.";
         sending_msg += "\n\x270C\YOU SHOULD RECEIVE THE IMAGE FILE WITHIN 10 SECONDS";
         string encoded_sending_msg = UrlEncode(sending_msg);
         Print(encoded_sending_msg);
         sendEncodedMessage(encoded_sending_msg,TG_API_URL,botTkn,chatID,10000);

      }

      //--- Caption
      string CAPTION = NULL;
      CAPTION = "Screenshot of Symbol: "+Symbol()+
                " ("+EnumToString(ENUM_TIMEFRAMES(_Period))+
                ") @ Time: "+TimeToString(TimeCurrent());

      sendScreenShot(SCREENSHOT_FILE_NAME,TG_API_URL,botTkn,chatID,CAPTION);
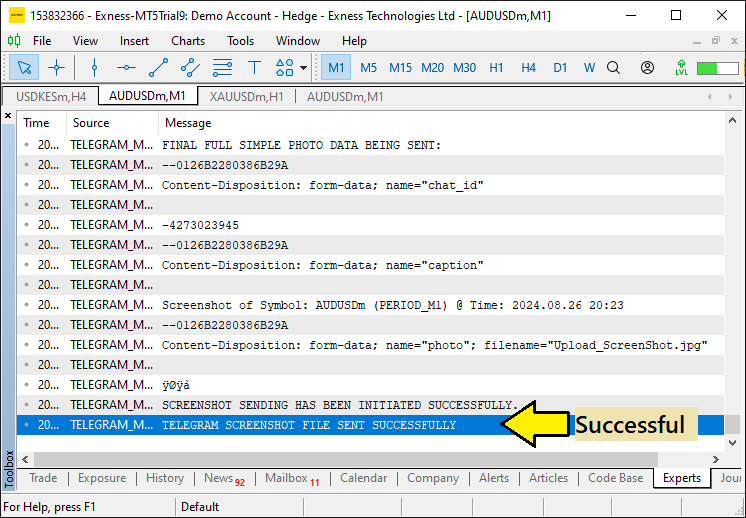
To confirm that there are signals generated, let us switch to a 1-minute timeframe and wait for signal responses. The first signal we get is a sell setup. It is generated as shown below in the trading terminal:

MetaTrader 5 sell signal log:
Sell message received in the Telegram chat field:
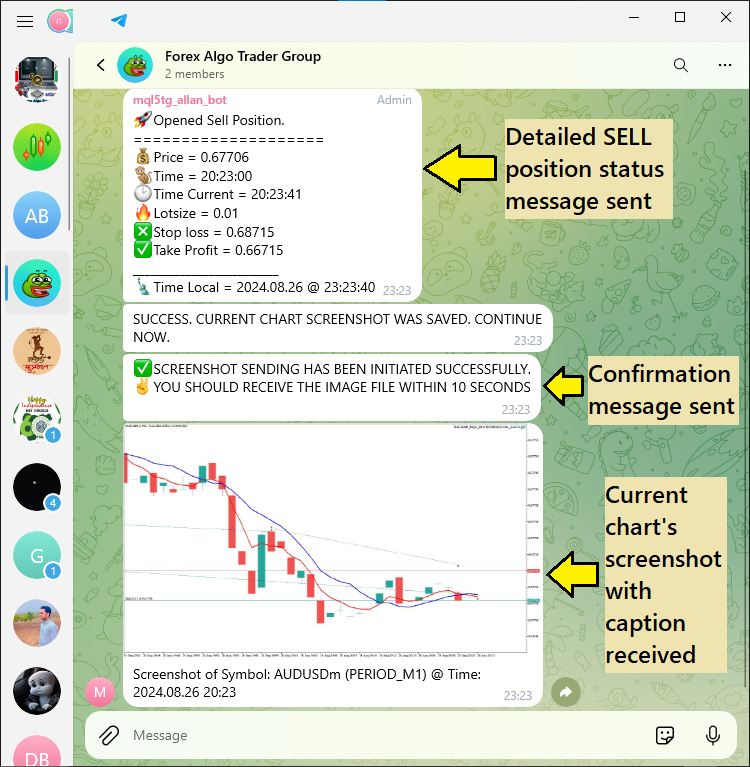
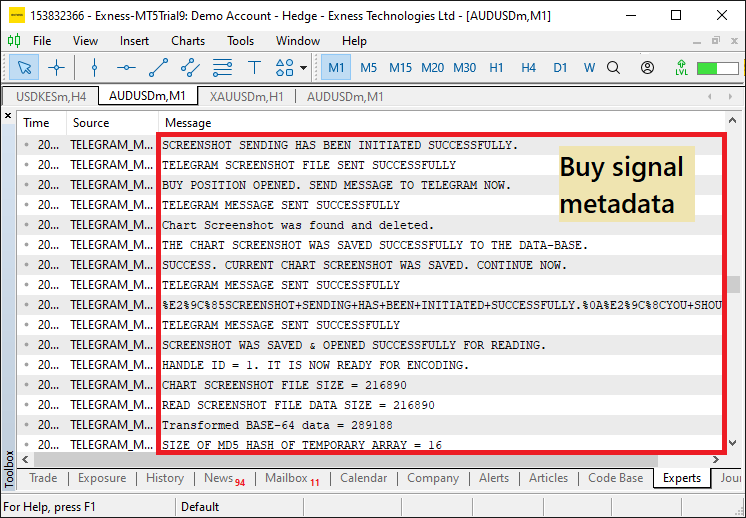
From the above images provided, we can see that the sell signal setup is confirmed in the trading terminal, important messages are logged to the journal, and the respective position data and screenshots are sent to the Telegram chat group. We now expect that when there is a bullish crossover, we close the existing sell position, open a buy position, and send the information to the Telegram group as well. The trading terminal confirmation setup is as below:
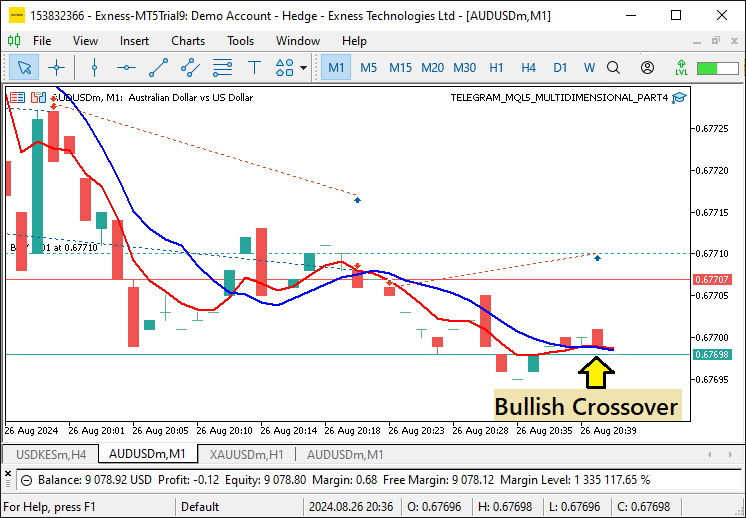
MetaTrader 5 buy signal log:
Buy message received in the Telegram chat field:
To visualize the milestone more efficiently, here is a detailed video based on the performance of the Expert Advisor from its compilation, through its initialization and opening of trades based on the signals generated, and how the metadata is transmitted from MQL5 to Telegram.
Up to this point, we can see that the function's code modularization is a success. The integration of MQL5 and Telegram now works without a hitch. Using modular functions, which we called upon to confirm signals, we’ve managed to automate messaging and screenshot-taking, so that every key event or update is Dana White-slammed into the Telegram chat as soon as it happens. And we’ve tested it enough that we’re confident it works. In terms of acting as a bridge between MQL5 and Telegram, this implementation is both reliable and flexible — a good modular design we can build on for more complex integrations later.
Conclusion
This article outlines the integration of MetaQuotes Language 5 (MQL5) with Telegram, focusing on creating modular functions for sending messages and trading chart screenshots. The modular design enhances the efficiency, scalability, and maintainability of the Expert Advisor (EA) without unnecessary complexity.
The next article will explore a two-way communication system, allowing Telegram to send commands to MetaTrader 5 and control the EA's actions. This integration will enable more advanced interactions, such as requesting live trading data or screenshots directly from Telegram, pushing the boundaries of MQL5-Telegram integration. Stay tuned for further developments.
 Features of Custom Indicators Creation
 Brain Storm Optimization algorithm (Part II): Multimodality
 Features of Experts Advisors
 Neural Networks Made Easy (Part 83): The "Conformer" Spatio-Temporal Continuous Attention Transformer Algorithm
- Free trading apps
- Over 8,000 signals for copying
- Economic news for exploring financial markets
You agree to website policy and terms of use