Creating a Trading Administrator Panel in MQL5 (Part I): Building a Messaging Interface
Introduction
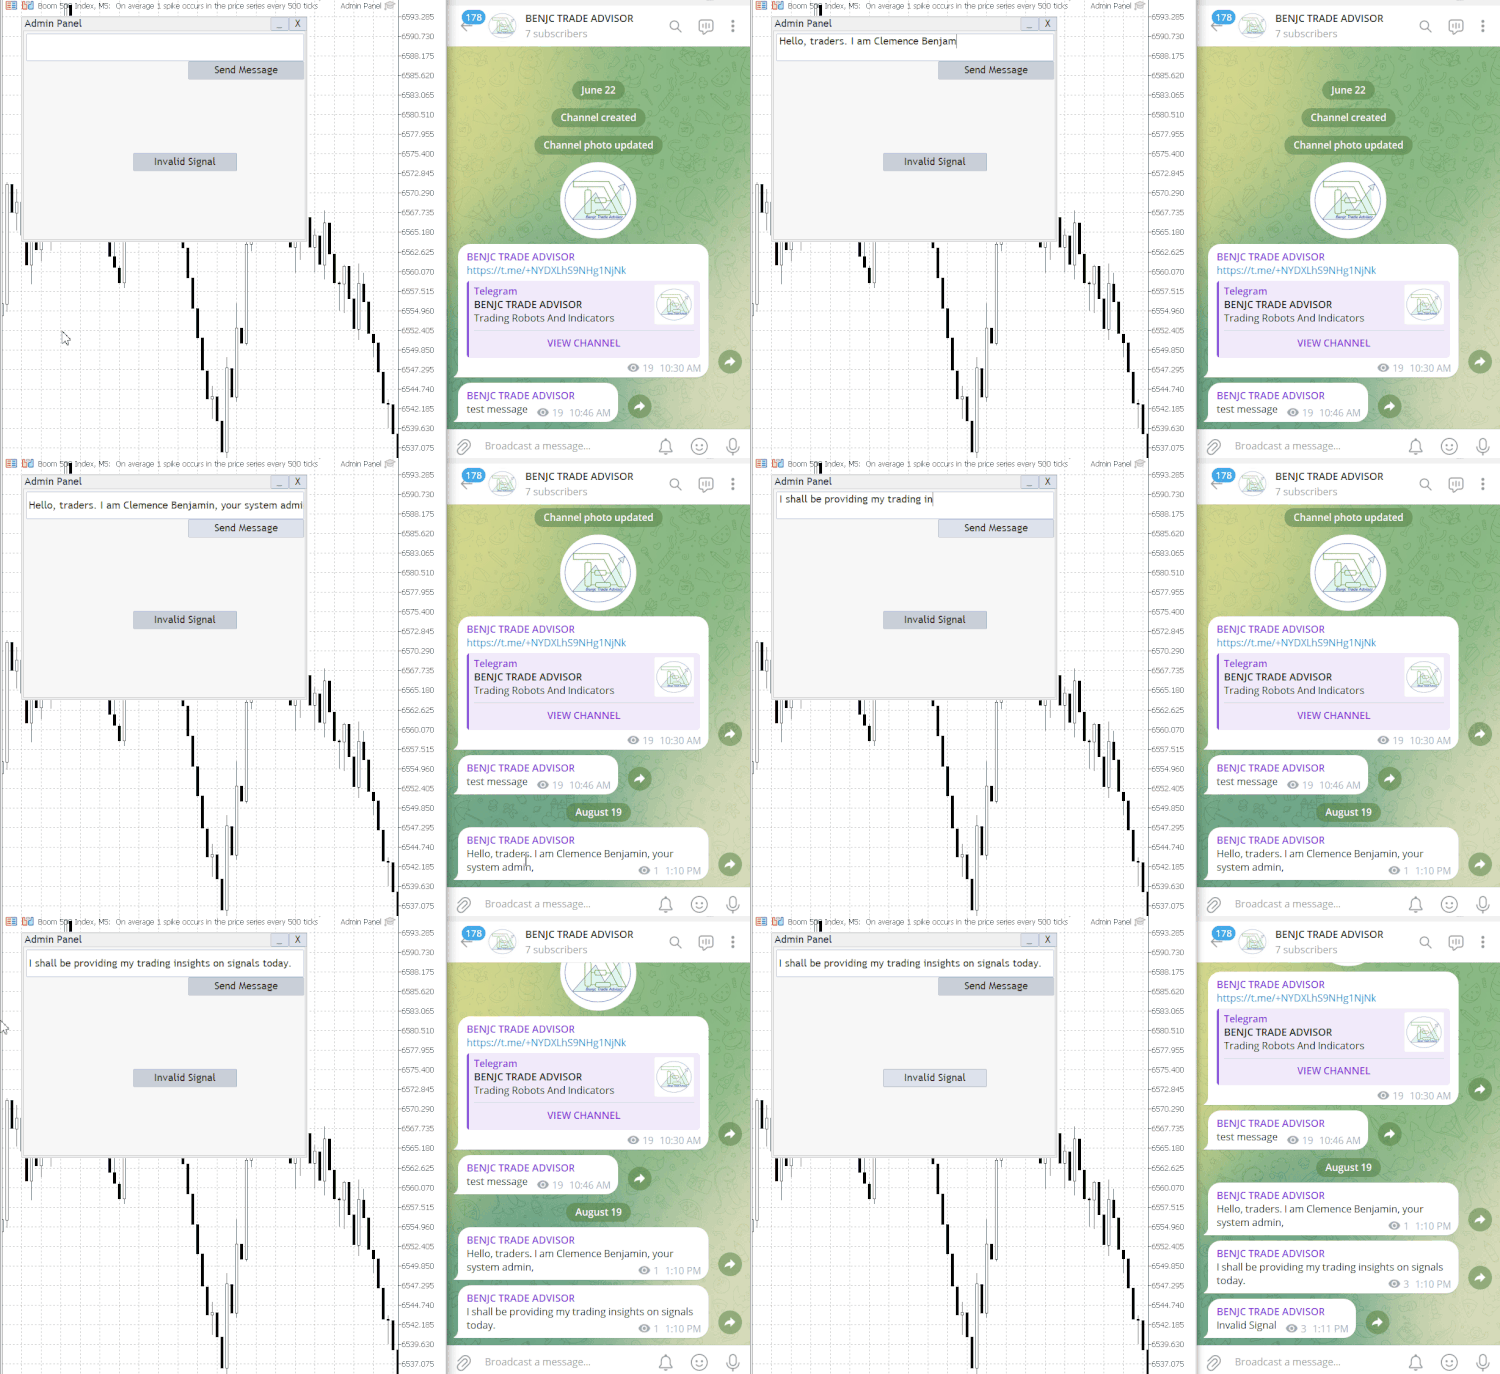
It is possible to interact with your system users directly from MetaTrader 5. This is one way an admin can share real-time insights on the performance of the system. It can also serve as a validation of recently delivered system signals to a social channel. If you read to the end, you will be able to see how it is possible to create an interactive interface, as shown in this image:
Systems Administrator Panel: Boom 500 Index, H1

Administrator Communications Panel (MetaTrader 5) and Telegram App (receiving real-time messages from the admin)
In today's hyper-connected world, where millions of trades are executed within milliseconds, having efficient communication channels in trading ecosystems is more critical than ever. Consider that over 70% of traders now rely on instant messaging platforms like Telegram for real-time updates, showcasing a trend towards integrated communication solutions in trading environments. This shift underscores the need for traders to receive algorithmic and immediate access to expert insights and recommendations.
For traders and developers using MetaTrader 5, the challenge lies in bridging the gap between automated signal generation and effective human intervention across distances. The admin panel offers system administrators the capability to wire quick and direct communication with traders dispersed globally. By leveraging this system, admins can seamlessly validate or invalidate signals, and provide essential comments or recommendations to traders via platforms like Telegram.
This article discusses the creation of this vital admin panel using MQL5. It offers a step-by-step walkthrough on developing this program that enhances trading communication and oversight. We will explore how to harness the power of MQL5 in building a comprehensive system that facilitates effective signal management and integrates immediate communication with traders, thereby revolutionizing the way trading operations are conducted globally.

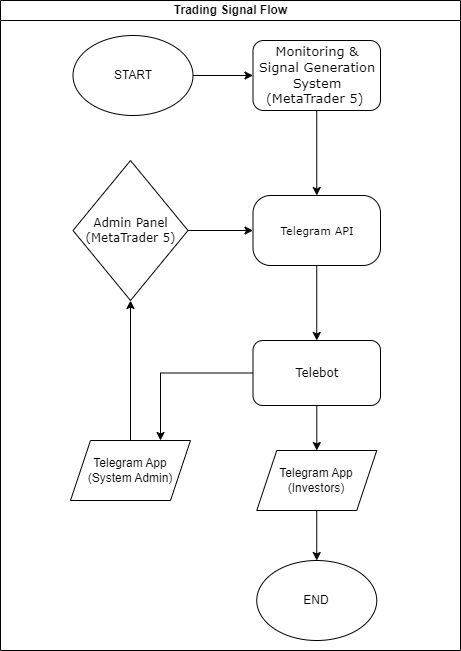
Signal Flow Chart
The flow chart illustrates the roles of the system, users, and administrators in a trading ecosystem, along with the associated tools.
Here is a summary of what we will cover in this discussion:
- Understanding Coordinates in MetaTrader 5 GUI Development
- Understand the library files in MQL5 development
- Creating a custom Administrator Panel algorithm in MQL5
- Integrating Telegram API for communication with Traders
- Testing the Admin Panel
- Usage Tips
- Conclusion
Understanding Coordinates in MetaTrader 5 GUI Development
When developing graphical user interfaces (GUIs) within the MetaTrader 5 platform, it is essential to understand the coordinate system that defines how graphical elements are positioned and sized on a chart.
Coordinate System:
The coordinate system in MetaTrader 5 is a two-dimensional space defined by horizontal (x) and vertical (y) axes. Each chart window has its own coordinate system, starting from the top-left corner, which is designated as the origin point (0,0).
Positioning Elements:
To position elements within the chart's coordinate space, you typically specify two points using coordinates:
- Top-left Corner: Defined by the coordinates (x1, y1). This is the position where the element begins.
- Bottom-right Corner: Defined by the coordinates (x2, y2). This marks the diagonal end of the element.
Width and Height Calculation:
The dimensions of the GUI element are derived from the difference between these coordinates:
- Width: Calculated as (Width = x2 - x1)
- Height: Calculated as (Height = y2 - y1)
These calculations determine the size of your element, ensuring it fits within the specified bounds on the chart.
Example GUI layout & example usage in MQL5
Practical Application Example
When creating dialogs or graphical controls, such as panels or buttons, using these coordinates helps you establish clear and precise positioning and sizing. This approach ensures that all GUI components are consistently placed and scaled to fit within the available space on your chart window, contributing to a cohesive user interface. Understanding and effectively utilizing this coordinate system is fundamental for creating intuitive and visually appealing applications within the MetaTrader 5 environment.
Another example: Creating a Simple Panel with a Button in MetaTrader 5
Let's create a simple panel with a button in the MetaTrader 5 chart window using the coordinate system described earlier.
Define the Coordinates:
First, we'll define the coordinates for both the panel and the button. We'll position the panel in the top-left corner of the chart and place the button within this panel.
Panel Coordinates:
- Top-left Corner (x1, y1): (10, 10)
- Bottom-right Corner (x2, y2): (200, 100)
These coordinates will create a panel that starts 10 pixels from the top and 10 pixels from the left of the chart window, with a width of 190 pixels (200 minus 10) and a height of 90 pixels (100 minus 10).
Button Coordinates:
- Top-left Corner (x1, y1): (20, 20)
- Bottom-right Corner (x2, y2): (180, 60)
These coordinates will place the button inside the panel, starting 20 pixels from the top and 20 pixels from the left of the panel, with a width of 160 pixels (180 minus 20) and a height of 40 pixels (60 minus 20). At least you now have the mathematics in mind.
Understand the library files in MQL5 development
In MQL5, ".mqh" files are header files used to organize and modularize code within the MetaTrader 5 platform, which is primarily utilized for developing trading algorithms and custom indicators. The files are a crucial component for efficient and maintainable code management in complex MQL5 projects.
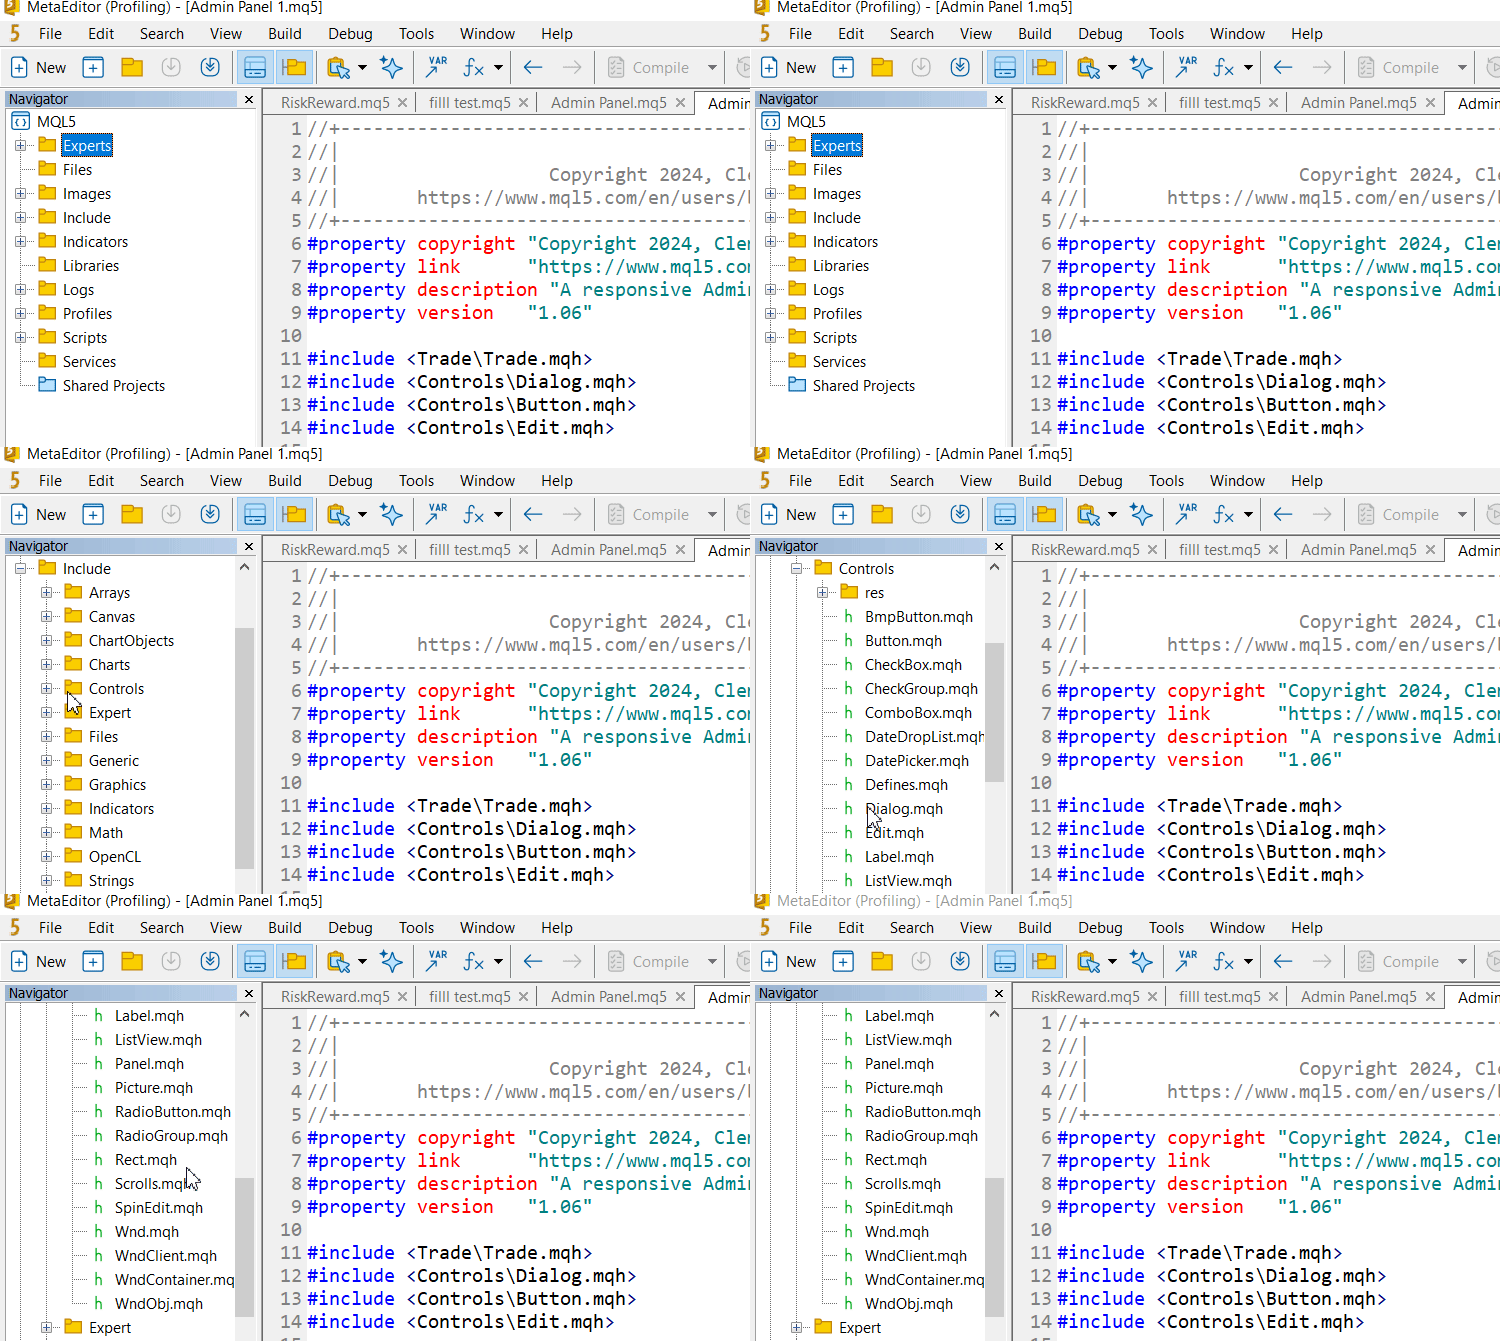
In MetaEditor, you can navigate to locate the include file in the MQL5 folder as follows:

Locating the #include files in MQL5
Here's an explanation of their purpose and use:
Purpose of (.mqh) Files:
1. Code Reusability: ".mqh" files are designed to hold reusable code components, such as function definitions, class declarations, and macro definitions, which can be shared across multiple MQL5 programs.
2. Modularity: By separating code into different files, developers can create modular applications. This allows specific code functionalities to be isolated, maintained, and developed independently.
3. Organization: Using header files helps in organizing code logically. Developers can keep different parts of their application separate in various files, such as placing utility functions or constants in dedicated headers.
Typical Contents of (.mqh) Files:
- Function Declarations: Functions that can be used across multiple scripts.
- Classes and Structs: Definitions and implementations of classes and structures used for object-oriented programming.
- Constants and Macros: Defined constant values and macros that can be used globally.
- Includes: The file may also include other `.mqh` files, thereby creating a hierarchy or chain of included functionalities.
How to use (.mqh) Files:
To use an ".mqh" file in your MQL5 script (such as an ".mq5" or another ".mqh" file), you include it using the #include directive. Here’s an example:#include <MyLibrary.mqh> This directive tells the compiler to include the contents of "MyLibrary.mqh" at the point where the #include directive appears, allowing your script to access the functions, classes, or macros defined within the included header.
Benefits:
- Improved Readability: By abstracting complex code into headers, the main script remains cleaner and easier to understand.
- Simplified Maintenance: Changes or updates can be made to a single header file, and all scripts that include it will automatically inherit these updates.
- Collaboration: In team environments, dividing code across several files can facilitate better collaboration, as different team members can work on separate parts of the codebase without conflicts.
For example, in this project, we will implement the files summarized in this table:
| File Name | File Type | Description |
|---|---|---|
| Dialog.mqh: | Library file; |
|
| Button.mqh: | Library file |
|
| Edit.mqh: | Library file |
|
Creating a custom Administrator Panel algorithm in MQL5
Create a new Expert template in MetaEditor, naming it "Admin Panel" or any other unique name. Retain only the Developer properties—your name, version, and copyright—and clear the rest of the template. Then follow the guide below to build your panel.
Create a new Expert in MetaEditor
In constructing the "Admin Panel.mq5" program, we ensured that every element serves a specific purpose while maintaining a cohesive flow. The foundation of our program begins with the inclusion of key libraries such as "Trade.mqh", "Dialog.mqh", "Button.mqh", and "Edit.mqh", which provide essential classes and functions for creating interactive chart-based interfaces. By incorporating these, we leverage existing resources, allowing us to focus on custom functionality.
#include <Trade\Trade.mqh>
#include <Controls\Dialog.mqh>
#include <Controls\Button.mqh>
#include <Controls\Edit.mqh>
We then defined the "CScalableDialog" class to manage a scalable and draggable panel within the chart. This class extends "CDialog", which provides a flexible base for our panel. In designing this, I implemented methods like "HandleDragging" to enable users to move the panel easily, and "SetSize" to allow dynamic resizing. This gives us the ability to create a user-friendly interface that can adapt to different screen sizes and user preferences, making the tool versatile.
class CScalableDialog : public CDialog
{
protected:
    bool m_Dragging;
    int m_OffsetX, m_OffsetY;
    int m_width, m_height;

public:
    CScalableDialog() : m_Dragging(false), m_OffsetX(1020), m_OffsetY(720), m_width(500), m_height(400) {}

    void HandleDragging(const int id, const long lparam, const double dparam)
    {
        if (id == CHARTEVENT_MOUSE_MOVE && m_Dragging)
        {
            int new_x = (int)lparam - m_OffsetX;
            int new_y = (int)dparam - m_OffsetY;
            SetXPosition(new_x, new_y);
        }
        else if (id == CHARTEVENT_OBJECT_CLICK)
        {
            m_OffsetX = (int)lparam;
            m_OffsetY = (int)dparam;
            m_Dragging = true;
        }
        else if (id == CHARTEVENT_CLICK)
        {
            m_Dragging = false;
        }
    }

    void SetSize(int width, int height)
    {
        m_width = width;
        m_height = height;
        UpdateDialogSize();
    }

    void UpdateDialogSize()
    {
        ObjectSetInteger(ChartID(), Name(), OBJPROP_XSIZE, m_width);
        ObjectSetInteger(ChartID(), Name(), OBJPROP_YSIZE, m_height);
    }

    void SetXPosition(int x, int y)
    {
        ObjectSetInteger(ChartID(), Name(), OBJPROP_XDISTANCE, x);
        ObjectSetInteger(ChartID(), Name(), OBJPROP_YDISTANCE, y);
        UpdateDialogSize();
    }
};
Within the "OnInit" function, we focused on initializing the interface components. This includes creating buttons, input boxes, and setting up the panel layout. I paid close attention to ensuring that each element is correctly positioned and functional. The (adminPanel. Create) method establishes the main dialog, while subsequent lines add buttons like "sendButton", "quickMessageButton", and utility buttons for minimizing and closing the panel. Here, I ensured that all components interact smoothly within the panel.
int OnInit()
{
    long chart_id = ChartID();

    if (!adminPanel.Create(chart_id, "Admin Panel", 0, 30, 30, 500, 400))
    {
        Print("Failed to create dialog");
        return INIT_FAILED;
    }

    if (!inputBox.Create(chart_id, "InputBox", 0, 5, 5, 460,50 ))
    {
        Print("Failed to create input box");
        return INIT_FAILED;
    }
    adminPanel.Add(inputBox);

    if (!sendButton.Create(chart_id, "SendButton", 0, 270, 50, 460, 80))
    {
        Print("Failed to create send button");
        return INIT_FAILED;
    }
    sendButton.Text("Send Message");
    adminPanel.Add(sendButton);

    if (!quickMessageButton.Create(chart_id, "QuickMessageButton", 0, 180, 200, 350, 230))
    {
        Print("Failed to create quick message button");
        return INIT_FAILED;
    }
    quickMessageButton.Text("Invalid Signal");
    adminPanel.Add(quickMessageButton);

    if (!minimizeButton.Create(chart_id, "MinimizeButton",0, 405, -22, 435, 0))
    {
        Print("Failed to create minimize button");
        return INIT_FAILED;
    }
    minimizeButton.Text("_");
    adminPanel.Add(minimizeButton);

    if (!closeButton.Create(chart_id, "CloseButton",0 , +435, -22,+465,0))
    {
        Print("Failed to create close button");
        return INIT_FAILED;
    }
    closeButton.Text("X");
    adminPanel.Add(closeButton);

    adminPanel.Show();
    ChartSetInteger(ChartID(), CHART_EVENT_OBJECT_CREATE, true);
    ChartSetInteger(ChartID(), CHART_EVENT_OBJECT_DELETE, true);
    ChartSetInteger(ChartID(), CHART_EVENT_MOUSE_WHEEL, true);
    ChartRedraw();

    Print("Initialization complete");
    return INIT_SUCCEEDED;
}
The "OnChartEvent" function is where we manage the interaction logic. This function handles various user actions such as clicks, mouse movements, and object creation events. By calling methods like "HandleDragging", we enable the panel to respond dynamically to user input. The switch-case structure within "OnChartEvent" allows us to efficiently route different events to their respective handlers, ensuring that the interface remains responsive and intuitive.
void OnChartEvent(const int id, const long &lparam, const double &dparam, const string &sparam)
{
    adminPanel.HandleDragging(id, lparam, dparam);

    switch(id)
    {
        case CHARTEVENT_KEYDOWN:
            Print("Key pressed: code=", lparam);
            break;

        case CHARTEVENT_MOUSE_MOVE:
            Print("Mouse move: x=", lparam, "  y=", dparam);
            break;

        case CHARTEVENT_OBJECT_CREATE:
            Print("Created object: ", sparam);
            break;

        case CHARTEVENT_OBJECT_DELETE:
            Print("Deleted object: ", sparam);
            break;

        case CHARTEVENT_CLICK:
            Print("Mouse click on chart: x=", lparam, "  y=", dparam);
            break;

        case CHARTEVENT_OBJECT_CLICK:
            if (sparam == "SendButton")
            {
                OnSendButtonClick();
            }
            else if (sparam == "QuickMessageButton")
            {
                OnQuickMessageButtonClick();
            }
            else if (sparam == "MinimizeButton")
            {
                OnMinimizeButtonClick();
            }
            else if (sparam == "CloseButton")
            {
                OnCloseButtonClick();
            }
            break;
    }
}
Finally, the button click-handling functions ("OnSendButtonClick", "OnQuickMessageButtonClick", "OnMinimizeButtonClick", and "OnCloseButtonClick") are where the program executes specific actions based on user input. For example, "OnSendButtonClick" retrieves the message from the input box and sends it to Telegram, providing feedback on the success of the operation. These functions are straightforward yet crucial, as they translate user actions into meaningful outcomes. Here, I ensured that the interface is not only functional but also aligns with the user’s expectations.
void OnSendButtonClick()
{
    string customMessage = inputBox.Text();
    if (SendMessageToTelegram(customMessage))
    {
        Print("Message sent: ", customMessage);
    }
    else
    {
        Print("Failed to send message.");
    }
}

void OnQuickMessageButtonClick()
{
    if (SendMessageToTelegram(QuickMessage))
    {
        Print("Quick message sent: ", QuickMessage);
    }
    else
    {
        Print("Failed to send quick message.");
    }
}

void OnMinimizeButtonClick()
{
    static bool minimized = false;
    if (minimized)
    {
        adminPanel.SetSize(500, 400);
        minimized = false;
    }
    else
    {
        adminPanel.SetSize(500, 30);
        minimized = true;
    }
}

void OnCloseButtonClick()
{
    adminPanel.Destroy();
    Print("Panel closed.");
}
Integrating Telegram API for communication with Traders
In integrating Telegram messaging within the MQL5 program, we created the function "SendMessageToTelegram" to facilitate communication between our trading interface and a Telegram chat. The function begins by defining two crucial variables: "botToken" and "chatId". These are unique identifiers provided by Telegram that allow us to authenticate our bot and specify the chat where the message will be sent. By hard-coding these values, we ensure the message is sent to the correct destination securely and efficiently. You can visit api.telegram.org or my past writings, to learn more about "BOT TOKEN" and "CHAT ID."
string botToken = "BOT TOKEN";
string chatId = "CHAT ID";
We then construct the "url" string, which is the endpoint for the Telegram Bot API, combining it with the "botToken" to create the full URL required to send messages. This step is crucial as it sets up the connection to the Telegram server, enabling our system to interact with it programmatically. Alongside this, we declare a "char" array "post_data" to hold the message payload, which will be formatted in JSON to meet the API's requirements.
string url = "https://api.telegram.org/bot" + botToken + "/sendMessage";
char post_data[];
To format the message in JSON, we concatenate the "chatId" and the actual "message" text into the "jsonMessage" string. This string is then converted into a character array using "StringToCharArray", and the array is resized accordingly using "ArrayResize" to ensure it fits the data properly. This step ensures that the message structure is compatible with the Telegram API's expectations, which is essential for successful communication.
string jsonMessage = "{\"chat_id\":\"" + chatId + "\", \"text\":\"" + message + "\"}";
ArrayResize(post_data, StringToCharArray(jsonMessage, post_data));
The function then sets a "timeout" variable to define how long the program should wait for a response from the Telegram server. We prepare a "result" array to store the server's response and a "responseHeaders" string for any additional information returned. These variables are important for handling the response and diagnosing any issues that might arise during the request.
int timeout = 5000;
char result[];
string responseHeaders;
The "WebRequest" function is where the actual communication with the Telegram API occurs. We send the "POST" request to the URL, passing the necessary headers, timeout, and "post_data". If the request is successful, indicated by an HTTP 200 response, the function prints a success message and returns "true". Otherwise, it prints the HTTP status code and error message, returning "false". This error handling is vital for debugging and ensuring that our message-sending functionality is reliable.
int res = WebRequest("POST", url, "Content-Type: application/json\r\n", timeout, post_data, result, responseHeaders);

if (res == 200) // HTTP 200 OK
{
    Print("Message sent successfully: ", message);
    return true;
}
else
{
    Print("Failed to send message. HTTP code: ", res, " Error code: ", GetLastError());
    Print("Response: ", CharArrayToString(result));
    return false;
}
Here is our final code after combining all the snippets:
//+------------------------------------------------------------------+
//|                                          Admin Panel.mq5         |
//|                   Copyright 2024, Clemence Benjamin              |
//|       https://www.mql5.com/en/users/billionaire2024/seller       |
//+------------------------------------------------------------------+
#property copyright "Copyright 2024, Clemence Benjamin"
#property link      "https://www.mql5.com/en/users/billionaire2024/seller"
#property description "A responsive Admin Panel. Send messages to your telegram clients without leaving MT5"
#property version   "1.06"

#include <Trade\Trade.mqh>
#include <Controls\Dialog.mqh>
#include <Controls\Button.mqh>
#include <Controls\Edit.mqh>

//+------------------------------------------------------------------+
//| Creating a scalable and draggable panel                          |
//+------------------------------------------------------------------+
class CScalableDialog : public CDialog
{
protected:
    bool m_Dragging;
    int m_OffsetX, m_OffsetY;
    int m_width, m_height;

public:
    CScalableDialog() : m_Dragging(false), m_OffsetX(1020), m_OffsetY(720), m_width(500), m_height(400) {}

    // Handle the event to allow dragging
    void HandleDragging(const int id, const long lparam, const double dparam)
    {
        if (id == CHARTEVENT_MOUSE_MOVE && m_Dragging)
        {
            int new_x = (int)lparam - m_OffsetX;
            int new_y = (int)dparam - m_OffsetY;
            SetXPosition(new_x, new_y); // Update the position without changing size
        }
        else if (id == CHARTEVENT_OBJECT_CLICK)
        {
            m_OffsetX = (int)lparam;
            m_OffsetY = (int)dparam;
            m_Dragging = true;
        }
        else if (id == CHARTEVENT_CLICK)
        {
            m_Dragging = false;
        }
    }

    void SetSize(int width, int height)
{
    m_width = width;
    m_height = height;

    // Call the method to update the size of the dialog
    UpdateDialogSize();
}

void UpdateDialogSize()
{
    // Adjust the internal layout or size of the controls within the dialog here
    // Example: Resize or reposition child controls based on the new dimensions

    // Ensure that dialog dimensions are respected within its design
    ObjectSetInteger(ChartID(), Name(), OBJPROP_CORNER, 0); // This aligns the dialog to the chart corner
    ObjectSetInteger(ChartID(), Name(), OBJPROP_XSIZE, m_width);  // Width of the dialog
    ObjectSetInteger(ChartID(), Name(), OBJPROP_YSIZE, m_height); // Height of the dialog
}


  void SetXPosition(int x, int y)
{
    // Set the X and Y positions of the dialog panel
    ObjectSetInteger(ChartID(), Name(), OBJPROP_XDISTANCE, x);
    ObjectSetInteger(ChartID(), Name(), OBJPROP_YDISTANCE, y);

    // Call the method to update the size of the dialog
    UpdateDialogSize();
}


};

//+------------------------------------------------------------------+
//| Inputs                                                           |
//+------------------------------------------------------------------+
input string QuickMessage = "Invalid Signal"; // Default quick message

//+------------------------------------------------------------------+
//| Global variables                                                 |
//+------------------------------------------------------------------+
CScalableDialog adminPanel;
CButton sendButton;
CButton quickMessageButton;
CButton minimizeButton;
CButton closeButton;
CEdit inputBox;

//+------------------------------------------------------------------+
//| Expert initialization function                                   |
//+------------------------------------------------------------------+
int OnInit()
{
    long chart_id = ChartID();

    // Create the dialog
    if (!adminPanel.Create(chart_id, "Admin Panel", 0, 30, 30, 500, 400))
    {
        Print("Failed to create dialog");
        return INIT_FAILED;
    }

    // Create the input box
    if (!inputBox.Create(chart_id, "InputBox", 0, 5, 5, 460,50 ))
    {
        Print("Failed to create input box");
        return INIT_FAILED;
    }
    adminPanel.Add(inputBox);

    // Create the send button for custom messages
    if (!sendButton.Create(chart_id, "SendButton", 0, 270, 50, 460, 80))
    {
        Print("Failed to create send button");
        return INIT_FAILED;
    }
    sendButton.Text("Send Message");
    adminPanel.Add(sendButton);

    // Create the quick message button
    if (!quickMessageButton.Create(chart_id, "QuickMessageButton", 0, 180, 200, 350, 230))
    {
        Print("Failed to create quick message button");
        return INIT_FAILED;
    }
    quickMessageButton.Text("Invalid Signal");
    adminPanel.Add(quickMessageButton);

    // Create the minimize button
    if (!minimizeButton.Create(chart_id, "MinimizeButton",0, 405, -22, 435, 0))
    {
        Print("Failed to create minimize button");
        return INIT_FAILED;
    }
    minimizeButton.Text("_");
    adminPanel.Add(minimizeButton);

    // Create the close button
    if (!closeButton.Create(chart_id, "CloseButton",0 , +435, -22,+465,0))
    {
        Print("Failed to create close button");
        return INIT_FAILED;
    }
    closeButton.Text("X");
    adminPanel.Add(closeButton);

    adminPanel.Show();

    // Enable chart events
    ChartSetInteger(ChartID(), CHART_EVENT_OBJECT_CREATE, true);
    ChartSetInteger(ChartID(), CHART_EVENT_OBJECT_DELETE, true);
    ChartSetInteger(ChartID(), CHART_EVENT_MOUSE_WHEEL, true);
    ChartRedraw();

    Print("Initialization complete");
    return INIT_SUCCEEDED;
}

//+------------------------------------------------------------------+
//| Expert deinitialization function                                 |
//+------------------------------------------------------------------+
void OnDeinit(const int reason)
{
    adminPanel.Destroy();
    Print("Deinitialization complete");
}

//+------------------------------------------------------------------+
//| Expert event handling function                                   |
//+------------------------------------------------------------------+
void OnChartEvent(const int id, const long &lparam, const double &dparam, const string &sparam)
{
    // Handle dragging and other events
    adminPanel.HandleDragging(id, lparam, dparam);

    // Handle different types of events
    switch(id)
    {
        case CHARTEVENT_KEYDOWN:
            Print("Key pressed: code=", lparam);
            break;

        case CHARTEVENT_MOUSE_MOVE:
            Print("Mouse move: x=", lparam, "  y=", dparam);
            break;

        case CHARTEVENT_OBJECT_CREATE:
            Print("Created object: ", sparam);
            break;

        case CHARTEVENT_OBJECT_DELETE:
            Print("Deleted object: ", sparam);
            break;

        case CHARTEVENT_CLICK:
            Print("Mouse click on chart: x=", lparam, "  y=", dparam);
            break;

        case CHARTEVENT_OBJECT_CLICK:
            if (sparam == "SendButton")
            {
                OnSendButtonClick();
            }
            else if (sparam == "QuickMessageButton")
            {
                OnQuickMessageButtonClick();
            }
            else if (sparam == "MinimizeButton")
            {
                OnMinimizeButtonClick();
            }
            else if (sparam == "CloseButton")
            {
                OnCloseButtonClick();
            }
            break;

        default:
            if (id > CHARTEVENT_CUSTOM)
                Print("Custom event ID=", id, " lparam=", lparam, " dparam=", dparam, " sparam=", sparam);
            break;
    }
}

//+------------------------------------------------------------------+
//| Function to handle custom message send button click              |
//+------------------------------------------------------------------+
void OnSendButtonClick()
{
    string message = inputBox.Text();
    if (message != "")
    {
        if(SendMessageToTelegram(message))
            Print("Custom message sent: ", message);
        else
            Print("Failed to send custom message.");
    }
    else
    {
        Print("No message entered.");
    }
}

//+------------------------------------------------------------------+
//| Function to handle quick message button click                    |
//+------------------------------------------------------------------+
void OnQuickMessageButtonClick()
{
    if(SendMessageToTelegram(QuickMessage))
        Print("Quick Message Button Clicked - Quick message sent: ", QuickMessage);
    else
        Print("Failed to send quick message.");
}

//+------------------------------------------------------------------+
//| Function to handle minimize button click                         |
//+------------------------------------------------------------------+
void OnMinimizeButtonClick()
{
    static bool minimized = false;
    if (minimized)
    {
        // Restore full size
        adminPanel.SetSize(500, 400);  // Restore full size (400x200)
    }
    else
    {
        // Minimize to header only
        adminPanel.SetSize(100, 80);   // Minimize height to 30 (keeping the width 400)
    }
    minimized = !minimized;
}

//+------------------------------------------------------------------+
//| Function to handle close button click                            |
//+------------------------------------------------------------------+
void OnCloseButtonClick()
{
    adminPanel.Destroy();
    Print("Admin Panel closed.");
}

///+------------------------------------------------------------------+
//| Function to send the message to Telegram                         |
//+------------------------------------------------------------------+
bool SendMessageToTelegram(string message)
{
    // Replace with your bot token and chat ID
    string botToken = "Your BOT TOKEN";
    string chatId = "Your Chat ID";

    string url = "https://api.telegram.org/bot" + botToken + "/sendMessage";
    char post_data[];

    // Prepare the message data
    string jsonMessage = "{\"chat_id\":\"" + chatId + "\", \"text\":\"" + message + "\"}";

    // Resize the character array to fit the JSON payload
    ArrayResize(post_data, StringToCharArray(jsonMessage, post_data));

    int timeout = 5000;
    char result[];
    string responseHeaders;

    // Make the WebRequest
    int res = WebRequest("POST", url, "Content-Type: application/json\r\n", timeout, post_data, result, responseHeaders);

    if (res == 200) // HTTP 200 OK
    {
        Print("Message sent successfully: ", message);
        return true;
    }
    else
    {
        Print("Failed to send message. HTTP code: ", res, " Error code: ", GetLastError());
        Print("Response: ", CharArrayToString(result));
        return false;
    }
}
Testing the Admin Panel
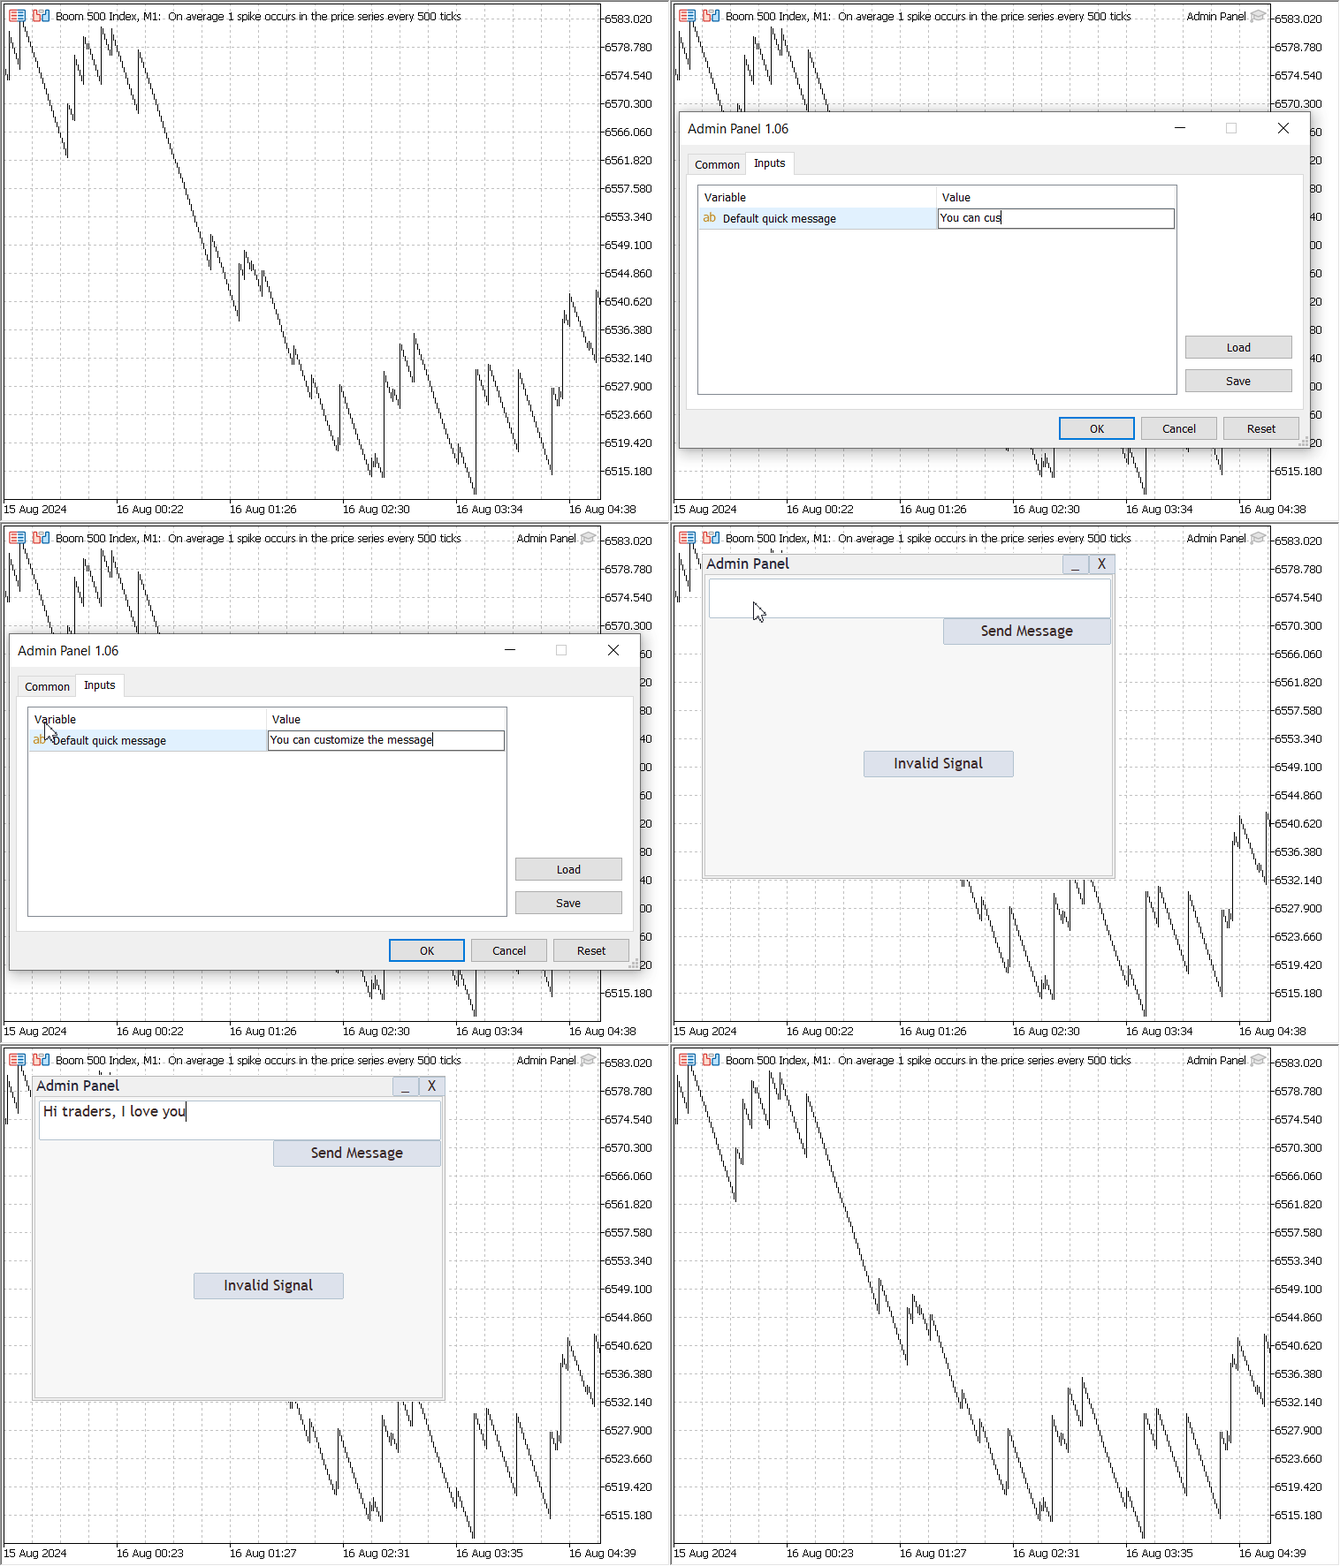
After a successful compile, we launched the program, and it worked as intended.

Launching the Admin Panel from Experts: Boom 500 Index
Usage Tips
If you've created a Telegram bot and channel, and have access to the Telegram bot API, you just need to edit the source code below to hard-code your bot token and chat ID to use the Admin Panel. Alternatively, you can simply obtain the tokens and input them into the compiled EA provided in attachments below, without needing to modify the source code.
Input Bot Token and Chat ID
Conclusion
In conclusion, the development of the Admin Panel Expert Advisor in MQL5 demonstrates a significant advancement in managing and communicating with traders directly from the MetaTrader 5 platform. By integrating a dynamic and scalable GUI with real-time messaging capabilities through Telegram, this tool enhances efficiency and responsiveness in trading operations. The ability to send quick messages or custom notifications directly from the panel allows for immediate communication, ensuring that critical information is relayed without delay. This project underscores the potential of combining user-friendly interfaces with robust communication tools, paving the way for more interactive and effective trading management solutions.
Further development is essential, including the addition of other quick buttons to reduce the time between typing and sending messages, especially in response to recent market behavior. We will delve deeper into this in future writings of this series. I appreciate you, Traders! Happy developing.
Your feedback is always welcome. Please explore the attached files in your projects.
| File Name | File Description |
|---|---|
| Admin Panel.mq5 | Admin Panel source code. |
| Admin Panel.ex5 | Ready to run Admin Panel Expert. You just need to input your correct Bot Token and chat ID |
| (terminal64_bK0FbSvNmw) | An image showing how the Admin Panel works. |
 Features of Custom Indicators Creation
 Developing a multi-currency Expert Advisor (Part 7): Selecting a group based on forward period
 Features of Experts Advisors
 Reimagining Classic Strategies (Part VI): Multiple Time-Frame Analysis
- Free trading apps
- Over 8,000 signals for copying
- Economic news for exploring financial markets
You agree to website policy and terms of use