
How to create a trading journal with MetaTrader and Google Sheets

Table of Contents
- Concept
- Introduction
- Available solutions
- What is Google spreadsheet
- Google Spreadsheets API
- Create a new Google Sheet
- Create a Google Apps Script
- Run the setup function
- Publish the project as a web app
- How to post (write) data to google Spreadsheets
- How to read and access Google Spreadsheets via HTTP
- Implement and update tools for our Trading Journal using MetaTrader
- Create an Expert Advisor to post data
- Get the list of running orders and positions
- Sending Order list data to Google Sheet
- Simple analysis to our trade list
- Conclusion
Concept
Today, in the world of trading, reducing the error and increasing the win rate is very important. Every trader needs a trading journal to improve his strategy performance. But this work requires a lot of time and precision. Imagine that this is done automatically.
Introduction
The Google Sheets trading journal system serves as an indispensable resource for traders of all levels, facilitating organized tracking of their trading activities. Keeping a trading journal is essential if you want to progress as a day trader. You can’t improve what you don’t measure. It enables users to maintain a structured approach to their trades, offering insights that are crucial for performance evaluation and enhancement. This system's accessibility and ease of use are enhanced by Google Sheets' collaborative features, allowing traders to share their journals or seek feedback from peers. By employing this system, traders can cultivate discipline, track their psychological factors, and ultimately increase their chances of success in the financial markets.
In this article, we design a personalized platform for traders to document and track their trades systematically. It includes customizable fields for reflecting on strategies and outcomes, and built-in functions for automating calculations, reducing errors, and saving time.
We’ll walk through how to send custom data automatically via HTTP POST protocol to a Google Sheet. We will also learn how we to read or retrieve them by HTTP request on MetaTrader.
Available solutions
To implement a trading journal, we need to transfer our trading data to a database for future analysis. On the other side, we need access that database, download the information, and utilize it. The database could be in any forms, like an Excel file, a CSV format file, a MySQL or Microsoft SQL server, a JSON file or even any simple text file where the desired data is stored line by line. Depended on which type of your database is, your system design and development are different.
We have several solution type.
- Google Sheets: Keeping a trading journal can be made simple by using a Google Sheets. It's an easy-to-use interface for monitoring important metrics like trades, entry and exit points, profits and losses, and trade notes. By using a public Google Sheet trade journal, traders can organize their trades and gather statistics to learn from their experiences. Furthermore, Google Sheets allows for customization, so traders can tailor the journal to suit their specific strategies.
- Trade Journals with Python and API: For traders seeking a more sophisticated solution, automating their trade journal using Python and Google Sheets API can significantly streamline data entry and analysis. This automation allows for real-time updates and reduces the potential for human error. By extracting data from trading platforms and automatically populating the Google Sheet, traders can focus more on analysis rather than manual data entry. This solution is particularly effective for those who trade frequently and require accurate and timely performance analysis.
- Online Trading Journals: Various online trading journals combine the ease of use and accessibility of web applications with features that allow traders to log their trades without needing to manage a spreadsheet manually But they need subscription fee. These platforms often come with built-in analytical tools that can help traders identify patterns in their trading behavior, potentially leading to more informed decision-making.
We choose Google Sheets as our Excel-based database for two key reasons: First, it’s simple and easy to understand. Second, Google Sheets is inherently an online database that can be accessed from anywhere and on any computer with just a link. There’s no need to set up additional infrastructure to make the data accessible online.
What is Google spreadsheet
The Google spreadsheet is a free web-based Excel from Google that allows users to create, edit, and manage spreadsheets. Similar to Microsoft Excel, it enables users to organize data in cells and tables and perform mathematical, statistical, and analytical operations with hundred of bars and chart analysis type.
Key features and benefit to use Google sheets are:
- Files are automatically saved in Google Drive, making them accessible from any device with an internet connection.
- Multiple users can work on the same file simultaneously and see each other's changes instantly.
- No software installation is needed; it only requires a browser and a Google account.
- Users can import and export data in formats such as Excel, CSV, and PDF.
- It supports a wide range of functions for data analysis, similar to Excel.
- Google sheets, support scripts, Automation function also accessible by API solutions.
Google Sheets is great for collaborating online and easily accessing or sharing data from anywhere. So It can be a great for Trading Journals.
Google Spreadsheets API
The Google Sheets API is a RESTful interface that lets you read and modify a spreadsheet's data. The most common uses of this API include the following tasks:
- Create spreadsheets
- Read and write spreadsheet cell values
- Update spreadsheet formatting
- Manage Connected Sheets
Using the API for Google Sheets requires complex steps and a Google Developer Account with a $300 fee.
But we do not end here, we provide you with a simple and free solution. Let's dive in steps by step:
Create a new Google Sheet
- To begin, open Google Sheets and create a new blank spreadsheet. If you don't already have a Google account, you'll need to sign up for new one to access this service. This spreadsheet will serve as the primary storage location for all the data we'll be working with, allowing us to seamlessly send and retrieve information for our trading journal.
- Once the spreadsheet is open, you'll need to set up the first row by adding headers that correspond to the key data points we'll use. In the first row, enter the following headers, one per column:
- ticket: Ticket, This will store the unique identifier for each trade.
- order: Order, This column will track whether the trade is a buy or sell order.
- symbol: Symbol, we'll record the trading instrument, such as currency pairs like EURUSD or GBPJPY.
- openprice: This will store the price at which the trade was opened.
- sl: Is for the stop loss value set for the trade
- tp:Is for the take profit value set for the trade
- close: This column will indicate whether the trade has been closed or not.
- lot: Here, you'll record the lot size, which is the volume of the trade.
- opentime: This column will log the exact time the trade was opened.
note: column name are case sensitive in our project code. So be sure you understand it if you like to change them (column name) with your style.

Create a Google Apps Script
To add functionality to your Google Sheet, the next step is to create a Google Apps Script. Google Apps Script allows you to write custom code that automates tasks and connects Google services, making it a perfect tool for linking your spreadsheet with external platforms.
To do that:
- In your Google Sheets, click on the “Extensions” menu at the top.
- From the dropdown menu, select “Apps Script” This action will open a new tab, taking you to the Google Apps Script interface where you can write and edit code to automate interactions with your sheet.
- Once the Apps Script editor opens, you’ll see a blank script editor. It's a good idea to give your project a meaningful name for easy identification in the future.
- You can name it to something like “my first journal” or “my trade list function” , whatever you like.
- Once you’ve opened the Google Apps Script editor and named your project, the next step is to modify the script by removing the default code that appears. By default, Google Apps Script includes a simple function template named “myFunction”, which we won’t be needing for our project.

So, remove that default function, Then copy and paste below function and replacing the default function with your own custom script below:
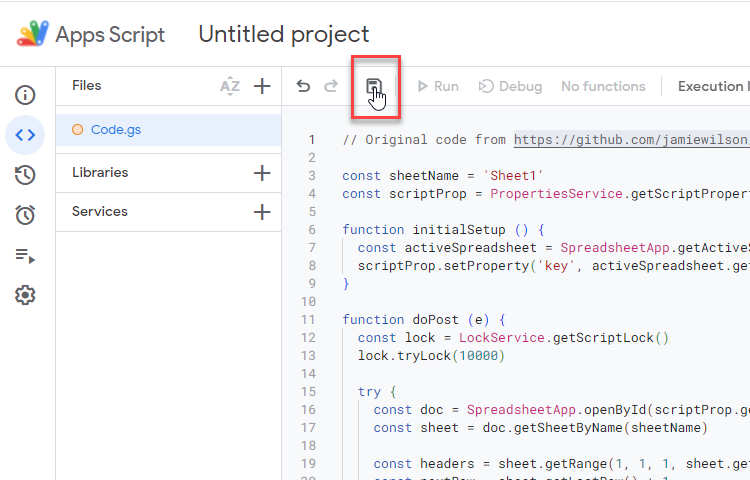
// Original code from https://github.com/jamiewilson/form-to-google-sheets
const sheetName = 'Sheet1'
const scriptProp = PropertiesService.getScriptProperties();

function initialSetup() {
const activeSpreadsheet = SpreadsheetApp.getActiveSpreadsheet();
scriptProp.setProperty('key', activeSpreadsheet.getId());
}

function doPost (e) {
  const lock = LockService.getScriptLock();
  lock.tryLock(10000);

  try {
    const doc = SpreadsheetApp.openById(scriptProp.getProperty('key'));
    const sheet = doc.getSheetByName(sheetName);
    const headers = sheet.getRange(1, 1, 1, sheet.getLastColumn()).getValues()[0];
    const nextRow = sheet.getLastRow() + 1;
    const newRow = headers.map(function(header) {
      return header === 'Date' ? newDate() : e.parameter[header];
    })

    sheet.getRange(nextRow, 1, 1, newRow.length).setValues([newRow]);

    return ContentService
      .createTextOutput(JSON.stringify({ 'result': 'success', 'row': nextRow }))
      .setMimeType(ContentService.MimeType.JSON);
  }
  catch (e) {
    return ContentService
      .createTextOutput(JSON.stringify({ 'result': 'error', 'error': e }))
      .setMimeType(ContentService.MimeType.JSON);
  }
  finally {
    lock.releaseLock();
  }}
Thanks to Jamie Wilson, as we used his code (form-to-google-sheets) for our project
Now, save the project, before we move to the next step. File > Save icon
This function is part of a Google Apps Script that connects a Google Form or an external HTTP POST request to a Google Sheet, allowing data to be stored dynamically in the sheet.
Here’s a breakdown of the function components:
sheetName: is a global variable to refer to our new spreadsheet that created before. default sheet name is “sheet1” .
scriptProp: This is used to store script-specific properties via the PropertiesService in Google Apps Script, enabling persistent storage for values such as the spreadsheet ID.
initialSetup: By this function we retrieve the currently active Google Spreadsheet using SpreadsheetApp.getActiveSpreadsheet() then stores the spreadsheet’s unique ID in the script properties using scriptProp.setProperty('key', activeSpreadsheet.getId()). This allows other parts of the script to access the spreadsheet by ID later.
doPost, is our main function that processes incoming HTTP POST requests by mapping the received data to a Google Sheet. It first acquires a lock to prevent concurrent write issues, then retrieves the target spreadsheet by its stored ID and identifies the correct sheet. The function reads the headers from the first row to map incoming data to the appropriate columns, appends the data to the next available row, and handles the “Date” header by automatically inserting the current date. It returns a success message in JSON format if the operation completes, or an error message if any issues occur, and finally releases the lock.
Run the setup function
Because this script has not been reviewed by Google, it will generate a warning before you can continue. This is a standard procedure for unverified scripts.
To execute the function and configure your Google Apps Script properly:
- Click on Run icon next to the Save icon.
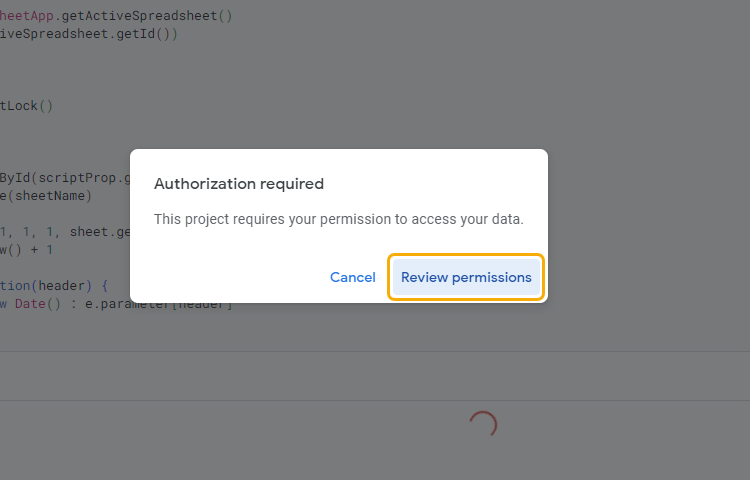
- A modal window will appear, indicating that “Authorization required.” Click on “Review permissions” to proceed to the next screen where you'll need to authorize the script to access your Google account.
- Select the Google account you want to use with this script. This is the account that will grant the necessary permissions.
- On the next screen, you may see a message stating “Google hasn’t verified this app.” This is a common warning for scripts that haven't gone through Google's verification process. To proceed, click on “Advanced”.
- After clicking Advanced, you will see an option to “Go to Untitled project (unsafe)”. This message indicates that while the script is not verified, you are still allowing it access to your Google account. Click on this link to continue.
- Finally, you will be prompted to grant permissions to the script. Review the permissions being requested and click “Allow” to authorize the script to interact with your Google Sheet and other Google services.
After giving the necessary permissions to the script, you will see an execution log in the script editor console indicating that the script has been authorized to run. At this point, the script is ready, but to automate its execution through HTTP POST requests, you need to set up a trigger.
To do that:
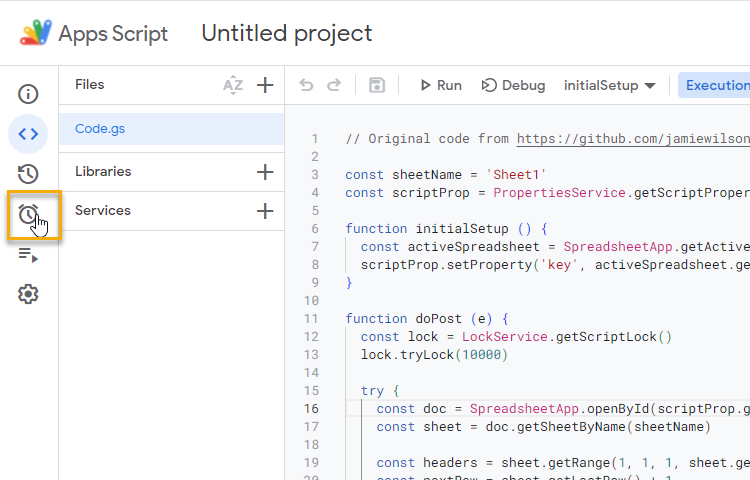
- On the Google Apps Script editor page, on the left sidebar, click on “Triggers” to open the trigger's management interface. This section allows you to configure when and how your script should be executed.
- Within the Triggers page, click on the “Add Trigger” button. This button is typically represented by a plus (+) icon or labeled explicitly as “Add Trigger.”
- A new dialog will appear where you can configure the details of your trigger. You need to set up the trigger to activate your function (doPost) in response to an HTTP POST request.
- For the event source, select “From the web app” or “Web app” (the exact option may vary based on updates to the Google Apps Script interface).
- Choose the function you want to trigger from the dropdown menu. In this case, select doPost.
- Choose which deployment should run: Head
- Select event source: From spreadsheet
- Set the type of event to “On form submit”. This configuration allows your script to run in response to an HTTP POST request sent to the web app URL.

Then click SAVE. if it need permitions, you have to accept it by your Google account.
Publish the project as a web app
Now we have to publish the project by click the Blue Deploy button on the App page and click New Deployment from the drop-down.
Then click the “Select type” icon and select Web app.
In the form that appears, select the following options:
- Description: This can be anything that you want. Just make it descriptive.
- Web app → Execute As: Me
- Web app → Who has access: Anyone
Then click Deploy.
Important: In the next appear page, copy the web app URL, we use that link in our project. Your link will be something like this:
Project link: https://script.google.com/macros/s/AfycbxWxYnDPsdvsvsdvdv236545OfgVnadvkvsASDCV6541scsSDHNfnqPeVkyH5A-r5eDhg/exec
How to post (write) data to google Spreadsheets
HTTP POST is a method used by the HTTP protocol for sending data from the client to the server. It is usually used when submitting form data on websites. You see a lot of them in web, exactly like the login form in MQL website.
The data is transmitted in the body of the request, unlike the GET method where data is passed in the URL. By using the post method, The data is not visible in the URL, so it slightly more secure and the size of the data sent is not limited and it allowing the submission of large files or data.
Just for test our sheet script function, we create a simple HTML form is used to collect test data and send it to the server for processing. Forms send method must be set to POST.
The basic HTML form below, contains:
Action: it must set by your Project link (From previous Publish steps)
Method: Is the form post method, could be on GET or POST method.
As we write our App script on the Google sheet with post method, we use post to send data to the Google.
input: included all type of data that we want to send.
This is our final HTML form:
<!DOCTYPE html>
<htmllang="en">
<head>
<metacharset="UTF-8">
</head>
<body>
<form method="post" action="https://script.google.com/macros/s/AfycbxWxYnDPsdvsvsdvdv236545OfgVnadvkvsASDCV6541scsSDHNfnqPeVkyH5A-r5eDhg/exec">
<input type="number" size="20" name="ticket" placeholder="ticket">
<input type="text" size="20" name="order" placeholder="order">
<input type="text" size="20" name="symbol" placeholder="symbol"><br>
<input type="number" step="0.00001" size="20" name="openprice" placeholder="openprice">
<input type="number" step="0.00001" size="20" name="sl" placeholder="stoploss">
<input type="number" step="0.00001" size="20" name="tp" placeholder="takeprofit"><br>
<input type="number" step="0.00001" size="20" name="close" placeholder="close price">
        <input type="number" step="0.01" size="20" name="lot" placeholder="volume">
        <input type="datetime-local" size="20" name="opentime" placeholder="opentime">
<input type="submit" value="post">
</form>
</body>
</html>
Copy and past this text to a local text file and rename the file format to a HTML file. Like this “newfile.html”
Also replace the form action address to your spreadsheet project link address.
Now we have easily managed to send the data we want to a Google sheet.
Fill the form inputs, click on post and wait for updating your Google spreadsheet.

If you have succeeded in this step, we will go to the next step, otherwise, read the above steps more carefully. Double-check your spreadsheet columns and compare them to your html form inputs name.
The form used above is just a test of sending data by HTML POST, otherwise, in the rest of this article, we will automatically send transaction data using the WebRequest MetaTrader function.
How to read and access Google Spreadsheets via HTTP
To read data from a spreadsheet using the HTTP method, you must set read permission on your sheet.
Open the Google sheet, find your sheet that you created before and open it.
On the sheet page, top-right corner, click on share, and set the General access to Anyone with the link and set the role to viewer.
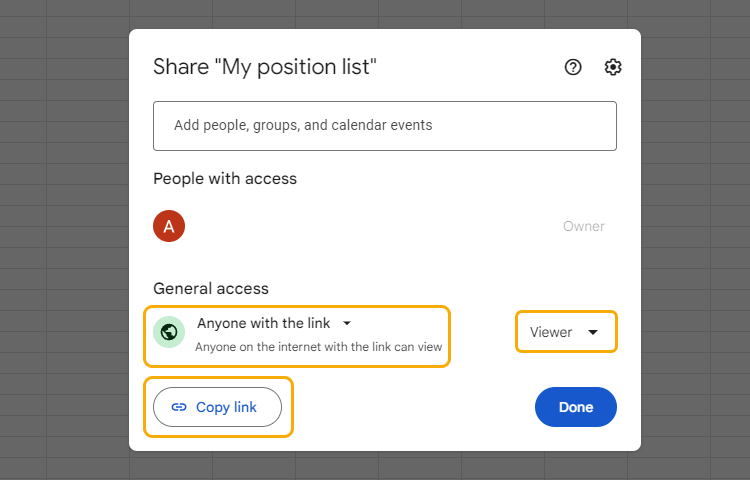
Then click on Copy link to use it as the sheet access link. The access link is like this:
https://docs.google.com/spreadsheets/d/1rYNuscaYWtRu_65W-fPnascNTYHwcU-3fWiNQ4asTBHQo/edit
The bold text is your sheet ID
We need that ID to read the sheet in JSON type.
Access Link: https://docs.google.com/spreadsheets/d/{YOUR_SHEET_ID}/gviz/tq?tqx=out:json&tq&gid='+gid
{YOUR_SHEET_ID} is your spreadsheet ID that can be found in your sheet URL.
Copy the ID from sheet URL and replace {YOUR_SHEET_ID} on the Access link and the access link will be like this:
When you use this link on your browser, A full details of your sheet downloaded in a JSON file format.
Result is like this:
google.visualization.Query.setResponse(
{
    "version": "0.6",
    "reqId": "0",
    "status": "ok",
    "sig": "529900317",
    "table":
    {
        "cols": [
        {
            "id": "A",
            "label": "ticket",
            "type": "number",
            "pattern": "General"
        },
        {
            "id": "B",
            "label": "order",
            "type": "string"
        },
        {
            "id": "C",
            "label": "symbol",
            "type": "string"
        },
        {
            "id": "D",
            "label": "openprice",
            "type": "number",
            "pattern": "General"
        }],
        "rows": [
        {
            "c": [
            {
                "v": 5.64123564E8,
                "f": "564123564"
            },
            {
                "v": "buy"
            },
            {
                "v": "EURUSD"
            },
            {
                "v": 1.2215,
                "f": "1.2215"
            },
            {
                "v": 1.21,
                "f": "1.21"
            },
            {
                "v": 1.23,
                "f": "1.23"
            },
            {
                "v": 0.0,
                "f": "0"
            },
            {
                "v": 0.01,
                "f": "0.01"
            },
            {
                "v": "Date(2024,8,11,18,27,0)",
                "f": "2024-09-11 18:27"
            }, null, null, null, null, null, null, null, null, null, null, null, null, null, null, null, null,
            {
                "v": null
            }]
        },
        {
            "c": [
            {
                "v": 123123.0,
                "f": "123123"
            },
            {
                "v": "sell"
            },
            {
                "v": "USDJPY"
            },
            {
                "v": 147.22,
                "f": "147.22"
            },
            {
                "v": 147.44,
                "f": "147.44"
            },
            {
                "v": 146.0,
                "f": "146"
            },
            {
                "v": 0.0,
                "f": "0"
            },
            {
                "v": 0.02,
                "f": "0.02"
            },
            {
                "v": "Date(2024,8,4,20,43,0)",
                "f": "2024-09-04 20:43"
            }, null, null, null, null, null, null, null, null, null, null, null, null, null, null, null, null,
            {
                "v": null
            }]
        }],
        "parsedNumHeaders": 1
    }
});
It contains all column name, numbers and values. All the above data is just for 2 rows of position details.
We use this JSON file to read the sheet in our Expert Advisor.
Let's go to the most interesting part of the story, the automatic implementation of all that we said in the Metatrader platform
Implement and update tools for our Trading Journal using MetaTrader
To implement a Google Sheet Trading Journal using MetaTrader, the process involves main steps.
First, we need to create a Google Sheet to save and manage trading details, including position details or position comments. We did it before.
Next, use the Google Apps Script to enable the Sheet to interact with external systems via HTTP requests. We did it before too.
Now In MetaTrader, we’ll write a custom Expert Advisor that sends trade data (such as symbol, volume, and order type) to the Google Sheet using the WebRequest function and HTTP POST protocol. The Sheet acts as a cloud database and allowing us to monitor, store, and share trades in real-time across different accounts and locations.
Create an Expert Advisor to post data
We need an Expert advisor to send position and orders detail to the Google sheet.So we need tow main part in our code.
- A function with this task, checking open positions and pending orders on an account in MetaTrader. We call that “OrderList”.
- A function with the task of sending “OrderList”data to our Google sheet via WebRequest function. We call that “UpdateDatabase”.
Get the list of running orders and positions
Our “OrderList” function can have such a structure:
void OrderList {
   for(int conter = PositionsTotal() - 1; conter >= 0; conter -= 1)
   {
      const ulong ticket = PositionGetTicket(conter);
      if(ticket == 0 || !PositionSelectByTicket(ticket)) continue;
      string   symbol      =  PositionGetString(POSITION_SYMBOL);
      int      order_type  =  PositionGetInteger(POSITION_TYPE);
      double   volume      =  PositionGetDouble(POSITION_VOLUME);
      double   open_price  =  PositionGetDouble(POSITION_PRICE_OPEN);
      datetime open_time   =  PositionGetInteger(POSITION_TIME);
      double   stop_loss   =  PositionGetDouble(POSITION_SL);
      double   take_profit =  PositionGetDouble(POSITION_TP);
      // Send trade details via WebRequest
      UpdateDatabase(symbol, order_type, volume, open_price, stop_loss, take_profit, ticket, open_time);
   }
}
and for MQL4, the code could be like this:
void OrderList {
   // Loop through all open trades
   for(int conter = OrdersTotal() - 1; conter >= 0; conter -= 1) {
      if(OrderSelect(conter, SELECT_BY_POS, MODE_TRADES)) {
         // Collect trade data
         int      ticket      =  OrderTicket();
         string   symbol      =  OrderSymbol();
         int      order_type  =  OrderType();
         double   volume      =  OrderLots();
         double   open_price  =  OrderOpenPrice();
         datetime open_time   =  OrderOpenTime();
         double   stop_loss   =  OrderStopLoss();
         double   take_profit =  OrderTakeProfit();
         // Send trade details via WebRequest
         UpdateDatabase(symbol, order_type, volume, open_price, stop_loss, take_profit, ticket, opentime);
      }
   }
}
This function code, contain a loop start from 0 to total number of open orders OrdersTotal() or PositionsTotal().
Every loop selects a position or orders from MetaTrader order list then pick it by OrderSelect function.
Then we read desire information by PositionGetString, PositionGetDouble and PositionGetInteger.
All you need in details for other data could be found here for MQL4 Trade Functions and MQL5 Trade Functions.
Sending Order list data to Google Sheet
After we get all orders details from previews function “OrderList”, now we need another function called “UpdateDatabase” to post OrderList data to our sheet.
Position details like the symbol, order type, volume, open price, stop loss, take profit, and ticket number as a function inputs, and prepare them into a formatted string. This data is then sent using an HTTP POST request via the WebRequest() function. If the request is successful, it confirms that the trade data was sent; if not, it prints an error message.
void SendTradeData(string orderSymbol, int orderType, double orderVolume, double openPrice, double stopLoss, double takeProfit, ulong orderTicket, datetime openTime)
{
   // Database url. Replace with your own url
   string url  = "https://script.google.com/macros/s/AfycbxWxYnDPsdvsvsdvdv236545OfgVnadvkvsASDCV6541scsSDHNfnqPeVkyH5A-r5eDhg/exec";
   int   digit = (int)SymbolInfoInteger(orderSymbol,SYMBOL_DIGITS);
   string datastring = "?
                  +"&ticket="+string(orderTicket)
                  +"&order="+string(orderType)
                  +"&symbol="+string(orderSymbol)
  +"&openprice="+DoubleToString(openPrice,digit)
                  +"&sl="+DoubleToString(stopLoss,digit)
                  +"&tp="+DoubleToString(takeProfit,digit)
                  +"&close=0"
  +"&lot="+DoubleToString(orderVolume,2)
  +"&opentime="+(string)openTime;

   int   res;     // To receive the operation execution result
   char  data[];  // Data array to send POST requests
   char  result[];
   //--- Create the body of the POST request for authorization
   ArrayResize(data,StringToCharArray(datastring,data,0,WHOLE_ARRAY,CP_UTF8)-1);
   ResetLastError();
   res=WebRequest("POST", url, NULL, 0, data, result, str);
   string responsestring   = CharArrayToString(result, 0, 0, CP_UTF8);
   Print(responsestring);
   if(res == -1)
      Print("Error in WebRequest: ", GetLastError());
   else
      Print("Trade data sent: ", data);
}
In this function, we get orders or positions data from “OrderList” function then prepare them to a standard post method.
The URL is our sheet public URL .
Then we create a string variable “datastring” with GET method format.
With StringToCharArray function, we store the string into an array with this name, data.
The WebRequest function initiated in next line with POST method, “url”, our “data” array and the responde string stored in “result” variable.
Then we convert the responce array to a string “responsestring” to print in MetaTrader Expert tab logs.
Simple analysis to our trade list
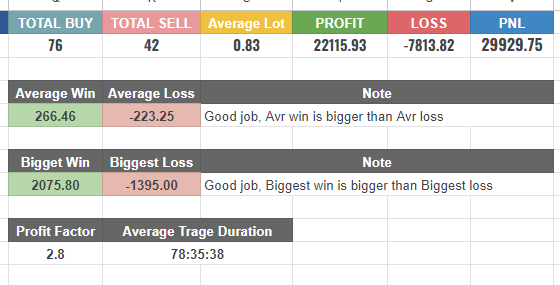
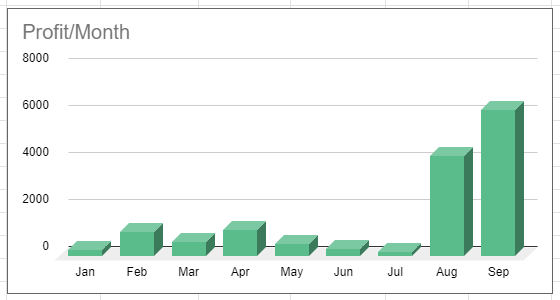
Every time you open and order, your sheet will be updated, and you can analyze all the data with Google sheet analytics chart.
Calculate total number of buy positions, total Sells, total of orders lot, total of win or loss positions, average win, average loss or everything that could be in your mind.
We created a template for your journal, and you can access it by this link. Check the columns formula to find out how we calculate and analysis details from raw position list.
https://docs.google.com/spreadsheets/d/1rYcRJKzVWtRu_65W-fPnQgODSzTU-3fWiNQHZz3P2Qo/edit?usp=sharing

Conclusion
In this article, we walked through the process of creating a trading journal using Google Sheets and linked to MetaTrader for automatic data tracking. We covered setting up the Google Sheet, adding headers, and using Google Apps Script to send trade data via HTTP POST requests. This system saves time and reduces errors, making it easier to track trades in real time.
We also learned how to create an Expert Advisor in MetaTrader to send trade details directly to Google Sheets, enabling real-time analysis. With this simple setup, you now have an efficient way to organize and improve your trading performance without needing complex tools.
We prepared for you, the necessary codes for two versions of MetaTrader 4 and 5.
If you have any questions or ideas, don't hesitate to leave a comment.
Warning: All rights to these materials are reserved by MetaQuotes Ltd. Copying or reprinting of these materials in whole or in part is prohibited.
This article was written by a user of the site and reflects their personal views. MetaQuotes Ltd is not responsible for the accuracy of the information presented, nor for any consequences resulting from the use of the solutions, strategies or recommendations described.

- Free trading apps
- Over 8,000 signals for copying
- Economic news for exploring financial markets
You agree to website policy and terms of use
Got a compile error for this line, pointing to an undefined variable 'str'
Error Description:
lvalue expected AutoJournal.mq5 49 55
could be one of 2 function(s) AutoJournal.mq5 49 8
built-in: int WebRequest(const string,const string,const string,const string,int,const uchar&[],int,uchar&[],string&) AutoJournal.mq5 49 8
built-in: int WebRequest(const string,const string,const string,int,const uchar&[],uchar&[],string&) AutoJournal.mq5 49 8
Amazing work, I really appreciate the time and effort to share this tutorial. Thank you very much.
I got a compilation error for this line, pointing to an undefined variable 'str'
Error description:
lvalue expected AutoJournal.mq5 49 55
could be one of 2 functions AutoJournal.mq5 49 8
built-in: int WebRequest(const string,const string,const string,const string,int,const uchar&[],int,uchar&[],string&) AutoJournal.mq5 49 8
built-in: int WebRequest(const string,const string,const string,int,const uchar&[],uchar&[],string&) AutoJournal.mq5 49 8
It is very likely that the problem is with your MetaTrader version. Please update it.
It's already using latest build 5572 when I got the error.
Version: 5.00 build 5572
30 Jan 2026
It's already using latest build 5572 when I got the error.
Version: 5.00 build 5572
30 Jan 2026