Creating a Trading Administrator Panel in MQL5 (Part III): Enhancing the GUI with Visual Styling (I)
Contents:
- Introduction
- Importance of a Visually appealing GUI
- Applying MQL5 GUI Styling Features
- Customizing Colors and Fonts
- Theme Management Logic
- Adjusting New Buttons Layout
- Advanced Enhancement of the GUI
- Conclusion
Introduction
Looking at the goals outlined in our previous article, can we confidently say we have done enough? In my opinion, what I see inspires a drive for advancement beyond our current offerings. Imagine how beneficial it would be to implement a toggle between dark and light themes for our Admin Panel. Additionally, we could enhance the user experience by adding stylish buttons, offering a diverse selection of fonts, and enabling language switching among major languages. This would make our panel more user-friendly for everyone.
Our goal is to provide trading Administrators with a comprehensive communication solution integrated within the trading platform. The concepts we aim to incorporate are inspired by influential research and developments in graphical user interfaces (GUIs) since the 1970s. Notable contributors include Alan Kay, Xerox PARC, Apple (macOS), Microsoft (Windows), CSS (Cascading Style Sheets), and Material Design from Google. By leveraging these insights, we can create an Admin Panel meets users’ needs and enhances their overall experience..
The Basic Admin Panel we have developed so far.
Recap of what we have accomplished so far:
- Creating the Admin Panel with a Messaging Interface and Telegram Integration.
- Adding essential buttons to the interface such as minimize, maximize, close, and quick message buttons.
By the end of this article, we will have a fully customized and visually styled trading administrator panel in MQL5. You’ll learn how to implement various styling techniques that improve both the appearance and functionality of the interface, creating a professional and user-friendly environment for traders.
Here are the main objectives of this article:- Applying basic styling techniques using MQL5
- Customizing fonts, colors, and layouts
- Enhancing user interaction with visual elements
- Incorporating customizability between white and dark theme mode.
- Adding dynamic features like animations and transitions
Applying MQL5 GUI Styling Features
MQL5 provides various functions and features to style the GUI of your trading application. These include options for customizing colors, fonts, and layouts to suit the needs of your users and the overall design aesthetic you want to achieve.
Styling the GUI in MQL5 involves using several key functions and techniques. We will write discuss the functions which allow us to change the properties of graphical objects, such as buttons, labels, and panels. With these, we can customize the background color, border style, font size, and other visual aspects to create a cohesive look and feel.
- Customizing Colors and Fonts
- Theme Management logic
- Adjusting New Buttons Layout
Customizing Colors and Fonts:
Font Array and Index:
We start by defining an availableFonts array and a currentFontIndex to manage font selections for the Admin Panel. The availableFonts array includes font names like "Arial," "Courier New," "Verdana," and "Times New Roman," giving users a range of options to customize the panel’s appearance. The currentFontIndex keeps track of the selected font by indexing into this array. This setup allows us to easily cycle through the fonts and apply them to the UI components whenever the user changes the font, making sure the user experience remains both dynamic and cohesive.
// Array of available fonts
string availableFonts[] = {"Arial", "Courier New", "Verdana", "Times New Roman"};
// Index of the current font in use
int currentFontIndex = 0;
Creating the Change Font Button:
Let’s create a button labeled "Font<>," which we position strategically within the Admin Panel. This button is not just any button; it’s a key feature for changing fonts. We ensure it fits well within the panel’s layout and handle any issues with its creation. By adding this button, we provide users with an intuitive way to cycle through different fonts, enhancing the panel’s usability and aesthetic flexibility. If there’s a hiccup in creating the button, we print an error message to keep track of any issues.// Create a button for changing the font CButton changeFontButton; changeFontButton.Create(panel, "ChangeFontButton", 0, 10, 10, 100, 30); changeFontButton.Text("Font<>"); // Verify button creation and handle errors if(!changeFontButton.IsCreated()) { Print("Error creating Font<> button."); }Handling Font Change Button Click:
When we implement the OnChangeFontButtonClick function, our goal is to manage the font-changing process smoothly. This function updates the currentFontIndex to select the next font in the availableFonts array, wrapping around to the beginning if needed. After updating the index, we apply the new font to all relevant UI components, such as the input box, clear button, and send button, ensuring a consistent look across the panel. To finalize the changes, we use ChartRedraw to refresh the display and print a confirmation message, letting users know the font change was successful.// Function to handle the font change button click void OnChangeFontButtonClick() { // Update the font index, wrapping around if necessary currentFontIndex = (currentFontIndex + 1) % ArraySize(availableFonts); string newFont = availableFonts[currentFontIndex]; // Apply the new font to UI components inputBox.Font(newFont); clearButton.Font(newFont); sendButton.Font(newFont); // Refresh the display to apply the changes ChartRedraw(); // Print confirmation of the font change Print("Font changed to ", newFont); }OnChartEvent to Handle Button Clicks:
In the OnChartEvent function, we handle user interactions with various chart objects, including our font change button. This function listens for button click events and checks which button was clicked by inspecting the sparam string. When the "ChangeFontButton" is clicked, we call the OnChangeFontButtonClick function to manage the font change. This event-driven approach keeps our UI responsive and interactive, ensuring that user actions trigger the right responses and maintain an engaging interface.// Function to handle chart events void OnChartEvent(const int id, const int sub_id, const int type, const int x, const int y, const int state) { // Handle button clicks if(type == CHARTEVENT_OBJECT_CLICK) { string buttonName = ObjectGetString(0, "ChangeFontButton", OBJPROP_TEXT); if(buttonName == "Font<>") { OnChangeFontButtonClick(); } } }

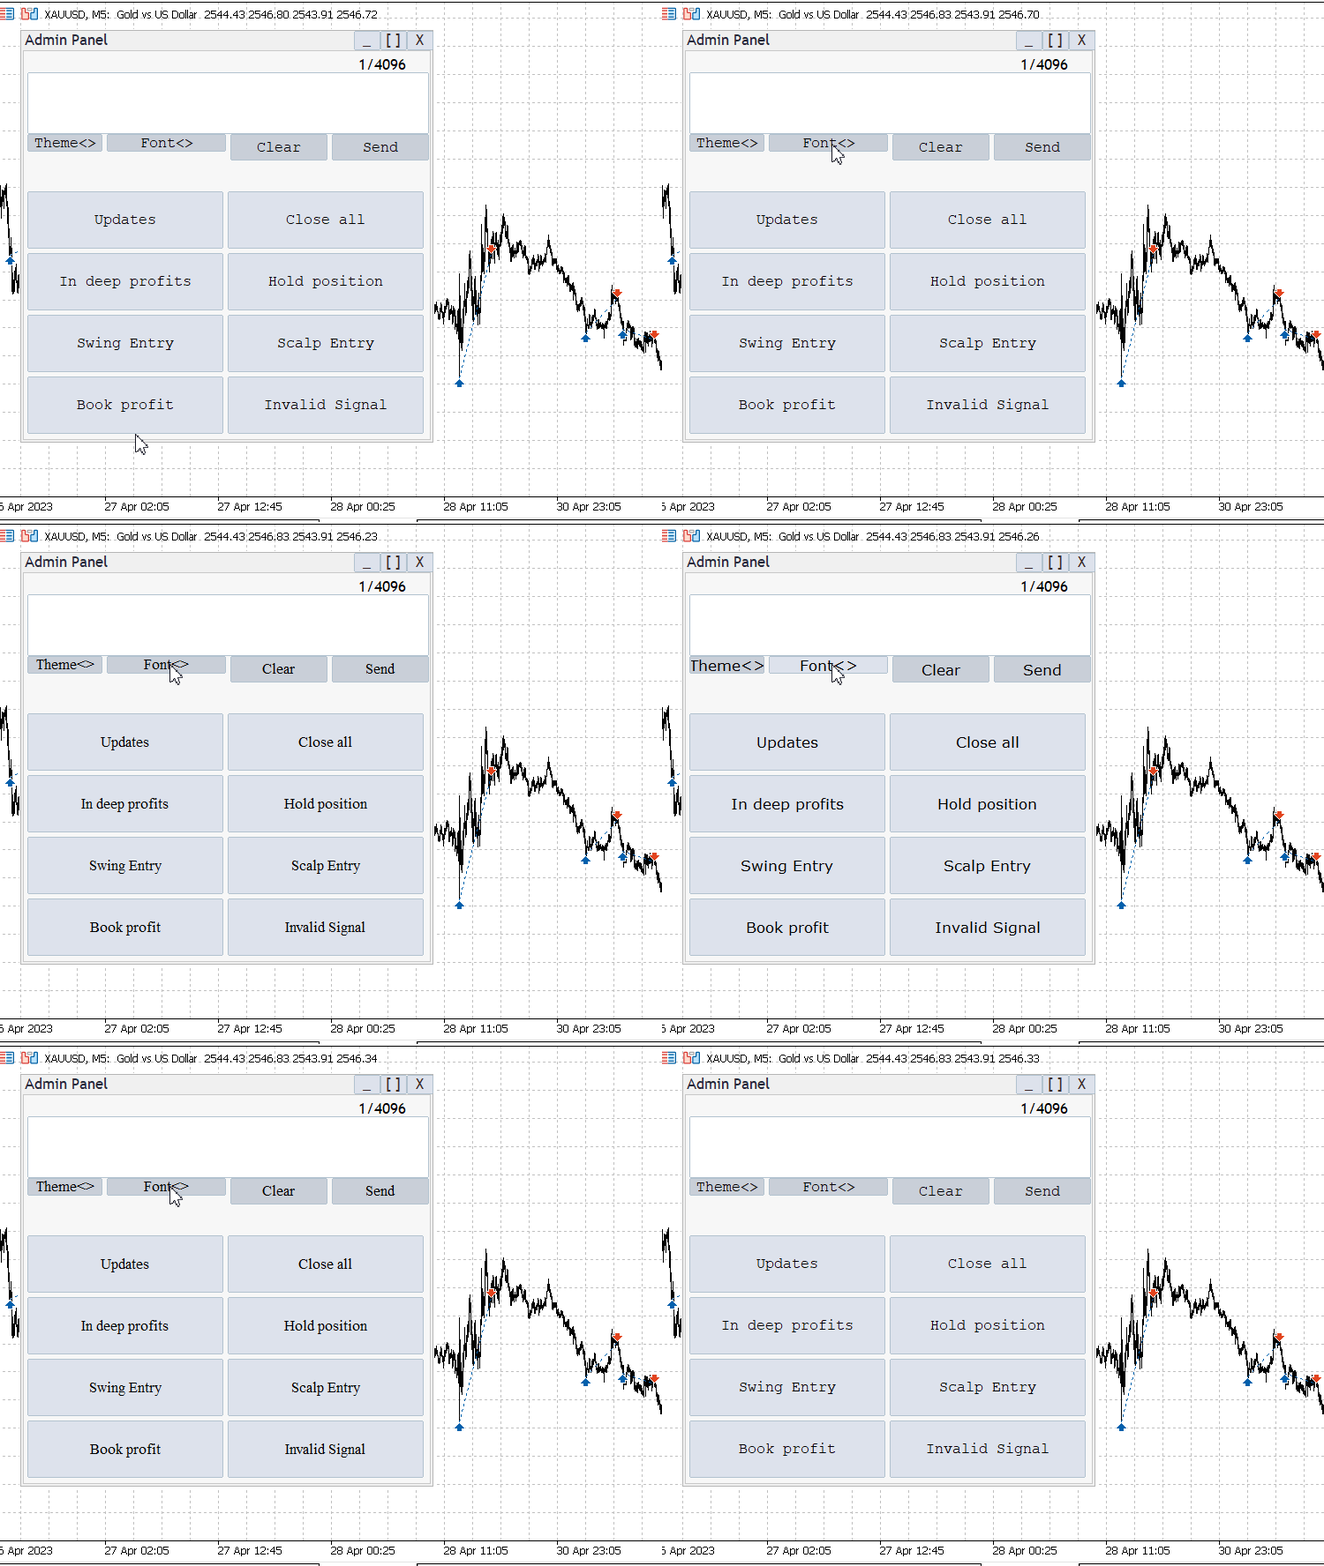
Font Switching working
Theme Management Logic:
Theme Switching Logic:
We start by setting up the theme management system with two distinct themes: light and dark. To manage the switch, we use a boolean variable, isDarkMode, that keeps track of which theme is currently active. The toggle is simple: when the user clicks the theme button, the isDarkMode value flips, changing the entire look and feel of the Admin Panel. By defining the colors for each theme separately, we streamline the process, making it easy to maintain and apply new styles whenever necessary.bool isDarkMode = false; // Tracks the current theme mode (light or dark) color lightBackgroundColor = clrWhite; // Background color for light mode color darkBackgroundColor = clrBlack; // Background color for dark mode color lightTextColor = clrBlack; // Text color for light mode color darkTextColor = clrWhite; // Text color for dark mode
Create the Theme Switch Button:
Let’s move on to creating a button labeled "Theme<>." This button is placed within the Admin Panel, and it provides users with an easy way to swap between light and dark modes. If something goes wrong during its creation, we make sure to handle the error with a printed message. This makes troubleshooting easier and ensures that the interface remains intuitive and responsive.//Creating the theme switch button if(!CreateButton("ToggleThemeButton", "Theme<>", 50, 220, 100, 30)) { Print("Error: Failed to create theme toggle button"); // Error handling if button creation fails }
Handle Theme Toggle Button Click:
Next, we handle the actual theme change by implementing the OnToggleModeButtonClick function. This function flips the isDarkMode variable, switching between the light and dark themes. Once we know which theme is active, we apply the corresponding background and text colors to all UI elements, such as the panel, buttons, and text. The theme change happens in real-time thanks to a quick refresh, making the interface feel smooth and responsive. We also print a confirmation message for users so they know when the mode has changed.//Theme switching handler void OnToggleModeButtonClick() { isDarkMode = !isDarkMode; // Toggle the theme mode if(isDarkMode) { ApplyTheme(darkBackgroundColor, darkTextColor); // Apply dark mode colors } else { ApplyTheme(lightBackgroundColor, lightTextColor); // Apply light mode colors } Print("Theme has been switched"); // Inform the user that the theme has changed }
OnChartEvent to Handle Theme Toggle Button Clicks:
In the OnChartEvent function, we detect when a user clicks the "Toggle Theme" button and trigger the OnToggleModeButtonClick function. This event-driven approach ensures that the panel instantly responds to user actions. By listening for button click events, we make sure the Admin Panel stays interactive and engaging, letting users easily switch between light and dark themes as needed.//The OneChartEvent for the theme void OnChartEvent(const int id, const long &lparam, const double &dparam, const string &sparam) { if(id == CHARTEVENT_OBJECT_CLICK) // Check if the event is a button click { if(sparam == "ToggleThemeButton") // Check if the clicked button is the theme toggle button { OnToggleModeButtonClick(); // Call the function to handle the theme change } } }
Applying Theme Without Recreating Objects:
One of our key design decisions is to update the theme without recreating any of the panel’s objects. Instead of tearing down and building new UI components, we simply apply the new color scheme to the existing elements. This keeps the system efficient, reducing lag and maintaining a smooth user experience. It also ensures that the panel remains responsive as we apply the new colors dynamically.//Applying theme void ApplyTheme(color backgroundColor, color textColor) { // Update background and text colors of existing objects ObjectSetInteger(0, "AdminPanelBackground", OBJPROP_COLOR, backgroundColor); // Change background color ObjectSetInteger(0, "ClearButton", OBJPROP_COLOR, textColor); // Change text color of clear button ObjectSetInteger(0, "SendButton", OBJPROP_COLOR, textColor); // Change text color of send button ObjectSetInteger(0, "InputBox", OBJPROP_COLOR, textColor); // Change text color of input box ChartRedraw(); // Redraw the chart to reflect the changes }
Adjusting New Buttons Layout.
Font Change button:
The Font Change button, we positioned it in the admin panel with its top-left corner at (95, 95) and its bottom-right corner at (230, 115). This places it to the left of the Send and Clear buttons. Its dimensions make it wide enough for the "Font<>" label and user-friendly interaction. The button allows users to cycle through different font options for all text elements within the panel.if (!changeFontButton.Create(chart_id, "ChangeFontButton", 0, 95, 95, 230, 115))
Theme Switch button:
As for the Theme Switch button, we placed it at coordinates (5, 95) for the top-left and (90, 115) for the bottom-right. This positions the button at the far-left side of the panel, slightly above the Font Change button, providing a clear separation. The compact size and proximity to other buttons make it easy for users to switch between dark and light themes without cluttering the interface.if (!toggleThemeButton.Create(chart_id, "ToggleThemeButton", 0, 5, 95, 90, 115))
Here's our full program with all the new features perfectly integrated.//+------------------------------------------------------------------+ //| Admin Panel.mq5 | //| Copyright 2024, Clemence Benjamin | //| https://www.mql5.com/en/users/billionaire2024/seller | //+------------------------------------------------------------------+ #property copyright "Copyright 2024, Clemence Benjamin" #property link "https://www.mql5.com/en/users/billionaire2024/seller" #property description "A responsive Admin Panel. Send messages to your telegram clients without leaving MT5" #property version "1.11" #include <Trade\Trade.mqh> #include <Controls\Dialog.mqh> #include <Controls\Button.mqh> #include <Controls\Edit.mqh> #include <Controls\Label.mqh> // Input parameters input string QuickMessage1 = "Updates"; input string QuickMessage2 = "Close all"; input string QuickMessage3 = "In deep profits"; input string QuickMessage4 = "Hold position"; input string QuickMessage5 = "Swing Entry"; input string QuickMessage6 = "Scalp Entry"; input string QuickMessage7 = "Book profit"; input string QuickMessage8 = "Invalid Signal"; input string InputChatId = "Enter Chat ID from Telegram bot API"; input string InputBotToken = "Enter BOT TOKEN from your Telegram bot"; // Global variables CDialog adminPanel; CButton sendButton, clearButton, changeFontButton, toggleThemeButton; CButton quickMessageButtons[8], minimizeButton, maximizeButton, closeButton; CEdit inputBox; CLabel charCounter; #define BG_RECT_NAME "BackgroundRect" bool minimized = false; bool darkTheme = false; int MAX_MESSAGE_LENGTH = 4096; string availableFonts[] = { "Arial", "Courier New", "Verdana", "Times New Roman" }; int currentFontIndex = 0; //+------------------------------------------------------------------+ //| Expert initialization function | //+------------------------------------------------------------------+ int OnInit() { // Initialize the Dialog if (!adminPanel.Create(ChartID(), "Admin Panel", 0, 30, 30, 500, 500)) { Print("Failed to create dialog"); return INIT_FAILED; } // Create controls if (!CreateControls()) { Print("Control creation failed"); return INIT_FAILED; } adminPanel.Show(); // Initialize with the default theme CreateOrUpdateBackground(ChartID(), darkTheme ? clrBlack : clrWhite); Print("Initialization complete"); return INIT_SUCCEEDED; } //+------------------------------------------------------------------+ //| Create necessary UI controls | //+------------------------------------------------------------------+ bool CreateControls() { long chart_id = ChartID(); // Create the input box if (!inputBox.Create(chart_id, "InputBox", 0, 5, 25, 460, 95)) { Print("Failed to create input box"); return false; } adminPanel.Add(inputBox); // Character counter if (!charCounter.Create(chart_id, "CharCounter", 0, 380, 5, 460, 25)) { Print("Failed to create character counter"); return false; } charCounter.Text("0/" + IntegerToString(MAX_MESSAGE_LENGTH)); adminPanel.Add(charCounter); // Clear button if (!clearButton.Create(chart_id, "ClearButton", 0, 235, 95, 345, 125)) { Print("Failed to create clear button"); return false; } clearButton.Text("Clear"); adminPanel.Add(clearButton); // Send button if (!sendButton.Create(chart_id, "SendButton", 0, 350, 95, 460, 125)) { Print("Failed to create send button"); return false; } sendButton.Text("Send"); adminPanel.Add(sendButton); // Change font button if (!changeFontButton.Create(chart_id, "ChangeFontButton", 0, 95, 95, 230, 115)) { Print("Failed to create change font button"); return false; } changeFontButton.Text("Font<>"); adminPanel.Add(changeFontButton); // Toggle theme button if (!toggleThemeButton.Create(chart_id, "ToggleThemeButton", 0, 5, 95, 90, 115)) { Print("Failed to create toggle theme button"); return false; } toggleThemeButton.Text("Theme<>"); adminPanel.Add(toggleThemeButton); // Minimize button if (!minimizeButton.Create(chart_id, "MinimizeButton", 0, 375, -22, 405, 0)) { Print("Failed to create minimize button"); return false; } minimizeButton.Text("_"); adminPanel.Add(minimizeButton); // Maximize button if (!maximizeButton.Create(chart_id, "MaximizeButton", 0, 405, -22, 435, 0)) { Print("Failed to create maximize button"); return false; } maximizeButton.Text("[ ]"); adminPanel.Add(maximizeButton); // Close button if (!closeButton.Create(chart_id, "CloseButton", 0, 435, -22, 465, 0)) { Print("Failed to create close button"); return false; } closeButton.Text("X"); adminPanel.Add(closeButton); // Quick messages return CreateQuickMessageButtons(); } //+------------------------------------------------------------------+ //| Create quick message buttons | //+------------------------------------------------------------------+ bool CreateQuickMessageButtons() { string quickMessages[8] = { QuickMessage1, QuickMessage2, QuickMessage3, QuickMessage4, QuickMessage5, QuickMessage6, QuickMessage7, QuickMessage8 }; int startX = 5, startY = 160, width = 222, height = 65, spacing = 5; for (int i = 0; i < 8; i++) { if (!quickMessageButtons[i].Create(ChartID(), "QuickMessageButton" + IntegerToString(i + 1), 0, startX + (i % 2) * (width + spacing), startY + (i / 2) * (height + spacing), startX + (i % 2) * (width + spacing) + width, startY + (i / 2) * (height + spacing) + height)) { Print("Failed to create quick message button ", i + 1); return false; } quickMessageButtons[i].Text(quickMessages[i]); adminPanel.Add(quickMessageButtons[i]); } return true; } //+------------------------------------------------------------------+ //| Expert deinitialization function | //+------------------------------------------------------------------+ void OnDeinit(const int reason) { adminPanel.Destroy(); ObjectDelete(ChartID(), BG_RECT_NAME); Print("Deinitialization complete"); } //+------------------------------------------------------------------+ //| Handle chart events | //+------------------------------------------------------------------+ void OnChartEvent(const int id, const long &lparam, const double &dparam, const string &sparam) { switch (id) { case CHARTEVENT_OBJECT_CLICK: if (sparam == "SendButton") OnSendButtonClick(); else if (sparam == "ClearButton") OnClearButtonClick(); else if (sparam == "ChangeFontButton") OnChangeFontButtonClick(); else if (sparam == "ToggleThemeButton") OnToggleThemeButtonClick(); else if (sparam == "MinimizeButton") OnMinimizeButtonClick(); else if (sparam == "MaximizeButton") OnMaximizeButtonClick(); else if (sparam == "CloseButton") OnCloseButtonClick(); else if (StringFind(sparam, "QuickMessageButton") != -1) { int index = StringToInteger(StringSubstr(sparam, 18)); OnQuickMessageButtonClick(index - 1); } break; case CHARTEVENT_OBJECT_ENDEDIT: if (sparam == "InputBox") OnInputChange(); break; } } //+------------------------------------------------------------------+ //| Handle custom message send button click | //+------------------------------------------------------------------+ void OnSendButtonClick() { string message = inputBox.Text(); if (message != "") { if (SendMessageToTelegram(message)) Print("Custom message sent: ", message); else Print("Failed to send custom message."); } else { Print("No message entered."); } } //+------------------------------------------------------------------+ //| Handle clear button click | //+------------------------------------------------------------------+ void OnClearButtonClick() { inputBox.Text(""); // Clear the text in the input box OnInputChange(); // Update the character counter Print("Input box cleared."); } //+------------------------------------------------------------------+ //| Handle quick message button click | //+------------------------------------------------------------------+ void OnQuickMessageButtonClick(int index) { string quickMessages[8] = { QuickMessage1, QuickMessage2, QuickMessage3, QuickMessage4, QuickMessage5, QuickMessage6, QuickMessage7, QuickMessage8 }; string message = quickMessages[index]; if (SendMessageToTelegram(message)) Print("Quick message sent: ", message); else Print("Failed to send quick message."); } //+------------------------------------------------------------------+ //| Update character counter | //+------------------------------------------------------------------+ void OnInputChange() { int currentLength = StringLen(inputBox.Text()); charCounter.Text(IntegerToString(currentLength) + "/" + IntegerToString(MAX_MESSAGE_LENGTH)); ChartRedraw(); } //+------------------------------------------------------------------+ //| Handle toggle theme button click | //+------------------------------------------------------------------+ void OnToggleThemeButtonClick() { darkTheme = !darkTheme; color bgColor = darkTheme ? clrBlack : clrWhite; color textColor = darkTheme ? clrWhite : clrBlack; // Set text color appropriate to the theme inputBox.Color(textColor); clearButton.Color(textColor); sendButton.Color(textColor); toggleThemeButton.Color(textColor); changeFontButton.Color(textColor); for(int i = 0; i < ArraySize(quickMessageButtons); i++) { quickMessageButtons[i].Color(textColor); } charCounter.Color(textColor); CreateOrUpdateBackground(ChartID(), bgColor); ChartRedraw(); } //+------------------------------------------------------------------+ //| Create and update background rectangle | //+------------------------------------------------------------------+ void CreateOrUpdateBackground(long chart_id, color bgColor) { if (!ObjectFind(chart_id, BG_RECT_NAME)) { if (!ObjectCreate(chart_id, BG_RECT_NAME, OBJ_RECTANGLE, 0, 0, 0)) Print("Failed to create background rectangle"); } ObjectSetInteger(chart_id, BG_RECT_NAME, OBJPROP_COLOR, bgColor); ObjectSetInteger(chart_id, BG_RECT_NAME, OBJPROP_BACK, true); ObjectSetInteger(chart_id, BG_RECT_NAME, OBJPROP_SELECTABLE, false); ObjectSetInteger(chart_id, BG_RECT_NAME, OBJPROP_SELECTED, false); ObjectSetInteger(chart_id, BG_RECT_NAME, OBJPROP_HIDDEN, false); ObjectSetInteger(chart_id, BG_RECT_NAME, OBJPROP_CORNER, CORNER_LEFT_UPPER); ObjectSetInteger(chart_id, BG_RECT_NAME, OBJPROP_XOFFSET, 25); ObjectSetInteger(chart_id, BG_RECT_NAME, OBJPROP_YOFFSET, 25); } //+------------------------------------------------------------------+ //| Handle change font button click | //+------------------------------------------------------------------+ void OnChangeFontButtonClick() { currentFontIndex = (currentFontIndex + 1) % ArraySize(availableFonts); inputBox.Font(availableFonts[currentFontIndex]); clearButton.Font(availableFonts[currentFontIndex]); sendButton.Font(availableFonts[currentFontIndex]); toggleThemeButton.Font(availableFonts[currentFontIndex]); changeFontButton.Font(availableFonts[currentFontIndex]); for(int i = 0; i < ArraySize(quickMessageButtons); i++) { quickMessageButtons[i].Font(availableFonts[currentFontIndex]); } Print("Font changed to: ", availableFonts[currentFontIndex]); ChartRedraw(); } //+------------------------------------------------------------------+ //| Handle minimize button click | //+------------------------------------------------------------------+ void OnMinimizeButtonClick() { minimized = true; adminPanel.Hide(); minimizeButton.Hide(); maximizeButton.Show(); closeButton.Show(); Print("Panel minimized."); } //+------------------------------------------------------------------+ //| Handle maximize button click | //+------------------------------------------------------------------+ void OnMaximizeButtonClick() { if (minimized) { adminPanel.Show(); minimizeButton.Show(); maximizeButton.Hide(); closeButton.Hide(); Print("Panel maximized."); } } //+------------------------------------------------------------------+ //| Handle close button click | //+------------------------------------------------------------------+ void OnCloseButtonClick() { ExpertRemove(); // Completely remove the EA Print("Admin Panel closed."); } //+------------------------------------------------------------------+ //| Send the message to Telegram | //+------------------------------------------------------------------+ bool SendMessageToTelegram(string message) { string url = "https://api.telegram.org/bot" + InputBotToken + "/sendMessage"; string jsonMessage = "{\"chat_id\":\"" + InputChatId + "\", \"text\":\"" + message + "\"}"; char post_data[]; ArrayResize(post_data, StringToCharArray(jsonMessage, post_data, 0, WHOLE_ARRAY) - 1); int timeout = 5000; char result[]; string responseHeaders; int res = WebRequest("POST", url, "Content-Type: application/json\r\n", timeout, post_data, result, responseHeaders); if (res == 200) // HTTP 200 OK { Print("Message sent successfully: ", message); return true; } else { Print("Failed to send message. HTTP code: ", res, " Error code: ", GetLastError()); Print("Response: ", CharArrayToString(result)); return false; } }
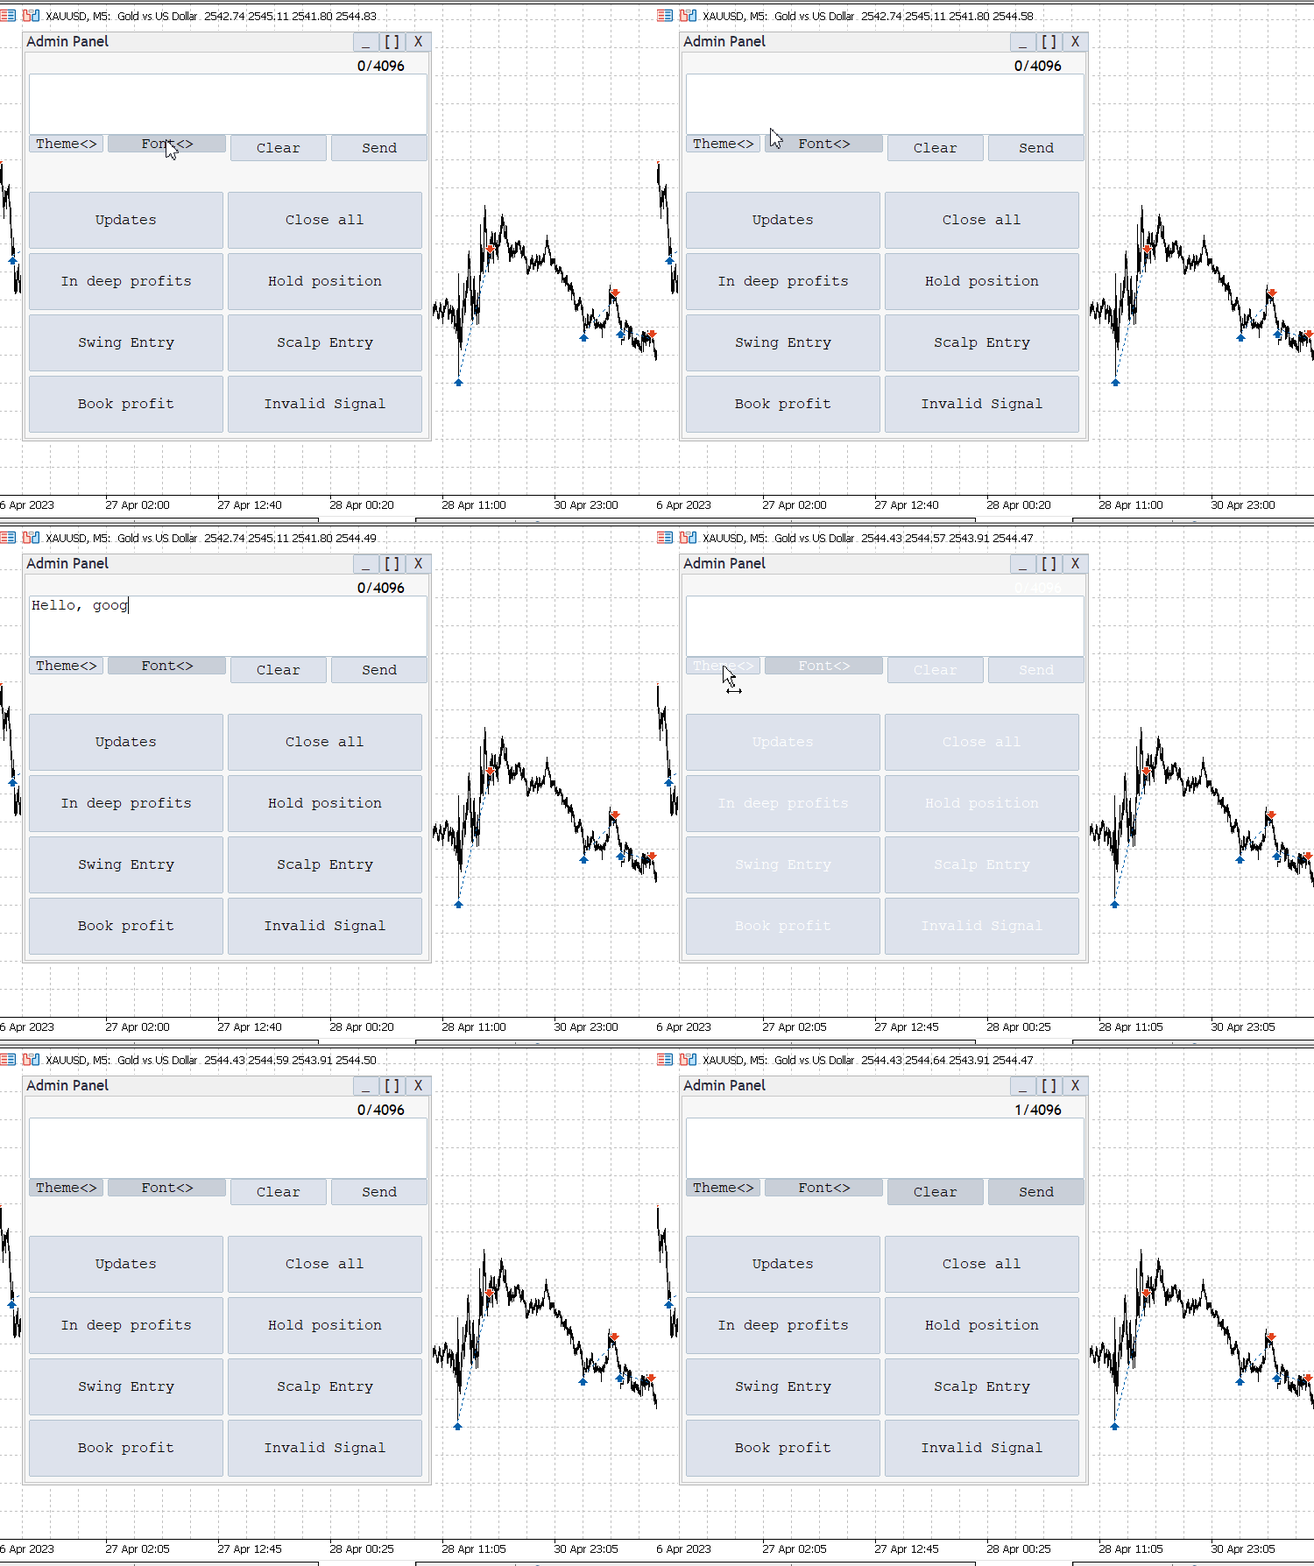
New Features Tested on XAUUSD
With these, foundational styling techniques in place, we can now explore more advanced customization options that can bring even greater interactivity and visual appeal to the GUI. From the above image, we can see that our theme is only working on foreground text, yet we want it to also affect the panel background. In the next segment, we will address ways to resolve this issue.
Advanced Enhancement of the GUI
Extending the Dialog Class for Theme Management:
To extend the Dialog for theme management, we can customize the existing dialog class to support dynamic theme changes, similar to how we manage themes in the Admin Panel. This would involve modifying or subclassing the CDialog class to include properties for background and text colors, as well as methods for applying different themes (light or dark). By overriding the constructor or adding methods like ApplyTheme, we can ensure that dialog boxes created using this class respond to theme changes without recreating the dialog objects.

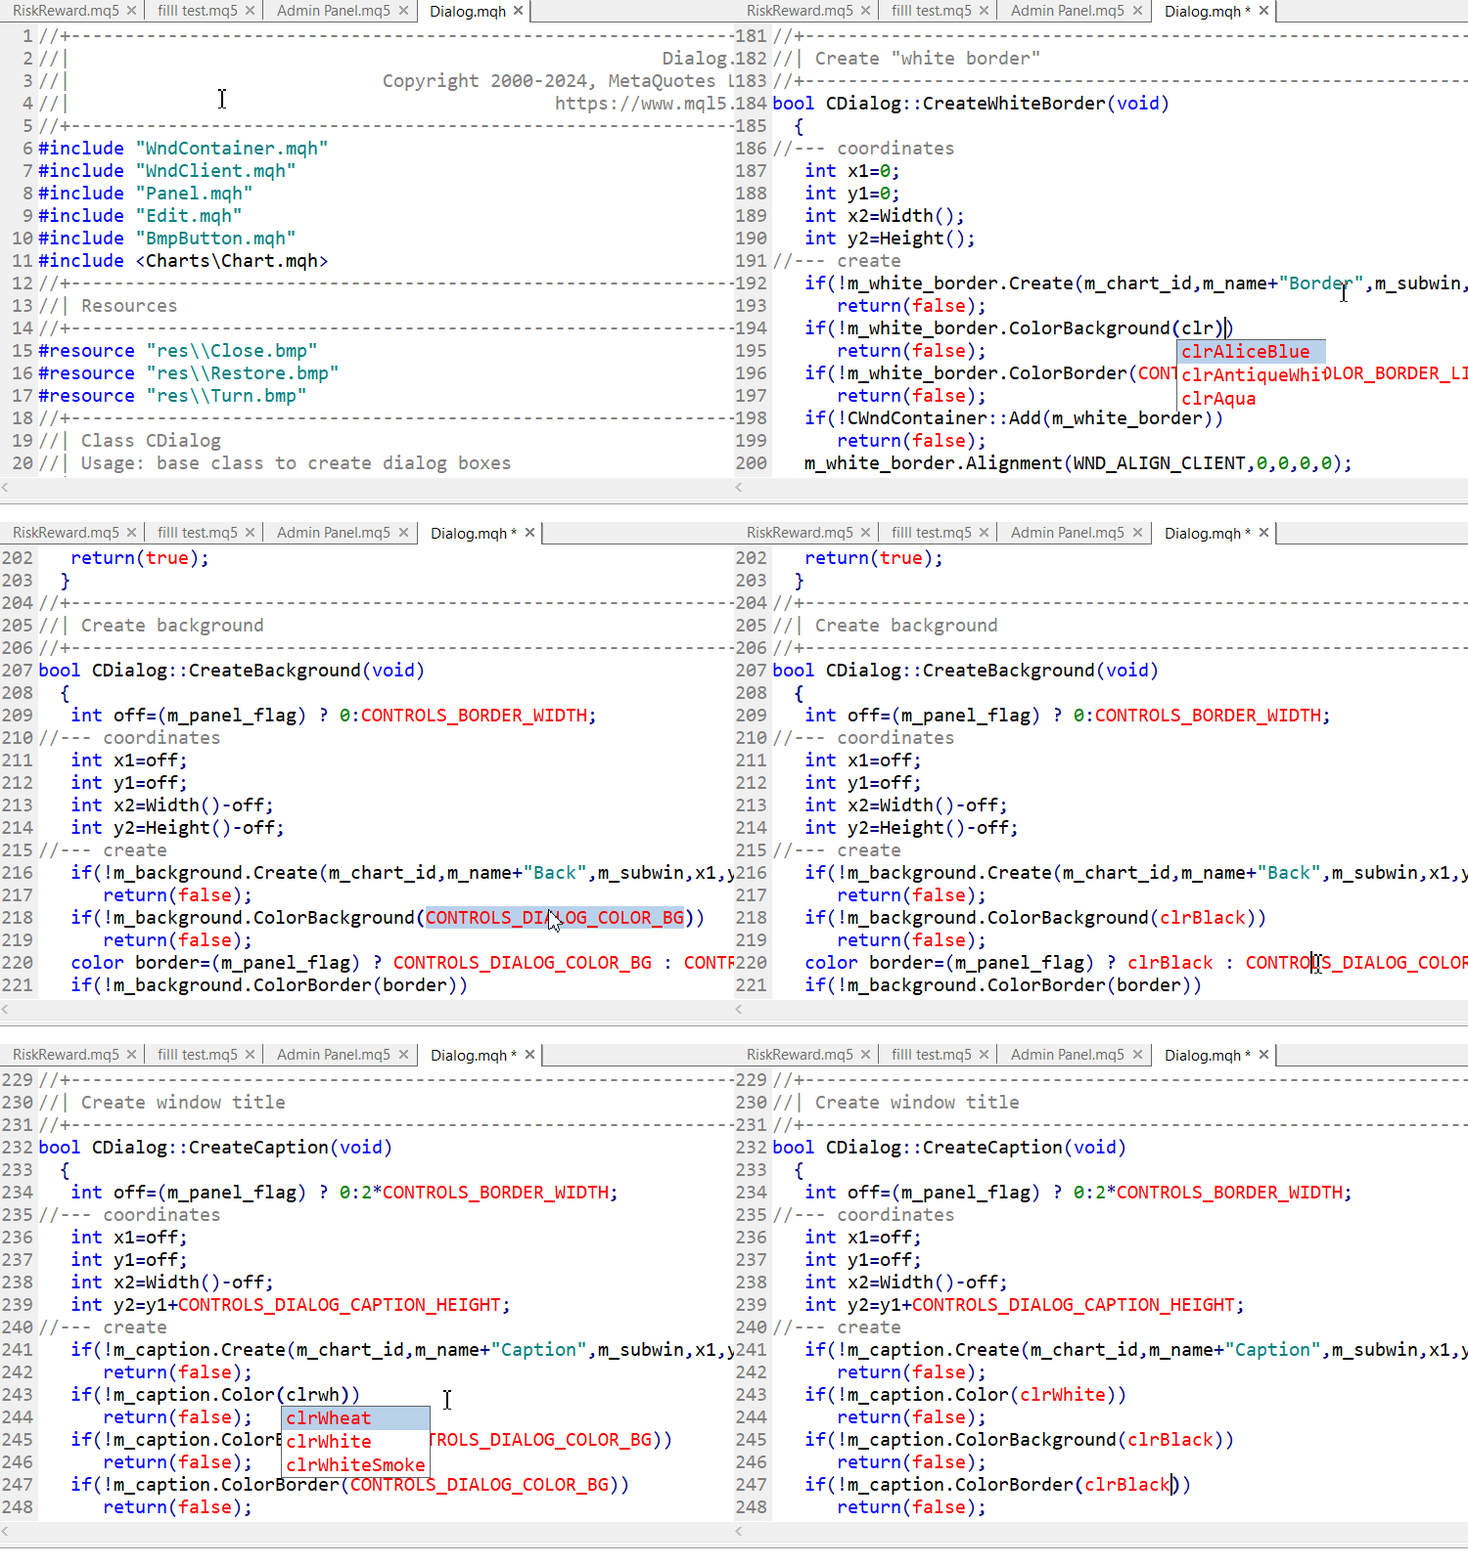
Customizing the colors on Dialog class
Why is it important?
Extending the Dialog class for theme management allows for a more seamless and cohesive user experience across all UI elements, not just the Admin Panel. It ensures that all parts of the application—including dialog boxes—adhere to the chosen theme, enhancing both usability and visual consistency. This feature becomes particularly important in trading applications where users may spend extended periods interacting with the interface, and customizable themes can reduce eye strain and improve overall user satisfaction.
Admin Panel: Background theme after modifying the Dialog class
Other options:
While extending Dialog class is a direct and flexible approach, another option is to apply theme management at a higher level. For example, we could create a global theme management system that automatically updates the properties of all UI elements, including dialogs, without requiring changes to individual components. Additionally, leveraging external libraries or designing a custom dialog framework might offer more granular control over UI elements if specific styling needs arise.
CEdit Class
According to research on Google, the maximum length of a Telegram message is 4096 characters and it must be UTF-8 encoded. When trying to implement the value in this project, we were limited to a maximum of 63 characters and the problem must be within the limitation of the CEdit class that we will address in the next article.
Conclusion
In conclusion, our implementation of font and theme management in the Admin Panel program demonstrated promising results. While we faced limitations with the static background of the dialog class, the text foreground successfully adapted to theme changes, providing an improved user experience. The dynamic font management also worked well, allowing users to switch between different fonts with ease.Moving forward, our next endeavor will be to extend the dialog class to fully support theme changes, including dynamic background updates. This enhancement aims to overcome the current limitations and provide a more cohesive and visually appealing interface. Stay tuned as we tackle these challenges in our upcoming articles!
Give these styling techniques a try on your own trading panels, and explore additional customization options in MQL5. I’d love to hear about your experiences and insights, so feel free to share them in the comments below as we dive into more advanced GUI design challenges. The source file for this project is attached—feel free to review it.
 Features of Custom Indicators Creation
 Developing a multi-currency Expert Advisor (Part 10): Creating objects from a string
 Features of Experts Advisors
 How to Implement Auto Optimization in MQL5 Expert Advisors
- Free trading apps
- Over 8,000 signals for copying
- Economic news for exploring financial markets
You agree to website policy and terms of use
