
Improve Your Trading Charts With Interactive GUI's in MQL5 (Part III): Simple Movable Trading GUI
Introduction
Hello and welcome back to part 3 of our series "Improve Your Trading Charts With Interactive GUI's in MQL5".
Before we venture into new territory, let's quickly recap what we've covered in Parts I and II:
1. In Part I, we started by understanding the concept of chart events, and from there, we created two simple movable dashboards on the same chart.
2. For Part II, we took a step further. We utilized classes within a .mqh file to make our code more efficient and versatile, ready for integration with full-scale EAs/Indicators.
And now, we are ready for Part III! In this part, we're going to focus on enhancing our dashboards by integrating GUIs into them. Because without GUIs, dashboards won't serve their intended purpose.
Here's a quick overview of what we'll tackle in this article:
- What are we creating?
- Creating a simple trading static dashboard
- Discussing the Approach to make our static dashboard move with all elements inside it
- Using discussed approach to make our static dashboard movable
- Conclusion
What are we creating?
We aim to create a Movable Dashboard with a GUI, and for that, we need to decide what we will be creating. I've chosen a simple EA, specifically, the Simple Trading EA, as our basis.
First, we need to construct this static dashboard i.e., the Simple Trading EA. It's crucial to do this efficiently since we're creating a full-fledged EA. By efficiency, I mean that we cannot merely open a file and write all the code there. Instead, we need a well-considered plan that allows us to write the bare minimum code across several well-organized .mqh files. Most importantly, we must avoid duplicating the same code repeatedly to create the required static GUIs for our movable dashboard.
Here is the basic static dashboard that we will be creating for our purpose:
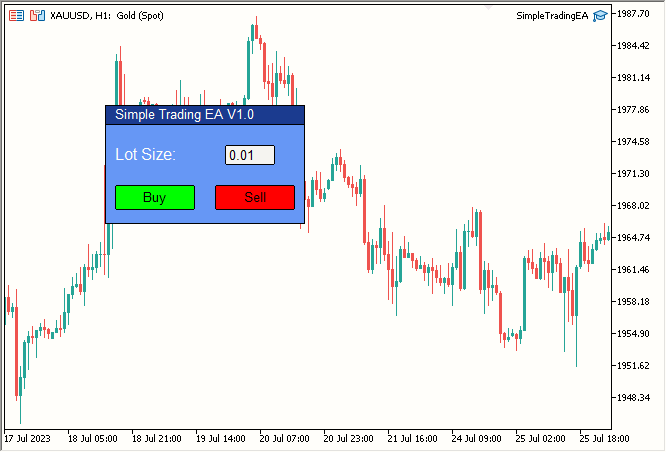
Fig 1. Simple Static Dashboard
It comprises:
| Element | Description |
|---|---|
| Label 1 | Title Text (Simple Trading EA V1.0) |
| Label 2 | Lot Size |
| Edit 1 | The white-colored edit box you see in the image above, with 0.01 written inside it. |
| Button 1 | The green-colored Buy button. |
| Button 2 | The red-colored Sell button. |
| Rectangle Label 1 | Title bar, the dark blue-colored bar on which "Simple Trading EA V1.0" is written. |
| Rectangle Label 2 | Main dashboard area, the light blue-colored dashboard. |
So, our dashboard consists of these seven components combined. If you ask me, I'd say that's a pretty good-looking dashboard we've created just by combining these seven elements.
Now, let's start coding this dashboard.
Creating a simple trading static dashboard
What classes are we going to write? Let's think...
We will need 2 Labels, 2 Buttons, 1 Edit, and 2 Rectangle Labels. So, let's create 4 .mqh files, one for each of these. Here's our project's folder structure:
- Simple Trading EA/
- SimpleTradingEA.mq5
- Button.mqh
- Label.mqh
- Edit.mqh
- RectangleLabel.mqh
These are the files in which we will be writing our code. Now, let's create our first file, "SimpleTradingEA.mq5", which is our main EA file.
I have removed the OnTick() function as we won't be needing it for this project. Here's what the file looks like at the moment:
//+------------------------------------------------------------------+
//| Expert initialization function                                   |
//+------------------------------------------------------------------+
int OnInit()
   {
    return(INIT_SUCCEEDED);
   }

//+------------------------------------------------------------------+
//| Expert deinitialization function                                 |
//+------------------------------------------------------------------+
void OnDeinit(const int reason)
   {
   }
//+------------------------------------------------------------------+
Let's create a plan now. We will construct our static dashboard in the following order:
- Title bar
- Main Dashboard Body
- Title Text
- "Lot Size:" Text
- Edit Box
- Buy and Sell Button
- Add any necessary finishing touches
This seems like a reasonable sequence to follow. Let's Start,
- Title bar
To create the Title bar, we need to use the Rectangle Label Object. So, let's create a class that will handle everything related to the Rectangle Label Object. We will be creating an .mqh file; let's name it "RectangleLabel.mqh" to keep things simple, and let's name the class "RectangleLabel," again to keep things simple.
Here's the empty class we created:
//+------------------------------------------------------------------+
//| Class Definition: RectangleLabel                                 |
//+------------------------------------------------------------------+
class RectangleLabel
   {
public:
                     RectangleLabel(void);
                    ~RectangleLabel(void);
   };

//+------------------------------------------------------------------+
//| Constructor: RectangleLabel                                      |
//+------------------------------------------------------------------+
RectangleLabel::RectangleLabel(void)
   {
   }

//+------------------------------------------------------------------+
//| Destructor: RectangleLabel                                       |
//+------------------------------------------------------------------+
RectangleLabel::~RectangleLabel(void)
   {
   }
//+------------------------------------------------------------------+
We will be needing some functions, let's see
- Create -> To create the rectangle label
- Destroy -> To destroy the dashboard
- SetBorderType -> To set border type
- SetBGColor -> To set background color
Let's declare the above functions in member function list. Now our class looks like this:
//+------------------------------------------------------------------+
//| Class Definition: RectangleLabel                                 |
//+------------------------------------------------------------------+
class RectangleLabel
   {
public:
                     RectangleLabel(void); // Constructor
                    ~RectangleLabel(void); // Destructor
    void             Create(string name, int xDis, int yDis, int xSize, int ySize); //Creates a Rectangle Label with the given parameters
    void             Destroy(); // Destroys the Rectangle Label
    void             SetBorderType(ENUM_BORDER_TYPE borderType); // Sets the border type of the Rectangle Label
    void             SetBGColor(color col); // Sets the background color of the Rectangle Label
   };
//+------------------------------------------------------------------+
Let's write down a basic create function:
//+------------------------------------------------------------------+
//| RectangleLabel Class - Create Method                             |
//+------------------------------------------------------------------+
void RectangleLabel::Create(string name, int xDis, int yDis, int xSize, int ySize)
   {
    ObjectCreate(0, name, OBJ_RECTANGLE_LABEL, 0, 0, 0); // Create the Rectangle Label object
    ObjectSetInteger(0, name, OBJPROP_XDISTANCE, xDis); // Set the X-axis distance
    ObjectSetInteger(0, name, OBJPROP_YDISTANCE, yDis); // Set the Y-axis distance
    ObjectSetInteger(0, name, OBJPROP_XSIZE, xSize); // Set the X size
    ObjectSetInteger(0, name, OBJPROP_YSIZE, ySize); // Set the Y size
   }
//+------------------------------------------------------------------+
Let's create Destroy, SetBorderType and SetBGColor in the same line as they only require one line. Here's our updated class:
//+------------------------------------------------------------------+
//| Class Definition for the Rectangle Label                         |
//+------------------------------------------------------------------+
class RectangleLabel
   {
private:
    string           _name; // Name of the rectangle label
public:
                     RectangleLabel(void); // Constructor
                    ~RectangleLabel(void); // Destructor

    void             Create(string name, int xDis, int yDis, int xSize, int ySize); // Method to create a rectangle label with given dimensions

    void             Destroy() {ObjectDelete(0, _name);} // Method to delete the object using the object's name

    void             SetBorderType(ENUM_BORDER_TYPE borderType) {ObjectSetInteger(0, _name, OBJPROP_BORDER_TYPE, borderType);} // Method to set the border type for the rectangle label

    void             SetBGColor(color col) {ObjectSetInteger(0, _name, OBJPROP_BGCOLOR, col);} // Method to set the background color for the rectangle label
   };
//+------------------------------------------------------------------+
Also we added a private variable named "_name" as ObjectDelete requires a name and we set "_name" in Create function, It now looks like:
//+------------------------------------------------------------------+
//| Rectangle Label Creation Method                                  |
//+------------------------------------------------------------------+
void RectangleLabel::Create(string name, int xDis, int yDis, int xSize, int ySize)
   {
    ObjectCreate(0, name, OBJ_RECTANGLE_LABEL, 0, 0, 0); // Create rectangle label object
    ObjectSetInteger(0, name, OBJPROP_XDISTANCE, xDis); // Set X distance
    ObjectSetInteger(0, name, OBJPROP_YDISTANCE, yDis); // Set Y distance
    ObjectSetInteger(0, name, OBJPROP_XSIZE, xSize); // Set X size
    ObjectSetInteger(0, name, OBJPROP_YSIZE, ySize); // Set Y size
    _name = name; // Assign the name to the member variable
   }
//+------------------------------------------------------------------+
we simply added "_name = name;" in the last line to set the _name variable to the name of the rectangle label when it was created.
If you are wandering where is the code that will make it movable, we are ignoring that aspect at the moment to keep things simple until we create a simple static dashboard.
Now Let's use this class in main file i.e. SimpleTradingEA.mq5 to see the result:
We first included the RectangleLabel.mqh file using "#include" and created a instance of the class named TitleBar as we are creating Title bar of the dashboard with this instance of the RectangleLabel class, We will be using it again for the Main Dashboard Body.Then we used this instance to create a Rectangle Label on the chart at (100,100) coordinate with dimensions of 200x20. Then we set its border to Flat (BORDER_FLAT) as that looks better according to me; you may change it according to your preference. Then we use the ChartRedraw(0) function to redraw the chart; that way, the dashboard will be created on the chart immediately. Otherwise, it may wait for the next price update, i.e., tick.
That was all in OnInit(), i.e., execute only once to create and show the dashboard on the chart.
Finally, we destroy the dashboard using our created Destroy() function in OnDeinit(), i.e., when the EA is removed from the chart.
Result:
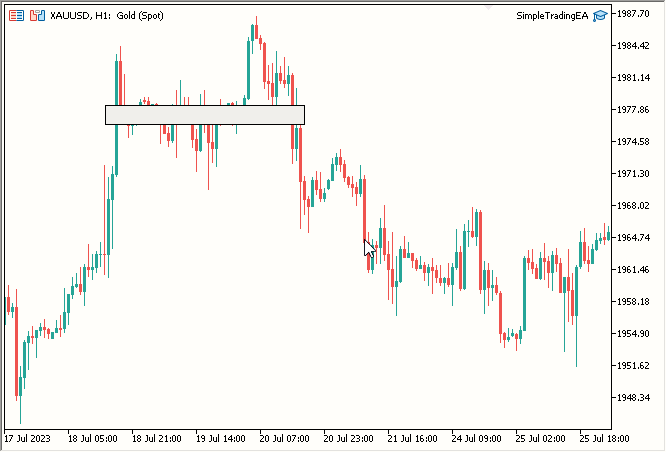
Fig 2. Title bar
- Main Dashboard Body
Let's again use the RectangleLabel class to create the main body. It's simple; we just need to create another instance; let's name it "MainDashboardBody" and add the below simple code in OnInit() after we create the title bar and then finally add MainDashboardBody.Destroy() in OnDeinit():
// Creating a rectangle label called "MainDashboardBody" with specific dimensions
MainDashboardBody.Create("MainDashboardBody", 100, 119, 200, 100);
// Setting the border type of the "MainDashboardBody" rectangle label to be flat
MainDashboardBody.SetBorderType(BORDER_FLAT);
After the our code looks like this:
#include "RectangleLabel.mqh" // Including the RectangleLabel class definition
RectangleLabel TitleBar; // Declaration of a TitleBar object
RectangleLabel MainDashboardBody; // Declaration of a MainDashboardBody object

//+------------------------------------------------------------------+
//| Expert initialization function                                   |
//+------------------------------------------------------------------+
int OnInit()
   {
    TitleBar.Create("TitleBar", 100, 100, 200, 20); // Creating the TitleBar with specified dimensions
    TitleBar.SetBorderType(BORDER_FLAT); // Setting the border type of TitleBar to be flat

    MainDashboardBody.Create("MainDashboardBody", 100, 119, 200, 100); // Creating the MainDashboardBody with specified dimensions
    MainDashboardBody.SetBorderType(BORDER_FLAT); // Setting the border type of MainDashboardBody to be flat

    ChartRedraw(0); // Redrawing the chart to reflect changes
    return(INIT_SUCCEEDED); // Indicating successful initialization
   }

//+------------------------------------------------------------------+
//| Expert deinitialization function                                 |
//+------------------------------------------------------------------+
void OnDeinit(const int reason)
   {
    MainDashboardBody.Destroy(); // Destroying the MainDashboardBody object
    TitleBar.Destroy(); // Destroying the TitleBar object
   }
//+------------------------------------------------------------------+
With that our result looks quite good:
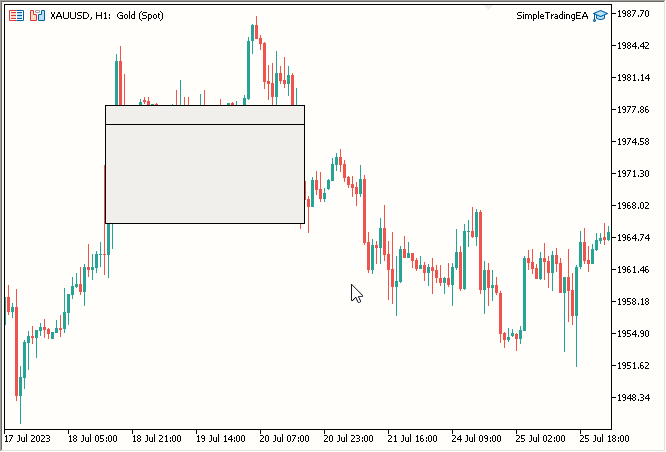
Fig 3. Added Main Dashboard Body
- Title Text
To add title text, we need to create a class similar to RectangleLabel but specifically for labels, allowing us to add text. Here's the code for a new class named Label :
//+------------------------------------------------------------------+
//| Label class definition                                           |
//+------------------------------------------------------------------+
class Label
   {
private:
    string           _name; // Name of the label
public:
                     Label(void); // Constructor
                    ~Label(void); // Destructor

    void             Create(string name, int xDis, int yDis); // Method to create a label
    void             Destroy() {ObjectDelete(0, _name);} // Method to destroy a label
    void             SetTextColor(color col) {ObjectSetInteger(0, _name, OBJPROP_COLOR, col);} // Method to set the text color
    void             SetText(string text) {ObjectSetString(0, _name, OBJPROP_TEXT, text);} // Method to set the text content
    string           GetText() {return ObjectGetString(0, _name, OBJPROP_TEXT);} // Method to retrieve the text content
    void             SetFontSize(int fontSize) {ObjectSetInteger(0, _name, OBJPROP_FONTSIZE, fontSize);} // Method to set the font size
    void             SetFont(string fontName) {ObjectSetString(0, _name, OBJPROP_FONT, fontName);} // Method to set the font name
   };

//+------------------------------------------------------------------+
//| Constructor                                                      |
//+------------------------------------------------------------------+
Label::Label(void)
   {

   }

//+------------------------------------------------------------------+
//| Destructor                                                       |
//+------------------------------------------------------------------+
Label::~Label(void)
   {

   }

//+------------------------------------------------------------------+
//| Method to create a label object                                  |
//+------------------------------------------------------------------+
void Label::Create(string name, int xDis, int yDis)
   {
    // Code to create label object, set its position, and assign its name
    ObjectCreate(0, name, OBJ_LABEL, 0, 0, 0);
    ObjectSetInteger(0, name, OBJPROP_XDISTANCE, xDis);
    ObjectSetInteger(0, name, OBJPROP_YDISTANCE, yDis);
    _name = name;
   }
//+------------------------------------------------------------------+
- Created class named Label in a new .mqh file named Label.mqh
- Decalred a private variable named _name to store name privately
- Created a function named Create with 3 requried parameters: name, xDis, yDis. Size is irrelevant for a Label object, To change Text Size we change Font Size
- Craete a function named Destroy to destroy the Label
- Created a function SetTextColor to set Text Color
- Created a function to Set Text of the Label Object
- Create a function GetText to get the text of the Label object which of course returns string
- Created a function to SetFontSize to of course set Font Size
- Created a function to set Font to set Font, requires name of the Font in string and of course font should be available/installed in the Operating System
That is it for the Label. Now Let's use it to create a label object on chart, No actually 2 label objects on the chart.
Now Our SimpleTradingEA.mq5 looks like:
#include "RectangleLabel.mqh" // Including the RectangleLabel class definition
RectangleLabel TitleBar; // Declaration of a TitleBar object
RectangleLabel MainDashboardBody; // Declaration of a MainDashboardBody object

#include "Label.mqh" // Including the Label class definition
Label TitleText; // Declaration of a Label object

//+------------------------------------------------------------------+
//| Expert initialization function                                   |
//+------------------------------------------------------------------+
int OnInit()
   {
    TitleBar.Create("TitleBar", 100, 100, 200, 20); // Creating the TitleBar with specified dimensions
    TitleBar.SetBorderType(BORDER_FLAT); // Setting the border type of TitleBar to be flat

    MainDashboardBody.Create("MainDashboardBody", 100, 119, 200, 100); // Creating the MainDashboardBody with specified dimensions
    MainDashboardBody.SetBorderType(BORDER_FLAT); // Setting the border type of MainDashboardBody to be flat

    TitleText.Create("TitleText", 110, 101); // Creating the TitleText at (110,101)
    TitleText.SetText("Simple Trading EA V1.0"); // Setting its text to "Simple Trading EA V1.0"
    TitleText.SetFontSize(10); // Setting its font size to 10
    TitleText.SetTextColor(clrBlack); // Setting its text color to clrBlack

    ChartRedraw(0); // Redrawing the chart to reflect changes
    return(INIT_SUCCEEDED); // Indicating successful initialization
   }

//+------------------------------------------------------------------+
//| Expert deinitialization function                                 |
//+------------------------------------------------------------------+
void OnDeinit(const int reason)
   {
    MainDashboardBody.Destroy(); // Destroying the MainDashboardBody object
    TitleBar.Destroy(); // Destroying the TitleBar object
    TitleText.Destroy(); // Destroying the TitleText object
   }
//+------------------------------------------------------------------+
- Created Label instance named TitleText
- Used TitleText.Create function to create the TitleText
- Used TitleText.SetText to set TitleText to "Simple Trading EA V1.0"
- Used TitleText.SetFontSize to Set FontSize to 10
- Used TitleText.SetTextColor to set color to Black
- Used TitleText.Destroy to destroy the the TitleText object in OnDeinit
Result:
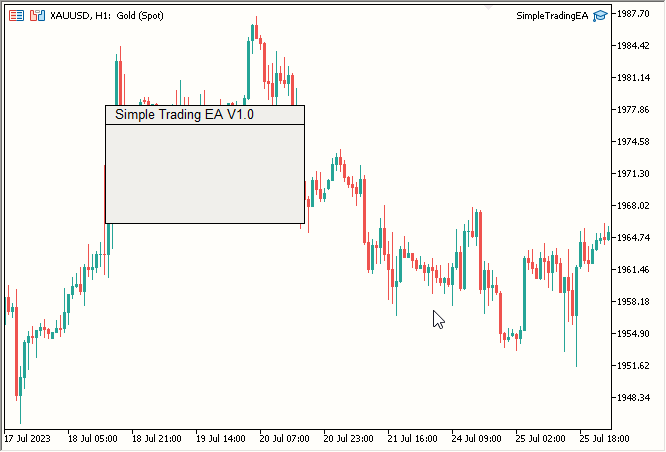
Fig 4. Added Title Text
- "Lot Size:" Text
For the "Lot Size:" text, you'll follow a process similar to the title text. The final code is as follows:
#include "RectangleLabel.mqh" // Including the RectangleLabel class definition
RectangleLabel TitleBar; // Declaration of a TitleBar object
RectangleLabel MainDashboardBody; // Declaration of a MainDashboardBody object

#include "Label.mqh" // Including the Label class definition
Label TitleText; // Declaration of a Label object
Label LotSizeText; // Declaration of a LotSizeText object

//+------------------------------------------------------------------+
//| Expert initialization function                                   |
//+------------------------------------------------------------------+
int OnInit()
   {
    TitleBar.Create("TitleBar", 100, 100, 200, 20); // Creating the TitleBar with specified dimensions
    TitleBar.SetBorderType(BORDER_FLAT); // Setting the border type of TitleBar to be flat

    MainDashboardBody.Create("MainDashboardBody", 100, 119, 200, 100); // Creating the MainDashboardBody with specified dimensions
    MainDashboardBody.SetBorderType(BORDER_FLAT); // Setting the border type of MainDashboardBody to be flat

    TitleText.Create("TitleText", 110, 101); // Creating the TitleText at (110,101)
    TitleText.SetText("Simple Trading EA V1.0"); // Setting its text to "Simple Trading EA V1.0"
    TitleText.SetFontSize(10); // Setting its font size to 10
    TitleText.SetTextColor(clrBlack); // Setting its text color to clrBlack

    LotSizeText.Create("LotSizeText", 110, 140); // Creating the LotSizeText at (110,140)
    LotSizeText.SetText("Lot Size:"); // Setting its text to "Lot Size:"
    LotSizeText.SetFontSize(12); // Setting its font size to 12
    LotSizeText.SetTextColor(clrBlack); // Setting its text color to clrBlack

    ChartRedraw(0); // Redrawing the chart to reflect changes
    return(INIT_SUCCEEDED); // Indicating successful initialization
   }

//+------------------------------------------------------------------+
//| Expert deinitialization function                                 |
//+------------------------------------------------------------------+
void OnDeinit(const int reason)
   {
    MainDashboardBody.Destroy(); // Destroying the MainDashboardBody object
    TitleBar.Destroy(); // Destroying the TitleBar object
    TitleText.Destroy(); // Destroying the TitleText object
    LotSizeText.Destroy(); // Destroying the LotSizeText object
   }
//+------------------------------------------------------------------+
- Created Label instance named LotSizeText
- Used LotSizeText.Create function to create the Lot Size Text
- Used LotSizeText.SetText to set text to "Lot Size:"
- Used LotSizeText.SetFontSize to Set FontSize to 12
- Used LotSizeText.SetTextColor to set color to Black
- Used LotSizeText.Destroy to destroy the the Label object in OnDeinit
- Edit Box
For the Edit Box, you'll create a class quite similar to the Label class. Here's the code for a new class named Edit :
//+------------------------------------------------------------------+
//| Edit class definition                                            |
//+------------------------------------------------------------------+
class Edit
   {
private:
    string           _name; // Name of the edit control
public:
                     Edit(void); // Constructor
                    ~Edit(void); // Destructor

    void             Create(string name, int xDis, int yDis, int xSize, int ySize); // Method to create an edit control
    void             Destroy() {ObjectDelete(0, _name);} // Method to destroy an edit control
    void             SetBorderColor(color col) {ObjectSetInteger(0, _name, OBJPROP_BORDER_COLOR, col);} // Method to set the border color
    void             SetBGColor(color col) {ObjectSetInteger(0, _name, OBJPROP_BGCOLOR, col);} // Method to set the background color
    void             SetTextColor(color col) {ObjectSetInteger(0, _name, OBJPROP_COLOR, col);} // Method to set the text color
    void             SetText(string text) {ObjectSetString(0, _name, OBJPROP_TEXT, text);} // Method to set the text content
    string           GetText() {return ObjectGetString(0, _name, OBJPROP_TEXT);} // Method to retrieve the text content
   };

//+------------------------------------------------------------------+
//| Constructor                                                      |
//+------------------------------------------------------------------+
Edit::Edit(void)
   {

   }

//+------------------------------------------------------------------+
//| Destructor                                                       |
//+------------------------------------------------------------------+
Edit::~Edit(void)
   {

   }

//+------------------------------------------------------------------+
//| Method to create an edit control object                          |
//+------------------------------------------------------------------+
void Edit::Create(string name, int xDis, int yDis, int xSize, int ySize)
   {
    // Code to create edit control object, set its position, size, and assign its name
    ObjectCreate(0, name, OBJ_EDIT, 0, 0, 0);
    ObjectSetInteger(0, name, OBJPROP_XDISTANCE, xDis);
    ObjectSetInteger(0, name, OBJPROP_YDISTANCE, yDis);
    ObjectSetInteger(0, name, OBJPROP_XSIZE, xSize);
    ObjectSetInteger(0, name, OBJPROP_YSIZE, ySize);
    _name = name;
   }
//+------------------------------------------------------------------+
- Created class named Edit in a new .mqh file named Edit.mqh
- Decalred a private variable named _name to store name privately
- Created a function named Create with 5 requried parameters: name, xDis, yDis, xSize, ySize
- Created a function named Destroy to destroy the Edit Object
- Created a function SetBorderColor to set Border Color
- Created a function SetBGColor to se Background color to WhiteSmoke
- Created a function SetTextColor to set the text color of the text inside the edit box
- Created a function SetText to set text
- Created a function GetText to get text
You can now use the Edit class in SimpleTradingEA, as shown below:
#include "RectangleLabel.mqh" // Including the RectangleLabel class definition
RectangleLabel TitleBar; // Declaration of a TitleBar object
RectangleLabel MainDashboardBody; // Declaration of a MainDashboardBody object

#include "Label.mqh" // Including the Label class definition
Label TitleText; // Declaration of a Label object
Label LotSizeText; // Declaration of a LotSizeText object

#include "Edit.mqh" // Including the Edit class definition
Edit LotSize; // Declaration of a LotSize object

//+------------------------------------------------------------------+
//| Expert initialization function                                   |
//+------------------------------------------------------------------+
int OnInit()
   {
    TitleBar.Create("TitleBar", 100, 100, 200, 20); // Creating the TitleBar with specified dimensions
    TitleBar.SetBorderType(BORDER_FLAT); // Setting the border type of TitleBar to be flat

    MainDashboardBody.Create("MainDashboardBody", 100, 119, 200, 100); // Creating the MainDashboardBody with specified dimensions
    MainDashboardBody.SetBorderType(BORDER_FLAT); // Setting the border type of MainDashboardBody to be flat

    TitleText.Create("TitleText", 110, 101); // Creating the TitleText at (110,101)
    TitleText.SetText("Simple Trading EA V1.0"); // Setting its text to "Simple Trading EA V1.0"
    TitleText.SetFontSize(10); // Setting its font size to 10
    TitleText.SetTextColor(clrBlack); // Setting its text color to clrBlack

    LotSizeText.Create("LotSizeText", 110, 140); // Creating the LotSizeText at (110,140)
    LotSizeText.SetText("Lot Size:"); // Setting its text to "Lot Size:"
    LotSizeText.SetFontSize(12); // Setting its font size to 12
    LotSizeText.SetTextColor(clrBlack); // Setting its text color to clrBlack

    LotSize.Create("LotSize", 220, 140, 50, 20); // Creating the LotSize with specified dimensions
    LotSize.SetBorderColor(clrBlack); // Setting its Border Color to clrBlack
    LotSize.SetBGColor(clrWhiteSmoke); // Setting its BG Color to clrWhiteSmoke
    LotSize.SetText("0.01"); // Setting its text to 0.01
    LotSize.SetTextColor(clrBlack); // Setting its text color to clrBlack

    ChartRedraw(0); // Redrawing the chart to reflect changes
    return(INIT_SUCCEEDED); // Indicating successful initialization
   }

//+------------------------------------------------------------------+
//| Expert deinitialization function                                 |
//+------------------------------------------------------------------+
void OnDeinit(const int reason)
   {
    MainDashboardBody.Destroy(); // Destroying the MainDashboardBody object
    TitleBar.Destroy(); // Destroying the TitleBar object
    TitleText.Destroy(); // Destroying the TitleText object
    LotSizeText.Destroy(); // Destroying the LotSizeText object
    LotSize.Destroy(); // Destroying the LotSize object
   }
//+------------------------------------------------------------------+
- Created Edit instance named LotSize
- Used LotSize.Create function to create the Edit Object
- Used LotSize.SetBorderColor to set border color to Black
- Used LotSize.SetBGColor to Set background color to WhiteSmoke
- Used LotSize.SetText to set text to 0.01 representing lot size
- Used LotSize.SetTextColor to set the text color inside the edit box to Black
- Used LotSize.Destroy to destroy the the Edit object in OnDeinit
- Buy and Sell Buttons
Finally, we come to the buttons. Let's create a class for buttons in a similar way as we did for others:
//+------------------------------------------------------------------+
//| Button class definition                                          |
//+------------------------------------------------------------------+
class Button
   {
private:
    string           _name; // Name of the button control

public:
                     Button(void); // Constructor
                    ~Button(void); // Destructor

    void             Create(string name, int xDis, int yDis, int xSize, int ySize); // Method to create a button control
    void             SetBorderColor(color col) {ObjectSetInteger(0, _name, OBJPROP_BORDER_COLOR, col);} // Method to set the border color
    void             SetBGColor(color col) {ObjectSetInteger(0, _name, OBJPROP_BGCOLOR, col);} // Method to set the background color
    void             SetText(string text) {ObjectSetString(0, _name, OBJPROP_TEXT, text);} // Method to set the text content
    void             Destroy() {ObjectDelete(0, _name);} // Method to destroy a button control
   };

//+------------------------------------------------------------------+
//| Constructor                                                      |
//+------------------------------------------------------------------+
Button::Button(void)
   {

   }

//+------------------------------------------------------------------+
//| Destructor                                                       |
//+------------------------------------------------------------------+
Button::~Button(void)
   {

   }

//+------------------------------------------------------------------+
//| Method to create a button control object                         |
//+------------------------------------------------------------------+
void Button::Create(string name, int xDis = 0, int yDis = 0, int xSize = 0, int ySize = 0)
   {
    // Code to create button control object, set its position, size, and assign its name
    ObjectCreate(0, name, OBJ_BUTTON, 0, 0, 0);
    ObjectSetInteger(0, name, OBJPROP_XDISTANCE, xDis);
    ObjectSetInteger(0, name, OBJPROP_YDISTANCE, yDis);
    ObjectSetInteger(0, name, OBJPROP_XSIZE, xSize);
    ObjectSetInteger(0, name, OBJPROP_YSIZE, ySize);
    _name = name;
   }
//+------------------------------------------------------------------+
In a new .mqh file named Button.mqh , we have created a class named Button . We've declared a private variable named _name to store the name privately. We have also created the following functions:
- A function named Create with 5 required parameters: name, xDis, yDis, xSize, ySize.
- A function named Destroy to destroy the Button Object.
- A function named SetBorderColor to set the Border Color.
- A function named SetBGColor to set the Background color to WhiteSmoke.
- A function named SetText to set text.
Now let's look at the main SimpleTradingEA.mq5 file after adding the buttons. You'll notice that it now includes instances for RectangleLabel , Label , Edit , Button for BuyButton , and SellButton.
#include "RectangleLabel.mqh" // Including the RectangleLabel class definition
RectangleLabel TitleBar; // Declaration of a TitleBar object
RectangleLabel MainDashboardBody; // Declaration of a MainDashboardBody object

#include "Label.mqh" // Including the Label class definition
Label TitleText; // Declaration of a Label object
Label LotSizeText; // Declaration of a LotSizeText object

#include "Edit.mqh" // Including the Edit class definition
Edit LotSize; // Declaration of a LotSize object

#include "Button.mqh" // Including the Button class definition
Button BuyButton; // Declaration of a BuyButton object
Button SellButton; // Declaration of a SellButton object

//+------------------------------------------------------------------+
//| Expert initialization function                                   |
//+------------------------------------------------------------------+
int OnInit()
   {
    TitleBar.Create("TitleBar", 100, 100, 200, 20); // Creating the TitleBar with specified dimensions
    TitleBar.SetBorderType(BORDER_FLAT); // Setting the border type of TitleBar to be flat

    MainDashboardBody.Create("MainDashboardBody", 100, 119, 200, 100); // Creating the MainDashboardBody with specified dimensions
    MainDashboardBody.SetBorderType(BORDER_FLAT); // Setting the border type of MainDashboardBody to be flat

    TitleText.Create("TitleText", 110, 101); // Creating the TitleText at (110,101)
    TitleText.SetText("Simple Trading EA V1.0"); // Setting its text to "Simple Trading EA V1.0"
    TitleText.SetFontSize(10); // Setting its font size to 10
    TitleText.SetTextColor(clrBlack); // Setting its text color to clrBlack

    LotSizeText.Create("LotSizeText", 110, 140); // Creating the LotSizeText at (110,140)
    LotSizeText.SetText("Lot Size:"); // Setting its text to "Lot Size:"
    LotSizeText.SetFontSize(12); // Setting its font size to 12
    LotSizeText.SetTextColor(clrBlack); // Setting its text color to clrBlack

    LotSize.Create("LotSize", 220, 140, 50, 20); // Creating the LotSize with specified dimensions
    LotSize.SetBorderColor(clrBlack); // Setting its Border Color to clrBlack
    LotSize.SetBGColor(clrWhiteSmoke); // Setting its BG Color to clrWhiteSmoke
    LotSize.SetText("0.01"); // Setting its text to 0.01
    LotSize.SetTextColor(clrBlack); // Setting its text color to clrBlack

    BuyButton.Create("BuyButton", 110, 180, 80, 25); // Creating the BuyButton with specified dimensions
    BuyButton.SetBorderColor(clrBlack); // Setting its Border Color to clrBlack
    BuyButton.SetText("Buy"); // Setting its text to "Buy"
    BuyButton.SetBGColor(clrLime); // Setting its BG Color to clrLime

    SellButton.Create("SellButton", 210, 180, 80, 25); // Creating the SellButton with specified dimensions
    SellButton.SetBorderColor(clrBlack); // Setting its Border Color to clrBlack
    SellButton.SetText("Sell"); // Setting its text to "Sell"
    SellButton.SetBGColor(clrRed); // Setting its BG Color to clrRed

    ChartRedraw(0); // Redrawing the chart to reflect changes
    return(INIT_SUCCEEDED); // Indicating successful initialization
   }

//+------------------------------------------------------------------+
//| Expert deinitialization function                                 |
//+------------------------------------------------------------------+
void OnDeinit(const int reason)
   {
    MainDashboardBody.Destroy(); // Destroying the MainDashboardBody object
    TitleBar.Destroy(); // Destroying the TitleBar object
    TitleText.Destroy(); // Destroying the TitleText object
    LotSizeText.Destroy(); // Destroying the LotSizeText object
    LotSize.Destroy(); // Destroying the LotSize object
    BuyButton.Destroy(); // Destroying the BuyButton object
    SellButton.Destroy(); // Destroying the SellButton object
   }
//+------------------------------------------------------------------+
- Created Button instance named BuyButton
- Used BuyButton.Create function to create the Edit Object
- Used BuyButton.SetBorderColor to set border color to Black
- Used BuyButton.SetBGColor to Set background color to Lime
- Used BuyButton.SetText to set text Buy
- Used BuyButton.Destroy to destroy the the Button object in OnDeinit
Now for Sell button:
- Created Button instance named SellButton
- Used SellButton.Create function to create the Button Object
- Used SellButton.SetBorderColor to set border color to Black
- Used SellButton.SetBGColor to Set background color to Red
- Used SellButton.SetText to set text Sell
- Used SellButton.Destroy to destroy the the Button object in OnDeinit
Result:
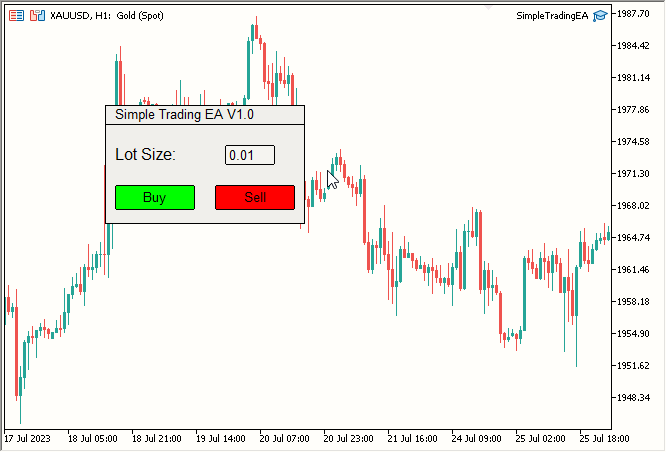
Fig 6. Added Buy and Sell Buttons - Finishing touches
- Change Title Bar color to Dark Blue
- Change Main Dashboard Body color to Light Blue
- Change Title Text color to White from Black
- Change Lot Size Text color to White from Black
- Add Buy/Sell functionality
-
Color Modifications:
- Changed the Title Bar's background color to dark blue using TitleBar.SetBGColor(C'27, 59, 146') .
- Updated the Main Dashboard Body's color to light blue with MainDashboardBody.SetBGColor(C'102, 152, 250') .
- Altered the Title Text's color to white via TitleText.SetTextColor(clrWhite) .
- Adjusted the Lot Size Text's color to white using LotSizeText.SetTextColor(clrWhite) .
-
Inclusion of the Trading Library:
- Integrated the Trading Library and created an instance named trade with the following code:
#include <Trade/Trade.mqh> CTrade trade;
- Integrated the Trading Library and created an instance named trade with the following code:
-
Creation of the OnChartEvent Function:
Implemented an OnChartEvent function that executes a corresponding order immediately when either the Buy or Sell button is clicked. The code is as follows:
//+------------------------------------------------------------------+ //| Chart event handling function | //+------------------------------------------------------------------+ void OnChartEvent(const int id, const long& lparam, const double& dparam, const string& sparam) { if(id == CHARTEVENT_OBJECT_CLICK) { double ask = SymbolInfoDouble(_Symbol, SYMBOL_ASK); double bid = SymbolInfoDouble(_Symbol, SYMBOL_BID); if(sparam == "BuyButton") { trade.PositionOpen(_Symbol, ORDER_TYPE_BUY, (double)LotSize.GetText(), ask, 0, 0); } if(sparam == "SellButton") { trade.PositionOpen(_Symbol, ORDER_TYPE_SELL, (double)LotSize.GetText(), bid, 0, 0); } } } //+------------------------------------------------------------------+
If the event ID equals CHARTEVENT_OBJECT_CLICK, the function detects an Object Click, retrieves the clicked object's name through sparam, checks whether the object name is "BuyButton" or "SellButton", and then places the respective trade using the Trade library.
That is all for it. Result:
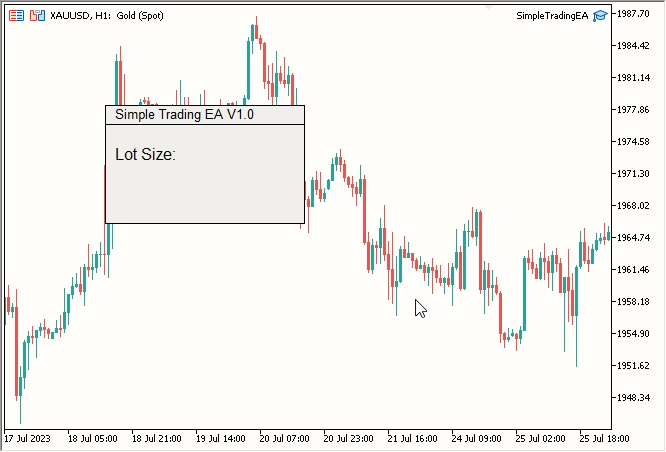
Fig 5. Added "Lot Size:" Text
Now for the finishing touches, let's make it colorful. We'll make the following changes:
Let's do the folowing:The final SimpleTradingEA.mq5 code includes color changes and includes the trading library. It also creates an OnChartEvent function so that when the Buy or Sell button is clicked, the corresponding order is placed immediately.
#include "RectangleLabel.mqh" // Including the RectangleLabel class definition
RectangleLabel TitleBar; // Declaration of a TitleBar object
RectangleLabel MainDashboardBody; // Declaration of a MainDashboardBody object

#include "Label.mqh" // Including the Label class definition
Label TitleText; // Declaration of a Label object
Label LotSizeText; // Declaration of a LotSizeText object

#include "Edit.mqh" // Including the Edit class definition
Edit LotSize; // Declaration of a LotSize object

#include "Button.mqh" // Including the Button class definition
Button BuyButton; // Declaration of a BuyButton object
Button SellButton; // Declaration of a SellButton object

//+------------------------------------------------------------------+
//| Expert initialization function                                   |
//+------------------------------------------------------------------+
int OnInit()
   {
    TitleBar.Create("TitleBar", 100, 100, 200, 20); // Creating the TitleBar with specified dimensions
    TitleBar.SetBorderType(BORDER_FLAT); // Setting the border type of TitleBar to be flat
    TitleBar.SetBGColor(C'27, 59, 146'); // Setting the color to RGB code: C'27, 59, 146'

    MainDashboardBody.Create("MainDashboardBody", 100, 119, 200, 100); // Creating the MainDashboardBody with specified dimensions
    MainDashboardBody.SetBorderType(BORDER_FLAT); // Setting the border type of MainDashboardBody to be flat
    MainDashboardBody.SetBGColor(C'102, 152, 250'); // Setting the color to RGB code: C'102, 152, 250'

    TitleText.Create("TitleText", 110, 101); // Creating the TitleBar at (110,101)
    TitleText.SetText("Simple Trading EA V1.0"); // Setting its text to "Simple Trading EA V1.0"
    TitleText.SetFontSize(10); // Setting its font size to 10
    TitleText.SetTextColor(clrWhite); // Setting its text color to clrWhite

    LotSizeText.Create("LotSizeText", 110, 140); // Creating the LotSizeText at (110,140)
    LotSizeText.SetText("Lot Size:"); // Setting its text to "Lot Size:"
    LotSizeText.SetFontSize(12); // Setting its font size to 12
    LotSizeText.SetTextColor(clrWhite); // Setting its text color to clrWhite

    LotSize.Create("LotSize", 220, 140, 50, 20); // Creating the LotSize with specified dimensions
    LotSize.SetBorderColor(clrBlack); // Setting its Border Color to clrBlack
    LotSize.SetBGColor(clrWhiteSmoke); // Setting its BG Color to clrWhiteSmoke
    LotSize.SetText("0.01"); // Setting its text to 0.01
    LotSize.SetTextColor(clrBlack); // Setting its text color to clrBlack

    BuyButton.Create("BuyButton", 110, 180, 80, 25); // Creating the BuyButton with specified dimensions
    BuyButton.SetBorderColor(clrBlack); // Setting its Border Color to clrBlack
    BuyButton.SetText("Buy"); // Setting its text to "Buy"
    BuyButton.SetBGColor(clrLime); // Setting its BG Color to clrLime

    SellButton.Create("SellButton", 210, 180, 80, 25); // Creating the SellButton with specified dimensions
    SellButton.SetBorderColor(clrBlack); // Setting its Border Color to clrBlack
    SellButton.SetText("Sell"); // Setting its text to "Sell"
    SellButton.SetBGColor(clrRed); // Setting its BG Color to clrRed

    ChartRedraw(0); // Redrawing the chart to reflect changes
    return(INIT_SUCCEEDED); // Indicating successful initialization
   }

//+------------------------------------------------------------------+
//| Expert deinitialization function                                 |
//+------------------------------------------------------------------+
void OnDeinit(const int reason)
   {
    MainDashboardBody.Destroy(); // Destroying the MainDashboardBody object
    TitleBar.Destroy(); // Destroying the TitleBar object
    TitleText.Destroy(); // Destroying the TitleText object
    LotSizeText.Destroy(); // Destroying the LotSizeText object
    LotSize.Destroy(); // Destroying the LotSize object
    BuyButton.Destroy(); // Destroying the BuyButton object
    SellButton.Destroy(); // Destroying the SellButton object
   }

//+------------------------------------------------------------------+
//| Chart event handling function                                    |
//+------------------------------------------------------------------+
void OnChartEvent(const int id, const long& lparam, const double& dparam, const string& sparam)
   {
    // Handles click events for Buy and Sell buttons and opens corresponding positions
    if(id == CHARTEVENT_OBJECT_CLICK) {
        double ask = SymbolInfoDouble(_Symbol, SYMBOL_ASK);
        double bid = SymbolInfoDouble(_Symbol, SYMBOL_BID);
        if(sparam == "BuyButton") {
            trade.PositionOpen(_Symbol, ORDER_TYPE_BUY, (double)LotSize.GetText(), ask, 0, 0);
        }
        if(sparam == "SellButton") {
            trade.PositionOpen(_Symbol, ORDER_TYPE_SELL, (double)LotSize.GetText(), bid, 0, 0);
        }
    }
   }
//+------------------------------------------------------------------+
Changes:
Final Result:
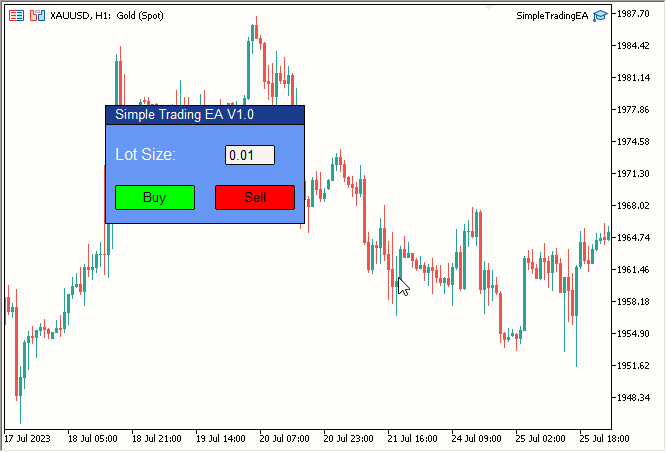
Fig 7. Completed Simple Trading EA (Static)
This section concludes with that.
Discussing the Approach to make our static dashboard move with all elements inside it
Now the real work begins. How do we make everything movable? Let's ponder this.
At the moment, we can make any single element movable. But what we need is for all the elements to move. Then, let's make one element move and have all others follow it. We can make other elements literally follow the main element using CustomChartEvent , but unfortunately, that method is slow and thus inefficient. So, what I found to be the most efficient approach is to move our main element (around which all other elements will move) and move other elements simultaneously. That's the theory, but how do we apply it practically?
Let's call our main element the Central Element, and let's make our title bar the Central Element. Now we will move all other elements around it.
Previously, we were moving a single element using a function defined in its class named OnEvent . Now we will modify this function so that it moves a single element and then moves all other elements by exactly the same amount.
Here's our current OnEvent function:
//+------------------------------------------------------------------+
//|                                                                  |
//+------------------------------------------------------------------+
void RectangleLabel::OnEvent(int id, long lparam, double dparam, string sparam)
  {
   //Verify the event that triggered the OnChartEvent was CHARTEVENT_MOUSE_MOVE because we only want to execute out code when that is the case
   if(id == CHARTEVENT_MOUSE_MOVE)
     {
      //define X, Y, XDistance, YDistance, XSize, YSize
      int X = (int)lparam;
      int Y = (int)dparam;
      int MouseState = (int)sparam;

      string name = Name;
      int XDistance = (int)ObjectGetInteger(0, name, OBJPROP_XDISTANCE); //Should be 100 initially as we set it in OnInit()
      int YDistance = (int)ObjectGetInteger(0, name, OBJPROP_YDISTANCE); //Should be 100 initially as we set it in OnInit()
      int XSize = (int)ObjectGetInteger(0, name, OBJPROP_XSIZE); //Should be 200 initially as we set it in OnInit()
      int YSize = (int)ObjectGetInteger(0, name, OBJPROP_YSIZE); //Should be 200 initially as we set it in OnInit()

      if(previousMouseState == 0 && MouseState == 1) //Check if this was the MLB first click
        {
         mlbDownX = X; //Set mlbDownX (Variable that stores the initial MLB X location) equal to the current X
         mlbDownY = Y; //Set mlbDownY (Variable that stores the initial MLB Y location) equal to the current Y
         mlbDownXDistance = XDistance; //Set mlbDownXDistance (Variable that stores the initial XDistance i.e. Width of the dashboard) equal to the current XDistance
         mlbDownYDistance = YDistance; //Set mlbDownYDistance (Variable that stores the initial YDistance i.e. Height of the dashboard) equal to the current YDistance

         if(X >= XDistance && X <= XDistance + XSize && Y >= YDistance && Y <= YDistance + YSize) //Check if the click was on the dashboard
           {
            movingState = true; //If yes the set movingState to True
           }

        }

      if(movingState)//if movingState is true, Update the Dashboard position
        {
         ChartSetInteger(0, CHART_MOUSE_SCROLL, false);//Restrict Chart to be moved by Mouse
         ObjectSetInteger(0, name, OBJPROP_XDISTANCE, mlbDownXDistance + X - mlbDownX);//Update XDistance to: mlbDownXDistance + (X - mlbDownX)
         ObjectSetInteger(0, name, OBJPROP_YDISTANCE, mlbDownYDistance + Y - mlbDownY);//Update YDistance to: mlbDownYDistance + (Y - mlbDownY)
         ChartRedraw(0); //Redraw Chart
        }

      if(MouseState == 0)//Check if MLB is not pressed
        {
         movingState = false;//set movingState again to false
         ChartSetInteger(0, CHART_MOUSE_SCROLL, true);//allow the cahrt to be moved again
        }

      previousMouseState = MouseState;//update the previousMouseState at the end so that we can use it next time and copare it with new value
     }
  }
//+------------------------------------------------------------------+
I know we still haven't added this function to the RectangleLabel class; we'll do that after discussing the approach.
Now, what do we need to move any object? Its name, right?
What we are going to do is quite simple: we'll loop through those names and move the objects by the same amount as we moved the central element. But there's a major flaw here that's harder to see.
Whenever the mouse moves, we set the XDis and YDis of the central element like this:
ObjectSetInteger(0, name, OBJPROP_XDISTANCE, mlbDownXDistance + X - mlbDownX);//Update XDistance to: mlbDownXDistance + (X - mlbDownX)
ObjectSetInteger(0, name, OBJPROP_YDISTANCE, mlbDownYDistance + Y - mlbDownY);//Update YDistance to: mlbDownYDistance + (Y - mlbDownY)
Here, we know the XDis and YDis of the central element when the mouse MLB was pressed. So, we need to know that information for other elements as well. However, this would make the function very complicated or inefficient, so we need a better approach.
Upon closer inspection, a better approach is right in front of us. We simply need to maintain the "X Distance and Y Distance between Central Elements and Other Elements." Yes, it's that simple.
So, we'll note the "X Distance and Y Distance between Central Elements and Other Elements," and maintain that distance. How do we record those distances? Well, at some point, we'll be adding our other elements to the central element, and at that point, we'll note the "X Distance and Y Distance between Central Elements and Other Elements."
To reiterate, at some point, we'll be using the names of the other elements to add them to the central element, and at that point, we'll save the "X Distance and Y Distance between Central Elements and Other Elements." Then we'll maintain this distance between the other elements and the central element. We'll update this distance after updating the central element's position.
That's our approach for the task. Now, let's put it into action.
Using discussed approach to make our static dashboard movable
So let's discuss where we will store the Name, X Distance, and Y Distance between Central Elements and Other Elements. These are the only two categories of information we need to store.
We will create a function named Add in the RectangleLabel class. Using that function, we will store the following two things:
- Name in the addedNames array
- X Distance and Y Distance between Central Elements and Other Elements in addedXDisDifference and addedYDisDifference , respectively
Regarding the naming conventions, "added" implies the variable is related to another element added to the central element, while "XDis" and "YDis" are fairly straightforward. "Difference" suggests that the variable has something to do with a difference, so it is a reasonable name. The reason for discussing the name is to alleviate any confusion, as the correct variable name can minimize misunderstanding.
Let's declare these variables:
string           addedNamed[];
int              addedXDisDiffrence[], addedYDisDiffrence[];
Please note that we declare them as Private, as we won't need them to be Public. Also, they are all arrays.
Now let's create the Add function:
//+------------------------------------------------------------------+
//| Method to add an object by name to the rectangle label           |
//+------------------------------------------------------------------+
void RectangleLabel::Add(string name)
   {
    ArrayResize(addedNames, ArraySize(addedNames) + 1);
    ArrayResize(addedXDisDiffrence, ArraySize(addedXDisDiffrence) + 1);
    ArrayResize(addedYDisDiffrence, ArraySize(addedYDisDiffrence) + 1);

    addedNames[ArraySize(addedNames) - 1] = name;
    addedXDisDiffrence[ArraySize(addedXDisDiffrence) - 1] = ObjectGetInteger(0, _name, OBJPROP_XDISTANCE) - ObjectGetInteger(0, name, OBJPROP_XDISTANCE);
    addedYDisDiffrence[ArraySize(addedYDisDiffrence) - 1] = ObjectGetInteger(0, _name, OBJPROP_YDISTANCE) - ObjectGetInteger(0, name, OBJPROP_YDISTANCE);
   }
//+------------------------------------------------------------------+
This function is declared in the RectangleLabel class, as the TitleBar is our central element, and it is essentially a RECTANGLE_LABEL object. We declare the variables in the same class, obviously, as we are using them in this function.
What this function does is accept the name as a parameter, then increase the size of those three arrays by one. At the last index, we store the corresponding data. For the Name, we simply store the name. For the Distance Differences (X and Y), we store the difference between the Central element (TitleBar in this case) and the element whose name is provided as a parameter. This constitutes our Add function.
Next, we need to modify the OnEvent function. We create a loop to iterate through the addedNames array and maintain the distance between the TitleBar and the named element, setting it equal to the new TitleBar X/Y Distance minus the difference value given in the respective arrays.
for(int i = 0; i < ArraySize(addedNames); i++)
   {
    ObjectSetInteger(0, addedNames[i], OBJPROP_XDISTANCE, mlbDownXDistance + X - mlbDownX - addedXDisDiffrence[i]);
    ObjectSetInteger(0, addedNames[i], OBJPROP_YDISTANCE, mlbDownYDistance + Y - mlbDownY - addedYDisDiffrence[i]);
   }
Please note that the underlined part is the new X/Y Distance of the TitleBar (Central Element), and we subtract the difference value given in the respective arrays (referring to the difference between X Distance and Y Distance between Central Elements and Other Elements).
Where do we place this loop? We put it just after the Central Element is updated.
Here's our new OnEvent function:
//+------------------------------------------------------------------+
//| Event handling for mouse movements                               |
//+------------------------------------------------------------------+
void RectangleLabel::OnEvent(int id, long lparam, double dparam, string sparam)
   {
    // Handle mouse movement events for dragging the rectangle label
    if(id == CHARTEVENT_MOUSE_MOVE)
       {
        int X = (int)lparam;
        int Y = (int)dparam;
        int MouseState = (int)sparam;

        string name = _name;
        int XDistance = (int)ObjectGetInteger(0, name, OBJPROP_XDISTANCE);
        int YDistance = (int)ObjectGetInteger(0, name, OBJPROP_YDISTANCE);
        int XSize = (int)ObjectGetInteger(0, name, OBJPROP_XSIZE);
        int YSize = (int)ObjectGetInteger(0, name, OBJPROP_YSIZE);

        if(previousMouseState == 0 && MouseState == 1)
           {
            mlbDownX = X;
            mlbDownY = Y;
            mlbDownXDistance = XDistance;
            mlbDownYDistance = YDistance;

            if(X >= XDistance && X <= XDistance + XSize && Y >= YDistance && Y <= YDistance + YSize)
               {
                movingState = true;
               }

           }

        if(movingState)
           {
            ChartSetInteger(0, CHART_MOUSE_SCROLL, false);
            ObjectSetInteger(0, name, OBJPROP_XDISTANCE, mlbDownXDistance + X - mlbDownX);
            ObjectSetInteger(0, name, OBJPROP_YDISTANCE, mlbDownYDistance + Y - mlbDownY);
            for(int i = 0; i < ArraySize(addedNames); i++)
               {
                ObjectSetInteger(0, addedNames[i], OBJPROP_XDISTANCE, mlbDownXDistance + X - mlbDownX - addedXDisDiffrence[i]);
                ObjectSetInteger(0, addedNames[i], OBJPROP_YDISTANCE, mlbDownYDistance + Y - mlbDownY - addedYDisDiffrence[i]);
               }
            ChartRedraw(0);
           }

        if(MouseState == 0)
           {
            movingState = false;
            ChartSetInteger(0, CHART_MOUSE_SCROLL, true);
           }

        previousMouseState = MouseState;
       }
   }
The highlighted part is our new loop.
Now we simply need to use the Add function to attach elements to the Central Element, as we have chosen the TitleBar. We use the Add function from the TitleBar instance, which we named "TitleBar."
Let's use the Add function in the TitleBar instance to add all other elements to the TitleBar:
// Add the other elements to the Central Element i.e. TitleBar object in this case
TitleBar.Add("MainDashboardBody");
TitleBar.Add("TitleText");
TitleBar.Add("LotSizeText");
TitleBar.Add("LotSize");
TitleBar.Add("BuyButton");
TitleBar.Add("SellButton");
With this, the names of all these elements are added to the addedNames array, allowing them to move. Also, their distances from the TitleBar are noted, so that distance will be maintained.
Now, let's make use of the OnEvent function. Without it, all of this would be for naught.
// Passes events to the TitleBar object
TitleBar.OnEvent(id, lparam, dparam, sparam);
We add this to the OnChartEvent() , and we are done at last. I know this was lengthy, but the final result should be well worth the effort. 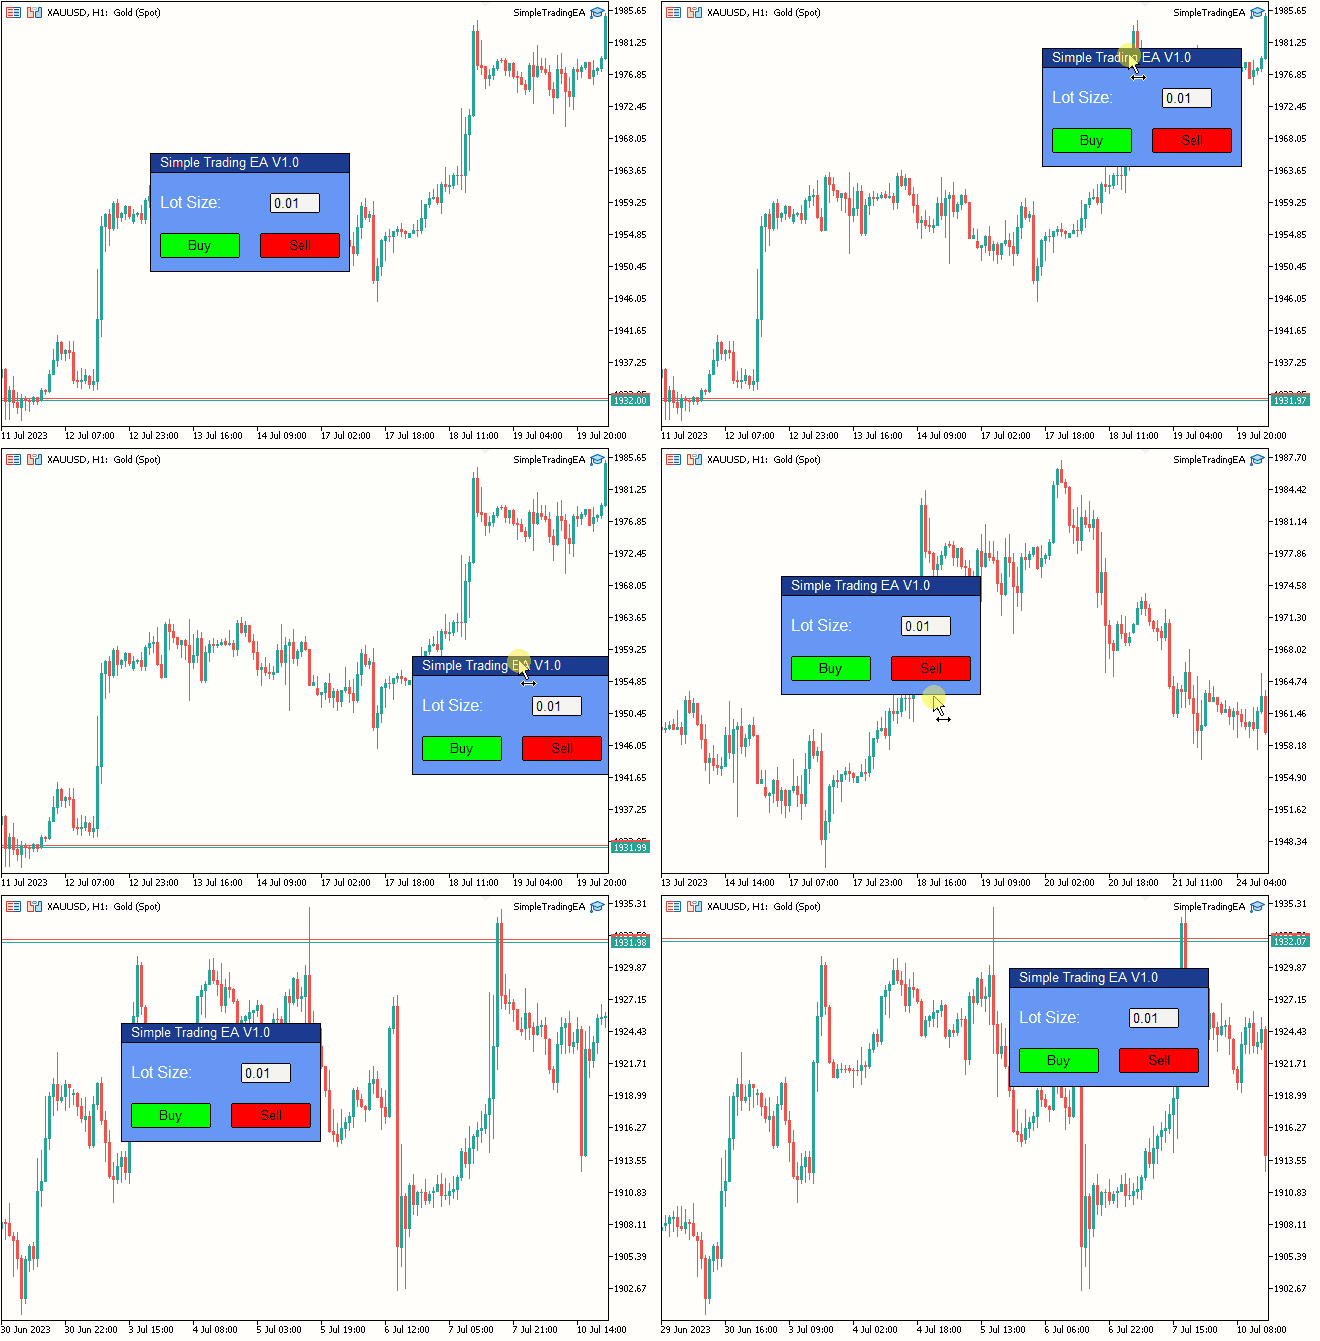
Fig 8. Final Result
Conclusion
With this, we come to the end of this article. Throughout our journey in this piece, we've accomplished a great deal, culminating in the completion of our part 3"Improve Your Trading Charts With Interactive GUIs in MQL5."
We have successfully achieved the objectives we set for ourselves in the "Movable GUI" series i.e. Part 1 and Part 2, bringing life to a dynamic and user-friendly interface for trading charts. Thank you for taking the time to read my articles. I hope you find them to be both informative and helpful in your endeavors.
If you have any ideas or suggestions for what you'd like to see in my next piece, please don't hesitate to share.
Happy Coding! Happy Trading!
- Free trading apps
- Over 8,000 signals for copying
- Economic news for exploring financial markets
You agree to website policy and terms of use
The article was really good. Well didactic and explained. I liked. 😁👍
Hi Kalish,
Interesting approach and congratulations on finishing your series. The OnEvent coding is what makes it all happen! As your first article got me excited, I developed my one version of the movable panel. It is a base class that is inherited by individual classes for each panel type. Secondly, as I had already created a controls header file that was based on examples in the MQL help file, I chose to use it instead of creating a Text class for inheritance and it worked well. I am planning on creating two more methods for the GUI class, Save and Initialize. Save will read and update a CSV file and set the starting location positions and data. Initialize sill read the CSV file and and set the initial positions.
For your review I am attaching a screen shot of my current EA headings and two Panels. The first is the Active Orders that I will be using and the Sample is the bare bones version used as s template for additional Panels.
Good Luck in your future endeavors, I'll be watching
Cape Coddah
I am glad you are benefitting with my articles.
Actually You motivated me to write this part 3 otherwise it would have taken more time due to lack of motivation.
Thank you very much for that.
Good luck to you too for your future endeavours.
The article was really good. Well didactic and explained. I liked. 😁👍
It’s my pleasure. Thanks for your time.
Hi Kailash,
I hope you monitor this article as I do not know how to private text.
Anyway, I I have really incorporated your concepts into a much better way of organizing an EA. Here is a screen shot of my old version and one using your moveable Panel concept using your part 2 concepts with multiple children. While it is still in the preliminary development stage, it will allow me to display more pertinent data during model testing.
Right now I have a separate child class for each panel, including the Controller.
While this approach is adequate, it leads to many separate functions to handle various tasks in the EA panels. A better approch would be to have an array of the children and use it as a parameter in the reduced function calls. I have tried using the first two approaches but I cannot cast the elements of array to the appropriate child class in order to call its unique public functions. I had limited success in accessing public variables by using a wrapper class with the object declaration. Thiis approach seems to use the elements class definition of the parameter element rather that the class definition of the Array
this approach does not work for Guis[5].Create_Controls(......);
The only approach that I have seen that works is to use c_array to create an array of object pointers and add them to the array. and then access by a function that calls the c_array AT(location) function to assign the array pointer to a local pointer of the object declared locally to access the child variables locally.
Do you or anyone know how to solve this issue or provide a reference to MQL articles or documentation that address an array of child classes rather than an array of one class?
Many many thanks and I am looking forward to your next articles
CapeCoddah
Fantastic !
I couldn't figure it out on my own,
yes read it twice .
Thanks !
Philip