
Manuale MQL5: Notifiche sonore per gli eventi di trading metaTrader 5

Introduzione
In questo articolo, considereremo problemi come l'inclusione di file audio nel file di Expert Advisor e quindi l'aggiunta di notifiche sonore agli eventi di trading. Il fatto che i file saranno inclusi significa che i file audio si troveranno all'interno dell'Expert Advisor. Quindi, quando si fornisce la versione compilata di Expert Advisor (*.ex5) a un altro utente, non sarà necessario fornire anche i file audio e spiegare dove devono essere salvati.
Sviluppo
A scopo di test, prenderemo l'Expert Advisor dal precedente articolo "Manuale MQL5: Salvataggio dei risultati di ottimizzazione di un Expert Advisor in base a criteri specificati". Per semplificare, ho rimosso tutto ciò che non è rilevante per l'argomento attuale.
Per aggiungere una notifica sonora a un evento commerciale utilizzando le risorse MQL5, possiamo utilizzare le funzioni Alert() e PlaySound(). Se si opta per la funzione Alert(), verrà sempre riprodotta la stessa notifica sonora e si aprirà una finestra con il messaggio pertinente. Puoi vederlo in azione nell'articolo intitolato "Manuale MQL5: Utilizzo di diverse modalità di stampa".
Il suono di avviso può essere impostato nelle impostazioni del terminale: Strumenti - > Opzioni o Ctrl+O. Inoltre, nella scheda Eventi, dobbiamo selezionare l'opzione "Abilita" per abilitare le notifiche sonore per gli eventi e selezionare il file audio appropriato nell'elenco a discesa degli avvisi.
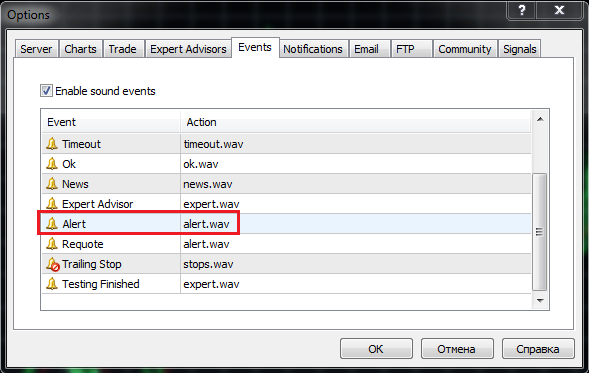
Fig. 1. La scheda "Eventi" nelle impostazioni del terminale
Tuttavia, hai anche la possibilità di impostare una notifica sonora univoca per qualsiasi evento del programma personalizzato. A tale scopo, utilizziamo la funzione PlaySound().
Prima di aggiungere notifiche sonore a Expert Advisor, creiamo un Expert Advisor a scopo di test. Implementiamo l'idea di aprire un pannello audio quando carichiamo un Expert Advisor sul grafico. Il pannello audio sarà composto da oggetti grafici, come pulsante (OBJ_BUTTON). Ogni pulsante avrà il proprio suono unico assegnato ad esso che verrà riprodotto quando si fa clic sul pulsante.
Sono andato online e ho trovato 25 diversi file audio nel formato *.wav (sono disponibili per il download alla fine dell'articolo). Devono essere inseriti nella cartella MetaTrader 5\MQL5\Files\Sounds. Per iniziare a lavorare con i file audio, ora creeremo un nuovo Expert Advisor utilizzando la procedura guidata (MQL5 Wizard)MQL5. All'inizio, specifichiamo la dimensione dell'array in base al numero di pulsanti sul pannello audio (ci saranno 26 pulsanti in totale).
//--- Array size
#define ARRAY_SIZE 26
Quindi, è necessario specificare le cartelle e i nomi dei file che forniranno risorse a Expert Advisor. Questo può essere fatto utilizzando la direttiva #resource. Dopo la direttiva, specifichiamo il percorso del file tra virgolette doppie:
//--- Sound files
#resource "\\Files\\Sounds\\alert.wav"
#resource "\\Files\\Sounds\\AHOOGA.wav"
#resource "\\Files\\Sounds\\APPLAUSE.wav"
#resource "\\Files\\Sounds\\BONK.wav"
#resource "\\Files\\Sounds\\CARBRAKE.wav"
#resource "\\Files\\Sounds\\CASHREG.wav"
#resource "\\Files\\Sounds\\CLAP.wav"
#resource "\\Files\\Sounds\\CORKPOP.wav"
#resource "\\Files\\Sounds\\DOG.wav"
#resource "\\Files\\Sounds\\DRIVEBY.wav"
#resource "\\Files\\Sounds\\DRUMROLL.wav"
#resource "\\Files\\Sounds\\EXPLODE.wav"
#resource "\\Files\\Sounds\\FINALBEL.wav"
#resource "\\Files\\Sounds\\FROG.wav"
#resource "\\Files\\Sounds\\GLASS.wav"
#resource "\\Files\\Sounds\\GUNSHOT.wav"
#resource "\\Files\\Sounds\\LASER.wav"
#resource "\\Files\\Sounds\\LATNWHIS.wav"
#resource "\\Files\\Sounds\\PIG.wav"
#resource "\\Files\\Sounds\\RICOCHET.wav"
#resource "\\Files\\Sounds\\RINGIN.wav"
#resource "\\Files\\Sounds\\SIREN.wav"
#resource "\\Files\\Sounds\\TRAIN.wav"
#resource "\\Files\\Sounds\\UH_OH.wav"
#resource "\\Files\\Sounds\\VERYGOOD.wav"
#resource "\\Files\\Sounds\\WHOOSH.wav"
Ora, dobbiamo creare tre matrici di stringhe che conterranno le posizioni dei file di risorse, i nomi degli oggetti grafici e il testo visualizzato sugli oggetti grafici. Si prega di notare l'uso dei doppi due punti quando si specificano le posizioni dei file - è un'indicazione speciale per chiamare la risorsa per nome.
//--- Sound file location
string sound_paths[ARRAY_SIZE]=
  {
   "::Files\\Sounds\\alert.wav",
   "::Files\\Sounds\\AHOOGA.wav",
   "::Files\\Sounds\\APPLAUSE.wav",
   "::Files\\Sounds\\BONK.wav",
   "::Files\\Sounds\\CARBRAKE.wav",
   "::Files\\Sounds\\CASHREG.wav",
   "::Files\\Sounds\\CLAP.wav",
   "::Files\\Sounds\\CORKPOP.wav",
   "::Files\\Sounds\\DOG.wav",
   "::Files\\Sounds\\DRIVEBY.wav",
   "::Files\\Sounds\\DRUMROLL.wav",
   "::Files\\Sounds\\EXPLODE.wav",
   "::Files\\Sounds\\FINALBEL.wav",
   "::Files\\Sounds\\FROG.wav",
   "::Files\\Sounds\\GLASS.wav",
   "::Files\\Sounds\\GUNSHOT.wav",
   "::Files\\Sounds\\LASER.wav",
   "::Files\\Sounds\\LATNWHIS.wav",
   "::Files\\Sounds\\PIG.wav",
   "::Files\\Sounds\\RICOCHET.wav",
   "::Files\\Sounds\\RINGIN.wav",
   "::Files\\Sounds\\SIREN.wav",
   "::Files\\Sounds\\TRAIN.wav",
   "::Files\\Sounds\\UH_OH.wav",
   "::Files\\Sounds\\VERYGOOD.wav",
   "::Files\\Sounds\\WHOOSH.wav"
  };
//--- Names of graphical objects
string sound_names[ARRAY_SIZE]=
  {
   "sound_button01","sound_button02",
   "sound_button03","sound_button04",
   "sound_button05","sound_button06",
   "sound_button07","sound_button08",
   "sound_button09","sound_button10",
   "sound_button11","sound_button12",
   "sound_button13","sound_button14",
   "sound_button15","sound_button16",
   "sound_button17","sound_button18",
   "sound_button19","sound_button20",
   "sound_button21","sound_button22",
   "sound_button23","sound_button24",
   "sound_button25","sound_button26"
  };
//--- Text displayed on graphical objects
string sound_texts[ARRAY_SIZE]=
  {
   "ALERT","AHOOGA","APPLAUSE","BONK","CARBRAKE","CASHREG",
   "CLAP","CORKPOP","DOG","DRIVEBY","DRUMROLL","EXPLODE","FINALBEL",
   "FROG","GLASS","GUNSHOT","LASER","LATNWHIS","PIG",
   "RICOCHET","RINGIN","SIREN","TRAIN","UH_OH","VERYGOOD","WHOOSH"
  };
Scriviamo una funzione, CreateButton(), che creerà l'oggetto grafico "Button" su un grafico con le proprietà specificate:
//+------------------------------------------------------------------+
//| Creating the Button object                                       |
//+------------------------------------------------------------------+
void CreateButton(long              chart_id,         // chart id
                  int               sub_window,       // window number
                  string            name,             // object name
                  string            text,             // displayed name
                  ENUM_ANCHOR_POINT anchor,           // anchor point
                  ENUM_BASE_CORNER  corner,           // chart corner
                  string            font_name,        // font
                  int               font_size,        // font size
                  color             font_color,       // font color
                  color             background_color, // background color
                  color             border_color,     // border color
                  int               x_size,           // width
                  int               y_size,           // height
                  int               x_distance,       // X-coordinate
                  int               y_distance,       // Y-coordinate
                  long              z_order)          // Z-order
  {
//--- Creating an object
   if(ObjectCreate(chart_id,name,OBJ_BUTTON,sub_window,0,0))
     {
      ObjectSetString(chart_id,name,OBJPROP_TEXT,text);                  // setting name
      ObjectSetString(chart_id,name,OBJPROP_FONT,font_name);             // setting font
      ObjectSetInteger(chart_id,name,OBJPROP_COLOR,font_color);          // setting font color
      ObjectSetInteger(chart_id,name,OBJPROP_BGCOLOR,background_color);  // setting background color
      ObjectSetInteger(chart_id,name,OBJPROP_BORDER_COLOR,border_color); // setting border color
      ObjectSetInteger(chart_id,name,OBJPROP_ANCHOR,anchor);             // setting anchor point
      ObjectSetInteger(chart_id,name,OBJPROP_CORNER,corner);             // setting chart corner
      ObjectSetInteger(chart_id,name,OBJPROP_FONTSIZE,font_size);        // setting font size
      ObjectSetInteger(chart_id,name,OBJPROP_XSIZE,x_size);              // setting width X
      ObjectSetInteger(chart_id,name,OBJPROP_YSIZE,y_size);              // setting height Y
      ObjectSetInteger(chart_id,name,OBJPROP_XDISTANCE,x_distance);      // setting X-coordinate
      ObjectSetInteger(chart_id,name,OBJPROP_YDISTANCE,y_distance);      // setting Y-coordinate
      ObjectSetInteger(chart_id,name,OBJPROP_SELECTABLE,false);          // cannot select the object if FALSE
      ObjectSetInteger(chart_id,name,OBJPROP_STATE,false);               // button state (clicked/unclicked)
      ObjectSetInteger(chart_id,name,OBJPROP_ZORDER,z_order);            // higher/lower Z-order
      ObjectSetString(chart_id,name,OBJPROP_TOOLTIP,"\n");               // no tooltip if "\n"
     }
  }
Per renderlo più giocoso, il colore di ciascun pulsante verrà selezionato a caso. Per implementare questo, scriveremo una semplice funzione - GetRandomColor():
//+------------------------------------------------------------------+
//| Returning a random color                                         |
//+------------------------------------------------------------------+
color GetRandomColor()
  {
//--- Select a random color from 0 to 25
   switch(MathRand()%26)
     {
      case 0  : return(clrOrange);           break;
      case 1  : return(clrGold);             break;
      case 2  : return(clrChocolate);        break;
      case 3  : return(clrChartreuse);       break;
      case 4  : return(clrLime);             break;
      case 5  : return(clrSpringGreen);      break;
      case 6  : return(clrMediumBlue);       break;
      case 7  : return(clrDeepSkyBlue);      break;
      case 8  : return(clrBlue);             break;
      case 9  : return(clrSeaGreen);         break;
      case 10 : return(clrRed);              break;
      case 11 : return(clrSlateGray);        break;
      case 12 : return(clrPeru);             break;
      case 13 : return(clrBlueViolet);       break;
      case 14 : return(clrIndianRed);        break;
      case 15 : return(clrMediumOrchid);     break;
      case 16 : return(clrCrimson);          break;
      case 17 : return(clrMediumAquamarine); break;
      case 18 : return(clrDarkGray);         break;
      case 19 : return(clrSandyBrown);       break;
      case 20 : return(clrMediumSlateBlue);  break;
      case 21 : return(clrTan);              break;
      case 22 : return(clrDarkSalmon);       break;
      case 23 : return(clrBurlyWood);        break;
      case 24 : return(clrHotPink);          break;
      case 25 : return(clrLightSteelBlue);   break;
      //---
      default : return(clrGold);
     }
//---
   return(clrGold);
  }
Scriviamo ora la funzione che aggiungerà il pannello audio al grafico - SetSoundPanel():
//+------------------------------------------------------------------+
//| Adding the sound panel to the chart                              |
//+------------------------------------------------------------------+
void SetSoundPanel()
  {
   int   column_count =0;       // Column counter
   int   x_dist       =10;      // Indent from the left side of the chart
   int   y_dist       =15;      // Indent from the top of the chart
   int   x_size       =100;     // Button width
   int   y_size       =20;      // Button height
   color button_color =clrNONE; // Button color
//--- Set the objects
   for(int i=0; i<ARRAY_SIZE; i++)
     {
      //--- Increase the column counter
      column_count++;
      //--- Get the button color
      button_color=GetRandomColor();
      //--- Draw a button
      CreateButton(0,0,sound_names[i],sound_texts[i],
                   ANCHOR_LEFT_UPPER,CORNER_LEFT_UPPER,"Arial",8,
                   clrWhite,button_color,button_color,x_size,y_size,x_dist,y_dist,1);
      //--- If two buttons have already been set in the same row
      if(column_count==2)
        {
         x_dist=10;        // Move the X-coordinate to the initial position
         y_dist+=20;       // Set the Y-coordinate for the next row
         column_count=0;   // Zero out the counter
        }
      else
      //--- Set the X-coordinate for the next button
         x_dist+=x_size;
     }
//--- Refresh the chart
   ChartRedraw(0);
  }
Per rimuovere il pannello dal grafico, utilizzeremo le funzioni fornite di seguito:
//+------------------------------------------------------------------+
//| Deleting the info panel                                          |
//+------------------------------------------------------------------+
void DeleteSoundPanel()
  {
//--- Delete position properties and their values
   for(int i=0; i<ARRAY_SIZE; i++)
      DeleteObjectByName(name_sound_object[i]);
//--- Redraw the chart
   ChartRedraw();
  }
//+------------------------------------------------------------------+
//| Deleting objects by name                                         |
//+------------------------------------------------------------------+
void DeleteObjectByName(string name)
  {
//--- If the object is found
   if(ObjectFind(ChartID(),name)>=0)
     {
      //--- If an error occurred when deleting, print the relevant message
      if(!ObjectDelete(ChartID(),name))
         Print("Error ("+IntegerToString(GetLastError())+") when deleting the object!");
     }
  }
Quindi, quando si carica Expert Advisor, il pannello verrà impostato sul grafico dalla funzione OnInit() ed eliminato dal grafico quando si rimuove Expert Advisor dalla funzione OnDeinit().
//+------------------------------------------------------------------+
//| Custom indicator initialization function                         |
//+------------------------------------------------------------------+
void OnInit()
  {
//--- Set the sound panel
   SetSoundPanel();
  }
//+------------------------------------------------------------------+
//| Deinitialization function of the expert advisor                  |
//+------------------------------------------------------------------+
void OnDeinit(const int reason)
  {
//--- Delete the sound panel
   DeleteSoundPanel();
  }
Ora dobbiamo solo implementare l'interazione con il pannello in modo che il suono appropriato venga riprodotto quando si fa clic su un determinato pulsante. Per renderlo ancora più allegro, cambieremo i colori dei pulsanti quando viene premuto uno dei pulsanti del pannello audio. Per implementare questo, avremo bisogno della funzione ChangeColorsOnSoundPanel() il cui codice è indicato di seguito:
//+------------------------------------------------------------------+
//| Changing colors on the sound panel                               |
//+------------------------------------------------------------------+
void ChangeColorsOnSoundPanel()
  {
   color clr=clrNONE; // Button color
//--- Iterate over all buttons in a loop and change their color
   for(int i=0; i<ARRAY_SIZE; i++)
     {
      //--- Get the new color
      clr=GetRandomColor();
      //--- Set the border color
      ObjectSetInteger(0,sound_names[i],OBJPROP_BGCOLOR,clr);
      //--- Set the background color
      ObjectSetInteger(0,sound_names[i],OBJPROP_BORDER_COLOR,clr);
      //--- Unclicked button
      ObjectSetInteger(0,sound_names[i],OBJPROP_STATE,false);
      //--- Refresh the chart
      ChartRedraw(0);
      //--- Wait for 20 ms (lag)
      Sleep(20);
     }
  }
Infine, il codice seguente deve essere aggiunto alla funzione OnChartEvent():
//+------------------------------------------------------------------+
//| Event handler                                                    |
//+------------------------------------------------------------------+
void OnChartEvent(const int     id,     // Event identifier
                  const long&   lparam, // Parameter of the event of type long
                  const double& dparam, // Parameter of the event of type double
                  const string& sparam) // Parameter of the event of type string
  {
//--- If there was an event of left-clicking on the object
   if(id==CHARTEVENT_OBJECT_CLICK)
     {
      //--- If the object name contains "sound_button"
      if(StringFind(sparam,"sound_button",0)>=0)
        {
         //--- Play the sound based on the object name
         //    5019 - ERR_FILE_NOT_EXIST - The file does not exist
         if(!PlaySound(GetSoundPath(sparam)))
            Print("Error: ",GetLastError());
         //--- Change colors of all buttons
         ChangeColorsOnSoundPanel();
        }
     }
  }
La stringa evidenziata nel codice precedente suggerisce che la posizione del file audio viene passata alla funzione PlaySound() utilizzando la funzione GetSoundPath() personalizzata. Il codice della funzione GetSoundPath() è fornito di seguito:
//+------------------------------------------------------------------+
//| Returning sound file location by the object name                 |
//+------------------------------------------------------------------+
string GetSoundPath(string object_name)
  {
//--- Iterate over all sound panel objects in a loop
   for(int i=0; i<ARRAY_SIZE; i++)
     {
      //--- If the name of the object clicked in the chart
      //    matches one of those available on the panel, return the file location
      if(object_name==name_sound_object[i])
         return(path_sound_object[i]);
     }
//---
   return("");
  }
Ora, tutto è pronto. Il pannello audio (il programma può essere scaricato dagli allegati all'articolo) verrà impostato non appena l'Expert Advisor sarà allegato al grafico:

Fig. 2. Il pannello audio sul grafico
Quindi, il principio di lavorare con i file audio è ora chiaro. Torniamo al nostro Expert Advisor dal precedente articolo intitolato "Manuale MQL5: Salvare i risultati di ottimizzazione di un Expert Advisor in base a criteri specificati" e decidere quali suoni utilizzeremo nell'Expert Advisor. Creiamo Resources.mqh e includiamolo nel file principale dell'Expert Advisor.
//--- Include custom libraries
#include "Include/Errors.mqh"
#include "Include/Enums.mqh"
#include "Include/Resources.mqh"
#include "Include/TradeSignals.mqh"
#include "Include/TradeFunctions.mqh"
#include "Include/ToString.mqh"
#include "Include/Auxiliary.mqh"
Ora selezioniamo i file per i principali eventi di trading.
//--- Sound files
#resource "\\Files\\Sounds\\AHOOGA.WAV"   // Error
#resource "\\Files\\Sounds\\CASHREG.WAV"  // Position opening/position volume increase/pending order triggering
#resource "\\Files\\Sounds\\WHOOSH.WAV"   // Pending order/Stop Loss/Take Profit setting/modification
#resource "\\Files\\Sounds\\VERYGOOD.WAV" // Position closing at profit
#resource "\\Files\\Sounds\\DRIVEBY.WAV"  // Position closing at loss
//--- Sound file location
string SoundError          = "::Files\\Sounds\\AHOOGA.WAV";
string SoundOpenPosition   = "::Files\\Sounds\\CASHREG.WAV";
string SoundAdjustOrder    = "::Files\\Sounds\\WHOOSH.WAV";
string SoundCloseWithProfit= "::Files\\Sounds\\VERYGOOD.WAV";
string SoundCloseWithLoss  = "::Files\\Sounds\\DRIVEBY.WAV";
Vorrei anche ricordare che oltre ai file audio utilizzati come risorse, in Expert Advisor è anche possibile memorizzare immagini *.bmp per scopi di interfaccia, file di testo e persino indicatori. Gli EA per MetaTrader 5 sono ora considerati applicazioni completamente funzionali - questo è molto conveniente in quanto invece di diversi file è sufficiente passarne uno.
Continuiamo. Nei parametri esterni, dobbiamo aggiungere il parametro UseSound per avere l'opportunità di disabilitare i suoni:
//--- External parameters of the Expert Advisor
input  int        NumberOfBars =2;    // Number of one-direction bars
sinput double     Lot          =0.1;  // Lot
input  double     TakeProfit   =100;  // Take Profit
input  double     StopLoss     =50;   // Stop Loss
input  double     TrailingStop =10;   // Trailing Stop
input  bool       Reverse      =true; // Position reversal
sinput bool       UseSound     =true; // Sound notifications
In Include\Enums.mqh viene, creata l'enumerazione ENUM_SOUNDS per i suoni.
//--- Sounds
enum ENUM_SOUNDS
  {
   SOUND_ERROR             =0,   // Error
   SOUND_OPEN_POSITION     = 1,  // Position opening/position volume increase/pending order triggering
   SOUND_ADJUST_ORDER      = 2,  // Stop Loss/Take Profit/pending order setting
   SOUND_CLOSE_WITH_PROFIT = 3,  // Position closing at profit
   SOUND_CLOSE_WITH_LOSS   = 4   // Position closing at loss
  };
Questi identificatori saranno necessari per la funzione personalizzata PlaySoundByID().
//+------------------------------------------------------------------+
//| Playing sounds                                                   |
//+------------------------------------------------------------------+
void PlaySoundByID(ENUM_SOUNDS id)
  {
//--- If it is the real-time mode and sounds are enabled
   if(IsRealtime() && UseSound)
     {
      //--- Play the sound based on the identifier passed
      switch(id)
        {
         case SOUND_ERROR              : PlaySound(SoundError);            break;
         case SOUND_OPEN_POSITION      : PlaySound(SoundOpenPosition);     break;
         case SOUND_ADJUST_ORDER       : PlaySound(SoundAdjustOrder);      break;
         case SOUND_CLOSE_WITH_PROFIT  : PlaySound(SoundCloseWithProfit);  break;
         case SOUND_CLOSE_WITH_LOSS    : PlaySound(SoundCloseWithLoss);    break;
        }
     }
  }
Durante le operazioni di trading eseguite dall'Expert Advisor, gli effetti sonori possono essere riprodotti chiamando PlaySoundByID() dalle funzioni di trading appropriate. Vediamo come questo viene implementato nella funzione OpenPosition():
//+------------------------------------------------------------------+
//| Opening a position                                               |
//+------------------------------------------------------------------+
void OpenPosition(double lot,
                  ENUM_ORDER_TYPE order_type,
                  double price,
                  double sl,
                  double tp,
                  string comment)
  {
//--- Set the magic number in the trading structure
   trade.SetExpertMagicNumber(0);
//--- Set the slippage in points
   trade.SetDeviationInPoints(CorrectValueBySymbolDigits(10));
//--- The Instant Execution and Market Execution modes
//    *** Starting with build 803, Stop Loss and Take Profit                             ***
//    *** can be set upon opening a position in the SYMBOL_TRADE_EXECUTION_MARKET mode ***
   if(symb.execution_mode==SYMBOL_TRADE_EXECUTION_INSTANT ||
      symb.execution_mode==SYMBOL_TRADE_EXECUTION_MARKET)
     {
      //--- If the position failed to open
      if(!trade.PositionOpen(_Symbol,order_type,lot,price,sl,tp,comment))
        {
         //--- Play the error sound and print the relevant message
         PlaySoundByID(SOUND_ERROR);
         Print("Error opening the position: ",GetLastError()," - ",ErrorDescription(GetLastError()));
        }
      //--- Otherwise play the position opening sound
      else
         PlaySoundByID(SOUND_OPEN_POSITION);
     }
  }
Se, tuttavia, una posizione viene chiusa a Stop Loss, Take Profit, manualmente o in altro modo, questo evento deve essere monitorato nella funzione OnTrade(). Per implementare questo, scriveremo un'altra funzione, SoundNotification(), che sarà responsabile dei controlli necessari: se la cronologia dei deal mostra un nuovo deal con l’identificatore DEAL_ENTRY_OUT o DEAL_ENTRY_INOUT (chiusura totale / parziale della posizione o un'inversione) per il simbolo corrente, il programma controllerà se quell'affare è stato chiuso a profitto o perdita e riprodurrà il suono appropriato.
//+------------------------------------------------------------------+
//| Sound notification                                               |
//+------------------------------------------------------------------+
void SoundNotification()
  {
//--- If it is the real-time mode and sounds are enabled
   if(IsRealtime() && UseSound)
     {
      ulong        ticket      =0; // Deal ticket
      int          total       =0; // Total deals
      static ulong last_ticket =0; // Last ticket prior to this check
      //--- Get the complete history
      if(!HistorySelect(0,TimeCurrent()+1000))
         return;
      //--- Get the number of deals in the obtained list
      total=HistoryDealsTotal();
      //--- In the obtained list, iterate over all deals from the last one to the first one
      for(int i=total-1; i>=0; i--)
        {
         //--- If the deal ticket by its position in the list has been obtained
         if((ticket=HistoryDealGetTicket(i))>0)
           {
            //--- get the symbol of the deal
            GetHistoryDealProperties(ticket,D_SYMBOL);
            //--- If the symbol of the deal and the current symbol are the same
            if(deal.symbol==_Symbol)
              {
               //--- get the direction of the deal
               GetHistoryDealProperties(ticket,D_ENTRY);
               //--- If it is position closing, volume decrease or reversal
               if(deal.entry==DEAL_ENTRY_OUT || deal.entry==DEAL_ENTRY_INOUT)
                 {
                  //--- If the ticket of the current deal from the list (the last deal for the symbol) is equal to the previous ticket
                  //    or this is the initialization of the ticket of the last deal
                  if(ticket==last_ticket || last_ticket==0)
                    {
                     //--- Save the ticket and exit
                     last_ticket=ticket;
                     return;
                    }
                  //--- Get the result of the deal
                  GetHistoryDealProperties(ticket,D_PROFIT);
                  //--- In case of profit
                  if(deal.profit>=0)
                    {
                     //--- Profit sound
                     PlaySoundByID(SOUND_CLOSE_WITH_PROFIT);
                     //--- Save the ticket number
                     last_ticket=ticket;
                     return;
                    }
                  //--- In case of loss
                  if(deal.profit<0)
                    {
                     //--- Loss sound
                     PlaySoundByID(SOUND_CLOSE_WITH_LOSS);
                     //--- Save the ticket number
                     last_ticket=ticket;
                     return;
                    }
                 }
              }
           }
        }
     }
  }
La funzione SoundNotification() deve essere inserita nelle funzioni OnInit() e OnTrade():
//+------------------------------------------------------------------+
//| Initialization                                                   |
//+------------------------------------------------------------------+
int OnInit()
  {
//--- Initialize the new bar
   CheckNewBar();
//--- Initialize tickets of the last deals for the symbol
   SoundNotification();
//--- Initialization completed successfully
   return(INIT_SUCCEEDED);
  }
//+------------------------------------------------------------------+
//| Monitoring trade events                                          |
//+------------------------------------------------------------------+
void OnTrade()
  {
//--- Sound notification
   SoundNotification();
  }
La notifica audio è stata aggiunta anche alla fine della funzione ModifyTrailingStop() quando si modifica il livello Trailing Stop.
Conclusione
Questo è tutto. Tutti i file a scopo di test sono disponibili per il download negli allegati all'articolo. Parlando di suoni nel terminale, vorrei attirare la vostra attenzione su un'interessante soluzione disponibile in Code Base sotto il nome cmIDI (di Integer): permette di riprodurre file MIDI in MetaTrader 5. Buona Fortuna!
Tradotto dal russo da MetaQuotes Ltd.
Articolo originale: https://www.mql5.com/ru/articles/748
 Estensione della MQL5 Standard Library e riutilizzo del codice
- App di trading gratuite
- Oltre 8.000 segnali per il copy trading
- Notizie economiche per esplorare i mercati finanziari
Accetti la politica del sito e le condizioni d’uso