
Guia prático do MQL5: Notificações sonoras para eventos de negociação do MetaTrader 5

Introdução
Neste artigo vamos considerar questões como a inclusão de arquivos sonoros no arquivo do Expert Advisor e, por conseguinte, a adição de notificações sonoras aos eventos de negociação. O fato de que os arquivos serão incluídos significa que os arquivos sonoros estarão localizados dentro do Expert Advisor. Assim, ao dar a versão compilada do Expert Advisor (*.ex5) para outro usuário, você não terá que fornecer também os arquivos sonoros e explicar onde eles precisam ser salvos.
Desenvolvimento
Para fins de teste, vamos pegar o Expert Advisor a partir do artigo anterior "Guia prático do MQL5: Salvando resultados de otimização de um Expert Advisor baseado em critérios especificados". Para torná-lo mais simples, removi tudo o que não seja relevante para o tema atual.
Para adicionar uma notificação sonora a um evento de negociação usando os recursos do MQL5, podemos usar as funções Alert() e PlaySound(). Se você optar pela função Alert(), ela sempre vai tocar a mesma notificação sonora e abrir uma janela com a mensagem relevante. Você pode vê-la em ação no artigo intitulado "Guia prático do MQL5: Utilização de diferentes modos de impressão".
O som de alerta pode ser definido nas configurações do terminal: Ferramentas -> Opções ou Ctrl+O. Além disso, na guia de Eventos, precisamos marcar a opção "Ativar" para habilitar as notificações sonoras para eventos e selecionar o arquivo de som apropriado na lista suspensa de alertas.
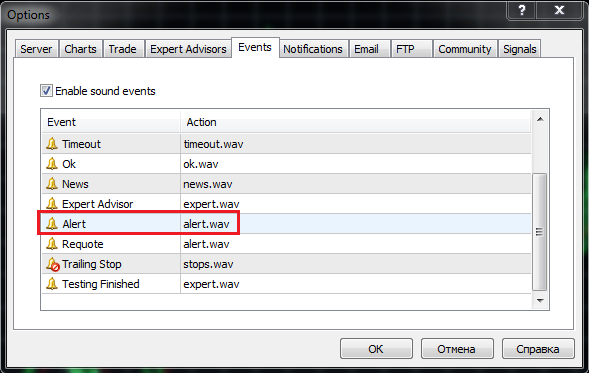
Fig. 1. A aba "Eventos" nas configurações do terminal
No entanto, você também tem a oportunidade de definir uma notificação sonora para qualquer evento do programa personalizado. Para isso, utilizamos a função PlaySound().
Antes de adicionar notificações sonoras ao Expert Advisor, vamos criar um Expert Advisor para fins de teste. Vamos implementar uma ideia de abertura de um painel sonoro durante o carregamento de um Expert Advisor no gráfico. O painel de som será feito de objetos gráficos, como o botão (OBJ_BUTTON). Cada botão terá o seu próprio som único atribuído a ele que será reproduzido quando o mesmo for clicado.
Eu estava online e encontrei 25 diferentes arquivos de som no formato *.wav (eles estão disponíveis para download no final do artigo). Eles devem ser colocados na pasta MetaTrader 5\MQL5\Files\Sounds. Para pegar o jeito de trabalhar com arquivos de som, vamos agora criar um novo Expert Advisor usando o assistente do MQL5. No início, especificamos o tamanho da matriz com base no número de botões no painel de som (serão 26 botões no total).
//--- Array size
#define ARRAY_SIZE 26
Em seguida, precisamos especificar as pastas e os nomes dos arquivos que fornecerão recursos ao Expert Advisor. Isso pode ser feito utilizando a função diretiva #resource: Depois da diretiva, especificamos o local do arquivo entre aspas duplas:
//--- Sound files
#resource "\\Files\\Sounds\\alert.wav"
#resource "\\Files\\Sounds\\AHOOGA.wav"
#resource "\\Files\\Sounds\\APPLAUSE.wav"
#resource "\\Files\\Sounds\\BONK.wav"
#resource "\\Files\\Sounds\\CARBRAKE.wav"
#resource "\\Files\\Sounds\\CASHREG.wav"
#resource "\\Files\\Sounds\\CLAP.wav"
#resource "\\Files\\Sounds\\CORKPOP.wav"
#resource "\\Files\\Sounds\\DOG.wav"
#resource "\\Files\\Sounds\\DRIVEBY.wav"
#resource "\\Files\\Sounds\\DRUMROLL.wav"
#resource "\\Files\\Sounds\\EXPLODE.wav"
#resource "\\Files\\Sounds\\FINALBEL.wav"
#resource "\\Files\\Sounds\\FROG.wav"
#resource "\\Files\\Sounds\\GLASS.wav"
#resource "\\Files\\Sounds\\GUNSHOT.wav"
#resource "\\Files\\Sounds\\LASER.wav"
#resource "\\Files\\Sounds\\LATNWHIS.wav"
#resource "\\Files\\Sounds\\PIG.wav"
#resource "\\Files\\Sounds\\RICOCHET.wav"
#resource "\\Files\\Sounds\\RINGIN.wav"
#resource "\\Files\\Sounds\\SIREN.wav"
#resource "\\Files\\Sounds\\TRAIN.wav"
#resource "\\Files\\Sounds\\UH_OH.wav"
#resource "\\Files\\Sounds\\VERYGOOD.wav"
#resource "\\Files\\Sounds\\WHOOSH.wav"
Agora, precisamos criar três matrizes sequenciais que conterão as localizações dos arquivos de recursos, nomes dos objetos gráficos e o texto exibido nos objetos gráficos. Por favor, observe o uso de dois pontos ao especificar os locais de arquivos - é uma indicação especial para chamar o recurso pelo nome.
//--- Sound file location
string sound_paths[ARRAY_SIZE]=
  {
   "::Files\\Sounds\\alert.wav",
   "::Files\\Sounds\\AHOOGA.wav",
   "::Files\\Sounds\\APPLAUSE.wav",
   "::Files\\Sounds\\BONK.wav",
   "::Files\\Sounds\\CARBRAKE.wav",
   "::Files\\Sounds\\CASHREG.wav",
   "::Files\\Sounds\\CLAP.wav",
   "::Files\\Sounds\\CORKPOP.wav",
   "::Files\\Sounds\\DOG.wav",
   "::Files\\Sounds\\DRIVEBY.wav",
   "::Files\\Sounds\\DRUMROLL.wav",
   "::Files\\Sounds\\EXPLODE.wav",
   "::Files\\Sounds\\FINALBEL.wav",
   "::Files\\Sounds\\FROG.wav",
   "::Files\\Sounds\\GLASS.wav",
   "::Files\\Sounds\\GUNSHOT.wav",
   "::Files\\Sounds\\LASER.wav",
   "::Files\\Sounds\\LATNWHIS.wav",
   "::Files\\Sounds\\PIG.wav",
   "::Files\\Sounds\\RICOCHET.wav",
   "::Files\\Sounds\\RINGIN.wav",
   "::Files\\Sounds\\SIREN.wav",
   "::Files\\Sounds\\TRAIN.wav",
   "::Files\\Sounds\\UH_OH.wav",
   "::Files\\Sounds\\VERYGOOD.wav",
   "::Files\\Sounds\\WHOOSH.wav"
  };
//--- Names of graphical objects
string sound_names[ARRAY_SIZE]=
  {
   "sound_button01","sound_button02",
   "sound_button03","sound_button04",
   "sound_button05","sound_button06",
   "sound_button07","sound_button08",
   "sound_button09","sound_button10",
   "sound_button11","sound_button12",
   "sound_button13","sound_button14",
   "sound_button15","sound_button16",
   "sound_button17","sound_button18",
   "sound_button19","sound_button20",
   "sound_button21","sound_button22",
   "sound_button23","sound_button24",
   "sound_button25","sound_button26"
  };
//--- Text displayed on graphical objects
string sound_texts[ARRAY_SIZE]=
  {
   "ALERT","AHOOGA","APPLAUSE","BONK","CARBRAKE","CASHREG",
   "CLAP","CORKPOP","DOG","DRIVEBY","DRUMROLL","EXPLODE","FINALBEL",
   "FROG","GLASS","GUNSHOT","LASER","LATNWHIS","PIG",
   "RICOCHET","RINGIN","SIREN","TRAIN","UH_OH","VERYGOOD","WHOOSH"
  };
Vamos escrever uma função, CreateButton(), que criará o objeto gráfico "Botão" em um gráfico com as propriedades especificadas:
//+------------------------------------------------------------------+
//| Creating the Button object                                       |
//+------------------------------------------------------------------+
void CreateButton(long              chart_id,         // chart id
                  int               sub_window,       // window number
                  string            name,             // object name
                  string            text,             // displayed name
                  ENUM_ANCHOR_POINT anchor,           // anchor point
                  ENUM_BASE_CORNER  corner,           // chart corner
                  string            font_name,        // font
                  int               font_size,        // font size
                  color             font_color,       // font color
                  color             background_color, // background color
                  color             border_color,     // border color
                  int               x_size,           // width
                  int               y_size,           // height
                  int               x_distance,       // X-coordinate
                  int               y_distance,       // Y-coordinate
                  long              z_order)          // Z-order
  {
//--- Creating an object
   if(ObjectCreate(chart_id,name,OBJ_BUTTON,sub_window,0,0))
     {
      ObjectSetString(chart_id,name,OBJPROP_TEXT,text);                  // setting name
      ObjectSetString(chart_id,name,OBJPROP_FONT,font_name);             // setting font
      ObjectSetInteger(chart_id,name,OBJPROP_COLOR,font_color);          // setting font color
      ObjectSetInteger(chart_id,name,OBJPROP_BGCOLOR,background_color);  // setting background color
      ObjectSetInteger(chart_id,name,OBJPROP_BORDER_COLOR,border_color); // setting border color
      ObjectSetInteger(chart_id,name,OBJPROP_ANCHOR,anchor);             // setting anchor point
      ObjectSetInteger(chart_id,name,OBJPROP_CORNER,corner);             // setting chart corner
      ObjectSetInteger(chart_id,name,OBJPROP_FONTSIZE,font_size);        // setting font size
      ObjectSetInteger(chart_id,name,OBJPROP_XSIZE,x_size);              // setting width X
      ObjectSetInteger(chart_id,name,OBJPROP_YSIZE,y_size);              // setting height Y
      ObjectSetInteger(chart_id,name,OBJPROP_XDISTANCE,x_distance);      // setting X-coordinate
      ObjectSetInteger(chart_id,name,OBJPROP_YDISTANCE,y_distance);      // setting Y-coordinate
      ObjectSetInteger(chart_id,name,OBJPROP_SELECTABLE,false);          // cannot select the object if FALSE
      ObjectSetInteger(chart_id,name,OBJPROP_STATE,false);               // button state (clicked/unclicked)
      ObjectSetInteger(chart_id,name,OBJPROP_ZORDER,z_order);            // higher/lower Z-order
      ObjectSetString(chart_id,name,OBJPROP_TOOLTIP,"\n");               // no tooltip if "\n"
     }
  }
Para torná-lo mais lúdico, a cor de cada botão será selecionada aleatoriamente. Para implementar isso, vamos escrever uma função simples - GetRandomColor():
//+------------------------------------------------------------------+
//| Returning a random color                                         |
//+------------------------------------------------------------------+
color GetRandomColor()
  {
//--- Select a random color from 0 to 25
   switch(MathRand()%26)
     {
      case 0  : return(clrOrange);           break;
      case 1  : return(clrGold);             break;
      case 2  : return(clrChocolate);        break;
      case 3  : return(clrChartreuse);       break;
      case 4  : return(clrLime);             break;
      case 5  : return(clrSpringGreen);      break;
      case 6  : return(clrMediumBlue);       break;
      case 7  : return(clrDeepSkyBlue);      break;
      case 8  : return(clrBlue);             break;
      case 9  : return(clrSeaGreen);         break;
      case 10 : return(clrRed);              break;
      case 11 : return(clrSlateGray);        break;
      case 12 : return(clrPeru);             break;
      case 13 : return(clrBlueViolet);       break;
      case 14 : return(clrIndianRed);        break;
      case 15 : return(clrMediumOrchid);     break;
      case 16 : return(clrCrimson);          break;
      case 17 : return(clrMediumAquamarine); break;
      case 18 : return(clrDarkGray);         break;
      case 19 : return(clrSandyBrown);       break;
      case 20 : return(clrMediumSlateBlue);  break;
      case 21 : return(clrTan);              break;
      case 22 : return(clrDarkSalmon);       break;
      case 23 : return(clrBurlyWood);        break;
      case 24 : return(clrHotPink);          break;
      case 25 : return(clrLightSteelBlue);   break;
      //---
      default : return(clrGold);
     }
//---
   return(clrGold);
  }
Vamos agora escrever a função que adicionará o painel de som ao gráfico - SetSoundPanel():
//+------------------------------------------------------------------+
//| Adding the sound panel to the chart                              |
//+------------------------------------------------------------------+
void SetSoundPanel()
  {
   int   column_count =0;       // Column counter
   int   x_dist       =10;      // Indent from the left side of the chart
   int   y_dist       =15;      // Indent from the top of the chart
   int   x_size       =100;     // Button width
   int   y_size       =20;      // Button height
   color button_color =clrNONE; // Button color
//--- Set the objects
   for(int i=0; i<ARRAY_SIZE; i++)
     {
      //--- Increase the column counter
      column_count++;
      //--- Get the button color
      button_color=GetRandomColor();
      //--- Draw a button
      CreateButton(0,0,sound_names[i],sound_texts[i],
                   ANCHOR_LEFT_UPPER,CORNER_LEFT_UPPER,"Arial",8,
                   clrWhite,button_color,button_color,x_size,y_size,x_dist,y_dist,1);
      //--- If two buttons have already been set in the same row
      if(column_count==2)
        {
         x_dist=10;        // Move the X-coordinate to the initial position
         y_dist+=20;       // Set the Y-coordinate for the next row
         column_count=0;   // Zero out the counter
        }
      else
      //--- Set the X-coordinate for the next button
         x_dist+=x_size;
     }
//--- Refresh the chart
   ChartRedraw(0);
  }
Para remover o painel do gráfico, vamos usar as funções fornecidas abaixo:
//+------------------------------------------------------------------+
//| Deleting the info panel                                          |
//+------------------------------------------------------------------+
void DeleteSoundPanel()
  {
//--- Delete position properties and their values
   for(int i=0; i<ARRAY_SIZE; i++)
      DeleteObjectByName(name_sound_object[i]);
//--- Redraw the chart
   ChartRedraw();
  }
//+------------------------------------------------------------------+
//| Deleting objects by name                                         |
//+------------------------------------------------------------------+
void DeleteObjectByName(string name)
  {
//--- If the object is found
   if(ObjectFind(ChartID(),name)>=0)
     {
      //--- If an error occurred when deleting, print the relevant message
      if(!ObjectDelete(ChartID(),name))
         Print("Error ("+IntegerToString(GetLastError())+") when deleting the object!");
     }
  }
Assim, ao carregar o Expert Advisor, o painel será definido no gráfico a partir da função OnInit() e excluído do gráfico ao remover o Expert Advisor pela função OnDeinit().
//+------------------------------------------------------------------+
//| Custom indicator initialization function                         |
//+------------------------------------------------------------------+
void OnInit()
  {
//--- Set the sound panel
   SetSoundPanel();
  }
//+------------------------------------------------------------------+
//| Deinitialization function of the expert advisor                  |
//+------------------------------------------------------------------+
void OnDeinit(const int reason)
  {
//--- Delete the sound panel
   DeleteSoundPanel();
  }
Agora só precisamos implementar a interação com o painel para que o som apropriado seja tocado quando um determinado botão for clicado. Para torná-lo ainda mais animado, mudaremos as cores dos botões quando um dos botões do painel de som for pressionado. Para implementar isso, vamos precisar da função ChangeColorsOnSoundPanel() cujo código é dado abaixo:
//+------------------------------------------------------------------+
//| Changing colors on the sound panel                               |
//+------------------------------------------------------------------+
void ChangeColorsOnSoundPanel()
  {
   color clr=clrNONE; // Button color
//--- Iterate over all buttons in a loop and change their color
   for(int i=0; i<ARRAY_SIZE; i++)
     {
      //--- Get the new color
      clr=GetRandomColor();
      //--- Set the border color
      ObjectSetInteger(0,sound_names[i],OBJPROP_BGCOLOR,clr);
      //--- Set the background color
      ObjectSetInteger(0,sound_names[i],OBJPROP_BORDER_COLOR,clr);
      //--- Unclicked button
      ObjectSetInteger(0,sound_names[i],OBJPROP_STATE,false);
      //--- Refresh the chart
      ChartRedraw(0);
      //--- Wait for 20 ms (lag)
      Sleep(20);
     }
  }
E, finalmente, o seguinte código deve ser adicionado à função OnChartEvent():
//+------------------------------------------------------------------+
//| Event handler                                                    |
//+------------------------------------------------------------------+
void OnChartEvent(const int     id,     // Event identifier
                  const long&   lparam, // Parameter of the event of type long
                  const double& dparam, // Parameter of the event of type double
                  const string& sparam) // Parameter of the event of type string
  {
//--- If there was an event of left-clicking on the object
   if(id==CHARTEVENT_OBJECT_CLICK)
     {
      //--- If the object name contains "sound_button"
      if(StringFind(sparam,"sound_button",0)>=0)
        {
         //--- Play the sound based on the object name
         //    5019 - ERR_FILE_NOT_EXIST - The file does not exist
         if(!PlaySound(GetSoundPath(sparam)))
            Print("Error: ",GetLastError());
         //--- Change colors of all buttons
         ChangeColorsOnSoundPanel();
        }
     }
  }
A sequência destacada no código acima sugere que a localização do arquivo de som seja passada à função PlaySound() usando a função GetSoundPath() customizada. O código da função GetSoundPath() é fornecido abaixo:
//+------------------------------------------------------------------+
//| Returning sound file location by the object name                 |
//+------------------------------------------------------------------+
string GetSoundPath(string object_name)
  {
//--- Iterate over all sound panel objects in a loop
   for(int i=0; i<ARRAY_SIZE; i++)
     {
      //--- If the name of the object clicked in the chart
      //    matches one of those available on the panel, return the file location
      if(object_name==name_sound_object[i])
         return(path_sound_object[i]);
     }
//---
   return("");
  }
Agora, está tudo pronto. O painel de som (o programa pode ser baixado dos anexos ao artigo), será definido assim que o Expert Advisor esteja anexado ao gráfico:

Fig. 2. O painel de som no gráfico
Assim, está claro agora o princípio do trabalho com arquivos sonoros. Voltamos ao nosso Expert Advisor do artigo anterior intitulado "Guia prático do MQL5: Salvando resultados de otimização de um Expert Advisor baseado em critérios especificados e decidir quais sons usaremos no Expert Advisor. Vamos criar Resources.mqh e incluí-lo no arquivo principal do Expert Advisor.
//--- Include custom libraries
#include "Include/Errors.mqh"
#include "Include/Enums.mqh"
#include "Include/Resources.mqh"
#include "Include/TradeSignals.mqh"
#include "Include/TradeFunctions.mqh"
#include "Include/ToString.mqh"
#include "Include/Auxiliary.mqh"
Vamos agora selecionar os arquivos para os principais eventos de negociação.
//--- Sound files
#resource "\\Files\\Sounds\\AHOOGA.WAV"   // Error
#resource "\\Files\\Sounds\\CASHREG.WAV"  // Position opening/position volume increase/pending order triggering
#resource "\\Files\\Sounds\\WHOOSH.WAV"   // Pending order/Stop Loss/Take Profit setting/modification
#resource "\\Files\\Sounds\\VERYGOOD.WAV" // Position closing at profit
#resource "\\Files\\Sounds\\DRIVEBY.WAV"  // Position closing at loss
//--- Sound file location
string SoundError          = "::Files\\Sounds\\AHOOGA.WAV";
string SoundOpenPosition   = "::Files\\Sounds\\CASHREG.WAV";
string SoundAdjustOrder    = "::Files\\Sounds\\WHOOSH.WAV";
string SoundCloseWithProfit= "::Files\\Sounds\\VERYGOOD.WAV";
string SoundCloseWithLoss  = "::Files\\Sounds\\DRIVEBY.WAV";
Gostaria também de mencionar que, além dos arquivos de som utilizados como recursos, no Expert Advisor você também pode armazenar imagens *.bmp para fins de interface, arquivos de texto e até mesmo indicadores. EAs para MetaTrader 5 agora são considerados aplicativos totalmente funcionais - isto é muito conveniente, em vez de vários arquivos você só precisa processar um.
Vamos continuar. Nos parâmetros externos, precisamos adicionar o parâmetro UseSound para termos a oportunidade de desativar os sons:
//--- External parameters of the Expert Advisor
input  int        NumberOfBars =2;    // Number of one-direction bars
sinput double     Lot          =0.1;  // Lot
input  double     TakeProfit   =100;  // Take Profit
input  double     StopLoss     =50;   // Stop Loss
input  double     TrailingStop =10;   // Trailing Stop
input  bool       Reverse      =true; // Position reversal
sinput bool       UseSound     =true; // Sound notifications
Em Include\Enums.mqh, criamos a enumeração ENUM_SOUNDS para sons.
//--- Sounds
enum ENUM_SOUNDS
  {
   SOUND_ERROR             =0,   // Error
   SOUND_OPEN_POSITION     = 1,  // Position opening/position volume increase/pending order triggering
   SOUND_ADJUST_ORDER      = 2,  // Stop Loss/Take Profit/pending order setting
   SOUND_CLOSE_WITH_PROFIT = 3,  // Position closing at profit
   SOUND_CLOSE_WITH_LOSS   = 4   // Position closing at loss
  };
Esses identificadores serão necessários para a função de customização PlaySoundByID().
//+------------------------------------------------------------------+
//| Playing sounds                                                   |
//+------------------------------------------------------------------+
void PlaySoundByID(ENUM_SOUNDS id)
  {
//--- If it is the real-time mode and sounds are enabled
   if(IsRealtime() && UseSound)
     {
      //--- Play the sound based on the identifier passed
      switch(id)
        {
         case SOUND_ERROR              : PlaySound(SoundError);            break;
         case SOUND_OPEN_POSITION      : PlaySound(SoundOpenPosition);     break;
         case SOUND_ADJUST_ORDER       : PlaySound(SoundAdjustOrder);      break;
         case SOUND_CLOSE_WITH_PROFIT  : PlaySound(SoundCloseWithProfit);  break;
         case SOUND_CLOSE_WITH_LOSS    : PlaySound(SoundCloseWithLoss);    break;
        }
     }
  }
Durante as operações de negociação realizadas pelo Expert Advisor, os efeitos sonoros podem ser tocados chamando PlaySoundByID() a partir das funções de negociação adequadas. Vamos ver como isso é implementado na função OpenPosition():
//+------------------------------------------------------------------+
//| Opening a position                                               |
//+------------------------------------------------------------------+
void OpenPosition(double lot,
                  ENUM_ORDER_TYPE order_type,
                  double price,
                  double sl,
                  double tp,
                  string comment)
  {
//--- Set the magic number in the trading structure
   trade.SetExpertMagicNumber(0);
//--- Set the slippage in points
   trade.SetDeviationInPoints(CorrectValueBySymbolDigits(10));
//--- The Instant Execution and Market Execution modes
//    *** Starting with build 803, Stop Loss and Take Profit                             ***
//    *** can be set upon opening a position in the SYMBOL_TRADE_EXECUTION_MARKET mode ***
   if(symb.execution_mode==SYMBOL_TRADE_EXECUTION_INSTANT ||
      symb.execution_mode==SYMBOL_TRADE_EXECUTION_MARKET)
     {
      //--- If the position failed to open
      if(!trade.PositionOpen(_Symbol,order_type,lot,price,sl,tp,comment))
        {
         //--- Play the error sound and print the relevant message
         PlaySoundByID(SOUND_ERROR);
         Print("Error opening the position: ",GetLastError()," - ",ErrorDescription(GetLastError()));
        }
      //--- Otherwise play the position opening sound
      else
         PlaySoundByID(SOUND_OPEN_POSITION);
     }
  }
Se, no entanto, a posição estiver fechada em Stop Loss, Take Profit, de maneira manual ou de outra forma, este evento deve ser monitorado na função OnTrade(). Para implementar isso, vamos escrever mais uma função, SoundNotification(), que será responsável pelas verificações necessárias: se o histórico de negócios mostra um novo acordo com o identificador DEAL_ENTRY_OUT ou DEAL_ENTRY_INOUT (fechamento total/parcial da posição ou uma reversão), para o símbolo atual, o programa verificará se aquele negócio fechou em lucro ou perda, e tocará o som apropriado.
//+------------------------------------------------------------------+
//| Sound notification                                               |
//+------------------------------------------------------------------+
void SoundNotification()
  {
//--- If it is the real-time mode and sounds are enabled
   if(IsRealtime() && UseSound)
     {
      ulong        ticket      =0; // Deal ticket
      int          total       =0; // Total deals
      static ulong last_ticket =0; // Last ticket prior to this check
      //--- Get the complete history
      if(!HistorySelect(0,TimeCurrent()+1000))
         return;
      //--- Get the number of deals in the obtained list
      total=HistoryDealsTotal();
      //--- In the obtained list, iterate over all deals from the last one to the first one
      for(int i=total-1; i>=0; i--)
        {
         //--- If the deal ticket by its position in the list has been obtained
         if((ticket=HistoryDealGetTicket(i))>0)
           {
            //--- get the symbol of the deal
            GetHistoryDealProperties(ticket,D_SYMBOL);
            //--- If the symbol of the deal and the current symbol are the same
            if(deal.symbol==_Symbol)
              {
               //--- get the direction of the deal
               GetHistoryDealProperties(ticket,D_ENTRY);
               //--- If it is position closing, volume decrease or reversal
               if(deal.entry==DEAL_ENTRY_OUT || deal.entry==DEAL_ENTRY_INOUT)
                 {
                  //--- If the ticket of the current deal from the list (the last deal for the symbol) is equal to the previous ticket
                  //    or this is the initialization of the ticket of the last deal
                  if(ticket==last_ticket || last_ticket==0)
                    {
                     //--- Save the ticket and exit
                     last_ticket=ticket;
                     return;
                    }
                  //--- Get the result of the deal
                  GetHistoryDealProperties(ticket,D_PROFIT);
                  //--- In case of profit
                  if(deal.profit>=0)
                    {
                     //--- Profit sound
                     PlaySoundByID(SOUND_CLOSE_WITH_PROFIT);
                     //--- Save the ticket number
                     last_ticket=ticket;
                     return;
                    }
                  //--- In case of loss
                  if(deal.profit<0)
                    {
                     //--- Loss sound
                     PlaySoundByID(SOUND_CLOSE_WITH_LOSS);
                     //--- Save the ticket number
                     last_ticket=ticket;
                     return;
                    }
                 }
              }
           }
        }
     }
  }
A função SoundNotification() deve ser instalada nas funções OnInit() e OnTrade():
//+------------------------------------------------------------------+
//| Initialization                                                   |
//+------------------------------------------------------------------+
int OnInit()
  {
//--- Initialize the new bar
   CheckNewBar();
//--- Initialize tickets of the last deals for the symbol
   SoundNotification();
//--- Initialization completed successfully
   return(INIT_SUCCEEDED);
  }
//+------------------------------------------------------------------+
//| Monitoring trade events                                          |
//+------------------------------------------------------------------+
void OnTrade()
  {
//--- Sound notification
   SoundNotification();
  }
A notificação sonora também foi adicionada no final da função ModifyTrailingStop() ao modificar o nível do limite móvel.
Conclusão
Isso é tudo. Todos os arquivos para fins de teste estão disponíveis para download nos anexos ao artigo. Falando de sons no terminal, eu gostaria de chamar sua atenção para uma solução interessante disponível no código base sob o nome CMIDI (pelo Integer): ele permite a você reproduzir arquivos MIDI no MetaTrader 5. Boa sorte!
Traduzido do russo pela MetaQuotes Ltd.
Artigo original: https://www.mql5.com/ru/articles/748
 Estendendo a biblioteca padrão do MQL5 e reutilizando o código
- Aplicativos de negociação gratuitos
- 8 000+ sinais para cópia
- Notícias econômicas para análise dos mercados financeiros
Você concorda com a política do site e com os termos de uso