
Guía práctica de MQL5: Notificaciones sonoras para los eventos de trading de MetaTrader 5

Introducción
En este artículo vamos a tratar el tema de la inclusión de archivos de sonido en el archivo del Asesor Experto y con ello añadir notificaciones sonoras a los eventos de trading. El hecho de que se incluyan los archivos significa que los archivos de sonido van a estar ubicados dentro del Asesor Experto. De modo que al proporcionar una versión compilada del Asesor Experto (*.ex5) a otro usuario, no tendrá que proporcionarle los archivos de sonido y explicarle dónde hay que guardarlos.
Desarrollo
Para las pruebas, usaremos el Asesor Experto del artículo anterior "Guía práctica de MQL5: Guardar los resultados de la optimización de un Asesor Experto en base a unos criterios especificados". Para simplificar, he quitado todos los elementos que no sean relevantes para el presente tema.
Para añadir notificaciones sonoras a un evento de trading usando los recursos de MQL5, podemos utilizar las funciones Alert() y PlaySound(). Si opta por la función Alert(), esta siempre reproducirá la misma notificación sonora y abrirá una ventana con el mensaje correspondiente. Lo puede comprobar en el artículo "Guía práctica de MQL5: Utilizar diferentes modos de visualización".
Se puede definir el sonido de la alerta (alert) en los ajustes del terminal: Herramientas -> Opciones o Ctrl+O. Luego, en la pestaña Eventos, tenemos que activar la casilla "Enable" con el fin de habilitar las notificaciones sonoras para los eventos y seleccionamos el archivo de sonido correspondiente en la lista desplegable de alertas.
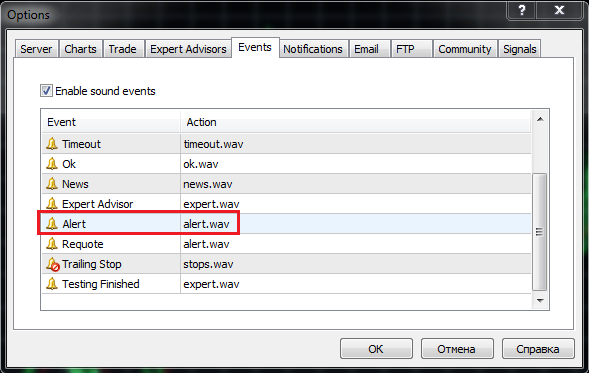
Fig. 1. La pestaña "Eventos" en los ajustes del terminal
No obstante, también tiene la posibilidad de establecer una notificación sonora única para cualquier evento de programa personalizado. Para ello, usamos la función PlaySound().
Antes de añadir notificaciones sonoras al Asesor Experto, vamos a crear un Asesor Experto para las pruebas. Vamos a implementar la idea de abrir un panel de sonido al cargar el Asesor Experto en el gráfico. El panel de sonido estará hecho de objetos, como un botón (OBJ_BUTTON). Cada botón tendrá asignado su propio y único sonido que se reproducirá al pulsar el botón.
He buscado por internet y encontré 25 archivos de sonido diferentes en el formato *.wav (están disponibles para su descarga al final del artículo). Hay que colocarlos en la carpeta MetaTrader 5\MQL5\Files\Sounds. Para familiarizarse con el uso de archivos de sonido, vamos a crear un nuevo Asesor Experto mediante MQL5 Wizard. Al principio, indicamos el tamaño de la matriz basado en el número de botones en el panel de sonido (habrán 26 botones en total).
//--- Array size
#define ARRAY_SIZE 26
A continuación, tenemos que indicar las carpetas y los nombres de los archivos que van a proporcionar los recursos a nuestro Asesor Experto. Se puede hacer esto mediante la directiva #resource. Después de la directiva, especificamos la ubicación del archivo entre comillas:
//--- Sound files
#resource "\\Files\\Sounds\\alert.wav"
#resource "\\Files\\Sounds\\AHOOGA.wav"
#resource "\\Files\\Sounds\\APPLAUSE.wav"
#resource "\\Files\\Sounds\\BONK.wav"
#resource "\\Files\\Sounds\\CARBRAKE.wav"
#resource "\\Files\\Sounds\\CASHREG.wav"
#resource "\\Files\\Sounds\\CLAP.wav"
#resource "\\Files\\Sounds\\CORKPOP.wav"
#resource "\\Files\\Sounds\\DOG.wav"
#resource "\\Files\\Sounds\\DRIVEBY.wav"
#resource "\\Files\\Sounds\\DRUMROLL.wav"
#resource "\\Files\\Sounds\\EXPLODE.wav"
#resource "\\Files\\Sounds\\FINALBEL.wav"
#resource "\\Files\\Sounds\\FROG.wav"
#resource "\\Files\\Sounds\\GLASS.wav"
#resource "\\Files\\Sounds\\GUNSHOT.wav"
#resource "\\Files\\Sounds\\LASER.wav"
#resource "\\Files\\Sounds\\LATNWHIS.wav"
#resource "\\Files\\Sounds\\PIG.wav"
#resource "\\Files\\Sounds\\RICOCHET.wav"
#resource "\\Files\\Sounds\\RINGIN.wav"
#resource "\\Files\\Sounds\\SIREN.wav"
#resource "\\Files\\Sounds\\TRAIN.wav"
#resource "\\Files\\Sounds\\UH_OH.wav"
#resource "\\Files\\Sounds\\VERYGOOD.wav"
#resource "\\Files\\Sounds\\WHOOSH.wav"
Ahora, tenemos que crear tres matrices de cadenas que contendrán las ubicaciones de los archivos de recursos, los nombres de los objetos gráficos y el texto que se muestra en los objetos gráficos. Tenga en cuenta el uso del símbolo "doble dos puntos" (::) al especificar las ubicaciones de los archivos; es una indicación especial para llamar a los recursos por el nombre.
//--- Sound file location
string sound_paths[ARRAY_SIZE]=
  {
   "::Files\\Sounds\\alert.wav",
   "::Files\\Sounds\\AHOOGA.wav",
   "::Files\\Sounds\\APPLAUSE.wav",
   "::Files\\Sounds\\BONK.wav",
   "::Files\\Sounds\\CARBRAKE.wav",
   "::Files\\Sounds\\CASHREG.wav",
   "::Files\\Sounds\\CLAP.wav",
   "::Files\\Sounds\\CORKPOP.wav",
   "::Files\\Sounds\\DOG.wav",
   "::Files\\Sounds\\DRIVEBY.wav",
   "::Files\\Sounds\\DRUMROLL.wav",
   "::Files\\Sounds\\EXPLODE.wav",
   "::Files\\Sounds\\FINALBEL.wav",
   "::Files\\Sounds\\FROG.wav",
   "::Files\\Sounds\\GLASS.wav",
   "::Files\\Sounds\\GUNSHOT.wav",
   "::Files\\Sounds\\LASER.wav",
   "::Files\\Sounds\\LATNWHIS.wav",
   "::Files\\Sounds\\PIG.wav",
   "::Files\\Sounds\\RICOCHET.wav",
   "::Files\\Sounds\\RINGIN.wav",
   "::Files\\Sounds\\SIREN.wav",
   "::Files\\Sounds\\TRAIN.wav",
   "::Files\\Sounds\\UH_OH.wav",
   "::Files\\Sounds\\VERYGOOD.wav",
   "::Files\\Sounds\\WHOOSH.wav"
  };
//--- Names of graphical objects
string sound_names[ARRAY_SIZE]=
  {
   "sound_button01","sound_button02",
   "sound_button03","sound_button04",
   "sound_button05","sound_button06",
   "sound_button07","sound_button08",
   "sound_button09","sound_button10",
   "sound_button11","sound_button12",
   "sound_button13","sound_button14",
   "sound_button15","sound_button16",
   "sound_button17","sound_button18",
   "sound_button19","sound_button20",
   "sound_button21","sound_button22",
   "sound_button23","sound_button24",
   "sound_button25","sound_button26"
  };
//--- Text displayed on graphical objects
string sound_texts[ARRAY_SIZE]=
  {
   "ALERT","AHOOGA","APPLAUSE","BONK","CARBRAKE","CASHREG",
   "CLAP","CORKPOP","DOG","DRIVEBY","DRUMROLL","EXPLODE","FINALBEL",
   "FROG","GLASS","GUNSHOT","LASER","LATNWHIS","PIG",
   "RICOCHET","RINGIN","SIREN","TRAIN","UH_OH","VERYGOOD","WHOOSH"
  };
Escribamos una función, CreateButton(), que creará el objeto gráfico "Button" (botón) en el gráfico con las propiedades especificadas:
//+------------------------------------------------------------------+
//| Creating the Button object                                       |
//+------------------------------------------------------------------+
void CreateButton(long              chart_id,         // chart id
                  int               sub_window,       // window number
                  string            name,             // object name
                  string            text,             // displayed name
                  ENUM_ANCHOR_POINT anchor,           // anchor point
                  ENUM_BASE_CORNER  corner,           // chart corner
                  string            font_name,        // font
                  int               font_size,        // font size
                  color             font_color,       // font color
                  color             background_color, // background color
                  color             border_color,     // border color
                  int               x_size,           // width
                  int               y_size,           // height
                  int               x_distance,       // X-coordinate
                  int               y_distance,       // Y-coordinate
                  long              z_order)          // Z-order
  {
//--- Creating an object
   if(ObjectCreate(chart_id,name,OBJ_BUTTON,sub_window,0,0))
     {
      ObjectSetString(chart_id,name,OBJPROP_TEXT,text);                  // setting name
      ObjectSetString(chart_id,name,OBJPROP_FONT,font_name);             // setting font
      ObjectSetInteger(chart_id,name,OBJPROP_COLOR,font_color);          // setting font color
      ObjectSetInteger(chart_id,name,OBJPROP_BGCOLOR,background_color);  // setting background color
      ObjectSetInteger(chart_id,name,OBJPROP_BORDER_COLOR,border_color); // setting border color
      ObjectSetInteger(chart_id,name,OBJPROP_ANCHOR,anchor);             // setting anchor point
      ObjectSetInteger(chart_id,name,OBJPROP_CORNER,corner);             // setting chart corner
      ObjectSetInteger(chart_id,name,OBJPROP_FONTSIZE,font_size);        // setting font size
      ObjectSetInteger(chart_id,name,OBJPROP_XSIZE,x_size);              // setting width X
      ObjectSetInteger(chart_id,name,OBJPROP_YSIZE,y_size);              // setting height Y
      ObjectSetInteger(chart_id,name,OBJPROP_XDISTANCE,x_distance);      // setting X-coordinate
      ObjectSetInteger(chart_id,name,OBJPROP_YDISTANCE,y_distance);      // setting Y-coordinate
      ObjectSetInteger(chart_id,name,OBJPROP_SELECTABLE,false);          // cannot select the object if FALSE
      ObjectSetInteger(chart_id,name,OBJPROP_STATE,false);               // button state (clicked/unclicked)
      ObjectSetInteger(chart_id,name,OBJPROP_ZORDER,z_order);            // higher/lower Z-order
      ObjectSetString(chart_id,name,OBJPROP_TOOLTIP,"\n");               // no tooltip if "\n"
     }
  }
Para que sea más alegre, se seleccionará el color de cada botón al azar. Para ello, vamos a escribir una función simple - GetRandomColor():
//+------------------------------------------------------------------+
//| Returning a random color                                         |
//+------------------------------------------------------------------+
color GetRandomColor()
  {
//--- Select a random color from 0 to 25
   switch(MathRand()%26)
     {
      case 0  : return(clrOrange);           break;
      case 1  : return(clrGold);             break;
      case 2  : return(clrChocolate);        break;
      case 3  : return(clrChartreuse);       break;
      case 4  : return(clrLime);             break;
      case 5  : return(clrSpringGreen);      break;
      case 6  : return(clrMediumBlue);       break;
      case 7  : return(clrDeepSkyBlue);      break;
      case 8  : return(clrBlue);             break;
      case 9  : return(clrSeaGreen);         break;
      case 10 : return(clrRed);              break;
      case 11 : return(clrSlateGray);        break;
      case 12 : return(clrPeru);             break;
      case 13 : return(clrBlueViolet);       break;
      case 14 : return(clrIndianRed);        break;
      case 15 : return(clrMediumOrchid);     break;
      case 16 : return(clrCrimson);          break;
      case 17 : return(clrMediumAquamarine); break;
      case 18 : return(clrDarkGray);         break;
      case 19 : return(clrSandyBrown);       break;
      case 20 : return(clrMediumSlateBlue);  break;
      case 21 : return(clrTan);              break;
      case 22 : return(clrDarkSalmon);       break;
      case 23 : return(clrBurlyWood);        break;
      case 24 : return(clrHotPink);          break;
      case 25 : return(clrLightSteelBlue);   break;
      //---
      default : return(clrGold);
     }
//---
   return(clrGold);
  }
Escribamos ahora la función que va a añadir el panel de sonido al gráfico - SetSoundPanel():
//+------------------------------------------------------------------+
//| Adding the sound panel to the chart                              |
//+------------------------------------------------------------------+
void SetSoundPanel()
  {
   int   column_count =0;       // Column counter
   int   x_dist       =10;      // Indent from the left side of the chart
   int   y_dist       =15;      // Indent from the top of the chart
   int   x_size       =100;     // Button width
   int   y_size       =20;      // Button height
   color button_color =clrNONE; // Button color
//--- Set the objects
   for(int i=0; i<ARRAY_SIZE; i++)
     {
      //--- Increase the column counter
      column_count++;
      //--- Get the button color
      button_color=GetRandomColor();
      //--- Draw a button
      CreateButton(0,0,sound_names[i],sound_texts[i],
                   ANCHOR_LEFT_UPPER,CORNER_LEFT_UPPER,"Arial",8,
                   clrWhite,button_color,button_color,x_size,y_size,x_dist,y_dist,1);
      //--- If two buttons have already been set in the same row
      if(column_count==2)
        {
         x_dist=10;        // Move the X-coordinate to the initial position
         y_dist+=20;       // Set the Y-coordinate for the next row
         column_count=0;   // Zero out the counter
        }
      else
      //--- Set the X-coordinate for the next button
         x_dist+=x_size;
     }
//--- Refresh the chart
   ChartRedraw(0);
  }
Para quitar el gráfico del panel, usaremos las funciones proporcionadas a continuación:
//+------------------------------------------------------------------+
//| Deleting the info panel                                          |
//+------------------------------------------------------------------+
void DeleteSoundPanel()
  {
//--- Delete position properties and their values
   for(int i=0; i<ARRAY_SIZE; i++)
      DeleteObjectByName(name_sound_object[i]);
//--- Redraw the chart
   ChartRedraw();
  }
//+------------------------------------------------------------------+
//| Deleting objects by name                                         |
//+------------------------------------------------------------------+
void DeleteObjectByName(string name)
  {
//--- If the object is found
   if(ObjectFind(ChartID(),name)>=0)
     {
      //--- If an error occurred when deleting, print the relevant message
      if(!ObjectDelete(ChartID(),name))
         Print("Error ("+IntegerToString(GetLastError())+") when deleting the object!");
     }
  }
Por lo tanto, cuando se carga el Asesor Experto, se coloca el panel en el gráfico mediante la función OnInit() y se elimina al quitar el Asesor Experto mediante la función OnDeinit().
//+------------------------------------------------------------------+
//| Custom indicator initialization function                         |
//+------------------------------------------------------------------+
void OnInit()
  {
//--- Set the sound panel
   SetSoundPanel();
  }
//+------------------------------------------------------------------+
//| Deinitialization function of the expert advisor                  |
//+------------------------------------------------------------------+
void OnDeinit(const int reason)
  {
//--- Delete the sound panel
   DeleteSoundPanel();
  }
Ahora, solo tenemos que implementar la interacción con el panel de modo que se reproduzca el sonido correspondiente al pulsar algún botón. Para hacerlo aún más alegre, vamos a cambiar los colores de los botones al pulsar algún botón del panel de sonido. Para implementarlo, nos hará falta la función ChangeColorsOnSoundPanel() con el siguiente código:
//+------------------------------------------------------------------+
//| Changing colors on the sound panel                               |
//+------------------------------------------------------------------+
void ChangeColorsOnSoundPanel()
  {
   color clr=clrNONE; // Button color
//--- Iterate over all buttons in a loop and change their color
   for(int i=0; i<ARRAY_SIZE; i++)
     {
      //--- Get the new color
      clr=GetRandomColor();
      //--- Set the border color
      ObjectSetInteger(0,sound_names[i],OBJPROP_BGCOLOR,clr);
      //--- Set the background color
      ObjectSetInteger(0,sound_names[i],OBJPROP_BORDER_COLOR,clr);
      //--- Unclicked button
      ObjectSetInteger(0,sound_names[i],OBJPROP_STATE,false);
      //--- Refresh the chart
      ChartRedraw(0);
      //--- Wait for 20 ms (lag)
      Sleep(20);
     }
  }
Y por último, habrá que añadir el siguiente código a la función OnChartEvent():
//+------------------------------------------------------------------+
//| Event handler                                                    |
//+------------------------------------------------------------------+
void OnChartEvent(const int     id,     // Event identifier
                  const long&   lparam, // Parameter of the event of type long
                  const double& dparam, // Parameter of the event of type double
                  const string& sparam) // Parameter of the event of type string
  {
//--- If there was an event of left-clicking on the object
   if(id==CHARTEVENT_OBJECT_CLICK)
     {
      //--- If the object name contains "sound_button"
      if(StringFind(sparam,"sound_button",0)>=0)
        {
         //--- Play the sound based on the object name
         //    5019 - ERR_FILE_NOT_EXIST - The file does not exist
         if(!PlaySound(GetSoundPath(sparam)))
            Print("Error: ",GetLastError());
         //--- Change colors of all buttons
         ChangeColorsOnSoundPanel();
        }
     }
  }
La cadena resaltada del código anterior muestra que la ubicación del archivo de sonido se envía a la función PlaySound() mediante la función personalizada GetSoundPath(). A continuación, se proporciona el código de la función GetSoundPath():
//+------------------------------------------------------------------+
//| Returning sound file location by the object name                 |
//+------------------------------------------------------------------+
string GetSoundPath(string object_name)
  {
//--- Iterate over all sound panel objects in a loop
   for(int i=0; i<ARRAY_SIZE; i++)
     {
      //--- If the name of the object clicked in the chart
      //    matches one of those available on the panel, return the file location
      if(object_name==name_sound_object[i])
         return(path_sound_object[i]);
     }
//---
   return("");
  }
Ya está todo listo. Se pondrá el panel de sonido (se puede descargar el programa a partir de los archivos adjuntos al artículo) nada más se añade el Asesor Experto al gráfico:

Fig. 2. El panel de sonido en el gráfico
Por tanto, ya queda claro el principio de funcionamiento de los archivos de sonido. Volvemos a nuestro Asesor Experto del artículo anterior "Guía práctica de MQL5: Guardar los resultados de la optimización de un Asesor Experto en base a unos criterios especificados" y decidimos qué sonidos vamos a utilizar en nuestro Asesor Experto. Vamos a crear Resources.mqh y lo incluimos en el archivo principal del Asesor Experto.
//--- Include custom libraries
#include "Include/Errors.mqh"
#include "Include/Enums.mqh"
#include "Include/Resources.mqh"
#include "Include/TradeSignals.mqh"
#include "Include/TradeFunctions.mqh"
#include "Include/ToString.mqh"
#include "Include/Auxiliary.mqh"
Seleccionamos ahora los archivos para los eventos de trading principales.
//--- Sound files
#resource "\\Files\\Sounds\\AHOOGA.WAV"   // Error
#resource "\\Files\\Sounds\\CASHREG.WAV"  // Position opening/position volume increase/pending order triggering
#resource "\\Files\\Sounds\\WHOOSH.WAV"   // Pending order/Stop Loss/Take Profit setting/modification
#resource "\\Files\\Sounds\\VERYGOOD.WAV" // Position closing at profit
#resource "\\Files\\Sounds\\DRIVEBY.WAV"  // Position closing at loss
//--- Sound file location
string SoundError          = "::Files\\Sounds\\AHOOGA.WAV";
string SoundOpenPosition   = "::Files\\Sounds\\CASHREG.WAV";
string SoundAdjustOrder    = "::Files\\Sounds\\WHOOSH.WAV";
string SoundCloseWithProfit= "::Files\\Sounds\\VERYGOOD.WAV";
string SoundCloseWithLoss  = "::Files\\Sounds\\DRIVEBY.WAV";
Me gustaría mencionar también que además de los archivos de sonido utilizados como recursos, puede almacenar imágenes *.bmp en el Asesor Experto para la interfaz, archivos de texto e incluso indicadores. Se puede decir ahora que los Asesores Expertos para MQL5 son funcionales en toda regla; esto es muy práctico, ya que solo tiene que enviar un archivo en lugar de varios.
Continuemos. Tenemos que añadir el parámetro UseSound a los parámetros externos para tener la posibilidad de desactivar el sonido:
//--- External parameters of the Expert Advisor
input  int        NumberOfBars =2;    // Number of one-direction bars
sinput double     Lot          =0.1;  // Lot
input  double     TakeProfit   =100;  // Take Profit
input  double     StopLoss     =50;   // Stop Loss
input  double     TrailingStop =10;   // Trailing Stop
input  bool       Reverse      =true; // Position reversal
sinput bool       UseSound     =true; // Sound notifications
En Include\Enums.mqh, creamos la enumeración ENUM_SOUNDS para los sonidos.
//--- Sounds
enum ENUM_SOUNDS
  {
   SOUND_ERROR             =0,   // Error
   SOUND_OPEN_POSITION     = 1,  // Position opening/position volume increase/pending order triggering
   SOUND_ADJUST_ORDER      = 2,  // Stop Loss/Take Profit/pending order setting
   SOUND_CLOSE_WITH_PROFIT = 3,  // Position closing at profit
   SOUND_CLOSE_WITH_LOSS   = 4   // Position closing at loss
  };
Harán falta estos identificadores para la función personalizada PlaySoundByID().
//+------------------------------------------------------------------+
//| Playing sounds                                                   |
//+------------------------------------------------------------------+
void PlaySoundByID(ENUM_SOUNDS id)
  {
//--- If it is the real-time mode and sounds are enabled
   if(IsRealtime() && UseSound)
     {
      //--- Play the sound based on the identifier passed
      switch(id)
        {
         case SOUND_ERROR              : PlaySound(SoundError);            break;
         case SOUND_OPEN_POSITION      : PlaySound(SoundOpenPosition);     break;
         case SOUND_ADJUST_ORDER       : PlaySound(SoundAdjustOrder);      break;
         case SOUND_CLOSE_WITH_PROFIT  : PlaySound(SoundCloseWithProfit);  break;
         case SOUND_CLOSE_WITH_LOSS    : PlaySound(SoundCloseWithLoss);    break;
        }
     }
  }
Durante las operaciones de trading llevadas a cabo por el Asesor Experto, se pueden reproducir los efectos sonoros llamando a PlaySoundByID() desde las funciones de trading correspondientes. Veamos cómo se implementa esto en la función OpenPosition():
//+------------------------------------------------------------------+
//| Opening a position                                               |
//+------------------------------------------------------------------+
void OpenPosition(double lot,
                  ENUM_ORDER_TYPE order_type,
                  double price,
                  double sl,
                  double tp,
                  string comment)
  {
//--- Set the magic number in the trading structure
   trade.SetExpertMagicNumber(0);
//--- Set the slippage in points
   trade.SetDeviationInPoints(CorrectValueBySymbolDigits(10));
//--- The Instant Execution and Market Execution modes
//    *** Starting with build 803, Stop Loss and Take Profit                             ***
//    *** can be set upon opening a position in the SYMBOL_TRADE_EXECUTION_MARKET mode ***
   if(symb.execution_mode==SYMBOL_TRADE_EXECUTION_INSTANT ||
      symb.execution_mode==SYMBOL_TRADE_EXECUTION_MARKET)
     {
      //--- If the position failed to open
      if(!trade.PositionOpen(_Symbol,order_type,lot,price,sl,tp,comment))
        {
         //--- Play the error sound and print the relevant message
         PlaySoundByID(SOUND_ERROR);
         Print("Error opening the position: ",GetLastError()," - ",ErrorDescription(GetLastError()));
        }
      //--- Otherwise play the position opening sound
      else
         PlaySoundByID(SOUND_OPEN_POSITION);
     }
  }
En el caso de que se cierre una posición, mediante Stop Loss, Take Profit, de forma manual o de cualquier otra manera, será necesario hacer un seguimiento de este evento en la función OnTrade(). Para implementar esto, vamos a escribir una función más, SoundNotification(), que se encargará de las comprobaciones necesarias: si el historial de transacciones muestra una nueva transacción con el identificador DEAL_ENTRY_OUT o DEAL_ENTRY_INOUT (cierre completo o parcial de la posición o una inversión) para el símbolo actual, el programa comprobará si esta transacción se ha cerrado con beneficio o pérdidas y reproducirá el sonido correspondiente.
//+------------------------------------------------------------------+
//| Sound notification                                               |
//+------------------------------------------------------------------+
void SoundNotification()
  {
//--- If it is the real-time mode and sounds are enabled
   if(IsRealtime() && UseSound)
     {
      ulong        ticket      =0; // Deal ticket
      int          total       =0; // Total deals
      static ulong last_ticket =0; // Last ticket prior to this check
      //--- Get the complete history
      if(!HistorySelect(0,TimeCurrent()+1000))
         return;
      //--- Get the number of deals in the obtained list
      total=HistoryDealsTotal();
      //--- In the obtained list, iterate over all deals from the last one to the first one
      for(int i=total-1; i>=0; i--)
        {
         //--- If the deal ticket by its position in the list has been obtained
         if((ticket=HistoryDealGetTicket(i))>0)
           {
            //--- get the symbol of the deal
            GetHistoryDealProperties(ticket,D_SYMBOL);
            //--- If the symbol of the deal and the current symbol are the same
            if(deal.symbol==_Symbol)
              {
               //--- get the direction of the deal
               GetHistoryDealProperties(ticket,D_ENTRY);
               //--- If it is position closing, volume decrease or reversal
               if(deal.entry==DEAL_ENTRY_OUT || deal.entry==DEAL_ENTRY_INOUT)
                 {
                  //--- If the ticket of the current deal from the list (the last deal for the symbol) is equal to the previous ticket
                  //    or this is the initialization of the ticket of the last deal
                  if(ticket==last_ticket || last_ticket==0)
                    {
                     //--- Save the ticket and exit
                     last_ticket=ticket;
                     return;
                    }
                  //--- Get the result of the deal
                  GetHistoryDealProperties(ticket,D_PROFIT);
                  //--- In case of profit
                  if(deal.profit>=0)
                    {
                     //--- Profit sound
                     PlaySoundByID(SOUND_CLOSE_WITH_PROFIT);
                     //--- Save the ticket number
                     last_ticket=ticket;
                     return;
                    }
                  //--- In case of loss
                  if(deal.profit<0)
                    {
                     //--- Loss sound
                     PlaySoundByID(SOUND_CLOSE_WITH_LOSS);
                     //--- Save the ticket number
                     last_ticket=ticket;
                     return;
                    }
                 }
              }
           }
        }
     }
  }
Hay que colocar la función SoundNotification() en las funciones OnInit() y OnTrade():
//+------------------------------------------------------------------+
//| Initialization                                                   |
//+------------------------------------------------------------------+
int OnInit()
  {
//--- Initialize the new bar
   CheckNewBar();
//--- Initialize tickets of the last deals for the symbol
   SoundNotification();
//--- Initialization completed successfully
   return(INIT_SUCCEEDED);
  }
//+------------------------------------------------------------------+
//| Monitoring trade events                                          |
//+------------------------------------------------------------------+
void OnTrade()
  {
//--- Sound notification
   SoundNotification();
  }
También se ha añadido la notificación sonora al final de la función ModifyTrailingStop() al modificar el nivel de Trailing Stop.
Conclusión
Esto es todo. Se pueden descargar todos los archivos para realizar las pruebas a partir de los archivos adjuntos al artículo. Hablando de sonidos en el terminal, me gustaría llamar su atención sobre una solución interesante que está disponible en la biblioteca de códigos fuente con el nombre de CMIDI (por Integer); le permite reproducir archivos MIDI en MetaTrader 5. ¡Buena suerte!
Traducción del ruso hecha por MetaQuotes Ltd.
Artículo original: https://www.mql5.com/ru/articles/748
Advertencia: todos los derechos de estos materiales pertenecen a MetaQuotes Ltd. Queda totalmente prohibido el copiado total o parcial.
Este artículo ha sido escrito por un usuario del sitio web y refleja su punto de vista personal. MetaQuotes Ltd. no se responsabiliza de la exactitud de la información ofrecida, ni de las posibles consecuencias del uso de las soluciones, estrategias o recomendaciones descritas.

 Ampliación de la librería estándar de MQL5 y la reutilización del código
- Aplicaciones de trading gratuitas
- 8 000+ señales para copiar
- Noticias económicas para analizar los mercados financieros
Usted acepta la política del sitio web y las condiciones de uso
...
Por ejemplo, su propuesta de sonidos de eventos de negociación, sería lógico proporcionar comentarios de voz específicos con los valores de ganancias, muertes, etc., con recomendaciones y consejos.
Los asesores deben algún día empezar a aconsejarnos en lenguaje normal y humano...).
...
El artículo, como siempre, es un simple ejemplo. Por ejemplo, me gusta el programa FL Studio 11. Puedes sintetizar cualquier sonido. O primero grabar (incluida la voz), y luego procesarlo con alta calidad.
Gracias por el artículo.
¿Dónde debo poner el programa adjunto? ¿En "Script" o en "Expert"?
Por cierto, ¿cuál es la diferencia entre Script y Expert? ¿La función OnStart funciona en Script (que se arrastrará al gráfico)?
No puedo encontrar mi archivo de sonidos MT5. Sé que usted dio la ubicación, pero no puedo encontrar en cualquier lugar en mi carpeta. ¿Puedo tirar los sonidos en cualquier lugar y encontrarlos más tarde?
La carpeta correcta es:
C: Archivos de programa carpeta de la plataforma sonidos
(Archivos y carpetas - Para usuarios avanzados - Primeros pasos - MetaTrader 5 Ayuda).
Gracias por el artículo.
¿Dónde debo poner el programa adjunto? ¿En "Script" o en "Experto"?
Por cierto, ¿cuál es la diferencia entre Script y Expert? ¿La función OnStart funciona en Script (que se arrastrará al gráfico)?
En el Artículo del Autor, ver"vamos a crear un Asesor Experto..."
Por lo tanto, esto es un Experto y no un Script.
Un Script sólo se ejecuta una vez al adjuntarlo. Un Experto se ejecuta en cada tick (o en un temporizador, evento, etc. dependiendo de la(s) función(es) estándar específica(s) en su código).