Creación de un asesor experto integrado de MQL5 y Telegram (Parte 6): Añadir botones interactivos en línea

Introducción
Este artículo se sumerge en hacer nuestro Asesor Experto (Expert Advisor, EA) MetaQuotes Language 5 (MQL5) más sensible e interactivo para los usuarios a través de Telegram. En la quinta entrega de esta serie, sentamos las bases de nuestro bot implementando la capacidad de responder a comandos y mensajes de Telegram y creando botones de teclado personalizados. En este segmento, aumentamos la interactividad de nuestro bot integrando botones en línea que desencadenan diversas acciones y responden dinámicamente a las entradas del usuario.
El artículo está organizado para abordar algunos componentes clave. En primer lugar, introduciremos los botones en línea en los bots de Telegram, incluyendo qué son, su utilidad y los beneficios que proporcionan sobre otros métodos de creación de una interfaz de bot. Luego, pasaremos a discutir cómo usar estos botones en línea en MQL5, para que puedan ser parte de la interfaz de usuario de nuestro Asesor Experto.
A partir de ahí, demostraremos cómo manejar las consultas retrollamadas enviadas desde Telegram cuando un usuario pulsa un botón. Esto implicará procesar la acción del usuario y determinar cuál es el siguiente paso apropiado que debe tomar el bot en su conversación con el usuario. Por último, probaremos la funcionalidad incorporada del bot para asegurarnos de que todo funcione perfectamente. Estos son los temas que cubriremos en el artículo a través de:
- Introducción a los botones en línea en los bots de Telegram
- Integración de botones en línea en MQL5
- Gestión de consultas de devolución de llamada para acciones de botones
- Prueba de la aplicación de los estados de los botones en línea
- Conclusión
Al final de este artículo, usted obtendrá una comprensión clara de cómo integrar y gestionar botones en línea dentro de su Asesor Experto MQL5 para Telegram, mejorando la funcionalidad de su bot de trading, y haciéndolo más sensible e interactivo para los usuarios. Empecemos entonces.
Introducción a los botones en línea en los bots de Telegram
Los botones en línea son elementos interactivos que aparecen directamente dentro de los mensajes del bot de Telegram, lo que permite a los usuarios realizar acciones con un solo toque. Estos botones utilizan JavaScript Object Notation (JSON) con formato de marcado de teclado en línea para definir su apariencia y comportamiento, ofreciendo una interfaz más integrada y con mayor capacidad de respuesta en comparación con los métodos tradicionales. Al incorporar estos botones directamente en los mensajes, los bots pueden brindar a los usuarios una experiencia optimizada e interacción inmediata sin necesidad de comandos de texto o mensajes adicionales. Para dar una idea de qué estamos hablando exactamente, proporcionamos una ilustración visual de botones en línea como se muestra a continuación:

La principal ventaja de los botones en línea sobre los teclados de respuesta tradicionales reside en su capacidad para permanecer dentro del propio mensaje, lo que hace que las interacciones sean más fluidas y contextualmente relevantes. Los botones en línea, definidos mediante estructuras JSON, permiten interacciones complejas con el usuario y respuestas dinámicas. Este enfoque elimina la necesidad de menús separados o mensajes adicionales, reduciendo así el desorden y mejorando el compromiso del usuario al proporcionar respuestas y acciones instantáneas. Con esta visión, ahora podemos comenzar su implementación en MQL5 para MetaTrader 5 como en la siguiente sección.
Integración de botones en línea en MQL5
Incorporando botones en línea en nuestro Asesor Experto (Expert Advisor, EA) MQL5 requiere un marco que pueda manejar las interacciones de los mensajes y los distintos estados de los botones. Esto se logra mediante la creación y gestión de varias clases, cada una de las cuales es responsable de una parte diferente del procesamiento de llamadas y mensajes. Explicaremos la integración en detalle, incluidas las clases y funciones utilizadas y, lo que es más importante, por qué se utilizan y cómo contribuyen al funcionamiento del bot con botones en línea. Lo primero que tenemos que hacer es diseñar una clase que pueda encapsular todos los detalles de un mensaje recibido de Telegram.
//+------------------------------------------------------------------+
//|        Class_Message                                             |
//+------------------------------------------------------------------+
class Class_Message : public CObject {
public:
    Class_Message(); // Constructor
    ~Class_Message(){}; // Destructor

    bool              done; //--- Indicates if a message has been processed.
    long              update_id; //--- Stores the update ID from Telegram.
    long              message_id; //--- Stores the message ID.
    long              from_id; //--- Stores the sender’s ID.
    string            from_first_name; //--- Stores the sender’s first name.
    string            from_last_name; //--- Stores the sender’s last name.
    string            from_username; //--- Stores the sender’s username.
    long              chat_id; //--- Stores the chat ID.
    string            chat_first_name; //--- Stores the chat’s first name.
    string            chat_last_name; //--- Stores the chat’s last name.
    string            chat_username; //--- Stores the chat’s username.
    string            chat_type; //--- Stores the chat type.
    datetime          message_date; //--- Stores the date of the message.
    string            message_text; //--- Stores the text of the message.
};
Aquí definimos la clase "Class_Message", que sirve como contenedor de todos los detalles relevantes sobre los mensajes recibidos de Telegram. Esta clase es esencial para administrar y procesar datos de mensajes dentro de nuestro Asesor Experto (Expert Advisor, EA) MQL5.
En esta clase, incluimos varios atributos públicos que capturan aspectos específicos de un mensaje. El atributo "done" indica si el mensaje ha sido procesado. Los atributos "update_id" y "message_id" almacenan identificadores únicos para la actualización y el mensaje, respectivamente. Los atributos "from_id", "from_first_name", "from_last_name" y "from_username" contienen información sobre el remitente del mensaje. De manera similar, "chat_id", "chat_first_name", "chat_last_name", "chat_username" y "chat_type" capturan detalles sobre el chat donde se envió el mensaje. El atributo "message_date" registra la fecha y la hora del mensaje, y "message_text" almacena el contenido real del mensaje. Después de definir los miembros de la clase, podemos proceder a inicializarlos.
//+------------------------------------------------------------------+
//|      Constructor to initialize class members                     |
//+------------------------------------------------------------------+
Class_Message::Class_Message(void) {
    done = false; //--- Sets default value indicating message not yet processed.
    update_id = 0; //--- Initializes update ID to zero.
    message_id = 0; //--- Initializes message ID to zero.
    from_id = 0; //--- Initializes sender ID to zero.
    from_first_name = NULL; //--- Sets sender's first name to NULL (empty).
    from_last_name = NULL; //--- Sets sender's last name to NULL (empty).
    from_username = NULL; //--- Sets sender's username to NULL (empty).
    chat_id = 0; //--- Initializes chat ID to zero.
    chat_first_name = NULL; //--- Sets chat’s first name to NULL (empty).
    chat_last_name = NULL; //--- Sets chat’s last name to NULL (empty).
    chat_username = NULL; //--- Sets chat’s username to NULL (empty).
    chat_type = NULL; //--- Sets chat type to NULL (empty).
    message_date = 0; //--- Initializes message date to zero.
    message_text = NULL; //--- Sets message text to NULL (empty).
}
Aquí, inicializamos el constructor "Class_Message" para establecer valores predeterminados para todos los atributos de la clase. El atributo "done" se establece en falso para indicar que el mensaje no ha sido procesado. Inicializamos "update_id", "message_id", "from_id" y "chat_id" en 0, con "from_first_name", "from_last_name", "from_username", "chat_first_name", "chat_last_name", "chat_username" y "chat_type" establecidos en NULL para indicar que estos campos están vacíos. Finalmente, "message_date" se establece en 0 y "message_text" se inicializa en NULL, garantizando que cada nueva instancia de "Class_Message" comience con valores predeterminados antes de completarse con datos reales. Siguiendo la misma lógica, definimos la clase de chat donde almacenaremos los detalles de actualización del chat como se muestra a continuación:
//+------------------------------------------------------------------+
//|        Class_Chat                                                |
//+------------------------------------------------------------------+
class Class_Chat : public CObject {
public:
    Class_Chat(){}; //--- Declares an empty constructor.
    ~Class_Chat(){}; //--- Declares an empty destructor.
    long              member_id; //--- Stores the chat ID.
    int               member_state; //--- Stores the state of the chat.
    datetime          member_time; //--- Stores the time of chat activities.
    Class_Message     member_last; //--- Instance of Class_Message to store the last message.
    Class_Message     member_new_one; //--- Instance of Class_Message to store the new message.
};
Después de definir la clase de chats, necesitaremos definir una clase adicional que manejará las consultas de devolución de llamada. Será esencial para manejar los datos específicos asociados con las consultas de devolución de llamada, que difieren de los mensajes regulares. Retrollamada: Las consultas proporcionan datos únicos, como los datos de devolución de llamada y la interacción que activó la consulta, que no están presentes en los mensajes estándar. De esta forma la clase nos permitirá capturar y gestionar estos datos especializados de forma efectiva. Además, nos permitirá gestionar las interacciones del usuario con los botones en línea de una manera distinta. Esta separación garantizará que podamos procesar y responder con precisión a las pulsaciones de botones, distinguiéndolas de otros tipos de mensajes e interacciones. La implementación será la siguiente:
//+------------------------------------------------------------------+
//|        Class_CallbackQuery                                       |
//+------------------------------------------------------------------+
class Class_CallbackQuery : public CObject {
public:
    string            id; //--- Stores the callback query ID.
    long              from_id; //--- Stores the sender’s ID.
    string            from_first_name; //--- Stores the sender’s first name.
    string            from_last_name; //--- Stores the sender’s last name.
    string            from_username; //--- Stores the sender’s username.
    long              message_id; //--- Stores the message ID related to the callback.
    string            message_text; //--- Stores the message text.
    string            data; //--- Stores the callback data.
    long              chat_id; //--- Stores the chat ID to send responses.
};
Aquí definimos una clase llamada "Class_CallbackQuery" para gestionar los datos asociados a las consultas retrollamadas de Telegram. Esta clase es crucial para gestionar interacciones con botones en línea. En la clase, declaramos varias variables para almacenar información específica de las consultas retrollamadas. La variable "id" contiene el identificador único para la consulta retrollamada, lo que nos permite distinguir entre diferentes consultas. "from_id" almacena el ID del remitente, lo que ayuda a identificar al usuario que activó la retrollamada. Usamos "from_first_name", "from_last_name" y "from_username" para realizar un seguimiento de los detalles del nombre del remitente.
La variable "message_id" captura el ID del mensaje relacionado con la retrollamada, mientras que "message_text" contiene el texto de ese mensaje. "data" contiene los datos de la retrollamada que se enviaron con el botón en línea, lo cual es crucial para determinar la acción a tomar en función del botón presionado. Finalmente, "chat_id" almacena el ID del chat donde se deben enviar las respuestas, lo que garantiza que la respuesta llegue al contexto de chat correcto. El resto de la definición y la inicialización de la clase Expert siguen siendo las mismas, salvo que ahora debemos incluir una función personalizada adicional para procesar consultas de retrollamadas.
//+------------------------------------------------------------------+
//|        Class_Bot_EA                                              |
//+------------------------------------------------------------------+
class Class_Bot_EA {
private:
    string            member_token; //--- Stores the bot’s token.
    string            member_name; //--- Stores the bot’s name.
    long              member_update_id; //--- Stores the last update ID processed by the bot.
    CArrayString      member_users_filter; //--- Array to filter messages from specific users.
    bool              member_first_remove; //--- Indicates if the first message should be removed.

protected:
    CList             member_chats; //--- List to store chat objects.

public:
    Class_Bot_EA(); //--- Constructor.
    ~Class_Bot_EA(){}; //--- Destructor.
    int getChatUpdates(); //--- Function to get updates from Telegram.
    void ProcessMessages(); //--- Function to process incoming messages.
    void ProcessCallbackQuery(Class_CallbackQuery &cb_query); //--- Function to process callback queries.
};

//+------------------------------------------------------------------+
//|   Constructor for Class_Bot_EA                                   |
//+------------------------------------------------------------------+
Class_Bot_EA::Class_Bot_EA(void) {
    member_token = NULL; //--- Initialize bot token to NULL (empty).
    member_token = getTrimmedToken(InpToken); //--- Assign bot token by trimming input token.
    member_name = NULL; //--- Initialize bot name to NULL.
    member_update_id = 0; //--- Initialize last update ID to zero.
    member_first_remove = true; //--- Set first remove flag to true.
    member_chats.Clear(); //--- Clear the list of chat objects.
    member_users_filter.Clear(); //--- Clear the user filter array.
}
Después de definir todas las clases necesarias, podemos proceder a obtener los detalles de actualización del chat.
//+------------------------------------------------------------------+
//|   Function to get chat updates from Telegram                     |
//+------------------------------------------------------------------+
int Class_Bot_EA::getChatUpdates(void) {

    //...

    return 0; //--- Return 0 to indicate successful processing of updates.
}
Aquí, definimos la función "getChatUpdates" como un método de la clase "Class_Bot_EA". Esta función pretende extraer actualizaciones de la API de Telegram: actualizaciones que consisten en mensajes nuevos o consultas de devolución de llamada que el bot aún no ha manejado. La implementación actual de "getChatUpdates" devuelve un valor entero de 0, que convencionalmente significa que la operación se completó exitosamente. Al devolver 0, señalamos que hemos extraído las actualizaciones y las hemos procesado sin encontrar ningún problema. El siguiente paso para nosotros es completar esta función para que haga lo que está destinado a hacer: extraer actualizaciones de la API.
    if (member_token == NULL) { //--- If bot token is empty
        Print("ERR: TOKEN EMPTY"); //--- Print error message indicating empty token.
        return (-1); //--- Return -1 to indicate error.
    }
Determinamos si la variable "member_token" está vacía. Si "member_token" es NULL, eso significa que no nos han dado un token de bot. Entonces, le hacemos saber al usuario, imprimiendo "ERR: TOKEN EMPTY", que hay una pieza de información necesaria que no se ha proporcionado, y devolvemos -1 para señalar una condición de error que impide que la función continúe. Si pasamos este paso, podemos proceder a publicar la solicitud para obtener las actualizaciones del chat.
    string out; //--- String to hold response data.
    string url = TELEGRAM_BASE_URL + "/bot" + member_token + "/getUpdates"; //--- Construct URL for Telegram API.
    string params = "offset=" + IntegerToString(member_update_id); //--- Set parameters including the offset based on the last update ID.

    int res = postRequest(out, url, params, WEB_TIMEOUT); //--- Send a POST request to Telegram with a timeout.
En primer lugar, definimos una variable llamada "out" que es de tipo cadena (string). Configuramos esta variable "out" para contener los datos de respuesta que recibiremos de la API de Telegram. Luego construimos la URL de API necesaria para obtener las actualizaciones. Para hacer esto, combinamos un "TELEGRAM_BASE_URL" con varios otros componentes: "/bot" y el token del bot, que se almacena en "member_token"; y "/getUpdates", que es el punto final que alcanzamos para obtener actualizaciones de Telegram. La API de Telegram es parte de la otra plataforma principal que utiliza nuestra aplicación, y el método "getUpdates" es cómo extraemos nuevos datos de esa plataforma. Luego continuamos y realizamos la llamada a la API y permitimos que la API nos devuelva nuevos datos desde nuestra aplicación. Luego podremos utilizar el resultado para realizar más modificaciones.
    if (res == 0) { //--- If request succeeds (res = 0)
        CJSONValue obj_json(NULL, jv_UNDEF); //--- Create a JSON object to parse the response.
        bool done = obj_json.Deserialize(out); //--- Deserialize the response.
        if (!done) { //--- If deserialization fails
            Print("ERR: JSON PARSING"); //--- Print error message indicating JSON parsing error.
            return (-1); //--- Return -1 to indicate error.
        }

        bool ok = obj_json["ok"].ToBool(); //--- Check if the response has "ok" field set to true.
        if (!ok) { //--- If "ok" field is false
            Print("ERR: JSON NOT OK"); //--- Print error message indicating that JSON response is not okay.
            return (-1); //--- Return -1 to indicate error.
        }
    }
Comenzamos por determinar si la solicitud fue exitosa verificando el valor de la variable "res". Si "res" es igual a 0, sabemos que la solicitud tuvo éxito y podemos proceder a procesar la respuesta. Creamos un objeto "CJSONValue", "obj_json", que usamos para analizar la respuesta. El objeto se inicializa en el estado "NULL" y con "jv_UNDEF", que denota un estado indefinido o un objeto preparado para recibir algunos datos. Después de analizar con "out", tenemos un objeto que contiene los datos analizados o hemos encontrado un error durante el análisis.
Si la deserialización falla (esto se indica porque la variable denominada "done" es falsa), imprimimos el mensaje de error "ERR: JSON PARSING" y devolvemos "-1" para señalar un problema. Si deserializamos los datos con éxito, verificamos si la respuesta contiene un campo llamado "ok". Lo convertimos en un booleano, usando el método "ToBool", y almacenamos el resultado en la variable "ok". Si "ok" es falso (lo que significa que la solicitud no fue exitosa en el lado del servidor), imprimimos "ERR: JSON NOT OK" y devolvemos "-1". De esta forma nos aseguramos de gestionar adecuadamente tanto la deserialización de la respuesta como su contenido. Luego continuamos iterando sobre cada respuesta empleando la siguiente lógica.
        int total = ArraySize(obj_json["result"].m_elements); //--- Get the total number of update elements.
        for (int i = 0; i < total; i++) { //--- Iterate through each update element.
            CJSONValue obj_item = obj_json["result"].m_elements[i]; //--- Access individual update element.

            if (obj_item["message"].m_type != jv_UNDEF) { //--- Check if the update has a message.
                Class_Message obj_msg; //--- Create an instance of Class_Message to store the message details.
                obj_msg.update_id = obj_item["update_id"].ToInt(); //--- Extract and store update ID.
                obj_msg.message_id = obj_item["message"]["message_id"].ToInt(); //--- Extract and store message ID.
                obj_msg.message_date = (datetime)obj_item["message"]["date"].ToInt(); //--- Extract and store message date.
                obj_msg.message_text = obj_item["message"]["text"].ToStr(); //--- Extract and store message text.
                obj_msg.message_text = decodeStringCharacters(obj_msg.message_text); //--- Decode any special characters in the message text.
            }
        }
Para comenzar nuestro examen del número total de elementos de actualización en la respuesta, empleamos la función ArraySize para contar los elementos dentro del array "m_elements" del objeto "result" en "obj_json". Almacenamos el recuento en la variable "total". A continuación, configuramos un bucle que procesa repetidamente cada elemento de actualización de la matriz "m_elements". Hay elementos "totales" para procesar, por lo tanto, la variable de control del bucle varía de 0 a "total" menos 1. Durante cada iteración, el valor actual "i" de la variable de control de bucle indica a qué elemento de la matriz "m_elements" estamos accediendo. Asignamos el elemento “i-ésimo” a la variable “obj_item”. Ahora verificamos si la actualización actual (el "obj_item") contiene un "mensaje" válido.
A continuación, instanciamos un objeto de la "Class_Message" llamado "obj_msg", que contendrá los detalles del mensaje en cuestión. El primer campo que completamos en "obj_msg" es su campo "update_id". Para ello, extraemos el "update_id" de "obj_item", lo convertimos a un entero y lo colocamos en "obj_msg.update_id". El siguiente campo al que accedemos en "obj_msg" es su campo "message_id". Para este valor, extraemos información del campo "message" de "obj_item". Convertimos el valor del campo "message_id" de "obj_item" a un entero y lo colocamos en "obj_msg.message_id". Después, completamos el campo "datetime" de "obj_msg" con el valor "date" de "item". A continuación, completamos el campo "message_text" de "obj_msg". Extraemos el valor "text" de "message", lo convertimos en una cadena y lo colocamos en "obj_msg.message_text". Finalmente, usamos la función "decodeStringCharacters" para garantizar que los caracteres especiales de "message_text" se representen correctamente. Se utiliza un enfoque similar para obtener los demás detalles de la respuesta.
                obj_msg.from_id = obj_item["message"]["from"]["id"].ToInt(); //--- Extract and store the sender's ID.
                obj_msg.from_first_name = obj_item["message"]["from"]["first_name"].ToStr(); //--- Extract and store the sender's first name.
                obj_msg.from_first_name = decodeStringCharacters(obj_msg.from_first_name); //--- Decode any special characters in the sender's first name.
                obj_msg.from_last_name = obj_item["message"]["from"]["last_name"].ToStr(); //--- Extract and store the sender's last name.
                obj_msg.from_last_name = decodeStringCharacters(obj_msg.from_last_name); //--- Decode any special characters in the sender's last name.
                obj_msg.from_username = obj_item["message"]["from"]["username"].ToStr(); //--- Extract and store the sender's username.
                obj_msg.from_username = decodeStringCharacters(obj_msg.from_username); //--- Decode any special characters in the sender's username.

                obj_msg.chat_id = obj_item["message"]["chat"]["id"].ToInt(); //--- Extract and store the chat ID.
                obj_msg.chat_first_name = obj_item["message"]["chat"]["first_name"].ToStr(); //--- Extract and store the chat's first name.
                obj_msg.chat_first_name = decodeStringCharacters(obj_msg.chat_first_name); //--- Decode any special characters in the chat's first name.
                obj_msg.chat_last_name = obj_item["message"]["chat"]["last_name"].ToStr(); //--- Extract and store the chat's last name.
                obj_msg.chat_last_name = decodeStringCharacters(obj_msg.chat_last_name); //--- Decode any special characters in the chat's last name.
                obj_msg.chat_username = obj_item["message"]["chat"]["username"].ToStr(); //--- Extract and store the chat's username.
                obj_msg.chat_username = decodeStringCharacters(obj_msg.chat_username); //--- Decode any special characters in the chat's username.
                obj_msg.chat_type = obj_item["message"]["chat"]["type"].ToStr(); //--- Extract and store the chat type.
Después de obtener los detalles del chat, procedemos a procesar el mensaje en función de su ID de chat asociado.
                //--- Process the message based on chat ID.
                member_update_id = obj_msg.update_id + 1; //--- Update the last processed update ID.
Después de extraer y almacenar los detalles necesarios del mensaje, actualizamos el último ID de actualización procesado. Logramos esto asignando el valor de "obj_msg.update_id" más 1 a la variable "member_update_id". Esto garantiza que la próxima vez que procesemos actualizaciones, podamos omitir esta actualización y continuar con la siguiente. Por último, necesitamos aplicar un filtro de verificación a los mensajes del usuario.
                //--- Check if we need to filter messages based on user or if no filter is applied.
                if (member_users_filter.Total() == 0 ||
                    (member_users_filter.Total() > 0 &&
                    member_users_filter.SearchLinear(obj_msg.from_username) >= 0)) {

                    int index = -1; //--- Initialize index to -1 (indicating no chat found).
                    for (int j = 0; j < member_chats.Total(); j++) { //--- Iterate through all chat objects.
                        Class_Chat *chat = member_chats.GetNodeAtIndex(j); //--- Get chat object by index.
                        if (chat.member_id == obj_msg.chat_id) { //--- If chat ID matches
                            index = j; //--- Store the index.
                            break; //--- Break the loop since we found the chat.
                        }
                    }

                    if (index == -1) { //--- If no matching chat was found
                        member_chats.Add(new Class_Chat); //--- Create a new chat object and add it to the list.
                        Class_Chat *chat = member_chats.GetLastNode(); //--- Get the last (newly added) chat object.
                        chat.member_id = obj_msg.chat_id; //--- Assign the chat ID.
                        chat.member_time = TimeLocal(); //--- Record the current time for the chat.
                        chat.member_state = 0; //--- Initialize the chat state to 0.
                        chat.member_new_one.message_text = obj_msg.message_text; //--- Store the new message in the chat.
                        chat.member_new_one.done = false; //--- Mark the new message as not processed.
                    } else { //--- If matching chat was found
                        Class_Chat *chat = member_chats.GetNodeAtIndex(index); //--- Get the chat object by index.
                        chat.member_time = TimeLocal(); //--- Update the time for the chat.
                        chat.member_new_one.message_text = obj_msg.message_text; //--- Store the new message.
                        chat.member_new_one.done = false; //--- Mark the new message as not processed.
                    }
                }
Para filtrar mensajes según el usuario o permitir que todos los mensajes pasen sin filtrar, primero verificamos si "member_users_filter" contiene algún elemento. Si el filtro está vacío ("Total == 0"), dejamos pasar todos los mensajes. Si el filtro contiene elementos ("Total > 0"), verificamos si el nombre de usuario del remitente ("obj_msg.from_username") está presente en el filtro. Utilizamos un método de búsqueda secuencial, "SearchLinear", en el que se compara el nombre de usuario del remitente con el filtro para ver si está presente. Si se encuentra el nombre de usuario (el método devuelve un índice de 0 o más), procedemos a procesar el mensaje normalmente. Después de este paso de filtrado, buscamos el chat del mensaje. Buscamos el nombre de usuario del remitente en el filtro para que solo puedan pasar determinados nombres de usuario (aquellos que son los del remitente mencionado anteriormente en el filtro).
Cuando "chat.member_id" es el mismo que el ID de chat del mensaje ("obj_msg.chat_id"), primero registramos el índice actual en la variable "index" durante un bucle y posteriormente salimos de ese bucle ya que hemos localizado el chat correcto. Cuando no encontramos coincidencias para el chat y además "index" permanece en -1, creamos un nuevo objeto de chat y lo colocamos en "member_chats" usando el método "Add". "GetLastNode" nos ayuda entonces a recolectar el objeto de chat recién creado, que mantenemos en el puntero "chat". Otorgamos el ID de chat de "obj_msg.chat_id" a "chat.member_id" y empleamos la función TimeLocal para vincular la hora actual a "chat.member_time". Establecemos el “member_state” del chat desde el comienzo en 0 y guardamos el nuevo mensaje en “chat.member_new_one.message_text”.
También indicamos que el mensaje no está procesado estableciendo "chat.member_new_one.done" como falso. Si encontramos un chat coincidente (es decir, "index" no es -1), recuperamos el objeto de chat correspondiente con "GetNodeAtIndex" y actualizamos su "member_time" con la hora actual. Luego pegamos el nuevo mensaje en "chat.member_new_one.message_text" y nuevamente lo marcamos como no procesado, estableciendo "chat.member_new_one.done" como falso. Esto garantiza que el chat se actualice con el mensaje más reciente y que el sistema sepa que el mensaje aún no ha sido procesado. A continuación, necesitamos gestionar las consultas de devolución de llamadas de los chats de Telegram.
            //--- Handle callback queries from Telegram.
            if (obj_item["callback_query"].m_type != jv_UNDEF) { //--- Check if there is a callback query in the update.
                Class_CallbackQuery obj_cb_query; //--- Create an instance of Class_CallbackQuery.

                //...

            }
Comenzamos verificando si la actualización actual ("obj_item") contiene una consulta de devolución de llamada verificando si el tipo del campo "callback_query" ("m_type") no es igual a "jv_UNDEF". Esto garantiza que exista una consulta de devolución de llamada dentro de la actualización. Si se cumple esta condición, procedemos a crear una instancia del objeto "Class_CallbackQuery", denominada "obj_cb_query". Este objeto se utilizará para almacenar y administrar los detalles de la consulta de devolución de llamada. Luego podemos usar el objeto para obtener y almacenar los datos de la consulta de devolución de llamada.
                obj_cb_query.id = obj_item["callback_query"]["id"].ToStr(); //--- Extract and store the callback query ID.
                obj_cb_query.from_id = obj_item["callback_query"]["from"]["id"].ToInt(); //--- Extract and store the sender's ID.
                obj_cb_query.from_first_name = obj_item["callback_query"]["from"]["first_name"].ToStr(); //--- Extract and store the sender's first name.
                obj_cb_query.from_first_name = decodeStringCharacters(obj_cb_query.from_first_name); //--- Decode any special characters in the sender's first name.
                obj_cb_query.from_last_name = obj_item["callback_query"]["from"]["last_name"].ToStr(); //--- Extract and store the sender's last name.
                obj_cb_query.from_last_name = decodeStringCharacters(obj_cb_query.from_last_name); //--- Decode any special characters in the sender's last name.
                obj_cb_query.from_username = obj_item["callback_query"]["from"]["username"].ToStr(); //--- Extract and store the sender's username.
                obj_cb_query.from_username = decodeStringCharacters(obj_cb_query.from_username); //--- Decode any special characters in the sender's username.
                obj_cb_query.message_id = obj_item["callback_query"]["message"]["message_id"].ToInt(); //--- Extract and store the message ID related to the callback.
                obj_cb_query.message_text = obj_item["callback_query"]["message"]["text"].ToStr(); //--- Extract and store the message text related to the callback.
                obj_cb_query.message_text = decodeStringCharacters(obj_cb_query.message_text); //--- Decode any special characters in the message text.
                obj_cb_query.data = obj_item["callback_query"]["data"].ToStr(); //--- Extract and store the callback data.
                obj_cb_query.data = decodeStringCharacters(obj_cb_query.data); //--- Decode any special characters in the callback data.

                obj_cb_query.chat_id = obj_item["callback_query"]["message"]["chat"]["id"].ToInt(); //--- Extract and store the chat ID.
Comenzamos con los detalles de la consulta de devolución de llamada en sí. El ID de la consulta de devolución de llamada se toma del campo "callback_query". Usamos el método "ToStr" para convertirlo al formato de cadena y lo almacenamos en "obj_cb_query.id". La siguiente información que extraemos es el ID del remitente, que se toma del campo "from". Nuevamente, utilizamos el método "ToInt" y almacenamos el número convertido en "obj_cb_query.from_id". Después de eso, tomamos el nombre del remitente, que está en el campo "from", y lo convertimos al formato de cadena. El nombre del remitente se almacena en "obj_cb_query.from_first_name". Lo último que hacemos con el nombre es usar la función "decodeStringCharacters" para decodificar cualquier carácter especial que pueda haber en el nombre.
Paralelamente, obtenemos el apellido de quien envía el mensaje, lo transformamos en una cadena y lo colocamos en "obj_cb_query.from_last_name". Como antes, invocamos "decodeStringCharacters" para desenmascarar cualquier carácter especial del apellido. El proceso para obtener el nombre de usuario del remitente es el mismo: extraemos el nombre de usuario, lo almacenamos en "obj_cb_query.from_username" y empleamos "decodeStringCharacters" para trabajar en cualquier carácter especial que pueda inhibir el funcionamiento adecuado del nombre de usuario en el futuro.
A continuación, nos centramos en el mensaje asociado a la consulta de devolución de llamada. Tomamos el ID del mensaje del campo "mensaje", lo convertimos en un entero y lo almacenamos en "obj_cb_query.message_id". Mientras tanto, el texto del mensaje también se extrae y se convierte en una cadena, que se almacena en "obj_cb_query.message_text". Cualquier carácter especial en el texto será decodificado. Luego dirigimos nuestra atención a los datos de devolución de llamada. Lo extraemos, lo convertimos en una cadena y lo almacenamos en "obj_cb_query.data". Al igual que cualquier otro dato, los datos de devolución de llamada están codificados con caracteres especiales.
Finalmente, obtenemos de la consulta de devolución de llamada el ID del chat al que se envió el mensaje, lo convertimos a un entero y lo colocamos en "obj_cb_query.chat_id". Esto nos proporciona la información completa sobre la consulta de devolución de llamada, incluyendo qué usuario estaba en el chat, cuál era el mensaje y cuáles eran los datos de la devolución de llamada. Luego procedemos a procesar los datos y actualizar la iteración.
                ProcessCallbackQuery(obj_cb_query); //--- Call function to process the callback query.

                member_update_id = obj_item["update_id"].ToInt() + 1; //--- Update the last processed update ID for callback queries.
Aquí, llamamos a la función "ProcessCallbackQuery", pasando el objeto "obj_cb_query" como argumento. Esta función es responsable de manejar la consulta de devolución de llamada y procesar los detalles extraídos que reunimos anteriormente, como la información del usuario, la ID del chat, el texto del mensaje y los datos de devolución de llamada. Al llamar a esta función, nos aseguramos de que la consulta de devolución de llamada se gestione adecuadamente en función de su contenido específico.
Después de procesar la consulta de devolución de llamada, actualizamos el último ID de actualización procesado recuperando el "update_id" del campo "obj_item", convirtiéndolo en un entero y luego agregándole 1. Este valor se almacena en "member_update_id", que rastrea la actualización más reciente procesada. Este paso garantiza que no volvamos a procesar la misma consulta de devolución de llamada en iteraciones futuras, realizando un seguimiento eficiente del progreso de la actualización. Finalmente, después de procesar el primer mensaje, debemos marcar el mensaje como ya manejado para evitar el reprocesamiento.
member_first_remove = false; //--- After processing the first message, mark that the first message has been handled.
Asignamos la variable "member_first_remove" a "false" después de manejar el primer mensaje. Esto significa que nos encargamos del primer mensaje y, si es necesario hacer algo especial, ya lo hemos hecho. ¿Por qué realizamos este paso? Su propósito es marcar que el primer mensaje ha sido manejado y que no será manejado nuevamente. Al hacer esto, nos aseguramos de que cualquier lógica futura que dependa de que el primer mensaje no se procese no se ejecute porque no es necesario.
El fragmento de código fuente completo responsable de obtener y almacenar los mensajes de chat y las consultas de devolución de llamada es el siguiente:
//+------------------------------------------------------------------+
//|   Function to get chat updates from Telegram                     |
//+------------------------------------------------------------------+
int Class_Bot_EA::getChatUpdates(void) {
    if (member_token == NULL) { //--- If bot token is empty
        Print("ERR: TOKEN EMPTY"); //--- Print error message indicating empty token.
        return (-1); //--- Return -1 to indicate error.
    }

    string out; //--- String to hold response data.
    string url = TELEGRAM_BASE_URL + "/bot" + member_token + "/getUpdates"; //--- Construct URL for Telegram API.
    string params = "offset=" + IntegerToString(member_update_id); //--- Set parameters including the offset based on the last update ID.

    int res = postRequest(out, url, params, WEB_TIMEOUT); //--- Send a POST request to Telegram with a timeout.

    if (res == 0) { //--- If request succeeds (res = 0)
        CJSONValue obj_json(NULL, jv_UNDEF); //--- Create a JSON object to parse the response.
        bool done = obj_json.Deserialize(out); //--- Deserialize the response.
        if (!done) { //--- If deserialization fails
            Print("ERR: JSON PARSING"); //--- Print error message indicating JSON parsing error.
            return (-1); //--- Return -1 to indicate error.
        }

        bool ok = obj_json["ok"].ToBool(); //--- Check if the response has "ok" field set to true.
        if (!ok) { //--- If "ok" field is false
            Print("ERR: JSON NOT OK"); //--- Print error message indicating that JSON response is not okay.
            return (-1); //--- Return -1 to indicate error.
        }

        int total = ArraySize(obj_json["result"].m_elements); //--- Get the total number of update elements.
        for (int i = 0; i < total; i++) { //--- Iterate through each update element.
            CJSONValue obj_item = obj_json["result"].m_elements[i]; //--- Access individual update element.

            if (obj_item["message"].m_type != jv_UNDEF) { //--- Check if the update has a message.
                Class_Message obj_msg; //--- Create an instance of Class_Message to store the message details.
                obj_msg.update_id = obj_item["update_id"].ToInt(); //--- Extract and store update ID.
                obj_msg.message_id = obj_item["message"]["message_id"].ToInt(); //--- Extract and store message ID.
                obj_msg.message_date = (datetime)obj_item["message"]["date"].ToInt(); //--- Extract and store message date.
                obj_msg.message_text = obj_item["message"]["text"].ToStr(); //--- Extract and store message text.
                obj_msg.message_text = decodeStringCharacters(obj_msg.message_text); //--- Decode any special characters in the message text.

                obj_msg.from_id = obj_item["message"]["from"]["id"].ToInt(); //--- Extract and store the sender's ID.
                obj_msg.from_first_name = obj_item["message"]["from"]["first_name"].ToStr(); //--- Extract and store the sender's first name.
                obj_msg.from_first_name = decodeStringCharacters(obj_msg.from_first_name); //--- Decode any special characters in the sender's first name.
                obj_msg.from_last_name = obj_item["message"]["from"]["last_name"].ToStr(); //--- Extract and store the sender's last name.
                obj_msg.from_last_name = decodeStringCharacters(obj_msg.from_last_name); //--- Decode any special characters in the sender's last name.
                obj_msg.from_username = obj_item["message"]["from"]["username"].ToStr(); //--- Extract and store the sender's username.
                obj_msg.from_username = decodeStringCharacters(obj_msg.from_username); //--- Decode any special characters in the sender's username.

                obj_msg.chat_id = obj_item["message"]["chat"]["id"].ToInt(); //--- Extract and store the chat ID.
                obj_msg.chat_first_name = obj_item["message"]["chat"]["first_name"].ToStr(); //--- Extract and store the chat's first name.
                obj_msg.chat_first_name = decodeStringCharacters(obj_msg.chat_first_name); //--- Decode any special characters in the chat's first name.
                obj_msg.chat_last_name = obj_item["message"]["chat"]["last_name"].ToStr(); //--- Extract and store the chat's last name.
                obj_msg.chat_last_name = decodeStringCharacters(obj_msg.chat_last_name); //--- Decode any special characters in the chat's last name.
                obj_msg.chat_username = obj_item["message"]["chat"]["username"].ToStr(); //--- Extract and store the chat's username.
                obj_msg.chat_username = decodeStringCharacters(obj_msg.chat_username); //--- Decode any special characters in the chat's username.
                obj_msg.chat_type = obj_item["message"]["chat"]["type"].ToStr(); //--- Extract and store the chat type.

                //--- Process the message based on chat ID.
                member_update_id = obj_msg.update_id + 1; //--- Update the last processed update ID.

                if (member_first_remove) { //--- If it's the first message after starting the bot
                    continue; //--- Skip processing it.
                }

                //--- Check if we need to filter messages based on user or if no filter is applied.
                if (member_users_filter.Total() == 0 ||
                    (member_users_filter.Total() > 0 &&
                    member_users_filter.SearchLinear(obj_msg.from_username) >= 0)) {

                    int index = -1; //--- Initialize index to -1 (indicating no chat found).
                    for (int j = 0; j < member_chats.Total(); j++) { //--- Iterate through all chat objects.
                        Class_Chat *chat = member_chats.GetNodeAtIndex(j); //--- Get chat object by index.
                        if (chat.member_id == obj_msg.chat_id) { //--- If chat ID matches
                            index = j; //--- Store the index.
                            break; //--- Break the loop since we found the chat.
                        }
                    }

                    if (index == -1) { //--- If no matching chat was found
                        member_chats.Add(new Class_Chat); //--- Create a new chat object and add it to the list.
                        Class_Chat *chat = member_chats.GetLastNode(); //--- Get the last (newly added) chat object.
                        chat.member_id = obj_msg.chat_id; //--- Assign the chat ID.
                        chat.member_time = TimeLocal(); //--- Record the current time for the chat.
                        chat.member_state = 0; //--- Initialize the chat state to 0.
                        chat.member_new_one.message_text = obj_msg.message_text; //--- Store the new message in the chat.
                        chat.member_new_one.done = false; //--- Mark the new message as not processed.
                    } else { //--- If matching chat was found
                        Class_Chat *chat = member_chats.GetNodeAtIndex(index); //--- Get the chat object by index.
                        chat.member_time = TimeLocal(); //--- Update the time for the chat.
                        chat.member_new_one.message_text = obj_msg.message_text; //--- Store the new message.
                        chat.member_new_one.done = false; //--- Mark the new message as not processed.
                    }
                }
            }


            //--- Handle callback queries from Telegram.
            if (obj_item["callback_query"].m_type != jv_UNDEF) { //--- Check if there is a callback query in the update.
                Class_CallbackQuery obj_cb_query; //--- Create an instance of Class_CallbackQuery.
                obj_cb_query.id = obj_item["callback_query"]["id"].ToStr(); //--- Extract and store the callback query ID.
                obj_cb_query.from_id = obj_item["callback_query"]["from"]["id"].ToInt(); //--- Extract and store the sender's ID.
                obj_cb_query.from_first_name = obj_item["callback_query"]["from"]["first_name"].ToStr(); //--- Extract and store the sender's first name.
                obj_cb_query.from_first_name = decodeStringCharacters(obj_cb_query.from_first_name); //--- Decode any special characters in the sender's first name.
                obj_cb_query.from_last_name = obj_item["callback_query"]["from"]["last_name"].ToStr(); //--- Extract and store the sender's last name.
                obj_cb_query.from_last_name = decodeStringCharacters(obj_cb_query.from_last_name); //--- Decode any special characters in the sender's last name.
                obj_cb_query.from_username = obj_item["callback_query"]["from"]["username"].ToStr(); //--- Extract and store the sender's username.
                obj_cb_query.from_username = decodeStringCharacters(obj_cb_query.from_username); //--- Decode any special characters in the sender's username.
                obj_cb_query.message_id = obj_item["callback_query"]["message"]["message_id"].ToInt(); //--- Extract and store the message ID related to the callback.
                obj_cb_query.message_text = obj_item["callback_query"]["message"]["text"].ToStr(); //--- Extract and store the message text related to the callback.
                obj_cb_query.message_text = decodeStringCharacters(obj_cb_query.message_text); //--- Decode any special characters in the message text.
                obj_cb_query.data = obj_item["callback_query"]["data"].ToStr(); //--- Extract and store the callback data.
                obj_cb_query.data = decodeStringCharacters(obj_cb_query.data); //--- Decode any special characters in the callback data.

                obj_cb_query.chat_id = obj_item["callback_query"]["message"]["chat"]["id"].ToInt(); //--- Extract and store the chat ID.

                ProcessCallbackQuery(obj_cb_query); //--- Call function to process the callback query.

                member_update_id = obj_item["update_id"].ToInt() + 1; //--- Update the last processed update ID for callback queries.
            }
        }

        member_first_remove = false; //--- After processing the first message, mark that the first message has been handled.
    }

    return 0; //--- Return 0 to indicate successful processing of updates.
}
Después de recibir las actualizaciones del chat, ahora debemos proceder a procesar las respuestas. Este tema se aborda en la siguiente sección.
Gestión de consultas de devolución de llamada para acciones de botones
En esta sección, manejamos los mensajes entrantes y respondemos con botones en línea basados en comandos específicos. Lo primero que debemos hacer es procesar el comando o mensaje de inicialización enviado por el usuario y desde allí podemos instanciar los botones en línea y luego proceder a obtener las consultas de devolución de llamada. No podemos omitir este paso porque no podemos simplemente proporcionar un teclado en línea sin tener que obtener primero un comando del usuario. Ésta es la lógica que empleamos.
#define BTN_MENU "BTN_MENU" //--- Identifier for menu button

//+------------------------------------------------------------------+
//| Process new messages                                             |
//+------------------------------------------------------------------+
void Class_Bot_EA::ProcessMessages(void){
   //--- Loop through all chats
   for(int i=0; i<member_chats.Total(); i++){
      Class_Chat *chat = member_chats.GetNodeAtIndex(i); //--- Get the current chat
      if(!chat.member_new_one.done){ //--- Check if the message has not been processed yet
         chat.member_new_one.done = true; //--- Mark the message as processed
         string text = chat.member_new_one.message_text; //--- Get the message text

         //--- Example of sending a message with inline buttons
         if (text == "Start" || text == "/start" || text == "Help" || text == "/help"){
            string message = "Welcome! You can control me via inline buttons!"; //--- Welcome message
            //--- Define inline button to provide menu
            string buttons = "[[{\"text\": \"Provide Menu\", \"callback_data\": \""+BTN_MENU+"\"}]]";
            sendMessageToTelegram(chat.member_id, message, customInlineKeyboardMarkup(buttons)); //--- Send the inline keyboard markup
         }
      }
   }
}
En este caso, configuramos una función llamada "ProcessMessages" para encargarse de los mensajes de usuario que llegan a nuestro sistema. Lo primero que hace esta función es iterar sobre el conjunto de chats almacenados en "member_chats". Para cada uno de estos chats, obtenemos el objeto de chat correspondiente al chat actual mediante "GetNodeAtIndex(i)." Ahora que tenemos un identificador del chat actual, comprobamos si el mensaje en "member_new_one" ya se ha procesado. Si no lo ha hecho, lo marcamos como procesado.
A continuación, extraemos el contenido real del mensaje utilizando "chat.member_new_one.message_text". Evaluamos este contenido para determinar si el usuario ha enviado algún comando, como "Start", "/start", "Help" o "/help". Cuando recibimos un comando similar, devolvemos un mensaje de bienvenida al usuario: "You can control me via inline buttons!". A continuación, definimos un botón de devolución de llamada en línea que queremos que sirva como opción de menú para el usuario. Utilizamos el campo "callback_data" del botón para indicar que está relacionado con "BTN_MENU". Formateamos el botón como un objeto JSON y lo almacenamos en la variable "buttons".
En conclusión, se llama a la función "sendMessageToTelegram" para enviar el mensaje de bienvenida y nuestro teclado en línea personalizado al usuario. Esta función toma tres parámetros: el "chat.member_id", el "mensaje" y el marcado del botón generado por la función "customInlineKeyboardMarkup". El mensaje junto con nuestros botones en línea se envía al usuario. Ahora pueden interactuar con los botones en línea de la misma manera que un usuario típico interactúa con un bot de Telegram. Dado que somos nuevos en esto del teclado en línea, concentrémonos en su lógica.
string buttons = "[[{\"text\": \"Provide Menu\", \"callback_data\": \""+BTN_MENU+"\"}]]";
Desglose detallado:
Comillas externas: Toda la cadena se encierra entre comillas dobles (" "), lo que es típico para definir literales de cadena en muchos lenguajes de programación. Dentro de esta cadena, vemos los caracteres "[[ ... ]]". Estos corchetes se utilizan para definir la estructura del teclado en línea:
- El primer conjunto de corchetes [...] denota una matriz de filas en el teclado.
- El segundo conjunto de corchetes [...] representa una fila dentro de esa matriz. En este caso solo hay una fila.
Definición del botón:
Dentro del segundo conjunto de corchetes, tenemos un objeto {"text": "Provide Menu", "callback_data": " + BTN_MENU + "}. Este objeto define un solo botón:
- "text": Esta clave especifica la etiqueta del botón, que es "Provide Menu". Este es el texto que aparecerá en el botón cuando el usuario lo vea.
- "callback_data": Esta clave especifica los datos que se enviarán al bot cuando se haga clic en el botón. En este caso, el valor es "BTN_MENU", que es una constante que definimos en otra parte del código. Esto permite que el bot reconozca qué botón se hizo clic y responda en consecuencia.
Combinando elementos:
La constante "BTN_MENU" se inserta en la cadena JSON mediante la concatenación de cadenas. Esto permite la inclusión dinámica de los datos de devolución de llamada del botón. Por ejemplo, si «BTN_MENU» es «BTN_MENU», el JSON resultante tendría el siguiente aspecto: [{«text»: «Provide Menu», «callback_data»: «BTN_MENU»}].
Formato final:
El formato final de los botones string, cuando se utiliza en el código, es: «[[{ «text»: «Provide Menu», «callback_data»: «BTN_MENU» }] ]». Este formato especifica que hay una fila en el teclado y esa fila contiene un botón.
Cuando la API de Telegram recibe esta estructura JSON, la interpreta como un teclado en línea con un solo botón. Cuando un usuario hace clic en este botón, el bot recibirá los datos de devolución de llamada "BTN_MENU" en la consulta de devolución de llamada, que luego puede usar para determinar la respuesta adecuada. En la estructura, hemos utilizado una función personalizada para crear el botón en línea. Su lógica es la siguiente:
//+------------------------------------------------------------------+
//| Create a custom inline keyboard markup for Telegram              |
//+------------------------------------------------------------------+
string customInlineKeyboardMarkup(const string buttons){
   //--- Construct the JSON string for the inline keyboard markup
   string result = "{\"inline_keyboard\": " + UrlEncode(buttons) + "}"; //--- Encode buttons as JSON
   return(result);
}
La función "customInlineKeyboardMarkup" crea un marcado de teclado en línea personalizado para los mensajes de Telegram. Para hacer esto, comenzamos con un parámetro de cadena, "botones", que contiene la estructura JSON que define los botones en línea. Nuestro trabajo es construir un objeto JSON que Telegram pueda usar para renderizar el teclado en línea. Comenzamos formando la estructura JSON con la clave "inline_keyboard". A continuación, utilizamos la función "UrlEncode" para manejar cualquier carácter especial que pueda estar presente en la cadena "buttons". Este paso de codificación es crucial porque, sin él, podríamos encontrarnos con problemas con caracteres especiales en las definiciones de los botones. Después de agregar la cadena de botones codificados, cerramos el objeto JSON. La cadena de resultado es una representación JSON válida del marcado del teclado en línea. Devolvemos esta cadena para que pueda enviarse a la API de Telegram, que luego renderizará de forma interactiva el teclado en línea en el mensaje. Al ejecutar el programa, tenemos el siguiente resultado.

Podemos ver que fue un éxito. Creamos el botón en línea. Sin embargo, todavía no podemos responder a sus clics. Por lo tanto, necesitamos capturar la consulta de devolución de llamada que se recibe y responder al clic respectivamente. Para lograr esto, necesitaremos crear una función que obtenga los datos de la consulta.
//+------------------------------------------------------------------+
//|   Function to process callback queries                           |
//+------------------------------------------------------------------+
void Class_Bot_EA::ProcessCallbackQuery(Class_CallbackQuery &cb_query) {
   Print("Callback Query ID: ", cb_query.id); //--- Log the callback query ID
   Print("Chat Token: ", member_token); //--- Log the member token
   Print("From First Name: ", cb_query.from_first_name); //--- Log the sender's first name
   Print("From Last Name: ", cb_query.from_last_name); //--- Log the sender's last name
   Print("From Username: ", cb_query.from_username); //--- Log the sender's username
   Print("Message ID: ", cb_query.message_id); //--- Log the message ID
   Print("Message Text: ", cb_query.message_text); //--- Log the message text
   Print("Callback Data: ", cb_query.data); //--- Log the callback data
}
La función «ProcessCallbackQuery» gestiona los detalles de una callback query procedente de Telegram. Funciona en una instancia de "Class_CallbackQuery" que contiene toda la información asociada con la devolución de llamada. En primer lugar, registra el ID de la consulta de devolución de llamada, que es un identificador único para la consulta y es esencial para su seguimiento y gestión. A continuación, la función registra el "member_token". La función de este token es indicar qué bot o miembro está procesando la devolución de llamada y, por lo tanto, garantizar que el bot correcto, y solo uno, esté gestionando la consulta.
Luego registramos el nombre y apellido del remitente utilizando "cb_query.from_first_name" y "cb_query.from_last_name", respectivamente. Estos nos permiten conocer la identidad del usuario que presionó el botón en línea y brindan un toque personal en caso de que necesitemos dirigirnos al usuario en el futuro. Y hablando de identidad, también registramos el nombre de usuario del remitente usando "cb_query.from_username". Esto nos brinda otra forma de dirigirnos directamente al usuario en el futuro, si surge la necesidad. Después de registrar la identidad del remitente, registramos el ID del mensaje que se asoció con la devolución de llamada utilizando "cb_query.message_id". Conocer este ID nos permite saber de qué mensaje específico se trata la pulsación del botón.
Además, registramos el texto del mensaje utilizando "cb_query.message_text". Esto proporciona contexto sobre el mensaje cuando se hizo clic en el botón. También registramos los datos de devolución de llamada con "cb_query.data". Estos datos son los que se envían al hacer clic en el botón y se utilizan para determinar qué acción tomar en función de la interacción del usuario. Al registrar estos detalles, obtenemos una vista completa de la consulta de devolución de llamada. Esto es útil para la depuración y proporciona una mejor comprensión de las interacciones del usuario con el bot. Una vez que ejecutamos el programa, estos son los resultados que obtenemos en la terminal comercial.

Como sabemos que recibimos la información, podemos verificar el botón en el que se hizo clic y generar una respuesta en consecuencia. En nuestro caso, utilizaremos los datos de devolución de llamada de la acción del botón de menú. Primero, definiremos las constantes del botón. Hemos añadido comentarios detallados para facilitar la comprensión.
#define BTN_NAME "BTN_NAME" //--- Identifier for name button
#define BTN_INFO "BTN_INFO" //--- Identifier for info button
#define BTN_QUOTES "BTN_QUOTES" //--- Identifier for quotes button
#define BTN_MORE "BTN_MORE" //--- Identifier for more options button
#define BTN_SCREENSHOT "BTN_SCREENSHOT" //--- Identifier for screenshot button
#define EMOJI_CANCEL "\x274C" //--- Cross mark emoji

#define EMOJI_UP "\x2B06" //--- Upwards arrow emoji
#define BTN_BUY "BTN_BUY" //--- Identifier for buy button
#define BTN_CLOSE "BTN_CLOSE" //--- Identifier for close button
#define BTN_NEXT "BTN_NEXT" //--- Identifier for next button

#define EMOJI_PISTOL "\xF52B" //--- Pistol emoji
#define BTN_CONTACT "BTN_CONTACT" //--- Identifier for contact button
#define BTN_JOIN "BTN_JOIN" //--- Identifier for join button
Luego de definir la función, podemos proceder a tener las respuestas.
   //--- Respond based on the callback data
   string response_text;
   if (cb_query.data == BTN_MENU) {
      response_text = "You clicked "+BTN_MENU+"!"; //--- Prepare response text for BTN_MENU
      Print("RESPONSE = ", response_text); //--- Log the response
      //--- Send the response message to the correct group/channel chat ID
      sendMessageToTelegram(cb_query.chat_id, response_text, NULL);
      string message = "Information"; //--- Message to display options
      //--- Define inline buttons with callback data
      string buttons = "[[{\"text\": \"Get Expert's Name\", \"callback_data\": \""+BTN_NAME+"\"}],"
                        "[{\"text\": \"Get Account Information\", \"callback_data\": \""+BTN_INFO+"\"}],"
                        "[{\"text\": \"Get Current Market Quotes\", \"callback_data\": \""+BTN_QUOTES+"\"}],"
                        "[{\"text\": \"More\", \"callback_data\": \""+BTN_MORE+"\"}, {\"text\": \"Screenshots\", \"callback_data\": \""+BTN_SCREENSHOT+"\"}, {\"text\": \""+EMOJI_CANCEL+"\", \"callback_data\": \""+EMOJI_CANCEL+"\"}]]";
      sendMessageToTelegram(cb_query.chat_id, message, customInlineKeyboardMarkup(buttons)); //--- Send the inline keyboard markup
   }
Aquí, gestionamos la respuesta a una consulta de devolución de llamada en función de sus datos de devolución de llamada. Comenzamos inicializando una variable de cadena, "response_text", para contener el mensaje que queremos enviar al usuario. Luego verificamos si "callback_data" de la consulta de devolución de llamada ("cb_query.data") coincide con la constante "BTN_MENU". Si es así, establecemos "response_text" en "You clicked "+BTN_MENU+"!", que reconoce la presión del botón e incluye el identificador del botón en el que se hizo clic. Registramos esta respuesta utilizando la función "Print" para rastrear lo que se envía.
Next, we use the "sendMessageToTelegram" function to send the "response_text" message to the chat identified by "cb_query.chat_id". Dado que en esta fase estamos enviando un mensaje de texto simple sin teclado en línea, el tercer parámetro es NULL, lo que indica que no se incluye ninguna marca de teclado adicional.
Después de enviar el mensaje inicial, preparamos un nuevo mensaje con el texto "Information", que proporcionará al usuario varias opciones. A continuación, definimos los botones en línea utilizando una estructura similar a JSON en la cadena "buttons". Esta estructura incluye botones con etiquetas como "Get Expert's Name", "Get Account Information", "Get Current Market Quotes", "More", "Screenshots" y "Cancel". A cada botón se le asignan valores "callback_data" específicos, como "BTN_NAME", "BTN_INFO", "BTN_QUOTES", "BTN_MORE", "BTN_SCREENSHOT" y "EMOJI_CANCEL", que ayudan a identificar qué botón se presionó.
Finalmente, enviamos este nuevo mensaje junto con el teclado en línea utilizando la función "sendMessageToTelegram". El teclado en línea está formateado en JSON por la función "customInlineKeyboardMarkup", lo que garantiza que Telegram pueda mostrar correctamente los botones. Este enfoque nos permite interactuar con los usuarios de forma interactiva proporcionándoles varias opciones directamente dentro de la interfaz de Telegram. Tras la compilación obtenemos los siguientes resultados.

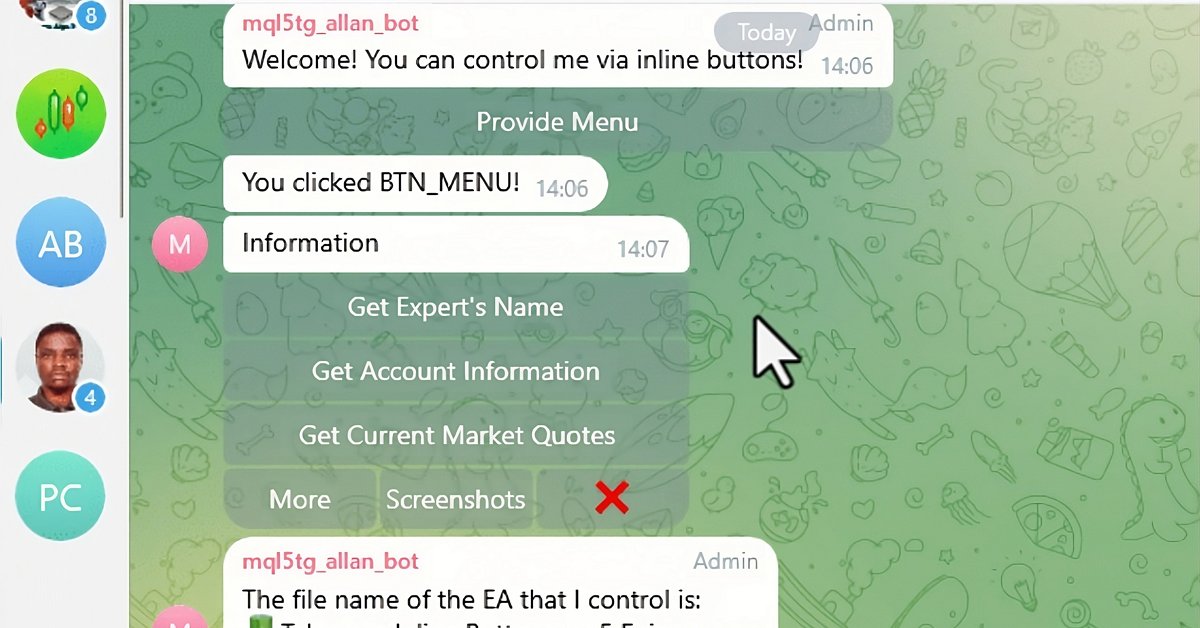
Eso fue un éxito. Ahora debemos responder a los datos de consulta de devolución de llamada respectivos que se reciben de los botones en línea específicos proporcionados. Primero comenzaremos con el responsable de obtener el nombre del programa.
   else if (cb_query.data == BTN_NAME) {
      response_text = "You clicked "+BTN_NAME+"!"; //--- Prepare response text for BTN_NAME
      Print("RESPONSE = ", response_text); //--- Log the response
      string message = "The file name of the EA that I control is:\n"; //--- Message with EA file name
      message += "\xF50B"+__FILE__+" Enjoy.\n"; //--- Append the file name and a friendly message
      sendMessageToTelegram(cb_query.chat_id, message, NULL); //--- Send the message
   }
Esta sección administra una consulta de devolución de llamada particular en la que callback_data es igual a "BTN_NAME". Comenzamos configurando un texto de respuesta en la variable "response_text". Si "callback_data" coincide con "BTN_NAME", establecemos "response_text" como "You clicked " + BTN_NAME + "!" Esto confirma la pulsación del botón e incluye el identificador del botón pulsado. Luego, imprimimos esta respuesta utilizando la función "Print" para controlar lo que se envía al usuario.
Luego creamos un mensaje novedoso que transmite detalles sobre el archivo del Asesor Experto sobre el cual el bot tiene control. Esta misiva generada por el bot comienza con las palabras "The file name of the EA that I control is:\n" y continúa añadiendo el nombre del archivo fuente actual, representado por __FILE__, al mensaje, rematado con un amistoso "Enjoy.". Un detalle curioso es que la misiva se abre con el carácter «\xF50B», que representa un icono, un adorno tipográfico o simplemente una forma de deslumbrar al lector en nombre del bot.
En conclusión, llamamos a la función “sendMessageToTelegram” para enviar el mensaje al chat que corresponde a “cb_query.chat_id”. NULL se pasa como tercer parámetro, lo que significa que ningún teclado en línea acompañará este mensaje. Cuando hacemos clic en el botón, tenemos la siguiente respuesta.

Eso fue un éxito. Ahora, para obtener la capacidad de respuesta de los otros botones, es decir, la información de la cuenta y las cotizaciones de precios del mercado, se utiliza un enfoque similar.
   else if (cb_query.data == BTN_INFO) {
      response_text = "You clicked "+BTN_INFO+"!"; //--- Prepare response text for BTN_INFO
      Print("RESPONSE = ", response_text); //--- Log the response
      ushort MONEYBAG = 0xF4B0; //--- Define money bag emoji
      string MONEYBAGcode = ShortToString(MONEYBAG); //--- Convert emoji code to string
      string currency = AccountInfoString(ACCOUNT_CURRENCY); //--- Get the account currency
      //--- Construct the account information message
      string message = "\x2733\Account No: "+(string)AccountInfoInteger(ACCOUNT_LOGIN)+"\n";
      message += "\x23F0\Account Server: "+AccountInfoString(ACCOUNT_SERVER)+"\n";
      message += MONEYBAGcode+"Balance: "+(string)AccountInfoDouble(ACCOUNT_BALANCE)+" "+currency+"\n";
      message += "\x2705\Profit: "+(string)AccountInfoDouble(ACCOUNT_PROFIT)+" "+currency+"\n";
      sendMessageToTelegram(cb_query.chat_id, message, NULL); //--- Send the message
   }
   else if (cb_query.data == BTN_QUOTES) {
      response_text = "You clicked "+BTN_QUOTES+"!"; //--- Prepare response text for BTN_QUOTES
      Print("RESPONSE = ", response_text); //--- Log the response
      double Ask = SymbolInfoDouble(_Symbol, SYMBOL_ASK); //--- Get the current ask price
      double Bid = SymbolInfoDouble(_Symbol, SYMBOL_BID); //--- Get the current bid price
      //--- Construct the market quotes message
      string message = "\xF170 Ask: "+(string)Ask+"\n";
      message += "\xF171 Bid: "+(string)Bid+"\n";
      sendMessageToTelegram(cb_query.chat_id, message, NULL); //--- Send the message
   }
Tras la compilación obtenemos los siguientes resultados:

Eso fue un éxito. Ahora procedemos a manejar también el botón en línea “More”. Hasta este punto, puedes ver que no saturamos la interfaz o el campo de chat con mensajes. Está limpio y reutilizamos los botones en línea de manera eficiente.
   else if (cb_query.data == BTN_MORE) {
      response_text = "You clicked "+BTN_MORE+"!"; //--- Prepare response text for BTN_MORE
      Print("RESPONSE = ", response_text); //--- Log the response

      string message = "Choose More Options Below:\n"; //--- Message to prompt for additional options
      message += "Trading Operations"; //--- Title for trading operations
      //--- Define inline buttons for additional options
      string buttons = "[[{\"text\": \""+EMOJI_UP+"\", \"callback_data\": \""+EMOJI_UP+"\"}],"
                        "[{\"text\": \"Buy\", \"callback_data\": \""+BTN_BUY+"\"}, {\"text\": \"Close\", \"callback_data\": \""+BTN_CLOSE+"\"}, {\"text\": \"Next\", \"callback_data\": \""+BTN_NEXT+"\"}]]";
      sendMessageToTelegram(cb_query.chat_id, message, customInlineKeyboardMarkup(buttons)); //--- Send the inline keyboard markup
   }
Aquí, manejamos una consulta de devolución de llamada donde los datos de devolución de llamada es "BTN_MORE". Comenzamos preparando un mensaje de respuesta almacenado en la variable "response_text". Si los datos de devolución de llamada coinciden con "BTN_MORE", establecemos "response_text" en "You clicked "+BTN_MORE+"!", que reconoce la presión del botón e incluye el identificador del botón en el que se hizo clic. Esta respuesta se registra mediante la función "Print" para realizar un seguimiento de lo que se envía.
A continuación, construimos un nuevo mensaje que solicita al usuario que elija entre opciones adicionales. La variable "message" comienza con "Choose More Options Below:\n", seguido de "Trading Operations", que actúa como título para el conjunto de opciones relacionadas con el comercio. Luego definimos los botones en línea para estas opciones adicionales usando una estructura similar a JSON en la cadena "buttons". Esta estructura incluye:
- Un botón con un emoji "EMOJI_UP" y su "callback_data" correspondiente como "EMOJI_UP".
- Una fila de botones para varias operaciones comerciales: "Buy", "Close" y "Next", cada uno con sus respectivos valores "callback_data" de "BTN_BUY", "BTN_CLOSE" y "BTN_NEXT".
Finalmente, utilizamos la función "sendMessageToTelegram" para enviar este mensaje junto con el teclado en línea al chat identificado por "cb_query.chat_id". El marcado del teclado en línea se formatea en JSON mediante la función "customInlineKeyboardMarkup". Si hacemos clic en este botón, deberíamos recibir otro botón extendido. Esto se ilustra a continuación:

Todo salió como se esperaba. Ahora sólo trabajamos en los nuevos botones que aparecen. Primero, está el botón de emoji hacia arriba. Si se hace clic, queremos volver al menú anterior, que es el menú principal.
   else if (cb_query.data == EMOJI_UP) {
      response_text = "You clicked "+EMOJI_UP+"!"; //--- Prepare response text for EMOJI_UP
      Print("RESPONSE = ", response_text); //--- Log the response
      string message = "Choose a menu item:\n"; //--- Message to prompt for menu selection
      message += "Information"; //--- Title for information options
      //--- Define inline buttons for menu options
      string buttons = "[[{\"text\": \"Get Expert's Name\", \"callback_data\": \""+BTN_NAME+"\"}],"
                        "[{\"text\": \"Get Account Information\", \"callback_data\": \""+BTN_INFO+"\"}],"
                        "[{\"text\": \"Get Current Market Quotes\", \"callback_data\": \""+BTN_QUOTES+"\"}],"
                        "[{\"text\": \"More\", \"callback_data\": \""+BTN_MORE+"\"}, {\"text\": \"Screenshots\", \"callback_data\": \""+BTN_SCREENSHOT+"\"}, {\"text\": \""+EMOJI_CANCEL+"\", \"callback_data\": \""+EMOJI_CANCEL+"\"}]]";
      sendMessageToTelegram(cb_query.chat_id, message, customInlineKeyboardMarkup(buttons)); //--- Send the inline keyboard markup
   }
Aquí, simplemente usamos el valor predeterminado y enviamos el teclado en línea del menú principal. En la misma lógica, respondemos a los otros botones para operaciones de apertura y cierre de posiciones como se muestra a continuación.
   else if (cb_query.data == BTN_BUY) {
      response_text = "You clicked "+BTN_BUY+"!"; //--- Prepare response text for BTN_BUY
      Print("RESPONSE = ", response_text); //--- Log the response

      CTrade obj_trade; //--- Create a trade object
      double Ask = SymbolInfoDouble(_Symbol, SYMBOL_ASK); //--- Get the current ask price
      double Bid = SymbolInfoDouble(_Symbol, SYMBOL_BID); //--- Get the current bid price
      //--- Open a buy position
      obj_trade.Buy(0.01, NULL, 0, Bid - 300 * _Point, Bid + 300 * _Point);
      double entry = 0, sl = 0, tp = 0, vol = 0;
      ulong ticket = obj_trade.ResultOrder(); //--- Get the ticket number of the new order
      if (ticket > 0) {
         if (PositionSelectByTicket(ticket)) { //--- Select the position by ticket
            entry = PositionGetDouble(POSITION_PRICE_OPEN); //--- Get the entry price
            sl = PositionGetDouble(POSITION_SL); //--- Get the stop loss price
            tp = PositionGetDouble(POSITION_TP); //--- Get the take profit price
            vol = PositionGetDouble(POSITION_VOLUME); //--- Get the volume
         }
      }
      //--- Construct the message with position details
      string message = "\xF340\Opened BUY Position:\n";
      message += "Ticket: "+(string)ticket+"\n";
      message += "Open Price: "+(string)entry+"\n";
      message += "Lots: "+(string)vol+"\n";
      message += "SL: "+(string)sl+"\n";
      message += "TP: "+(string)tp+"\n";
      sendMessageToTelegram(cb_query.chat_id, message, NULL); //--- Send the message
   }
   else if (cb_query.data == BTN_CLOSE) {
      response_text = "You clicked "+BTN_CLOSE+"!"; //--- Prepare response text for BTN_CLOSE
      Print("RESPONSE = ", response_text); //--- Log the response
      CTrade obj_trade; //--- Create a trade object
      int totalOpenBefore = PositionsTotal(); //--- Get the total number of open positions before closing
      obj_trade.PositionClose(_Symbol); //--- Close the position for the symbol
      int totalOpenAfter = PositionsTotal(); //--- Get the total number of open positions after closing
      //--- Construct the message with position closure details
      string message = "\xF62F\Closed Position:\n";
      message += "Total Positions (Before): "+(string)totalOpenBefore+"\n";
      message += "Total Positions (After): "+(string)totalOpenAfter+"\n";
      sendMessageToTelegram(cb_query.chat_id, message, NULL); //--- Send the message
   }
Al ejecutar el programa, estos son los resultados que obtenemos.

Fantástico. De manera similar, agregamos los otros segmentos de control como se muestra a continuación.
   else if (cb_query.data == BTN_NEXT) {
      response_text = "You clicked "+BTN_NEXT+"!"; //--- Prepare response text for BTN_NEXT
      Print("RESPONSE = ", response_text); //--- Log the response

      string message = "Choose Still More Options Below:\n"; //--- Message to prompt for further options
      message += "More Options"; //--- Title for more options
      //--- Define inline buttons for additional options
      string buttons = "[[{\"text\": \""+EMOJI_UP+"\", \"callback_data\": \""+EMOJI_UP+"\"}, {\"text\": \"Contact\", \"callback_data\": \""+BTN_CONTACT+"\"}, {\"text\": \"Join\", \"callback_data\": \""+BTN_JOIN+"\"},{\"text\": \""+EMOJI_PISTOL+"\", \"callback_data\": \""+EMOJI_PISTOL+"\"}]]";
      sendMessageToTelegram(cb_query.chat_id, message, customInlineKeyboardMarkup(buttons)); //--- Send the inline keyboard markup
   }
   else if (cb_query.data == BTN_CONTACT) {
      response_text = "You clicked "+BTN_CONTACT+"!"; //--- Prepare response text for BTN_CONTACT
      Print("RESPONSE = ", response_text); //--- Log the response
      string message = "Contact the developer via link below:\n"; //--- Message with contact link
      message += "https://t.me/Forex_Algo_Trader";
      sendMessageToTelegram(cb_query.chat_id, message, NULL); //--- Send the message
   }
   else if (cb_query.data == BTN_JOIN) {
      response_text = "You clicked "+BTN_JOIN+"!"; //--- Prepare response text for BTN_JOIN
      Print("RESPONSE = ", response_text); //--- Log the response
      string message = "You want to be part of our MQL5 Community?\n"; //--- Message inviting to join the community
      message += "Welcome! <a href=\"https://t.me/forexalgo_trading\">Click me</a> to join.\n";
      message += "<s>Civil Engineering</s> Forex AlgoTrading\n"; //--- Strikethrough text
      message += "<pre>This is a sample of our MQL5 code</pre>\n"; //--- Preformatted text
      message += "<u><i>Remember to follow community guidelines!\xF64F\</i></u>\n"; //--- Italic and underline text
      message += "<b>Happy Trading!</b>\n"; //--- Bold text
      sendMessageToTelegram(cb_query.chat_id, message, NULL); //--- Send the message
   }
   else if (cb_query.data == EMOJI_PISTOL) {
      response_text = "You clicked "+EMOJI_PISTOL+"!"; //--- Prepare response text for EMOJI_PISTOL
      Print("RESPONSE = ", response_text); //--- Log the response
      string message = "Choose More Options Below:\n"; //--- Message to prompt for more options
      message += "Trading Operations"; //--- Title for trading operations
      //--- Define inline buttons for additional trading options
      string buttons = "[[{\"text\": \""+EMOJI_UP+"\", \"callback_data\": \""+EMOJI_UP+"\"}],"
                        "[{\"text\": \"Buy\", \"callback_data\": \""+BTN_BUY+"\"}, {\"text\": \"Close\", \"callback_data\": \""+BTN_CLOSE+"\"}, {\"text\": \"Next\", \"callback_data\": \""+BTN_NEXT+"\"}]]";
      sendMessageToTelegram(cb_query.chat_id, message, customInlineKeyboardMarkup(buttons)); //--- Send the inline keyboard markup
   }
Esto se encarga de los botones generados en el campo "Next", así como de su capacidad de respuesta. Luego debemos ocuparnos del botón de captura de pantalla que se encuentra en el menú del botón en línea principal.
   else if (cb_query.data == BTN_SCREENSHOT) {
      response_text = "You clicked "+BTN_SCREENSHOT+"!"; //--- Prepare response text for BTN_SCREENSHOT
      Print("RESPONSE = ", response_text); //--- Log the response

      string message = "Okay. Command 'get Current Chart Screenshot' received.\n"; //--- Message acknowledging screenshot command
      message += "Screenshot sending process initiated \xF60E"; //--- Emoji indicating process initiation
      sendMessageToTelegram(cb_query.chat_id, message, NULL); //--- Send the message
      string caption = "Screenshot of Symbol: "+_Symbol+ //--- Caption for screenshot
                       " ("+EnumToString(ENUM_TIMEFRAMES(_Period))+ //--- Timeframe
                       ") @ Time: "+TimeToString(TimeCurrent()); //--- Current time
      //--- Send the screenshot to Telegram
      sendScreenshotToTelegram(cb_query.chat_id, _Symbol, _Period, caption);
   }
Por último, debemos ocuparnos del botón “Cancel” eliminando los botones en línea actuales, listos para comenzar de nuevo.
   else if (cb_query.data == EMOJI_CANCEL) {
      response_text = "You clicked "+EMOJI_CANCEL+"!"; //--- Prepare response text for EMOJI_CANCEL
      Print("RESPONSE = ", response_text); //--- Log the response

      string message = "Choose /start or /help to begin."; //--- Message for user guidance
      sendMessageToTelegram(cb_query.chat_id, message, NULL); //--- Send the message
      //--- Reset the inline button state by removing the keyboard
      removeInlineButtons(member_token, cb_query.chat_id, cb_query.message_id);
   }
Aquí se implementa un enfoque similar a la lógica que hemos estado usando, solo que hemos agregado otra función para eliminar los botones en línea.
//+------------------------------------------------------------------+
//| Remove inline buttons by editing message reply markup            |
//+------------------------------------------------------------------+
void removeInlineButtons(string memberToken, long chatID, long messageID){
   //--- Reset the inline button state by removing the keyboard
   string url = TELEGRAM_BASE_URL + "/bot" + memberToken + "/editMessageReplyMarkup"; //--- API URL to edit message
   string params = "chat_id=" + IntegerToString(chatID) + //--- Chat ID parameter
                 "&message_id=" + IntegerToString(messageID) + //--- Message ID parameter
                 "&reply_markup=" + UrlEncode("{\"inline_keyboard\":[]}"); //--- Empty inline keyboard
   string response;
   int res = postRequest(response, url, params, WEB_TIMEOUT); //--- Send request to Telegram API
}
Aquí definimos la función "removeInlineButtons". Su propósito es deshacerse de los botones en línea de un mensaje enviado previamente cambiando el marcado de respuesta del mensaje. La función tiene tres parámetros: el "memberToken" (el token de autenticación del bot), el "chatID" (el ID del chat donde se envió el mensaje) y el "messageID" (el ID del mensaje que contiene los botones en línea). Primero, construimos la URL del punto final de la API para el método "editMessageReplyMarkup" de Telegram. Hacemos esto combinando "TELEGRAM_BASE_URL" con "/bot" y "memberToken". Esto forma la URL que usaremos para comunicarnos con los servidores de Telegram.
Luego especificamos la cadena "params", que contiene los parámetros necesarios para la llamada API. Incluimos el parámetro "chat_id". Para obtener su valor, convertimos la variable "chatID" de un entero a una cadena. Hacemos lo mismo para el parámetro "message_id". Por último, le indicamos a la API que elimine los botones en línea enviando un campo "reply_markup" vacío. El valor de este campo es una cadena JSON vacía, que obtenemos al "UrlEncoding" el valor de la variable "emptyInlineKeyboard".
Una vez que hemos configurado los parámetros, declaramos la variable "response" para contener lo que el servidor envía de vuelta y llamamos "postRequest" para enviar la solicitud de API a Telegram. La función "postRequest" envía la solicitud utilizando la URL y los parámetros proporcionados junto con un tiempo de espera ("WEB_TIMEOUT") en caso de que las cosas salgan mal. Si la solicitud tiene éxito, obtenemos el resultado deseado: un mensaje sin botones en línea, restableciendo efectivamente su estado. Si los datos de devolución de llamada no se reconocen, devolvemos una impresión que indica que el botón en el que se hizo clic es desconocido, lo que significa que el botón no se reconoce.
   else {
      response_text = "Unknown button!"; //--- Prepare response text for unknown buttons
      Print("RESPONSE = ", response_text); //--- Log the response
   }
Cuando hacemos clic en el botón cancelar, obtenemos el siguiente resultado.

Eso fue un éxito. El código fuente completo responsable de procesar las consultas de devolución de llamada es el siguiente.
#define BTN_MENU "BTN_MENU" //--- Identifier for menu button

//+------------------------------------------------------------------+
//| Process new messages                                             |
//+------------------------------------------------------------------+
void Class_Bot_EA::ProcessMessages(void){
   //--- Loop through all chats
   for(int i=0; i<member_chats.Total(); i++){
      Class_Chat *chat = member_chats.GetNodeAtIndex(i); //--- Get the current chat
      if(!chat.member_new_one.done){ //--- Check if the message has not been processed yet
         chat.member_new_one.done = true; //--- Mark the message as processed
         string text = chat.member_new_one.message_text; //--- Get the message text

         //--- Example of sending a message with inline buttons
         if (text == "Start" || text == "/start" || text == "Help" || text == "/help"){
            string message = "Welcome! You can control me via inline buttons!"; //--- Welcome message
            //--- Define inline button to provide menu
            string buttons = "[[{\"text\": \"Provide Menu\", \"callback_data\": \""+BTN_MENU+"\"}]]";
            sendMessageToTelegram(chat.member_id, message, customInlineKeyboardMarkup(buttons)); //--- Send the inline keyboard markup
         }
      }
   }
}


#define BTN_NAME "BTN_NAME" //--- Identifier for name button
#define BTN_INFO "BTN_INFO" //--- Identifier for info button
#define BTN_QUOTES "BTN_QUOTES" //--- Identifier for quotes button
#define BTN_MORE "BTN_MORE" //--- Identifier for more options button
#define BTN_SCREENSHOT "BTN_SCREENSHOT" //--- Identifier for screenshot button
#define EMOJI_CANCEL "\x274C" //--- Cross mark emoji

#define EMOJI_UP "\x2B06" //--- Upwards arrow emoji
#define BTN_BUY "BTN_BUY" //--- Identifier for buy button
#define BTN_CLOSE "BTN_CLOSE" //--- Identifier for close button
#define BTN_NEXT "BTN_NEXT" //--- Identifier for next button

#define EMOJI_PISTOL "\xF52B" //--- Pistol emoji
#define BTN_CONTACT "BTN_CONTACT" //--- Identifier for contact button
#define BTN_JOIN "BTN_JOIN" //--- Identifier for join button

//+------------------------------------------------------------------+
//|   Function to process callback queries                           |
//+------------------------------------------------------------------+
void Class_Bot_EA::ProcessCallbackQuery(Class_CallbackQuery &cb_query) {
   Print("Callback Query ID: ", cb_query.id); //--- Log the callback query ID
   Print("Chat Token: ", member_token); //--- Log the member token
   Print("From First Name: ", cb_query.from_first_name); //--- Log the sender's first name
   Print("From Last Name: ", cb_query.from_last_name); //--- Log the sender's last name
   Print("From Username: ", cb_query.from_username); //--- Log the sender's username
   Print("Message ID: ", cb_query.message_id); //--- Log the message ID
   Print("Message Text: ", cb_query.message_text); //--- Log the message text
   Print("Callback Data: ", cb_query.data); //--- Log the callback data

   //--- Respond based on the callback data
   string response_text;
   if (cb_query.data == BTN_MENU) {
      response_text = "You clicked "+BTN_MENU+"!"; //--- Prepare response text for BTN_MENU
      Print("RESPONSE = ", response_text); //--- Log the response
      //--- Send the response message to the correct group/channel chat ID
      sendMessageToTelegram(cb_query.chat_id, response_text, NULL);
      string message = "Information"; //--- Message to display options
      //--- Define inline buttons with callback data
      string buttons = "[[{\"text\": \"Get Expert's Name\", \"callback_data\": \""+BTN_NAME+"\"}],"
                        "[{\"text\": \"Get Account Information\", \"callback_data\": \""+BTN_INFO+"\"}],"
                        "[{\"text\": \"Get Current Market Quotes\", \"callback_data\": \""+BTN_QUOTES+"\"}],"
                        "[{\"text\": \"More\", \"callback_data\": \""+BTN_MORE+"\"}, {\"text\": \"Screenshots\", \"callback_data\": \""+BTN_SCREENSHOT+"\"}, {\"text\": \""+EMOJI_CANCEL+"\", \"callback_data\": \""+EMOJI_CANCEL+"\"}]]";
      sendMessageToTelegram(cb_query.chat_id, message, customInlineKeyboardMarkup(buttons)); //--- Send the inline keyboard markup
   }
   else if (cb_query.data == BTN_NAME) {
      response_text = "You clicked "+BTN_NAME+"!"; //--- Prepare response text for BTN_NAME
      Print("RESPONSE = ", response_text); //--- Log the response
      string message = "The file name of the EA that I control is:\n"; //--- Message with EA file name
      message += "\xF50B"+__FILE__+" Enjoy.\n"; //--- Append the file name and a friendly message
      sendMessageToTelegram(cb_query.chat_id, message, NULL); //--- Send the message
   }
   else if (cb_query.data == BTN_INFO) {
      response_text = "You clicked "+BTN_INFO+"!"; //--- Prepare response text for BTN_INFO
      Print("RESPONSE = ", response_text); //--- Log the response
      ushort MONEYBAG = 0xF4B0; //--- Define money bag emoji
      string MONEYBAGcode = ShortToString(MONEYBAG); //--- Convert emoji code to string
      string currency = AccountInfoString(ACCOUNT_CURRENCY); //--- Get the account currency
      //--- Construct the account information message
      string message = "\x2733\Account No: "+(string)AccountInfoInteger(ACCOUNT_LOGIN)+"\n";
      message += "\x23F0\Account Server: "+AccountInfoString(ACCOUNT_SERVER)+"\n";
      message += MONEYBAGcode+"Balance: "+(string)AccountInfoDouble(ACCOUNT_BALANCE)+" "+currency+"\n";
      message += "\x2705\Profit: "+(string)AccountInfoDouble(ACCOUNT_PROFIT)+" "+currency+"\n";
      sendMessageToTelegram(cb_query.chat_id, message, NULL); //--- Send the message
   }
   else if (cb_query.data == BTN_QUOTES) {
      response_text = "You clicked "+BTN_QUOTES+"!"; //--- Prepare response text for BTN_QUOTES
      Print("RESPONSE = ", response_text); //--- Log the response
      double Ask = SymbolInfoDouble(_Symbol, SYMBOL_ASK); //--- Get the current ask price
      double Bid = SymbolInfoDouble(_Symbol, SYMBOL_BID); //--- Get the current bid price
      //--- Construct the market quotes message
      string message = "\xF170 Ask: "+(string)Ask+"\n";
      message += "\xF171 Bid: "+(string)Bid+"\n";
      sendMessageToTelegram(cb_query.chat_id, message, NULL); //--- Send the message
   }
   else if (cb_query.data == BTN_MORE) {
      response_text = "You clicked "+BTN_MORE+"!"; //--- Prepare response text for BTN_MORE
      Print("RESPONSE = ", response_text); //--- Log the response

      string message = "Choose More Options Below:\n"; //--- Message to prompt for additional options
      message += "Trading Operations"; //--- Title for trading operations
      //--- Define inline buttons for additional options
      string buttons = "[[{\"text\": \""+EMOJI_UP+"\", \"callback_data\": \""+EMOJI_UP+"\"}],"
                        "[{\"text\": \"Buy\", \"callback_data\": \""+BTN_BUY+"\"}, {\"text\": \"Close\", \"callback_data\": \""+BTN_CLOSE+"\"}, {\"text\": \"Next\", \"callback_data\": \""+BTN_NEXT+"\"}]]";
      sendMessageToTelegram(cb_query.chat_id, message, customInlineKeyboardMarkup(buttons)); //--- Send the inline keyboard markup
   }
   else if (cb_query.data == EMOJI_CANCEL) {
      response_text = "You clicked "+EMOJI_CANCEL+"!"; //--- Prepare response text for EMOJI_CANCEL
      Print("RESPONSE = ", response_text); //--- Log the response

      string message = "Choose /start or /help to begin."; //--- Message for user guidance
      sendMessageToTelegram(cb_query.chat_id, message, NULL); //--- Send the message
      //--- Reset the inline button state by removing the keyboard
      removeInlineButtons(member_token, cb_query.chat_id, cb_query.message_id);
   }
   else if (cb_query.data == EMOJI_UP) {
      response_text = "You clicked "+EMOJI_UP+"!"; //--- Prepare response text for EMOJI_UP
      Print("RESPONSE = ", response_text); //--- Log the response
      string message = "Choose a menu item:\n"; //--- Message to prompt for menu selection
      message += "Information"; //--- Title for information options
      //--- Define inline buttons for menu options
      string buttons = "[[{\"text\": \"Get Expert's Name\", \"callback_data\": \""+BTN_NAME+"\"}],"
                        "[{\"text\": \"Get Account Information\", \"callback_data\": \""+BTN_INFO+"\"}],"
                        "[{\"text\": \"Get Current Market Quotes\", \"callback_data\": \""+BTN_QUOTES+"\"}],"
                        "[{\"text\": \"More\", \"callback_data\": \""+BTN_MORE+"\"}, {\"text\": \"Screenshots\", \"callback_data\": \""+BTN_SCREENSHOT+"\"}, {\"text\": \""+EMOJI_CANCEL+"\", \"callback_data\": \""+EMOJI_CANCEL+"\"}]]";
      sendMessageToTelegram(cb_query.chat_id, message, customInlineKeyboardMarkup(buttons)); //--- Send the inline keyboard markup
   }
   else if (cb_query.data == BTN_BUY) {
      response_text = "You clicked "+BTN_BUY+"!"; //--- Prepare response text for BTN_BUY
      Print("RESPONSE = ", response_text); //--- Log the response

      CTrade obj_trade; //--- Create a trade object
      double Ask = SymbolInfoDouble(_Symbol, SYMBOL_ASK); //--- Get the current ask price
      double Bid = SymbolInfoDouble(_Symbol, SYMBOL_BID); //--- Get the current bid price
      //--- Open a buy position
      obj_trade.Buy(0.01, NULL, 0, Bid - 300 * _Point, Bid + 300 * _Point);
      double entry = 0, sl = 0, tp = 0, vol = 0;
      ulong ticket = obj_trade.ResultOrder(); //--- Get the ticket number of the new order
      if (ticket > 0) {
         if (PositionSelectByTicket(ticket)) { //--- Select the position by ticket
            entry = PositionGetDouble(POSITION_PRICE_OPEN); //--- Get the entry price
            sl = PositionGetDouble(POSITION_SL); //--- Get the stop loss price
            tp = PositionGetDouble(POSITION_TP); //--- Get the take profit price
            vol = PositionGetDouble(POSITION_VOLUME); //--- Get the volume
         }
      }
      //--- Construct the message with position details
      string message = "\xF340\Opened BUY Position:\n";
      message += "Ticket: "+(string)ticket+"\n";
      message += "Open Price: "+(string)entry+"\n";
      message += "Lots: "+(string)vol+"\n";
      message += "SL: "+(string)sl+"\n";
      message += "TP: "+(string)tp+"\n";
      sendMessageToTelegram(cb_query.chat_id, message, NULL); //--- Send the message
   }
   else if (cb_query.data == BTN_CLOSE) {
      response_text = "You clicked "+BTN_CLOSE+"!"; //--- Prepare response text for BTN_CLOSE
      Print("RESPONSE = ", response_text); //--- Log the response
      CTrade obj_trade; //--- Create a trade object
      int totalOpenBefore = PositionsTotal(); //--- Get the total number of open positions before closing
      obj_trade.PositionClose(_Symbol); //--- Close the position for the symbol
      int totalOpenAfter = PositionsTotal(); //--- Get the total number of open positions after closing
      //--- Construct the message with position closure details
      string message = "\xF62F\Closed Position:\n";
      message += "Total Positions (Before): "+(string)totalOpenBefore+"\n";
      message += "Total Positions (After): "+(string)totalOpenAfter+"\n";
      sendMessageToTelegram(cb_query.chat_id, message, NULL); //--- Send the message
   }
   else if (cb_query.data == BTN_NEXT) {
      response_text = "You clicked "+BTN_NEXT+"!"; //--- Prepare response text for BTN_NEXT
      Print("RESPONSE = ", response_text); //--- Log the response

      string message = "Choose Still More Options Below:\n"; //--- Message to prompt for further options
      message += "More Options"; //--- Title for more options
      //--- Define inline buttons for additional options
      string buttons = "[[{\"text\": \""+EMOJI_UP+"\", \"callback_data\": \""+EMOJI_UP+"\"}, {\"text\": \"Contact\", \"callback_data\": \""+BTN_CONTACT+"\"}, {\"text\": \"Join\", \"callback_data\": \""+BTN_JOIN+"\"},{\"text\": \""+EMOJI_PISTOL+"\", \"callback_data\": \""+EMOJI_PISTOL+"\"}]]";
      sendMessageToTelegram(cb_query.chat_id, message, customInlineKeyboardMarkup(buttons)); //--- Send the inline keyboard markup
   }
   else if (cb_query.data == BTN_CONTACT) {
      response_text = "You clicked "+BTN_CONTACT+"!"; //--- Prepare response text for BTN_CONTACT
      Print("RESPONSE = ", response_text); //--- Log the response
      string message = "Contact the developer via link below:\n"; //--- Message with contact link
      message += "https://t.me/Forex_Algo_Trader";
      sendMessageToTelegram(cb_query.chat_id, message, NULL); //--- Send the message
   }
   else if (cb_query.data == BTN_JOIN) {
      response_text = "You clicked "+BTN_JOIN+"!"; //--- Prepare response text for BTN_JOIN
      Print("RESPONSE = ", response_text); //--- Log the response
      string message = "You want to be part of our MQL5 Community?\n"; //--- Message inviting to join the community
      message += "Welcome! <a href=\"https://t.me/forexalgo_trading\">Click me</a> to join.\n";
      message += "<s>Civil Engineering</s> Forex AlgoTrading\n"; //--- Strikethrough text
      message += "<pre>This is a sample of our MQL5 code</pre>\n"; //--- Preformatted text
      message += "<u><i>Remember to follow community guidelines!\xF64F\</i></u>\n"; //--- Italic and underline text
      message += "<b>Happy Trading!</b>\n"; //--- Bold text
      sendMessageToTelegram(cb_query.chat_id, message, NULL); //--- Send the message
   }
   else if (cb_query.data == EMOJI_PISTOL) {
      response_text = "You clicked "+EMOJI_PISTOL+"!"; //--- Prepare response text for EMOJI_PISTOL
      Print("RESPONSE = ", response_text); //--- Log the response
      string message = "Choose More Options Below:\n"; //--- Message to prompt for more options
      message += "Trading Operations"; //--- Title for trading operations
      //--- Define inline buttons for additional trading options
      string buttons = "[[{\"text\": \""+EMOJI_UP+"\", \"callback_data\": \""+EMOJI_UP+"\"}],"
                        "[{\"text\": \"Buy\", \"callback_data\": \""+BTN_BUY+"\"}, {\"text\": \"Close\", \"callback_data\": \""+BTN_CLOSE+"\"}, {\"text\": \"Next\", \"callback_data\": \""+BTN_NEXT+"\"}]]";
      sendMessageToTelegram(cb_query.chat_id, message, customInlineKeyboardMarkup(buttons)); //--- Send the inline keyboard markup
   }
   else if (cb_query.data == BTN_SCREENSHOT) {
      response_text = "You clicked "+BTN_SCREENSHOT+"!"; //--- Prepare response text for BTN_SCREENSHOT
      Print("RESPONSE = ", response_text); //--- Log the response

      string message = "Okay. Command 'get Current Chart Screenshot' received.\n"; //--- Message acknowledging screenshot command
      message += "Screenshot sending process initiated \xF60E"; //--- Emoji indicating process initiation
      sendMessageToTelegram(cb_query.chat_id, message, NULL); //--- Send the message
      string caption = "Screenshot of Symbol: "+_Symbol+ //--- Caption for screenshot
                       " ("+EnumToString(ENUM_TIMEFRAMES(_Period))+ //--- Timeframe
                       ") @ Time: "+TimeToString(TimeCurrent()); //--- Current time
      //--- Send the screenshot to Telegram
      sendScreenshotToTelegram(cb_query.chat_id, _Symbol, _Period, caption);
   }
   else {
      response_text = "Unknown button!"; //--- Prepare response text for unknown buttons
      Print("RESPONSE = ", response_text); //--- Log the response
   }

   //--- Optionally, reset the inline button state by removing the keyboard
   // removeInlineButtons(member_token, cb_query.chat_id, cb_query.message_id);
}


//+------------------------------------------------------------------+
//| Create a custom inline keyboard markup for Telegram              |
//+------------------------------------------------------------------+
string customInlineKeyboardMarkup(const string buttons){
   //--- Construct the JSON string for the inline keyboard markup
   string result = "{\"inline_keyboard\": " + UrlEncode(buttons) + "}"; //--- Encode buttons as JSON
   return(result);
}

//+------------------------------------------------------------------+
//| Remove inline buttons by editing message reply markup            |
//+------------------------------------------------------------------+
void removeInlineButtons(string memberToken, long chatID, long messageID){
   //--- Reset the inline button state by removing the keyboard
   string url = TELEGRAM_BASE_URL + "/bot" + memberToken + "/editMessageReplyMarkup"; //--- API URL to edit message
   string params = "chat_id=" + IntegerToString(chatID) + //--- Chat ID parameter
                 "&message_id=" + IntegerToString(messageID) + //--- Message ID parameter
                 "&reply_markup=" + UrlEncode("{\"inline_keyboard\":[]}"); //--- Empty inline keyboard
   string response;
   int res = postRequest(response, url, params, WEB_TIMEOUT); //--- Send request to Telegram API
}
Para resumir brevemente, gestionamos las consultas callback respondiendo a determinadas pulsaciones de botón y dirigiendo a los usuarios a las opciones de teclado en línea adecuadas. Esto mejora la interacción al ofrecer mensajes y opciones apropiados según el contexto. A continuación, probaremos la integración para asegurarnos de que estas funciones funcionan como deberían y que las interacciones se procesan correctamente.
Prueba de la aplicación de los estados de los botones en línea
En esta sección, comprobaremos lo bien que interactúan los botones en línea con el bot Telegram y el Asesor Experto MQL5. Este proceso implicará simular acciones del usuario, como pulsar botones, y asegurarse de que el bot gestiona correctamente las consultas callback. Evaluaremos la correcta visualización, eliminación o actualización de los botones en línea en función de la interacción del usuario. Para mayor claridad, hemos creado un vídeo que muestra cómo funciona la integración, mostrando el comportamiento paso a paso del bot cuando responde a la pulsación de botones en línea. Esto garantiza que la configuración funcione como se espera en tiempo real. A continuación se muestra la ilustración.
Hemos probado las interacciones de los botones y las consultas de devolución de llamada para garantizar que el bot funciona correctamente con las entradas del usuario y que los estados de los botones en línea se actualizan o restablecen según sea necesario. Esto ofrece un estilo de interacción no lineal, que mejora el compromiso y proporciona una experiencia más eficiente al controlar el bot a través de Telegram.
Conclusión
Para concluir, hemos puesto en marcha y probado el paso de consultas callback y botones en línea en el bot de Telegram. Ahora, el bot puede responder a las entradas del usuario con mensajes personalizados y ofrecer opciones interactivas a través de teclados en línea. La experiencia del usuario se ha mejorado con la adición de botones en tiempo real y fáciles de usar para acciones como acceder a menús, obtener información de expertos o ejecutar comandos relacionados con el trading.
Hemos probado el sistema y podemos confirmar que funciona según lo previsto, procesando correctamente cada consulta callback y ofreciendo a los usuarios la información pertinente que necesitan. Al hacer estas cosas, el bot aún conserva una calidad conversacional, lo que ayuda a mantener el interés y la usabilidad del usuario. Podemos ver que los botones en línea son más eficientes ya que no saturan el campo de chat, tal como se pretende. Esperamos que el artículo le resulte detallado y fácil de entender.
Traducción del inglés realizada por MetaQuotes Ltd.
Artículo original: https://www.mql5.com/en/articles/15823
Advertencia: todos los derechos de estos materiales pertenecen a MetaQuotes Ltd. Queda totalmente prohibido el copiado total o parcial.
Este artículo ha sido escrito por un usuario del sitio web y refleja su punto de vista personal. MetaQuotes Ltd. no se responsabiliza de la exactitud de la información ofrecida, ni de las posibles consecuencias del uso de las soluciones, estrategias o recomendaciones descritas.

 Aprendiendo MQL5 de principiante a profesional (Parte V): Operadores básicos para redirigir el flujo de comandos
- Aplicaciones de trading gratuitas
- 8 000+ señales para copiar
- Noticias económicas para analizar los mercados financieros
Usted acepta la política del sitio web y las condiciones de uso
Echa un vistazo al nuevo artículo: Creación de un Asesor Experto Integrado MQL5-Telegram (Parte 6): Adición de botones responsivos en línea.
Autor: Allan Munene Mutiiria
¡Esto es fantástico! Usted proporciona constantemente ideas valiosas, y realmente lo aprecio. Gracias, estimado Sir Allan.
Esto es fantástico. Usted proporciona constantemente ideas valiosas, y realmente lo aprecio. Gracias, estimado Sir Allan.
¡Buen trabajo! ¡Gracias!
@Javier Santiago Gaston De Iriarte Cabrera gracias por el amable comentario y reconocimiento. Son muy bienvenidos.