
From Basic to Intermediate: BREAK and CONTINUE Statements

Introduction
The content presented here is intended solely for educational purposes. Under no circumstances should the application be viewed for any purpose other than to learn and master the concepts presented.
In the previous article, "From Basic to Intermediate: WHILE and DO WHILE Statements", we introduced loops. Therefore, the prerequisite for following along and fully understanding the concepts in this article is to understand the explanations and examples provided in the previous one.
I understand that many beginner programmers struggle to properly comprehend how loop-generating commands work. However, loops are essential and are present in nearly every program you will develop throughout your career, even if you only create programs as a hobby. Understanding and effectively working with loop-related commands is crucial.
There is another type of loop that does not use conventional commands, but we will explore that at a later time. For now, we will focus on three commands that frequently appear within loops. While two of them can also be used outside a loop, one of them is strictly confined to loop structures. However, it should never, except in highly justified cases, be used in isolation within a loop.
In this article, we will examine these commands, particularly two of them, as highlighted in the title. In other words, it's time to understand how to control a loop from within. At this point, I urge you to pay close attention, dear reader, to what will be explained. If you fail to understand the concepts presented here, you will undoubtedly face difficulties at some point in your programming journey.
A Possible Answer
Before we begin, I left you with a small challenge in the previous article. The task was to transform the following code into a version that utilizes a loop.
01. //+------------------------------------------------------------------+
02. #property copyright "Daniel Jose"
03. //+------------------------------------------------------------------+
04. void OnStart(void)
05. {
06.     Factorial();
07.     Factorial();
08.     Factorial();
09.     Factorial();
10.     Factorial();
11. }
12. //+------------------------------------------------------------------+
13. void Factorial(void)
14. {
15.     static uchar counter = 0;
16.     static ulong value = 1;
17.
18.     Print("Factorial of ", counter, " => ", value);
19.     counter = counter + 1;
20.     value = value * counter;
21. }
22. //+------------------------------------------------------------------+
Code 01
If you were unable to come up with a solution, don't worry as it's all part of the learning process at this stage. However, don't let the material pile up before you start studying it. As we progress toward what I consider an intermediate level, concepts will accumulate rapidly.
There are multiple ways to transform - or rather, incorporate - a loop into Code 01 to make it more efficient. One such approach is already within our reach, thanks to what we covered in the previous article.
In simple terms, you could modify Code 07 from the previous article to achieve the same result as executing Code 01. How? By using Code 02, which is shown below:
01. //+------------------------------------------------------------------+
02. #property copyright "Daniel Jose"
03. //+------------------------------------------------------------------+
04. void OnStart(void)
05. {
06.     uchar counter = 0;
07.
08.     while (counter < 5)
09.         Factorial(counter);
10. }
11. //+------------------------------------------------------------------+
12. void Factorial(uchar &counter)
13. {
14.     static ulong value = 1;
15.
16.     Print("Factorial of ", counter, " => ", value);
17.     counter = counter + 1;
18.     value = value * counter;
19. }
20. //+------------------------------------------------------------------+
Code 02
This is just one way to solve the problem. There are other approaches, some more complex, some less so. However, given what we have covered so far, this solution is a solid choice. Now, if you don't fully understand what Code 02 is doing, or more importantly, why it produces the same output as Code 01, stop reading this article immediately. Go back to the previous articles and ensure you understand Code 02. Only once you have a firm understanding of it should you proceed with this and future articles.
Now that I've given that warning, let's begin by examining the first statement introduced in this article. We will start with the simplest statement that can be used within a loop. But before diving into it, let’s introduce a new topic.
The RETURN Statement
I know that many of you with some prior experience in MQL5 programming might be thinking: But this statement has nothing to do with loops, it's more related to functions! And you'd be absolutely right. The RETURN statement is far more relevant to functions than to loops. However, despite being a mandatory statement in functions, it is optional in procedures. It is precisely because of its effect when used within procedures that the RETURN statement can sometimes appear inside a loop.
Now, pay close attention. The purpose of the RETURN statement is to return control to the function or procedure that called it. However (and this is where many beginners struggle to understand) if you place a RETURN statement inside the main procedure of your application, such as OnInit or OnStart (depending on the case), executing RETURN will terminate your application. This will cause MetaTrader 5 to remove it from the chart. This happens because ultimately, every application is just a function or procedure being executed by the operating system. Understanding this makes it easier to see why placing a RETURN statement inside OnInit or OnStart can cause your application to end prematurely.
If RETURN appears in OnInit, whether or not the application terminates depends on the value returned to MetaTrader 5. However, if RETURN is executed inside the OnStart procedure, the application will be terminated.
To understand this, let's start with a simple example, shown below:
01. //+------------------------------------------------------------------+
02. #property copyright "Daniel Jose"
03. //+------------------------------------------------------------------+
04. void OnStart(void)
05. {
06.     Print(__FUNCTION__, " ", __LINE__, " It will be executed anyway...");
07.
08.     return;
09.
10.     Print(__FUNCTION__, " ", __LINE__, " This line will never be executed...");
11. }
12. //+------------------------------------------------------------------+
Code 03
The result of executing this code can be seen below:

Figure 01
The key point to understand here is that the RETURN statement, located on line 8, is inside a procedure. Since it is a procedure, it must not be associated with any return value. This is to prevent conflicts with the compiler when generating the executable. However, if RETURN were inside a function, associating a return value with it would be mandatory. This is because the calling function must receive a return value. We have previously discussed this when covering variables.
However, our focus at this moment is different. Here, we are interested in exiting a loop prematurely. This is often necessary and even desirable when a specific condition arises. A simple example where this could be applied is shown below:
01. //+------------------------------------------------------------------+
02. #property copyright "Daniel Jose"
03. //+------------------------------------------------------------------+
04. void OnStart(void)
05. {
06.     Print(__FUNCTION__, " ", __LINE__, " It will be executed anyway...");
07.
08.     Procedure_Loop();
09.
10.     Print(__FUNCTION__, " ", __LINE__, " It will be executed anyway...");
11. }
12. //+------------------------------------------------------------------+
13. void Procedure_Loop(void)
14. {
15.     char info = 10;
16.
17.     Print(__FUNCTION__, " ", __LINE__, " It will be executed anyway...");
18.
19.     while (info)
20.     {
21.         info = info - 3;
22.
23.         Print("Loop : ", info);
24.
25.         if (info < -5) return;
26.     }
27.
28.     Print(__FUNCTION__, " ", __LINE__, " This line will never be executed...");
29. }
30. //+------------------------------------------------------------------+
Code 04
When executed, Code 04 will produce the result displayed in the image below:
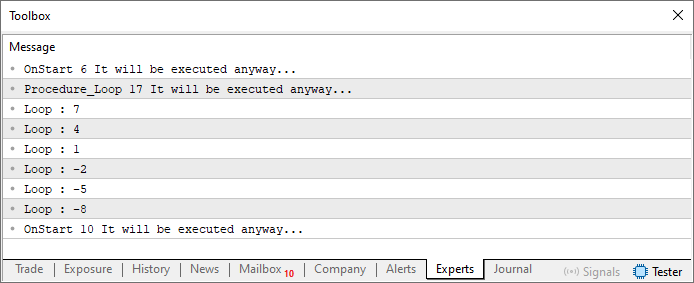
Figure 02
At this point, you might find the behavior a bit unusual. If we want the loop to terminate when the info variable reaches a value lower than negative five, why not include this condition directly in the loop's test expression? The reason for not doing so is that sometimes we do not want the loop to reach a certain value; but if it does, we want to ignore the rest of the routine or procedure in which the loop exists.
Due to this detail, line 28 will never be executed in Code 04. This is because the value of 'info' will not reach zero before the IF condition triggers the execution of the RETURN statement. As a result, Image 02 displays values ranging from seven down to negative eight.
You may be wondering: Why doesn't the application terminate when line 25 executes, allowing line 10 to be executed? This behavior differs from what we saw in Code 03. The reason, dear reader, is that OnStart is the initial procedure (or function) called by MetaTrader 5, while Procedure_Loop is called by OnStart. Therefore, when the RETURN statement is executed, it returns control to the function or procedure that originally called it, in this case, OnStart.
The way MetaTrader 5 manages function calls will be explained in detail later. However, in simple terms, MetaTrader 5 calls two main functions: OnStart and OnInit. Only in these specific cases will the RETURN statement cause the application to terminate. Beyond these cases, using RETURN will not end the application.
Great. At this point, you should now have a solid understanding of how RETURN can be used inside a loop. If anything remains unclear, take some time to practice with these simpler examples until you fully grasp the concept. Now, let's move on to the next statement to be explored in this article.
The BREAK Statement
The BREAK statement is quite interesting, but it requires careful attention. You should take your time studying this statement. It is not uncommon for beginners to struggle with its usage. While using BREAK in simple loops is quite simple, things can become more complex when dealing with more intricate loop structures.
One of the most common mistakes when using BREAK is assuming that it will influence a different loop or even another control flow statement. This happens because BREAK is not used exclusively for loops; it is also applicable to another control structure that we will discuss later. However, for now, do not worry about that. Let's focus solely on its behavior within loops.
There is an important concept that many programmers either overlook or forget: the BREAK statement follows a principle very similar to RETURN. In other words, it is not placed arbitrarily within a loop. Typically, it is part of an IF statement. To illustrate this, we can take Code 04 from the previous section and replace the RETURN statement with BREAK. The updated version of the code is shown below:
01. //+------------------------------------------------------------------+
02. #property copyright "Daniel Jose"
03. //+------------------------------------------------------------------+
04. void OnStart(void)
05. {
06.     Print(__FUNCTION__, " ", __LINE__, " It will be executed anyway...");
07.
08.     Procedure_Loop();
09.
10.     Print(__FUNCTION__, " ", __LINE__, " It will be executed anyway...");
11. }
12. //+------------------------------------------------------------------+
13. void Procedure_Loop(void)
14. {
15.     char info = 10;
16.
17.     Print(__FUNCTION__, " ", __LINE__, " It will be executed anyway...");
18.
19.     while (info)
20.     {
21.         info = info - 3;
22.
23.         Print("Loop : ", info);
24.
25.         if (info < -5) break;
26.     }
27.
28.     Print(__FUNCTION__, " ", __LINE__, " It will be executed anyway...");
29. }
30. //+------------------------------------------------------------------+
Code 05
When Code 05 is executed, the output displayed in the MetaTrader 5 terminal is as follows:
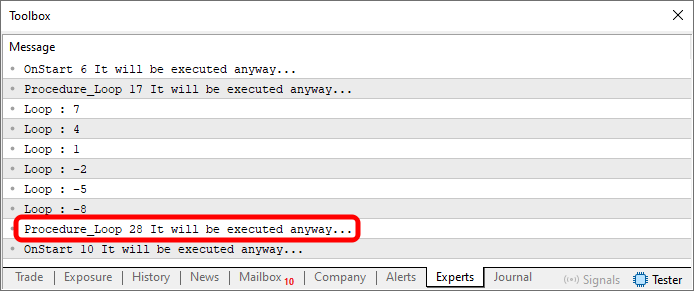
Figure 03
Interesting! This time we have information that has not been shown before. It's really interesting, it seems like loops are quite easy to work with. Now we are ready to work with more complex codes. (Laughs.) Calm down, dear reader, we are just getting started. There is one problem (actually a misunderstanding) that often arises among beginning programmers regarding these statements. So I ask you to practice using variations of the codes given here.
The first misunderstanding is related to the use of the BREAK operator in nested loops. Yes, just like we can nest multiple IF statements, we can nest multiple loops within each other. This is very common when working with multidimensional matrices, when we don't want to calculate indices manually. But let's look at a simple example of a nested loop to understand how the BREAK statement behaves in this case. A simple example is shown below:
01. //+------------------------------------------------------------------+
02. #property copyright "Daniel Jose"
03. //+------------------------------------------------------------------+
04. void OnStart(void)
05. {
06.     Print(__FUNCTION__, " ", __LINE__, " It will be executed anyway...");
07.
08.     Procedure_Loop();
09.
10.     Print(__FUNCTION__, " ", __LINE__, " It will be executed anyway...");
11. }
12. //+------------------------------------------------------------------+
13. void Procedure_Loop(void)
14. {
15.     char    info = 10,
16.             limit = 5;
17.
18.     do
19.     {
20.         Print(__FUNCTION__, "  ", __LINE__, " : Info (", info, ")  Limit (", limit, ")");
21.
22.         while (info > limit)
23.         {
24.             if (limit < 0) break;
25.
26.             info = info - 3;
27.
28.             Print(__FUNCTION__, "  ", __LINE__, " : Info (", info, ")  Limit (", limit, ")");
29.         }
30.         info = info + limit;
31.         limit = limit - 2;
32.
33.         Print(__FUNCTION__, "  ", __LINE__, " : Info (", info, ")  Limit (", limit, ")");
34.
35.     }while (info > 0);
36.
37.     Print(__FUNCTION__, "  ", __LINE__, " : Info (", info, ")  Limit (", limit, ")");
38. }
39. //+------------------------------------------------------------------+
Code 06
Although it may initially seem complex due to the number of printed messages, Code 06 is actually quite simple. It effectively demonstrates how the BREAK statement operates within nested loops. When you run Code 06, the result is quite interesting. It can be seen below:

Figure 04
Now, pay close attention, dear reader. Within the loop that begins on line 18, there is another nested loop that starts on line 22. Inside this nested loop, a condition check occurs on line 24. This is where things get interesting. You might want to experiment later by replacing the BREAK statement with a RETURN statement to observe how the code behaves. But for now, let's focus on what happens when we use BREAK.
It is clear that some form of counting is taking place here. But how is it being controlled? That is the key question. Often, we need to track specific values, but manually analyzing the output of multiple nested loops can be cumbersome. In many cases, we develop a mathematical expression or formula that defines how the calculation should be performed. Once we have this formula, we implement it in the form of code.
When doing so, we must trust our ability to translate mathematical expressions into functional code. If the number of values being processed or the way they are generated is particularly complex or extensive, we cannot analyze each value individually. Instead, we use sampling - we determine the expected values within a defined range and analyze only that range. This is why mastering each command and understanding how every operation functions is crucial.
Returning to the code, you may notice that in Image 04, line 28 is printed only in certain cases, even though the condition in the loop on line 22 suggests it should be executed more frequently. This happens because the BREAK statement terminates the inner loop before the condition indicates it should end. However, in this specific case, breaking the inner loop does not cause the outer loop to terminate. This is why you should also try replacing BREAK with RETURN to see how it affects the final output in the terminal. There is a distinct difference in the results.
By following the execution flow, you will understand this concept quite easily. Since we have already explored the execution flow of the WHILE and DO-WHILE loops, as well as the IF statement, in previous articles, you should be able to visualize them in this context as well. However, we have not yet demonstrated the execution flow when encountering a BREAK statement. This is illustrated below:
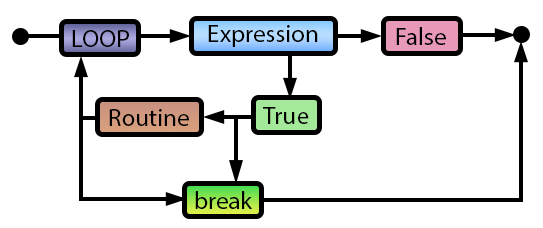
Figure 05
Here, LOOP represents any command that allows the creation of loops. However, the BREAK statement is depicted as if it were placed freely within the code. At this point, we need to make a clarification. If we were to include all the necessary conditions for the BREAK statement to be correctly implemented, we would need to add the execution flow of the IF statement here. When the condition inside IF evaluates to true, the BREAK statement is executed, and the flow follows the path shown in the image. Also, note that the BREAK statement can be placed before, during, or after the execution of the loop routine. Typically, it is positioned either at the beginning or the end. If it appears in the middle, it usually indicates that the routine has been divided into two parts. However, to keep the execution flow simpler, I have not included this type of operation in the diagram.
At this point, I believe you understand the concept. However, keep one important thing in mind: the BREAK statement is also associated with another type of control flow command. For now, we will leave that discussion for later and take things one step at a time.
Now, let's examine another statement - the last one that can appear within a loop. However, unlike the commands we have discussed so far, this next statement exists only within loops, requiring extra caution when using it.
The CONTINUE Statement
The CONTINUE statement is inherently risky when used within a loop, particularly with WHILE or DO-WHILE loops. This is because it is all too common to accidentally create infinite loops when using this statement. Even though the FOR loop, which will be explained later, might appear to be more resistant to becoming an infinite loop, it can still happen. This is usually due to a simple oversight during implementation that necessitates the use of the CONTINUE command. So, stay alert and be extra cautious whenever you need to use, or come across, this statement in any section of your code. It will always be linked to some form of loop, but special attention should be paid especially when dealing with WHILE and DO-WHILE loops.
Given the potential danger of misusing this statement, let's approach it a bit differently here. We'll start by understanding the flow of execution when this statement is encountered. For that, we will refer to the image below.
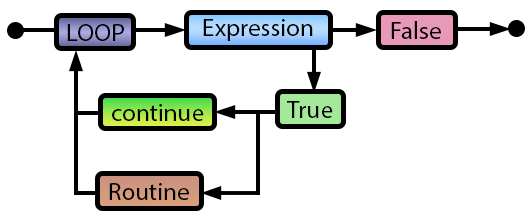
Figure 06
The same advice we gave for other statements like BREAK and RETURN applies here as well. However, in this specific case, the advice to use BREAK or RETURN as a routine inside an IF statement is even more critical. As you can see in Image 06, nothing inside the loop routine will be executed when CONTINUE is used. Unlike other statements that terminate the loop, CONTINUE causes the control flow to immediately return to the start of the loop.
Thus, if there is no condition in place that will cause the loop expression to evaluate as false, the loop will inevitably run infinitely. This is why you must exercise extreme caution when using the CONTINUE statement. Many programming languages do not implement, or use, the GOTO statement for this very reason, due to the potential for such issues. However, when used correctly and in the right context, CONTINUE is highly useful in many situations. But always be calm and very attentive when using it.
To demonstrate the potential risk of a careless implementation involving the CONTINUE statement, let's create a code that will only exit due to some external event. For this, we'll use the following code:
01. //+------------------------------------------------------------------+
02. #property copyright "Daniel Jose"
03. //+------------------------------------------------------------------+
04. void OnStart(void)
05. {
06.     Print(__FUNCTION__, " ", __LINE__, " It will be executed anyway...");
07.
08.     Procedure_Loop();
09.
10.     Print(__FUNCTION__, " ", __LINE__, " It will be executed anyway...");
11. }
12. //+------------------------------------------------------------------+
13. void Procedure_Loop(void)
14. {
15.     char info = 10;
16.
17.     Print(__FUNCTION__, "  ", __LINE__, " : Info (", info, ")");
18.
19.     while ((info) && (!TerminalInfoInteger(TERMINAL_KEYSTATE_ESCAPE)) && (!IsStopped()))
20.     {
21.         if (info) continue;
22.
23.         info = info - 3;
24.
25.         Print(__FUNCTION__, "  ", __LINE__, " : Info (", info, ")");
26.
27.         if (info < -5) return;
28.     }
29.     Print(__FUNCTION__, "  ", __LINE__, " : Info (", info, ")");
30. }
31. //+------------------------------------------------------------------+
Code 07
Before discussing what is happening in Code 07, let's first see the result of executing it. Since this code will enter an infinite loop while waiting for an event to occur, we will not use a static image. Instead, we will use an animation to show how I managed to terminate the application. You can view the animation below:
Animation 01
Now, consider the following, dear reader. This happened only because I implemented a way to exit the infinite loop we are creating. Without this implementation, we would remain stuck there indefinitely or until someone forcibly removes the application from MetaTrader 5. In no other situation would the application terminate. Given this warning and alert, let's now take a closer look at what is happening in Code 07.
Since this code is a variation of the other examples we've seen in this article, we can focus on the parts that are truly important. The first thing to note is that the variable in line 15 is declared to allow the WHILE loop to run, as observed on line 19 where the loop begins. The next key observation is that we have three conditions to exit the loop. The first is when the info variable becomes false. The second is when the ESC key is pressed. The third is when you request the script to end. Without the third condition, MetaTrader 5 would try to close the script until it succeeded. When this happens, a different message would appear in the terminal, as shown in the image below.
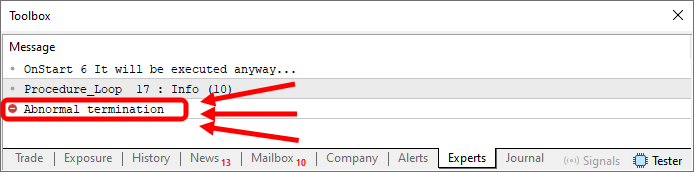
Figure 07
This would represent the worst-case scenario for terminating the code. However, it is important to emphasize again that this message in Figure 07 would only appear if the third condition (seen on line 19 in Code 07) were missing. Since it exists, the result would be the same as observed in the animation, giving the impression that the code was properly terminated.
But the key point here is line 21. Notice that despite the presence of the IF statement checking whether something should change in the loop, the fact that the routine inside the IF statement consists only of a CONTINUE statement forces the entire loop into an infinite cycle. This is because no other part of the WHILE loop routine will be executed.
However, small changes to the same code can make it less risky. Even though the lines from 23 to 27 would still never be executed, an example of this would be modifying Code 07 to something like Code 08, as shown below:
01. //+------------------------------------------------------------------+
02. #property copyright "Daniel Jose"
03. //+------------------------------------------------------------------+
04. void OnStart(void)
05. {
06.     Print(__FUNCTION__, " ", __LINE__, " It will be executed anyway...");
07.
08.     Procedure_Loop();
09.
10.     Print(__FUNCTION__, " ", __LINE__, " It will be executed anyway...");
11. }
12. //+------------------------------------------------------------------+
13. void Procedure_Loop(void)
14. {
15.     char info = 10;
16.
17.     Print(__FUNCTION__, "  ", __LINE__, " : Info (", info, ")");
18.
19.     while (((info = info - 3) > 0) && (!TerminalInfoInteger(TERMINAL_KEYSTATE_ESCAPE)) && (!IsStopped()))
20.     {
21.         if (info) continue;
22.
23.         info = info - 3;
24.
25.         Print(__FUNCTION__, "  ", __LINE__, " : Info (", info, ")");
26.
27.         if (info < -5) return;
28.     }
29.     Print(__FUNCTION__, "  ", __LINE__, " : Info (", info, ")");
30. }
31. //+------------------------------------------------------------------+
Code 08
When we execute Code 08, we will see a different output in the terminal compared to what was shown in Animation 01. It is shown below:
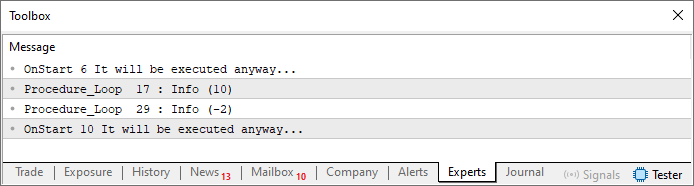
Figure 08
As you can see, we now have different values for the variable info. But how did this happen? Well, dear reader, it's due to a small change in the code - specifically at line 19, within the first condition in the WHILE loop expression. Notice that in this particular case, we are no longer creating an infinite loop. However, this doesn't make the rest of the loop routine executable. This is because deep down, the Procedure_Loop can be summarized as something shown in the fragment below:
                   .
                   .
                   .
12//+------------------------------------------------------------------+
13void Procedure_Loop(void)
14{
15    char info = 10;
16
17    Print(__FUNCTION__, "  ", __LINE__, " : Info (", info, ")");
18
19    while (((info = info - 3) > 0) && (!TerminalInfoInteger(TERMINAL_KEYSTATE_ESCAPE)) && (!IsStopped()));
20
21    Print(__FUNCTION__, " 29 : Info (", info, ")");
22}
23//+------------------------------------------------------------------+
Fragment 01
This is because of the presence of the CONTINUE command at line 21 within an IF statement, which causes it to execute every time inside the loop. This was interesting. But what if, for some reason, instead of using the WHILE loop, we had used the DO WHILE loop? What would happen then? Well, dear reader, we would definitely have a very interesting scenario, one that will intrigue many. Depending on how you implement your code, it could function in a very complex way.
So, let's experiment with a very simple version aimed at showing what happens when we use the CONTINUE command in a DO WHILE loop. This example can be seen in Code 09 below:
01. //+------------------------------------------------------------------+
02. #property copyright "Daniel Jose"
03. //+------------------------------------------------------------------+
04. void OnStart(void)
05. {
06.     Print(__FUNCTION__, " ", __LINE__, " It will be executed anyway...");
07.
08.     Procedure_Loop();
09.
10.     Print(__FUNCTION__, " ", __LINE__, " It will be executed anyway...");
11. }
12. //+------------------------------------------------------------------+
13. void Procedure_Loop(void)
14. {
15.     char info = 10;
16.     ulong counter = 0;
17.
18.     Print(__FUNCTION__, "  ", __LINE__, " : Info (", info, ")");
19.
20.     do
21.     {
22.         Sleep(500);
23.
24.         Print(__FUNCTION__, "  ", __LINE__, " : Counter (", counter = counter + 1, ")");
25.
26.         if (info) continue;
27.
28.         Print(__FUNCTION__, "  ", __LINE__, " : Info (", info, ")");
29.
30.     }while ((info = info - 2) > 0);
31.
32.     Print(__FUNCTION__, "  ", __LINE__, " : Info (", info, ")");
33. }
34. //+------------------------------------------------------------------+
Code 09
Although you might initially think that an infinite loop is being created here, this will not happen due to a small detail that was demonstrated in previous code examples in this section. However, many programmers with less experience using DO WHILE loops might assume that when line 26 is executed, the loop will return to line 20. This kind of thinking arises precisely from a lack of understanding of how the execution flow works in the DO WHILE loop. We covered the flow of execution in the previous article. So I won’t go into further detail here. However, one fact will be proven when you study this code: line 28 will NEVER be executed in what's seen in Code 09. This is because of line 26 and how the flow of execution operates in the DO WHILE loop.
To demonstrate this, instead of providing an image, I found it better to use an animation. In my opinion, this approach is much more effective for teaching, and it allows you to begin thinking about the reason why Code 09 behaves the way it does. You can view the animation below. Pay close attention and try to understand how and why it happens the way it does.
Animation 02
Final considerations
In this article, I've made every effort to explain as simply and clearly as possible how to work with the RETURN, BREAK, and CONTINUE statements when they are used within loops. Although most of the content focused on the use of WHILE and DO WHILE loops, the principles demonstrated here also apply to the FOR loop, which will be explained later.
However, it is essential that you, my dear and valued reader, take the time to study and practice what was covered in this article. As we progress toward more advanced levels of programming, a thorough understanding of these concepts will be required. The topics and concepts discussed here won't be revisited as things get more complex.
Therefore, make the most of the code examples provided in the attachment. Study them carefully, paying attention to how these three commands (RETURN, BREAK, and CONTINUE) affect the flow of code during the execution of your applications. That said, I'll see you in the next article. See you soon!
Translated from Portuguese by MetaQuotes Ltd.
Original article: https://www.mql5.com/pt/articles/15376
- Free trading apps
- Over 8,000 signals for copying
- Economic news for exploring financial markets
You agree to website policy and terms of use