
From Basic to Intermediate: The Include Directive

Introduction
The content presented here is intended solely for educational purposes. Under no circumstances should the application be viewed for any purpose other than to learn and master the concepts presented.
In the previous article From Basic to Intermediate: BREAK and CONTINUE Statements we focused primarily on understanding how to control the execution flow within loops that utilize the WHILE and DO WHILE statements. However, although I imagine that you, dear reader, are likely well-prepared to understand loops with the FOR Statement, I will take a brief pause from discussing loops. This break is necessary, as it's beneficial to review other concepts before we proceed with more flow control operators.
Thus, in this article, we will address a topic that can be very helpful to you. Once it is explained, I will be able to start presenting more sophisticated code examples. Until now, it has been quite challenging for me to write code without utilizing certain resources available in MQL5. Even though some of you may think it has been easy for me, writing code without these resources is, in fact, a significant challenge. But now, we will add some new capabilities to the list of what can already be done.
The resource I am referring to is the use of compilation directives. Without these directives, much of what we can do becomes significantly limited, forcing us to write much more code than would be necessary in a real programming scenario.
Compilation directives, contrary to what many may think, do not make the code more confusing. On the contrary, their main purpose is exactly the opposite: to make the code simpler, faster, and easier to handle and modify. The problem is that many beginners either ignore or fail to learn how to use this resource properly. This may be because some programming languages do not have such resources in their toolkit. Some examples of languages that do not feature compilation directives include JavaScript and Python. While these languages are quite popular among casual programmers, they are not suitable for creating certain types of applications. However, the purpose here is not to discuss these languages, but rather to focus on MQL5. So, let us begin with the first topic of this article.
Why Use Compilation Directives?
Although the compilation directives present in MQL5 are well-suited for most situations, there are moments when I feel the absence of other directives. This is because MQL5 essentially stems from a highly refined modification of C/C++. However, in C/C++, there are certain directives that are not available in MQL5. One such directive is #if, which, although seemingly unremarkable, can be extremely helpful in controlling specific parts of the version we are working on.
That being said, even though this directive is not present in MQL5 (at least not at the time I am writing this article), it will not be missed here. I merely mention this fact so that you, dear reader, who may be interested in learning C/C++ in the future, are aware of some of the details that differentiate C/C++ from MQL5. Even though everything, if not most of what is presented here, can also serve as a stepping stone to learning C/C++.
Essentially, compilation directives serve two main purposes, to summarize briefly. The first purpose is to guide the implementation toward a more efficient model of code. The second purpose is to allow you to create different versions of the same code without actually deleting or losing previous sections.
I understand that for many of you, these ideas might seem strange. This is because beginner programmers often have the habit of deleting a portion of code to try creating a new version. They do this in an attempt to correct potential issues or improve the way certain calculations or operations are performed.
However, this approach only needs to be used in languages where compilation directives do not exist. Languages that allow and include such resources can accommodate various mini-versions of the same code simultaneously. The way to select between versions is precisely through the use of directives, done intelligently and in an organized manner.
As part of this organization, some experience is required from the programmer. Here, and at this moment, we will begin from the very basics. In other words, I will assume that you, my dear and valued reader, have absolutely no knowledge of how to work with, handle, and implement code using compilation directives.
However, as the upcoming articles are posted, I will gradually show you how to integrate activities related to compilation directives. Most likely, I won't create an article focused solely on this specific topic. This one is merely an introduction to the subject, so that you can gain an understanding of what a compilation directive is.
Now that we've covered what can be considered a general introduction to the topic, let's start by looking at the most common directive in MQL5 code. But for that, we'll move on to a new topic.
The #INCLUDE Directive
Most likely, this will be the compilation directive that you, dear reader, will encounter most often in code, particularly in MQL5 and C/C++-style code. And why is that? The reason is that a large part, if not all, of more experienced programmers DISLIKE putting everything into a single code file. Typically, as you will come to understand over time, experienced programmers break their code into smaller blocks. These blocks often evolve into what would be considered a library of functions, procedures, structures, and classes, all organized in a highly logical manner. This organization makes programming, even when creating new and unique code, extremely fast to accomplish, with minimal modifications needed. The goal is to turn the original code, which the programmer has carefully cataloged over time, into a new version of the code.
Meanwhile, you may find yourself typing out code repeatedly to accomplish the same tasks.
However, organizing your code to make use of this directive is something I will not teach you how to do. In fact, NO ONE will teach you how to do this, as it only makes sense when the person maintaining the code carefully and meticulously selects where each element should be placed. That being said, while I won't teach you how to organize your code this way, I can explain how to access the code you've created with so much care and attention. This is the primary purpose of this directive: to allow you to access things in a very natural and practical way.
In this case, there is no execution flow involved. Although there are details to be observed, we will address these gradually so that you can understand them in a natural way.
To begin, let's take one of the codes covered in previous articles. This will make what we discuss here feel more familiar. For that, let's start by building a small initial code. You can see it below:
01. //+------------------------------------------------------------------+
02. #property copyright "Daniel Jose"
03. //+------------------------------------------------------------------+
04. void OnStart(void)
05. {
06.     ulong value;
07.
08.     Print("Factorial of 5: ", Factorial(5));
09.     Print("Factorial of 3: ", Factorial(3));
10.     Print(One_Radian());
11.     do
12.     {
13.         value = Tic_Tac();
14.         Print(__FUNCTION__, " ", __LINE__, " Tic Tac: ", value);
15.     }while (value < 3);
16.     Print(__FUNCTION__, " ", __LINE__, " Tic Tac: ", Tic_Tac(true));
17.     Print(__FUNCTION__, " ", __LINE__, " Tic Tac: ", Tic_Tac());
18. }
19. //+------------------------------------------------------------------+
20. double One_Radian()
21. {
22.     return 180. / M_PI;
23. }
24. //+------------------------------------------------------------------+
25. ulong Tic_Tac(bool reset = false)
26. {
27.     static ulong Tic_Tac = 0;
28.
29.     if (reset)
30.         Tic_Tac = 0;
31.     else
32.         Tic_Tac = Tic_Tac + 1;
33.
34.     return Tic_Tac;
35. }
36. //+------------------------------------------------------------------+
37. ulong Factorial(uchar who)
38. {
39.     static uchar counter = 0;
40.     static ulong value = 1;
41.
42.     if (who) who = who - 1;
43.     else
44.     {
45.         counter = 0;
46.         value = 1;
47.     }
48.     while (counter < who)
49.     {
50.         counter = counter + 1;
51.         value = value * counter;
52.     };
53.     while (counter > who)
54.     {
55.         value = value / counter;
56.         counter = counter - 1;
57.     };
58.     counter = counter + 1;
59.     return (value = value * counter);
60. }
61. //+------------------------------------------------------------------+
Code 01
You, dear reader, must absolutely be able to understand this Code 01. This is a prerequisite for us to continue from here onward. If you are unable to understand this code, please stop right now and go back to the previous articles. This code is very simple and, under no circumstances, should be confusing or difficult to comprehend.
When executed, this code will produce the following output in the MetaTrader 5 terminal:
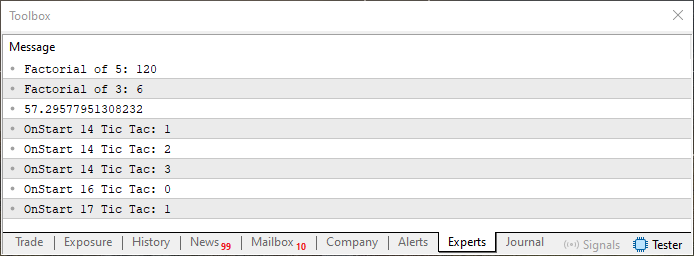
Figure 01
We are doing this simply to verify that it works. Since we can clearly see that it functions as expected, we can now begin discussing how to use the compilation directive here. Perhaps I should have started with another directive, but that's fine. Since the #include directive is the most commonly used of all, it makes sense to start with it. So, let's move on.
The first thing you need to understand, before doing anything else, is how to divide your code. This may seem trivial, but it is not. If you don't come up with a method that is suitable and highly usable for you, over time, you will run into serious problems when trying to create new code. However, if you devise a method that works for you, you'll go far.
As the goal here is purely educational, we will divide things into three separate files. Each will contain a function or procedure originally seen in this Code 01.
With this in mind, you might think: "Okay, I'll create the files." But this is not the second step you should take, dear reader. In fact, there is a step before that. The second step you should take is to answer: Where will I place the files I create? Wait a minute. Shouldn't the directory be the include directory? This is a much more personal question than anything else. The reason is that the best place is not always the include directory. If you're unsure of what I'm talking about, simply navigate to the MQL5 folder through the MetaEditor, as shown in the image below:
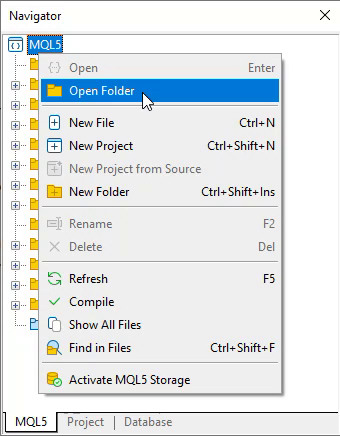
Figure 02
When you do this, you will see a folder named 'include' inside the MQL5 directory. This is the default directory for the types of files we will be creating, which are more commonly referred to as header files. However, as I mentioned earlier, this is not always the best choice. Depending on the project or the objective you are trying to achieve, placing all your header files inside the include directory can end up causing issues. This is because slightly different versions of the same procedure or function could conflict with another version that may or should be inside the include folder.
However, many may question this by asking: Couldn't we create subdirectories to better organize our header files? Yes, this is, in fact, one of the most common practices. However, even when using this subdirectory approach within the include folder, in some cases, it is still not ideal.
But before anyone starts to panic, I will indeed show you how you can handle this. This is with the goal of helping you organize your own code in the best way possible. As I said earlier, no one can teach you how to do this. But by understanding how it can be done, you will be able to create your own organizational structure.
So, let's do something completely different in this first instance. We will create a subdirectory inside the Scripts folder. This subdirectory will contain each of the functions seen in Code 01. But to properly separate things, we will address this in sections, starting with Solution 1.
Solution 1
The first solution for separating the functions seen in Code 01 is to place each one in a header file. However, these files will be located in a folder within the Scripts directory. One important detail: Always use the .MQH extension for the header files you create. This way, it becomes easier to identify what the files are just by looking at the file explorer of your operating system. With that said, we make the division. This ensures that each of the files will contain the following contents.
1. //+------------------------------------------------------------------+
2. #property copyright "Daniel Jose"
3. //+------------------------------------------------------------------+
4. double One_Radian()
5. {
6.     return 180. / M_PI;
7. }
8. //+------------------------------------------------------------------+
File 01
01. //+------------------------------------------------------------------+
02. #property copyright "Daniel Jose"
03. //+------------------------------------------------------------------+
04. ulong Tic_Tac(bool reset = false)
05. {
06.     static ulong Tic_Tac = 0;
07.
08.     if (reset)
09.         Tic_Tac = 0;
10.     else
11.         Tic_Tac = Tic_Tac + 1;
12.
13.     return Tic_Tac;
14. }
15. //+------------------------------------------------------------------+
File 02
01. //+------------------------------------------------------------------+
02. #property copyright "Daniel Jose"
03. //+------------------------------------------------------------------+
04. ulong Factorial(uchar who)
05. {
06.     static uchar counter = 0;
07.     static ulong value = 1;
08.
09.     if (who) who = who - 1;
10.     else
11.     {
12.         counter = 0;
13.         value = 1;
14.     }
15.     while (counter < who)
16.     {
17.         counter = counter + 1;
18.         value = value * counter;
19.     };
20.     while (counter > who)
21.     {
22.         value = value / counter;
23.         counter = counter - 1;
24.     };
25.     counter = counter + 1;
26.     return (value = value * counter);
27. }
28. //+------------------------------------------------------------------+
File 03
Another important point: once the division is done, it is up to you to decide where the items are placed, as well as the name of each file. There is no fixed rule here. You are free to make your own choice.
Now that the codes have been extracted from code 01 and placed into separate files, we end up with code that looks like this:
01. //+------------------------------------------------------------------+
02. #property copyright "Daniel Jose"
03. //+------------------------------------------------------------------+
04. void OnStart(void)
05. {
06.     ulong value;
07.
08.     Print("Factorial of 5: ", Factorial(5));
09.     Print("Factorial of 3: ", Factorial(3));
10.     Print(One_Radian());
11.     do
12.     {
13.         value = Tic_Tac();
14.         Print(__FUNCTION__, " ", __LINE__, " Tic Tac: ", value);
15.     }while (value < 3);
16.     Print(__FUNCTION__, " ", __LINE__, " Tic Tac: ", Tic_Tac(true));
17.     Print(__FUNCTION__, " ", __LINE__, " Tic Tac: ", Tic_Tac());
18. }
19. //+------------------------------------------------------------------+
Code 02
Great! It seems much simpler than what we saw in Code 01. That's true, dear reader. However, if you attempt to compile this Code 02, you will encounter a large number of errors reported by the compiler. These errors, as shown in the image below, indicate that the compiler was unable to interpret the code.
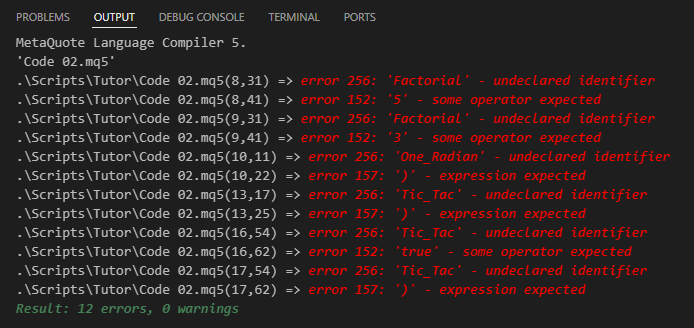
Figure 03
In reality, it's not that the compiler didn't understand the code. The problem is that the compiler does not know how to resolve the procedure and function calls appearing in the code. But what does that mean? Contrary to what many think or assume about programming languages, a programming language actually consists of two components. The first component is known as the standard library. This standard library defines the functions, procedures, reserved words, constants, and other elements that we use to create what we call user-level code.
As a programmer using any given language, you cannot change how the standard library functions. However, you can utilize what is defined within it to build your own solutions. Everything within the standard library can be used without requiring any special operations. However, anything outside this library must be explicitly added to the code. This allows the compiler to know how to resolve each function or procedure call that may arise. That is why, when you attempt to compile Code 02, despite its similarity to Code 01, it fails to compile.
To successfully compile the code, you must explicitly tell the compiler which files should be included in the compilation process. This is precisely why this directive is called a compilation directive, and it has the very fitting name #include. In other words, it tells the compiler: include this file during the compilation of this code. Do you understand now, dear reader?
If you truly grasp this concept, you will be able to accomplish things that you previously could not. Even when trying to learn programming, some aspects may have seemed unclear or lacking a concrete meaning. But we will discuss this in greater detail at another time. I don't want to overwhelm you with too much information. I want you to fully understand and absorb what is being explained and demonstrated in each of these articles.
Now, if Code 02 cannot be compiled simply because the compiler does not know how to access the necessary information, how can we resolve this? Should we manually open the files we just created, copy each function or procedure, and paste them directly into Code 02 to make it resemble Code 01 again? After all, if Code 01 compiled successfully, it means it was correct. But that approach doesn't seem entirely logical. I have seen other programs working, and they did not require copying and pasting entire sections of code into the final script. Now I'm curious. How to solve this problem? This is the easy part. You simply need to do something similar to what is shown in the following code:
01. //+------------------------------------------------------------------+
02. #property copyright "Daniel Jose"
03. //+------------------------------------------------------------------+
04. #include "Tutorial\File 01.mqh"
05. #include "Tutorial\File 02.mqh"
06. #include "Tutorial\File 03.mqh"
07. //+------------------------------------------------------------------+
08. void OnStart(void)
09. {
10.     ulong value;
11.
12.     Print("Factorial of 5: ", Factorial(5));
13.     Print("Factorial of 3: ", Factorial(3));
14.     Print(One_Radian());
15.     do
16.     {
17.         value = Tic_Tac();
18.         Print(__FUNCTION__, " ", __LINE__, " Tic Tac: ", value);
19.     }while (value < 3);
20.     Print(__FUNCTION__, " ", __LINE__, " Tic Tac: ", Tic_Tac(true));
21.     Print(__FUNCTION__, " ", __LINE__, " Tic Tac: ", Tic_Tac());
22. }
23. //+------------------------------------------------------------------+
Code 03
Now comes the interesting part. When you try to compile Code 03, you will get a response similar to the one shown below:
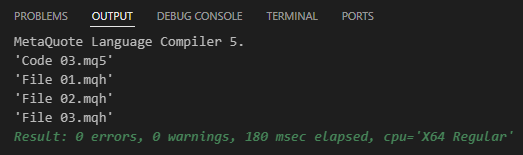
Figure 04
In other words, success. But how? The reason lies in lines four, five, and six of Code 03. These lines can technically be placed anywhere in the code. However, for organizational purposes, they are typically placed at the beginning of the script. There are rare situations where they might appear elsewhere, but these are specific cases that do not apply here. Regardless, it is fantastic to be able to structure things in a much more organized and practical manner.
However, there is an important concept you need to understand at least the basics. We will explore this in more depth in future articles. The key point is how each #include directive is declared in Code 03.
At this moment, I will not explain this in detail. Instead, I encourage you to read the documentation If I were to explain it right now, you might struggle to understand why it is done this way in Code 03. Even worse, you could end up more confused rather than gaining clarity on why the declarations appear one way in some cases and differently in others.
In the documentation, you can find more details under Including Files (#include). However, those who have been following me for a while already know there is a specific reason for the way lines four, five, and six are written in Code 03.
Regardless, when you execute Code 03, you will get the same output shown in Image 01. Now, let's move on to the second type of solution. To clearly separate it from this one, let's introduce a new section.
Solution 2
This second solution follows the principle of usability. In other words, we create something that extends MQL5's capability to create new code or to generate code faster. It is not uncommon to see other programmers distributing modified header files that are originally included with MetaTrader 5. Personally, I find these distributions quite useful, as some modifications can be very interesting. However, the question is where to place these files.
The reason this is important is that MetaTrader 5 updates periodically. If you have a modified header file, whether created by someone else or customized by you, and you find it extremely practical and useful for your development work, you shouldn't store it just anywhere. If it is inside the include directory within the MQL5 folder, the next MetaTrader 5 update could overwrite it. In this case, you would lose your valuable file.
There is a solution to this: Rename the modified header file. However, you could also use the approach described in the previous section. Both methods will work. However, in the first approach, you will face some limitations. For example, it will be more difficult to access header files stored outside the current directory. This is not impossible, but it does require additional steps to manage.
Because of this, when we want to use the same header file across multiple, unrelated applications, it is best to store it in a single, central location. Here we do this within the include directory. However, always remember to create regular backups. Ideally, you should use a version control system to manage your files efficiently.
For that, I recommend using GIT. You can learn more about it in my other article: "GIT: What is it?". Using GIT properly will save you from countless headaches and sleepless nights. But, of course, you need to study and learn to use the tool correctly.
Now, back to our topic. We can now reuse the same files from the previous section but store them inside the 'include' directory. This allows us to maintain two different versions of the same file: one that is easily accessible to any application you create, and another that is specific to the project we are working on here. To demonstrate this and prove that it is possible, let's modify one of the files from the previous section. In fact, we will now maintain two versions of it: one accessible only to the current project and another available to any script you develop. This file is shown below:
01. //+------------------------------------------------------------------+
02. #property copyright "Daniel Jose"
03. //+------------------------------------------------------------------+
04. double One_Radian()
05. {
06.     return 180. / M_PI;
07. }
08. //+------------------------------------------------------------------+
09. double ToRadians(double angle)
10. {
11.     return angle / One_Radian();
12. }
13. //+------------------------------------------------------------------+
14. double ToDegrees(double angle)
15. {
16.     return angle * One_Radian();
17. }
18. //+------------------------------------------------------------------+
File 04
Since we're starting from the very basics, I won't show some things we could do. I will focus on how you can work with the header file. Now we have two files containing two identical versions of the same function, in this case the One_Radians function. While this may seem trivial and unimportant to you now, as we dig deeper and reveal new features, we will see that this situation can be useful. We will sort this out in due time.
Now we want file 04 to be used instead of file 01. This is because it contains other functions that we want to use.
01. //+------------------------------------------------------------------+
02. #property copyright "Daniel Jose"
03. //+------------------------------------------------------------------+
04. #include "Tutorial\File 01.mqh"
05. #include "Tutorial\File 02.mqh"
06. #include "Tutorial\File 03.mqh"
07. //+------------------------------------------------------------------+
08. void OnStart(void)
09. {
10.     ulong value;
11.
12.     Print("Factorial of 5: ", Factorial(5));
13.     Print("Factorial of 3: ", Factorial(3));
14.     Print(One_Radian());
15.     Print(ToRadians(90));
16.     do
17.     {
18.         value = Tic_Tac();
19.         Print(__FUNCTION__, " ", __LINE__, " Tic Tac: ", value);
20.     }while (value < 3);
21.     Print(__FUNCTION__, " ", __LINE__, " Tic Tac: ", Tic_Tac(true));
22.     Print(__FUNCTION__, " ", __LINE__, " Tic Tac: ", Tic_Tac());
23. }
24. //+------------------------------------------------------------------+
Code 04
If you try to compile Code 04, you will get the result shown in the image below.
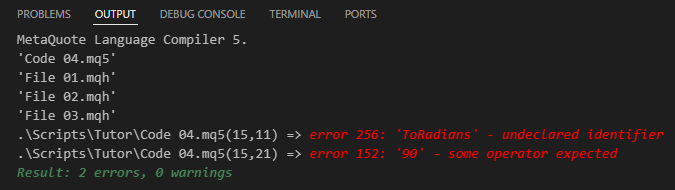
Figure 05
This proves that there is an error in the code. However, fixing this issue is straightforward, though it requires careful attention on your part as a programmer. The challenge arises when working with header files that contain different versions of a function or procedure with the same name. This is where things get tricky. You will need to learn how to handle this situation on your own. Unfortunately, there is no universal method or simple explanation for dealing with this. The reason is quite simple: it all depends on how you have structured your code over time. Aside from this complexity, for the purposes of this educational example, the solution is quite simple. In fact, the error message is due to a missing function that should be on line 15. Since this function is not in any of the header files included in the 04 code, compilation will always fail. To fix this, we need to tell the compiler where to find the correct file that contains the necessary function for line 15 to work. The solution is to update the code to Code 05, which is shown next:
01. //+------------------------------------------------------------------+
02. #property copyright "Daniel Jose"
03. //+------------------------------------------------------------------+
04. #include <Tutorial\File 01.mqh>
05. #include "Tutorial\File 02.mqh"
06. #include "Tutorial\File 03.mqh"
07. //+------------------------------------------------------------------+
08. void OnStart(void)
09. {
10.     ulong value;
11.
12.     Print("Factorial of 5: ", Factorial(5));
13.     Print("Factorial of 3: ", Factorial(3));
14.     Print(One_Radian());
15.     Print(ToRadians(90));
16.     do
17.     {
18.         value = Tic_Tac();
19.         Print(__FUNCTION__, " ", __LINE__, " Tic Tac: ", value);
20.     }while (value < 3);
21.     Print(__FUNCTION__, " ", __LINE__, " Tic Tac: ", Tic_Tac(true));
22.     Print(__FUNCTION__, " ", __LINE__, " Tic Tac: ", Tic_Tac());
23. }
24. //+------------------------------------------------------------------+
Code 05
Notice that the change appears to be very minor. However, this small adjustment is intentional. It serves to demonstrate that practicing and truly understanding how things work in real-world coding is essential. Once you attempt to compile Code 05, the result will be as shown below:
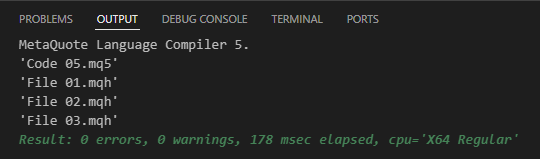
Figure 06
This confirms that the file included on line 4 is actually located in the include directory. You can see this in the attached file, which visually demonstrates how everything should be organized in practice. The last thing that will be shown in this article is the result of executing code 05:
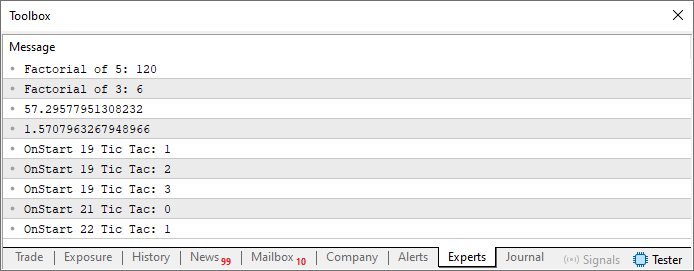
Figure 07
Final considerations
In this article, we explored one of the most commonly used compilation directives. Although we focused on a single aspect, it is impossible to cover everything this directive can do in just one article. Even if we were to create multiple articles dedicated to this directive alone, some aspects would still be difficult to explain fully. This is because what truly makes someone a great programmer isn’t just the ability to structure a program to produce results. It's about organizing your own identity as a developer. This means creating and cataloging useful and frequently used code snippets in header files for easier reuse in your daily programming tasks.
And learning how to do this? That's not something anyone can teach you. It is only something you will master through practice and time. However, you must take the first step. The goal of this article is precisely to guide you through that first step. I hope you found this article useful, dear reader. In the next one, we will explore another control flow statement. So, see you there!
Translated from Portuguese by MetaQuotes Ltd.
Original article: https://www.mql5.com/pt/articles/15383
Warning: All rights to these materials are reserved by MetaQuotes Ltd. Copying or reprinting of these materials in whole or in part is prohibited.
This article was written by a user of the site and reflects their personal views. MetaQuotes Ltd is not responsible for the accuracy of the information presented, nor for any consequences resulting from the use of the solutions, strategies or recommendations described.

 Developing a Trading System Based on the Order Book (Part I): Indicator
- Free trading apps
- Over 8,000 signals for copying
- Economic news for exploring financial markets
You agree to website policy and terms of use
The author's nonsense again. Quote:" But there are some directives in C/C++ that are not available in MQL5. One of them is #ifdef, which, although it may seem uninteresting, at some moments helps us a lot to control certain parts of the version we are working on. "
#ifdef has been in MQL4 and MQL5 for a very long time.
Why are you reading this? 🤦♀️
His nickname in the base is vDev - this is his topic!!!
Lekha - let's scalp test!!!! )
O autor está falando bobagem de novo. Citação: " Mas em C/C++ há algumas diretivas que não estão no MQL5. Um deles é o #ifdef, que, embora possa parecer desinteressante, em alguns pontos realmente nos ajuda a controlar certas partes da versão em que estamos trabalhando. "
#ifdef está no MQL4 e MQL5 há muito tempo.
Sorry. However, it was an error on my part to refer to the directive in the text. My intention was to refer to the #if directive, because the #ifdef directive is the equivalent of the #if defined directive present in C and C++. But to generalise it here in MQL5, we use #ifdef, which is also present in C and C++. Again, the purpose will be to refer to the #if directive, which has a completely different purpose and can even be used to check the values of definitions. But due to my writing mistake, I ended up putting #ifdef and didn't realise it. I apologise for this oversight on my part. 👍
Sorry. However, there was an error on my part in referring to the directive in the text. My purpose was to refer to the #if directive, because the #ifdef directive is the equivalent of the #if defined directive, which is present in C and C++. But to generalise it here in MQL5, we use #ifdef, which is also present in C and C++. Again, the purpose will be to refer to the #if directive, which has a completely different purpose and can even be used to check the values of definitions. But due to my writing mistake, I ended up putting #ifdef and didn't realise it. I apologise for this oversight on my part. 👍
That's okay, everyone has their moments )
Why are you reading this? 🤦♀️
I came across this article by accident, the site gave it out in the links.