Implementation of Indicators as Classes by Examples of Zigzag and ATR
What Do We Need It For?
MetaQuotes Software Corp. revised the concept of working with custom indicators in the new 5-th version of the MetaTrader client terminal. Now they are executed much faster; there is only one example of each indicator with unique input parameters, so it is calculated only once regardless of using its copies on even ten charts of a symbol, etc.
But the operation of one algorithm remains without changes. At loosing of connection to a server or significant synchronization of history the prev_calculated value (or IndicatorCounted() for MetaTrader 4) is zeroized, what leads to a full recalculation of the indicator for the entire history (developers made it intentionally to guarantee the correctness of values of indicators in any circumstances). There are several things that can affect the speed of calculation of indicators:
- Big period: rates_total;
- Complex, resource consuming calculations;
- Using several symbols and periods;
- Weak personal computer;
The more items are applicable to your situation, the more actual for you the problem of indicator recalculation for the entire history is. In addition, the situation becomes worse with a bad channel for transmitting information.
Of course, you can limit the depth of indicator calculation using an additional input parameter, but there is a nuance when using iCustom indicators. The maximum number of bars that are used by any chart or any custom indicator is set on the global scope for the entire terminal. The memory is allocated for each buffer of a custom indicator, and it is limited only by TERMINAL_MAXBARS.
However, there is a significant addition - if you limit the maximum number of calculated bars right in the algorithm of indicator (for example, using an input parameter or directly in the code), then the memory will be allocated dynamically at coming of each new bar (increase gradually to the specified TERMINAL_MAXBARS limit (or a little more - this algorithm fully depends on the developers, they can change it in next builds)).
Ways to Avoid the Recalculation of Indicator for the Whole History
For the moment, I see the following ways of solving this problem:- Ask MetaQuotes to revise this problem on the platform level
- Create a separate class for implementation of an analogue of prev_calculated
There was another variant as an assumption that you can build right in the indicator an algorithm of calculation of prev_calculated, but it appeared that MetaTrader 5, as distinct for MetaTrader 4, "clears" all the indicator buffers when zeroizing prev_calculated (i.e. it forcedly performs the zeroizing of all indicator array; you cannot control it, since this behavior is implemented on the platform level).
Let's analyze each variant separately.
- The first variant depends only on the developers. May be they'll consider it after the article publication. And maybe, the implementation of a full-fledged mechanism will strongly affect the performance of the block of calculation of custom indicators (however, this mechanism can be implemented as an optional one) and they will leave everything as it is now.
- The second variant. Creation of a special class that will be responsible for implementation of an analogue of prev_calculated. We can use it both in a custom indicator (only to get the prev_calculated values) and in a data provider to be used in Expert Advisors (or scripts) together with a separately developed class for the calculation of necessary custom indicator.
Advantages and Disadvantages of the Second Variant of Solving the Problem
Advantages:- fixed volume of required memory through single allocation of memory for a dynamical array with organization of a ring access to the array elements;
- synchronization and calculation of indicator when using a separate class for its calculation on demand (without using semaphores, flags, events, etc.);
- when using a separate call for the calculation of indicator the result of recalculation is returned in an extended form (for example: there were no changes, only the last ray has been changed, new ray added, etc.).
- necessity of storing own copy of price history, which is used for calculation of an indicator values;
- necessity of manual synchronization of history with the terminal history using logic operations of comparing data.
Creating the class CCustPrevCalculated for Implementation of an Analogue of prev_calculated
The implementation of the class itself doesn't contain anything interesting to be described. The algorithm considers both expanding history to both sides and its possible "cutting off" from the left side. Also this algorithm can process inserting of history inside the calculated data (it is actual for MetaTrader 4, in MetaTrader 5 I hasn't faced it yet). The source code of the class is in the file CustPrevCalculated.mqh.
Let me tell you about the key things.
Creating a Ring Access to Array Elements
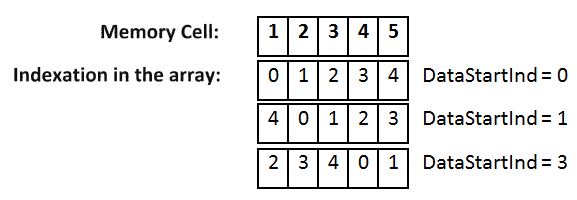
For creating this class, we are going to use an unconventional method - ring access to the array elements for the one-time allocation of memory for the array and for avoiding excessive procedures of copying arrays. Let's consider it by the example of 5 elements:

Initially, we work with the array, which numeration starts with 0. But what should we do if we need to add next value keeping the array size (add a new bar)? There are two ways:
- copy the memory cells 2-5 to the cells 1-4 respectively; thus we have the empty memory cell 5;
- change the array indexing without changing information stored in it (wraparound addressing).
To implement the second variant, we need a variable, let's call it DataStartInd; it will store the position of the zero index of the array. For convenience of further calculations, its numeration will correspond to the usual indexing of an array (i.e. it will start from zero). In the BarsLimit variable we're going to store the number of elements of the array. Thus, the real address of the array element for the virtual index 'I' will be calculated using the following simple formula:
- (DataStartInd+I) % BarsLimit – for usual numeration
- (DataStartInd+DataBarsCount-1-I) % BarsLimit – for addressing like in timeseries
Algorithms of History Synchronization
For myself, I've selected and implemented three modes of working of the algorithm of synchronization of a copy of history (local history) with the history in the client terminal:- CPCHSM_NotSynch – synchronization of the local history is not performed for already formed bars (at your risk and responsibility). Actually, this mode can be freely used for an indicator, where insignificant deviation of price values cannot strongly affect the precision of calculations (MA, ADX, etc.). This mode can be fatal for ZigZag, for example, where an excess of one peak over a another is significant.
- CPCHSM_Normal – the local history is synchronized at every new bar by the algorithm described below.
- CPCHSM_Paranoid – the local history is synchronized at each call of the function of data synchronization described below.
The mechanism of synchronization itself is based on another parameter set by a programmer - HSMinute (stored as HistorySynchSecond). We suppose that a Dealer Center can correct only the last HSMinute minutes of the history. If no difference is found during synchronization of that period, the history is considered as identical and the comparison is stopped. If a difference is found, the entire history is checked and corrected.
In addition to it, the algorithm allows checking only prices/spreads/volumes from the structure MqlRates specified at initialization. For example, to draw ZigZag we need only High and Low prices.
Practical Use of the Class CCustPrevCalculated
To initialize the CCustPrevCalculated class we need to call the function InitData(), which return 'true' in case of success:CCustPrevCalculated CustPrevCalculated; CustPrevCalculated.InitData(_Symbol, _Period, 150, CPCHSM_Normal, CPCH_high|CPCH_low, 15);To synchronize the history we need to call the function PrepareData():
CPCPrepareDataResultCode resData;
resData = CustPrevCalculated.PrepareData();
Variants of values that can be returned by the PrepareData() function:
enum CPCPrepareDataResultCode
  {
   CPCPDRC_NoData,                     // Returned when there is no data for calculation (not prepared by the server)
   CPCPDRC_FullInitialization,         // Full initialization of the array has been performed
   CPCPDRC_Synch,                      // Synchronization with adding new bars has been performed
   CPCPDRC_SynchOnlyLastBar,           // Synchronization of only the last bar has been performed (possible cutting of the history)
   CPCPDRC_NoRecountNotRequired        // Recalculation has not been performed, since the data was not changed
  };
Functions of the Class CCustPrevCalculated for Data Access
Note: to accelerate the calculations, the checks for array overflowing are excluded. To be more precise, wrong values will be returned if the index is incorrect.
| Name | Purpose |
|---|---|
| uint GetDataBarsCount() | Returns the number of available bars |
| uint GetDataBarsCalculated() | Returns the number of unchanged bars |
| uint GetDataStartInd() | Returns the index for wraparound access (for custom indicators) |
| bool GetDataBarsCuttingLeft() | Returns the result of cutting of bars from the left |
| double GetDataOpen(int shift, bool AsSeries) | Returns 'Open' for the shift-bar |
| double GetDataHigh(int shift, bool AsSeries) | Returns 'High' for the shift-bar |
| double GetDataLow(int shift, bool AsSeries) | Returns Low for the shift-bar |
| double GetDataClose(int shift, bool AsSeries) | Returns 'Close' for the shift-bar |
| datetime GetDataTime(int shift, bool AsSeries) | Returns 'Time' for the shift-bar |
| long GetDataTick_volume(int shift, bool AsSeries) | Returns 'Tick_volume' for the shift-bar |
| long GetDataReal_volume(int shift, bool AsSeries) | Returns 'Real_volume' for the shift-bar |
| int GetDataSpread(int shift, bool AsSeries) | Returns 'Spread' for the shift-bar |
Examples of Further Optimization of the Class CCustPrevCalculated
- Refuse from MqlRates with switching to several (determined by a certain purpose) arrays (decreases the memory requirements, but increases the loading on the number of calls of arrays copying).
- Dividing each functions of access into two independent ones for definite use with certain type of array indexing (refusing from the «bool AsSeries» parameter). The advantage is only in the logic condition «if (AsSeries)».
Creating the CCustZigZagPPC for Calculation of the Custom Indicator ZigZag on the Basis of Data of the CCustPrevCalculated Class
This algorithm is based on the custom indicator Professional ZigZag. The source code of the class is in the ZigZags.mqh file; in addition, the library OutsideBar.mqh is used for working with external bars.
Let's create a separate structure for the description of one bar of our indicator:
struct ZZBar
  {
   double UP, DN;                      // Buffers of the ZigZag indicator
   OrderFormationBarHighLow OB;       // Buffer for caching of an external bar
  };
Also let's determine the result of return of calculations of the class:
enum CPCZZResultCode
  {
   CPCZZRC_NotInitialized,             // Class is no initialized
   CPCZZRC_NoData,                     // Faield to receive data (including the external bar)
   CPCZZRC_NotChanged,                 // No changes of ZZ rays
   CPCZZRC_Changed                     // ZZ rays changed
  };
To initialize the CCustZigZagPPC class we need to call the Init() function for one time; it returns 'true' in case of success:
CCustZigZagPPC ZZ1;
ZZ1.Init(CustPrevCalculated, _Symbol, _Period, 150, CPCHSM_Normal, CPCH_high|CPCH_low, 15, 0, true, 12, 10);
For the calculations of the indicator we need to start the updating of data based on the previously calculated data of the class CCustPrevCalculated:
CPCPrepareDataResultCode resZZ1;
resZZ1 = ZZ1.PrepareData(resData);
And then call the procedure Calculate():
if ( (resZZ1 != CPCPDRC_NoData) && (resZZ1 != CPCPDRC_NoRecountNotRequired) )
   ZZ1.Calculate();
The full example of using one class CCustPrevCalculated together with several CCustZigZagPPC classes is given in the file ScriptSample_CustZigZagPPC.mq5.
Data Access Function of the Class CCustZigZagPPC
| Name | Purpose |
|---|---|
| uint GetBarsCount() | Returns the number of available bars |
| uint GetBarsCalculated() | Returns the number of calculated bars |
| double GetUP(uint shift, bool AsSeries) | Returns the value of the ZigZag peak for a bar |
| double GetDN(uint shift, bool AsSeries) | Returns the value of the ZigZag low for a bar |
| OrderFormationBarHighLow GetOB(uint shift, bool AsSeries) | Returns the 'Outside' value for a bar |
Visual and Program Check
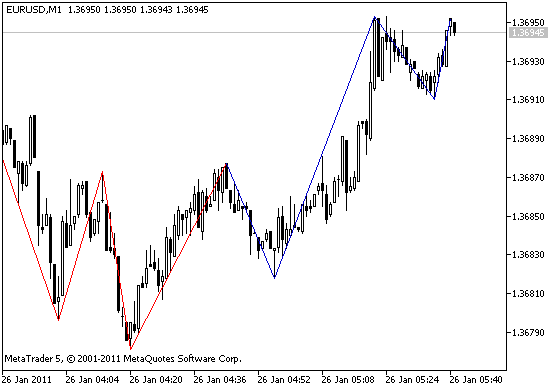
For the visual checking, let's attach the original indicator to a chart, and over it attach the specially written test indicator Indicator_CustZigZag.mq5 with identical input parameters (but you should select other colors, to see both indicators); here is the result of its working:

Red - original, blue - our own, calculated on last 100 bars.
In the same way we can compare them in an Expert Advisor; will there be a difference? The results obtained from iCustom("AlexSTAL_ZigZagProf") and the class CCustZigZagPPC are compared at every tick in the test Expert Advisor Expert_CustZigZagPPC_test.mq5. The information about the calculation is displayed in the journal (there may be no calculations at first bars, because of lack of history for the algorithm):
(EURUSD,M1)                1.35797; 1.35644; 1.35844; 1.35761; 1.35901; 1.35760; 1.35959; 1.35791; 1.36038; 1.35806; 1.36042; 1.35976; 1.36116; 1.35971; // it is normal
(EURUSD,M1) Tick processed: 1.35797; 1.35644; 1.35844; 1.35761; 1.35901; 1.35760; 1.35959; 1.35791; 1.36038; 1.35806; 1.36042; 1.35976; 1.36116;
(EURUSD,M1) Divergence on the bar: 7
Let's consider this Expert Advisor in more details. Determine the global variables for working:
#include <ZigZags.mqh>

CCustPrevCalculated CustPrevCalculated;
CCustZigZagPPC ZZ1;
int HandleZZ;
Initialize the variables:
int OnInit()
  {
   // Creating new class and initializing it
   CustPrevCalculated.InitData(_Symbol, _Period, 150, CPCHSM_Normal, CPCH_high|CPCH_low, 15);

   // Initializing the class ZZ
   ZZ1.Init(GetPointer(CustPrevCalculated), _Symbol, _Period, 150, CPCHSM_Normal, CPCH_high|CPCH_low, 15, 0, true, 12, 10);

   // Receiving handle for the custom indicator
   HandleZZ = iCustom(_Symbol, _Period, "AlexSTAL_ZigZagProf", 12, 10, 0 , true);
   Print("ZZ_handle = ", HandleZZ, "  error = ", GetLastError());

   return(0);
  }
Processing ticks in the Expert Advisor:
void OnTick()
  {
   // Calculation of data
   CPCPrepareDataResultCode resData, resZZ1;
   resData = CustPrevCalculated.PrepareData();

   // Start recalculation for each indicator! PrepareData obligatory!
   resZZ1 = ZZ1.PrepareData(resData);

   // Расчет данных ZZ1
   if ( !((resZZ1 != CPCPDRC_NoData) && (resZZ1 != CPCPDRC_NoRecountNotRequired)) )
      return;

   // Получим результаты расчета
   ZZ1.Calculate();
Now we have ZZ1.GetBarsCalculated() bars calculated by the CCustZigZagPPC. Let's add the code of comparing data of iCustom("AlexSTAL_ZigZagProf") and the class CCustZigZagPPC:
   int tmpBars = (int)ZZ1.GetBarsCalculated();
   double zzUP[], zzDN[];
   CopyBuffer(HandleZZ, 0, 0, tmpBars, zzUP);
   CopyBuffer(HandleZZ, 1, 0, tmpBars, zzDN);

   // Perform comparison
   string tmpSt1 = "", tmpSt2 = "";
   for (int i = (tmpBars-1); i >= 0; i--)
     {
      double tmpUP = ZZ1.GetUP(i, false);
      double tmpDN = ZZ1.GetDN(i, false);
      if (tmpUP != zzUP[i])
         Print("Divergence on the bar: ", i);
      if (tmpDN != zzDN[i])
         Print("Divergence on the bar: ", i);
      if (tmpUP != EMPTY_VALUE)
         tmpSt1 = tmpSt1 + DoubleToString(tmpUP, _Digits) + "; ";
      if (tmpDN != EMPTY_VALUE)
         tmpSt1 = tmpSt1 + DoubleToString(tmpDN, _Digits) + "; ";

      if (zzUP[i] != EMPTY_VALUE)
         tmpSt2 = tmpSt2 + DoubleToString(zzUP[i], _Digits) + "; ";
      if (zzDN[i] != EMPTY_VALUE)
         tmpSt2 = tmpSt2 + DoubleToString(zzDN[i], _Digits) + "; ";
     }
  Print("Tick processed: ", tmpSt1);
  Print("                              ", tmpSt2);
  }
Here is the simple practical use of the CCustZigZagPPC class in an Expert Advisor or script. The functions of direct access GetUP(), GetDN(), GetOB() instead of CopyBuffer().
Moving Our Indicator to a Separate Class (by the example of iATR)
General plan:
1. Preparatory Stage.
- Copy MyIndicator.mqh as a file with another name (it is ATRsample.mqh in my example) and open the latter one in MetaEditor 5.
- Replace the text "MyInd" by the name of your indicator (it is "ATR" in my example).
2. Choose external parameters that will be taken from the initial (original) indicator to the class, declare and initialize them.
In my example, the ATR indicator has one external parameter:input int InpAtrPeriod=14; // ATR period
- add this parameter to our class and to the function of initialization of the class:
class CCustATR
  {
protected:
   ...
   uchar iAtrPeriod;
   ...
public:
   ...
   bool Init(CCustPrevCalculated *CPC, string Instr, ENUM_TIMEFRAMES TF, int Limit, CPCHistorySynchMode HSM, uchar HS, uint HSMinute, uchar AtrPeriod);
- change the body header of the Init function and initialize the variable parameter with the input value:
bool CCustATR::Init(CCustPrevCalculated *CPC, string Instr, ENUM_TIMEFRAMES TF, int Limit, CPCHistorySynchMode HSM, uchar HS, uint HSMinute, uchar AtrPeriod)
{
      ...
      BarsLimit = Limit;
      iAtrPeriod = AtrPeriod;
      ...
3. Determine the required number of buffers in the initial indicator, declare them in our class. Also declare the functions of returning the INDICATOR_DATA buffers.
- Change the structure
struct ATRBar
  {
   double Val;                          // Indicator buffers
  };
to our own structure:
struct ATRBar
  {
   double ATR;
   double TR;
  };
- Determine the zero values:
CPCPrepareDataResultCode CCustATR::PrepareData(CPCPrepareDataResultCode resData)
{
   ...
   for (uint i = (DataBarsCalculated == 0)?0:(DataBarsCalculated+1); i < DataBarsCount; i++)
     {
      Buf[PInd(i, false)].ATR = EMPTY_VALUE;
      Buf[PInd(i, false)].TR = EMPTY_VALUE;
     }
... - Change and add the function of returning values of the INDICATOR_DATA buffers:
change (if there is only one buffer, you can skip changing)
class CCustATR
  {
   ...
   double GetVal(uint shift, bool AsSeries);                      // returns the Val value of the buffer for a bar
   ...
to
class CCustATR
  {
   ...
   double GetATR(uint shift, bool AsSeries);                      // Возвращает значение буфера ATR для бара
   ...
and change the code of the corresponding function:
double CCustATR::GetATR(uint shift, bool AsSeries)
{
   if ( shift > (DataBarsCount-1) )
      return(EMPTY_VALUE);
   return(Buf[PInd(shift, AsSeries)].ATR);
}
Note: instead of several functions of returning buffer values, you can use only one, which has an additional parameter - number or name of the buffer.
4. Copy the logic of the OnCalculate() function of the initial indicator to the corresponding function of the class
- Primary checks
CPCATRResultCode CCustATR::Calculate()
{
   ...
   // Check if there are enough bars for the calculation
   if (DataBarsCount <= iAtrPeriod)
      return(CPCATRRC_NoData);
... - Calculations: at the first tick and the number of bars for calculations at next ticks:
   if ( DataBarsCalculated != 0 )
      BarsForRecalculation = DataBarsCount - ATRDataBarsCalculated - 1;
   else
     {
      Buf[PInd(0, false)].TR = 0.0;
      Buf[PInd(0, false)].ATR = 0.0;
      //--- filling out the array of True Range values for each period
      for (uint i = 1; i < DataBarsCount; i++)
         Buf[PInd(i, false)].TR = MathMax(CustPrevCalculated.GetDataHigh(i, false), CustPrevCalculated.GetDataClose(i-1, false)) -
                                  MathMin(CustPrevCalculated.GetDataLow(i, false), CustPrevCalculated.GetDataClose(i-1, false));
      //--- first AtrPeriod values of the indicator are not calculated
      double firstValue = 0.0;
      for (uint i = 1; i <= iAtrPeriod; i++)
        {
         Buf[PInd(i, false)].ATR = 0;
         firstValue += Buf[PInd(i, false)].TR;
        }
      //--- calculating the first value of the indicator
      firstValue /= iAtrPeriod;
      Buf[PInd(iAtrPeriod, false)].ATR = firstValue;

      BarsForRecalculation = DataBarsCount - iAtrPeriod - 2;
     }
- The calculation at every tick itself:
   for (uint i = (DataBarsCount - BarsForRecalculation - 1); i < DataBarsCount; i++)
     {
      Buf[PInd(i, false)].TR = MathMax(CustPrevCalculated.GetDataHigh(i, false), CustPrevCalculated.GetDataClose(i-1, false)) -
                               MathMin(CustPrevCalculated.GetDataLow(i, false), CustPrevCalculated.GetDataClose(i-1, false));
      Buf[PInd(i, false)].ATR = Buf[PInd(i-1, false)].ATR + (Buf[PInd(i, false)].TR-Buf[PInd(i-iAtrPeriod, false)].TR) / iAtrPeriod;
      ...
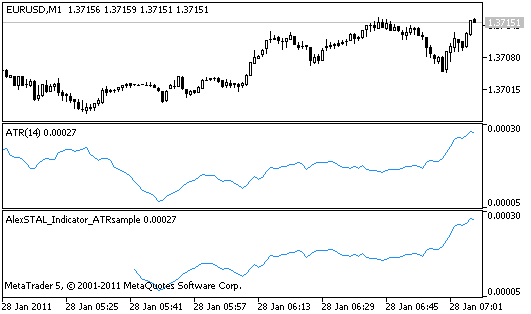
That's all. Our class has been created. For the visual checking, you can create a test indicator (in my example, it is Indicator_ATRsample.mq5):

I came up with an idea while correcting the article, that if you use the CCustPrevCalculated class together with only one custom indicator, you can integrate the creation, initialization and synchronization of this class in the custom indicator (in my examples they are CCustZigZagPPC and CCustATR). When calling the function of initialization of custom indicators for this purpose you need to use the zero pointer to the object:
ATR.Init(NULL, _Symbol, _Period, iBars, CPCHSM_Normal, 0, 30, InpAtrPeriod);
At that the general structure
#include <CustPrevCalculated.mqh>
#include <ATRsample.mqh>
CCustPrevCalculated CustPrevCalculated;
CCustATR ATR;

int OnInit()
  {
   CustPrevCalculated.InitData(_Symbol, _Period, iBars, CPCHSM_Normal, 0, 30);
   ATR.Init(GetPointer(CustPrevCalculated), _Symbol, _Period, iBars, CPCHSM_Normal, 0, 30, InpAtrPeriod);
  }

int OnCalculate(...)
  {
   CPCPrepareDataResultCode resData = CustPrevCalculated.PrepareData();
   CPCPrepareDataResultCode resATR = ATR.PrepareData(resData);
   if ( (resATR != CPCPDRC_NoData) && (resATR != CPCPDRC_NoRecountNotRequired) )
      ATR.Calculate();
  }
will be simplified to:
#include <ATRsample.mqh>
CCustATR ATR;

int OnInit()
  {
   ATR.Init(NULL, _Symbol, _Period, iBars, CPCHSM_Normal, 0, 30, InpAtrPeriod);
  }

int OnCalculate(...)
  {
   ATR.Calculate();
  }
A practical example is given in the file Indicator_ATRsample2.mq5.
Influence of the Described Technology on Performance in the Strategy Tester
For checking, I've made a test Expert Advisor (TestSpeed_IndPrevCalculated.mq5) that receives the value of the zero bar indicator at every tick according to one of three variants:
enum eTestVariant
  {
   BuiltIn,    // Built-in indicator iATR
   Custom,     // Custom indicator iCustom("ATR")
   IndClass    // Calculation in the class
  };
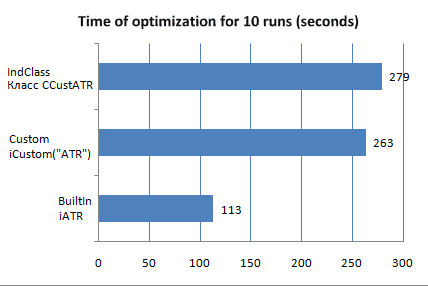
This Expert Advisor was run 10 times on 1 agent with the following optimization parameters:
- Symbol: EURUSD
- Period: entire history [1993..2001]
- Trade mode: every tick
- External parameter: FalseParameter [0..9]
I measured the time of optimization when using each of three variants of the indicator. The result of checking is shows as a linear histogram.

The source code of the Expert Advisor used for measuring the optimization time:
//+------------------------------------------------------------------+
//|                                  TestSpeed_IndPrevCalculated.mq5 |
//|                                         Copyright 2011, AlexSTAL |
//|                                           http://www.alexstal.ru |
//+------------------------------------------------------------------+
#property copyright "Copyright 2011, AlexSTAL"
#property link      "http://www.alexstal.ru"
#property version   "1.00"
//--- connect the include file with the CustATR class
#include <ATRsample.mqh>
//--- set the selection of the parameter as an enumeration
enum eTestVariant
  {
   BuiltIn,    // Built-in indicator iATR
   Custom,     // Custom indicator iCustom("ATR")
   IndClass    // Calculation withing the class
  };
//--- input variables
input eTestVariant TestVariant;
input int          FalseParameter = 0;
//--- period of the ATR indicator
const uchar        InpAtrPeriod = 14;
//--- handle of the built-in or custom indicator
int                Handle;
//--- indicator based on the class
CCustATR           *ATR;

//+------------------------------------------------------------------+
//| Expert initialization function                                   |
//+------------------------------------------------------------------+
int OnInit()
  {
   //---
   switch(TestVariant)
     {
      case BuiltIn:
         Handle = iATR(_Symbol, _Period, InpAtrPeriod);
         break;
      case Custom:
         Handle = iCustom(_Symbol, _Period, "Examples\ATR", InpAtrPeriod);
         break;
      case IndClass:
         ATR = new CCustATR;
         ATR.Init(NULL, _Symbol, _Period, 100, CPCHSM_Normal, 0, 30, InpAtrPeriod);
         break;
     };
   //---
   return(0);
  }
//+------------------------------------------------------------------+
//| Expert deinitialization function                                 |
//+------------------------------------------------------------------+
void OnDeinit(const int reason)
  {
   switch(TestVariant)
     {
      case IndClass:
         delete ATR;
         break;
     };
  }
//+------------------------------------------------------------------+
//| Expert tick function                                             |
//+------------------------------------------------------------------+
void OnTick()
  {
   double tmpValue[1];
   switch(TestVariant)
     {
      case BuiltIn:
         CopyBuffer(Handle, 0, 0, 1, tmpValue);
         break;
      case Custom:
         CopyBuffer(Handle, 0, 0, 1, tmpValue);
         break;
      case IndClass:
         ATR.Calculate();
         tmpValue[0] = ATR.GetATR(0, true);
         break;
     };
  }
//+------------------------------------------------------------------+
As we see, this technology doesn't decrease the performance in the strategy tester significantly comparing to using an ordinary custom indicator.
Notes to Practical Use of this Technology
- when testing an Expert Advisor in the strategy tester, the prev_calculated value cannot be zeroized in a custom indicator, that's why the synchronization of history is disabled in this mode;
- the calculation of indicator is performed only at the last 'n' bars that are strictly set at the initial initialization of the classes;
- the calculation implies strict binding to a certain symbol and period of the initialized class. For performing calculations on other symbols or periods, you need to create new instances of the classes.
Conclusion
In each situation, a programmer should consider all pros and cons of different variants of implementation of the task. The implementation suggested in the article is just a way with its own advantages and disadvantages.
P.S. Who makes no mistakes, makes nothing! If you find mistakes, please inform me.
Translated from Russian by MetaQuotes Ltd.
Original article: https://www.mql5.com/ru/articles/247
 Filtering Signals Based on Statistical Data of Price Correlation
 Parallel Calculations in MetaTrader 5
 Expert Advisor based on the "New Trading Dimensions" by Bill Williams
 Building a Spectrum Analyzer
- Free trading apps
- Over 8,000 signals for copying
- Economic news for exploring financial markets
You agree to website policy and terms of use
Hi
I'm trying to get the ATR of MACD. It would be helpful if you modify the code and make it something like MovingAverageOnArray ones so that it can take an array as input and use it's values instead of just the close. Same goes with RMA (the harder one to code and part of ATR calculation) having these as libraries can be useful in many cases that many people not paying attention to. If you would be kind enough and provide these many like me would appreciate it.
thanks