
Automating Trading Strategies in MQL5 (Part 3): The Zone Recovery RSI System for Dynamic Trade Management
Introduction
In the previous article (Part 2 of the series), we demonstrated how to transform the Kumo Breakout Strategy into a fully functional Expert Advisor (EA) using MetaQuotes Language 5 (MQL5). In this article (Part 3), we focus on the Zone Recovery RSI System, an advanced strategy designed to manage trades and recover from losses dynamically. This system combines the Relative Strength Index (RSI) to trigger entry signals with a Zone Recovery mechanism that places counter-trades when the market moves against the initial position. The goal is to mitigate drawdowns and improve overall profitability by adapting to market conditions.
We walk through the process of coding the recovery logic, managing positions with dynamic lot sizing, and utilizing RSI for trade entry and recovery signals. By the end of this article, you'll have a clear understanding of how to implement the Zone Recovery RSI System, test its performance using the MQL5 Strategy Tester, and optimize it for better risk management and returns. The article is structured as follows for easier understanding.
- Strategy Design and Key Concepts
- Implementation in MQL5
- Backtesting and Performance Analysis
- Conclusion
Strategy Design and Key Concepts
The Zone Recovery RSI System combines the Relative Strength Index (RSI) indicator for trade entries with a Zone Recovery mechanism for managing adverse price movements. Trade entries are triggered when the RSI crosses key thresholds—typically 30 for oversold (buy) and 70 for overbought (sell) conditions. However, the system's true power lies in its ability to recover from losing trades using a well-structured Zone Recovery model.
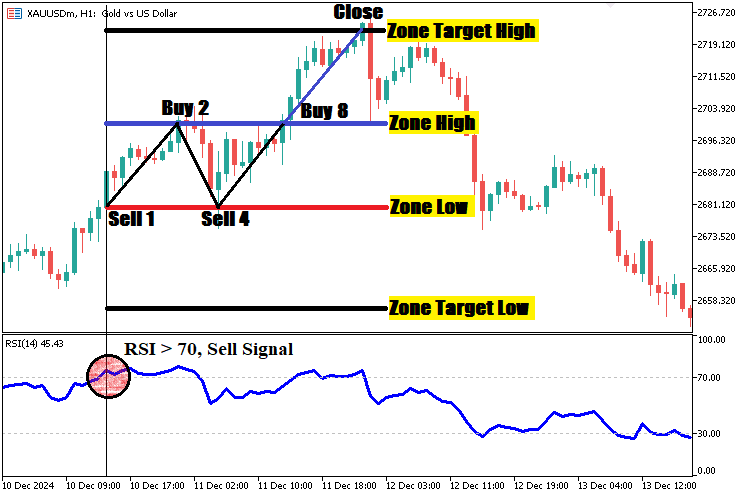
The Zone Recovery system establishes four critical price levels for each trade: Zone High, Zone Low, Target High, and Target Low. When a trade is opened, these levels are calculated relative to the entry price. For a buy trade, the Zone Low is set below the entry price, while the Zone High sits at the entry price. Conversely, for a sell trade, the Zone High is placed above the entry price, while the Zone Low aligns with it. If the market moves beyond Zone Low (for buys) or Zone High (for sells), a counter-trade is triggered in the opposite direction with an increased lot size based on a predefined multiplier. The Target High and Target Low define the profit-taking points for buy and sell positions, ensuring trades are closed at a profit once the market moves favorably. This approach allows for loss recovery while controlling risk through systematic position sizing and level adjustments. Here is an illustration to summarize the whole model.
Implementation in MQL5
After learning all the theories about the Zone Recovery trading strategy, let us then automate the theory and craft an Expert Advisor (EA) in MetaQuotes Language 5 (MQL5) for MetaTrader 5.
To create an expert advisor (EA), on your MetaTrader 5 terminal, click the Tools tab and check MetaQuotes Language Editor, or simply press F4 on your keyboard. Alternatively, you can click the IDE (Integrated Development Environment) icon on the tools bar. This will open the MetaQuotes Language Editor environment, which allows the writing of trading robots, technical indicators, scripts, and libraries of functions. Once the MetaEditor is opened, on the tools bar, navigate to the File tab and check New File, or simply press CTRL + N, to create a new document. Alternatively, you can click on the New icon on the tools tab. This will result in a MQL Wizard pop-up.
On the Wizard that pops, check Expert Advisor (template) and click Next. On the general properties of the Expert Advisor, under the name section, provide your expert's file name. Note that to specify or create a folder if it doesn't exist, you use the backslash before the name of the EA. For example, here we have "Experts\" by default. That means that our EA will be created in the Experts folder and we can find it there. The other sections are pretty much straightforward, but you can follow the link at the bottom of the Wizard to know how to precisely undertake the process.
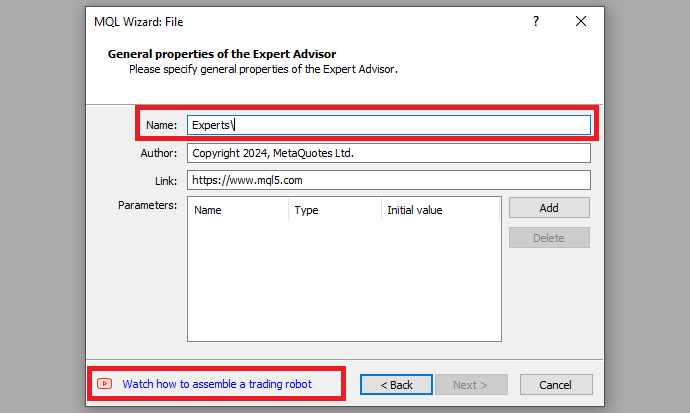
After providing your desired Expert Advisor file name, click on Next, click Next, and then click Finish. After doing all that, we are now ready to code and program our strategy.
First, we start by defining some metadata about the Expert Advisor (EA). This includes the name of the EA, the copyright information, and a link to the MetaQuotes website. We also specify the version of the EA, which is set to "1.00".
//+------------------------------------------------------------------+
//|                                      1. Zone Recovery RSI EA.mq5 |
//|                                  Copyright 2024, MetaQuotes Ltd. |
//|                                             https://www.mql5.com |
//+------------------------------------------------------------------+
#property copyright "Copyright 2024, MetaQuotes Ltd."
#property link      "https://www.mql5.com"
#property version   "1.00"
This will display the system metadata when loading the program. We can then move on to adding some global variables that we will use within the program. First, we include a trade instance by using #include at the beginning of the source code. This gives us access to the "CTrade class", which we will use to create a trade object. This is crucial as we need it to open trades.
#include <Trade/Trade.mqh>
CTrade obj_Trade;
The preprocessor will replace the line #include <Trade/Trade.mqh> with the content of the file Trade.mqh. Angle brackets indicate that the Trade.mqh file will be taken from the standard directory (usually it is terminal_installation_directory\MQL5\Include). The current directory is not included in the search. The line can be placed anywhere in the program, but usually, all inclusions are placed at the beginning of the source code, for a better code structure and easier reference. Declaration of the "obj_Trade" object of the CTrade class will give us access to the methods contained in that class easily, thanks to the MQL5 developers.
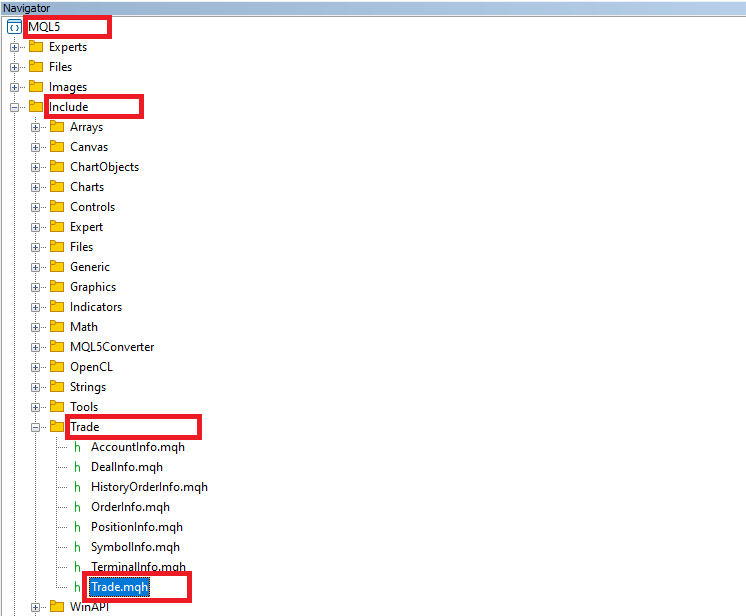
After that, we need to declare several important global variables that we will use in the trading system.
// Global variables for RSI logic
int rsiPeriod = 14;                //--- The period used for calculating the RSI indicator.
int rsiHandle;                     //--- Handle for the RSI indicator, used to retrieve RSI values.
double rsiBuffer[];                //--- Array to store the RSI values retrieved from the indicator.
datetime lastBarTime = 0;          //--- Holds the time of the last processed bar to prevent duplicate signals.
To handle signal generation, we set up the global variables required to manage the logic for the Relative Strength Index (RSI) indicator. First, we define "rsiPeriod" as 14, which determines the number of price bars used to calculate the RSI. This is a standard setting in technical analysis, allowing us to gauge overbought or oversold market conditions. Next, we create "rsiHandle", a reference for the RSI indicator. This handle will allow us to request and retrieve RSI values from the MetaTrader platform, enabling us to track the indicator's movements in real-time.
To store these RSI values, we use "rsiBuffer", an array that holds the indicator's output. We will analyze this buffer to detect key crossover points, such as when the RSI moves below 30 (potential buy signal) or above 70 (potential sell signal). Finally, we introduce "lastBarTime", which stores the time of the most recently processed bar. This variable will ensure that we only process one signal per bar, preventing multiple trades from triggering within the same bar. After that, we can define a class that will handle the recovery mechanism.
// Global ZoneRecovery object
class ZoneRecovery {

//---

};
Here, we create a Zone Recovery system using a class called "ZoneRecovery", which serves as a container for all the variables, functions, and logic required to manage the recovery process. By using a class, we can organize the code into a self-contained object, allowing us to manage trades, track recovery progress, and calculate essential levels for each trade cycle. This approach provides better structure, reusability, and scalability for handling multiple trade positions simultaneously. A class can contain three-member encapsulations in the form of private, protected, and public members. Let us first define the private members.
private:
   CTrade trade;                    //--- Object to handle trading operations.
   double initialLotSize;           //--- The initial lot size for the first trade.
   double currentLotSize;           //--- The lot size for the current trade in the sequence.
   double zoneSize;                 //--- Distance in points defining the range of the recovery zone.
   double targetSize;               //--- Distance in points defining the target profit range.
   double multiplier;               //--- Multiplier to increase lot size in recovery trades.
   string symbol;                   //--- Symbol for trading (e.g., currency pair).
   ENUM_ORDER_TYPE lastOrderType;   //--- Type of the last executed order (BUY or SELL).
   double lastOrderPrice;           //--- Price at which the last order was executed.
   double zoneHigh;                 //--- Upper boundary of the recovery zone.
   double zoneLow;                  //--- Lower boundary of the recovery zone.
   double zoneTargetHigh;           //--- Upper boundary for target profit range.
   double zoneTargetLow;            //--- Lower boundary for target profit range.
   bool isRecovery;                 //--- Flag indicating whether the recovery process is active.
Here, we define the private member variables of the "ZoneRecovery" class, which stores essential data for managing the zone recovery process. These variables allow us to track the state of the strategy, calculate the key levels of the recovery zone, and manage trade execution logic.
We use the "CTrade" object to handle all trading operations, such as placing, modifying, and closing trades. The "initialLotSize" represents the lot size of the first trade, while "currentLotSize" tracks the lot size for subsequent recovery trades, which increases based on the "multiplier". The "zoneSize" and "targetSize" define the critical boundaries of the recovery system. Specifically, the recovery zone is bounded by "zoneHigh" and "zoneLow", while the profit target is defined by "zoneTargetHigh" and "zoneTargetLow".
To track the flow of trades, we store the "lastOrderType" (BUY or SELL) and the "lastOrderPrice" at which the previous trade was executed. This information helps us determine how to position future trades in response to market movements. The "symbol" variable identifies the trading instrument being used, while the "isRecovery" flag indicates whether the system is actively in the recovery process. By keeping these variables private, we ensure that only the internal logic of the class can modify them, maintaining the integrity and accuracy of the system's calculations. After that, we can now define the class's functions directly, other than having to call them later and define them, just for simplicity. So instead of declaring the functions we need and defining them later, we just go on to declare and define them once and for all. Let us define the function responsible for calculating the recovery zones first.
// Calculate dynamic zones and targets
void CalculateZones() {
   if (lastOrderType == ORDER_TYPE_BUY) {
      zoneHigh = lastOrderPrice;                 //--- Upper boundary starts from the last BUY price.
      zoneLow = zoneHigh - zoneSize;             //--- Lower boundary is calculated by subtracting zone size.
      zoneTargetHigh = zoneHigh + targetSize;    //--- Profit target above the upper boundary.
      zoneTargetLow = zoneLow - targetSize;      //--- Buffer below the lower boundary for recovery trades.
   } else if (lastOrderType == ORDER_TYPE_SELL) {
      zoneLow = lastOrderPrice;                  //--- Lower boundary starts from the last SELL price.
      zoneHigh = zoneLow + zoneSize;             //--- Upper boundary is calculated by adding zone size.
      zoneTargetLow = zoneLow - targetSize;      //--- Buffer below the lower boundary for profit range.
      zoneTargetHigh = zoneHigh + targetSize;    //--- Profit target above the upper boundary.
   }
   Print("Zone recalculated: ZoneHigh=", zoneHigh, ", ZoneLow=", zoneLow, ", TargetHigh=", zoneTargetHigh, ", TargetLow=", zoneTargetLow);
}
Here, we design the "CalculateZones" function, which plays a vital role in defining the key levels for our Zone Recovery strategy. The primary objective of this function is to calculate the four essential boundaries — "zoneHigh", "zoneLow", "zoneTargetHigh", and "zoneTargetLow" — which guide our entry, recovery, and profit exit points. These boundaries are dynamic and adjust based on the type and price of the last executed order, ensuring that we maintain control over the recovery process.
If our last order was a BUY, we set the "zoneHigh" to the price at which the BUY order was executed. From this point, we calculate the "zoneLow" by subtracting the "zoneSize" from the "zoneHigh", creating a recovery range below the original BUY price. To establish our profit targets, we calculate "zoneTargetHigh" by adding the "targetSize" to the "zoneHigh", while "zoneTargetLow" is positioned below "zoneLow" by the same "targetSize". This structure will enable us to position recovery trades below the original BUY entry and define the upper and lower limits of our profit range.
If our last order was a SELL, we flip the logic. Here, we set "zoneLow" to the price of the last SELL order. We then calculate "zoneHigh" by adding "zoneSize" to "zoneLow", forming the upper boundary of the recovery range. The profit targets are established by calculating "zoneTargetLow" as a value below "zoneLow", while "zoneTargetHigh" is set above "zoneHigh", both by the "targetSize". This setup again will allow us to initiate recovery trades above the original SELL entry while also defining the profit-taking zone.
By the end of this process, we have established our zone recovery boundaries and profit targets for both BUY and SELL trades. To aid in debugging and strategy evaluation, we use the Print function to display the values of "zoneHigh", "zoneLow", "zoneTargetHigh", and "zoneTargetLow" in the log. That way, we can define another function to take care of the trade execution logic.
// Open a trade based on the given type
bool OpenTrade(ENUM_ORDER_TYPE type) {
   if (type == ORDER_TYPE_BUY) {
      if (trade.Buy(currentLotSize, symbol)) {
         lastOrderType = ORDER_TYPE_BUY;         //--- Mark the last trade as BUY.
         lastOrderPrice = SymbolInfoDouble(symbol, SYMBOL_BID); //--- Store the current BID price.
         CalculateZones();                       //--- Recalculate zones after placing the trade.
         Print(isRecovery ? "RECOVERY BUY order placed" : "INITIAL BUY order placed", " at ", lastOrderPrice, " with lot size ", currentLotSize);
         isRecovery = true;                      //--- Set recovery state to true after the first trade.
         return true;
      }
   } else if (type == ORDER_TYPE_SELL) {
      if (trade.Sell(currentLotSize, symbol)) {
         lastOrderType = ORDER_TYPE_SELL;        //--- Mark the last trade as SELL.
         lastOrderPrice = SymbolInfoDouble(symbol, SYMBOL_BID); //--- Store the current BID price.
         CalculateZones();                       //--- Recalculate zones after placing the trade.
         Print(isRecovery ? "RECOVERY SELL order placed" : "INITIAL SELL order placed", " at ", lastOrderPrice, " with lot size ", currentLotSize);
         isRecovery = true;                      //--- Set recovery state to true after the first trade.
         return true;
      }
   }
   return false;                                 //--- Return false if the trade fails.
}
Here, we define a function called "OpenTrade" that returns a boolean value. The purpose of this function will be to open a trade depending on whether we want to execute a BUY or SELL order. We first check if the requested order type is a BUY. If it is, we use the "trade.Buy" function to attempt opening a buy position with the current lot size and the specified symbol. If the trade is successfully opened, we set the "lastOrderType" to BUY, then we store the current price of the symbol using SymbolInfoDouble function to get the bid price. This price represents the price at which we opened the position. We then recalculate the recovery zones by calling the "CalculateZones" function, which adjusts the zone levels based on the new position.
Next, we print a message to the log indicating whether this was an initial BUY or a recovery BUY. We use a ternary operator to check if the "isRecovery" flag is true or false—if it’s true, the message will state that it's a recovery order; otherwise, it will indicate that it's the initial order. Afterward, we set the "isRecovery" flag to true, signaling that any subsequent trades will be considered part of the recovery process. Finally, the function returns true, confirming that the trade was placed successfully.
If the order type is SELL, we follow the same steps. We attempt to open a SELL position by calling the "trade.Sell" function with the same parameters, and upon successful execution, we store the "lastOrderPrice" and adjust the recovery zones in the same manner. We print a message indicating whether this was an initial SELL or a recovery SELL, again using a ternary operator to check the "isRecovery" flag. The "isRecovery" flag is then set to true, and the function returns true to indicate that the trade was placed successfully. If, for any reason, the trade is not successfully opened, the function returns false, indicating that the trade attempt has failed. Those are the crucial functions that we need to have as private. Others we can have them as public, no issues.
public:
   // Constructor
   ZoneRecovery(double initialLot, double zonePts, double targetPts, double lotMultiplier, string _symbol) {
      initialLotSize = initialLot;
      currentLotSize = initialLot;                 //--- Start with the initial lot size.
      zoneSize = zonePts * _Point;                 //--- Convert zone size to points.
      targetSize = targetPts * _Point;             //--- Convert target size to points.
      multiplier = lotMultiplier;
      symbol = _symbol;                            //--- Initialize the trading symbol.
      lastOrderType = ORDER_TYPE_BUY;
      lastOrderPrice = 0.0;                        //--- No trades exist initially.
      isRecovery = false;                          //--- No recovery process active at initialization.
   }
Here, we declare the public section of the "ZoneRecovery" class, which contains the constructor. The constructor is used to initialize an object of the "ZoneRecovery" class with specific parameters when it is created. The constructor takes in "initialLot", "zonePts", "targetPts", "lotMultiplier", and "_symbol" as inputs.
We begin by assigning the "initialLot" value to "initialLotSize" and "currentLotSize", ensuring that both start with the same value, which represents the lot size for the first trade. We then calculate the "zoneSize" by multiplying "zonePts" (the zone distance in points) by _Point, which is a built-in constant representing the minimum price movement for the symbol. Similarly, "targetSize" is calculated by converting "targetPts" (target profit distance) to points using the same approach. The "multiplier" is set to "lotMultiplier", which will be used later to adjust the lot size for recovery trades.
Next, the "symbol" is assigned to the "symbol" variable to indicate which trading instrument will be used. "lastOrderType" is set to ORDER_TYPE_BUY initially, assuming that the first trade will be a buy order. "lastOrderPrice" is set to "0.0" because no trade has been executed yet. Lastly, "isRecovery" is set to "false", indicating that the recovery process is not yet active. This constructor ensures that the "ZoneRecovery" object is properly initialized and prepared for managing trades and recovery processes. Next, we define a function to trigger trades based on external signals.
// Trigger trade based on external signals
void HandleSignal(ENUM_ORDER_TYPE type) {
   if (lastOrderPrice == 0.0)                   //--- Open the first trade if no trades exist.
      OpenTrade(type);
}
Here, we define a function called "HandleSignal" that takes an ENUM_ORDER_TYPE type as its parameter, representing the type of trade to be executed (either a BUY or SELL). First, we check if the "lastOrderPrice" is "0.0", which indicates that no previous trade has been executed. If this condition is true, it means that this is the first trade to be opened, so we call the "OpenTrade" function and pass the "type" parameter to it. The "OpenTrade" function will then handle the logic for opening either a BUY or SELL order based on the signal received. We can now manage the zones by opening recovery trades via the logic below.
// Manage zone recovery positions
void ManageZones() {
   double currentPrice = SymbolInfoDouble(symbol, SYMBOL_BID); //--- Get the current BID price.

   // Open recovery trades based on zones
   if (lastOrderType == ORDER_TYPE_BUY && currentPrice <= zoneLow) {
      currentLotSize *= multiplier;            //--- Increase lot size for recovery.
      OpenTrade(ORDER_TYPE_SELL);              //--- Open a SELL order for recovery.
   } else if (lastOrderType == ORDER_TYPE_SELL && currentPrice >= zoneHigh) {
      currentLotSize *= multiplier;            //--- Increase lot size for recovery.
      OpenTrade(ORDER_TYPE_BUY);               //--- Open a BUY order for recovery.
   }
}
To manage the opened trades, we define a void function called "ManageZones" that is responsible for managing the recovery trades based on predefined price zones. Inside this function, we first retrieve the current BID price for the specified symbol using the SymbolInfoDouble function with the SYMBOL_BID parameter. This gives us the current market price at which the asset is being traded.
Next, we check the trade type of the last executed order using the "lastOrderType" variable. If the last trade was a BUY and the current market price has fallen to or below the "zoneLow" (the lower boundary of the recovery zone), we increase the "currentLotSize" by multiplying it with the "multiplier" to allocate more capital for the recovery trade. Afterward, we call the "OpenTrade" function with the ORDER_TYPE_SELL parameter, indicating that we need to open a SELL position to manage the loss from the previous BUY trade.
Similarly, if the last trade was a SELL and the current market price has risen to or above the "zoneHigh" (the upper boundary of the recovery zone), we again increase the "currentLotSize" by multiplying it with the "multiplier" to scale up the trade size for recovery. Then, we call the "OpenTrade" function with the ORDER_TYPE_BUY parameter, opening a BUY position to recover from the earlier SELL trade. Just that easy. Now, after we open the initial and recovery trades, we need logic to close them at a point. So let us define the closure or target logic below.
// Check and close trades at zone targets
void CheckCloseAtTargets() {
   double currentPrice = SymbolInfoDouble(symbol, SYMBOL_BID); //--- Get the current BID price.

   // Close BUY trades at target high
   if (lastOrderType == ORDER_TYPE_BUY && currentPrice >= zoneTargetHigh) {
      for (int i = PositionsTotal() - 1; i >= 0; i--) { //--- Loop through all open positions.
         if (PositionGetSymbol(i) == symbol) { //--- Check if the position belongs to the current symbol.
            ulong ticket = PositionGetInteger(POSITION_TICKET); //--- Retrieve the ticket number.
            int retries = 10;
            while (retries > 0) {
               if (trade.PositionClose(ticket)) { //--- Attempt to close the position.
                  Print("Closed BUY position with ticket: ", ticket);
                  break;
               } else {
                  Print("Failed to close BUY position with ticket: ", ticket, ". Retrying... Error: ", GetLastError());
                  retries--;
                  Sleep(100);                   //--- Wait 100ms before retrying.
               }
            }
            if (retries == 0)
               Print("Gave up on closing BUY position with ticket: ", ticket);
         }
      }
      Reset();                                  //--- Reset the strategy after closing all positions.
   }
   // Close SELL trades at target low
   else if (lastOrderType == ORDER_TYPE_SELL && currentPrice <= zoneTargetLow) {
      for (int i = PositionsTotal() - 1; i >= 0; i--) { //--- Loop through all open positions.
         if (PositionGetSymbol(i) == symbol) { //--- Check if the position belongs to the current symbol.
            ulong ticket = PositionGetInteger(POSITION_TICKET); //--- Retrieve the ticket number.
            int retries = 10;
            while (retries > 0) {
               if (trade.PositionClose(ticket)) { //--- Attempt to close the position.
                  Print("Closed SELL position with ticket: ", ticket);
                  break;
               } else {
                  Print("Failed to close SELL position with ticket: ", ticket, ". Retrying... Error: ", GetLastError());
                  retries--;
                  Sleep(100);                   //--- Wait 100ms before retrying.
               }
            }
            if (retries == 0)
               Print("Gave up on closing SELL position with ticket: ", ticket);
         }
      }
      Reset();                                  //--- Reset the strategy after closing all positions.
   }
}
Here, we define a function called "CheckCloseAtTargets" which is responsible for checking if any open trades have reached their predefined target price and closing them accordingly.
First, we retrieve the current BID price for the given symbol using the SymbolInfoDouble function with the SYMBOL_BID parameter. This gives us the current market price of the symbol, which we will use to compare against the target price levels (either the "zoneTargetHigh" or "zoneTargetLow") to decide whether the trades should be closed.
Next, we check if the last order type is BUY and whether the current price has reached or exceeded the "zoneTargetHigh" (the target price level for a BUY trade). If these conditions are met, we loop through all open positions using the PositionsTotal function, starting from the last position. For each open position, we check if the position belongs to the same symbol using the PositionGetSymbol function. If the symbol matches, we retrieve the position's ticket number using the PositionGetInteger function with the "POSITION_TICKET" parameter.
Afterward, we attempt to close the position by calling the "trade.PositionClose" function with the retrieved ticket. If the position closes successfully, we print a confirmation message stating that the BUY position has been closed, including the ticket number. If the closure fails, we retry up to 10 times, printing an error message each time and using the Sleep function to wait for 100 milliseconds before retrying. If we still cannot close the position after 10 retries, we print a failure message and proceed to the next open position. Once all the positions are closed or the retry limit is reached, we call the "Reset" function to reset the strategy, ensuring the state is cleared for any future trades.
Similarly, if the last order type is SELL and the current price has reached or fallen below the "zoneTargetLow" (the target price level for a SELL trade), the process is repeated for all SELL positions. The function will attempt to close the SELL positions in the same manner, retrying if necessary and printing status messages at each step. We used a foreign function to reset the status, but here is the logic adopted.
// Reset the strategy after hitting targets
void Reset() {
   currentLotSize = initialLotSize;             //--- Reset lot size to the initial value.
   lastOrderType = -1;                          //--- Clear the last order type.
   lastOrderPrice = 0.0;                        //--- Clear the last order price.
   isRecovery = false;                          //--- Set recovery state to false.
   Print("Strategy reset after closing trades.");
}
We define a function called "Reset", which is responsible for resetting the strategy's internal variables and preparing the system for the next trade or reset scenario. We start by resetting the "currentLotSize" to the "initialLotSize", which means that after a series of recovery trades or reaching target levels, we return the lot size to its original value. This ensures that the strategy starts fresh with the initial lot size for any new trades.
Next, we clear the "lastOrderType" by setting it to -1, effectively indicating that there is no previous order type (neither a BUY nor a SELL). This helps ensure that there is no confusion or dependency on the previous order type in future trading logic. Similarly, we reset the "lastOrderPrice" to 0.0, clearing the last price at which a trade was executed. We then set the "isRecovery" flag to false, signaling that the recovery process is no longer active. This is particularly important as it ensures that any future trades are treated as initial trades and not as part of a recovery strategy.
Finally, we print a message using the Print function, indicating that the strategy has been successfully reset after closing all trades. This provides feedback in the terminal, helping the trader track when the strategy has been reset and ensuring the proper state for future operations. In essence, the function clears all essential variables that track trade conditions, recovery states, and trade sizes, returning the system to its default settings for fresh operations. And that is all that we need for the class to handle all incoming signals. We can now proceed to initialize the class object by passing in default parameters.
ZoneRecovery zoneRecovery(0.1, 200, 400, 2.0, _Symbol);
//--- Initialize the ZoneRecovery object with specified parameters.
Here, we create an instance of the "ZoneRecovery" class by calling its constructor and passing in the necessary parameters. Specifically, we initialize the object "zoneRecovery" with the following values:
- "0.1" for the initial lot size. This means that the first trade will use a lot size of 0.1.
- "200" for the zone size, which is the number of points defining the range of the recovery zone. It is then multiplied by _Point to convert this value to actual points for the specified symbol.
- "400" for the target size, defining the distance in points to the target profit level. Similar to the zone size, this is also converted to points using _Point.
- "2.0" for the multiplier, which will be used to increase the lot size in subsequent recovery trades if necessary.
- "_Symbol" is used as the trading symbol for this particular instance of ZoneRecovery, which corresponds to the symbol of the instrument the trader is using.
By initializing "zoneRecovery" with these parameters, we set up the object to handle the trading logic for this specific trading strategy, including managing the recovery zones, lot size adjustments, and target levels for any trades that will be opened or managed. This object is ready to handle trade operations based on the defined recovery strategy once the system is executed. We can now graduate to the event handlers where we concentrate on signal generation. We start with the OnInit event handler. Here, we just need to initialize the indicator handle and set the storage array as a time series.
//+------------------------------------------------------------------+
//| Expert initialization function                                   |
//+------------------------------------------------------------------+
int OnInit() {
   //--- Initialize RSI indicator
   rsiHandle = iRSI(_Symbol, PERIOD_CURRENT, rsiPeriod, PRICE_CLOSE); //--- Create RSI indicator handle.
   if (rsiHandle == INVALID_HANDLE) { //--- Check if RSI handle creation failed.
      Print("Failed to create RSI handle. Error: ", GetLastError());
      return(INIT_FAILED); //--- Return failure status if RSI initialization fails.
   }
   ArraySetAsSeries(rsiBuffer, true); //--- Set the RSI buffer as a time series to align values.
   Print("Zone Recovery Strategy initialized."); //--- Log successful initialization.
   return(INIT_SUCCEEDED); //--- Return success status.
}
Here, we initialize the RSI indicator and prepare the system for trading by performing a series of setup tasks in the OnInit function. First, we create an RSI indicator handle by calling the iRSI function, passing in the current symbol (_Symbol), the PERIOD_CURRENT timeframe, the specified "rsiPeriod", and the PRICE_CLOSE price type. This step sets up the RSI indicator for use in the strategy.
We then check if the handle creation was successful by verifying if the handle is not equal to INVALID_HANDLE. If the creation fails, we print an error message with the specific error code using the GetLastError function and return "INIT_FAILED" to signal the failure. If the handle creation succeeds, we proceed by setting the RSI buffer as a time series using ArraySetAsSeries to align the buffer with the chart’s time series, ensuring that the most recent values are at index 0. Finally, we print a success message confirming the initialization of the "Zone Recovery Strategy" and return INIT_SUCCEEDED, signaling that the setup was successful and the Expert Advisor is ready to begin operation. Here is an illustration.
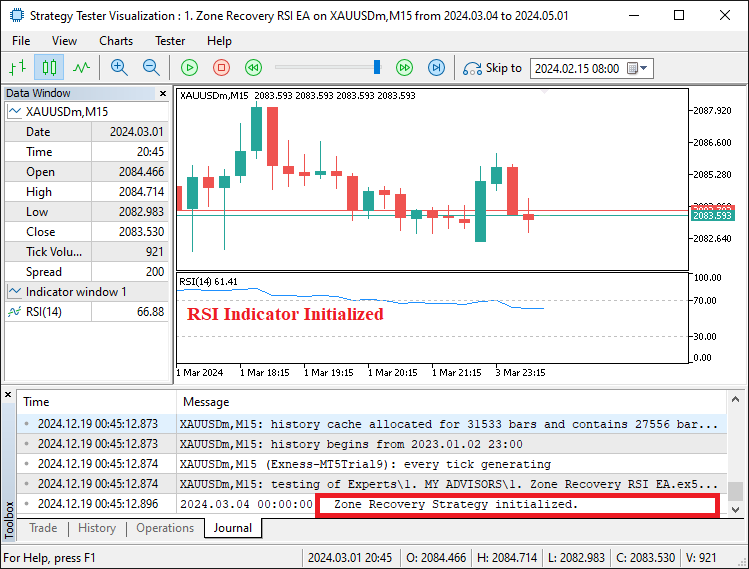
However, since we create and initialize an indicator, we need to release it once we no longer need the program to free up resources. Here is the logic we adopt.
//+------------------------------------------------------------------+
//| Expert deinitialization function                                 |
//+------------------------------------------------------------------+
void OnDeinit(const int reason) {
   if (rsiHandle != INVALID_HANDLE) //--- Check if RSI handle is valid.
      IndicatorRelease(rsiHandle); //--- Release RSI indicator handle to free resources.

   Print("Zone Recovery Strategy deinitialized."); //--- Log deinitialization message.
}
Here, we deinitialize the strategy and release any resources used by the RSI indicator when the Expert Advisor (EA) is removed or stopped. In the OnDeinit function, we first check if the "rsiHandle" is valid by confirming that it is not equal to INVALID_HANDLE. This ensures that the RSI indicator handle exists before attempting to release it.
If the handle is valid, we use the IndicatorRelease function to free the resources associated with the RSI indicator, ensuring that memory is properly managed and not left in use after the EA stops running. Finally, we print a "Zone Recovery Strategy deinitialized" message to log that the deinitialization process has been completed, confirming that the system has been properly shut down. This ensures that the EA can be safely removed without leaving any unnecessary resources allocated. Here is an outcome example.
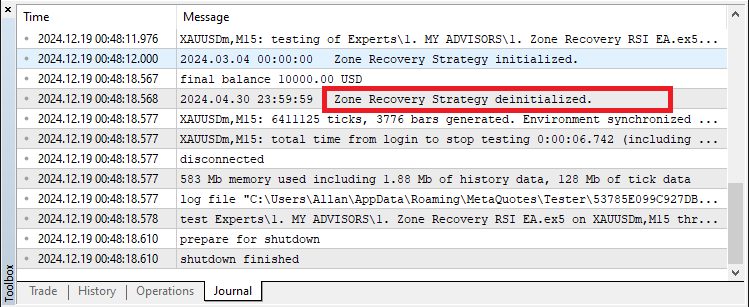
After taking care of the instance the program is stopped, we can graduate to the final event handler, which is the main one, where ticks are processed, which is the OnTick event handler.
//+------------------------------------------------------------------+
//| Expert tick function                                             |
//+------------------------------------------------------------------+
void OnTick() {
   //--- Copy RSI values
   if (CopyBuffer(rsiHandle, 0, 1, 2, rsiBuffer) <= 0) { //--- Attempt to copy RSI buffer values.
      Print("Failed to copy RSI buffer. Error: ", GetLastError()); //--- Log failure if copying fails.
      return; //--- Exit the function on failure to avoid processing invalid data.
   }

//---

}
In the OnTick function, we first attempt to copy the RSI values into the "rsiBuffer" array using the CopyBuffer function. The CopyBuffer function is called with parameters: the RSI indicator handle "rsiHandle", the buffer index 0 (which indicates the primary RSI buffer), the starting position 1 (where to start copying the data), the number of values to copy 2, and the "rsiBuffer" array, which will store the copied data. This function retrieves the most recent two RSI values and stores them in the buffer.
Next, we check if the copy operation was successful by evaluating whether the returned value is greater than 0. If the operation fails (i.e., it returns a value less than or equal to 0), we log an error message indicating that the "RSI buffer copy" failed using the Print function and display the GetLastError code to provide details about the failure. After logging the error, we immediately exit the function using "return" to prevent any further processing based on invalid or missing RSI data. This ensures that the EA does not attempt to make trading decisions with incomplete or faulty data, thus avoiding potential errors or losses. If we do not terminate the process, it then means that we have the necessary requested data and we can continue to make trading decisions.
//--- Check RSI crossover signals
datetime currentBarTime = iTime(_Symbol, PERIOD_CURRENT, 0); //--- Get the time of the current bar.
if (currentBarTime != lastBarTime) { //--- Ensure processing happens only once per bar.
   lastBarTime = currentBarTime; //--- Update the last processed bar time.
   if (rsiBuffer[1] > 30 && rsiBuffer[0] <= 30) { //--- Check for RSI crossing below 30 (oversold signal).
      Print("BUY SIGNAL"); //--- Log a BUY signal.
      zoneRecovery.HandleSignal(ORDER_TYPE_BUY); //--- Trigger the Zone Recovery BUY logic.
   } else if (rsiBuffer[1] < 70 && rsiBuffer[0] >= 70) { //--- Check for RSI crossing above 70 (overbought signal).
      Print("SELL SIGNAL"); //--- Log a SELL signal.
      zoneRecovery.HandleSignal(ORDER_TYPE_SELL); //--- Trigger the Zone Recovery SELL logic.
   }
}
Here, we check for RSI crossover signals on each new market bar to trigger potential trades. We begin by retrieving the current bar's timestamp using the iTime function. The function takes the symbol (_Symbol), the timeframe (PERIOD_CURRENT), and the bar index (0 for the current bar). This provides the "currentBarTime", which represents the timestamp of the most recent completed bar.
Next, we ensure that the trading logic is executed only once per bar by comparing the "currentBarTime" with the "lastBarTime". If the times are different, it means a new bar has formed, so we proceed with processing. We then update the "lastBarTime" to match the "currentBarTime" to keep track of the most recently processed bar and prevent repetitive executions during the same bar.
The next step is to detect RSI crossover signals. We first check if the RSI value has crossed below 30 (an oversold condition) by comparing "rsiBuffer[1]" (the RSI value from the previous bar) with "rsiBuffer[0]" (the RSI value from the current bar). If the previous bar’s RSI was above 30 and the current bar’s RSI is at or below 30, this indicates a potential BUY signal, so we print a message saying "BUY SIGNAL" and then call the "HandleSignal" function of the "zoneRecovery" object to trigger the recovery process for a BUY order.
Similarly, we check if the RSI has crossed above 70 (an overbought condition). If the previous bar’s RSI was below 70 and the current bar’s RSI is at or above 70, it signals a potential SELL signal, and we print "SELL SIGNAL". Then, we call "HandleSignal" again, but this time for a SELL order, triggering the corresponding Zone Recovery SELL logic. Finally, we just call the respective functions to manage the opened zones and close them when targets are reached.
//--- Manage zone recovery logic
zoneRecovery.ManageZones(); //--- Perform zone recovery logic for active positions.

//--- Check and close at zone targets
zoneRecovery.CheckCloseAtTargets(); //--- Evaluate and close trades when target levels are reached.
Here, we use the dot operator (".") to call functions that are part of the "ZoneRecovery" class. First, we use "zoneRecovery.ManageZones()" to execute the "ManageZones" method, which handles the logic for managing zone recovery trades based on the current price and the defined recovery zones. This method adjusts the lot size for recovery trades and opens new positions as necessary.
Next, we call "zoneRecovery.CheckCloseAtTargets()" to trigger the "CheckCloseAtTargets" method, which checks if the price has reached the target levels for closing the positions. If the conditions are met, it attempts to close the open trades, ensuring the strategy remains in line with its target profit or loss boundaries. By using the dot operator, we access and execute these methods on the "zoneRecovery" object to manage the recovery process effectively. To make sure that the methods are called successfully on every tick, we run the program, and here is the outcome.
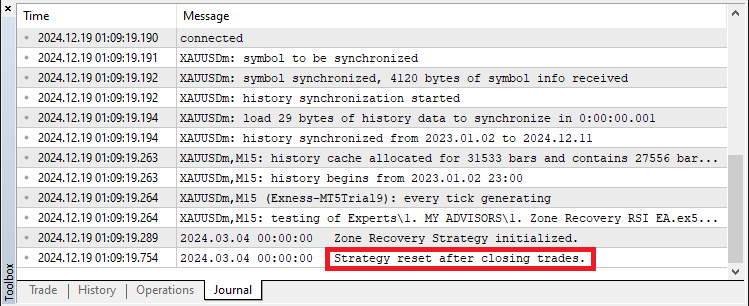
From the image, we can see that we successfully call the class methods to ready the program on the first tick, which confirms that our program class is connected and ready to work. To confirm also this, we run the program, and here are the trade confirmations.
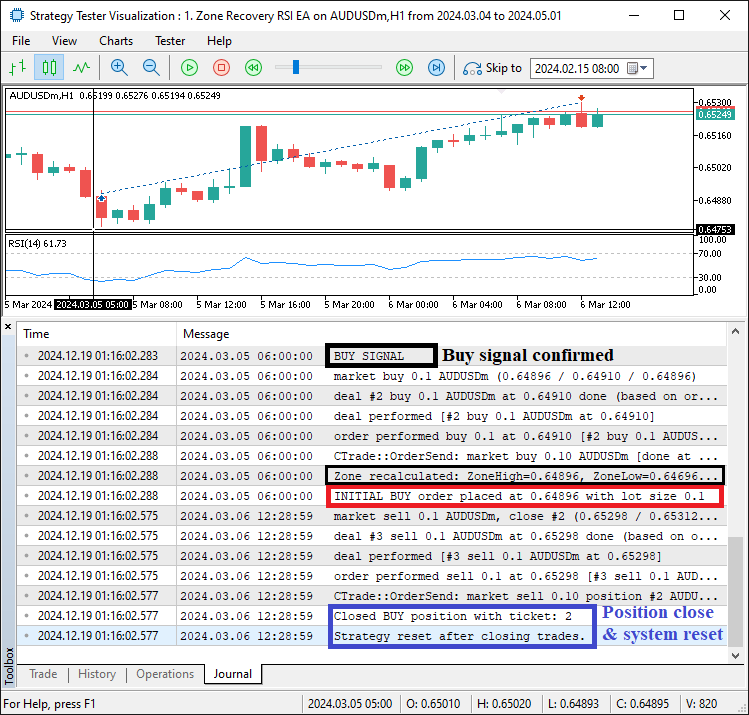
From the image, we can see that we confirm a buy signal, open a position from it, add it to the zone recovery system, recalculate the zone levels, identify that it is an initial position, and when the target is reached, we close the position and reset the system for the next trade. Let us try and see for a case where we enter a zone recovery system.
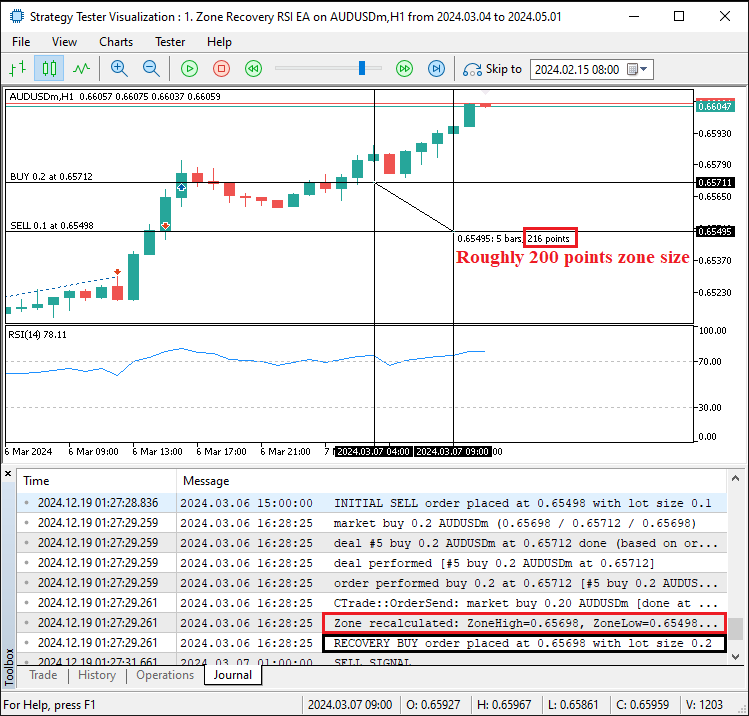
From the image, we can see that when the market goes against us by 200 points, we assume that the trend is a bullish one, and we follow it by opening a buy position with a higher lot size, 0.2 in this case.
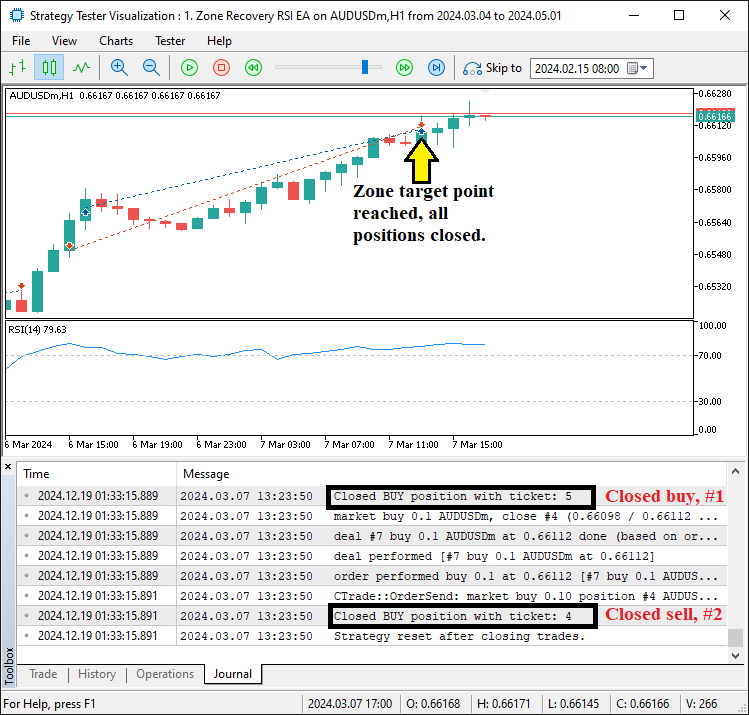
We can again see that when the market hits the target levels, we close the trades and reset for another one. While the system is in recovery mode, we ignore any incoming signal. This verifies that we have successfully achieved our objective, and what remains is to backtest the program and analyze its performance. This is handled in the next section.
Backtesting and Performance Analysis
In this section, we focus on the process of backtesting and analyzing the performance of our Zone Recovery RSI System. Backtesting allows us to assess the effectiveness of our strategy on historical data, identify potential flaws, and fine-tune the parameters to achieve better results in live trading.
We begin by setting up the Strategy Tester in the MetaTrader 5 platform. The Strategy Tester allows us to simulate historical market conditions and execute trades as if they were happening in real-time. To run a backtest, we select the relevant symbol, time frame, and testing period. We also ensure that the "visual mode" is enabled if we want to see the trades as they occur on the chart.
Once the backtesting environment is ready, we configure the inputs for our program. We specify the initial deposit, lot size, and the specific parameters related to the Zone Recovery logic. Key inputs include "initial lot size", "zone size", "target size", and "multiplier". By varying these inputs, we can analyze how they affect the overall profitability of the strategy. Here is what we have changed.
ZoneRecovery zoneRecovery(0.1, 700, 1400, 2.0, _Symbol);
//--- Initialize the ZoneRecovery object with specified parameters.
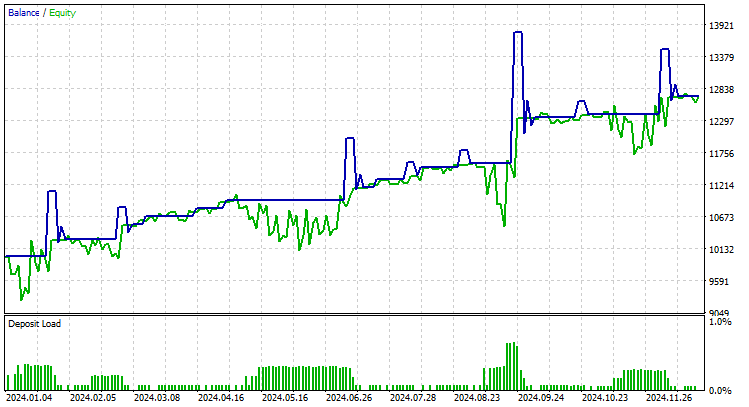
We configured the system to run from date one on January 2024 for a whole year and here are the results.
Strategy tester graph:
Strategy tester report:
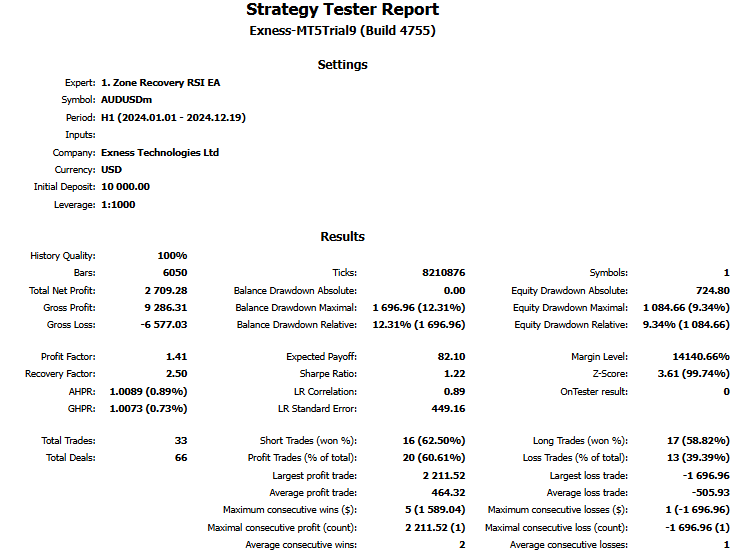
From the graph and report results obtained, we can be certain that our strategy is working as anticipated. However, we can yet increase the performance of the program by making sure that we limit ourselves to profit maximization by adding a trailing logic, whereby instead of having to wait for a full profit target, which exposes us to recovery instances most of the time, we can protect the little profits that we have and maximize them by applying a trailing stop. Since we can only trail the first positions, we can have a logic that will make sure we only trail the first positions, and if we enter a recovery mode, we wait for a full recovery. Thus, we will first need a trailing stop function.
//+------------------------------------------------------------------+
//|      FUNCTION TO APPLY TRAILING STOP                             |
//+------------------------------------------------------------------+
void applyTrailingStop(double slPoints, CTrade &trade_object, int magicNo=0, double minProfitPoints=0){
   double buySl = NormalizeDouble(SymbolInfoDouble(_Symbol, SYMBOL_BID) - slPoints*_Point, _Digits); //--- Calculate the stop loss price for BUY trades
   double sellSl = NormalizeDouble(SymbolInfoDouble(_Symbol, SYMBOL_ASK) + slPoints*_Point, _Digits); //--- Calculate the stop loss price for SELL trades

   for (int i = PositionsTotal() - 1; i >= 0; i--){ //--- Loop through all open positions
      ulong ticket = PositionGetTicket(i); //--- Get the ticket number of the current position
      if (ticket > 0){ //--- Check if the ticket is valid
         if (PositionSelectByTicket(ticket)){ //--- Select the position by its ticket number
            if (PositionGetString(POSITION_SYMBOL) == _Symbol && //--- Check if the position belongs to the current symbol
               (magicNo == 0 || PositionGetInteger(POSITION_MAGIC) == magicNo)){ //--- Check if the position matches the given magic number or if no magic number is specified

               double positionOpenPrice = PositionGetDouble(POSITION_PRICE_OPEN); //--- Get the opening price of the position
               double positionSl = PositionGetDouble(POSITION_SL); //--- Get the current stop loss of the position

               if (PositionGetInteger(POSITION_TYPE) == POSITION_TYPE_BUY){ //--- Check if the position is a BUY trade
                  double minProfitPrice = NormalizeDouble(positionOpenPrice + minProfitPoints * _Point, _Digits); //--- Calculate the minimum price at which profit is locked
                  if (buySl > minProfitPrice &&  //--- Check if the calculated stop loss is above the minimum profit price
                      buySl > positionOpenPrice && //--- Check if the calculated stop loss is above the opening price
                      (buySl > positionSl || positionSl == 0)){ //--- Check if the calculated stop loss is greater than the current stop loss or if no stop loss is set
                     trade_object.PositionModify(ticket, buySl, PositionGetDouble(POSITION_TP)); //--- Modify the position to update the stop loss
                  }
               }
               else if (PositionGetInteger(POSITION_TYPE) == POSITION_TYPE_SELL){ //--- Check if the position is a SELL trade
                  double minProfitPrice = NormalizeDouble(positionOpenPrice - minProfitPoints * _Point, _Digits); //--- Calculate the minimum price at which profit is locked
                  if (sellSl < minProfitPrice &&  //--- Check if the calculated stop loss is below the minimum profit price
                      sellSl < positionOpenPrice && //--- Check if the calculated stop loss is below the opening price
                      (sellSl < positionSl || positionSl == 0)){ //--- Check if the calculated stop loss is less than the current stop loss or if no stop loss is set
                     trade_object.PositionModify(ticket, sellSl, PositionGetDouble(POSITION_TP)); //--- Modify the position to update the stop loss
                  }
               }
            }
         }
      }
   }
}
Here, we create a function called "applyTrailingStop" that allows us to apply a trailing stop to all open BUY and SELL positions. The purpose of this trailing stop is to protect and lock in profits as the market moves in favor of our trades. We use the "CTrade" object to automatically modify the stop-loss levels for the trades. To ensure that the trailing stop does not activate too early, we include a condition that requires a minimum profit to be reached before the stop-loss begins to trail. This approach prevents premature stop-loss adjustments and ensures we secure a certain amount of profit before trailing.
We define four key parameters in this function. The "slPoints" parameter specifies the distance, in points, from the current market price to the new stop-loss level. The "trade_object" parameter refers to the "CTrade" object, which allows us to manage open positions, modify stop-loss, and adjust take-profit. The "magicNo" parameter serves as a unique identifier to filter trades. If "magicNo" is set to 0, we apply the trailing stop to all trades, regardless of their magic number. Lastly, the "minProfitPoints" parameter defines the minimum profit (in points) that must be achieved before the trailing stop activates. This ensures that we only adjust the stop-loss after the position is in sufficient profit.
Here, we start by calculating the trailing stop-loss prices for BUY and SELL trades. For BUY trades, we calculate the new stop-loss price by subtracting "slPoints" from the current BID price. For SELL trades, we calculate it by adding "slPoints" to the current ASK price. These stop-loss prices are normalized using _Digits to ensure accuracy based on the symbol's price precision. This normalization step ensures that the prices conform to the correct number of decimal places for the specific financial instrument.
Next, we loop through all open positions, starting from the last position and moving to the first. This reverse loop approach is essential because modifying positions during a forward loop can cause errors in the position indexing. For each position, we obtain its "ticket", which is the unique identifier for that position. If the ticket is valid, we use the PositionSelectByTicket function to select and access the position's details.
Once we have selected the position, we check if it matches the current symbol and if its magic number matches the given "magicNo". If "magicNo" is set to 0, we apply the trailing stop to all trades, regardless of their magic number. After identifying a matching position, we determine if it is a BUY or SELL trade.
If the position is a BUY trade, we calculate the minimum price that the market must reach before the stop-loss begins to trail. This value is derived by adding "minProfitPoints" to the position's opening price. We then check if the calculated trailing stop price is above both the position's opening price and the current stop-loss. If these conditions are met, we modify the position using "trade_object.PositionModify", updating the stop-loss price for the BUY trade.
If the position is a SELL trade, we follow a similar process. We calculate the minimum profit price by subtracting "minProfitPoints" from the position's opening price. We check if the calculated trailing stop price is below both the position's opening price and the current stop-loss. If these conditions are met, we modify the position using "trade_object.PositionModify", updating the stop-loss for the SELL trade.
Now armed with this function, we need logic to find the initial positions first, and to those functions, we can add the trailing stop logic. For this, we will need to define a boolean variable in the zone recovery class, but one important thing, make it accessible anywhere in the program by making it public.
public:
   bool isFirstPosition;
Here, we have a public variable called "isFirstPosition" inside the "ZoneRecovery" class. This variable is of boolean (bool) type, meaning it can only hold two possible values: true or false. The purpose of the function is to track whether the current trade is in the first position in the Zone Recovery process. When "isFirstPosition" is true, it indicates that no previous trades have been opened, and this is the initial position. This distinction is essential because the logic for handling the first trade will change since we want to apply trailing stop logic to it.
Since we declare "isFirstPosition" as public, it can be accessed and modified from outside the "ZoneRecovery" class. This makes it possible for other parts of the program to check if a position is the first in a series or update its status accordingly. Now, inside the function responsible for opening trades, we need to assign the boolean flags for whether it is a first position or not, once a position is opened.
if (trade.Buy(currentLotSize, symbol)) {
   lastOrderType = ORDER_TYPE_BUY;         //--- Mark the last trade as BUY.
   lastOrderPrice = SymbolInfoDouble(symbol, SYMBOL_BID); //--- Store the current BID price.
   CalculateZones();                       //--- Recalculate zones after placing the trade.
   Print(isRecovery ? "RECOVERY BUY order placed" : "INITIAL BUY order placed", " at ", lastOrderPrice, " with lot size ", currentLotSize);
   isFirstPosition = isRecovery ? false : true;
   isRecovery = true;                      //--- Set recovery state to true after the first trade.
   return true;
}
Here, we set the "isFirstPosition" variable to false if the position is registered as a recovery position, or to true if the "isRecovery" variable is false. Again, in the constructor and reset functions, we default the target variable to false. From that, we can go to the "OnTick" event handler and apply the trailing stop when we have an initial position.
if (zoneRecovery.isFirstPosition == true){ //--- Check if this is the first position in the Zone Recovery process
   applyTrailingStop(100, obj_Trade, 0, 100); //--- Apply a trailing stop with 100 points, passing the "obj_Trade" object, a magic number of 0, and a minimum profit of 100 points
}
Here, we check if the variable "zoneRecovery.isFirstPosition" is true, indicating this is the first position in the Zone Recovery process. If so, we call the "applyTrailingStop" function. The parameters passed are "100" points for the trailing stop distance, "obj_Trade" as the trade object, a magic number of "0" to identify the trade and a minimum profit of "100" points. This ensures that once the trade reaches a profit of 100 points, the trailing stop is applied to protect the gains by trailing the stop loss as the price moves in favor of the trade. However, when we close the trades by trailing stop, we still have remnants of the zone recovery logic since we don't reset them. This causes the system to open recovery trades even when we have no existing trades. Here is what we mean by that.
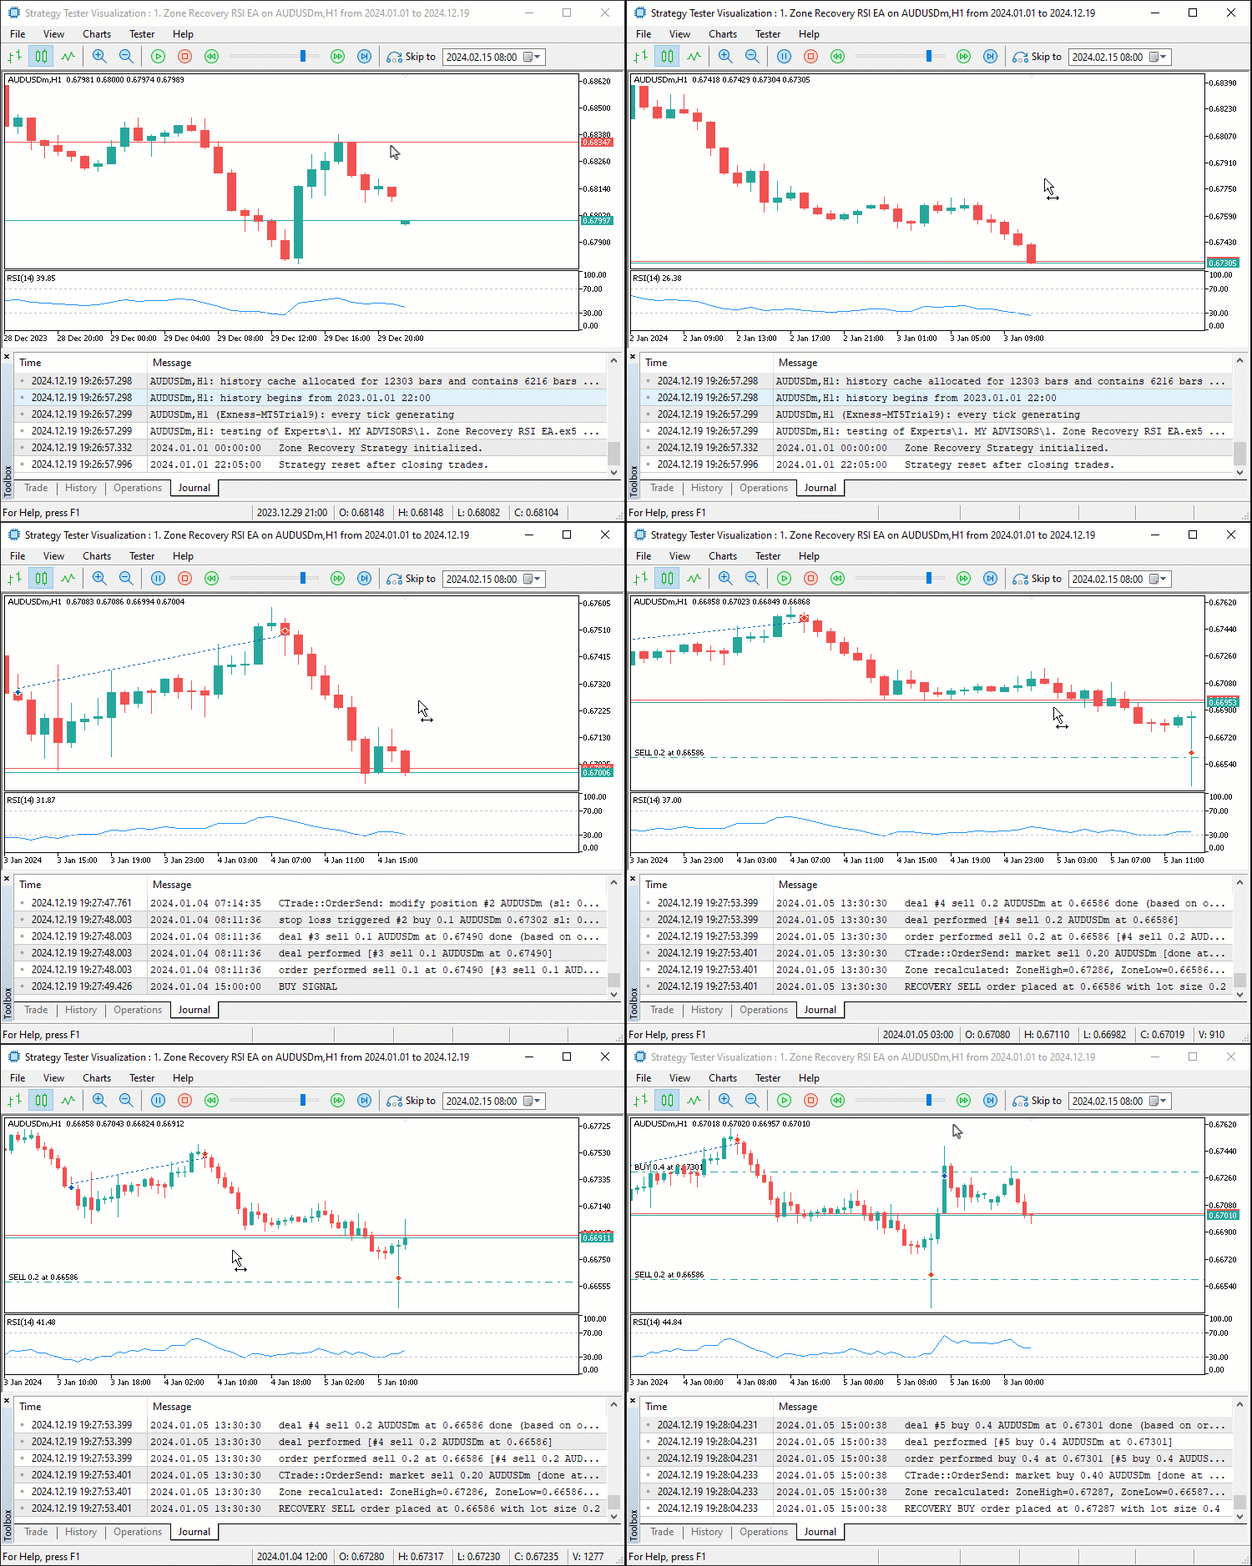
From the visualization, you can see that we have to reset the system once the initial position is trailed. Here is the logic we need to adopt for that.
if (zoneRecovery.isFirstPosition == true && PositionsTotal() == 0){ //--- Check if this is the first position and if there are no open positions
   zoneRecovery.Reset(); //--- Reset the Zone Recovery system, restoring initial settings and clearing previous trade data
}
Here, we check if the "isFirstPosition" variable is true and if there are no positions in existence. If both conditions are met, it means that we had an initial position, that closed whatever the reason was, and now that it is no longer in existence, we call the "zoneRecovery.Reset()" function. This resets the Zone Recovery system by restoring its initial settings and clearing any previous trade data, ensuring that the recovery process starts fresh. These modifications make the system perfect. Upon running the final tests, we have the following results.
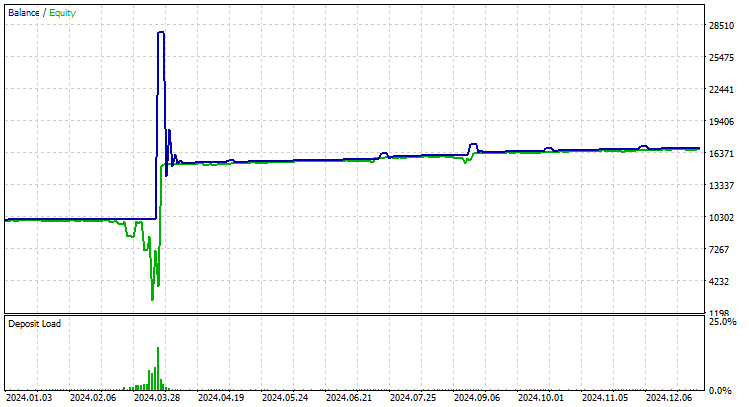
Strategy tester graph:
Strategy tester report:
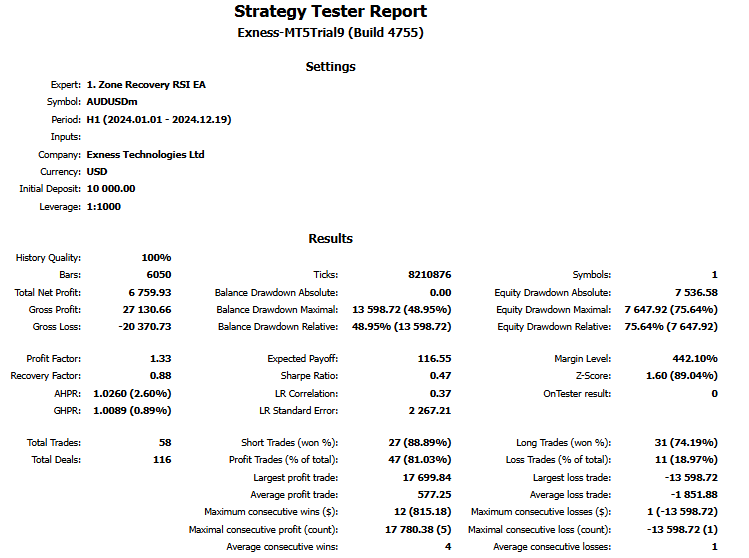
From the image, we can see that we reduced the number of recovery positions, which increases our hit rate significantly. This verifies that we achieved our objective of creating a zone recovery system with a dynamic trade management logic.
Conclusion
In conclusion, we have demonstrated how to build a MetaQuotes Language 5 (MQL5) Expert Advisor using the Zone Recovery strategy. By combining the Relative Strength Index (RSI) indicator with "Zone Recovery" logic, we created a system capable of detecting trade signals, managing recovery positions, and securing profits with trailing stops. Key elements included signal identification, automated trade execution, and dynamic position recovery.
Disclaimer: This article serves as an educational guide for developing MQL5 Programs. While the "Zone Recovery RSI" strategy offers a structured approach to trade management, market conditions remain unpredictable. Trading involves financial risk, and past performance does not guarantee future results. Proper testing and risk management are essential before live trading.
By mastering the concepts outlined in this guide, you can build more adaptive trading systems and explore new strategies for algorithmic trading. Happy coding and successful trading!
Warning: All rights to these materials are reserved by MetaQuotes Ltd. Copying or reprinting of these materials in whole or in part is prohibited.
This article was written by a user of the site and reflects their personal views. MetaQuotes Ltd is not responsible for the accuracy of the information presented, nor for any consequences resulting from the use of the solutions, strategies or recommendations described.
 Neural Networks Made Easy (Part 96): Multi-Scale Feature Extraction (MSFformer)
 Price Action Analysis Toolkit Development (Part 6): Mean Reversion Signal Reaper
 Econometric tools for forecasting volatility: GARCH model
 MQL5 Trading Toolkit (Part 5): Expanding the History Management EX5 Library with Position Functions
- Free trading apps
- Over 8,000 signals for copying
- Economic news for exploring financial markets
You agree to website policy and terms of use
i cant find tradq mq files where is it
That is perfectly explained even with image.
This EA actually based on Martingale, So it's difficult to control large loss,The author has any method to avoid large loss?
Well said. The strategy assumes that price will break out of the initially traded range in order to recover losses. As we know, at least regarding the forex market, price ranges more often than it trends. The method for mitigating catastrophic Martingale losses would be to add a volatility filter for initial trades.
Well said. The strategy assumes that price will break out of the initially traded range in order to recover losses. As we know, at least regarding the forex market, price ranges more often than it trends. The method for mitigating catastrophic Martingale losses would be to add a volatility filter for initial trades.
Sure.
Sure.
Here's Mladen Rakic's highly efficient MTF ATR code if you want to incorporate it into your code. I've used it elsewhere, and it's a gem.
Forum on trading, automated trading systems and testing trading strategies
most efficient way to call daily ATR from lower timeframes?
Mladen Rakic, 2017.12.25 21:12
Using handles to indicators like that tends to be clumsy (what if we decide to change the time frame or the period "on the fly" - new handle? ... yeeah ...)
More or less mt5 is making us code a bit more to get better results - ATR is a simple case (excluding the time frame and the period, it is not so much lines of code after all, and allows us flexibility that handle usage would not let us). I did not bother with the case explanation when there is less data available than the ATR desired period+1 rates available in the target time frame data - that is the case that built in ATR does not solve intuitively, and this simple code does that better (at least that is my opinion ...). Making this a function is no big deal either and will work better, faster, and in more flexible way than the built in ATR ...
I skim through code and wonder why not use the ask price to compute in the buy case? Is there any conflict if I change it ? Thx.