
利用 Python 和 MQL5 构建您的第一个玻璃盒模型
概述
玻璃盒算法是机器学习算法,其完全透明、且其内在可理解。它们打破了传统观念,即机器学习中的预测准确性和可解释性之间存在权衡,因为它们提供了无与伦比的准确性和透明度。这意味着与我们更熟悉的黑盒替代品相比,它们在迭代时更容易调试、维护和改进。黑盒模型都是机器学习模型,其内部工作原理复杂、且不易解释。这些模型可以表示高维和非线性关系,而我们人类却不容易理解这些关系。
根据经验,黑盒模型应仅在玻璃盒模型无法提供相同精度水平的情况下使用。在本文中,我们将构建一个玻璃盒模型,并理解使用它们的潜在益处。我们将探索使用玻璃盒模型控制 MetaTrader 5 终端的 2 种途径:
- 传统方式:这可能是最简单的方式。我们简单地利用 MetaTrader 5 中集成的 Python 库将玻璃盒模型连接至 MetaTrader 5 终端。从那里,我们将用 MetaQuotes 5 语言构建一个智能系统,来协助我们的玻璃盒模型,并最大限度地提高我们的效率。
- 当下方式:推荐该方法将机器学习模型集成到智能交易系统之中。我们将玻璃盒模型导出为开放神经网络交换格式,然后将模型作为资源直接加载到我们的智能系统当中,令我们能够利用 MetaTrader 5 中提供的所有实用功能,并引领玻璃盒模型的强大功能。

图例 1:使用人工智能模仿人脑
黑盒模型与玻璃盒模型
如前所述,大多数传统的机器学习模型都难以解释或解释。已知这类模型被统归为黑盒模型。黑盒模型包括所有含有复杂且不易解释的内部工作原理的模型。这给我们带来了一个主要问题,因为我们尝试改进模型的关键性能度量。另一方面,玻璃盒模型是一套机器学习模型,其内部工作原理透明且可理解,而其预测准确性也颇高且可靠。
微软研究所的研究人员、开发人员、和一群领域专家融汇,在撰写本文时正积极维护一个名为 Interpret ML 的 Python 包。-该软件包内含一整套黑盒解释器和玻璃盒模型。黑盒解释器是一组算法,试图深入洞察黑盒模型的内部工作原理。Interpret ML 中的大多数黑盒解释器算法都与模型无关,这意味着它们可以应用于任何黑盒模型。然而,这些黑盒解释器只能给出黑匣子模型的评估,我们将在本文的下一章节中探讨为什么这样会有问题。Interpret ML 还包括一套玻璃盒模型,这些模型以其前所未有的透明度,能与黑盒模型的预测精度相媲美。这对于任何使用机器学习的人来说都是完美的,无论是初学者亦或专家,模型可解释性的价值超越了专业领域和经验水平。
相关的其它信息:
1. 如果您有兴趣,可以阅读 Interpret ML 文档。
2. 此外,您还可以通读 Interpret ML 白皮书。
在本文中,我们将用 Interpret ML 以 python 构建一个玻璃盒模型。我们将看到我们的玻璃盒模型如何为我们提供关键的洞察力,从而指导我们的特征参照过程,并提高我们对模型内部工作原理的理解。
黑盒模型的挑战:分歧问题
我们可能想要停止使用黑盒模型的原因之一谓之“分歧问题”。简而言之,不同的解释技术会给出压根不同的模型解释,即使它们评估的是相同模型。解释技术试图深入洞悉黑盒模型的底层结构。有许多不同的思想流派包罗多种模型解释,而因为每种解释技术也许专注模型行为的不同方面,因此它们可以推测出有关黑盒模型底层的不同度量。分歧问题是一个开放的研究领域,需要识别警告,并主动缓解。
在本论文当中,我们将观察分歧问题的真实演示,以防读者未曾独立观察到这种现象。
相关的其它信息:
1. 如果您有兴趣学习更多有关分歧问题的信息,我建议您阅读这篇优秀的研究论文,作者是来自哈佛大学、麻省理工学院、德雷塞尔大学和卡内基梅隆大学的校友圈子。
事不宜迟,我们看看分歧问题的实际效果:
首先,我们导入 python 包来帮助我们执行分析。
#Import MetaTrader5 Python package
#pip install --upgrade MetaTrader5, if you don't have it installed
import MetaTrader5 as mt5

#Import datetime for selecting data
#Standard python package, no installation required
from datetime import datetime

#Plotting Data
#pip install --upgrade matplotlib, if you don't have it installed
import matplotlib.pyplot as plt

#Import pandas for handling data
#pip install --upgrade pandas, if you don't have it installed
import pandas as pd

#Import library for calculating technical indicators
#pip install --upgrade pandas-ta, if you don't have it installed
import pandas_ta as ta

#Scoring metric to assess model accuracy
#pip install --upgrade scikit-learn, if you don't have it installed
from sklearn.metrics import precision_score

#Import mutual information, a black-box explanation technique
from sklearn.feature_selection import mutual_info_classif

#Import permutation importance, another black-box explanation technique
from sklearn.inspection import permutation_importance

#Import our model
#pip install --upgrade xgboost, if you don't have it installed
from xgboost import XGBClassifier

#Plotting model importance
from xgboost import plot_importance
从那里,我们可以转到连接我们的 MetaTrader 5 终端,但在此之前我们必须指定我们的登录凭据。
#Enter your account number
login = 123456789

#Enter your password
password = '_enter_your_password_'

#Enter your Broker's server
server = 'Deriv-Demo'
现在我们可以初始化 MetaTrader 5 终端,并在同一步骤中登录我们的交易账户。
#We can initialize the MT5 terminal and login to our account in the same step
if mt5.initialize(login=login,password=password,server=server):
    print('Logged in successfully')
else:
    print('Failed To Log in')
登录成功。
我们现在可以完全访问 MetaTrader 5 终端,并请求图表数据、即刻报价数据、当前报价,以及更多。
#To view all available symbols from your broker
symbols = mt5.symbols_get()

for index,value in enumerate(symbols):
    print(value.name)
Volatility 10 Index
Volatility 25 Index
Volatility 50 Index
Volatility 75 Index
Volatility 100 Index
Volatility 10 (1s) Index
Boom 1000 Index
Boom 500 Index
Crash 1000 Index
Crash 500 Index
Step Index
...
一旦我们已辨别出要建模的品种,我们就可以请求该品种的图表数据,但首先我们需要指定打算提取的日期范围。
#We need to specify the dates we want to use in our dataset
date_from = datetime(2019,4,17)
date_to = datetime.now()
现在我们可以请求有关该品种的图表数据。
#Fetching historical data
data = pd.DataFrame(mt5.copy_rates_range('Boom 1000 Index',mt5.TIMEFRAME_D1,date_from,date_to))
我们为了绘图过程,需要格式化数据帧中的时间列。
#Let's convert the time from seconds to year-month-date
data['time'] = pd.to_datetime(data['time'],unit='s')

data
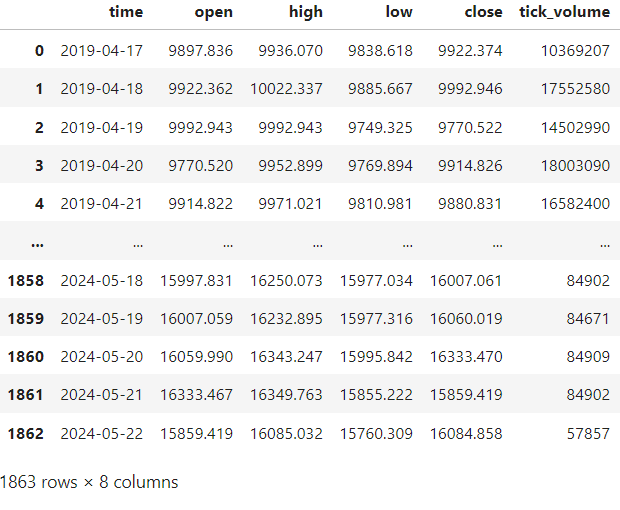
图例 2:我们的数据帧现在能以人类可读的格式显示时间。注意,“real_volume” 列以零值填充。
现在我们需要创建一个辅助函数来帮助我们向数据帧添加新功能、计算技术指标、以及清理数据帧。
#Let's create a function to preprocess our data
def preprocess(df):
    #All values of real_volume are 0 in this dataset, we can drop the column
    df.drop(columns={'real_volume'},inplace=True)
    #Calculating 14 period ATR
    df.ta.atr(length=14,append=True)
    #Calculating the growth in the value of the ATR, the second difference
    df['ATR Growth'] = df['ATRr_14'].diff().diff()
    #Calculating 14 period RSI
    df.ta.rsi(length=14,append=True)
    #Calculating the rolling standard deviation of the RSI
    df['RSI Stdv'] = df['RSI_14'].rolling(window=14).std()
    #Calculating the mid point of the high and low price
    df['mid_point'] = ( ( df['high'] + df['low'] ) / 2 )
    #We will keep track of the midpoint value of the previous day
    df['mid_point - 1'] = df['mid_point'].shift(1)
    #How far is our price from the midpoint?
    df['height'] = df['close'] - df['mid_point']
    #Drop any rows that have missing values
    df.dropna(axis=0,inplace=True)
我们针对数据帧调用预处理函数。
preprocess(data)

data
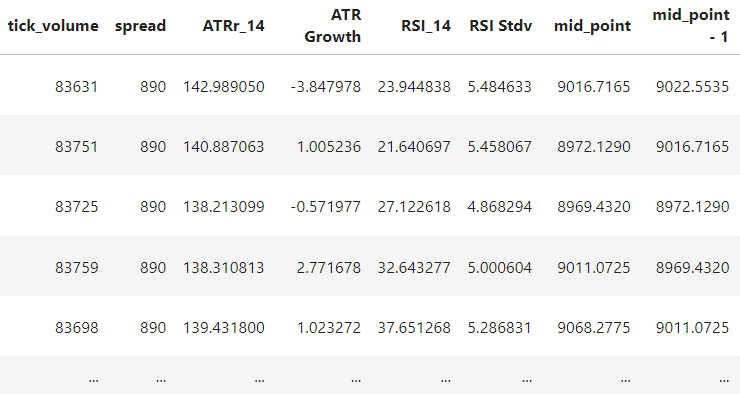
图例 3:我们的数据帧现在已预处理完毕。
我们的目标是下一个收盘价是否大于今天的收盘价。为此,我们将使用伪编码,如果明天的收盘价大于今天的收盘价,我们的目标将是 1。否则,我们的目标将是 0。
#We want to predict whether tomorrow's close will be greater than today's close
#We can encode a dummy variable for that:
#1 means tomorrow's close will be greater.
#0 means today's close will be greater than tomorrow's.

data['target'] = (data['close'].shift(-1) > data['close']).astype(int)

data

#The first date is 2019-05-14, and the first close price is 9029.486, the close on the next day 2019-05-15 was 8944.461
#So therefore, on the first day, 2019-05-14, the correct forecast is 0 because the close price fell the following day.
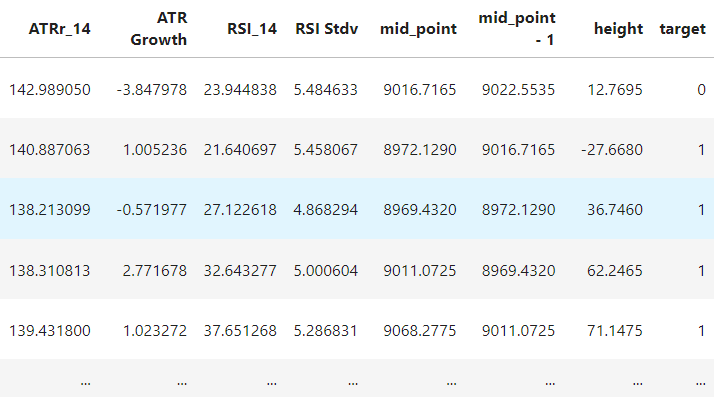
图例 4:创建目标
接下来,我们明确定义我们的目标和预测变量。然后,我们将数据拆分为训练集和测试集。注意,这是时间序列数据,因此我们不能随机切分成 2 组。
#Seperating predictors and target
predictors = ['open','high','low','close','tick_volume','spread','ATRr_14','ATR Growth','RSI_14','RSI Stdv','mid_point','mid_point - 1','height']
target     = ['target']

#The training and testing split definition
train_start = 27
train_end = 1000

test_start = 1001
现在我们创建训练和测试集。
#Train set
train_x = data.loc[train_start:train_end,predictors]
train_y = data.loc[train_start:train_end,target]

#Test set
test_x = data.loc[test_start:,predictors]
test_y = data.loc[test_start:,target]
现在我们可以拟合我们的黑盒模型了。
#Let us fit our model
black_box = XGBClassifier()
black_box.fit(train_x,train_y)
我们看看模型在测试集上的预测。
#Let's see our model predictions
black_box_predictions = pd.DataFrame(black_box.predict(test_x),index=test_x.index)
我们评估一下模型的准确度。
#Assesing model prediction accuracy
black_box_score = precision_score(test_y,black_box_predictions)

#Model precision score
black_box_score
0.4594594594594595
我们的模型准确率为 45%,但哪些特征有助于我们达成这一目标,哪些特征则不能?幸运的是,XGBoost 附带了一个内置函数来衡量特征重要性,令我们的生活更轻松。不过,这是 XGBoost 的特殊实现,并非所有黑盒都包含有用的函数,以这种方式轻松显示特征重要性。例如,神经网络和支持向量机就没有等效的函数,您必须自己冷静地分析、并仔细解释模型权重,才能更好地理解您的模型。XGBoost 中的 plot_importance 函数允许我们窥视模型内部。
plot_importance(black_box)
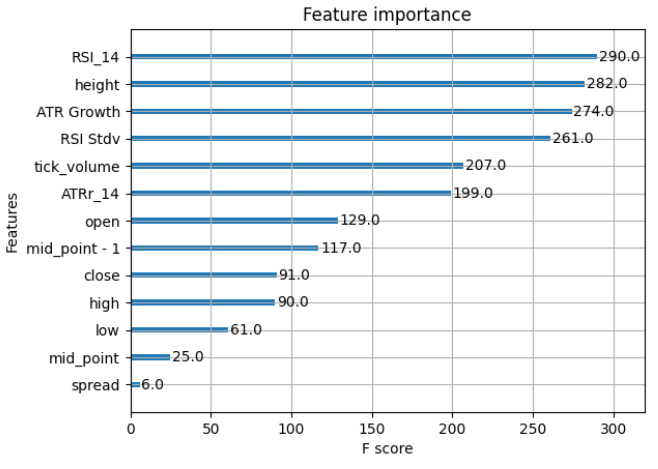
图例 5:XGBClassifier 的特征重要性。注意,该表格不包含任何交互项,这是否意味着不存?不一定!
现在我们已经奠定了基本事实,我们看看我们的第一个黑盒解释技术,谓之“排列重要性”。排列重要性试图通过随机洗牌每个特征中的值,然后衡量模型损失函数的变化,据此估每个特征的重要性。原因在于,如果我们随机洗牌这些值,您的模型越依赖该特征,其性能就越差。我们来讨论排列重要性的一些优点和缺点
优势
- 模型无关性:排列重要性可用于任何黑盒模型,而无需对模型或排列重要性函数进行任何预处理,这令它很容易集成到您现有的机器学习工作流程之中。
- 可解释性:排列重要性的结果易于解释,并且无论评估的基础模型如何,解释都是一致的。这令它成为一个简单易用的工具。
- 处理非线性:排列重要性是稳健的,且适用于捕获预测变量和响应之间的非线性关系。
- 处理异常值:排列重要性不依赖于预测变量的原始值;它看重的是特征对模型性能的影响。即使原始数据中可能存在异常值,这种方式令其仍然具有稳健性。
缺点
- 计算成本:对于含有许多特征的大型数据集,计算排列重要性在计算上可能很昂贵,因为我们必须遍历每个特征,对其进行排列、并评估模型,然后转到下一个特征,并重复该过程。
- 受到相关特征的挑战:在评估强相关特征时,排列重要性可能会给出有偏见的结果。
- 模型复杂度敏感:尽管排列重要性与模型无关,但过于复杂的模型在其特征排列时可能会表现出高方差,因此很难得到可靠的结论。
- 特征独立性:排列重要性假定数据集中的特征是独立的,并且可以随机排列,而不会产生任何后果。这令计算更容易,但在现实世界中,大多数特征都是相互依赖的,且含有不易被排列重要性所拾取的交互作用。
我们来计算黑盒分类器的排列重要性。
#Now let us observe the disagreement problem
black_box_pi = permutation_importance(black_box,train_x,train_y)

# Get feature importances and standard deviations
perm_importances = black_box_pi.importances_mean
perm_std = black_box_pi.importances_std

# Sort features based on importance
sorted_idx = perm_importances.argsort()
我们依据计算出的排列重要性值绘图。
#We're going to utilize a bar histogram
plt.barh(range(train_x.shape[1]), perm_importances[sorted_idx], xerr=perm_std[sorted_idx])
plt.yticks(range(train_x.shape[1]), train_x.columns[sorted_idx])
plt.xlabel('Permutation Importance')
plt.title('Permutation Importances')
plt.show() 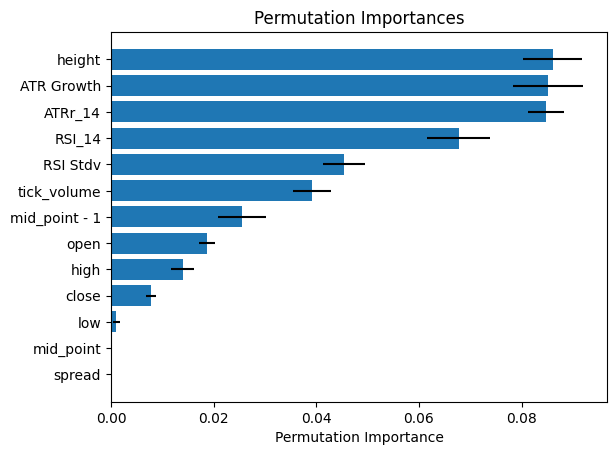
图例 6:黑盒的排列重要性
根据排列重要性算法执行的计算,ATR 读数是我们筛选的信息量丰富的特征。但我们从基本事实中得知,事实并非如此,ATR 只排名第六。ATR 增长是最重要的特征!第二个最重要的特征是高度,不过排列重要性经计算得出 ATR 增长更重要。第三个最重要的特征是 RSI 读数,但我们的排列重要性计算得出高度更重要。
这就是黑盒解释技术的问题,它们对于特征重要性的估算非常不错,然而它们很容易出错,因为它们充其量只是估算。不仅如此,在评估同一模型时,它们也可能彼此不同意。我们自己来看看。
我们将使用互通信息算法作为我们的第二种黑盒解释技术。互通信息衡量的是由于意识到特征的价值而带来的不确定性的减少。
#Let's see if our black-box explainers will disagree with each other by calculating mutual information
black_box_mi = mutual_info_classif(train_x,train_y)
black_box_mi = pd.Series(black_box_mi, name="MI Scores", index=train_x.columns)
black_box_mi = black_box_mi.sort_values(ascending=False)

black_box_mi
RSI_14: 0.014579
open: 0.010044
low: 0.005544
mid_point - 1: 0.005514
close: 0.002428
tick_volume : 0.001402
high: 0.000000
spread: 0.000000
ATRr_14: 0.000000
ATR Growth: 0.000000
RSI Stdv: 0.000000
mid_point: 0.000000
height: 0.000000
Name: MI Scores, dtype: float64
正如您所看到的,我们的重要性排名大不相同。与我们的基本事实和排列重要性计算相比,互通信息几乎以逆反的顺序对特征进行排序。如果您没有我们在这个例子中的基本事实,您会更多地依赖哪个解释器?甚至,如果您使用了 5 种不同的解释技巧,并且每种技巧都给了您不同的重要性排名,那又该如何呢?您是否选择与您对现实世界运作的信念相一致的排名,这恰好为另一个称为“确认偏见”的问题打开了大门。“确认偏见”是当您无视任何与您现有信念相矛盾的证据时,您会积极寻求验证您认为是真理的东西,即使它不是真的!
玻璃盒模型的优势
玻璃盒模型完美地取代了对黑盒解释技术的需求,因为它们是完全透明的,并且非常易于理解。它们有可能解决许多领域的分歧问题,包括我们的金融领域。如果这还不够,那么调试玻璃盒模型比调试具有相同灵活性的黑盒模型要容易得多。这节省了我们最重要的资源,时间!最好的部分是,它不会因为这是一个玻璃盒而影响模型的准确性,为我们提供了两全其美的效果。根据经验,黑盒只应在玻璃盒无法达到相同水平精度的情况下使用。
言归正传,现在我们把注意力转向构建我们的第一个玻璃盒模型,分析它的性能,并尝试提升它的准确性。从那里,我们将覆盖如何将我们的玻璃盒模型连接到我们的 MetaTrader 5 终端,并开始用玻璃盒模型进行交易。然后,我们将构建一个智能交易系统,从而协助我们使用 MetaQuotes 5 语言的玻璃盒模型。最后,我们将玻璃盒模型导出为开放神经网络交换格式,如此我们就可以释放 MetaTrader 5 和玻璃盒模型的全部潜力。
使用 Python 构建您的第一个玻璃盒模型相当容易
为了保持代码易于阅读,我们将从构建黑盒模型的 python 脚本里把构建玻璃盒挪到单独的 python 脚本中,但大多数事情将保持不变,例如登录、获取数据、和预处理数据。因此,我们不会再次讨论这些步骤,我们将只关注玻璃盒模型的独有步骤。
首先,我们首先需要安装 Interpret ML
#Installing Interpret ML
pip install --upgrade interpret
然后我们加载依赖项。在本文中,我们将专注于解释包中的 3 个模块。第一个是玻璃盒模型本身,第二个是一个实用模块,它允许我们查看模型内部,并在交互式 GUI 仪表板中呈现该信息,最后一个软件包允许我们在一个图表中将模型的性能可视化。其它软件包都已讨论过了。
#Import MetaTrader5 package
import MetaTrader5 as mt5

#Import datetime for selecting data
from datetime import datetime

#Import matplotlib for plotting
import matplotlib.pyplot as plt

#Intepret glass-box model for classification
from interpret.glassbox import ExplainableBoostingClassifier

#Intepret GUI dashboard utility
from interpret import show

#Visualising our model's performance in one graph
from interpret.perf import ROC

#Pandas for handling data
import pandas as pd

#Pandas-ta for calculating technical indicators
import pandas_ta as ta

#Scoring metric to assess model accuracy
from sklearn.metrics import precision_score
然后,我们创建登录凭据,并如前登录我们的 MT5 终端。该步骤省略。
从那里选择要建模的品种,就像我们之前所做的那样。该步骤省略。
然后,我们如前指定要建模的数据日期范围。该步骤省略。
然后,我们可以像以前一样获取历史数据。该步骤省略。
从那里,我们遵循与上述相同的预处理步骤。该步骤省略。
一旦数据经过预处理,我们就如前添加我们的目标。该步骤省略。
然后,我们如前执行训练测试拆分。该步骤省略。确保您的训练测试拆分不是随机的。保持自然的时间顺序,否则您的结果将受到影响,并对未来的表现涂抹过于乐观的画面。
现在我们拟合我们的玻璃盒模型。
#Let us fit our glass-box model
#Please note this step can take a while, depending on your computational resources
glass_box = ExplainableBoostingClassifier()
glass_box.fit(train_x,train_y)
现在,我们可以看看我们的玻璃盒模型
#The show function provides an interactive GUI dashboard for us to interface with out model
#The explain_global() function helps us find what our model found important and allows us to identify potential bias or unintended flaws
show(glass_box.explain_global())

图例 7:玻璃盒全局状态
解释汇总统计数据非常重要。但在我们去那里之前,我们先回顾一些重要的命名法。“全局项”或“全局状态”汇总了整个模型的状态。它为我们提供了模型发现了哪些特征的信息。这不应与“局部项”或“局部状态”相混淆。局部状态用于解释单次模型预测,以帮助我们了解模型做出预测的原因,以及哪些特征影响了单次预测。
回到我们的玻璃盒模型的全局状态。正如我们所看到的,模型发现滞后中点值非常有用,这是我们所期望的。不仅如此,它还发现 ATR 增长和滞后中点值之间可能的交汇项。高度是第三个最重要的特征,其次是收盘价和高度之间的交汇项。注意,我们不需要任何额外的工具来理解我们的玻璃盒模型,这样就完全封闭了分歧问题和确认偏见的大门。全局状态信息在特征参照方面非常宝贵,因为它向我们展示了何处是未来努力的方向,以便参照更好的特征。转进,我们看看我们的玻璃盒的性能如何。
获取玻璃盒预测
#Obtaining glass-box predictions
glass_box_predictions = pd.DataFrame(glass_box.predict(test_x))
现在我们衡量玻璃盒的精度。
glass_box_score = precision_score(test_y,glass_box_predictions)

glass_box_score
0.49095022624434387
我们的玻璃盒的准确率为 49%。显然,与我们的 XGBClassifier 相比,我们的可解释助推分类器可以发挥自己的权重。这恰恰证明了玻璃盒模型的强大能力,在不影响可理解性的情况下为我们提供高精度。
我们还可以从我们的玻璃盒模型中获得每个预测的单独解释,从而了解哪些特征在粒度级别上影响了其预测,这些被称为局部解释,能从我们的可解释助推分类器中直接获取它们
#We can also obtain individual explanations for each prediction
show(glass_box.explain_local(test_x,test_y))
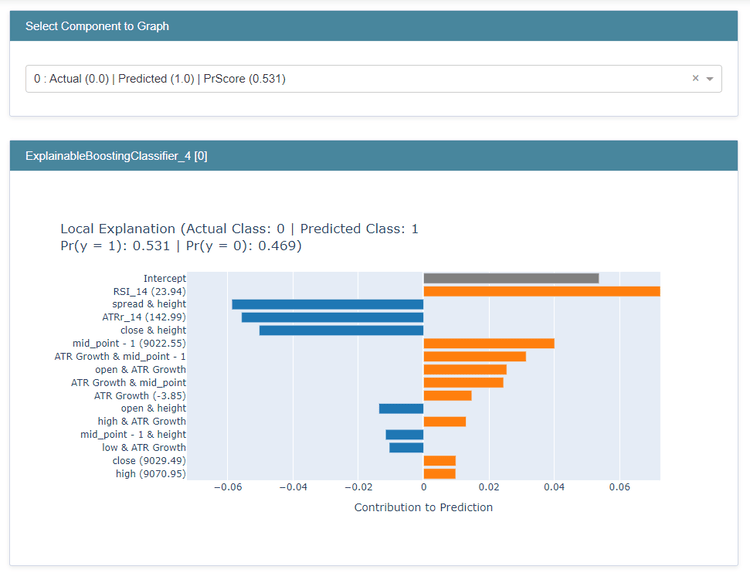
图例 8:来自可解释助推分类器的局部解释
第一个下拉菜单允许我们滚动遍历所做的每次预测,并选择我们想要更好理解的预测。
从那里我们可以看到实际类与预测类。在本例中,实际类别为 0,这意味着收盘价下跌,但我们将其归类为 1。我们还分别看到了每个类别的估算概率,因为我们可以看到我们的模型错误地估算下一根蜡烛收盘价会走高的概率为 53%。我们还细分了每个特征对估算概率的贡献。蓝色特征为模型预测提供了反作用,橙色特征则负责模型做出预测。因此,这意味着 RSI 的贡献更多是错误分类,但价差和高度之间的交汇项为我们指明了正确的方向,这些特征可能值得进一步参照,但在我们得出任何结论之前,需要对局部解释进行更严格的检查。
现在,我们将使用称为“接收器操作特征(ROC)”的单个图形来检验模型的性能。ROC 图形允许我们以简单的方式评估分类器的性能。我们关注的是曲线下面积或 AUC。理论上,一个完美的分类器在曲线下的总面积为 1。这令仅用一个图形即可轻松评估我们的分类器。
glass_box_performance = ROC(glass_box.predict_proba).explain_perf(test_x,test_y, name='Glass Box')
show(glass_box_performance)
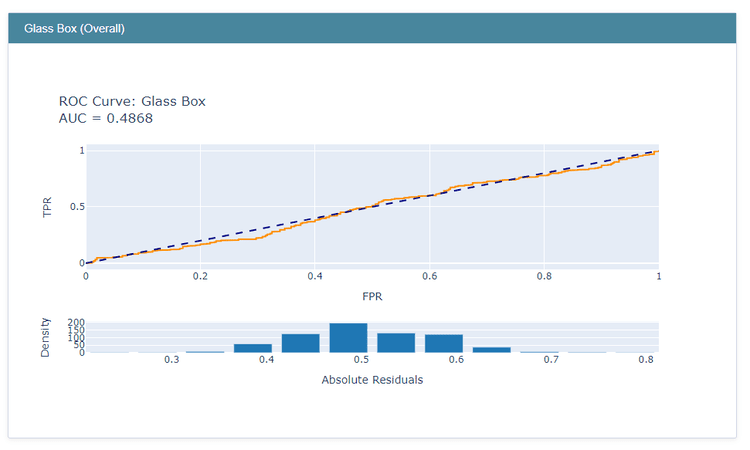
图例 9:玻璃盒模型的 ROC 图表
我们的玻璃盒模型的 AUC 为 0.49。这个简单的度量值令我们能够按人类可解释的单位来评估模型的性能,此外,该曲线与模型无关,可用于比较不同的分类器,无关底层分类技术。
将您的玻璃盒模型连接到您的 MT5 终端
这是橡胶与道路接触的地方,我们现在将首先使用更简单的方法将我们的玻璃盒模型连接到我们的 MT5 终端。
首先,我们跟踪我们的经常账户状况。
#Fetching account Info
account_info = mt5.account_info()

# getting specific account data
initial_balance = account_info.balance
initial_equity = account_info.equity

print('balance: ', initial_balance)
print('equity: ', initial_equity)
balance: 912.11 equity: 912.11
获取所有符品种。
symbols = mt5.symbols_get()
我们设置一些全局变量。
#Trading global variables
#The symbol we want to trade
MARKET_SYMBOL = 'Boom 1000 Index'

#This data frame will store the most recent price update
last_close = pd.DataFrame()

#We may not always enter at the price we want, how much deviation can we tolerate?
DEVIATION = 100

#For demonstrational purposes we will always enter at the minimum volume
#However,we will not hardcode the minimum volume, we will fetch it dynamically
VOLUME = 0
#How many times the minimum volume should our positions be
LOT_MUTLIPLE = 1

#What timeframe are we working on?
TIMEFRAME = mt5.TIMEFRAME_D1
我们不打算对交易量进行硬编码;我们宁愿从经纪商那里动态获取允许的最小交易量,然后将其乘以某个因子,从而确保我们不会发送无效订单。故此,在本论文中,我们将考虑相对于最小交易量的订单规模。
在我们的例子中,我们将以最小交易量、或以 1 倍为因子开立每笔交易。
for index,symbol in enumerate(symbols):
    if symbol.name == MARKET_SYMBOL:
        print(f"{symbol.name} has minimum volume: {symbol.volume_min}")
        VOLUME = symbol.volume_min * LOT_MULTIPLE
Boom 1000 Index has minimum volume: 0.2
现在我们将定义一个辅助函数来开立交易。
# function to send a market order
def market_order(symbol, volume, order_type, **kwargs):
    #Fetching the current bid and ask prices
    tick = mt5.symbol_info_tick(symbol)

    #Creating a dictionary to keep track of order direction
    order_dict = {'buy': 0, 'sell': 1}
    price_dict = {'buy': tick.ask, 'sell': tick.bid}

    request = {
        "action": mt5.TRADE_ACTION_DEAL,
        "symbol": symbol,
        "volume": volume,
        "type": order_dict[order_type],
        "price": price_dict[order_type],
        "deviation": DEVIATION,
        "magic": 100,
        "comment": "Glass Box Market Order",
        "type_time": mt5.ORDER_TIME_GTC,
        "type_filling": mt5.ORDER_FILLING_FOK,
    }

    order_result = mt5.order_send(request)
    print(order_result)
    return order_result
接下来,我们将定义一个辅助函数来根据单号平仓。
# Closing our order based on ticket id
def close_order(ticket):
    positions = mt5.positions_get()

    for pos in positions:
        tick = mt5.symbol_info_tick(pos.symbol) #validating that the order is for this symbol
        type_dict = {0: 1, 1: 0}  # 0 represents buy, 1 represents sell - inverting order_type to close the position
        price_dict = {0: tick.ask, 1: tick.bid} #bid ask prices

        if pos.ticket == ticket:
            request = {
                "action": mt5.TRADE_ACTION_DEAL,
                "position": pos.ticket,
                "symbol": pos.symbol,
                "volume": pos.volume,
                "type": type_dict[pos.type],
                "price": price_dict[pos.type],
                "deviation": DEVIATION,
                "magic": 100,
                "comment": "Glass Box Close Order",
                "type_time": mt5.ORDER_TIME_GTC,
                "type_filling": mt5.ORDER_FILLING_FOK,
            }

            order_result = mt5.order_send(request)
            print(order_result)
            return order_result

    return 'Ticket does not exist'
我们不需要持续从服务器请求大量数据,故此我们还将更新日期范围。
#Update our date from and date to
date_from = datetime(2023,11,1)
date_to = datetime.now()
我们还需要一个函数来从我们的玻璃盒模型中获取预测,并将预测当作交易信号。
#Get signals from our glass-box model
def ai_signal():
    #Fetch OHLC data
    df = pd.DataFrame(mt5.copy_rates_range(market_symbol,TIMEFRAME,date_from,date_to))
    #Process the data
    df['time'] = pd.to_datetime(df['time'],unit='s')
    df['target'] = (df['close'].shift(-1) > df['close']).astype(int)
    preprocess(df)
    #Select the last row
    last_close = df.iloc[-1:,1:]
    #Remove the target column
    last_close.pop('target')
    #Use the last row to generate a forecast from our glass-box model
    #Remember 1 means buy and 0 means sell
    forecast = glass_box.predict(last_close)
    return forecast[0]
现在我们定义玻璃盒交易机器人的 Python 主体
#Now we define the main body of our Python Glass-box Trading Bot
if __name__ == '__main__':
    #We'll use an infinite loop to keep the program running
    while True:
        #Fetching model prediction
        signal = ai_signal()

        #Decoding model prediction into an action
        if signal == 1:
            direction = 'buy'
        elif signal == 0:
            direction = 'sell'

        print(f'AI Forecast: {direction}')

        #Opening A Buy Trade
        #But first we need to ensure there are no opposite trades open on the same symbol
        if direction == 'buy':
            #Close any sell positions
            for pos in mt5.positions_get():
                if pos.type == 1:
                    #This is an open sell order, and we need to close it
                    close_order(pos.ticket)

            if not mt5.positions_totoal():
                #We have no open positions
                market_order(MARKET_SYMBOL,VOLUME,direction)

        #Opening A Sell Trade
        elif direction == 'sell':
            #Close any buy positions
            for pos in mt5.positions_get():
                if pos.type == 0:
                    #This is an open buy order, and we need to close it
                    close_order(pos.ticket)

            if not mt5.positions_get():
                #We have no open positions
                market_order(MARKET_SYMBOL,VOLUME,direction)

        print('time: ', datetime.now())
        print('-------\n')
        time.sleep(60)
AI Forecast: sell
OrderSendResult(retcode=10009, deal=3830247156, order=3917630794, volume=0.2, price=16042.867, bid=16042.867, ask=16044.37, comment='Request executed', request_id=4013241765, retcode_external=0, request=TradeRequest(action=1, magic=100, order=0, symbol='Boom 1000 Index', volume=0.2, price=16042.883, stoplimit=0.0, sl=0.0, tp=0.0, deviation=100, type=1, type_filling=0, type_time=0, expiration=0, comment='Glass Box Market Order', position=0, position_by=0))
time: 2024-05-22 19:04:17.842750
-------
AI Forecast: sell
time: 2024-05-22 19:05:17.904601
-------
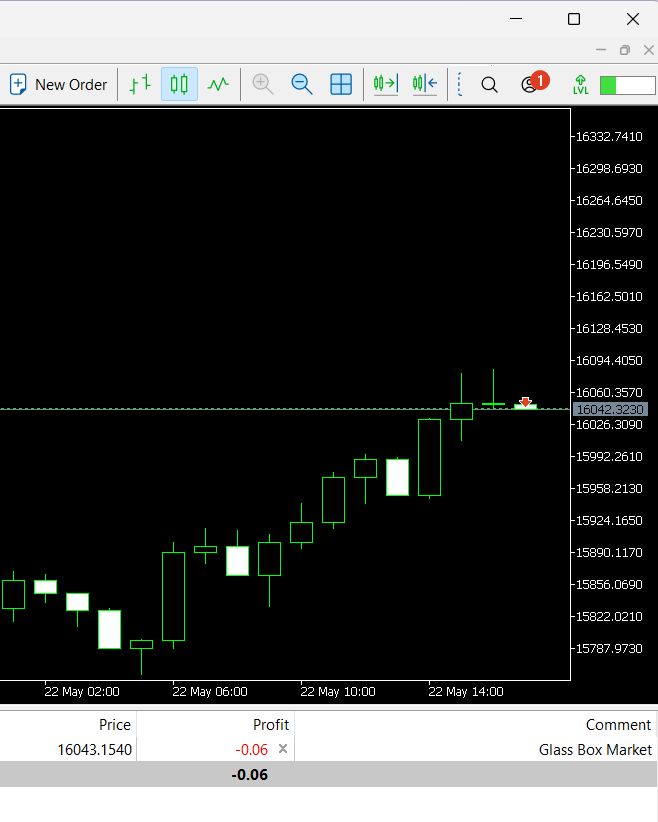
图例 10:我们用内置 Python 开发的玻璃盒交易机器人正在获利
构建智能交易系统来协助您的玻璃盒模型
现在,我们转到用 MQL5 为我们的玻璃盒模型构建一个助手。我们想构建一个 EA,基于 ATR 读数移动我们的止损(SL)和止盈(TP)。下面的代码将在每次即刻报价更新我们的 TP 和 SL 值,除非您以较低的频率(例如每分钟或每小时)更新,否则使用 Python 集成模块执行该任务将是一场噩梦。我们想运行一艘紧凑的船只,并在每次即刻报价时更新我们的止损和止盈,其它任何事情都不能满足我们的严格要求。我们需要用户提供两个输入,指定入场价与 SL/TP 的间距应该有多大。我们将 ATR 读数乘以用户输入,来判定计算从 SL 或 TP 到入场点的高度。第二个输入就是 ATR 的周期。
//Meta Properties
#property copyright "Gamuchirai Ndawana"
#property link "https://twitter.com/Westwood267"

//Classes for managing Trades And Orders
#include  <Trade\Trade.mqh>
#include <Trade\OrderInfo.mqh>

//Instatiating the trade class and order manager
CTrade trade;
class COrderInfo;

//Input variables
input double atr_multiple =0.025;  //How many times the ATR should the SL & TP be?
input int atr_period = 200;      //ATR Period

//Global variables
double ask, bid,atr_stop; //We will use these variables to determine where we should place our ATR
double atr_reading[];     //We will store our ATR readings in this arrays
int    atr;               //This will be our indicator handle for our ATR indicator
int min_volume;

int OnInit(){
                  //Check if we are authorized to use an EA on the terminal
                  if(!TerminalInfoInteger(TERMINAL_TRADE_ALLOWED)){
                           Comment("Press Ctrl + E To Give The Robot Permission To Trade And Reload The Program");
                           //Remove the EA from the terminal
                           ExpertRemove();
                           return(INIT_FAILED);
                  }

                  //Check if we are authorized to use an EA on the terminal
                  else if(!MQLInfoInteger(MQL_TRADE_ALLOWED)){
                            Comment("Reload The Program And Make Sure You Clicked Allow Algo Trading");
                            //Remove the EA from the terminal
                            ExpertRemove();
                            return(INIT_FAILED);
                  }

                  //If we arrive here then we are allowed to trade using an EA on the Terminal
                  else{
                        //Symbol information
                        //The smallest distance between our point of entry and the stop loss
                        min_volume = SymbolInfoInteger(_Symbol,SYMBOL_TRADE_STOPS_LEVEL);//SymbolInfoDouble(_Symbol,SYMBOL_VOLUME_MIN)
                        //Setting up our ATR indicator
                        atr = iATR(_Symbol,PERIOD_CURRENT,atr_period);
                        return(INIT_SUCCEEDED);
                  }
}

void OnDeinit(const int reason){

}

void OnTick(){
               //Get the current ask
               ask = SymbolInfoDouble(_Symbol,SYMBOL_ASK);
               //Get the current bid
               bid = SymbolInfoDouble(_Symbol,SYMBOL_BID);
               //Copy the ATR reading our array for storing the ATR value
               CopyBuffer(atr,0,0,1,atr_reading);
               //Set the array as series so the natural time ordering is preserved
               ArraySetAsSeries(atr_reading,true);

               //Calculating where to position our stop loss
               //For now we'll keep it simple, we'll add the minimum volume and the current ATR reading and multiply it by the ATR multiple
               atr_stop = ((min_volume + atr_reading[0]) * atr_multiple);

               //If we have open positions we should adjust the stop loss and take profit
               if(PositionsTotal() > 0){
                        check_atr_stop();
               }
}

//--- Functions
//This funciton will update our S/L & T/P based on our ATR reading
void check_atr_stop(){

      //First we iterate over the total number of open positions
      for(int i = PositionsTotal() -1; i >= 0; i--){

            //Then we fetch the name of the symbol of the open position
            string symbol = PositionGetSymbol(i);

            //Before going any furhter we need to ensure that the symbol of the position matches the symbol we're trading
                  if(_Symbol == symbol){
                           //Now we get information about the position
                           ulong ticket = PositionGetInteger(POSITION_TICKET); //Position Ticket
                           double position_price = PositionGetDouble(POSITION_PRICE_OPEN); //Position Open Price
                           double type = PositionGetInteger(POSITION_TYPE); //Position Type
                           double current_stop_loss = PositionGetDouble(POSITION_SL); //Current Stop loss value

                           //If the position is a buy
                           if(type == POSITION_TYPE_BUY){
                                  //The new stop loss value is just the ask price minus the ATR stop we calculated above
                                  double atr_stop_loss = (ask - (atr_stop));
                                  //The new take profit is just the ask price plus the ATR stop we calculated above
                                  double atr_take_profit = (ask + (atr_stop));

                                  //If our current stop loss is less than our calculated ATR stop loss
                                  //Or if our current stop loss is 0 then we will modify the stop loss and take profit
                                 if((current_stop_loss < atr_stop_loss) || (current_stop_loss == 0)){
                                       trade.PositionModify(ticket,atr_stop_loss,atr_take_profit);
                                 }
                           }

                            //If the position is a sell
                           else if(type == POSITION_TYPE_SELL){
                                     //The new stop loss value is just the bid price plus the ATR stop we calculated above
                                     double atr_stop_loss = (bid + (atr_stop));
                                     //The new take profit is just the bid price minus the ATR stop we calculated above
                                     double atr_take_profit = (bid - (atr_stop));

                                 //If our current stop loss is greater than our calculated ATR stop loss
                                 //Or if our current stop loss is 0 then we will modify the stop loss and take profit
                                 if((current_stop_loss > atr_stop_loss) || (current_stop_loss == 0)){
                                       trade.PositionModify(ticket,atr_stop_loss,atr_take_profit);
                                 }
                           }
                  }
            }
}
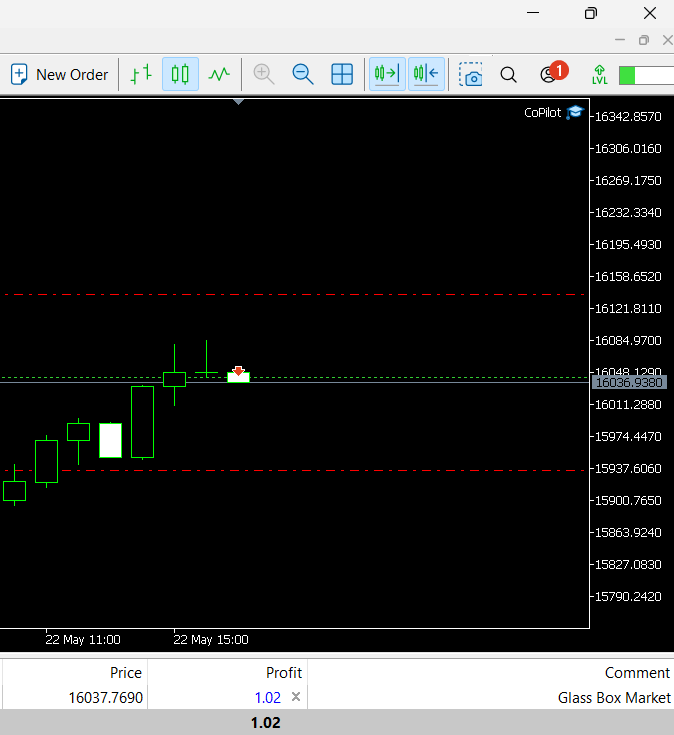
图例 11:我们的 EA 与我们的玻璃盒模型携手合作
将玻璃盒模型导出为开放神经网络交换(ONNX)格式

图例 12:开放神经网络交换徽标
开放神经网络交换(ONNX)是一种开源协议,用于表述任何机器学习模型。它得到了来自世界各地和不同行业公司的大规模集体努力,故获得了广泛支持和维护。仅举几个公司名称:微软,脸书,MATLAB,IBM,高通,华为,英特尔,AMD,等。在撰写本文时,ONNX 是表示任何机器学习模型的通用标准形式,无论它是按哪个框架开发的,此外,它还允许在不同的编程语言和环境中开发和部署机器学习模型。如果您好奇这是如何实现的,其核心思路是任何机器学习模型都可以表示为节点和边的图形。每个节点代表一个数学运算,每条边代表数据流。使用这种简单的表述,我们可以呈现任何机器学习模型,无关其制作框架。
一旦您有了 ONNX 模型,您还需要运行 ONNX 模型的引擎,其负责 ONNX 运行时。ONNX 运行时负责在各种设备上高效运行和部署 ONNX 模型,从数据中心的超级计算机、到口袋中的移动电话、以及介于两者之间的所有设备。
在我们的案例中,ONNX 允许我们将机器学习模型集成到我们的智能交易系统当中,实质上是构建了一个拥有自己大脑的智能系统。MetaTrader 5 终端为我们提供了一套工具,可以安全可靠地测试我们的交易系统,甚至能更好地执行前瞻测试,这是测试任何智能交易系统的推荐方法。前瞻测试简单说是实时运行智能交易系统,或者覆盖了模型最后一个训练日期所见往前的任何时间区间。这是模型处理数据稳健性的最佳测试,它处理的数据在之前训练中从未见过,此外,它还可以防止我们通过对训练数据进行回溯测试来欺骗自己。
如前所做,我们将导出 ONNX 模型的代码与本文目前用到的其余代码分开,从而保持代码易于阅读。进而,我们将减少模型所需的输入参数数量,从而简化其实际实现。我们仅选择了以下特征作为 ONNX 模型的输入:
1. 滞后高度:记住,我们例子中的高度定义为: (((最高价 + 最低价) / 2) – 收盘价),因此滞后高度是之前的高度读数。
2. 高度增长:高度增长高度读数二阶导数的估值。这是通过取连续两次历史高度值之间的差值来实现的。结果值提供了对高度变化速率的洞察。简单来说,它帮助我们了解高度随着时间的推移是加速增长还是减速增长。
3. 中点:记住,我们例子中的中点定义为:((最高价 + 最低价) / 2)
4. 中点增长:中点增长是表示中点读数的二阶导数的派生特征。这是通过取连续两次历史中点值之间的差值来实现的。结果值提供了对中点变化速率的洞察。具体来说,它表明中点是经历加速增长还是减速增长。用更简单、更少技术性的术语来说,它帮助我们了解中点是以越来越快的速度远离零点,亦或是以越来越快的速度接近零点。
进而,读者应该知道我们已经修改品种,在文章的前半部分,我们模拟了 “Boom 1000 Index” 品种,现在我们将针对 “Volatility 75 Index” 品种进行建模。
正如我们之前所看到的,我们的智能系统还将自动取 ATR 读数动态设置持仓止损/止盈,此外,一旦我们的利润超过某个阈值,我们将赋予它自动加仓的能力。
除了 2 个新导入的 ONNX 和 ebm2onnx 以外,大多数导入软件包保持不变。这 2 个软件包允许我们将可解释助推机器转换为 ONNX 格式。
#Import MetaTrader5 package
import MetaTrader5 as mt5

#Import datetime for selecting data
from datetime import datetime

#Keeping track of time
import time

#Import matplotlib
import matplotlib.pyplot as plt

#Intepret glass-box model
from interpret.glassbox import ExplainableBoostingClassifier

#Intepret GUI dashboard utility
from interpret import show

#Pandas for handling data
import pandas as pd

#Pandas-ta for calculating technical indicators
import pandas_ta as ta

#Scoring metric to assess model accuracy
from sklearn.metrics import precision_score

#ONNX
import onnx

#Import ebm2onnx
import ebm2onnx

#Path handling
from sys import argv
从那里,我们重复上述相同的步骤来登录、并获取数据,唯一的区别是我们准备自定义特征的步骤。
#Let's create a function to preprocess our data
def preprocess(data):
    data['mid_point'] = ((data['high'] + data['low']) / 2)

    data['mid_point_growth'] = data['mid_point'].diff().diff()

    data['mid_point_growth_lag'] = data['mid_point_growth'].shift(1)

    data['height'] = (data['mid_point'] - data['close'])

    data['height - 1'] = data['height'].shift(1)

    data['height_growth'] = data['height'].diff().diff()

    data['height_growth_lag'] = data['height_growth'].shift(1)

    data['time'] = pd.to_datetime(data['time'],unit='s')

    data.dropna(axis=0,inplace=True)

    data['target'] = (data['close'].shift(-1) > data['close']).astype(int)
收集数据后,将数据拆分为训练集和测试集所需的步骤,以及拟合玻璃盒模型所需的步骤保持不变。
假设您已经拟合您的玻璃盒模型,我们现在可以转到导出为 ONNX 格式。
首先,我们需要指定要保存模型的路径。每次安装 MetaTrader 5 都会在终端中创建一个专用文件夹,我们可以使用 Python 库非常简单地获取绝对路径。
terminal_info=mt5.terminal_info()
print(terminal_info)
我们正查找的路径将保存为我们上面创建的 terminal_info 对象中的“数据路径”。
file_path=terminal_info.data_path+"\\MQL5\\Files\\"
print(file_path)
C:\Users\Westwood\AppData\Roaming\MetaQuotes\Terminal\D0E8209F77C8CF37AD8BF550E51FF075\MQL5\Files\
从那里我们需要准备我们将要使用的路径,代码采用我们从终端获取的文件路径,并通过排除任何文件名来隔离路径的目录。
data_path=argv[0]
last_index=data_path.rfind("\\")+1
data_path=data_path[0:last_index]
print("data path to save onnx model",data_path)
保存 onnx 模型的数据路径 C:\Users\Westwood\AppData\Local\Programs\Python\Python311\Lib\site-packages\
从那里,我们使用 ebm2onnx 软件包来准备要转换为 ONNX 格式的玻璃盒模型。注意,我们需要为每个输入显式指定数据类型,我们更愿意使用 ebm2onnx.get_dtype_from_pandas 函数动态地执行该操作,并将我们之前使用的训练数据帧传递给它。
onnx_model = ebm2onnx.to_onnx(glass_box,ebm2onnx.get_dtype_from_pandas(train_x))
#Save the ONNX model in python
output_path = data_path+"Volatility_75_EBM.onnx"
onnx.save_model(onnx_model,output_path)
#Save the ONNX model as a file to be imported in our MetaEditor
output_path = file_path+"Volatility_75_EBM.onnx"
onnx.save_model(onnx_model,output_path)
我们现在已准备好在 MetaEditor 5 中使用 ONNX 文件。MetaEditor 是一个集成开发环境,用于以 MetaQuotes 语言编写代码。
当我们第一次打开 MetaEditor 5 集成开发环境并双击 “Volatility Doctor 75 EBM” 时,我们看到的是这样的
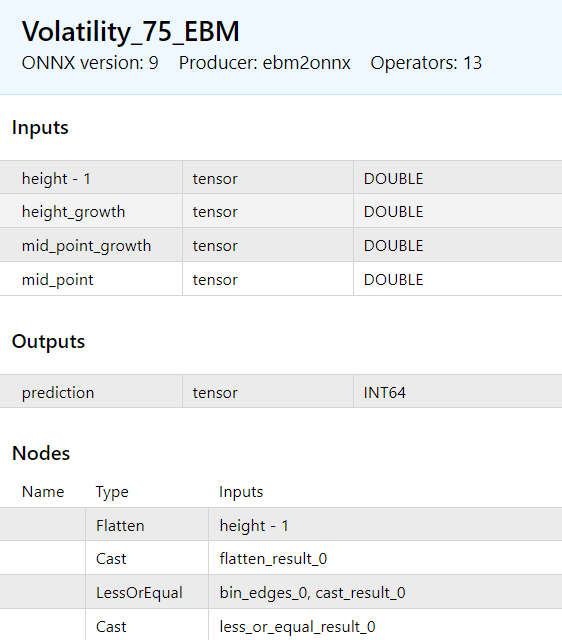
图例 13:ONNX 模型的输入和输出。
现在,我们将创建一个智能系统,并导入我们的 ONNX 模型。
我们从指定常规文件信息开始。
//+------------------------------------------------------------------+
//|                                                         ONNX.mq5 |
//|                                  Copyright 2023, MetaQuotes Ltd. |
//|                                             https://www.mql5.com |
//+------------------------------------------------------------------+
//Meta properties
#property copyright "Gamuchirai Zororo Ndawana"
#property link      "https://www.mql5.com/en/users/gamuchiraindawa"
#property version   "1.00"
从那里我们需要指定一些全局变量。
//Trade Library
#include <Trade\Trade.mqh>           //We will use this library to modify our positions

//Global variables
//Input variables
input double atr_multiple =0.025;    //How many times the ATR should the SL & TP be?
int input lot_mutliple = 1;          //How many time greater than minimum lot should we enter?
const int atr_period = 200;          //ATR Period

//Trading variables
double ask, bid,atr_stop;            //We will use these variables to determine where we should place our ATR
double atr_reading[];                //We will store our ATR readings in this arrays
int    atr;                          //This will be our indicator handle for our ATR indicator
long min_distance;                   //The smallest distance allowed between our entry position and the stop loss
double min_volume;                   //The smallest contract size allowed by the broker
static double initial_balance;       //Our initial trading balance at the beginning of the trading session
double current_balance;              //Our trading balance at every instance of trading
long     ExtHandle = INVALID_HANDLE; //This will be our model's handler
int      ExtPredictedClass = -1;     //This is where we will store our model's forecast
CTrade   ExtTrade;                   //This is the object we will call to open and modify our positions

//Reading our ONNX model and storing it into a data array
#resource "\\Files\\Volatility_75_EBM.onnx" as uchar ExtModel[] //This is our ONNX file being read into our expert advisor

//Custom keyword definitions
#define  PRICE_UP 1
#define  PRICE_DOWN 0
从那里我们指定 OnInit() 函数。我们调用 OnInit 函数来设置我们的 ONNX 模型。为了设置 ONNX 模型,我们只需要完成 3 个简单的步骤。当我们需要 ONNX 模型作为资源时,我们首先依据上述全局变量中指定的缓冲区创建 ONNX 模型。读取完毕后,我们需要指定每个单独输入的形状,然后我们指定每个单独输出的形状。这样做之后,我们检查在尝试设置输入和输出形状时是否抛出任何错误。如果一切顺利,我们还会继续取得经纪商允许的最小合约交易量、止损和入场价之间的最小距离,我们还要设置 ATR 指标。
int OnInit()
  {
   //Check if the symbol and time frame conform to training conditions
   if(_Symbol != "Volatility 75 Index" || _Period != PERIOD_M1)
       {
            Comment("Model must be used with the Volatility 75 Index on the 1 Minute Chart");
            return(INIT_FAILED);
       }

    //Create an ONNX model from our data array
    ExtHandle = OnnxCreateFromBuffer(ExtModel,ONNX_DEFAULT);
    Print("ONNX Create from buffer status ",ExtHandle);

    //Checking if the handle is valid
    if(ExtHandle == INVALID_HANDLE)
      {
            Comment("ONNX create from buffer error ", GetLastError());
            return(INIT_FAILED);
      }

   //Set input shape
   long input_count = OnnxGetInputCount(ExtHandle);
   const long input_shape[] = {1};
   Print("Total model inputs : ",input_count);

   //Setting the input shape of each input
   OnnxSetInputShape(ExtHandle,0,input_shape);
   OnnxSetInputShape(ExtHandle,1,input_shape);
   OnnxSetInputShape(ExtHandle,2,input_shape);
   OnnxSetInputShape(ExtHandle,3,input_shape);

   //Check if anything went wrong when setting the input shape
   if(!OnnxSetInputShape(ExtHandle,0,input_shape) || !OnnxSetInputShape(ExtHandle,1,input_shape) || !OnnxSetInputShape(ExtHandle,2,input_shape) || !OnnxSetInputShape(ExtHandle,3,input_shape))
      {
            Comment("ONNX set input shape error ", GetLastError());
            OnnxRelease(ExtHandle);
            return(INIT_FAILED);
      }

   //Set output shape
   long output_count = OnnxGetOutputCount(ExtHandle);
   const long output_shape[] = {1};
   Print("Total model outputs : ",output_count);
   //Setting the shape of each output
   OnnxSetOutputShape(ExtHandle,0,output_shape);
   //Checking if anything went wrong when setting the output shape
   if(!OnnxSetOutputShape(ExtHandle,0,output_shape))
      {
            Comment("ONNX set output shape error ", GetLastError());
            OnnxRelease(ExtHandle);
            return(INIT_FAILED);
      }
    //Get the minimum trading volume allowed
    min_volume = SymbolInfoDouble(_Symbol,SYMBOL_VOLUME_MIN);
    //Symbol information
    //The smallest distance between our point of entry and the stop loss
    min_distance = SymbolInfoInteger(_Symbol,SYMBOL_TRADE_STOPS_LEVEL);
    //Initial account balance
    initial_balance = AccountInfoDouble(ACCOUNT_BALANCE);
    //Setting up our ATR indicator
    atr = iATR(_Symbol,PERIOD_CURRENT,atr_period);
    return(INIT_SUCCEEDED);
//---
  }
DeInit 函数非常简单,它删除 ONNX 处理程序,这样我们就不会占用我们再用到的资源。
void OnDeinit(const int reason)
  {
//---
   if(ExtHandle != INVALID_HANDLE)
      {
         OnnxRelease(ExtHandle);
         ExtHandle = INVALID_HANDLE;
      }
  }
OnTick 函数是我们智能交易系统的核心,每次我们从交易商那里收到新的即刻报价时都会调用它。在我们的例子中,我们从时间跟踪开始,这令我们能够将我们想要在每次即刻报价时执行的过程,与我们想要在新蜡烛形成时执行的过程分开。我们希望在每次即刻报价时更新我们的出价和要价,我们还希望在每次即刻报价时更新我们的持仓止盈和止损,不过如果我们没有任何持仓,我们则只想在新蜡烛形成后进行模型预测。
void OnTick()
  {
//---
   //Time trackers
   static datetime time_stamp;
   datetime time = iTime(_Symbol,PERIOD_M1,0);

   //Current bid price
   bid = SymbolInfoDouble(_Symbol,SYMBOL_BID);
   //Current ask price
   ask = SymbolInfoDouble(_Symbol,SYMBOL_ASK);

   //Copy the ATR reading our array for storing the ATR value
   CopyBuffer(atr,0,0,1,atr_reading);

   //Set the array as series so the natural time ordering is preserved
   ArraySetAsSeries(atr_reading,true);

   //Calculating where to position our stop loss
   //For now we'll keep it simple, we'll add the minimum volume and the current ATR reading and multiply it by the ATR multiple
   atr_stop = ((min_distance + atr_reading[0]) * atr_multiple);

   //Current Session Profit and Loss Position
   current_balance = AccountInfoDouble(ACCOUNT_BALANCE);
   Comment("Current Session P/L: ",current_balance - initial_balance);

   //If we have a position open we need to update our stoploss
   if(PositionsTotal() > 0){
        check_atr_stop();
   }

    //Check new bar
     if(time_stamp != time)
      {
         time_stamp = time;

         //If we have no open positions let's make a forecast and open a new position
         if(PositionsTotal() == 0){
            Print("No open positions making a forecast");
            PredictedPrice();
            CheckForOpen();
         }
      }

  }
从那里,我们定义了更新 ATR 持仓止盈和止损的函数。该函数遍历我们开立的每笔持仓,并检查持仓是否与我们的交易品种匹配。这样做,它就会获取有关持仓的更多信息,从那里它会根据持仓方向相应地调整持仓的止损和止盈。注意,如果交易与我们的持仓背道而驰,它将保留止盈和止损,无论它们在何处。
//--- Functions
//This function will update our S/L & T/P based on our ATR reading
void check_atr_stop(){

      //First we iterate over the total number of open positions
      for(int i = PositionsTotal() -1; i >= 0; i--){

            //Then we fetch the name of the symbol of the open position
            string symbol = PositionGetSymbol(i);

            //Before going any further we need to ensure that the symbol of the position matches the symbol we're trading
                  if(_Symbol == symbol){
                           //Now we get information about the position
                           ulong ticket = PositionGetInteger(POSITION_TICKET); //Position Ticket
                           double position_price = PositionGetDouble(POSITION_PRICE_OPEN); //Position Open Price
                           long type = PositionGetInteger(POSITION_TYPE); //Position Type
                           double current_stop_loss = PositionGetDouble(POSITION_SL); //Current Stop loss value

                           //If the position is a buy
                           if(type == POSITION_TYPE_BUY){
                                  //The new stop loss value is just the ask price minus the ATR stop we calculated above
                                  double atr_stop_loss = (ask - (atr_stop));
                                  //The new take profit is just the ask price plus the ATR stop we calculated above
                                  double atr_take_profit = (ask + (atr_stop));

                                  //If our current stop loss is less than our calculated ATR stop loss
                                  //Or if our current stop loss is 0 then we will modify the stop loss and take profit
                                 if((current_stop_loss < atr_stop_loss) || (current_stop_loss == 0)){
                                       ExtTrade.PositionModify(ticket,atr_stop_loss,atr_take_profit);
                                 }
                           }

                            //If the position is a sell
                           else if(type == POSITION_TYPE_SELL){
                                     //The new stop loss value is just the bid price plus the ATR stop we calculated above
                                     double atr_stop_loss = (bid + (atr_stop));
                                     //The new take profit is just the bid price minus the ATR stop we calculated above
                                     double atr_take_profit = (bid - (atr_stop));

                                 //If our current stop loss is greater than our calculated ATR stop loss
                                 //Or if our current stop loss is 0 then we will modify the stop loss and take profit
                                 if((current_stop_loss > atr_stop_loss) || (current_stop_loss == 0)){
                                       ExtTrade.PositionModify(ticket,atr_stop_loss,atr_take_profit);
                                 }
                           }
                  }
            }
}
我们还需要另一个函数来开立新持仓。注意,我们使用上面声明的全局出价和要价变量。这确保了整个程序使用相同的价格。进而,我们将止损和止盈都设置为 0,因为其将由我们的 check_atr_stop 函数接管。
void CheckForOpen(void)
   {
      ENUM_ORDER_TYPE signal = WRONG_VALUE;

      //Check signals
      if(ExtPredictedClass == PRICE_DOWN)
         {
            signal = ORDER_TYPE_SELL;
         }
      else if(ExtPredictedClass == PRICE_UP)
         {
            signal = ORDER_TYPE_BUY;
         }

      if(signal != WRONG_VALUE && TerminalInfoInteger(TERMINAL_TRADE_ALLOWED))
         {
            double price, sl = 0 , tp = 0;

            if(signal == ORDER_TYPE_SELL)
               {
                  price = bid;
               }

           else
               {
                  price = ask;
               }

            Print("Opening a new position: ",signal);
            ExtTrade.PositionOpen(_Symbol,signal,min_volume,price,0,0,"ONNX Order");
         }
   }
最后,我们需要一个函数来用我们智能系统内的 ONNX 模型进行预测。该函数还将负责预处理我们的数据,方式与训练期间的预处理相同。这一点怎么强调都不为过,注意必须确保在训练和生产过程中处理数据的方式一致。注意,模型的每个输入都存储在其自己的向量中,然后每个向量都按照它们在训练期间传递给模型的相同顺序传递给 ONNX 的 Run 函数。贯穿整个项目保持一致性至关重要,否则我们可能会遇到运行时错误,这些错误也许不会在编译模型时引发任何异常。确保每个输入向量的数据类型与模型预期的输入类型匹配,此外,输出类型也应与模型的输出类型匹配。
void PredictedPrice(void)
   {
      long output_data[] = {1};

      double lag_2_open = double(iOpen(_Symbol,PERIOD_M1,3));
      double lag_2_high = double(iOpen(_Symbol,PERIOD_M1,3));
      double lag_2_close = double(iClose(_Symbol,PERIOD_M1,3));
      double lag_2_low = double(iLow(_Symbol,PERIOD_M1,3));
      double lag_2_mid_point = double((lag_2_high + lag_2_low) / 2);
      double lag_2_height = double(( lag_2_mid_point - lag_2_close));

      double lag_open = double(iOpen(_Symbol,PERIOD_M1,2));
      double lag_high = double(iOpen(_Symbol,PERIOD_M1,2));
      double lag_close = double(iClose(_Symbol,PERIOD_M1,2));
      double lag_low = double(iLow(_Symbol,PERIOD_M1,2));
      double lag_mid_point = double((lag_high + lag_low) / 2);
      double lag_height = double(( lag_mid_point - lag_close));

      double   open  =  double(iOpen(_Symbol,PERIOD_M1,1));
      double   high  = double(iHigh(_Symbol,PERIOD_M1,1));
      double   low   = double(iLow(_Symbol,PERIOD_M1,1));
      double   close = double(iClose(_Symbol,PERIOD_M1,1));
      double   mid_point = double( (high + low) / 2 );
      double   height =  double((mid_point - close));

      double first_height_delta = (height - lag_height);
      double second_height_delta = (lag_height - lag_2_height);
      double height_growth = first_height_delta - second_height_delta;

      double first_midpoint_delta = (mid_point - lag_mid_point);
      double second_midpoint_delta = (lag_mid_point - lag_2_mid_point);
      double mid_point_growth = first_midpoint_delta - second_midpoint_delta;

      vector input_data_lag_height = {lag_height};
      vector input_data_height_grwoth = {height_growth};
      vector input_data_midpoint_growth = {mid_point_growth};
      vector input_data_midpoint = {mid_point};

       if(OnnxRun(ExtHandle,ONNX_NO_CONVERSION,input_data_lag_height,input_data_height_grwoth,input_data_midpoint_growth,input_data_midpoint,output_data))
         {
            Print("Model Inference Completed Successfully");
            Print("Model forecast: ",output_data[0]);
         }
       else
       {
            Print("ONNX run error : ",GetLastError());
            OnnxRelease(ExtHandle);
       }

       long predicted = output_data[0];

       if(predicted == 1)
         {
            ExtPredictedClass = PRICE_UP;
         }

       else if(predicted == 0)
         {
            ExtPredictedClass = PRICE_DOWN;
         }
   }
一旦这步完成,我们就可以编译我们的模型,并在我们的 MetaTrader 5 终端上使用模拟账户进行前瞻测试。
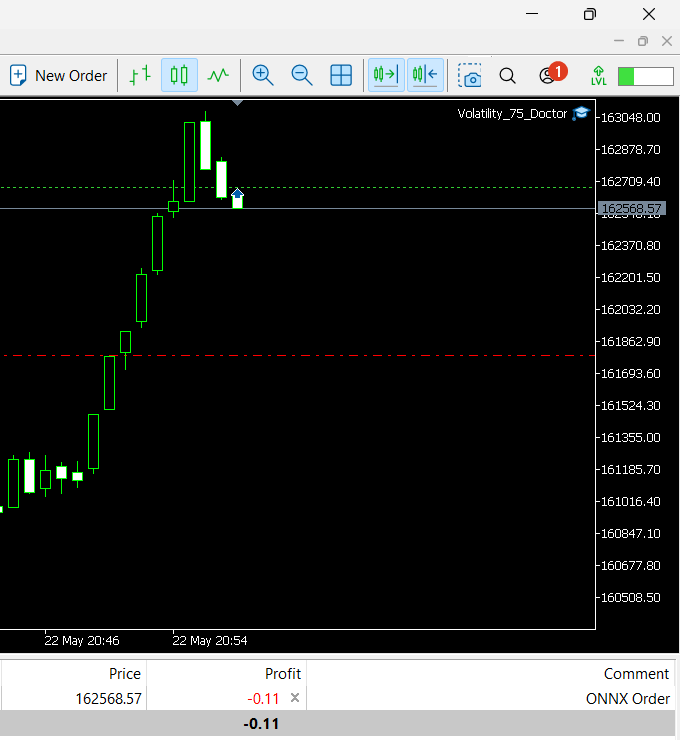
图例 14:前瞻测试我们的 Glass-box ONNX 智能系统
通过检查“智能系统”选项卡和“日志”选项卡,确保模型运行没有任何错误。
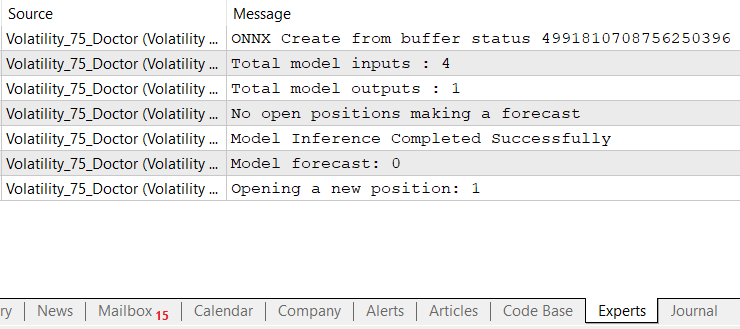
图例 15:检查“智能系统”选项卡中的任何错误
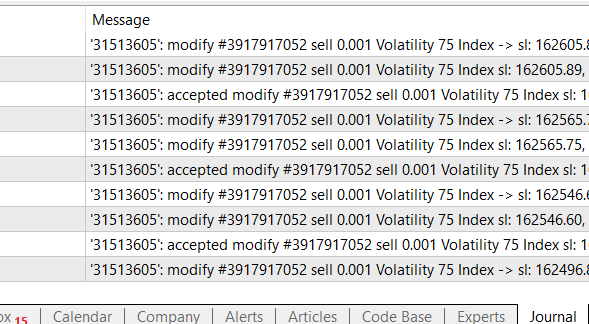
图例 16:检查日志选项卡中的错误
正如我们所见,模型运行良好。记住,我们可以随时调整智能系统的设置。
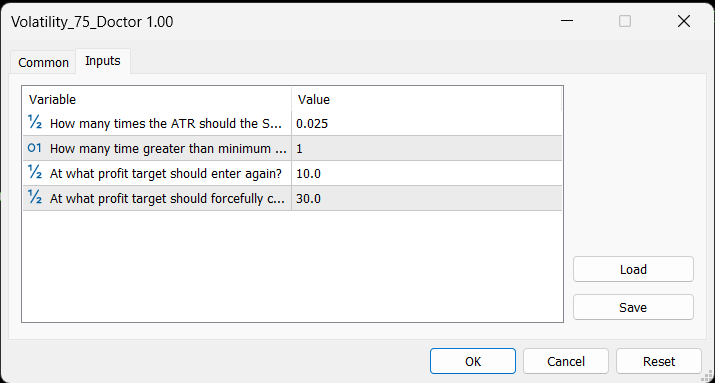
图例 17:调整智能系统的设置
常遇挑战
在本文的这一章节中,我们将重现首次设置时可能遇到的一些错误。我们将检查导致错误的原因,并最终针对每个问题细思相应解决方案。
无法正确设置输入或输出形状。
最常遇到的问题是由于未能在输入里正确设置输出形状,记住,您必须为模型期望的每个特征定义输入形状。确保迭代遍历每个索引,并在该索引处定义每个特征的输入形状。如果您未能为每个特征指定形状,您的模型仍然可以编译而不会引发任何错误,如下面的演示所示,但是当我们尝试使用模型执行推理时,错误就会暴露。错误代码为 5808,MQL5 文档将其描述为“张量维度未设置或无效”。记住,在该示例中我们有 4 个输入,但是在下面的代码示例中,我们只设置了一个输入形状。
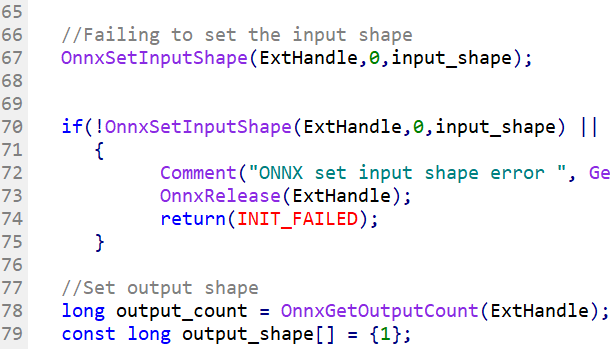
图例 18:智能系统编译时不会抛出任何异常
我们还附上了当您检查“智能系统”选项卡时,一张显示出错的屏幕截图,并记住正确的代码已附加到文末。

图例 19: 错误消息 5808
不正确的类型转换
不正确的类型转换有时可能会导致数据完全丢失,或者智能系统崩溃。在下面的示例中,我们使用整数型数组来存储 ONNX 模型的输出,记住,我们的 ONNX 模型拥有 int64 类型的输出。为什么您认为这会抛出错误?这会导致错误,因为 int 类型没有足够的内存来存储模型的输出,从而导致模型失败。我们的模型输出需要 8 个字节,但我们的 int 数组只提供 4 个字节。解决方案很简单,确保您使用正确的数据类型来存储输入和输出,如果您必须进行类型转换,请确保您符合 MQL5 文档中指定的类型转换规则。错误代码为 5807,描述为“参数大小无效”。

图例 20:不正确的类型转换

图例 21: 错误消息 5807
调用 ONNX 运行失败
ONNX Run 函数要求每个模型输入分别在其自己的数组中传递。在下面的代码示例中,我们将所有输入合并到一个数组中,并将该单一数组传递给 ONNX Run 函数。当我们编译代码时,这都不会引发任何异常,但在执行时,它会在“智能系统”选项卡中抛出错误。错误代码为 5804,文档简明扼要地将其描述为“传递给 OnnxRun 的参数数量无效”。

图例 22:调用 ONNXRun 函数失败。
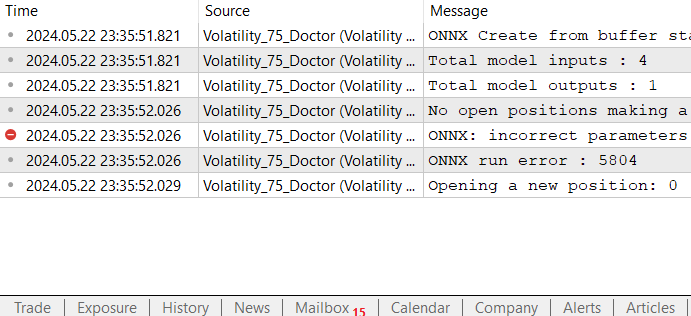
图例 23: 错误消息 5804
结束语
回顾一下,作为金融工程师,您现在明白了为什么玻璃盒模型对我们有用,相对于忠实地从黑盒模型中提取相同信息所需的工作量而言,它们为我们提供了宝贵的见解,而劳动量却很小。进而,玻璃盒模型更易于调试、维护、和解释。对我们来说,仅仅假设我们的模型能按照我们的预期运行是不够的,我们必须看看引擎盖下的实况才能发言。
到目前为止,玻璃盒模型有一个很大的缺点,它们不如黑盒模型灵活。玻璃盒模型是一个开放的研究领域,随着时间的推移,我们也许会在未来看到更灵活的玻璃盒模型,但在撰写本文时,它们并不那么灵活,这意味着有些关系也许经由黑盒模型建模更佳。进而,当前玻璃盒模型的实现是基于决策树,因此当前 InterpretML 中 ExplainableBoostingClassifiers 的实现继承了决策树的所有缺点。
直到我们再次相遇之前,我祝愿您的交易平和、甜蜜、和谐、并获利颇丰。
本文由MetaQuotes Ltd译自英文
原文地址: https://www.mql5.com/en/articles/13842
 Python、ONNX 和 MetaTrader 5:利用 RobustScaler 和 PolynomialFeatures 数据预处理创建 RandomForest 模型
 开发具有 RestAPI 集成的 MQL5 强化学习代理(第 2 部分):用于与井字游戏 RestAPI 进行 HTTP 交互的 MQL5 函数
 新手在交易中的10个基本错误
 开发回放系统(第 37 部分):铺平道路 (一)