
软件开发和 MQL5 中的设计模式(第 2 部分):结构模式
概述
欢迎阅读这篇新文章,本文通过继续介绍其他类型的设计模式,来讨论这一软件开发中的非常重要的话题。我们在上一篇文章中谈到了创建设计模式,如果您想进一步了解这种类型,可以阅读软件开发和 MQL5 中的设计模式(第一部分):创建模式。如果你是设计模式的新手,我建议你阅读这篇文章,从总体上了解设计模式,并了解它们在软件开发中的重要作用。
如果你想让自己的软件开发技能更上一层楼,那么学习设计模式是必不可少的。这些模式为你提供了解决特定问题的现成蓝图,而不是重新发明轮子,可以利用它们来获得非常实用和经过验证的解决方案。
在本文中,我们将继续介绍结构设计模式,并了解它们如何在软件开发领域发挥巨大作用,通过使用我们所拥有的类来形成更大的结构。这篇文章最有趣的部分是让我们了解如何在 MQL5 编程语言中使用这些模式,从而从中受益,并通过使用 MetaTrader 5 交易终端设计出用于交易领域的实用软件。
我们将通过以下主题介绍结构型的设计模式:
- 结构模式(Structural Patterns)
- 适配器(Adapter)
- 桥接(Bridge)
- 组合(Composite)
- 修饰(Decorator)
- 外观(Facade)
- 享元(Flyweight)
- 代理(Proxy)
- 结论
希望这篇文章对你有所帮助,通过学习一个非常有趣的话题来提高你的开发和编程技能。如果您想了解这方面的知识,可以阅读我之前写的关于 "了解 MQL5面向对象编程 (OOP) "的文章,希望对您有所帮助。
结构模式(Structural Patterns)
在本部分中,我们将确定什么是结构设计模式及其类型和结构。结构模式关注的是如何将类和对象结构化,使其成为构建更大结构的组件。这些模式通过使用继承概念来组成接口和实现。这种继承概念意味着,我们将有一个类拥有或组合其父类的属性。当我们需要让已开发好的类一起独立工作时,对这种模式的需求会更大。
结构模式有很多种,如下所示:
- 适配器模式(Adapter):通过转换类的接口,帮助获得客户期望的另一个接口。
- 桥接模式(Bridge):通过解耦,抽象和实现可以独立地变化。
- 组合模式(Composite):为了表示部分-整体层次结构,它有助于将对象组合成树形结构。除此以外,组合模式还允许客户对个体和对象组合进行统一处理。
- 修饰模式(Decorator):可用于以动态方式为当前对象附加更多功能,也可作为子类化提供者的灵活替代品,以扩展功能。
- 外观模式(Facade):当我们需要一个统一的接口来连接子系统中的一组界面时,就可以使用它,通过定义一个更高级别的接口,它可以帮助我们方便地使用子系统。
- 享元模式(Flyweight):它有助于通过共享有效支持大量细粒度对象。
- 代理模式(Proxy):当我们需要通过获取一个替代或占位符来控制对某个对象的访问时,可以使用它。
我们将通过以下方法或回答以下问题来介绍这些模式:
- 该模式有什么作用?
- 该模式能解决什么问题?
- 如何在 MQL5 中使用它?
适配器(Adapter)
在本部分中,我们将通过认识第一种类型(即适配器)来开始了解结构设计模式的类型。理解这种模式的关键词是适应性。很简单,如果我们有一个可以在特定情况下使用的接口,然后这些情况发生了一些变化,那么就必须对接口进行更新,让代码能够适应这些新情况并有效地工作。这就是这种模式的作用,因为它可以将我们所拥有的类的接口转换成另一种接口,让客户可以按照自己的期望使用。所以这种适配器模式允许类在接口不兼容的情况下协同工作。这种模式也被称为 "封装器"(Wrapper),因为它似乎为接口提供了一个封装器,使其能够适应并作为另一个接口工作。
该模式有什么作用?
如前所述,当设计的接口不符合特定领域接口的应用要求时,可以使用这种模式将该类的接口转换为另一种接口,从而使类能够协同工作。
下图表示适配器设计模式的结构:
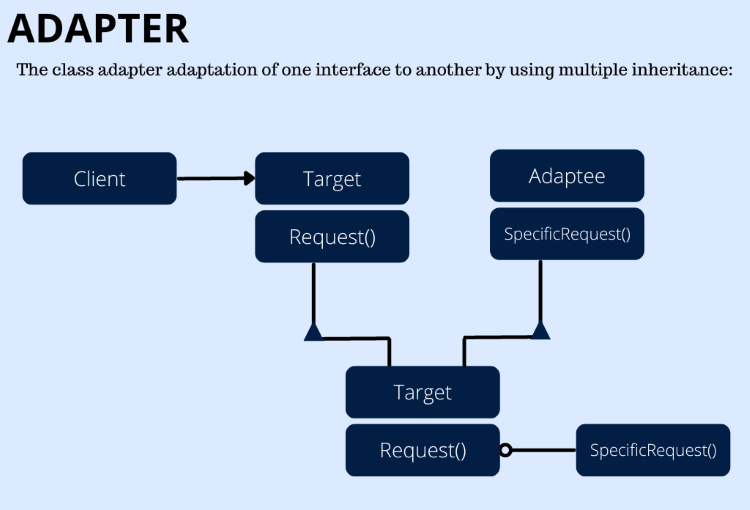
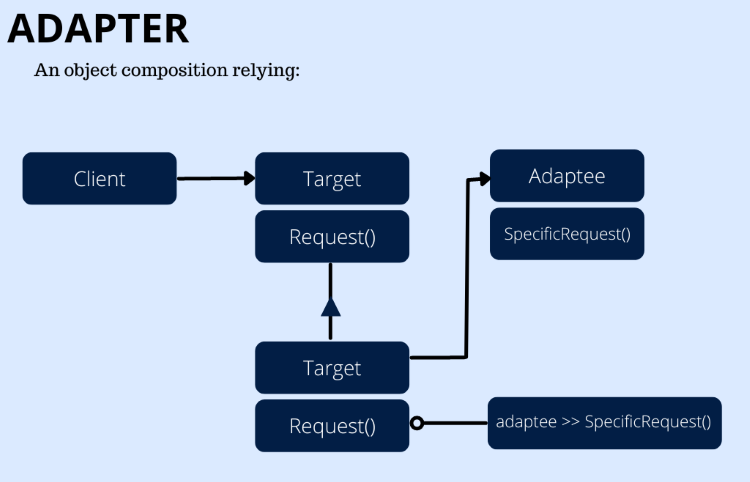
如上图所示,基于编程语言的多重继承支持,我们就有了类适配器和对象适配器。我们有目标(Target),它标识了客户使用的新接口的特定领域;有客户(Client),它与适应目标接口的对象一起参与;有被适应者(Adaptee),它标识了我们需要使其适应的现有接口(旧接口);还有适配器(Adapter),它使被适应者的接口适应目标接口。
该模式能解决什么问题?
- 使用不符合我们所需的接口的现有类。
- 创建可重复使用的类,无论这些类的接口是兼容还是不兼容,它们都能与不相关的类协同工作。
- 当我们需要使用许多现有子类时,调整父类的接口。
如何在 MQL5 中使用它?
在本部分中,我们将学习如何在 MQL5 编程语言中使用这种模式(AdapterClass 和 ObjectClass),详情如下:
使用命名空间函数声明区域(AdapterClass),我们将在其中定义函数、变量和类。
namespace AdapterClass 使用接口函数声明(Target)可以确定类以后可以实现的特定功能,或定义客户使用的特定域。
interface Target
  {
   void Request();
  };
使用类函数定义 Adaptee,该 Adaptee 通过一个公有成员(SpecificRequest())定义了我们需要的现有适配接口。
class Adaptee
  {
public:
   void              SpecificRequest();
  };
在 Adaptee 执行请求时打印信息。
void Adaptee::SpecificRequest(void)
  {
   Print("A specific request is executing by the Adaptee");
  }
声明 Adapter 类,将被适配者的接口适配到继承自目标和适配者的目标接口,作为多重继承。
class Adapter;
class AdapterAsTarget:public Target
  {
public:
   Adapter*          asAdaptee;
   void              Request();
  };
void AdapterAsTarget::Request()
  {
   printf("The Adapter requested Operation");
   asAdaptee.SpecificRequest();
  }
class Adapter:public Adaptee
  {
public:
   AdapterAsTarget*  asTarget;
                     Adapter();
                    ~Adapter();
  };
void Adapter::Adapter(void)
  {
   asTarget=new AdapterAsTarget;
   asTarget.asAdaptee=&this;
  }
void Adapter::~Adapter(void)
  {
   delete asTarget;
  }
声明 Client 类。
class Client
  {
public:
   string            Output();
   void              Run();
  };
string Client::Output()
  {
   return __FUNCTION__;
  }
运行客户端。
void Client::Run()
  {
   Adapter adapter;
   Target* target=adapter.asTarget;
   target.Request();
  }
因此,以下是 MQL5 中 Adapter(适配器)类的完整代码块。
namespace AdapterClass
{
interface Target
  {
   void Request();
  };
class Adaptee
  {
public:
   void              SpecificRequest();
  };
void Adaptee::SpecificRequest(void)
  {
   Print("A specific request is executing by the Adaptee");
  }
class Adapter;
class AdapterAsTarget:public Target
  {
public:
   Adapter*          asAdaptee;
   void              Request();
  };
void AdapterAsTarget::Request()
  {
   printf("The Adapter requested Operation");
   asAdaptee.SpecificRequest();
  }
class Adapter:public Adaptee
  {
public:
   AdapterAsTarget*  asTarget;
                     Adapter();
                    ~Adapter();
  };
void Adapter::Adapter(void)
  {
   asTarget=new AdapterAsTarget;
   asTarget.asAdaptee=&this;
  }
void Adapter::~Adapter(void)
  {
   delete asTarget;
  }
class Client
  {
public:
   string            Output();
   void              Run();
  };
string Client::Output()
  {
   return __FUNCTION__;
  }
void Client::Run()
  {
   Adapter adapter;
   Target* target=adapter.asTarget;
   target.Request();
  }
}
下面介绍如何在 MQL5 中使用对象适配器:
使用命名空间为 AdapterObject 的函数、变量和类创建声明区。
namespace AdapterObject 使用接口定义目标,这是客户使用的特定域。
interface Target
  {
   void Request();
  };
创建 Adaptee 类,定义我们需要的现有可适配接口。
class Adaptee
  {
public:
   void              SpecificRequest();
  };
void Adaptee::SpecificRequest(void)
  {
   Print("The specific Request");
  }
class Adapter:public Target
  {
public:
   void              Request();
protected:
   Adaptee           adaptee;
  };
void Adapter::Request(void)
  {
   Print("The request of Operation requested");
   adaptee.SpecificRequest();
  }
声明客户端。
class Client
  {
public:
   string            Output();
   void              Run();
  };
string Client::Output()
  {
   return __FUNCTION__;
  }
当客户端调用适配器实例上的操作时,运行客户端。
void Client::Run()
  {
   Target* target=new Adapter;
   target.Request();
   delete target;
  }
以下是整块代码:
namespace AdapterObject
{
interface Target
  {
   void Request();
  };
class Adaptee
  {
public:
   void              SpecificRequest();
  };
void Adaptee::SpecificRequest(void)
  {
   Print("The specific Request");
  }
class Adapter:public Target
  {
public:
   void              Request();
protected:
   Adaptee           adaptee;
  };
void Adapter::Request(void)
  {
   Print("The request of Operation requested");
   adaptee.SpecificRequest();
  }
class Client
  {
public:
   string            Output();
   void              Run();
  };
string Client::Output()
  {
   return __FUNCTION__;
  }
void Client::Run()
  {
   Target* target=new Adapter;
   target.Request();
   delete target;
  }
}
桥接(Bridge)
在本部分中,我们将探讨结构模式之一、桥接设计模式。使用这种模式的主要想法是,当我们需要将抽象与其实现解耦,以避免未来在其中一个实现更新或变更时可能发生的任何冲突。它也被称为 "柄体模式(Handle and Body)"。
该模式有什么作用?
正如我们所提到的,当我们有一个抽象概念,而这个抽象概念又有许多可能的实现时,就可以使用桥接模式,而不是使用通常的继承方法将实现与抽象概念联系起来,我们可以使用这种模式将抽象概念与它的实现解耦,以避免在变更或更新时出现任何问题。这对于创建可重用、可扩展、易测试的简洁代码非常有用。
下图是桥接设计模式的示意图:
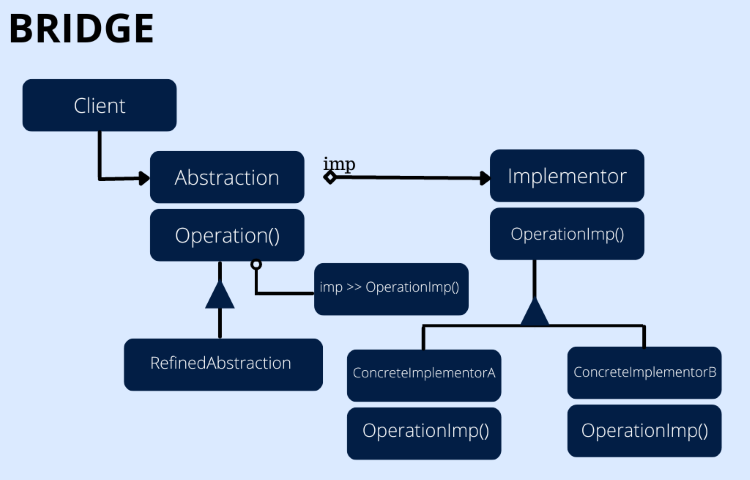
通过前面的图表,我们可以看到桥接模式结构的参与者如下:
- Abstraction:定义抽象的接口,并保持对实现者类型对象的引用。
- RefinedAbstraction: 抽象接口的扩展。
- Implementor:标识实现类接口。
- ConcreteImplementor:实现实现者的接口,并标识该接口的具体实现。
该模式能解决什么问题?
当我们需要以下情况时,就可以使用这种桥接模式:
- 避免抽象与实现之间的持续联系,因为这种模式有助于将它们解耦。
- 将不同的抽象概念和实现方式结合起来,并在不发生任何冲突的情况下独立扩展每一种抽象概念和实现方式。
- 当抽象的实现发生变化时,避免对客户产生影响。
- 用 C++ 向客户完全隐藏抽象的实现。
如何在 MQL5 中使用它?
在本部分中,我们将确定如何在 MQL5 编程语言中使用这种模式,以受益于其有益的优势,创建高效的软件。以下是我们如何使用 MQL5 编码桥接模式的结构:
创建声明区,以定义模式的变量、函数和类。
namespace Bridge 使用 interface 关键字创建 Implementor 接口,允许类实现确定的功能。
interface Implementor
  {
   void OperationImp();
  };
创建具有公共成员和受保护成员的 Abstraction 类作为参与者,并保持对 Implementor 对象的引用。
class Abstraction
  {
public:
   virtual void      Operation();
                     Abstraction(Implementor*);
                     Abstraction();
                    ~Abstraction();
protected:
   Implementor*      implementor;
  };
void Abstraction::Abstraction(void) {}
void Abstraction::Abstraction(Implementor*i):implementor(i) {}
void Abstraction::~Abstraction()
  {
   delete implementor;
  }
void Abstraction::Operation()
  {
   implementor.OperationImp();
  }
创建作为参与者的 RefinedAbstraction 类。
class RefinedAbstraction:public Abstraction
  {
public:
                     RefinedAbstraction(Implementor*);
   void              Operation();
  };
void RefinedAbstraction::RefinedAbstraction(Implementor*i):Abstraction(i) {}
void RefinedAbstraction::Operation()
  {
   Abstraction::Operation();
  }
创建 ConcreteImplementorA 和 B 的类。
class ConcreteImplementorA:public Implementor
  {
public:
   void              OperationImp();
  };
void ConcreteImplementorA::OperationImp(void)
  {
   Print("The implementor A");
  }
class ConcreteImplementorB:public Implementor
  {
public:
   void              OperationImp();
  };
void ConcreteImplementorB::OperationImp(void)
  {
   Print("The implementor B");
  }
创建客户端类。
class Client
  {
public:
   string            Output();
   void              Run();
  };
string Client::Output(void)
  {
   return __FUNCTION__;
  }
运行客户端。
void Client::Run(void)
  {
   Abstraction* abstraction;
   abstraction=new RefinedAbstraction(new ConcreteImplementorA);
   abstraction.Operation();
   delete abstraction;
   abstraction=new RefinedAbstraction(new ConcreteImplementorB);
   abstraction.Operation();
   delete abstraction;
  }
这样,以下代码就是桥接模式结构的完整代码。
namespace Bridge
{
interface Implementor
  {
   void OperationImp();
  };
class Abstraction
  {
public:
   virtual void      Operation();
                     Abstraction(Implementor*);
                     Abstraction();
                    ~Abstraction();
protected:
   Implementor*      implementor;
  };
void Abstraction::Abstraction(void) {}
void Abstraction::Abstraction(Implementor*i):implementor(i) {}
void Abstraction::~Abstraction()
  {
   delete implementor;
  }
void Abstraction::Operation()
  {
   implementor.OperationImp();
  }
class RefinedAbstraction:public Abstraction
  {
public:
                     RefinedAbstraction(Implementor*);
   void              Operation();
  };
void RefinedAbstraction::RefinedAbstraction(Implementor*i):Abstraction(i) {}
void RefinedAbstraction::Operation()
  {
   Abstraction::Operation();
  }
class ConcreteImplementorA:public Implementor
  {
public:
   void              OperationImp();
  };
void ConcreteImplementorA::OperationImp(void)
  {
   Print("The implementor A");
  }
class ConcreteImplementorB:public Implementor
  {
public:
   void              OperationImp();
  };
void ConcreteImplementorB::OperationImp(void)
  {
   Print("The implementor B");
  }
class Client
  {
public:
   string            Output();
   void              Run();
  };
string Client::Output(void)
  {
   return __FUNCTION__;
  }
void Client::Run(void)
  {
   Abstraction* abstraction;
   abstraction=new RefinedAbstraction(new ConcreteImplementorA);
   abstraction.Operation();
   delete abstraction;
   abstraction=new RefinedAbstraction(new ConcreteImplementorB);
   abstraction.Operation();
   delete abstraction;
  }
}
组合(Composite)
在这一部分中,我们将确定另一种结构模式,即组合模式。这种模式有助于将对象组合成树状结构,并允许客户对单个对象和组合进行统一处理。
该模式有什么作用?
如前所述,这种组合模式取决于我们需要将对象组合成树状结构,而树状结构是这种模式的主要关键。因此,如果我们有一个组件,我们可以根据树形结构发现,在这个组件下有两个东西,一个是 Leaf,它只有操作功能,另一个是 Composite,它有更多的操作功能,如添加、删除和调用子组件。
下图展示了组合设计模式:
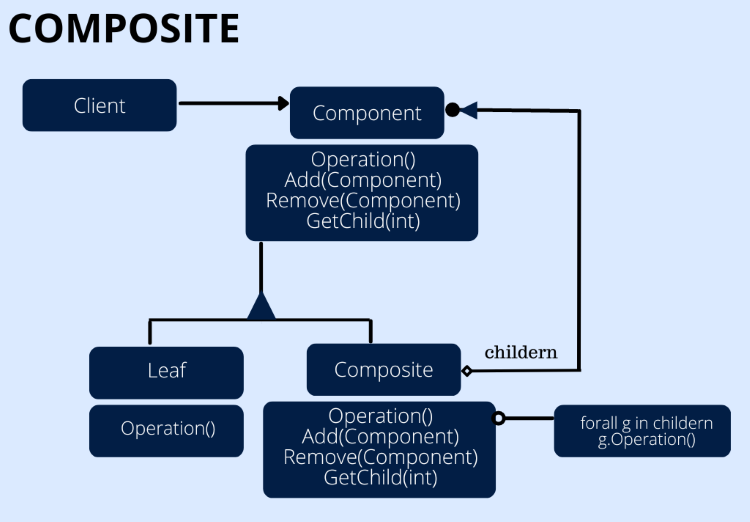
如上图所示,我们有以下参与者:
- Component:它声明了对象的接口,并为类实现了接口的默认行为,用于访问和管理为其声明的接口组件。
- Leaf:表示组合体中叶片的对象,该叶片没有子组件,标识组合体中可视为原始对象的行为。
- Composite:它用 Childs 识别组件的行为,存储组件的 Childs,并在组件接口中实现 Childs 的操作。
- Client:客户端通过组件界面操作对象。
该模式能解决什么问题?
当我们如下需要时,就可以使用这种组合模式:
- 对象表征使用“部分 - 整体”层次结构。
- 客户端将统一处理组合中的所有对象。
如何在 MQL5 中使用它?
在本部分中,我们将介绍如何在 MQL5 中对组合模式进行编码,具体方法如下:
使用 namespace 关键字创建组合空间或区域,以声明所有函数、变量和类。
namespace Composite 创建带有公共成员和受保护成员的 Component 类,并访问组件的父类。
class Component
  {
public:
   virtual void      Operation(void)=0;
   virtual void      Add(Component*)=0;
   virtual void      Remove(Component*)=0;
   virtual Component*   GetChild(int)=0;
                     Component(void);
                     Component(string);
protected:
   string            name;
  };
Component::Component(void) {}
Component::Component(string a_name):name(a_name) {}
定义添加和删除叶子的用户错误并创建 Leaf 类。
#define ERR_INVALID_OPERATION_EXCEPTION   1
class Leaf:public Component
  {
public:
   void              Operation(void);
   void              Add(Component*);
   void              Remove(Component*);
   Component*        GetChild(int);
                     Leaf(string);
  };
void Leaf::Leaf(string a_name):Component(a_name) {}
void Leaf::Operation(void)
  {
   Print(name);
  }
void Leaf::Add(Component*)
  {
   SetUserError(ERR_INVALID_OPERATION_EXCEPTION);
  }
void Leaf::Remove(Component*)
  {
   SetUserError(ERR_INVALID_OPERATION_EXCEPTION);
  }
Component* Leaf::GetChild(int)
  {
   SetUserError(ERR_INVALID_OPERATION_EXCEPTION);
   return NULL;
  }
将 Composite 类创建为参与者,然后进行操作、添加组件、删除组件和 GetChild(int)。
class Composite:public Component
  {
public:
   void              Operation(void);
   void              Add(Component*);
   void              Remove(Component*);
   Component*        GetChild(int);
                     Composite(string);
                    ~Composite(void);
protected:
   Component*        nodes[];
  };
Composite::Composite(string a_name):Component(a_name) {}
Composite::~Composite(void)
  {
   int total=ArraySize(nodes);
   for(int i=0; i<total; i++)
     {
      Component* i_node=nodes[i];
      if(CheckPointer(i_node)==1)
        {
         delete i_node;
        }
     }
  }
void Composite::Operation(void)
  {
   Print(name);
   int total=ArraySize(nodes);
   for(int i=0; i<total; i++)
     {
      nodes[i].Operation();
     }
  }
void Composite::Add(Component *src)
  {
   int size=ArraySize(nodes);
   ArrayResize(nodes,size+1);
   nodes[size]=src;
  }
void Composite::Remove(Component *src)
  {
   int find=-1;
   int total=ArraySize(nodes);
   for(int i=0; i<total; i++)
     {
      if(nodes[i]==src)
        {
         find=i;
         break;
        }
     }
   if(find>-1)
     {
      ArrayRemove(nodes,find,1);
     }
  }
Component* Composite::GetChild(int i)
  {
   return nodes[i];
  }
将客户类创建为参与者。
class Client
  {
public:
   string            Output(void);
   void              Run(void);
  };
string Client::Output(void) {return __FUNCTION__;}
运行客户端。
void Client::Run(void)
  {
   Component* root=new Composite("root");
   Component* branch1=new Composite("The branch 1");
   Component* branch2=new Composite("The branch 2");
   Component* leaf1=new Leaf("The leaf 1");
   Component* leaf2=new Leaf("The leaf 2");
   root.Add(branch1);
   root.Add(branch2);
   branch1.Add(leaf1);
   branch1.Add(leaf2);
   branch2.Add(leaf2);
   branch2.Add(new Leaf("The leaf 3"));
   Print("The tree");
   root.Operation();
   root.Remove(branch1);
   Print("Removing one branch");
   root.Operation();
   delete root;
   delete branch1;
  }
修饰(Decorator)
修饰模式是另一种结构设计模式,可用于为创建的或现有的对象形成更大的结构。这种模式可用于在运行时通过动态方法为对象添加额外的功能、行为或职责,因为它可以灵活地替代子类化。它也被称为 Wrapper。
该模式有什么作用?
正如我们所说的,这种模式可以帮助我们为任何单个对象添加职责,而无需在整个类中加一个 Wrapper,而是使用子类化的方式。
下图是修饰设计模式的结构图:
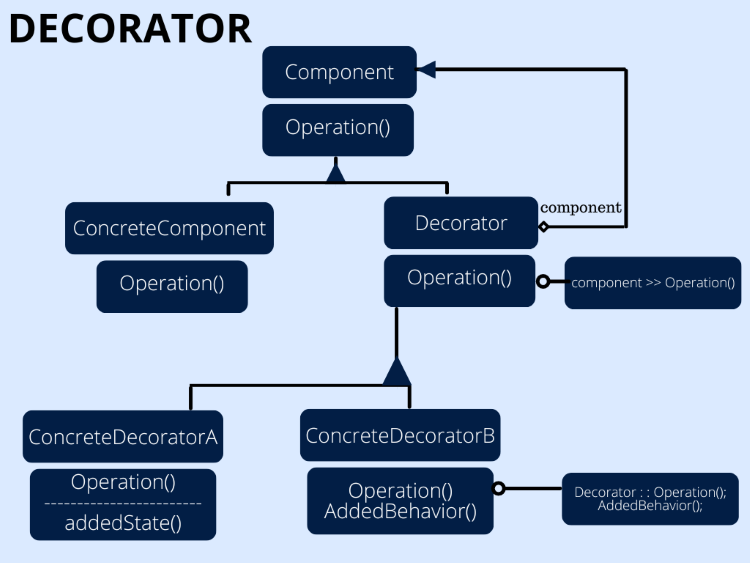
如上图所示,我们有以下参与者:
- Component:它能识别对象的界面,并以动态方式识别对象的附加角色。
- ConcreteComponent:它标识了可以为其附加额外功能的对象。
- Decorator:它有助于维护组件对象的引用,并识别符合组件界面的接口。
- ConcreteDecorator:负责为组件添加功能。
该模式能解决什么问题?
当我们有如下需要时,可以使用修饰设计模式:
- 在不影响其他对象的情况下,动态、透明地为单个对象增加额外的功能。
- 撤消对象的功能。
- 在扩展的情况下,找到子类化方法是不切实际的。
如何在 MQL5 中使用它?
如果我们需要在 MQL5 中编写该修饰模式的代码,以便在创建的软件中使用该模式,则需要采取以下步骤:
创建声明我们的修饰模式的区域,以在其中声明我们需要的所有内容。
namespace Decorator 创建带有公共成员的组件类,以定义对象的接口。
class Component
  {
public:
   virtual void      Operation(void)=0;
  };
作为参与者创建 Decorator 类。
class Decorator:public Component
  {
public:
   Component*        component;
   void              Operation(void);
  };
void Decorator::Operation(void)
  {
   if(CheckPointer(component)>0)
     {
      component.Operation();
     }
  }
以参与者身份创建 ConcreteComponent 类。
class ConcreteComponent:public Component
  {
public:
   void              Operation(void);
  };
void ConcreteComponent::Operation(void)
  {
   Print("The concrete operation");
  }
创建 ConcreteDecoratorA 和 B。
class ConcreteDecoratorA:public Decorator
  {
protected:
   string            added_state;
public:
                     ConcreteDecoratorA(void);
   void              Operation(void);
  };
ConcreteDecoratorA::ConcreteDecoratorA(void):
   added_state("The added state()")
  {
  }
void ConcreteDecoratorA::Operation(void)
  {
   Decorator::Operation();
   Print(added_state);
  }
class ConcreteDecoratorB:public Decorator
  {
public:
   void              AddedBehavior(void);
   void              Operation(void);
  };
void ConcreteDecoratorB::AddedBehavior(void)
  {
   Print("The added behavior()");
  }
void ConcreteDecoratorB::Operation(void)
  {
   Decorator::Operation();
   AddedBehavior();
  }
创建客户端类。
class Client
  {
public:
   string            Output(void);
   void              Run(void);
  };
string Client::Output(void)
  {
   return __FUNCTION__;
  }
运行客户端。
void Client::Run(void)
  {
   Component* component=new ConcreteComponent();
   Decorator* decorator_a=new ConcreteDecoratorA();
   Decorator* decorator_b=new ConcreteDecoratorB();
   decorator_a.component=component;
   decorator_b.component=decorator_a;
   decorator_b.Operation();
   delete component;
   delete decorator_a;
   delete decorator_b;
  }
就这样,如果我们需要查看一个代码块中的全部代码,我们可以看到与下面相同的内容。
namespace Decorator
{
class Component
  {
public:
   virtual void      Operation(void)=0;
  };
class Decorator:public Component
  {
public:
   Component*        component;
   void              Operation(void);
  };
void Decorator::Operation(void)
  {
   if(CheckPointer(component)>0)
     {
      component.Operation();
     }
  }
class ConcreteComponent:public Component
  {
public:
   void              Operation(void);
  };
void ConcreteComponent::Operation(void)
  {
   Print("The concrete operation");
  }
class ConcreteDecoratorA:public Decorator
  {
protected:
   string            added_state;
public:
                     ConcreteDecoratorA(void);
   void              Operation(void);
  };
ConcreteDecoratorA::ConcreteDecoratorA(void):
   added_state("The added state()")
  {
  }
void ConcreteDecoratorA::Operation(void)
  {
   Decorator::Operation();
   Print(added_state);
  }
class ConcreteDecoratorB:public Decorator
  {
public:
   void              AddedBehavior(void);
   void              Operation(void);
  };
void ConcreteDecoratorB::AddedBehavior(void)
  {
   Print("The added behavior()");
  }
void ConcreteDecoratorB::Operation(void)
  {
   Decorator::Operation();
   AddedBehavior();
  }
class Client
  {
public:
   string            Output(void);
   void              Run(void);
  };
string Client::Output(void)
  {
   return __FUNCTION__;
  }
void Client::Run(void)
  {
   Component* component=new ConcreteComponent();
   Decorator* decorator_a=new ConcreteDecoratorA();
   Decorator* decorator_b=new ConcreteDecoratorB();
   decorator_a.component=component;
   decorator_b.component=decorator_a;
   decorator_b.Operation();
   delete component;
   delete decorator_a;
   delete decorator_b;
  }
}
外观(Facade)
外观是另一种结构模式,可用于软件开发,创建其他更大的结构。它确定了与上一级系统的接口,使子系统的使用更顺畅、更便捷。
该模式有什么作用?
正如我们所提到的,外观模式是一种将客户端从子系统的复杂性中解脱出来的方法,因为它为一组子系统接口提供了统一的接口。因此,客户将与这个统一接口交互,以获取他所要求的内容,而这个接口将与子系统交互,以返回客户所要求的内容。
如果我们需要查看外观设计模式的结构,可以发现它与下图相同:
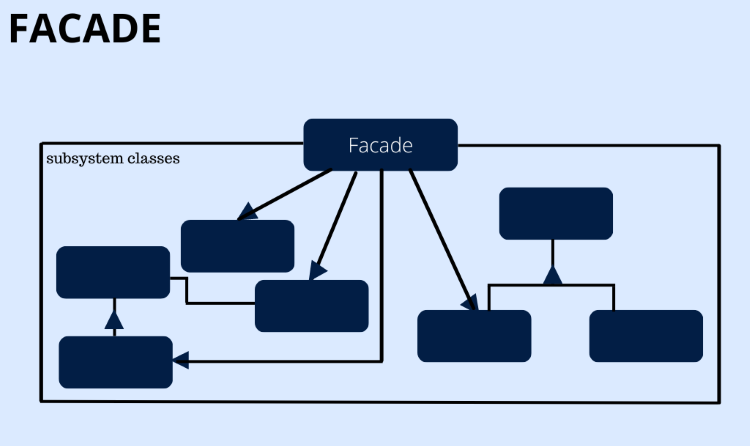
如上图所示,这种模式的参与者如下:
- Facade:它知道哪个子系统可以提出请求,并将客户的请求委托给子系统中合适的对象。
- 子系统类:它们执行子系统的功能,当收到来自 Facade 的请求时,它们会处理该请求,它们没有对 Facade 的引用。
该模式能解决什么问题?
当我们有以下需要时,可以使用这种外观设计模式:
- 通过提供简单的界面,简化子系统的复杂性。
- 将子系统与客户端和其他子系统解耦,改变客户端与抽象类实现之间的现有依赖关系,使子系统具有独立性和可移植性。
- 通过分层,定义每个子系统级别的入口点。
如何在 MQL5 中使用它?
在本部分中,我们将提供在 MQL5 中使用 Facade 模式的代码,具体步骤如下:
创建 Facade 空间,通过使用命名空间来声明我们所需的内容。
namespace Facade 声明 SubSystemA、SubSystemB 和 SubSystemC 类。
class SubSystemA
  {
public:
   void              Operation(void);
  };
void SubSystemA::Operation(void)
  {
   Print("The operation of the subsystem A");
  }
class SubSystemB
  {
public:
   void              Operation(void);
  };
void SubSystemB::Operation(void)
  {
   Print("The operation of the subsystem B");
  }
class SubSystemC
  {
public:
   void              Operation(void);
  };
void SubSystemC::Operation(void)
  {
   Print("The operation of the subsystem C");
  }
声明 Facade 类。
class Facade
  {
public:
   void              Operation_A_B(void);
   void              Operation_B_C(void);
protected:
   SubSystemA        subsystem_a;
   SubSystemB        subsystem_b;
   SubSystemC        subsystem_c;
  };
void Facade::Operation_A_B(void)
  {
   Print("The facade of the operation of A & B");
   Print("The request of the facade of the subsystem A operation");
   subsystem_a.Operation();
   Print("The request of the facade of the subsystem B operation");
   subsystem_b.Operation();
  }
void Facade::Operation_B_C(void)
  {
   Print("The facade of the operation of B & C");
   Print("The request of the facade of the subsystem B operation");
   subsystem_b.Operation();
   Print("The request of the facade of the subsystem C operation");
   subsystem_c.Operation();
  }
声明客户端。
class Client
  {
public:
   string            Output(void);
   void              Run(void);
  };
string Client::Output(void)
  {
   return __FUNCTION__;
  }
运行客户端。
void Client::Run(void)
  {
   Facade facade;
   Print("The request of client of the facade operation A & B");
   facade.Operation_A_B();
   Print("The request of client of the facade operation B & C");
   facade.Operation_B_C();
  }
就这样,下面是一个代码块中的全部代码。
namespace Facade
{
class SubSystemA
  {
public:
   void              Operation(void);
  };
void SubSystemA::Operation(void)
  {
   Print("The operation of the subsystem A");
  }
class SubSystemB
  {
public:
   void              Operation(void);
  };
void SubSystemB::Operation(void)
  {
   Print("The operation of the subsystem B");
  }
class SubSystemC
  {
public:
   void              Operation(void);
  };
void SubSystemC::Operation(void)
  {
   Print("The operation of the subsystem C");
  }
class Facade
  {
public:
   void              Operation_A_B(void);
   void              Operation_B_C(void);
protected:
   SubSystemA        subsystem_a;
   SubSystemB        subsystem_b;
   SubSystemC        subsystem_c;
  };
void Facade::Operation_A_B(void)
  {
   Print("The facade of the operation of A & B");
   Print("The request of the facade of the subsystem A operation");
   subsystem_a.Operation();
   Print("The request of the facade of the subsystem B operation");
   subsystem_b.Operation();
  }
void Facade::Operation_B_C(void)
  {
   Print("The facade of the operation of B & C");
   Print("The request of the facade of the subsystem B operation");
   subsystem_b.Operation();
   Print("The request of the facade of the subsystem C operation");
   subsystem_c.Operation();
  }
class Client
  {
public:
   string            Output(void);
   void              Run(void);
  };
string Client::Output(void)
  {
   return __FUNCTION__;
  }
void Client::Run(void)
  {
   Facade facade;
   Print("The request of client of the facade operation A & B");
   facade.Operation_A_B();
   Print("The request of client of the facade operation B & C");
   facade.Operation_B_C();
  }
}
享元(Flyweight)
当存在大量细粒度对象时,Flyweight 结构模式是另一种有用的模式,因为在这种情况下,它使用共享来支持细粒度对象。
该模式有什么作用?
正如我们提到的,这种模式通过使用共享作为支持,在内存方面也很有帮助,这也是它被命名为 Flyweight 的原因。
以下是 Flyweights 设计模式结构图:
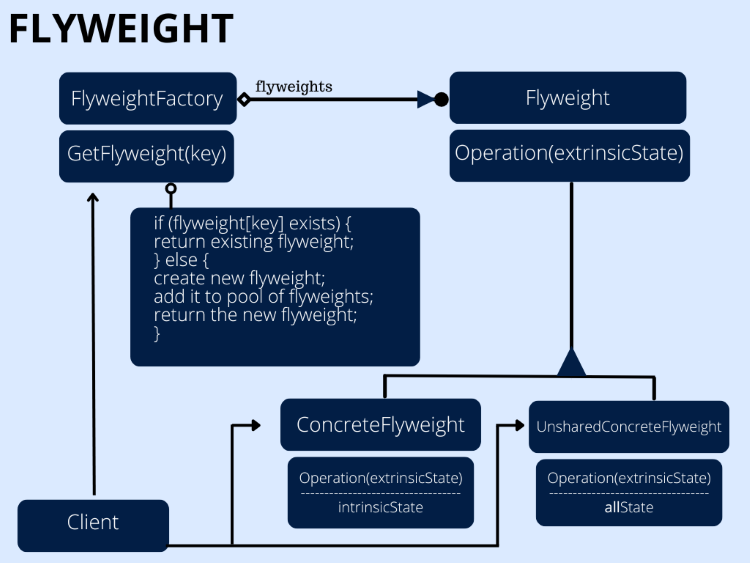
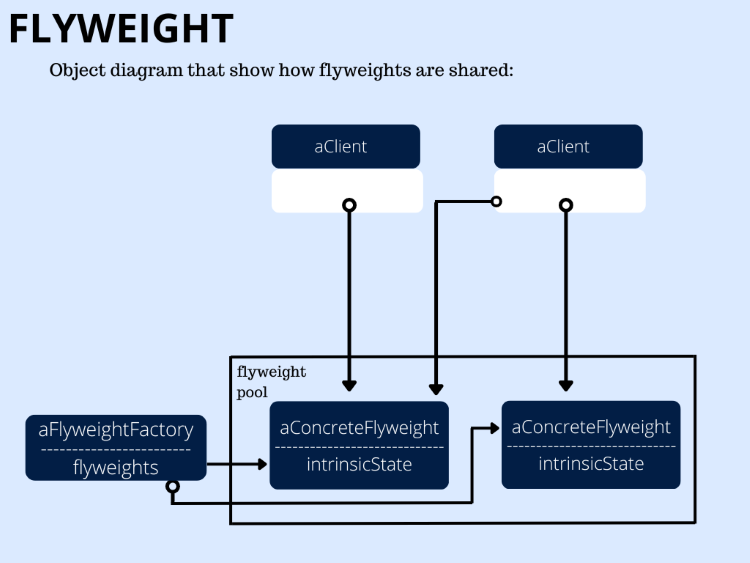
如上图所示,我们有以下参与者:
- Flyweight。
- ConcreteFlyweight。
- UnsharedConcreteFlyweight。
- FlyweightFactory。
- Client。
该模式能解决什么问题?
这种模式可在以下情况下使用:
- 应用程序中会使用大量对象。
- 我们需要降低昂贵的存储成本。
- 如果大部分对象状态都可以是外在的。
- 如果我们去除外在状态,许多对象组可能会被相对较少的共享对象所取代。
- 就依赖性而言,对象的身份对应用程序并不那么重要。
如何在 MQL5 中使用它?
如果希望在 MQL5 中对该模式进行编码,我们将创建下面这样的代码:
使用 namespace 关键字来创建我们的 Flyweight 空间。
namespace Flyweight 使用 interface 关键字声明 Flyweight。
interface Flyweight; 创建 Pair 类,将受保护成员和公共成员作为参与者。
class Pair
  {
protected:
   string            key;
   Flyweight*        value;
public:
                     Pair(void);
                     Pair(string,Flyweight*);
                    ~Pair(void);
   Flyweight*        Value(void);
   string            Key(void);
  };
Pair::Pair(void){}
Pair::Pair(string a_key,Flyweight *a_value):
   key(a_key),
   value(a_value){}
Pair::~Pair(void)
  {
   delete value;
  }
string Pair::Key(void)
  {
   return key;
  }
Flyweight* Pair::Value(void)
  {
   return value;
  }
创建引用类并定义其构造函数和析构函数。
class Reference
  {
protected:
   Pair*             pairs[];
public:
                     Reference(void);
                    ~Reference(void);
   void              Add(string,Flyweight*);
   bool              Has(string);
   Flyweight*        operator[](string);
protected:
   int               Find(string);
  };
Reference::Reference(void){}
Reference::~Reference(void)
  {
   int total=ArraySize(pairs);
   for(int i=0; i<total; i++)
     {
      Pair* ipair=pairs[i];
      if(CheckPointer(ipair))
        {
         delete ipair;
        }
     }
  }
int Reference::Find(string key)
  {
   int total=ArraySize(pairs);
   for(int i=0; i<total; i++)
     {
      Pair* ipair=pairs[i];
      if(ipair.Key()==key)
        {
         return i;
        }
     }
   return -1;
  }
bool Reference::Has(string key)
  {
   return (Find(key)>-1)?true:false;
  }
void Reference::Add(string key,Flyweight *value)
  {
   int size=ArraySize(pairs);
   ArrayResize(pairs,size+1);
   pairs[size]=new Pair(key,value);
  }
Flyweight* Reference::operator[](string key)
  {
   int find=Find(key);
   return (find>-1)?pairs[find].Value():NULL;
  }
声明 Flyweight 接口以作用于外在状态。
interface Flyweight
  {
   void Operation(int extrinsic_state);
  };
声明 ConcreteFlyweight 类。
class ConcreteFlyweight:public Flyweight
  {
public:
   void              Operation(int extrinsic_state);
protected:
   int               intrinsic_state;
  };
void ConcreteFlyweight::Operation(int extrinsic_state)
  {
   intrinsic_state=extrinsic_state;
   printf("The intrinsic state - %d",intrinsic_state);
  }
声明 UnsharedConcreteFlyweight 类。
class UnsharedConcreteFlyweight:public Flyweight
  {
protected:
   int               all_state;
public:
   void              Operation(int extrinsic_state);
  };
void UnsharedConcreteFlyweight::Operation(int extrinsic_state)
  {
   all_state=extrinsic_state;
   Print("all state - %d",all_state);
  }
声明 FlyweightFactory 类。
class FlyweightFactory
  {
protected:
   Reference        pool;
public:
                     FlyweightFactory(void);
   Flyweight*        Flyweight(string key);
  };
FlyweightFactory::FlyweightFactory(void)
  {
   pool.Add("1",new ConcreteFlyweight);
   pool.Add("2",new ConcreteFlyweight);
   pool.Add("3",new ConcreteFlyweight);
  }
Flyweight* FlyweightFactory::Flyweight(string key)
  {
   if(!pool.Has(key))
     {
      pool.Add(key,new ConcreteFlyweight());
     }
   return pool[key];
  }
声明 Client 类。
class Client
  {
public:
   string            Output();
   void              Run();
  };
string Client::Output(void)
  {
   return __FUNCTION__;
  }
运行客户端。
void Client::Run(void)
  {
   int extrinsic_state=7;
   Flyweight* flyweight;
   FlyweightFactory factory;
   flyweight=factory.Flyweight("1");
   flyweight.Operation(extrinsic_state);
   flyweight=factory.Flyweight("10");
   flyweight.Operation(extrinsic_state);
   flyweight=new UnsharedConcreteFlyweight();
   flyweight.Operation(extrinsic_state);
   delete flyweight;
  }
以下是在 MQL5 中编码 Flyweight 模式的完整代码块。
namespace Flyweight
{
interface Flyweight;
class Pair
  {
protected:
   string            key;
   Flyweight*        value;
public:
                     Pair(void);
                     Pair(string,Flyweight*);
                    ~Pair(void);
   Flyweight*        Value(void);
   string            Key(void);
  };
Pair::Pair(void){}
Pair::Pair(string a_key,Flyweight *a_value):
   key(a_key),
   value(a_value){}
Pair::~Pair(void)
  {
   delete value;
  }
string Pair::Key(void)
  {
   return key;
  }
Flyweight* Pair::Value(void)
  {
   return value;
  }
class Reference
  {
protected:
   Pair*             pairs[];
public:
                     Reference(void);
                    ~Reference(void);
   void              Add(string,Flyweight*);
   bool              Has(string);
   Flyweight*        operator[](string);
protected:
   int               Find(string);
  };
Reference::Reference(void){}
Reference::~Reference(void)
  {
   int total=ArraySize(pairs);
   for(int i=0; i<total; i++)
     {
      Pair* ipair=pairs[i];
      if(CheckPointer(ipair))
        {
         delete ipair;
        }
     }
  }
int Reference::Find(string key)
  {
   int total=ArraySize(pairs);
   for(int i=0; i<total; i++)
     {
      Pair* ipair=pairs[i];
      if(ipair.Key()==key)
        {
         return i;
        }
     }
   return -1;
  }
bool Reference::Has(string key)
  {
   return (Find(key)>-1)?true:false;
  }
void Reference::Add(string key,Flyweight *value)
  {
   int size=ArraySize(pairs);
   ArrayResize(pairs,size+1);
   pairs[size]=new Pair(key,value);
  }
Flyweight* Reference::operator[](string key)
  {
   int find=Find(key);
   return (find>-1)?pairs[find].Value():NULL;
  }
interface Flyweight
  {
   void Operation(int extrinsic_state);
  };
class ConcreteFlyweight:public Flyweight
  {
public:
   void              Operation(int extrinsic_state);
protected:
   int               intrinsic_state;
  };
void ConcreteFlyweight::Operation(int extrinsic_state)
  {
   intrinsic_state=extrinsic_state;
   Print("The intrinsic state - %d",intrinsic_state);
  }
class UnsharedConcreteFlyweight:public Flyweight
  {
protected:
   int               all_state;
public:
   void              Operation(int extrinsic_state);
  };
void UnsharedConcreteFlyweight::Operation(int extrinsic_state)
  {
   all_state=extrinsic_state;
   Print("all state - %d",all_state);
  }
class FlyweightFactory
  {
protected:
   Reference        pool;
public:
                     FlyweightFactory(void);
   Flyweight*        Flyweight(string key);
  };
FlyweightFactory::FlyweightFactory(void)
  {
   pool.Add("1",new ConcreteFlyweight);
   pool.Add("2",new ConcreteFlyweight);
   pool.Add("3",new ConcreteFlyweight);
  }
Flyweight* FlyweightFactory::Flyweight(string key)
  {
   if(!pool.Has(key))
     {
      pool.Add(key,new ConcreteFlyweight());
     }
   return pool[key];
  }
class Client
  {
public:
   string            Output();
   void              Run();
  };
string Client::Output(void)
  {
   return __FUNCTION__;
  }
void Client::Run(void)
  {
   int extrinsic_state=7;
   Flyweight* flyweight;
   FlyweightFactory factory;
   flyweight=factory.Flyweight("1");
   flyweight.Operation(extrinsic_state);
   flyweight=factory.Flyweight("10");
   flyweight.Operation(extrinsic_state);
   flyweight=new UnsharedConcreteFlyweight();
   flyweight.Operation(extrinsic_state);
   delete flyweight;
  }
}
代理(Proxy)
现在,我们将确定最后一种结构设计模式,即代理。这种模式有多种类型,但总的来说,我们可以说代理可以用来为另一个对象提供替代或占位符,以完成对该对象访问的控制。它也被称为 "Surrogate"。
该模式有什么作用?
这种模式与我们提到的代理模式相同,可以控制对对象的访问。
下图是代理设计模式的结构图:
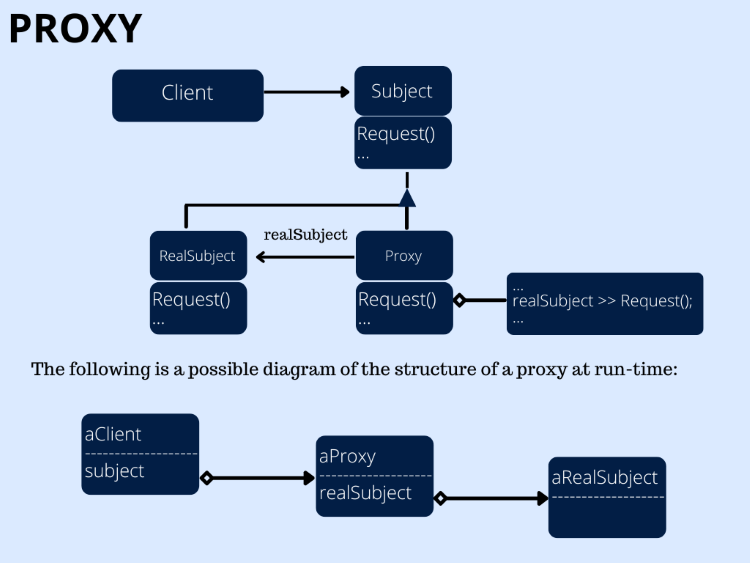
如上图所示,我们有以下参与者:
- Proxy.
- Subject.
- Real subject.
该模式能解决什么问题?
以下是我们可以使用代理的常见情况:- 如果我们需要不同地址空间中某个对象的本地代表,我们可以使用提供该代表的远程代理。
- 如果我们需要一个昂贵的对象,我们可以使用虚拟代理来创建这些对象。
- 如果我们需要控制对主对象或原始对象的访问,可以使用保护代理来实现。
- 如果我们需要替换裸指针,可以使用智能引用(smart reference)。
如何在 MQL5 中使用它?
如果我们需要在 MQL5 中编写代理模式代码来创建高效的软件,我们可以通过以下步骤来实现:
声明代理空间,以声明我们在其中所需的变量、函数、类......等。
namespace Proxy 宣布 Subject 类为参与者。
class Subject
  {
public:
   virtual void      Request(void)=0;
  };
创建 RealSubject 类。
class RealSubject:public Subject
  {
public:
   void              Request(void);
  };
void RealSubject::Request(void)
  {
   Print("The real subject");
  }
将 Proxy 类创建为参与者。
class Proxy:public Subject
  {
protected:
   RealSubject*      real_subject;
public:
                    ~Proxy(void);
   void              Request(void);
  };
Proxy::~Proxy(void)
  {
   delete real_subject;
  }
void Proxy::Request(void)
  {
   if(!CheckPointer(real_subject))
     {
      real_subject=new RealSubject;
     }
   real_subject.Request();
  }
声明 Client 类。
class Client
  {
public:
   string            Output(void);
   void              Run(void);
  };
string Client::Output(void)
  {
   return __FUNCTION__;
  }
运行客户端。
void Client::Run(void)
  {
   Subject* subject=new Proxy;
   subject.Request();
   delete subject;
  }
以下是一个代码块中的完整代码:
namespace Proxy
{
class Subject
  {
public:
   virtual void      Request(void)=0;
  };
class RealSubject:public Subject
  {
public:
   void              Request(void);
  };
void RealSubject::Request(void)
  {
   Print("The real subject");
  }
class Proxy:public Subject
  {
protected:
   RealSubject*      real_subject;
public:
                    ~Proxy(void);
   void              Request(void);
  };
Proxy::~Proxy(void)
  {
   delete real_subject;
  }
void Proxy::Request(void)
  {
   if(!CheckPointer(real_subject))
     {
      real_subject=new RealSubject;
     }
   real_subject.Request();
  }
class Client
  {
public:
   string            Output(void);
   void              Run(void);
  };
string Client::Output(void)
  {
   return __FUNCTION__;
  }
void Client::Run(void)
  {
   Subject* subject=new Proxy;
   subject.Request();
   delete subject;
  }
}
结论
在本文末尾,我们提供了有关结构设计模式主题的简单介绍和信息。通过这篇文章,我们确定了每种结构模式的类型,以了解如何通过深入了解这些模式的每种类型,确定模式是什么、模式做什么、模式的结构是什么、模式解决了哪些设计问题,从而编写出可重用、可扩展、易测试的简洁代码。
这样,我们探讨了以下结构设计模式:
- 适配器(Adapter)
- 桥接(Bridge)
- 组合(Composite)
- 修饰(Decorator)
- 外观(Facade)
- 享元(Flyweight)
- 代理(Proxy)
正如我们在第一部分中所说的,设计模式对于软件开发人员来说非常重要,因为它可以节省大量时间,让你通过使用预先确定、经过测试和实用的解决方案来解决具体问题,从而避免重复发明轮子。并且,您的面向对象编程知识对理解设计模式主题非常有帮助。
我建议阅读更多有关这一重要主题的资料,并推荐以下资源以了解更多信息:
- 《设计模式 - 可重用面向对象软件的要素》,Eric Gamma, Richard Helm, Ralph Johnson, 和 John Vlissides 所著
- 《设计模式傻瓜书》,Steve Holzner 著
- 《深入浅出设计模式》Eric Freeman, Elisabeth Robson, Bert Bates, 和 Kathy Sierra 所著
我希望这篇文章对您有用,它能增加您在软件开发领域的知识和认识,并让您从中受益,用 MQL5 编程语言开发出更高效的软件。如果您觉得这篇文章对您有帮助并从中获得了价值,而且您需要阅读我的更多文章,您可以浏览我的出版物部分,您会发现许多关于 MQL5 编程语言的文章,而且您还会发现许多关于如何根据最常用的技术指标(如 RSI、MACD、布林带、移动平均线、随机指标等)创建交易系统的文章。我希望你能从中受益,并在软件开发和交易方面获得更多的知识和成果。
本文由MetaQuotes Ltd译自英文
原文地址: https://www.mql5.com/en/articles/13724
 群体优化算法:螺旋动态优化 (SDO) 算法
 精通模型解释:从您的机器学习模型中获取深入见解
 您应当知道的 MQL5 向导技术(第 09 部分):K-Means 聚类与分形波配对