Candlestick Trend Constraintモデルの構築(第5回):通知システム(パート2)
内容
- はじめに
- Trend ConstraintにおけるTelegramの統合
- Telegram BOT APIについて
- WindowsにTelegram Pythonモジュールをインストールする
- send_telegram_messages pythonスクリプトについて
- Trend Constraint指標をTelegram用に設定する
- 最終コード
- エラー処理
- テスト結果
- 結論
はじめに
前回は、統合プロセスについて簡単に紹介しました。サブセクションに分けることで、一歩一歩のプロセスの理解を単純化することを目指しました。強力な基盤が不可欠です。特にTrend Constraintモデルの中で、これらの統合をシームレスに機能させるために深く掘り下げる中で、私たちが築いた基礎が強固なものであることを願っています。最終的には、プロジェクト終了までにTelegramとWhatsAppの両方で快適に通知を受け取ることが目標です。この設定により、シグナルを見逃すことなく、ソーシャルメディア上で友人や家族と交流しながらも、指標を常に把握することができます。ソーシャルプラットフォーム上で直接シグナルを共有することで、アプリケーションを切り替える必要がなくなります。
この記事の目的は、望ましい結果が得られるまで、各ステップを総合的に案内することです。前回の記事で得た基礎知識があれば、すべてが明確になります。統合されたプログラムを構成する各コード行について説明します。このプロジェクトには、Telegramの統合に関連して、一貫して念頭に置く必要のある4つの重要な要素があります。
- Telegram bot API
- Pythonスクリプト
- Webリクエストに対応するスクリプトをホスティングする専用サーバー
- 私たちの指標プログラムはTelegram用に設定されています。
これは、主な統合プロセスに関わるコンポーネントの基本的な概要です。ここではTelegramとWhatsAppを取り上げましたが、他のソーシャルメディアプラットフォームも、プロセスを容易にするプログラミング言語さえあれば統合できることに留意すべきです。プログラミングにおける言語の互換性の重要性を認識し、PythonとMQL5をひとつのプロジェクトに組み込みました。これは、Python、C++、ONNX、C#といった様々な言語に精通していることの利点を浮き彫りにしています。このような知識は、MQL5プログラマーがプラットフォーム内で機能を開発したり、他のソーシャルAPIと統合したりする際に大いに役立ちます。
Telegramの実際の統合については、連載第5回の3番目のサブセクションに進み、Telegramに似た構造に従いながら、ボットAPIではなくメッセージングAPIを利用してWhatsAppをさらに統合します。私たちが確立した土台の上に立つことで、原理原則を念頭に置くことができ、この作業は容易になるでしょう。
Trend ConstraintにおけるTelegramの統合
この重要なプロジェクトを進めましょう。この時点では、実質的には中断したところから継続しています。私の調査によると、コードのロジックが理解できれば、これを実現する方法はいくつかあります。私はPythonスクリプトとShellExecuteW関数を使用して、MetaTrader 5指標とTelegram用telebot間の相互作用を促進する方法に集中することを選択しました。これらの点について、さらに詳しく掘り下げていきたいと思います。このアプローチは、PythonとMQL5に慣れている人にとっては比較的簡単であるという利点があります。MQL5指標に大規模な変更を加える必要はありません。唯一の欠点は、Pythonスクリプトやライブラリなどの外部依存を必要とすることです。
その目的は、Telegram上でのMetaTrader 5シグナルへのアクセシビリティを強化し、テレボットを実装することで共有と転送を容易にすることです。
前回の記事(パート1)では、WebRequest関数を利用した統合方法について説明しました。しかし、MQL5のドキュメントを見直すと、この方法は指標を統合するには理想的ではないが、ロボットではうまく機能することがわかりました。
シェルDLLファイルは、信頼できないアプリケーションで使用すると重大なリスクを引き起こす可能性があるため、使用する際には注意が必要です。攻撃やハッキングを防ぐためには、コンピュータ上のこれらのシステムの機能を十分に理解し、信頼することが極めて重要です。
Telegram BOT APIについて
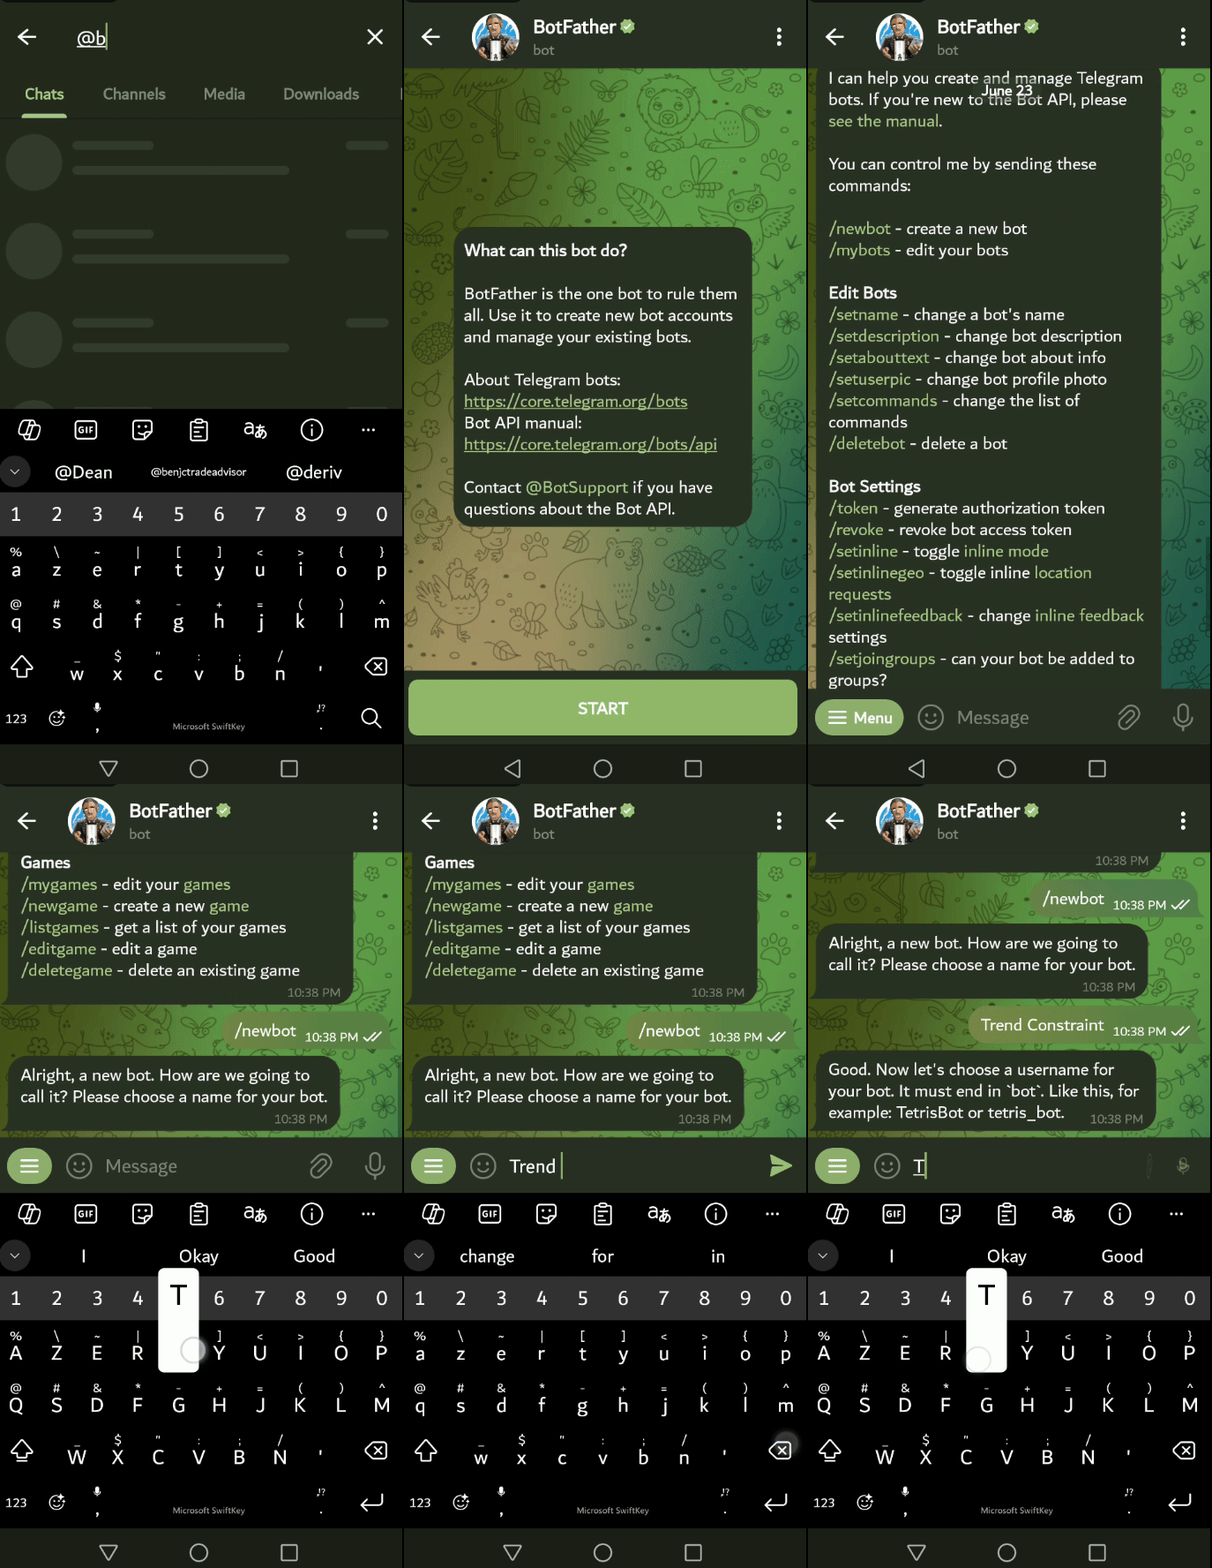
読者がすでにTelegramのアクティブユーザーだと仮定します。このプロジェクトでは、私自身が保持する詳細を含め、よりパーソナライズされたプライバシーが求められます。@Botfatherを使っておこなったように、ユニークな名前を付けてTelegramボットを作成するには、ついてきてください。このボットをTrend Constraintと名付け、ユーザー名は@trend_constraint_botとしました。同様の方法で、ユニークな名前を付けて自分のボットを作成することができます。Botfatherの使い方を簡単に説明します。Botfatherの指示に従って手続きを完了します。完了すると、ボットAPIにアクセスするためのボットトークンが発行されます。その後、ボットと会話を開始し、グループやチャンネルに追加してチャットを開始します。各チャットには、ボットが特定のユーザーと対話するために使用する一意のIDがあります。このチャットは、MetaTrader 5指標からTelegramユーザーにシグナルを渡すためにも使用されます。

すべてを設定した後、クロームブラウザを使ってボットAPIにアクセスしました。BotFatherから受け取ったボットトークンを覚えておいてください。APIへのリンクhttps://api.telegram.org/bot<ボットトークン>/getUpdatesを使用し、ハイライトされたテキストをご自分のボットトークンに置き換えてください。
典型的な例:https://api.telegram.org/bot9004946256:shTUYuq52f8CHLt8BLdYGHYJi2QM6H3donA/getUpdates
注:強調表示されたAPIトークンは、教育目的でランダムに生成されたものです。ロボットには@BotFatherから提供されたものを使用してください。APIが私たちの望むものを表示するために、ボットとチャットをすることを確認してください。また、新しいチャットの更新が表示されるように、APIブラウザのタブを更新してください。APIブラウザのタブにあるpretty-printボックスをチェックすると、レイアウトがわかりやすくなります。
APIは、ボットとの継続的な通信のためのJSONコードを表示します。まず、JSON (JavaScript Object Notation)を、人間が読み書きしやすく、機械が解析生成しやすい軽量のデータ交換フォーマットとして定義しましょう。Webアプリケーション(サーバーとクライアント間など)でのデータ送信や、アプリケーションやデータストレージの設定によく使われます。オブジェクトと配列で構成されています。
以下は、ボットに「hey」メッセージを送信した後に表示されたAPI JSONです。
{
  "ok": true,
  "result": [
    {
      "update_id": 464310132,
      "message": {
        "message_id": 12,
        "from": {
          "id": 7049213628,
          "is_bot": false,
          "first_name": "Clemence",
          "last_name": "Benjamin",
          "username": "benjc_trade_advisor",
          "language_code": "en"
        },
        "chat": {
          "id": 7049213628,
          "first_name": "Clemence",
          "last_name": "Benjamin",
          "username": "benjc_trade_advisor",
          "type": "private"
        },
        "date": 1719044625,
        "text": "hey"
      }
JSONコードの詳しい説明は次の通りです。
トップレベルの構造
- ok:APIリクエストの成功を示すブール値です。この場合trueであり、リクエストが成功したことを意味します。
- result:1つ以上の更新オブジェクトを含む配列です。この例では、1つの更新オブジェクトがあります。
result配列の各要素は更新を表します。ここでは、1つの更新があります。
- update_id:更新の一意の識別子です。更新状況を把握し、更新漏れや複数回の更新がないようにすることができます。この場合、update_idは
- 464310132です。
messageオブジェクト
このオブジェクトには、更新のトリガーとなったメッセージに関する情報が含まれています。
- message_id:チャット内のメッセージの一意な識別子です。ここでは12です。
- from:このオブジェクトにはメッセージの送信者に関する情報が含まれます。
- id:メッセージを送信したユーザーの一意の識別子です。ここでは7049213628です。
- is_bot:このブール値は、送信者がボットであるかどうかを示します。この場合はfalseで、送信者は人間であることを意味します。
- first_name:差出人の名前(Clemence)
- last_name:差出人の姓(Benjamin)
- language_code:差出人の言語設定を表す言語コード。ここでは英語のenです。
- chat:このオブジェクトには、メッセージが送信されたチャットに関する情報が含まれています。
- id:チャットの一意識別子。これはプライベートチャットなので、ユーザーのID(7049213628)と一致します。
- first_name:チャット参加者の名前(Clemence)
- last_name:チャット参加者の姓(Benjamin)
- type:チャットの種類。ここではprivateであり、ユーザーとボットの1対1のチャットを示しています。
- date:メッセージが送信された日時。Unixタイムスタンプ(1970年1月1日からの秒数)で表されます。この場合、タイムスタンプは1719044625です。
- text:メッセージの実際のテキスト内容(「hey」)
指標プログラムで必要となるチャットIDという最も重要な部分に簡単に集中できるように、JSONのチャットセクションは脇に置くことにしました。以下のJSONスニペットをご覧ください。
"chat": {
          "id": 7049213628,
          "first_name": "Clemence",
          "last_name": "Benjamin",
          "username": "benjc_trade_advisor",
          "type": "private"
        }
chatオブジェクトは、チャットの一意識別子、参加者の姓名、チャットのタイプなど、メッセージが送信されたチャットに関する詳細情報を提供します。この場合、Clemence Benjaminというユーザーのプライベートチャットが指定されています。Chatオブジェクトの詳しい説明を見てみましょう。
id
- 説明:チャットのユニークな識別子
- 値:7049213628
- 重要さ:プライベートチャットの場合、このIDは通常、チャットに参加している参加者のユーザーIDと一致します。
first_name
- 説明:チャット参加者の名
- 値:Clemence
- 重要さ:これは、チャット内でユーザーを名で識別するのに役立ちます
last_name
- 説明:チャット参加者の姓
- 値:Benjamin
- 重要さ:チャット内でユーザーを完全に識別するために名を補完します
username
- 説明:鍵です。
- 値:"benjc_trade_advisor"
- 重要さ:この行は、オブジェクト(ユーザー、ボット、チャットなど)に関連付けられたユーザー名が "benjc_trade_advisor "であることを示します。このユーザー名は通常、JSONデータを使用するアプリケーションやシステム内で、認識可能な形式でエンティティを識別するために使用されます。
type
- 説明:チャットの種類
- 値:private
- 重要さ:このチャットがグループチャットやチャンネルではなく、ユーザーとボットの1対1の会話であることを示します。
概要
前述のセクションの目的は、実用的なTelegramボットを開発し、メインプロジェクトにとって重要な要素であるボットトークンとチャットIDを取得することでした。各コンポーネントをより深く理解するためにAPIを掘り下げました。ボットトークンとチャットIDを取得することで、統合プロセスを進めることができ、様々なプログラミング言語を検討することができます。
WindowsにTelegram Pythonモジュールをインストールする
お使いのコンピュータにpythonがインストールされている必要があります。コンピューターがインターネットに接続されていることを確認してください。Python.orgからダウンロードできます。このガイドは実質的にWindowsコンピュータで作成しました。Mac、Linux、その他のフレームワークでは違うアプローチになるかもしれません。pythonのインストールが終わったら、次の手順としてpython telegram APIモジュールもインストールします。これにより、TelegramのPythonスクリプトが正常に実行されるようになります。cmd.exe(Windowコマンドプロンプト)を開き、以下のコードスニペットを実行します。コードをコピーしてWindowsのコマンドプロンプトに貼り付けます。キーボードのEnterキーを押してコードのダウンロードを開始させ、モジュールのインストールが完了するまでしばらく待ちます。
pip install pyTelegramBotAPI
コマンドプロンプトのスクリーンショットを以下に示します。
完了したらウィンドウを閉じ、コンピュータを再起動します。
このステップを完了すると、コンピュータがTelegram Bot APIとやりとりするためのPythonスクリプトを実行する準備が整ったことになります。次の段階では、コードを精査し、このタスクのためにシステムを設定します。
send_telegram_messages pythonスクリプトについて
スクリプトの構成を見てみましょう。そして、最終的なコードを1つのスニペットで示します。ファイル名は send_telegram_message.pyとします。
スクリプトは、まず必要なモジュールを以下のようにインポートします。
- import telebot:Telegram Bot APIとのやりとりに必要な関数を提供するtelebotモジュールをインポート
- import sys:スクリプトがコマンドライン引数を使えるようにするsysモジュールをインポート
import telebot
import sys
API_TOKENとチャットIDの宣言に移ります。
- API_TOKEN:この変数には、ボットのAPIトークンが格納されます。このAPIトークンは、ボットをTelegramサーバーで認証するために使用されます。
- CHAT_ID:ユーザーとテレボットの間、またはチャネルとグループの間の各チャットのIDの一意の値
API_TOKEN = '9004946256:shTUYuq52f8CHLt8BLdYGHYJi2QM6H3donA' #Replace the API TOKEN with your bot tokrn from @BotFather
CHAT_ID = '7049213628'  #Replace the ID with your actual Chat ID from the telebot API
提供されたAPIトークンでTeleBotオブジェクトを初期化し、Telegram Bot APIと対話できるようにする必要があります。
bot = telebot.TeleBot(API_TOKEN)
次のpythonコードスニペットは、Telegram経由でメッセージを送信する関数を定義し、APIとシステムに関連する例外をエラー処理します。
def send_telegram_message(message):
    try:
        bot.send_message(CHAT_ID, message)
        print("Message sent successfully!")
    except telebot.apihelper.ApiTelegramException as e:
        print(f"Failed to send message: {e}")
    except Exception as e:
        print(f"An error occurred: {e}")
コードの最後の部分は、このコードのブロックが、モジュールとしてインポートされた場合ではなく、スクリプトが直接実行された場合にのみ実行されるようにするための条件です。コマンドライン引数からメッセージを取得するか、引数がない場合はデフォルトのメッセージを設定します。
if __name__ == "__main__":
    message = sys.argv[1] if len(sys.argv) > 1 else "Test message"
    send_telegram_message(message)
すべてをまとめると最終的なコードになります。ファイルを send_telegram_message.pyとして、python scriptsフォルダに保存します。scriptsフォルダへのアクセスは問題なく動作していることがわかりました。
import telebot
import sys

API_TOKEN = '9004946256:shTUYuq52f8CHLt8BLdYGHYJi2QM6H3donA'#Replace with your API_TOKEN given by BotFather
CHAT_ID = '7049213628' #Replace with your CHAT_ID

bot = telebot.TeleBot(API_TOKEN)

def send_telegram_message(message):
    try:
        bot.send_message(CHAT_ID, message)
        print("Message sent successfully!")
    except telebot.apihelper.ApiTelegramException as e:
        print(f"Failed to send message: {e}")
    except Exception as e:
        print(f"An error occurred: {e}")

if __name__ == "__main__":
   message = sys.argv[1] if len(sys.argv) > 1 else "Test message"
    send_telegram_message(message)
次の主要ステップは、MQL5指標がPythonスクリプトを呼び出すように設定することです。
Trend Constraint指標をTelegram用に設定する
ここでは、ShellExecuteW 関数を使用してPythonスクリプトを呼び出すために、MQL5指標のmyAlert関数を修正する必要があります。この関数はPythonスクリプトを実行し、引数としてアラートメッセージを渡します。
ここでは、Trend Constraintの修正方法について、修正前と修正後の2つのコードスニペットを示します。
修正前
void myAlert(string type, string message)
  {
   if(type == "print")
      Print(message);
   else if(type == "error")
     {
      Print(type+" | Trend Constraint V1.05 @ "+Symbol()+","+IntegerToString(Period())+" | "+message);
     }
   else if(type == "order")
     {
     }
   else if(type == "modify")
     {
     }
   else if(type == "indicator")
     {
      if(Audible_Alerts) Alert(type+" | Trend Constraint V1.05 @ "+Symbol()+","+IntegerToString(Period())+" | "+message);
      if(Push_Notifications) SendNotification(type+" | Trend Constraint V1.05 @ "+Symbol()+","+IntegerToString(Period())+" | "+message);
     }
  }
修正後
//--- ShellExecuteW declaration ----------------------------------------------
#import "shell32.dll"
int ShellExecuteW(int hwnd, string lpOperation, string lpFile, string lpParameters, string lpDirectory, int nShowCmd);
#import


datetime last_alert_time;
input int alert_cooldown_seconds = 60; // Cooldown period in seconds, this helps to avoid instant continuous alerting depending on indicator conditions

//Modify the myAlert Function for telegram notification
void myAlert(string type, string message) {
    datetime current_time = TimeCurrent();
    if (current_time - last_alert_time < alert_cooldown_seconds) {
        // Skip alert if within cooldown period
        return;
    }

    last_alert_time = current_time;
    string full_message = type + " | Trend Constraint V1.04 @ " + Symbol() + "," + IntegerToString(Period()) + " | " + message;
    if (type == "print") {
        Print(message);
    } else if (type == "error") {
        Print(type + " | Trend Constraint V1.04 @ " + Symbol() + "," + IntegerToString(Period()) + " | " + message);
    } else if (type == "order") {
        // Add order alert handling if needed
    } else if (type == "modify") {
        // Add modify alert handling if needed
    } else if (type == "indicator") {
        if (Audible_Alerts) {
            Alert(full_message);
        }
        if (Push_Notifications) {
            SendNotification(full_message);
        }

        // Send to Telegram
        string python_path = "C:\\Users\\Pro_tech\\AppData\\Local\\Programs\\Python\\Python312\\python.exe";
        string script_path = "C:\\Users\\Pro_tech\\AppData\\Local\\Programs\\Python\\Python312\\Scripts\\send_telegram_message.py";
        string command = python_path + " \"" + script_path + "\" \"" + full_message + "\"";

        Print("Executing command to send Telegram message: ", command);

        // Use cmd.exe to execute the command and then wait for 5 seconds
        string final_command = "/c " + command + " && timeout 5";
        int result = ShellExecuteW(0, "open", "cmd.exe", final_command, NULL, 1);
        if (result <= 32) {
            int error_code = GetLastError();
            Print("Failed to execute Python script. Error code: ", error_code);
        } else {
            Print("Successfully executed Python script. Result code: ", result);
        }
    }
}


//--- End of Telegram Integration functions ---------------------------------------
この修正が何をしようとしているのか、簡単に説明しましょう。
まずWindowsのshell32.dllライブラリからShellExecuteW関数をインポートし、MQL5プログラムが外部コマンドを実行できるようにします。この場合は、send_telegram_message.pyスクリプトを実行しています。ShellExecuteW関数を宣言しなければ、プログラムは動作しません。また、指標の設定ミスによるcmd.exeの連続実行を抑制するため、クールダウンを導入しました。私の場合、前回の記事で述べたように、Trend ConstraintV1.04のバッファ5と6にアラート条件があり、複数のシグナルアラートが短時間に発生しました。Telegram機能を統合すると結果はさらに悪化しました。cmd.exeは瞬時に何度も起動し、コンピュータがフリーズしました。それを軽減するために、myAlert()なしで指標を描画できるようにしました。つまり、コメントはプログラム中では実行されないので、コメントにしてミュートしたのです。
//--- ShellExecuteW declaration ----------------------------------------------
#import "shell32.dll"
int ShellExecuteW(int hwnd, string lpOperation, string lpFile, string lpParameters, string lpDirectory, int nShowCmd);
#import
次はコードのもう1つの重要な部分です。
// Send to Telegram
string python_path = "C:\\Users\\Pro_tech\\AppData\\Local\\Programs\\Python\\Python312\\python.exe";
string script_path = "C:\\Users\\Pro_tech\\AppData\\Local\\Programs\\Python\\Python312\\Scripts\\send_telegram_message.py";
string command = python_path + " \"" + script_path + "\" \"" + full_message + "\"";
上記のコードでは、MetaTrader 5の指標プログラム内からPythonスクリプトを実行するコマンドを作成し、Pythonインタープリターとスクリプトへのパス、および送信するメッセージを指定しています。強調表示されたテキストは、お使いのコンピュータに応じて、パスのテキストに置き換えてください。これは私のコンピュータからの例です。
最終コード
すべての説明を終えました。統合に成功し、新機能が追加され、Trend ConstraintV1.05にアップグレードしました。
//+------------------------------------------------------------------+
//|                                       Trend Constraint V1.05.mq5 |
//|                                Copyright 2024, Clemence Benjamin |
//|                                             https://www.mql5.com |
//+------------------------------------------------------------------+
#property copyright "Copyright 2024, Clemence Benjamin"
#property link      "https://www.mql5.com"
#property version   "1.05"
#property description "A model that seeks to produce sell signals when D1 candle is Bearish only and buy signals when it is Bullish"


//--- indicator settings
#property indicator_chart_window
#property indicator_buffers 6
#property indicator_plots 6

#property indicator_type1 DRAW_ARROW
#property indicator_width1 5
#property indicator_color1 0xFF3C00
#property indicator_label1 "Buy"

#property indicator_type2 DRAW_ARROW
#property indicator_width2 5
#property indicator_color2 0x0000FF
#property indicator_label2 "Sell"

#property indicator_type3 DRAW_ARROW
#property indicator_width3 2
#property indicator_color3 0xE8351A
#property indicator_label3 "Buy Reversal"

#property indicator_type4 DRAW_ARROW
#property indicator_width4 2
#property indicator_color4 0x1A1AE8
#property indicator_label4 "Sell Reversal"

#property indicator_type5 DRAW_LINE
#property indicator_style5 STYLE_SOLID
#property indicator_width5 2
#property indicator_color5 0xFFAA00
#property indicator_label5 "Buy"

#property indicator_type6 DRAW_LINE
#property indicator_style6 STYLE_SOLID
#property indicator_width6 2
#property indicator_color6 0x0000FF
#property indicator_label6 "Sell"

#define PLOT_MAXIMUM_BARS_BACK 5000
#define OMIT_OLDEST_BARS 50

//--- indicator buffers
double Buffer1[];
double Buffer2[];
double Buffer3[];
double Buffer4[];
double Buffer5[];
double Buffer6[];

input double Oversold = 30;
input double Overbought = 70;
input int Slow_MA_period = 200;
input int Fast_MA_period = 100;
datetime time_alert; //used when sending alert
input bool Audible_Alerts = true;
input bool Push_Notifications = true;
double myPoint; //initialized in OnInit
int RSI_handle;
double RSI[];
double Open[];
double Close[];
int MA_handle;
double MA[];
int MA_handle2;
double MA2[];
int MA_handle3;
double MA3[];
int MA_handle4;
double MA4[];
double Low[];
double High[];
int MA_handle5;
double MA5[];
int MA_handle6;
double MA6[];
int MA_handle7;
double MA7[];

//--- ShellExecuteW declaration ----------------------------------------------
#import "shell32.dll"
int ShellExecuteW(int hwnd, string lpOperation, string lpFile, string lpParameters, string lpDirectory, int nShowCmd);
#import

//--- functions for telegram integration -----------------------------------------------
datetime last_alert_time;
input int alert_cooldown_seconds = 60; // Cooldown period in seconds

void myAlert(string type, string message) {
    datetime current_time = TimeCurrent();
    if (current_time - last_alert_time < alert_cooldown_seconds) {
        // Skip alert if within cooldown period
        return;
    }

    last_alert_time = current_time;
    string full_message = type + " | Trend Constraint V1.05 @ " + Symbol() + "," + IntegerToString(Period()) + " | " + message;
    if (type == "print") {
        Print(message);
    } else if (type == "error") {
        Print(type + " | Trend Constraint V1.05 @ " + Symbol() + "," + IntegerToString(Period()) + " | " + message);
    } else if (type == "order") {
        // Add order alert handling if needed
    } else if (type == "modify") {
        // Add modify alert handling if needed
    } else if (type == "indicator") {
        if (Audible_Alerts) {
            Alert(full_message);
        }
        if (Push_Notifications) {
            SendNotification(full_message);
        }

        // Send to Telegram //Remember to replace the storages path with your actual path.
        string python_path = "C:\\Users\\Pro_tech\\AppData\\Local\\Programs\\Python\\Python312\\python.exe";
        string script_path = "C:\\Users\\Pro_tech\\AppData\\Local\\Programs\\Python\\Python312\\Scripts\\send_telegram_message.py";
        string command = python_path + " \"" + script_path + "\" \"" + full_message + "\"";

        // Debugging: Print the command being executed
        Print("Executing command to send Telegram message: ", command);

        // Use cmd.exe to execute the command and then wait for 5 seconds
        string final_command = "/c " + command + " && timeout 5";
        int result = ShellExecuteW(0, "open", "cmd.exe", final_command, NULL, 1);
        if (result <= 32) {
            int error_code = GetLastError();
            Print("Failed to execute Python script. Error code: ", error_code);
        } else {
            Print("Successfully executed Python script. Result code: ", result);
        }
    }
}

//+------------------------------------------------------------------+
//| Custom indicator initialization function                         |
//+------------------------------------------------------------------+
int OnInit()
  {
   SetIndexBuffer(0, Buffer1);
   PlotIndexSetDouble(0, PLOT_EMPTY_VALUE, EMPTY_VALUE);
   PlotIndexSetInteger(0, PLOT_DRAW_BEGIN, MathMax(Bars(Symbol(), PERIOD_CURRENT)-PLOT_MAXIMUM_BARS_BACK+1, OMIT_OLDEST_BARS+1));
   PlotIndexSetInteger(0, PLOT_ARROW, 241);
   SetIndexBuffer(1, Buffer2);
   PlotIndexSetDouble(1, PLOT_EMPTY_VALUE, EMPTY_VALUE);
   PlotIndexSetInteger(1, PLOT_DRAW_BEGIN, MathMax(Bars(Symbol(), PERIOD_CURRENT)-PLOT_MAXIMUM_BARS_BACK+1, OMIT_OLDEST_BARS+1));
   PlotIndexSetInteger(1, PLOT_ARROW, 242);
   SetIndexBuffer(2, Buffer3);
   PlotIndexSetDouble(2, PLOT_EMPTY_VALUE, EMPTY_VALUE);
   PlotIndexSetInteger(2, PLOT_DRAW_BEGIN, MathMax(Bars(Symbol(), PERIOD_CURRENT)-PLOT_MAXIMUM_BARS_BACK+1, OMIT_OLDEST_BARS+1));
   PlotIndexSetInteger(2, PLOT_ARROW, 236);
   SetIndexBuffer(3, Buffer4);
   PlotIndexSetDouble(3, PLOT_EMPTY_VALUE, EMPTY_VALUE);
   PlotIndexSetInteger(3, PLOT_DRAW_BEGIN, MathMax(Bars(Symbol(), PERIOD_CURRENT)-PLOT_MAXIMUM_BARS_BACK+1, OMIT_OLDEST_BARS+1));
   PlotIndexSetInteger(3, PLOT_ARROW, 238);
   SetIndexBuffer(4, Buffer5);
   PlotIndexSetDouble(4, PLOT_EMPTY_VALUE, EMPTY_VALUE);
   PlotIndexSetInteger(4, PLOT_DRAW_BEGIN, MathMax(Bars(Symbol(), PERIOD_CURRENT)-PLOT_MAXIMUM_BARS_BACK+1, OMIT_OLDEST_BARS+1));
   SetIndexBuffer(5, Buffer6);
   PlotIndexSetDouble(5, PLOT_EMPTY_VALUE, EMPTY_VALUE);
   PlotIndexSetInteger(5, PLOT_DRAW_BEGIN, MathMax(Bars(Symbol(), PERIOD_CURRENT)-PLOT_MAXIMUM_BARS_BACK+1, OMIT_OLDEST_BARS+1));
   //initialize myPoint
   myPoint = Point();
   if(Digits() == 5 || Digits() == 3)
     {
      myPoint *= 10;
     }
   RSI_handle = iRSI(NULL, PERIOD_CURRENT, 14, PRICE_CLOSE);
   if(RSI_handle < 0)
     {
      Print("The creation of iRSI has failed: RSI_handle=", INVALID_HANDLE);
      Print("Runtime error = ", GetLastError());
      return(INIT_FAILED);
     }

   MA_handle = iMA(NULL, PERIOD_CURRENT, 7, 0, MODE_SMMA, PRICE_CLOSE);
   if(MA_handle < 0)
     {
      Print("The creation of iMA has failed: MA_handle=", INVALID_HANDLE);
      Print("Runtime error = ", GetLastError());
      return(INIT_FAILED);
     }

   MA_handle2 = iMA(NULL, PERIOD_CURRENT, 400, 0, MODE_SMA, PRICE_CLOSE);
   if(MA_handle2 < 0)
     {
      Print("The creation of iMA has failed: MA_handle2=", INVALID_HANDLE);
      Print("Runtime error = ", GetLastError());
      return(INIT_FAILED);
     }

   MA_handle3 = iMA(NULL, PERIOD_CURRENT, 100, 0, MODE_EMA, PRICE_CLOSE);
   if(MA_handle3 < 0)
     {
      Print("The creation of iMA has failed: MA_handle3=", INVALID_HANDLE);
      Print("Runtime error = ", GetLastError());
      return(INIT_FAILED);
     }

   MA_handle4 = iMA(NULL, PERIOD_CURRENT, 200, 0, MODE_SMA, PRICE_CLOSE);
   if(MA_handle4 < 0)
     {
      Print("The creation of iMA has failed: MA_handle4=", INVALID_HANDLE);
      Print("Runtime error = ", GetLastError());
      return(INIT_FAILED);
     }

   MA_handle5 = iMA(NULL, PERIOD_CURRENT, Fast_MA_period, 0, MODE_SMA, PRICE_CLOSE);
   if(MA_handle5 < 0)
     {
      Print("The creation of iMA has failed: MA_handle5=", INVALID_HANDLE);
      Print("Runtime error = ", GetLastError());
      return(INIT_FAILED);
     }

   MA_handle6 = iMA(NULL, PERIOD_CURRENT, Slow_MA_period, 0, MODE_SMA, PRICE_CLOSE);
   if(MA_handle6 < 0)
     {
      Print("The creation of iMA has failed: MA_handle6=", INVALID_HANDLE);
      Print("Runtime error = ", GetLastError());
      return(INIT_FAILED);
     }

   MA_handle7 = iMA(NULL, PERIOD_CURRENT, 200, 0, MODE_EMA, PRICE_CLOSE);
   if(MA_handle7 < 0)
     {
      Print("The creation of iMA has failed: MA_handle7=", INVALID_HANDLE);
      Print("Runtime error = ", GetLastError());
      return(INIT_FAILED);
     }

   return(INIT_SUCCEEDED);
  }

//+------------------------------------------------------------------+
//| Custom indicator iteration function                              |
//+------------------------------------------------------------------+
int OnCalculate(const int rates_total,
                const int prev_calculated,
                const datetime& time[],
                const double& open[],
                const double& high[],
                const double& low[],
                const double& close[],
                const long& tick_volume[],
                const long& volume[],
                const int& spread[])
  {
   int limit = rates_total - prev_calculated;
   //--- counting from 0 to rates_total
   ArraySetAsSeries(Buffer1, true);
   ArraySetAsSeries(Buffer2, true);
   ArraySetAsSeries(Buffer3, true);
   ArraySetAsSeries(Buffer4, true);
   ArraySetAsSeries(Buffer5, true);
   ArraySetAsSeries(Buffer6, true);
   //--- initial zero
   if(prev_calculated < 1)
     {
      ArrayInitialize(Buffer1, EMPTY_VALUE);
      ArrayInitialize(Buffer2, EMPTY_VALUE);
      ArrayInitialize(Buffer3, EMPTY_VALUE);
      ArrayInitialize(Buffer4, EMPTY_VALUE);
      ArrayInitialize(Buffer5, EMPTY_VALUE);
      ArrayInitialize(Buffer6, EMPTY_VALUE);
     }
   else
      limit++;
   datetime Time[];

   datetime TimeShift[];
   if(CopyTime(Symbol(), PERIOD_CURRENT, 0, rates_total, TimeShift) <= 0) return(rates_total);
   ArraySetAsSeries(TimeShift, true);
   int barshift_M1[];
   ArrayResize(barshift_M1, rates_total);
   int barshift_D1[];
   ArrayResize(barshift_D1, rates_total);
   for(int i = 0; i < rates_total; i++)
     {
      barshift_M1[i] = iBarShift(Symbol(), PERIOD_M1, TimeShift[i]);
      barshift_D1[i] = iBarShift(Symbol(), PERIOD_D1, TimeShift[i]);
   }
   if(BarsCalculated(RSI_handle) <= 0)
      return(0);
   if(CopyBuffer(RSI_handle, 0, 0, rates_total, RSI) <= 0) return(rates_total);
   ArraySetAsSeries(RSI, true);
   if(CopyOpen(Symbol(), PERIOD_M1, 0, rates_total, Open) <= 0) return(rates_total);
   ArraySetAsSeries(Open, true);
   if(CopyClose(Symbol(), PERIOD_D1, 0, rates_total, Close) <= 0) return(rates_total);
   ArraySetAsSeries(Close, true);
   if(BarsCalculated(MA_handle) <= 0)
      return(0);
   if(CopyBuffer(MA_handle, 0, 0, rates_total, MA) <= 0) return(rates_total);
   ArraySetAsSeries(MA, true);
   if(BarsCalculated(MA_handle2) <= 0)
      return(0);
   if(CopyBuffer(MA_handle2, 0, 0, rates_total, MA2) <= 0) return(rates_total);
   ArraySetAsSeries(MA2, true);
   if(BarsCalculated(MA_handle3) <= 0)
      return(0);
   if(CopyBuffer(MA_handle3, 0, 0, rates_total, MA3) <= 0) return(rates_total);
   ArraySetAsSeries(MA3, true);
   if(BarsCalculated(MA_handle4) <= 0)
      return(0);
   if(CopyBuffer(MA_handle4, 0, 0, rates_total, MA4) <= 0) return(rates_total);
   ArraySetAsSeries(MA4, true);
   if(CopyLow(Symbol(), PERIOD_CURRENT, 0, rates_total, Low) <= 0) return(rates_total);
   ArraySetAsSeries(Low, true);
   if(CopyHigh(Symbol(), PERIOD_CURRENT, 0, rates_total, High) <= 0) return(rates_total);
   ArraySetAsSeries(High, true);
   if(BarsCalculated(MA_handle5) <= 0)
      return(0);
   if(CopyBuffer(MA_handle5, 0, 0, rates_total, MA5) <= 0) return(rates_total);
   ArraySetAsSeries(MA5, true);
   if(BarsCalculated(MA_handle6) <= 0)
      return(0);
   if(CopyBuffer(MA_handle6, 0, 0, rates_total, MA6) <= 0) return(rates_total);
   ArraySetAsSeries(MA6, true);
   if(BarsCalculated(MA_handle7) <= 0)
      return(0);
   if(CopyBuffer(MA_handle7, 0, 0, rates_total, MA7) <= 0) return(rates_total);
   ArraySetAsSeries(MA7, true);
   if(CopyTime(Symbol(), Period(), 0, rates_total, Time) <= 0) return(rates_total);
   ArraySetAsSeries(Time, true);
   //--- main loop
   for(int i = limit-1; i >= 0; i--)
     {
      if (i >= MathMin(PLOT_MAXIMUM_BARS_BACK-1, rates_total-1-OMIT_OLDEST_BARS)) continue; //omit some old rates to prevent "Array out of range" or slow calculation

      if(barshift_M1[i] < 0 || barshift_M1[i] >= rates_total) continue;
      if(barshift_D1[i] < 0 || barshift_D1[i] >= rates_total) continue;

      //Indicator Buffer 1
      if(RSI[i] < Oversold
      && RSI[i+1] > Oversold //Relative Strength Index crosses below fixed value
      && Open[barshift_M1[i]] >= Close[1+barshift_D1[i]] //Candlestick Open >= Candlestick Close
      && MA[i] > MA2[i] //Moving Average > Moving Average
      && MA3[i] > MA4[i] //Moving Average > Moving Average
      )
        {
         Buffer1[i] = Low[1+i]; //Set indicator value at Candlestick Low
         if(i == 1 && Time[1] != time_alert) myAlert("indicator", "Buy"); //Alert on next bar open
         time_alert = Time[1];
        }
      else
        {
         Buffer1[i] = EMPTY_VALUE;
        }
      //Indicator Buffer 2
      if(RSI[i] > Overbought
      && RSI[i+1] < Overbought //Relative Strength Index crosses above fixed value
      && Open[barshift_M1[i]] <= Close[1+barshift_D1[i]] //Candlestick Open <= Candlestick Close
      && MA[i] < MA2[i] //Moving Average < Moving Average
      && MA3[i] < MA4[i] //Moving Average < Moving Average
      )
        {
         Buffer2[i] = High[1+i]; //Set indicator value at Candlestick High
         if(i == 1 && Time[1] != time_alert) myAlert("indicator", "Sell"); //Alert on next bar open
         time_alert = Time[1];
        }
      else
        {
         Buffer2[i] = EMPTY_VALUE;
        }
      //Indicator Buffer 3
      if(MA5[i] > MA6[i]
      && MA5[i+1] < MA6[i+1] //Moving Average crosses above Moving Average
      )
        {
         Buffer3[i] = Low[i]; //Set indicator value at Candlestick Low
         if(i == 1 && Time[1] != time_alert) myAlert("indicator", "Buy Reversal"); //Alert on next bar open
         time_alert = Time[1];
        }
      else
        {
         Buffer3[i] = EMPTY_VALUE;
        }
      //Indicator Buffer 4
      if(MA5[i] < MA6[i]
      && MA5[i+1] > MA6[i+1] //Moving Average crosses below Moving Average
      )
        {
         Buffer4[i] = High[i]; //Set indicator value at Candlestick High
         if(i == 1 && Time[1] != time_alert) myAlert("indicator", "Sell Reversal"); //Alert on next bar open
         time_alert = Time[1];
        }
      else
        {
         Buffer4[i] = EMPTY_VALUE;
        }
      //Indicator Buffer 5, Alert muted by turning it into a comment
      if(MA3[i] > MA7[i] //Moving Average > Moving Average
      )
        {
         Buffer5[i] = MA3[i]; //Set indicator value at Moving Average
         //if(i == 1 && Time[1] != time_alert) myAlert("indicator", "Buy"); //Alert on next bar open
         //time_alert = Time[1];
        }
      else
        {
         Buffer5[i] = EMPTY_VALUE;
        }
      //Indicator Buffer 6, Alert muted by turning it into a comment
      if(MA3[i] < MA7[i] //Moving Average < Moving Average
      )
        {
         Buffer6[i] = MA3[i]; //Set indicator value at Moving Average
         //if(i == 1 && Time[1] != time_alert) myAlert("indicator", "Sell"); //Alert on next bar open
         //time_alert = Time[1];
        }
      else
        {
         Buffer6[i] = EMPTY_VALUE;
        }
     }
   return(rates_total);
  }
//+------------------------------------------------------------------+
エラー処理
Failed to send message: A request to the Telegram API was unsuccessful. Error code: 401. Description: Unauthorized 私のテストによると、上記のエラーコードは、先に例として使用したようなAPI_TOKENが機能不全に陥っていることが原因でした。使用可能なAPI_TOKEN値を使用する必要があります。エラーのほとんどは、このガイドのためにきれいに動作するコードを持つためにクリアしましたが、コードの編集中や修正中にエラーに遭遇するかもしれません。したがって、ご自分が取る一歩一歩を本当に注意深く見守る必要があります。
テスト結果
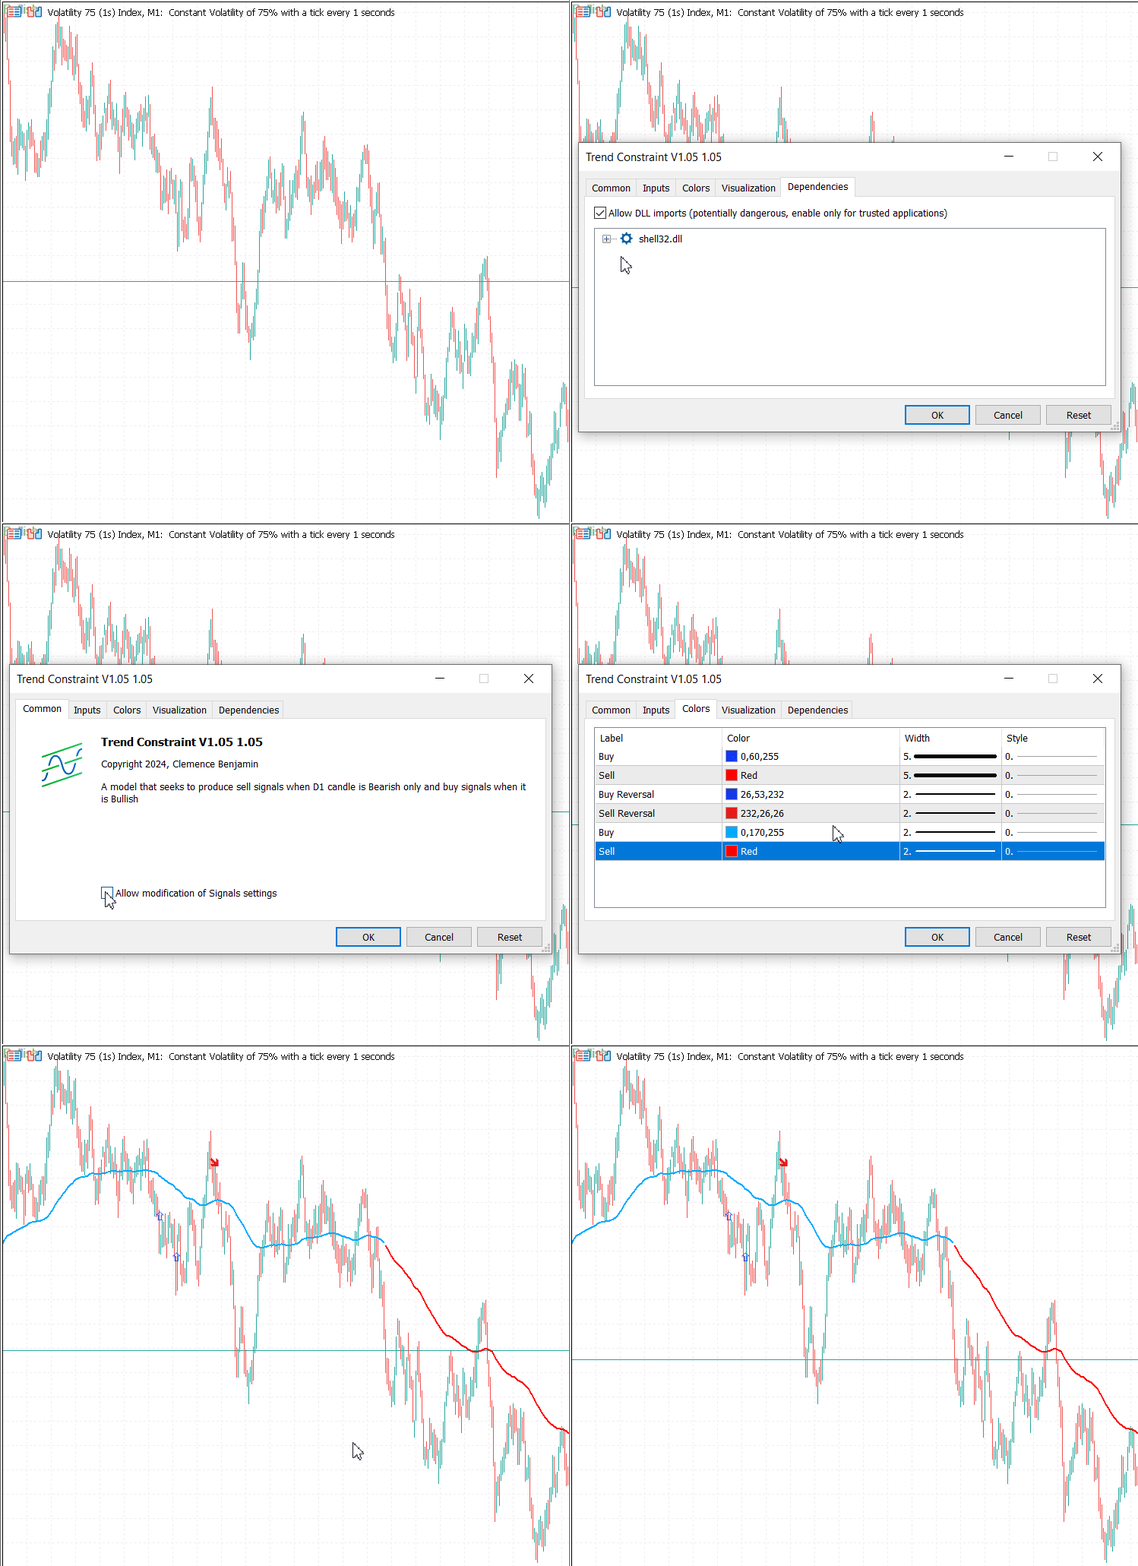
指標をチャートに追加した後、コマンドプロンプト経由で指標がスクリプトを実行できるように、DLLの許可オプションを有効にしました。アニメーション画像は、指標がどのように追加され、チャート上にどのように表示されるかを示しています。
スクリプトが動作しているかどうかは、コマンドプロンプトでファイルを実行することで確認できます。コマンドプロンプトでスクリプトのあるフォルダを開き、python send_telegram_message.pyとタイプします。メッセージ送信が成功すると、スクリプトが動作していることを示す応答があり、テストメッセージもチャットに転送されます。
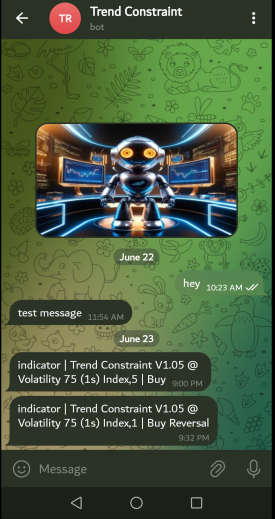
下の結果画像は、ボットAPIでチャットIDを取得することができたボットとの会話の始まりを示しています。また、Trend ConstraintV1.05からボットが送信した受信シグナルも示されています。シグナルはMetaTrader 5プラットフォームで生成されたので、すぐに届きました。

結論
Telegramをモデルに組み込むことに成功しました。Trend Constraint V1.05は大幅に進化しました。シグナルを内部と外部で受け渡しできるようになり、Telegramにアクセスできる世界中のトレーダーに恩恵をもたらしています。シグナル伝送は高速です。アルゴリズムは効率的に実行されるため、遅延ありません。このシステムは、プラットフォーム内の特定の指標専用であり、他の機能との干渉はありません。シグナルは安全に指定されたIDに直接送信されます。これらのシステムは、仮想専用サーバーでホスティングして継続的に運用することができ、ユーザーに安定したシグナル供給を提供します。このようなプロジェクトでは、開発中にエラーが発生することがありますが、無事に解決できたことをうれしく思います。
このプロジェクトが、読者に何らかのインスピレーションを与えてくれることを願っています。プロジェクトに取り組んでいて、このような統合に関する問題に遭遇したことがあれば、以下のディスカッションセクションでご自分の考えを自由に共有してください。添付されているソースファイルは、ご自由にご自分のプロジェクト用に変更してください。教育目的で提供されているコメントの助けを借りて、いくつかのアイデアを探求することができます。次回は、もう1つの人気ソーシャルプラットフォームであるWhatsAppを統合する予定です。
| 添付ファイル | 詳細 |
|---|---|
| send_telegram_message.py | API_TokenとチャットIDを含むtelegramに指標から通知を渡すためのスクリプト |
| Trend Constraint V1.05.mq5 | メインMQL5指標プログラムのソースコード |
| Telebot_API.txt | Telegram Bot API構造 |
MetaQuotes Ltdにより英語から翻訳されました。
元の記事: https://www.mql5.com/en/articles/14968
 データサイエンスと機械学習(第24回):通常のAIモデルによるFX時系列予測
 Candlestick Trend Constraintモデルの構築(第5回):通知システム(パート1)
 LSTMニューラルネットワークを用いた時系列予測の作成:価格の正規化と時間のトークン化
 独自のLLMをEAに統合する(第4部):GPUを使った独自のLLMの訓練
- 無料取引アプリ
- 8千を超えるシグナルをコピー
- 金融ニュースで金融マーケットを探索
