
Strategy builder based on Merrill patterns
Table of contents
- Introduction
- Task statement and application prototype
- Implementing a strategy builder for testing
- Demonstration and example of strategy builder operation
- Conclusion
Introduction
In the previous article, we considered application of Merrill patterns to various data, such as to a price value on a currency symbol chart and values of standard MetaTrader 5 indicators: ATR, WPR, CCI, RSI, among others. A graphical interface was developed to explore this idea. The main purpose of the interface is to test and find efficient pattern use methods. Further, the found successful configurations should be built into trading strategies and tested. In this article, we will develop a basic toolkit for building trading strategies and testing them.
Task statement and application prototype
Before starting to develop the application, let us determine a list of required features and interface elements. First, we define two sections:
- Constructor tab
- Settings tab
The Constructor tab will feature the main set of interface elements required to form a trading strategy. Consider all the basic elements:
- Table of symbols, which consists of a full list of symbols available in the terminal, under the Market Watch tab.
- Filter option for the symbol table, which enables a convenient search for required groups of symbols.
- Two identical section for generating Buy and Sell signals. The sections contain identical elements, so only one section description is provided below.
- Date range for testing.
- Current timeframe selection.
- The last section under the Constructor tab is the block with testing results related to the set trading strategy.
Let us consider the Signal Generation section:
- A pattern selected from the set of Merrill patterns.
- A set of three signals, to which the patterns can be applied. Each of the signals can be disabled. I.e. if only one signal is selected, market entry will be performed based on this signal. If more signals are selected, the entry will be performed by any of them. Merrill patterns can be applied to indicators as well as to the price.
- Setting Take Profit and Stop Loss.
The Settings tab is used for standard indicator parameters and allows uploading custom indicators.
Based on the desired features specified above, let us create a prototype of our application. Figure 1 below shows the scheme and a set of interface elements for the Constructor tab:
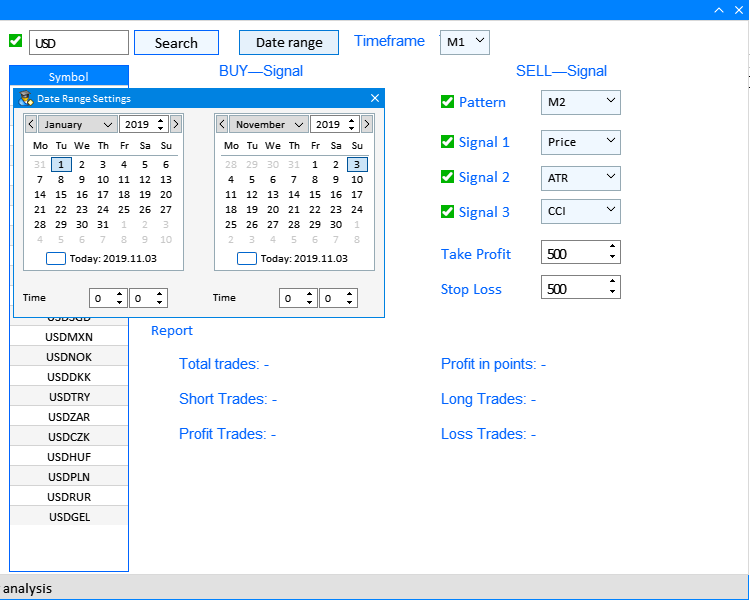
Fig.1 Constructor tab prototype and interface elements.
Let us also create a prototype for the Settings tab and arrange elements in this tab.
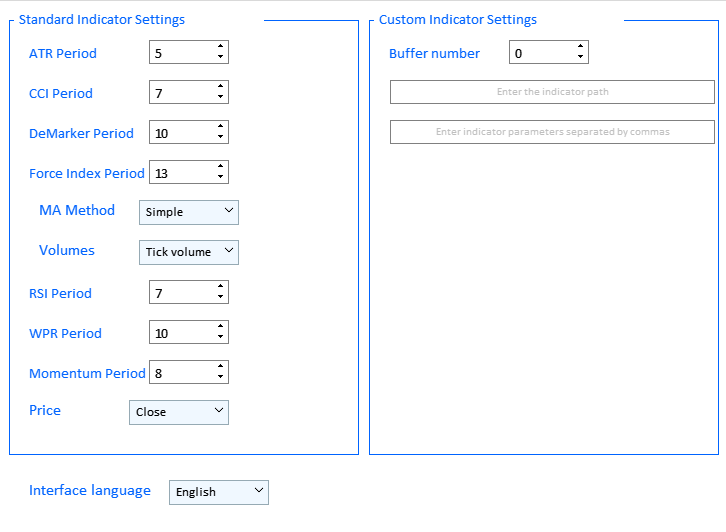
Fig.2 Settings tab prototype and interface elements.
Pay attention to the second subsection, Custom Indicator Settings, and the input field. Input of correct values and operation of a third-party indicator correspond to the iCustom function syntax. First of all, this concerns the correct input of the indicator path:
name
[in] Custom indicator name, which contains the path relative to the Indicators root directory (MQL5/Indicators/). If the indicator is located in a subdirectory, for example MQL5/Indicators/Examples, the name should look accordingly: "Examples\\indicator_name" (a double backslash is required instead of a single backslash as a separator).
To apply a third-party indicator to one of the signals, select Custom in the drop-down list for any of the signals, as shown in Fig. 3 below:
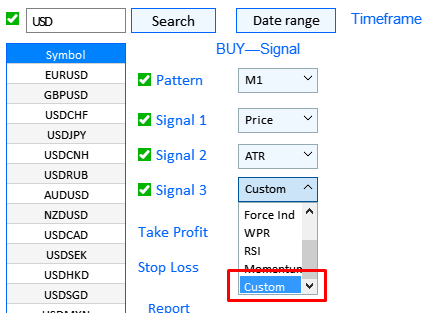
Fig.3 Selecting the use of a custom indicator.
The full sequence of actions concerning the setup and use of the Strategy Constructor will be described further in the article, after the software implementation of the application.
Implementing a strategy builder for testing
Before proceeding to creation of the application graphical interface, let us determine its basic elements, on the basis of which the rest of the elements will be built and developed.
The application has two windows: the main application window and a dialog box for the date range setup. The main window has two tabs: Constructor and Settings. To implement this, the main interface creation method CreateGUI() combines two window creation methods:
- CreateWindow() creates the main window.
- CreateDateSetting() creates the Date Range Settings window.
//+------------------------------------------------------------------+
//| Creates the graphical interface of the program                   |
//+------------------------------------------------------------------+
bool CProgram::CreateGUI(void)
{
//--- Creating a panel
   if(!CreateWindow("Merrill Constructor"))
      return(false);
//--- Creating a dialog window
   if(!CreateDateSetting())
      return(false);
//--- Finishing the creation of GUI
   CWndEvents::CompletedGUI();
   return(true);
}
//+------------------------------------------------------------------+
Let us consider the contents of each of the methods. The CreateDateSetting() method is easier to implement and it contains simple elements. The interface element implemented through this method is shown separately in Fig.4:
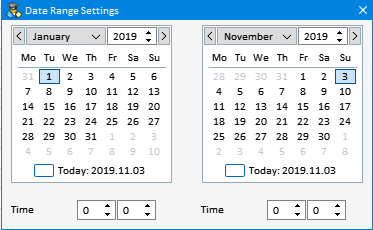
Fig.4 Date Range Settings dialog box.
The window consists of the dialog box, as well as two calendar elements and two elements for setting the starting and ending time. We have defined the element contents. Now, let us implement it inside the CreateDate Setting() method.
//+------------------------------------------------------------------+
//| Creates a date range selection dialog box                        |
//+------------------------------------------------------------------+
bool CProgram::CreateDateSetting(void)
{
//--- Add the pointer to the window array
   CWndContainer::AddWindow(m_window[1]);
//--- Coordinates
   int x=m_date_range.X();
   int y=m_date_range.Y()+m_date_range.YSize();
//--- Properties
   m_window[1].XSize(372);
   m_window[1].YSize(230);
   m_window[1].WindowType(W_DIALOG);
   m_window[1].IsMovable(true);
//--- Creating the form
   if(!m_window[1].CreateWindow(m_chart_id,m_subwin,"",x,y))
      return(false);
//---
   if(!CreateCalendar(m_calendar1,m_window[1],10,25,D'01.01.2019',1))
      return(false);
   if(!CreateCalendar(m_calendar2,m_window[1],201,25,m_calendar2.Today(),1))
      return(false);
//---
   if(!CreateTimeEdit(m_time_edit1,m_window[1],10,200,"Time",1))
      return(false);
   if(!CreateTimeEdit(m_time_edit2,m_window[1],200,200,"Time",1))
      return(false);
//---
   return(true);
}
Now let us move on to the CreateWindow() method which implements the main application window. The method structure is extensive, that is why let's divide them into separate key components. The first one is the creation of the window itself and of its basic structure, i.e. of two tabs, Constructor and Settings.
//+------------------------------------------------------------------+
//| Creates a form for controls                                      |
//+------------------------------------------------------------------+
bool CProgram::CreateWindow(const string caption_text)
{
#define VERSION " 1.0"
   color caption=C'0,130,255';
   int ygap=30;
//--- Add the pointer to the window array
   CWndContainer::AddWindow(m_window[0]);
//--- Properties
   m_window[0].XSize(900);
   m_window[0].YSize(600);
   m_window[0].FontSize(9);
   m_window[0].CloseButtonIsUsed(true);
   m_window[0].CollapseButtonIsUsed(true);
   m_window[0].CaptionColor(caption);
   m_window[0].CaptionColorHover(caption);
   m_window[0].CaptionColorLocked(caption);
//--- Creating the form
   if(!m_window[0].CreateWindow(m_chart_id,m_subwin,caption_text+VERSION,10,20))
      return(false);
//--- Tabs
   if(!CreateTabs(150,20))
      return(false);
This part of code creates the main window, while the CreateTabs() method is responsible for the addition of the two tabs described above:
//+------------------------------------------------------------------+
//| Create a group with tabs                                         |
//+------------------------------------------------------------------+
bool CProgram::CreateTabs(const int x_gap,const int y_gap)
{
//--- Save the pointer to the main control
   m_tabs1.MainPointer(m_window[0]);
//--- Properties
   m_tabs1.IsCenterText(true);
   m_tabs1.PositionMode(TABS_LEFT);
   m_tabs1.AutoXResizeMode(true);
   m_tabs1.AutoYResizeMode(true);
   m_tabs1.AutoYResizeBottomOffset(25);
   m_tabs1.TabsYSize(40);
//--- Add tabs with the specified properties
   for(int i=0; i<ArraySize(m_tabs_names); i++)
      m_tabs1.AddTab(m_tabs_names[i],150);
//--- Creating a control
   if(!m_tabs1.CreateTabs(x_gap,y_gap))
      return(false);
//--- Add the object to the common array of object groups
   CWndContainer::AddToElementsArray(0,m_tabs1);
   return(true);
}
In the prototype above we have defined the contents of elements for each of the tabs: Constructor (Fig.1) and Settings (Fig.2). Now let's consider the implementation of elements contained in the tabs. The Constructor tab contains a lot of repeating element types and thus we will only consider the main subsections and the list of methods used for the implementation of these elements.
//---- Constructor tab
//--- Symbols filter
   if(!CreateSymbolsFilter(10,10))
      return(false);
   if(!CreateSymbolsTable(10,45))
      return(false);
//--- Working timeframe
   if(!CreateTextLabel(m_text_labels1[2],290,10,"Timeframe",0))
      return(false);
   if(!CreateTimeframe1(440,10))
      return(false);
//--- Date range
   if(!CreateButton(m_date_range,240,10))
      return(false);
//--- Text labels
   if(!CreateTextLabel(m_text_labels1[0],int(0.35*(m_window[0].XSize()-150)-100),10+ygap,"BUY—Signal",0))
      return(false);
   if(!CreateTextLabel(m_text_labels1[1],int(0.75*(m_window[0].XSize()-150)-100),10+ygap,"SELL—Signal",0))
      return(false);
//--- Pattern selection
   if(!PatternType1(int(0.35*(m_window[0].XSize()-150)-100),40+ygap,0))
      return(false);
   if(!CreateCheckBox(m_checkbox[0],int(0.35*(m_window[0].XSize()-150)-120),45+ygap,"Pattern"))
      return(false);
   if(!PatternType2(int(0.75*(m_window[0].XSize()-150)-100),40+ygap,0))
      return(false);
   if(!CreateCheckBox(m_checkbox[1],int(0.75*(m_window[0].XSize()-150)-120),45+ygap,"Pattern"))
      return(false);
//--- Selecting the application of patterns
   if(!AppliedType1(int(0.35*(m_window[0].XSize()-150)-100),80+ygap))
      return(false);
   if(!AppliedType2(int(0.35*(m_window[0].XSize()-150)-100),50+33*2+ygap))
      return(false);
   if(!AppliedType3(int(0.35*(m_window[0].XSize()-150)-100),50+33*3+ygap))
      return(false);
   if(!AppliedType4(int(0.75*(m_window[0].XSize()-150)-100),80+ygap))
      return(false);
   if(!AppliedType5(int(0.75*(m_window[0].XSize()-150)-100),50+33*2+ygap))
      return(false);
   if(!AppliedType6(int(0.75*(m_window[0].XSize()-150)-100),50+33*3+ygap))
      return(false);
//--- Signal checkboxes
   for(int i=2; i<8; i++)
   {
      if(i<5)
         if(!CreateCheckBox(m_checkbox[i],int(0.35*(m_window[0].XSize()-150)-120),50+35*(i-1)+ygap,"Signal "+string(i-1)))
            return(false);
      if(i>=5)
         if(!CreateCheckBox(m_checkbox[i],int(0.75*(m_window[0].XSize()-150)-120),50+35*(i-4)+ygap,"Signal "+string(i-4)))
            return(false);
   }
//--- Take Profit and Stop Loss settings
   if(!CreateEditValue(m_takeprofit1,int(0.35*(m_window[0].XSize()-150)-120),50+35*4+ygap,"Take Profit",500,0))
      return(false);
   if(!CreateEditValue(m_stoploss1,int(0.35*(m_window[0].XSize()-150)-120),50+35*5+ygap,"Stop Loss",500,0))
      return(false);
   if(!CreateEditValue(m_takeprofit2,int(0.75*(m_window[0].XSize()-150)-120),50+35*4+ygap,"Take Profit",500,0))
      return(false);
   if(!CreateEditValue(m_stoploss2,int(0.75*(m_window[0].XSize()-150)-120),50+35*5+ygap,"Stop Loss",500,0))
      return(false);
//--- Report
   if(!CreateReportFrame(m_frame[2],"",int(0.35*(m_window[0].XSize()-150)-120),60+35*6+ygap))
      return(false);
   for(int i=0; i<6; i++)
   {
      if(i<3)
         if(!CreateTextLabel(m_report_text[i],int(0.4*(m_window[0].XSize()-150)-120),60+35*(7+i)+ygap,"",0))
            return(false);
      if(i>=3)
         if(!CreateTextLabel(m_report_text[i],int(0.75*(m_window[0].XSize()-150)-120),60+35*(7+i-3)+ygap,"",0))
            return(false);
      m_report_text[i].IsCenterText(false);
   }
Let us see what the main interface parts implement and what methods they consist of.
1. Symbols Filter.
Consists of the CreateSymbolsFilter() and CreateSymbolsTable() methods. They implement the following element:

Fig.5 Symbols filter.
CreateSymbolsFilter() implements an input fields with a checkbox and a Search button.
//+------------------------------------------------------------------+
//| Creates a checkbox with the "Symbols filter" input field         |
//+------------------------------------------------------------------+
bool CProgram::CreateSymbolsFilter(const int x_gap,const int y_gap)
{
//--- Save the pointer to the main control
   m_symb_filter.MainPointer(m_tabs1);
//--- Attach to tab
   m_tabs1.AddToElementsArray(0,m_symb_filter);
//--- Properties
   m_symb_filter.CheckBoxMode(true);
   m_symb_filter.YSize(25);
   m_symb_filter.FontSize(11);
   m_symb_filter.XSize(200);
   m_symb_filter.GetTextBoxPointer().XGap(20);
   m_symb_filter.GetTextBoxPointer().XSize(100);
   m_symb_filter.GetTextBoxPointer().YSize(25);
   m_symb_filter.GetTextBoxPointer().AutoSelectionMode(true);
   m_symb_filter.SetValue("USD"); // "EUR,USD" "EURUSD,GBPUSD" "EURUSD,GBPUSD,AUDUSD,NZDUSD,USDCHF"
//--- Creating a control
   if(!m_symb_filter.CreateTextEdit("",x_gap,y_gap))
      return(false);
//--- Enable the checkbox
   m_symb_filter.IsPressed(true);
//--- Add the object to the common array of object groups
   CWndContainer::AddToElementsArray(0,m_symb_filter);
//---
   if(!CreateRequest(x_gap+125,y_gap))
      return(false);
   return(true);
}
CreateSymbolsTable() implements a table which outputs filtered currency symbols from the Market Watch window.
//+------------------------------------------------------------------+
//| Creates a symbol table                                           |
//+------------------------------------------------------------------+
bool CProgram::CreateSymbolsTable(const int x_gap,const int y_gap)
{
#define ROWS1_TOTAL    1
//--- Save the pointer to the main control
   m_table_symb.MainPointer(m_tabs1);
//--- Attach to tab
   m_tabs1.AddToElementsArray(0,m_table_symb);
//--- Array of column widths
   int width[1]= {119};
//--- Array of text alignment in columns
   ENUM_ALIGN_MODE align[1]= {ALIGN_CENTER};
//--- Array of text offset along the X axis in the columns
   int text_x_offset[1]= {5};
//--- Properties
   m_table_symb.XSize(120);
   m_table_symb.TableSize(1,ROWS1_TOTAL);
   m_table_symb.ColumnsWidth(width);
   m_table_symb.TextAlign(align);
   m_table_symb.FontSize(10);
   m_table_symb.TextXOffset(text_x_offset);
   m_table_symb.ShowHeaders(true);
   m_table_symb.SelectableRow(true);
   m_table_symb.IsWithoutDeselect(true);
   m_table_symb.IsZebraFormatRows(clrWhiteSmoke);
   m_table_symb.AutoYResizeMode(true);
   m_table_symb.AutoYResizeBottomOffset(3);
   m_table_symb.HeadersColor(C'0,130,255');
   m_table_symb.HeadersColorHover(clrCornflowerBlue);
   m_table_symb.HeadersTextColor(clrWhite);
   m_table_symb.BorderColor(C'0,100,255');
//--- Creating a control
   if(!m_table_symb.CreateTable(x_gap,y_gap))
      return(false);
//--- Add the object to the common array of object groups
   CWndContainer::AddToElementsArray(0,m_table_symb);
   return(true);
}
2. Working timeframe and the "Date range" button.
All elements implement the selection of a working timeframe for testing. The Date range button opens the appropriate dialog box, described above. The CreateButton() method implements the button. CreateTextLabel() creates an appropriate label, CreateTimeframe1() implements timeframe selection. CreateButton() and CreateTextLabel() are universal methods, which will be used further. Their code is provided here only once. The elements are shown separately in Fig.6:
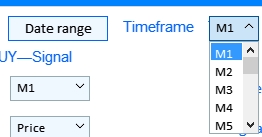
Fig.6 The Date range button and manual timeframe selection.
//+------------------------------------------------------------------+
//| Creates a text label in the first tab                            |
//+------------------------------------------------------------------+
bool CProgram::CreateTextLabel(CTextLabel &text_label,const int x_gap,const int y_gap,string label_text,int tab)
{
//--- Save the window pointer
   text_label.MainPointer(m_tabs1);
//--- Attach to tab
   m_tabs1.AddToElementsArray(tab,text_label);
//---
   text_label.Font("Trebuchet");
   text_label.FontSize(11);
   text_label.XSize(200);
   text_label.LabelColor(C'0,100,255');
   text_label.IsCenterText(true);
//--- Creation of a button
   if(!text_label.CreateTextLabel(label_text,x_gap,y_gap))
      return(false);
//--- Add the element pointer to the data base
   CWndContainer::AddToElementsArray(0,text_label);
   return(true);
}
//+------------------------------------------------------------------+
//| Creates a button to show the date range selection window         |
//+------------------------------------------------------------------+
bool CProgram::CreateButton(CButton &button,const int x_gap,const int y_gap)
{
//--- Save the pointer to the main control
   button.MainPointer(m_tabs1);
//--- Attach to tab
   m_tabs1.AddToElementsArray(0,button);
//--- Properties
   button.XSize(100);
   button.YSize(25);
   button.FontSize(11);
   button.IsHighlighted(false);
   button.IsCenterText(true);
   button.BorderColor(C'0,100,255');
   button.BackColor(clrAliceBlue);
//--- Creating a control
   if(!button.CreateButton("Date range",x_gap,y_gap))
      return(false);
//--- Add the element pointer to the data base
   CWndContainer::AddToElementsArray(0,button);
   return(true);
}
The CreateTimeframe1() method is a drop-down list with all available timeframes.
//+------------------------------------------------------------------+
//|                                                                  |
//+------------------------------------------------------------------+
bool CProgram::CreateTimeframe1(const int x_gap,const int y_gap)
{
//--- Pass the object to the panel
   m_timeframe1.MainPointer(m_tabs1);
//--- Attach to tab
   m_tabs1.AddToElementsArray(0,m_timeframe1);
//--- Array of the item values in the list view
   string timeframe_names[21]=
   {
      "M1","M2","M3","M4","M5","M6","M10","M12","M15","M20","M30",
      "H1","H2","H3","H4","H6","H8","H12","D1","W1","MN"
   };
//--- Set properties before creation
   m_timeframe1.XSize(50);
   m_timeframe1.YSize(25);
   m_timeframe1.ItemsTotal(21);
   m_timeframe1.FontSize(12);
   m_timeframe1.LabelColor(C'0,100,255');
   CButton *but=m_timeframe1.GetButtonPointer();
   but.FontSize(10);
   but.XSize(50);
   but.BackColor(clrAliceBlue);
   but.XGap(1);
   m_timeframe1.GetListViewPointer().FontSize(10);
//--- Save the item values in the combobox list view
   for(int i=0; i<21; i++)
      m_timeframe1.SetValue(i,timeframe_names[i]);
//--- Get the list view pointer
   CListView *lv=m_timeframe1.GetListViewPointer();
//--- Set the list view properties
   lv.LightsHover(true);
   m_timeframe1.SelectItem(0);
//--- Creating a control
   if(!m_timeframe1.CreateComboBox("",x_gap,y_gap))
      return(false);
//--- Add the object to the common array of object groups
   CWndContainer::AddToElementsArray(0,m_timeframe1);
   return(true);
}
3. Text labels in sections and pattern selection elements for Buy and Sell signals.
Text labels are created using the CreateTextLabel() method, which we have considered earlier. The other two methods implement the checkboxes and the drop-down menus for selecting a Merrill pattern for testing.

Fig.7 Text labels in sections and pattern selection.
The CreateCheckBox() method creates Pattern checkboxes.
//+------------------------------------------------------------------+
//|                                                                  |
//+------------------------------------------------------------------+
bool CProgram::CreateCheckBox(CCheckBox &checkbox,const int x_gap,const int y_gap,const string text)
{
//--- Save the pointer to the main control
   checkbox.MainPointer(m_tabs1);
//--- Attach to tab
   m_tabs1.AddToElementsArray(0,checkbox);
//--- Properties
   checkbox.YSize(25);
   checkbox.GreenCheckBox(true);
   checkbox.IsPressed(true);
   checkbox.FontSize(12);
   checkbox.LabelColor(C'0,100,255');
   checkbox.LabelColorPressed(C'0,100,255');
//--- Creating a control
   if(!checkbox.CreateCheckBox(text,x_gap,y_gap))
      return(false);
//--- Add the element pointer to the data base
   CWndContainer::AddToElementsArray(0,checkbox);
   return(true);
}
Methods PatternType1() and PatternType2() are identical.
//+------------------------------------------------------------------+
//| Creates combobox 1                                               |
//+------------------------------------------------------------------+
bool CProgram::PatternType1(const int x_gap,const int y_gap,const int tab)
{
//--- Total number of the list items
#define ITEMS_TOTAL1 32
//--- Pass the object to the panel
   m_combobox1.MainPointer(m_tabs1);
//--- Attach to tab
   m_tabs1.AddToElementsArray(tab,m_combobox1);
//--- Array of the item values in the list view
   string pattern_names[ITEMS_TOTAL1]=
   {
      "M1","M2","M3","M4","M5","M6","M7","M8",
      "M9","M10","M11","M12","M13","M14","M15","M16",
      "W1","W2","W3","W4","W5","W6","W7","W8",
      "W9","W10","W11","W12","W13","W14","W15","W16"
   };
//--- Set properties before creation
   m_combobox1.XSize(200);
   m_combobox1.YSize(25);
   m_combobox1.ItemsTotal(ITEMS_TOTAL1);
   m_combobox1.GetButtonPointer().FontSize(10);
   m_combobox1.GetButtonPointer().BackColor(clrAliceBlue);
   m_combobox1.GetListViewPointer().FontSize(10);
//--- Save the item values in the combobox list view
   for(int i=0; i<ITEMS_TOTAL1; i++)
      m_combobox1.SetValue(i,pattern_names[i]);
//--- Get the list view pointer
   CListView *lv=m_combobox1.GetListViewPointer();
//--- Set the list view properties
   lv.LightsHover(true);
   m_combobox1.SelectItem(0);
//--- Creating a control
   if(!m_combobox1.CreateComboBox("",x_gap,y_gap))
      return(false);
//--- Add the object to the common array of object groups
   CWndContainer::AddToElementsArray(0,m_combobox1);
   return(true);
}
4. Selecting the use of patterns and signal checkboxes.
This interface block consists of a set of signals for configuring Buy and Sell signals. Each block consists of an optional selector from one to three signals, which can be used as entry conditions. Consists of methods CreateCheckBox() and AppliedTypeN().

Fig.8 Use of patterns and signal checkboxes.
The structures of methods AppliedType1()—AppliedType6() are similar: they represent a drop-down list with a selection of a data array to search pattern-based signals.
//+------------------------------------------------------------------+
//|                                                                  |
//+------------------------------------------------------------------+
bool CProgram::AppliedType1(const int x_gap,const int y_gap)
{
//--- Pass the object to the panel
   m_applied1.MainPointer(m_tabs1);
//--- Attach to tab
   m_tabs1.AddToElementsArray(0,m_applied1);
//--- Array of the item values in the list view
   string pattern_names[9]=
   {
      "Price","ATR","CCI","DeMarker","Force Ind","WPR","RSI","Momentum","Custom"
   };
//--- Set properties before creation
   m_applied1.XSize(200);
   m_applied1.YSize(25);
   m_applied1.ItemsTotal(9);
   m_applied1.GetButtonPointer().FontSize(10);
   m_applied1.GetButtonPointer().BackColor(clrAliceBlue);
   m_applied1.GetListViewPointer().FontSize(10);
//--- Save the item values in the combobox list view
   for(int i=0; i<9; i++)
      m_applied1.SetValue(i,pattern_names[i]);
//--- Get the list view pointer
   CListView *lv=m_applied1.GetListViewPointer();
//--- Set the list view properties
   lv.LightsHover(true);
   m_applied1.SelectItem(0);
//--- Creating a control
   if(!m_applied1.CreateComboBox("",x_gap,y_gap))
      return(false);
//--- Add the object to the common array of object groups
   CWndContainer::AddToElementsArray(0,m_applied1);
   return(true);
}
5. Take Profit and Stop Loss settings.
The interface section that allows configuring Take Profit and Stop Loss separately for buy signals and sell signals. The levels are set in points.

Fig.9 Take Profit and Stop Loss input fields.
The universal method CreateEditValue() is used for implementing these input fields.
//+------------------------------------------------------------------+
//| Creates an input field                                           |
//+------------------------------------------------------------------+
bool CProgram::CreateEditValue(CTextEdit &text_edit,const int x_gap,const int y_gap,const string label_text,const int value,const int tab)
{
//--- Save the pointer to the main control
   text_edit.MainPointer(m_tabs1);
//--- Attach to tab
   m_tabs1.AddToElementsArray(tab,text_edit);
//--- Properties
   text_edit.XSize(210);
   text_edit.YSize(24);
   text_edit.LabelColor(C'0,100,255');
   text_edit.FontSize(12);
   text_edit.MaxValue(1000);
   text_edit.MinValue(10);
   text_edit.SpinEditMode(true);
   text_edit.SetValue((string)value);
   text_edit.GetTextBoxPointer().AutoSelectionMode(true);
   text_edit.GetTextBoxPointer().XGap(100);
//--- Creating a control
   if(!text_edit.CreateTextEdit(label_text,x_gap,y_gap))
      return(false);
//--- Add the object to the common array of object groups
   CWndContainer::AddToElementsArray(0,text_edit);
   return(true);
}
6. Testing results and report.
This block consists of testing results. It is implemented using the CreateTextLabel() method considered above.
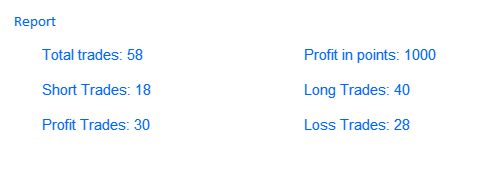
Fig.10 Report block.
We have considered the implementation of the Constructor tab. Now let use proceed to Settings.
1. Standard indicator parameters.
This section includes all the indicator settings offered for testing and analysis.
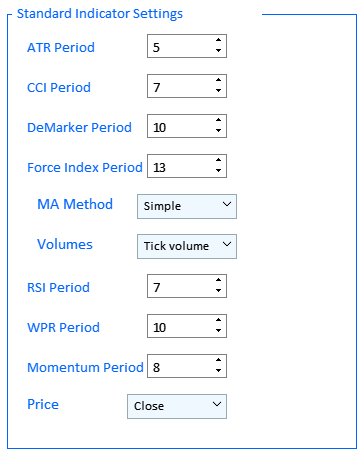
Fig.11 Block with standard indicator settings.
This block is implemented using three CreateFrame() methods which create a visual section with a frame. We also use here a universal input field method for creating indicator parameters CreateIndSetting() and a set of IndicatorSetting1()—IndicatorSetting4() method for drop-down lists for Ma Method, Volumes and Price parameters.
//+------------------------------------------------------------------+
//|                                                                  |
//+------------------------------------------------------------------+
bool CProgram::CreateFrame(CFrame &frame,const string text,const int x_gap,const int y_gap)
{
//--- Save the pointer to the main control
   frame.MainPointer(m_tabs1);
//--- Attach to tab
   m_tabs1.AddToElementsArray(1,frame);
//---
   frame.XSize(350);
   frame.YSize(500);
   frame.LabelColor(C'0,100,255');
   frame.BorderColor(C'0,100,255');
   frame.FontSize(11);
   frame.AutoYResizeMode(true);
   frame.AutoYResizeBottomOffset(100);
   frame.GetTextLabelPointer().XSize(250);
//--- Creating a control
   if(!frame.CreateFrame(text,x_gap,y_gap))
      return(false);
//--- Add the object to the common array of object groups
   CWndContainer::AddToElementsArray(0,frame);
   return(true);
}
//+------------------------------------------------------------------+
//|                                                                  |
//+------------------------------------------------------------------+
bool CProgram::IndicatorSetting1(const int x_gap,const int y_gap,const string text)
{
//--- Pass the object to the panel
   m_ind_set1.MainPointer(m_tabs1);
//--- Attach to tab
   m_tabs1.AddToElementsArray(1,m_ind_set1);
//--- Array of the item values in the list view
   string pattern_names[4]=
   {
      "Simple","Exponential","Smoothed","Linear weighted"
   };
//--- Set properties before creation
   m_ind_set1.XSize(200);
   m_ind_set1.YSize(25);
   m_ind_set1.ItemsTotal(4);
   m_ind_set1.FontSize(12);
   m_ind_set1.LabelColor(C'0,100,255');
   CButton *but=m_ind_set1.GetButtonPointer();
   but.FontSize(10);
   but.XSize(100);
   but.BackColor(clrAliceBlue);
   m_ind_set1.GetListViewPointer().FontSize(10);
//--- Save the item values in the combobox list view
   for(int i=0; i<4; i++)
      m_ind_set1.SetValue(i,pattern_names[i]);
//--- Get the list view pointer
   CListView *lv=m_ind_set1.GetListViewPointer();
//--- Set the list view properties
   lv.LightsHover(true);
   m_ind_set1.SelectItem(0);
//--- Creating a control
   if(!m_ind_set1.CreateComboBox(text,x_gap,y_gap))
      return(false);
//--- Add the object to the common array of object groups
   CWndContainer::AddToElementsArray(0,m_ind_set1);
   return(true);
}
//+------------------------------------------------------------------+
//|                                                                  |
//+------------------------------------------------------------------+
bool CProgram::IndicatorSetting3(const int x_gap,const int y_gap,const string text)
{
//--- Pass the object to the panel
   m_ind_set3.MainPointer(m_tabs1);
//--- Attach to tab
   m_tabs1.AddToElementsArray(1,m_ind_set3);
//--- Array of the item values in the list view
   string pattern_names[2]=
   {
      "Tick volume","Real Volume"
   };
//--- Set properties before creation
   m_ind_set3.XSize(200);
   m_ind_set3.YSize(25);
   m_ind_set3.ItemsTotal(2);
   m_ind_set3.FontSize(12);
   m_ind_set3.LabelColor(C'0,100,255');
   CButton *but=m_ind_set3.GetButtonPointer();
   but.FontSize(10);
   but.XSize(100);
   but.BackColor(clrAliceBlue);
   m_ind_set3.GetListViewPointer().FontSize(10);
//--- Save the item values in the combobox list view
   for(int i=0; i<2; i++)
      m_ind_set3.SetValue(i,pattern_names[i]);
//--- Get the list view pointer
   CListView *lv=m_ind_set3.GetListViewPointer();
//--- Set the list view properties
   lv.LightsHover(true);
   lv.ItemYSize(20);
   lv.YSize(42);
   m_ind_set3.SelectItem(0);
//--- Creating a control
   if(!m_ind_set3.CreateComboBox(text,x_gap,y_gap))
      return(false);
//--- Add the object to the common array of object groups
   CWndContainer::AddToElementsArray(0,m_ind_set3);
   return(true);
}
//+------------------------------------------------------------------+
//|                                                                  |
//+------------------------------------------------------------------+
bool CProgram::IndicatorSetting4(const int x_gap,const int y_gap,const string text)
{
//--- Pass the object to the panel
   m_ind_set4.MainPointer(m_tabs1);
//--- Attach to tab
   m_tabs1.AddToElementsArray(1,m_ind_set4);
//--- Array of the item values in the list view
   string pattern_names[4]=
   {
      "Open","Close","High","Low"
   };
//--- Set properties before creation
   m_ind_set4.XSize(200);
   m_ind_set4.YSize(25);
   m_ind_set4.ItemsTotal(4);
   m_ind_set4.FontSize(12);
   m_ind_set4.LabelColor(C'0,100,255');
   CButton *but=m_ind_set4.GetButtonPointer();
   but.FontSize(10);
   but.XSize(100);
   but.BackColor(clrAliceBlue);
   m_ind_set4.GetListViewPointer().FontSize(10);
//--- Save the item values in the combobox list view
   for(int i=0; i<4; i++)
      m_ind_set4.SetValue(i,pattern_names[i]);
//--- Get the list view pointer
   CListView *lv=m_ind_set4.GetListViewPointer();
//--- Set the list view properties
   lv.LightsHover(true);
   lv.ItemYSize(20);
   lv.YSize(82);
   m_ind_set4.SelectItem(1);
//--- Creating a control
   if(!m_ind_set4.CreateComboBox(text,x_gap,y_gap))
      return(false);
//--- Add the object to the common array of object groups
   CWndContainer::AddToElementsArray(0,m_ind_set4);
   return(true);
}
2. Interface language.
The "Interface Language" control is implemented as a drop-down list containing two options: English and Russian. This element is implemented using the LanguageSetting() method:
//+------------------------------------------------------------------+
//|                                                                  |
//+------------------------------------------------------------------+
bool CProgram::LanguageSetting(const int x_gap,const int y_gap,const string text)
{
//--- Pass the object to the panel
   m_language_set.MainPointer(m_tabs1);
//--- Attach to tab
   m_tabs1.AddToElementsArray(1,m_language_set);
//--- Array of the item values in the list view
   string pattern_names[2]=
   {
      "Русский","English"
   };
//--- Set properties before creation
   m_language_set.XSize(200);
   m_language_set.YSize(25);
   m_language_set.ItemsTotal(2);
   m_language_set.FontSize(12);
   m_language_set.LabelColor(C'0,100,255');
   CButton *but=m_language_set.GetButtonPointer();
   but.FontSize(10);
   but.XSize(100);
   but.BackColor(clrAliceBlue);
   but.XGap(140);
   m_language_set.GetListViewPointer().FontSize(10);
//--- Save the item values in the combobox list view
   for(int i=0; i<2; i++)
      m_language_set.SetValue(i,pattern_names[i]);
//--- Get the list view pointer
   CListView *lv=m_language_set.GetListViewPointer();
//--- Set the list view properties
   lv.LightsHover(true);
   lv.ItemYSize(20);
   lv.YSize(42);
   m_language_set.SelectItem(1);
//--- Creating a control
   if(!m_language_set.CreateComboBox(text,x_gap,y_gap))
      return(false);
//--- Add the object to the common array of object groups
   CWndContainer::AddToElementsArray(0,m_language_set);
   return(true);
}
3. Custom indicator parameters.
Consists of the visual section with the header and frame, which is created using the CreateFrame() method mentioned above, and an input field for the indicator value created using CreateIndSetting() and a new method CreateCustomEdit() for entering the indicator name and a comma separated list of its parameter.
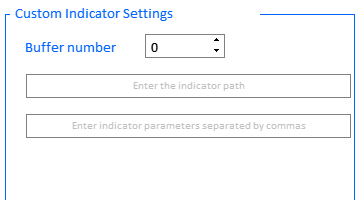
Fig.12 Custom indicator parameters.
//+------------------------------------------------------------------+
//|                                                                  |
//+------------------------------------------------------------------+
bool CProgram::CreateCustomEdit(CTextEdit &text_edit,const int x_gap,const int y_gap,const string default_text)
{
//--- Save the pointer to the main control
   text_edit.MainPointer(m_tabs1);
//--- Attach to tab
   m_tabs1.AddToElementsArray(1,text_edit);
//--- Properties
   text_edit.XSize(100);
   text_edit.YSize(24);
   text_edit.LabelColor(C'0,100,255');
   CTextBox *box=text_edit.GetTextBoxPointer();
   box.AutoSelectionMode(true);
   box.XSize(325);
   box.XGap(1);
   box.DefaultTextColor(clrSilver);
   box.DefaultText(default_text);
//--- Creating a control
   if(!text_edit.CreateTextEdit("",x_gap,y_gap))
      return(false);
//--- Add the object to the common array of object groups
   CWndContainer::AddToElementsArray(0,text_edit);
   return(true);
}
We have considered the visual part. Now let us analyze the algorithm of testing of the configured trading strategies.
To explain the algorithm of testing using this application, we need to determine the sequence of actions which will enable us to correctly run a test and receive a result. A well-composed sequence of actions can highlight the principle of each interaction with the application interface.
Step 1. Interface language selection
According to our implementation, this option is available under the Settings tab, in a drop-down list. Let us describe how the interface language is switched. This is done by a custom Event of combo box item selection, which calls the ChangeLanguage() method.
//--- Selection of a combo box item
   if(id==CHARTEVENT_CUSTOM+ON_CLICK_COMBOBOX_ITEM)
   {
      //--- Changing the interface language
      if(ChangeLanguage(lparam))
         Update(true);
   }
Now let us consider the interface language changing method. Although the method is a bit lengthy, its idea is simple.
//+------------------------------------------------------------------+
//| Changing the interface language                                  |
//+------------------------------------------------------------------+
bool CProgram::ChangeLanguage(const long id)
{
//--- Check the element ID
   if(id!=m_language_set.Id())
      return(false);
   m_lang_index=m_language_set.GetListViewPointer().SelectedItemIndex();
//---
   if(m_lang_index==0)
   {
      //--- Constructor tab
      m_tabs1.Text(0,"Конструктор");
      m_tabs1.Text(1,"Настройки");
      m_table_symb.SetHeaderText(0,"Символ");
      m_request.LabelText("Поиск");
      m_date_range.LabelText("Диапазон дат");
      m_timeframe1.LabelText("Таймфрейм");
      for(int i=0; i<8; i++)
      {
         if(i<2)
            m_checkbox[i].LabelText("Паттерн");
         else if(i>=2 && i<5)
            m_checkbox[i].LabelText("Сигнал "+string(i-1));
         else if(i>=5)
            m_checkbox[i].LabelText("Сигнал "+string(i-4));
      }
      m_takeprofit1.LabelText("Тейк Профит");
      m_takeprofit2.LabelText("Тейк Профит");
      m_stoploss1.LabelText("Стоп Лосс");
      m_stoploss2.LabelText("Стоп Лосс");
      m_frame[2].GetTextLabelPointer().LabelText("Отчёт");
      string report_label[6]=
      {
         "Всего трейдов: ","Короткие трейды: ","Прибыльные трейды: ",
         "Прибыль в пунктах: ","Длинные трейды: ","Убыточные трейды: "
      };
      for(int i=0; i<6; i++)
         m_report_text[i].LabelText(report_label[i]+"-");
      //--- Settings tab
      m_frame[0].GetTextLabelPointer().LabelText("Настройки стандартных индикаторов");
      m_frame[1].GetTextLabelPointer().LabelText("Настройки кастомных индикаторов");
      m_custom_buffer.LabelText("Номер буфера");
      m_custom_path.GetTextBoxPointer().DefaultText("Введите адрес индикатора");
      m_custom_param.GetTextBoxPointer().DefaultText("Введите параметры индикатора через запятую");
      m_language_set.LabelText("Язык интерфейса");
      //--- Date Range window
      m_window[1].LabelText("Настройки диапазона дат");
      m_time_edit1.LabelText("Время");
      m_time_edit2.LabelText("Время");
      m_time_edit3.LabelText("Время");
      m_time_edit4.LabelText("Время");
      m_status_bar.SetValue(0,"Не выбран символ для анализа");
   }
   else
   {
      //--- Constructor tab
      m_tabs1.Text(0,"Constructor");
      m_tabs1.Text(1,"Settings");
      m_table_symb.SetHeaderText(0,"Symbol");
      m_request.LabelText("Search");
      m_date_range.LabelText("Date range");
      m_timeframe1.LabelText("Timeframe");
      for(int i=0; i<8; i++)
      {
         if(i<2)
            m_checkbox[i].LabelText("Pattern");
         else if(i>=2 && i<5)
            m_checkbox[i].LabelText("Signal "+string(i-1));
         else if(i>=5)
            m_checkbox[i].LabelText("Signal "+string(i-4));
      }
      m_takeprofit1.LabelText("Take Profit");
      m_takeprofit2.LabelText("Take Profit");
      m_stoploss1.LabelText("Stop Loss");
      m_stoploss2.LabelText("Stop Loss");
      m_frame[2].GetTextLabelPointer().LabelText("Report");
      string report_label[6]=
      {
         "Total trades: ","Short Trades: ","Profit Trades: ",
         "Profit in points: ","Long Trades: ","Loss Trades: "
      };
      for(int i=0; i<6; i++)
         m_report_text[i].LabelText(report_label[i]+"-");
      //--- Settings tab
      m_frame[0].GetTextLabelPointer().LabelText("Standard Indicator Settings");
      m_frame[1].GetTextLabelPointer().LabelText("Custom Indicator Settings");
      m_custom_buffer.LabelText("Buffer number");
      m_custom_path.GetTextBoxPointer().DefaultText("Enter the indicator path");
      m_custom_param.GetTextBoxPointer().DefaultText("Enter indicator parameters separated by commas");
      m_language_set.LabelText("Interface language");
      //--- Date Range window
      m_window[1].LabelText("Date Range Settings");
      m_time_edit1.LabelText("Time");
      m_time_edit2.LabelText("Time");
      m_time_edit3.LabelText("Time");
      m_time_edit4.LabelText("Time");
      m_status_bar.SetValue(0,"No symbol selected for analysis");
   }
   return(true);
}
Step 2. Indicator parameters settings
Under the same tab, indicator parameter values are set in case specific indicators will be tested. Optionally, custom indicator parameters are configured: buffer number, name or parameters separated by commas. Please note that only numeric values are supported for custom indicators.
Step 3. Settings of the table of symbols.
In the upper part of the Constructor tab, configure the required symbols available from the Market Watch window. This is done by the RequestData() method. The method is called by the "Search" button press event.
   //--- Button click event
   if(id==CHARTEVENT_CUSTOM+ON_CLICK_BUTTON)
   {
      //--- Requesting data
      RequestData(lparam);
....
//+------------------------------------------------------------------+
//| Output of symbols to the symbols table                           |
//+------------------------------------------------------------------+
bool CProgram::RequestData(const long id)
{
//--- Check the element ID
//---
   if(id==m_request.Id())
   {
      //--- Hide the table
      m_table_symb.Hide();
      //--- Initialize the table
      GetSymbols(m_symb_filter);
      RebuildingTables(m_table_symb);
      //--- Show the table
      m_table_symb.Show();
   }
   return(true);
}
Step 4. Selecting the testing time range
This event occurs at a click on the "Date range" button. The logic is simple: it opens a dialog box for setting the date range.
//--- Button click event
   if(id==CHARTEVENT_CUSTOM+ON_CLICK_BUTTON)
   {
...
      //---
      if(lparam==m_date_range.Id())
      {
         int x=m_date_range.X();
         int y=m_date_range.Y()+m_date_range.YSize();
         m_window[1].X(x);
         m_window[1].Y(y);
         m_window[1].OpenWindow();
         string val=(m_lang_index==0)?"Настройки диапазона дат":"Date Range Settings";
         m_window[1].LabelText(val);
      }
...
Be careful when selecting the dates. If dates are set incorrectly, the app will return error messages. The most common errors include the following: the end date is later than the current date in the terminal or the end date is earlier than the beginning date.
Step 5. Setting the working timeframe.
The working timeframe applies to all six signals, which can be configured in the constructor.
Step 6. Enabling sell/buy signals and selecting a pattern for testing.
Testing is performed in two directions by default: both buying and selling. However, one of the modes can be disabled, as shown in figure 13 below.
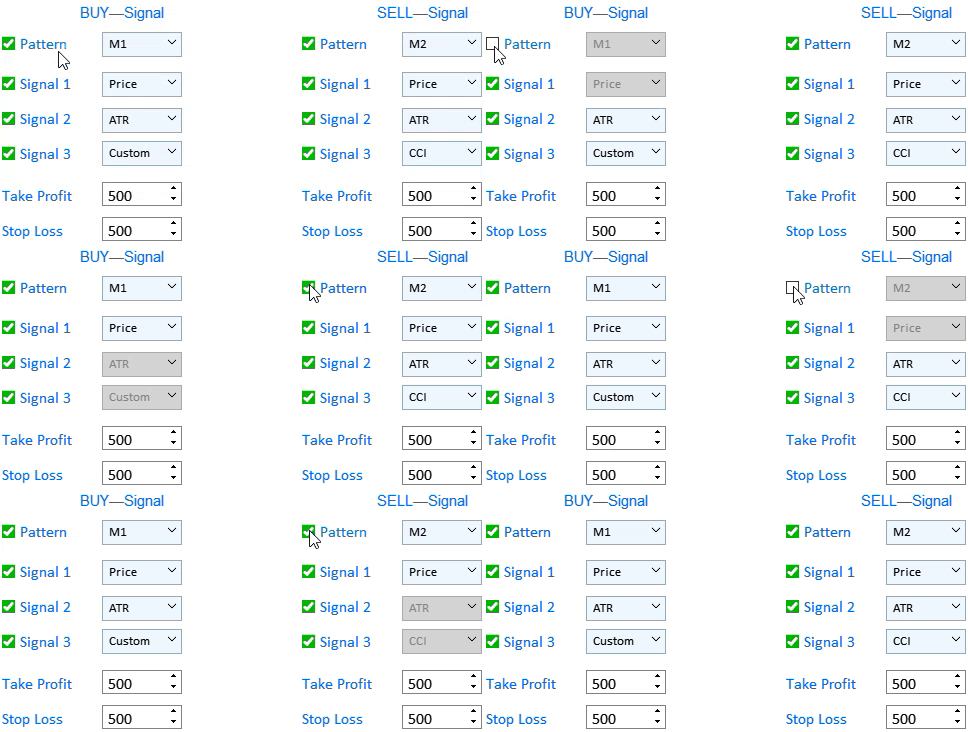
Fig.13 Disabling buy or sell signals.
The Merrill pattern for further testing can be selected on the left of the Pattern label. The details of Merrill patterns were described in the previous article.
Step 7. Selecting signals for testing and setting Take Profit and Stop Loss
Figure 13 shows that up to three signals can be set simultaneously for each of market entry types. The signals operate according to the logical OR principle. Thus, if all the three buy signals are set in a test, a market entry will be registered if any of the three signal emerges. The same applies to sell signals. In the drop-down list to the right of the Signal text labels, you can select the data type to which the selected pattern will be applied.
Step 8. Running the test
After steps 1-7, select the testing instrument by a left-click in the table. The testing algorithm is launched by a custom event of clicking on a list or table item.
//--- Event of pressing on a list or table item
   if(id==CHARTEVENT_CUSTOM+ON_CLICK_LIST_ITEM)
   {
      //--- Select a symbol for further work
      //--- Check the element ID
      if(lparam==m_table_symb.Id())
      {
         //--- Exit if the line is not selected
         if(m_table_symb.SelectedItem()==WRONG_VALUE)
         {
            //--- Show the full symbol description in the status bar
            m_status_bar.SetValue(0,"Не выбран символ для анализа");
            m_status_bar.GetItemPointer(0).Update(true);
         }
         //--- Get a selected symbol
         string symbol=m_table_symb.GetValue(0,m_table_symb.SelectedItem());
         //--- Show the full symbol description in the status bar
         m_status_bar.SetValue(0,"Selected symbol: "+::SymbolInfoString(symbol,SYMBOL_DESCRIPTION));
         m_status_bar.GetItemPointer(0).Update(true);
         GetResult(symbol);
      }
   }
The testing is performed by the GetResult() method. Consider it in more detail.
//+------------------------------------------------------------------+
//|                                                                  |
//+------------------------------------------------------------------+
void CProgram::GetResult(const string symbol)
{
//--- Get the date range
   m_start_date=StringToTime(TimeToString(m_calendar1.SelectedDate(),TIME_DATE)+" "+(string)m_time_edit1.GetHours()+":"+(string)m_time_edit1.GetMinutes()+":00");
   m_end_date=StringToTime(TimeToString(m_calendar2.SelectedDate(),TIME_DATE)+" "+(string)m_time_edit2.GetHours()+":"+(string)m_time_edit2.GetMinutes()+":00");
//--- Check specified dates
   if(m_start_date>m_end_date || m_end_date>TimeCurrent())
   {
      if(m_lang_index==0)
         MessageBox("Неправильно выбран диапазон дат!","Ошибка",MB_OK);
      else if(m_lang_index==1)
         MessageBox("Incorrect date range selected!","Error",MB_OK);
      return;
   }
//--- Проверка выбора паттернов
   int buy_pat=m_combobox1.GetListViewPointer().SelectedItemIndex();
   int sell_pat=m_combobox2.GetListViewPointer().SelectedItemIndex();
   if(buy_pat==sell_pat)
   {
      if(m_lang_index==0)
         MessageBox("Паттерн на покупку и продажу не может быть одинаков!","Ошибка",MB_OK);
      else if(m_lang_index==1)
         MessageBox("The pattern for buying and selling cannot be the same!","Error",MB_OK);
      return;
   }
//---
   ZeroMemory(m_report);
   datetime cur_date=m_start_date;
   string tf=m_timeframe1.GetListViewPointer().SelectedItemText();
   int applied1=m_applied1.GetListViewPointer().SelectedItemIndex();
   int applied2=m_applied2.GetListViewPointer().SelectedItemIndex();
   int applied3=m_applied3.GetListViewPointer().SelectedItemIndex();
   int applied4=m_applied4.GetListViewPointer().SelectedItemIndex();
   int applied5=m_applied5.GetListViewPointer().SelectedItemIndex();
   int applied6=m_applied6.GetListViewPointer().SelectedItemIndex();
//---
   while(cur_date<m_end_date)
   {
      if(
         BuySignal(symbol,m_start_date,applied1,1) ||
         BuySignal(symbol,m_start_date,applied2,2) ||
         BuySignal(symbol,m_start_date,applied3,3))
      {
         CalculateBuyDeals(symbol,m_start_date);
         cur_date=m_start_date;
         continue;
      }
      if(
         SellSignal(symbol,m_start_date,applied4,1) ||
         SellSignal(symbol,m_start_date,applied5,2) ||
         SellSignal(symbol,m_start_date,applied6,3))
      {

         CalculateSellDeals(symbol,m_start_date);
         cur_date=m_start_date;
         continue;
      }
      m_start_date+=PeriodSeconds(StringToTimeframe(tf));
      cur_date=m_start_date;
   }
//--- Output the report
   PrintReport();
}
This method includes checks of whether the date range is set correctly. Another check is performed to make sure that the user has not set the same patterns for testing both buy and sell signals. The GetResult() method includes three methods for working with data, specified in settings.
1. Signal search methods: BuySignal() and SellSignal(). They are similar. Let us consider one of them.
//+------------------------------------------------------------------+
//|                                                                  |
//+------------------------------------------------------------------+
bool CProgram::BuySignal(const string symbol,datetime start,int applied,int signal)
{
//--- Exit if the buy signal is disabled
   if(!m_checkbox[0].IsPressed())
      return(false);
//---
   int Handle=INVALID_HANDLE;
   string tf=m_timeframe1.GetListViewPointer().SelectedItemText();
//--- Preparing data
   if(m_checkbox[signal+1].IsPressed())
   {
      //--- Price
      if(applied==0)
      {
         MqlRates rt[];
         int sl=0,tp=0;
         POINTS pat;
         double arr[];
         int copied=CopyRates(symbol,StringToTimeframe(tf),m_start_date,5,rt);
         int app_price=m_ind_set4.GetListViewPointer().SelectedItemIndex();
         ArrayResize(arr,copied);
         //Print(m_start_date+": "+copied);
         if(copied<5)
            return(false);
         //---
         for(int i=0; i<copied; i++)
         {
            if(app_price==0)
               arr[i]=rt[i].open;
            else if(app_price==1)
               arr[i]=rt[i].close;
            else if(app_price==2)
               arr[i]=rt[i].high;
            else if(app_price==3)
               arr[i]=rt[i].low;
         }
         //--- Pattern search
         pat.A=arr[0];
         pat.B=arr[1];
         pat.C=arr[2];
         pat.D=arr[3];
         pat.E=arr[4];
         //--- If the pattern is found, check the signal
         if(GetPatternType(pat)==m_combobox1.GetListViewPointer().SelectedItemIndex())
         {
            m_start_date=IndexToDate(m_start_date,StringToTimeframe(tf),5);
            return(true);
         }
         return(false);
      }
      //--- ATR
      if(applied==1)
         Handle=iATR(symbol,StringToTimeframe(tf),int(m_ind_setting[0].GetValue()));
      //--- CCI
      if(applied==2)
      {
         int app_price;
         switch(m_ind_set4.GetListViewPointer().SelectedItemIndex())
         {
         case  0:
            app_price=PRICE_OPEN;
            break;
         case  1:
            app_price=PRICE_CLOSE;
            break;
         case  2:
            app_price=PRICE_HIGH;
            break;
         case  3:
            app_price=PRICE_LOW;
            break;
         default:
            app_price=PRICE_CLOSE;
            break;
         }
         Handle=iCCI(symbol,StringToTimeframe(tf),int(m_ind_setting[1].GetValue()),app_price);
      }
      //--- DeMarker
      if(applied==3)
         Handle=iDeMarker(symbol,StringToTimeframe(tf),int(m_ind_setting[2].GetValue()));
      //--- Force Index
      if(applied==4)
      {
         int force_period=int(m_ind_setting[3].GetValue());
         ENUM_MA_METHOD force_ma_method;
         ENUM_APPLIED_VOLUME force_applied_volume;
         switch(m_ind_set1.GetListViewPointer().SelectedItemIndex())
         {
         case  0:
            force_ma_method=MODE_SMA;
            break;
         case  1:
            force_ma_method=MODE_EMA;
            break;
         case  2:
            force_ma_method=MODE_SMMA;
            break;
         case  3:
            force_ma_method=MODE_LWMA;
            break;
         default:
            force_ma_method=MODE_SMA;
            break;
         }
         switch(m_ind_set3.GetListViewPointer().SelectedItemIndex())
         {
         case  0:
            force_applied_volume=VOLUME_TICK;
            break;
         case  1:
            force_applied_volume=VOLUME_REAL;
            break;
         default:
            force_applied_volume=VOLUME_TICK;
            break;
         }
         Handle=iForce(symbol,StringToTimeframe(tf),force_period,force_ma_method,force_applied_volume);
      }
      //--- WPR
      if(applied==5)
         Handle=iWPR(symbol,StringToTimeframe(tf),int(m_ind_setting[5].GetValue()));
      //--- RSI
      if(applied==6)
         Handle=iRSI(symbol,StringToTimeframe(tf),int(m_ind_setting[4].GetValue()),PRICE_CLOSE);
      //--- Momentum
      if(applied==7)
         Handle=iMomentum(symbol,StringToTimeframe(tf),int(m_ind_setting[6].GetValue()),PRICE_CLOSE);
      //--- Custom
      if(applied==8)
      {
         string str[];
         double arr[];
         string parameters=m_custom_param.GetValue();
         StringSplit(parameters,',',str);
         if(ArraySize(str)>20)
         {
            if(m_lang_index==0)
               MessageBox("Количество параметров не должно быть больше 20!","Ошибка",MB_OK);
            else if(m_lang_index==1)
               MessageBox("The number of parameters should not be more than 20!","Error",MB_OK);
         }
         ArrayResize(arr,ArraySize(str));
         for(int i=0; i<ArraySize(str); i++)
            arr[i]=StringToDouble(str[i]);
         string name=m_custom_path.GetValue();
         Handle=GetCustomValue(StringToTimeframe(tf),name,arr);
      }
      //---
      if(applied>0)
      {
         if(Handle==INVALID_HANDLE)
         {
            if(m_lang_index==0)
               MessageBox("Не удалось получить хендл индикатора!","Ошибка",MB_OK);
            else if(m_lang_index==1)
               MessageBox("Failed to get indicator handle!","Error",MB_OK);
         }
         double arr[];
         int buffer=(applied==8)?int(m_custom_buffer.GetValue()):0;
         int copied=CopyBuffer(Handle,buffer,m_start_date,5,arr);
         //---
         int sl=0,tp=0;
         POINTS pat;
         if(copied<5)
            return(false);
         //--- Pattern search condition
         pat.A=arr[0];
         pat.B=arr[1];
         pat.C=arr[2];
         pat.D=arr[3];
         pat.E=arr[4];
         //--- If the pattern is found, check the signal
         if(GetPatternType(pat)==m_combobox1.GetListViewPointer().SelectedItemIndex())
         {
            m_start_date=IndexToDate(m_start_date,StringToTimeframe(tf),5);
            return(true);
         }
         return(false);
      }
      return(false);
   }
   return(false);
}
The idea of the method is in the preset sequence of actions:
- Checking if any buy signal is allowed and checking the specific signal.
- Checking the data array, to which patterns will be applied.
- Preparing data for search and searching for the specified pattern using the GetPatternType() method.
2. Methods for processing the found signal CalculateBuyDeals() and CalculateSellDeals().
//+------------------------------------------------------------------+
//|                                                                  |
//+------------------------------------------------------------------+
void CProgram::CalculateBuyDeals(const string symbol,datetime start)
{
   MqlRates rt[];
   int TP=int(m_takeprofit1.GetValue());
   int SL=int(m_stoploss1.GetValue());
   string tf=m_timeframe1.GetListViewPointer().SelectedItemText();
   int copied=CopyRates(symbol,StringToTimeframe(tf),m_start_date,m_end_date,rt);
   double deal_price=iOpen(symbol,StringToTimeframe(tf),copied);
   for(int j=0; j<copied; j++)
   {
      if((iHigh(symbol,StringToTimeframe(tf),copied-j)-deal_price)/SymbolInfoDouble(symbol,SYMBOL_POINT)>=TP)
      {
         m_report.profit_trades++;
         m_report.profit+=TP;
         m_report.long_trades++;
         m_report.total_trades++;
         m_start_date=IndexToDate(m_start_date,StringToTimeframe(tf),j);
         return;
      }
      else if((deal_price-iLow(symbol,StringToTimeframe(tf),copied-j))/SymbolInfoDouble(symbol,SYMBOL_POINT)>=SL)
      {
         m_report.loss_trades++;
         m_report.profit-=SL;
         m_report.long_trades++;
         m_report.total_trades++;
         m_start_date=IndexToDate(m_start_date,StringToTimeframe(tf),j);
         return;
      }
   }
   m_start_date=m_end_date;
}
//+------------------------------------------------------------------+
//|                                                                  |
//+------------------------------------------------------------------+
void CProgram::CalculateSellDeals(const string symbol,datetime start)
{
   MqlRates rt[];
   int TP=int(m_takeprofit2.GetValue());
   int SL=int(m_stoploss2.GetValue());
   string tf=m_timeframe1.GetListViewPointer().SelectedItemText();
   int copied=CopyRates(symbol,StringToTimeframe(tf),m_start_date,m_end_date,rt);
   double deal_price=iOpen(symbol,StringToTimeframe(tf),copied);
   for(int j=0; j<copied; j++)
   {
      if((deal_price-iLow(symbol,StringToTimeframe(tf),copied-j))/SymbolInfoDouble(symbol,SYMBOL_POINT)>=TP)
      {
         m_report.profit_trades++;
         m_report.profit+=TP;
         m_report.short_trades++;
         m_report.total_trades++;
         m_start_date=IndexToDate(m_start_date,StringToTimeframe(tf),j);
         return;
      }
      else if((iHigh(symbol,StringToTimeframe(tf),copied-j)-deal_price)/SymbolInfoDouble(symbol,SYMBOL_POINT)>=SL)
      {
         m_report.loss_trades++;
         m_report.profit-=SL;
         m_report.short_trades++;
         m_report.total_trades++;
         m_start_date=IndexToDate(m_start_date,StringToTimeframe(tf),j);
         return;
      }
   }
   m_start_date=m_end_date;
}
Their task is to handle the found signal and to record statistics, based on which the Report will be generated.
3. The PrintReport() method, which outputs testing results.
//+------------------------------------------------------------------+
//|                                                                  |
//+------------------------------------------------------------------+
void CProgram::PrintReport(void)
{
   if(m_lang_index==0)
   {
      string report_label[6]=
      {
         "Всего трейдов: ","Короткие трейды: ","Прибыльные трейды: ",
         "Прибыль в пунктах: ","Длинные трейды: ","Убыточные трейды: "
      };
      //---
      m_report_text[0].LabelText(report_label[0]+string(m_report.total_trades));
      m_report_text[1].LabelText(report_label[1]+string(m_report.short_trades));
      m_report_text[2].LabelText(report_label[2]+string(m_report.profit_trades));
      m_report_text[3].LabelText(report_label[3]+string(m_report.profit));
      m_report_text[4].LabelText(report_label[4]+string(m_report.long_trades));
      m_report_text[5].LabelText(report_label[5]+string(m_report.loss_trades));
   }
   else
   {
      string report_label[6]=
      {
         "Total trades: ","Short Trades: ","Profit Trades: ",
         "Profit in points: ","Long Trades: ","Loss Trades: "
      };
      //---
      m_report_text[0].LabelText(report_label[0]+string(m_report.total_trades));
      m_report_text[1].LabelText(report_label[1]+string(m_report.short_trades));
      m_report_text[2].LabelText(report_label[2]+string(m_report.profit_trades));
      m_report_text[3].LabelText(report_label[3]+string(m_report.profit));
      m_report_text[4].LabelText(report_label[4]+string(m_report.long_trades));
      m_report_text[5].LabelText(report_label[5]+string(m_report.loss_trades));
   }
   Update(true);
}
Shows testing data in the application. Thus the algorithm has been fully executed.
Demonstration and example of strategy builder operation
As an example, I decided to record a short video, which shows the operation of the strategy builder.
Conclusion
The archive attached below contains all described files properly arranged into folders. For correct operation, save the MQL5 folder to the terminal's root directory. To open the terminal root directory, in which the MQL5 folder is located, press the Ctrl+Shift+D key combination in the MetaTrader 5 terminal or use the context menu as shown in Fig. 7 below.
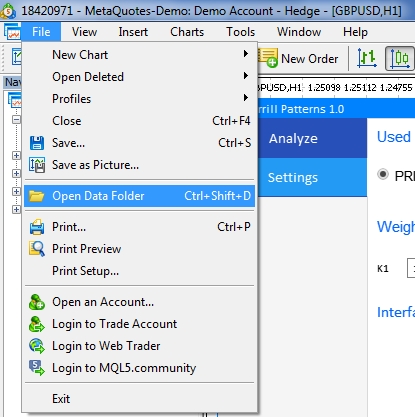
Fig. 14. Opening the MQL5 folder in the MetaTrader 5 terminal root
Translated from Russian by MetaQuotes Ltd.
Original article: https://www.mql5.com/ru/articles/7218
 Developing a cross-platform grid EA (Last part): Diversification as a way to increase profitability
- Free trading apps
- Over 8,000 signals for copying
- Economic news for exploring financial markets
You agree to website policy and terms of use