
Graphical Interfaces X: Updates for Easy And Fast Library (Build 2)
Contents
Introduction
The first article Graphical Interfaces I: Preparation of the Library Structure (Chapter 1) explains in detail what this library is for. You will find a list of articles with links at the end of each chapter. There you can also find and download a complete version of the library at the current stage of development. The files must be placed in the same directories as they are located in the archive.
Since the publication of the previous article in this series, Easy And Fast library has received some new features. The library structure and code have been partially optimized slightly reducing CPU load. Some recurring methods in many control classes have been moved to the CElement base class. Also, some minor visual improvements and fixes have been added. Let's examine all that in details.
Updates
1. Changed the default color scheme. Now, it is mostly in light shades conforming to any chart background. Using the default color scheme allows specifying the minimum amount of properties when developing methods for creating controls in a custom class.
The following screenshots show examples of an MQL application graphical interface against the light and dark backgrounds:
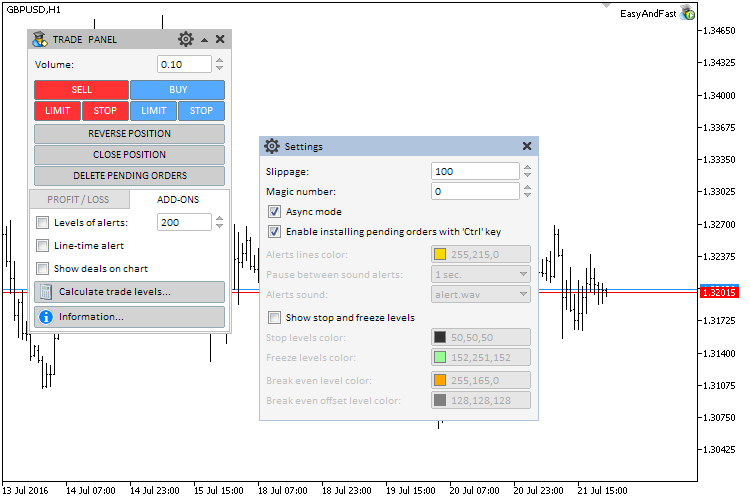
Fig. 1. Sample graphical interface with the default color scheme against the light background

Fig. 2. Sample graphical interface with the default color scheme against the dark background
2. Implemented the first version of the CMouse class for storing mouse and mouse cursor parameters. Let's look at it more carefully.
The CMouse class can be found in the Mouse.mqh file located in the directory for all library files: “<terminal directlory>\MQLX\Include\EasyAndFastGUI\Controls ”. Here we need the CChart class instance from the standard library. The CChart::SubwindowY() method is to be used from that class for calculating the Y coordinate relative to the subwindow where the mouse cursor is currently located. Binding to the chart is performed in the class constructor, while unbinding is done in the destructor.
The CChart class will be available to all basic library classes from here. Therefore, the appropriate changes have been implemented.
//+------------------------------------------------------------------+
//|                                                        Mouse.mqh |
//|                        Copyright 2016, MetaQuotes Software Corp. |
//|                                              http://www.mql5.com |
//+------------------------------------------------------------------+
#include <Charts\Chart.mqh>
//+------------------------------------------------------------------+
//| Class for receiving the mouse parameters                         |
//+------------------------------------------------------------------+
class CMouse
  {
private:
   //--- Class instance for managing the chart
   CChart            m_chart;
   //---
public:
                     CMouse(void);
                    ~CMouse(void);
  };
//+------------------------------------------------------------------+
//| Constructor                                                      |
//+------------------------------------------------------------------+
CMouse::CMouse(void)
  {
//--- Receive the current chart ID
   m_chart.Attach();
  }
//+------------------------------------------------------------------+
//| Destructor                                                       |
//+------------------------------------------------------------------+
CMouse::~CMouse(void)
  {
//--- Unbind from the chart
   m_chart.Detach();
  }
The list of the mouse and cursor parameters to be used in almost all library classes is provided below.
- Current cursor coordinates.
- Subwindow number currently containing the cursor.
- Time corresponding to the cursor X coordinate on the chart.
- Level corresponding to the cursor Y coordinate on the chart.
- Left mouse button state (pressed/released).
The relevant fields and methods for storing and receiving the parameter values are implemented in the CMouse class body:
class CMouse
  {
private:
   //--- Coordinates
   int               m_x;
   int               m_y;
   //--- Number of the window, in which the cursor is located
   int               m_subwin;
   //--- Time corresponding to X coordinate
   datetime          m_time;
   //--- Level (price) corresponding to Y coordinate
   double            m_level;
   //--- Left mouse button status (pressed/released)
   bool              m_left_button_state;
   //---
public:
   //--- Return the coordinates
   int               X(void)               const { return(m_x);                 }
   int               Y(void)               const { return(m_y);                 }
   //--- Return the (1) number of the window where the cursor is currently located, (2) time corresponding to X coordinate,
   //    (3) level (price) corresponding to Y coordinate
   int               SubWindowNumber(void) const { return(m_subwin);            }
   datetime          Time(void)            const { return(m_time);              }
   double            Level(void)           const { return(m_level);             }
   //--- Return the left mouse button status (pressed/released)
   bool              LeftButtonState(void) const { return(m_left_button_state); }
  };
Of course, we need the event handler tracking the occurrence of the CHARTEVENT_MOUSE_MOVE event. The CMouse class fields are filled in the event processing block. We have already encountered this code in all control event handlers. Now, it is present only in the CMouse class making the code of the control classes more intuitive. Besides, the mouse and cursor parameters are now received only once within the entire pass along all the elements, thus reducing the CPU load.
class CMouse
  {
   //--- Event handler
   void              OnEvent(const int id,const long &lparam,const double &dparam,const string &sparam);
  };
//+------------------------------------------------------------------+
//| Mouse cursor move event handler                                  |
//+------------------------------------------------------------------+
void CMouse::OnEvent(const int id,const long &lparam,const double &dparam,const string &sparam)
  {
//--- Cursor move event handler
   if(id==CHARTEVENT_MOUSE_MOVE)
     {
      //--- Left mouse button coordinates and status
      m_x                 =(int)lparam;
      m_y                 =(int)dparam;
      m_left_button_state =(bool)int(sparam);
      //--- Receive the cursor location
      if(!::ChartXYToTimePrice(0,m_x,m_y,m_subwin,m_time,m_level))
         return;
      //--- Receive the relative Y coordinate
      if(m_subwin>0)
         m_y=m_y-m_chart.SubwindowY(m_subwin);
     }
  }
The CMouse class instance is declared in the library engine base class (CWndContainer):
//+------------------------------------------------------------------+
//| Class for storing all interface objects                          |
//+------------------------------------------------------------------+
class CWndContainer
  {
protected:
   //--- Class instance for receiving the mouse parameters
   CMouse            m_mouse;
  };
The CMouse class instance is also declared in the CElement base control class for storing the pointer to the object of that type which in turn is declared in the CWndContainer class. Besides, the methods for saving and receiving the pointer are located here.
//+------------------------------------------------------------------+
//| Base control class                                               |
//+------------------------------------------------------------------+
class CElement
  {
protected:
   //--- Class instance for receiving the mouse parameters
   CMouse           *m_mouse;
   //---
public:
   //--- (1) Save and (2) return the mouse pointer
   void              MousePointer(CMouse &object)                   { m_mouse=::GetPointer(object);       }
   CMouse           *MousePointer(void)                       const { return(::GetPointer(m_mouse));      }
  };
The pointer to the CMouse object is automatically passed to all controls when creating the library graphical interface. To do this, the CMouse object should be passed in the CWndContainer::AddToObjectsArray() method where the pointers of all the graphical objects the controls consist of are sent to the common array as shown in the code listing below.
//+------------------------------------------------------------------+
//| Add the pointers to the control objects into the common array    |
//+------------------------------------------------------------------+
template<typename T>
void CWndContainer::AddToObjectsArray(const int window_index,T &object)
  {
   int total=object.ObjectsElementTotal();
   for(int i=0; i<total; i++)
      AddToArray(window_index,object.Object(i));
//--- Save the mouse cursor in the base control class
   object.MousePointer(m_mouse);
  }
Now, each control class has access to the mouse and cursor parameters stored in a single object in the entire library. In order to receive new values in the ChartEvent() handler of the CWndEvents class, the CMouse object handler should be called by sending to it the current parameters of the event. Since the call is performed before handling the events of all controls, the relevant values of the mouse and cursor parameters will be further available for all controls without the need to repeatedly convert the types, assign values to the class fields and calculate the relative Y coordinate.
//+------------------------------------------------------------------+
//| Handling the program events                                      |
//+------------------------------------------------------------------+
void CWndEvents::ChartEvent(const int id,const long &lparam,const double &dparam,const string &sparam)
  {
//--- Exit if the array is empty
//--- Initialization of event parameter fields

//--- Receive the mouse parameters
   m_mouse.OnEvent(id,lparam,dparam,sparam);

//--- Custom events
//--- Check the interface control events
//--- Mouse move event
//--- Chart properties change event
  }
Let's use the extract from the CSimpleButton control code handler as an example. The listing below shows the abridged version of the CSimpleButton::OnEvent() method. The yellow color is used to highlight the strings containing the call of the CMouse object methods for receiving (1) the subwindow number, in which the mouse cursor is located, (2) the cursor coordinates and (3) the left mouse button status.
//+------------------------------------------------------------------+
//| Event handler                                                    |
//+------------------------------------------------------------------+
void CSimpleButton::OnEvent(const int id,const long &lparam,const double &dparam,const string &sparam)
  {
//--- handle the cursor move event
   if(id==CHARTEVENT_MOUSE_MOVE)
     {
      //--- Exit if the control is hidden
      if(!CElement::IsVisible())
         return;
      //--- Exit if the form is blocked
      if(m_wnd.IsLocked())
         return;
      //--- Exit if subwindow numbers do not match
      if(CElement::m_subwin!=CElement::m_mouse.SubWindowNumber())
         return;
      //--- Exit if the button is blocked
      if(!m_button_state)
         return;
      //--- Define the focus
      CElement::MouseFocus(CElement::m_mouse.X()>X() && CElement::m_mouse.X()<X2() &&
                           CElement::m_mouse.Y()>Y() && CElement::m_mouse.Y()<Y2());
      //--- Exit if the mouse button released
      if(!CElement::m_mouse.LeftButtonState())
         return;
      //---
      ...
      return;
     }
//...
  }
The appropriate changes have been implemented to all library control classes.
3. Previously, the methods for receiving a control's ID and index from the control's graphical object name were repeated in many library control classes. Now, these methods have been placed to the CElement base class to avoid repetition.
//+------------------------------------------------------------------+
//| Base control class                                               |
//+------------------------------------------------------------------+
class CElement
  {
protected:
   //--- Receive ID from the button name
   int               IdFromObjectName(const string object_name);
   //--- Receive index from the menu option name
   int               IndexFromObjectName(const string object_name);
  };
4. Add methods in the CWindow class to enable the button for folding/unfolding the window and header text label positioning.
//+------------------------------------------------------------------+
//| Class for creating the form for controls                         |
//+------------------------------------------------------------------+
class CWindow : public CElement
  {
private:
   //--- Header text label indents
   int               m_label_x_gap;
   int               m_label_y_gap;
   //--- Presence of the button for folding/unfolding the window
   bool              m_roll_button;
   //---
public:
   //--- Text label indents
   void              LabelXGap(const int x_gap)                              { m_label_x_gap=x_gap;                }
   void              LabelYGap(const int y_gap)                              { m_label_y_gap=y_gap;                }
   //--- Use the tooltip button
   void              UseRollButton(void)                                     { m_roll_button=true;                 }
  };
5. Added the CheckWindowPointer() method to the CElement class in order to check the presence of the window pointer (CWindow). Send the pointer type to this method using the CheckPointer() system method to verify its correctness. Previously, the same code was repeated in all control classes within the main control creation method before creating. The CElement::CheckWindowPointer() method simplifies the process, reduces the amount of code and makes it more versatile.
//+------------------------------------------------------------------+
//| Base control class                                               |
//+------------------------------------------------------------------+
class CElement
  {
protected:
   //--- Check if the pointer to the form is present
   bool              CheckWindowPointer(ENUM_POINTER_TYPE pointer_type);
  };
//+------------------------------------------------------------------+
//| Check if the pointer to the form is present                      |
//+------------------------------------------------------------------+
bool CElement::CheckWindowPointer(ENUM_POINTER_TYPE pointer_type)
  {
//--- If there is no the pointer to the form
   if(pointer_type==POINTER_INVALID)
     {
      //--- Generate the message
      string message=__FUNCTION__+" > Before creating the control, the pointer to the form: "+ClassName()+"::WindowPointer(CWindow &object)" should be sent;
      //--- Send the message to the terminal journal
      ::Print(message);
      //--- Interrupt creating the application graphical interface
      return(false);
     }
//--- Send the pointer presence attribute
   return(true);
  }
Now, simply call the CElement::CheckWindowPointer() method in order to check the presence of the pointer to the form the control should be attached to as shown in the code listing below (creating a simple button in the CSimpleButton class). The appropriate changes have been implemented to all library control classes.
//+------------------------------------------------------------------+
//| Create "a simple button" control                                 |
//+------------------------------------------------------------------+
bool CSimpleButton::CreateSimpleButton(const long chart_id,const int subwin,const string button_text,const int x,const int y)
  {
//--- Exit if the pointer to the form is absent
   if(!CElement::CheckWindowPointer(::CheckPointer(m_wnd)))
      return(false);
//--- Initialize the variables
   m_id          =m_wnd.LastId()+1;
   m_chart_id    =chart_id;
   m_subwin      =subwin;
   m_x           =x;
   m_y           =y;
   m_button_text =button_text;
//--- Indents from the edge point
   CElement::XGap(m_x-m_wnd.X());
   CElement::YGap(m_y-m_wnd.Y());
//--- Create the button
   if(!CreateButton())
      return(false);
//--- Hide the control if this is a dialog window or it is minimized
   if(m_wnd.WindowType()==W_DIALOG || m_wnd.IsMinimized())
      Hide();
//---
   return(true);
  }
6. Added the mode for automatic change of the control width to the CElement base class if the width of the form, to which the control is attached, has been changed. The CElement::AutoXResizeMode() method is used to set the mode. Now, the right edge of the control in this mode is bound to the right edge of the form. Also, added the CElement::AutoXResizeRightOffset() method for setting and receiving the indent (in pixels) from the right edge of the form.
//+------------------------------------------------------------------+
//| Base control class                                               |
//+------------------------------------------------------------------+
class CElement
  {
protected:
   //--- Control width auto change mode
   bool              m_auto_xresize_mode;
   //--- Indent from the right edge of the form in the control width auto change mode
   int               m_auto_xresize_right_offset;
   //---
public:
   //--- (1) Control width auto change mode, (2) setting/receiving the indent from the right edge of the form
   bool              AutoXResizeMode(void)                    const { return(m_auto_xresize_mode);         }
   void              AutoXResizeMode(const bool flag)               { m_auto_xresize_mode=flag;            }
   int               AutoXResizeRightOffset(void)             const { return(m_auto_xresize_right_offset); }
   void              AutoXResizeRightOffset(const int offset)       { m_auto_xresize_right_offset=offset;  }
  };
By default, the mode of binding the control's right edge to the right edge of the form is disabled (false) and the indent is equal to 0. Initialization is performed in the CElement class constructor (see the code listing below):
//+------------------------------------------------------------------+
//| Constructor                                                      |
//+------------------------------------------------------------------+
CElement::CElement(void) : m_auto_xresize_mode(false),
                           m_auto_xresize_right_offset(0)
  {
  }
Previously, the CWindow::ChangeWindowWidth() method has already been created in the CWindow class to change the form width. Now, if the mode is enabled, the form width is automatically changed only if the graphical interface has been implemented in the indicator subwindow. In other words, if the chart window width is changed in the form event handler due to the CHARTEVENT_CHART_CHANGE event, the form width is changed.
//--- Chart property change event
   if(id==CHARTEVENT_CHART_CHANGE)
     {
      //--- If the button is released
      if(m_clamping_area_mouse==NOT_PRESSED)
        {
         //--- Receive the chart window size
         SetWindowProperties();
         //--- Correct the coordinates
         UpdateWindowXY(m_x,m_y);
        }
      //--- Change the size if the mode is enabled
      if(CElement::AutoXResizeMode())
         ChangeWindowWidth(m_chart.WidthInPixels()-2);
      //---
      return;
     }
The new ID has been added to the library event ID list — ON_WINDOW_CHANGE_SIZE. This ID is used to generate the form size change message.
//+------------------------------------------------------------------+
//|                                                      Defines.mqh |
//|                        Copyright 2015, MetaQuotes Software Corp. |
//|                                              http://www.mql5.com |
//+------------------------------------------------------------------+
...
//--- Event IDs
#define ON_WINDOW_CHANGE_SIZE     (3)  // Change the window size
...
Generation of such a message has been added to the CWindow::ChangeWindowWidth() method. The abridged version of the method is shown below:
//+------------------------------------------------------------------+
//| Change the window width                                          |
//+------------------------------------------------------------------+
void CWindow::ChangeWindowWidth(const int width)
  {
//--- Exit if the width is not changed
//--- Update the background and header width
//--- Update coordinates and indents for all buttons:
//    Close button
//--- Unfold button
//--- Fold button
//--- Tooltip button (if enabled)

//--- Window size change message
   ::EventChartCustom(m_chart_id,ON_WINDOW_CHANGE_SIZE,(long)CElement::Id(),0,””);
  }
The message is processed in the library engine (the CWndEvents class). Added the virtual ChangeWidthByRightWindowSide() method to the CElement base control class. Also, changed the method's implementation in many derivatives (where the control width should be changed).
//+------------------------------------------------------------------+
//| Base control class                                               |
//+------------------------------------------------------------------+
class CElement
  {
public:
   //--- Change the width by the right window edge
   virtual void      ChangeWidthByRightWindowSide(void) {}
  };
After the ON_WINDOW_CHANGE_SIZE event arrives, the width of the controls with the appropriate mode enabled can be changed in the CWndEvents class. The CWndEvents::OnWindowChangeSize() method has been implemented for that.
//+------------------------------------------------------------------+
//| Event handling class                                             |
//+------------------------------------------------------------------+
class CWndEvents : public CWndContainer
  {
private:
   //--- Handle the window size change
   bool              OnWindowChangeSize(void);
  };
//+------------------------------------------------------------------+
//| ON_WINDOW_CHANGE_SIZE event                                      |
//+------------------------------------------------------------------+
bool CWndEvents::OnWindowChangeSize(void)
  {
//--- In case of the "Change control size" signal
   if(m_id!=CHARTEVENT_CUSTOM+ON_WINDOW_CHANGE_SIZE)
      return(false);
//--- Active window index
   int awi=m_active_window_index;
//--- If the window IDs coincide
   if(m_lparam!=m_windows[awi].Id())
      return(true);
//--- Change the width of all controls except the form
   int elements_total=CWndContainer::ElementsTotal(awi);
   for(int e=0; e<elements_total; e++)
     {
      if(m_wnd[awi].m_elements[e].ClassName()=="CWindow")
         continue;
      //---
      if(m_wnd[awi].m_elements[e].AutoXResizeMode())
         m_wnd[awi].m_elements[e].ChangeWidthByRightWindowSide();
     }
//---
   return(true);
  }
The method is called in the main method of processing the CWndEvents::ChartEventCustom() library events:
//+------------------------------------------------------------------+
//| CHARTEVENT_CUSTOM event                                          |
//+------------------------------------------------------------------+
void CWndEvents::ChartEventCustom(void)
  {
//--- Signal to fold the form
//--- Signal to unfold the form

//--- Signal to change the control size
   if(OnWindowChangeSize())
      return;

//--- Signal to hide the context menus from the initiator item
//--- Signal to hide all context menus
//--- Signal to open the dialog window
//--- Signal to close the dialog window
//--- Signal to reset the control color on the specified form
//--- Signal to reset the left mouse button click priorities
//--- Signal to restore the left mouse button click priorities
  }
Currently, the unique ChangeWidthByRightWindowSide() methods for changing the control width relative to the form width they are attached to are present in the following classes:
- CTabs – simple tabs.
- CIconTabs – tabs with images.
- CStatusBar – status bar.
- CMenuBar – main menu.
- CLabelsTable – text label table.
- CTable – edit box table.
- CCanvasTable – rendered table.
- CProgressBar – progress bar.
- CTreeView – tree view.
- CFileNavigator – file navigator.
- CLineGraph – linear chart.
The method code for CLabelsTable type control is shown in the below listing as an example.
//+------------------------------------------------------------------+
//| Change the width by the right edge of the margin                 |
//+------------------------------------------------------------------+
void CLabelsTable::ChangeWidthByRightWindowSide(void)
  {
//--- Coordinates
   int x=0;
//--- Size
   int x_size=0;
//--- Calculate and set the new size of the table background
   x_size=m_wnd.X2()-m_area.X()-m_auto_xresize_right_offset;
   CElement::XSize(x_size);
   m_area.XSize(x_size);
   m_area.X_Size(x_size);
//--- Calculate and set the new coordinate for the vertical scroll bar
   x=m_area.X2()-m_scrollv.ScrollWidth();
   m_scrollv.XDistance(x);
//--- Calculate and change the width of the horizontal scroll bar
   x_size=CElement::XSize()-m_scrollh.ScrollWidth()+1;
   m_scrollh.ChangeXSize(x_size);
//--- Update positions of objects
   Moving(m_wnd.X(),m_wnd.Y());
  }
7. Added ability to programmatically switch the tabs after they have been created. The SelectTab() method has been implemented in the CTabs and CIconTabs classes. The listing code below shows the method from the CTabs class as an example:
//+------------------------------------------------------------------+
//| Class for creating tabs                                          |
//+------------------------------------------------------------------+
class CTabs : public CElement
  {
public:
   //--- Highlight the specified tab
   void              SelectTab(const int index);
  };
//+------------------------------------------------------------------+
//| Highlight the tab                                                |
//+------------------------------------------------------------------+
void CTabs::SelectTab(const int index)
  {
   for(int i=0; i<m_tabs_total; i++)
     {
      //--- If the tab is selected
      if(index==i)
        {
         //--- Coordinates
         int x=0;
         int y=0;
         //--- Size
         int x_size=0;
         int y_size=0;
         //--- Save highlighted tab index
         SelectedTab(index);
         //--- Set the colors
         m_tabs[i].Color(m_tab_text_color_selected);
         m_tabs[i].BackColor(m_tab_color_selected);
         //--- Calculation relative to the tab positioning
         CalculatingPatch(x,y,x_size,y_size);
         //--- Update the value
         m_patch.X_Size(x_size);
         m_patch.Y_Size(y_size);
         m_patch.XGap(x-m_wnd.X());
         m_patch.YGap(y-m_wnd.Y());
         //--- Update location of objects
         Moving(m_wnd.X(),m_wnd.Y());
        }
      else
        {
         //--- Set colors for non-active tabs
         m_tabs[i].Color(m_tab_text_color);
         m_tabs[i].BackColor(m_tab_color);
        }
     }
//--- Show controls of the highlighted tab only
   ShowTabElements();
  }
8. Added ability to deselect a row in an entry box table (CTable) by clicking on it again.
9. The string of the "column_row_text" format is sent in a generated event as a string parameter (sparam) when clicking on a table cell (CTable) with the cell editing mode disabled.
10. Fixed enumeration and methods for defining the mouse button click area. Now, the ENUM_MOUSE_STATE enumeration is used to track the left mouse button click area in all controls.
11. Renamed some image files used as resources in the library due to file name length limitations in the Indicator type applications.
12. Also, added some minor visual improvements and fixes. Some detected errors were reproduced only in MetaTrader 4.
Application for Testing the Updates
Let's develop an application allowing you to test all updates mentioned above. We will create two versions of the application — "Expert" and "Indicator". The indicator graphical interface will be located in the chart subwindow making it possible to test auto fitting of the window width to the chart window width, as well as the elements adjusting their width to the window they are attached to.
All currently present control types should be implemented into the graphical interface for the full-scale test. The controls are to be located on different tabs (CTabs) to make the interface as space-efficient as possible. Since the list of controls is rather large, it would be reasonable to place the implementation of methods for their creation into a separate file. Let's name the file MainWindow.mqh. It will be stored in the folder with the rest project files. It should be connected right after the body of the custom class as shown in the code listing below:
//+------------------------------------------------------------------+
//|                                                      Program.mqh |
//|                        Copyright 2015, MetaQuotes Software Corp. |
//|                                              http://www.mql5.com |
//+------------------------------------------------------------------+
#include <EasyAndFastGUI\Controls\WndEvents.mqh>
//+------------------------------------------------------------------+
//| Class for creating the application                               |
//+------------------------------------------------------------------+
class CProgram : public CWndEvents
  {

//...

  };
//+------------------------------------------------------------------+
//| Create controls                                                  |
//+------------------------------------------------------------------+
#include "MainWindow.mqh"
Program.mqh should be connected to MainWindow.mqh.
//+------------------------------------------------------------------+
//|                                                   MainWindow.mqh |
//|                        Copyright 2015, MetaQuotes Software Corp. |
//|                                              http://www.mql5.com |
//+------------------------------------------------------------------+
#include "Program.mqh"
In the Program.mqh file, it is reasonable to leave only the main file for creating the program graphical interface, in which all control creation methods are called.
The test applications' graphical interface will contain eight tabs in total. The screenshots below show the location of controls. The first tab contains all button types (including button groups) and the list with the vertical scroll bar. "Simple Button 3" features two modes. If enabled, the progress bar control simulating a process execution becomes visible.

Fig. 3. Group of controls for the first tab's graphical interface
When "Simple Button 3" is enabled, the progress bar is shown in the status bar area (see the screenshot below):
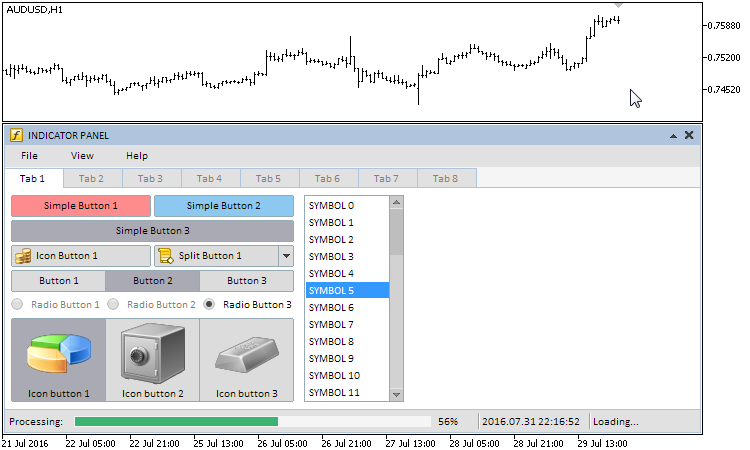
Fig. 4. Progress bar control
The second, third and fourth tabs contain tables of different types:

Fig. 5. Group of controls for the second tab's graphical interface

Fig. 6. Group of controls for the third tab's graphical interface

Fig. 7. Group of controls for the fourth tab's graphical interface
The fifth tab contains the line chart control. Methods for working with it are declared and implemented in the CProgram class. The CProgram::OnTimerEvent() timer generates random series every 300 milliseconds:
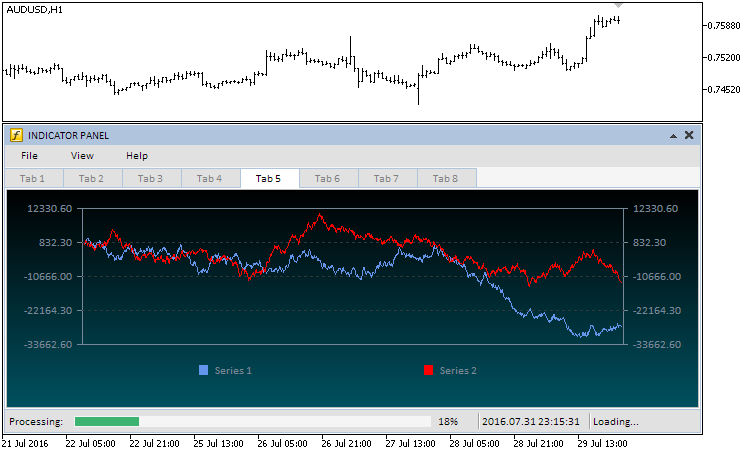
Fig. 8. Group of controls for the fifth tab's graphical interface
The sixth and seventh tabs contain the tree view and file navigator, as well as various types of combo boxes, input fields and check boxes:

Fig. 9. Group of controls for the sixth tab's graphical interface
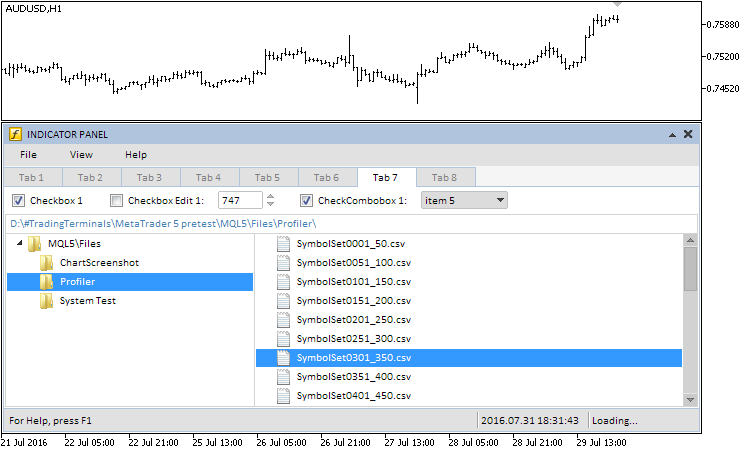
Fig. 10. Group of controls for the seventh tab's graphical interface
The seventh tab contains the following controls: calendar, drop down calendar, slider, dual slider, separator and color palette button:
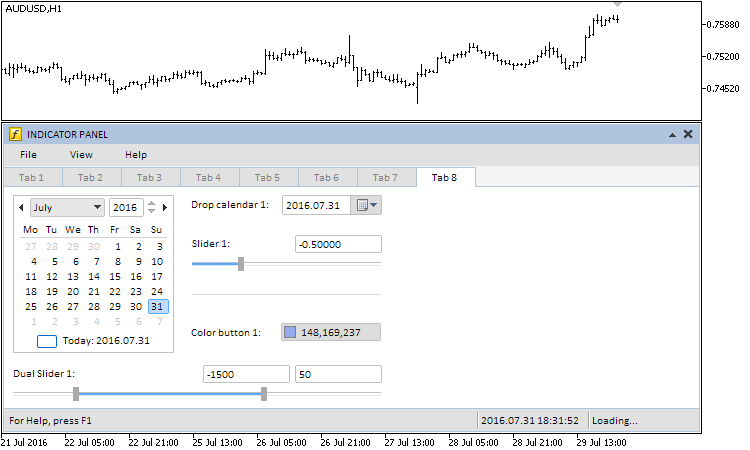
Fig. 11. Group of controls for the eighth tab's graphical interface
If you want the color palette window to be created in the main chart window, zero index both for the form and the controls to be attached to it should be specified in the creation method. Here, only one control (color palette) is attached to the form. The screenshot below shows the final result:
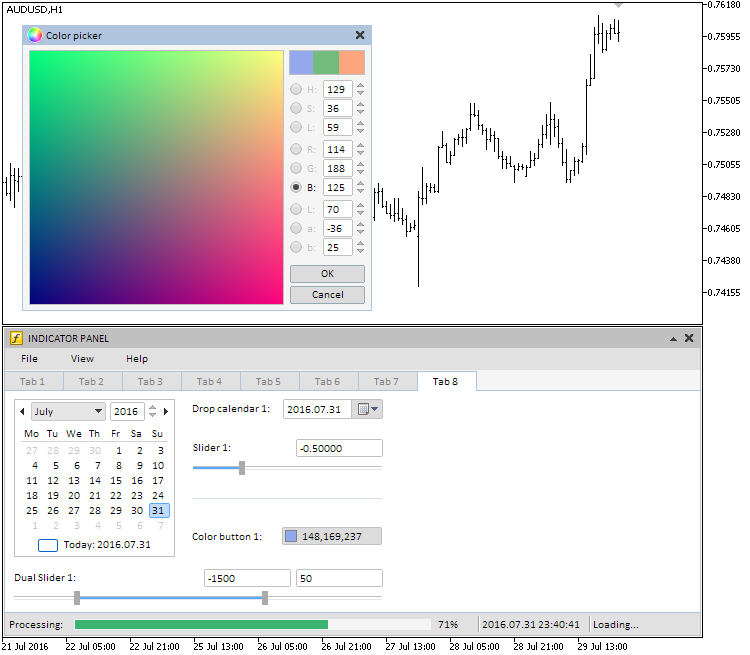
Fig. 12. Color palette control in the main chart window
As already mentioned, yet another application (Expert) having the same graphical interface was created for tests:

Fig. 13. Testing the Expert application
Both application types (Expert and Indicator) were implemented for the two platforms – MetaTrader 4 and MetaTrader 5. All necessary files are attached below.
Conclusion
The library for creating graphical interfaces at the current stage of development looks like in the schematic below.

Fig. 14. Library structure at the current stage of development
Many fixes and updates have been implemented at the requests from interested users. If you lack something or you have detected a bug related to the library when developing an application, please write a comment to the article or via a personal message. I will be glad to help you. I am already working on the next version of the library (build 3). It will have many additional features raising the library to a new level.
Apart from test applications described in the article, the archives below contain the updated versions of test EAs and indicators from all the previous articles of the series.
Translated from Russian by MetaQuotes Ltd.
Original article: https://www.mql5.com/ru/articles/2634
 How to copy signals using an EA by your rules?
 How to quickly develop and debug a trading strategy in MetaTrader 5
 Graphical Interfaces IX: The Progress Bar and Line Chart Controls (Chapter 2)
- Free trading apps
- Over 8,000 signals for copying
- Economic news for exploring financial markets
You agree to website policy and terms of use
At the moment this is not possible. I'll think about how to implement it.
Or, any way so i can ask an input by splash, message box or any window automaticly requested when i run the code.
I'm thinking some possibilities, and i really don't wanna use DLL, i'm not that pro yet. But i really have will. If you have me some directions or ideas i can really improve our code.
Dear Anatoli, thank you very much for your effort!
I just want to point you out that there is a typo in MenuItem.mqh, line 237, that makes it not possibile to be compiled successfully:
" > The type of the menu item can be set using the CMenuItem::TypeMenuItem()") method");should read instead
" > The type of the menu item can be set using the CMenuItem::TypeMenuItem() method");right?
The Edit is always flickering.
https://www.mql5.com/en/forum/274301
http://prntscr.com/tmjkm3
Hi. I'm working with MT4, so unfortunately I'm stock with this last version of MT4. Here is a bug that no matter what I tried won't fix itself. As you see in the picture above, there is a horizontal line "near" the caption. In case that horizontal line is selected, if you click inside the caption, it will jump to the middle of the caption and start moving with the caption. Also, if there is a horizontal line somewhere in the window background that is selected, if you click and drag inside the window when you are near the line, it will start dragging the line around. This happens to all objects on chart not only the line, only when they are selected this will happen.
In other words, the panel and caption is not "capturing" the mouse event and let it pass through to objects bellow them. How to fix this issue?
Please someone help