
Using Layouts and Containers for GUI Controls: The CBox Class
Table of Contents
- 1. Introduction
- 2. Objectives
- 3. The CBox Class
- 4. Implementation in a Dialog Window
- 5. Examples
- 6. Advantages and Disadvantages
- 7. Conclusion
1. Introduction
Absolute positioning of controls within an application dialog window is the most direct way of creating a graphical user interface for an application. However, in some cases, this approach to graphical user interface (GUI) design can be inconvenient, or even impractical. This article presents an alternative method of GUI creation based on layouts and containers, using one layout manager — the CBox class.
The layout manager class implemented and used in this article is roughly equivalent to those found in some mainstream programming languages such as BoxLayout (Java) and Pack geometry manager (Python/Tkinter).
2. Objectives
Looking at the SimplePanel and Controls examples available in MetaTrader 5, we can see that the controls within these panels are positioned pixel-by-pixel (absolute positioning). Each control is created and assigned a definite position in the client area, and the position of each control will depend on the control created before it, with some additional offsets. Although this is the natural approach, such a level of precision is not needed in most cases, and using this method can be disadvantageous on many levels.
Any programmer with sufficient skill would be able to design graphical user interfaces using precise pixel positions for graphical controls. However, it has the following disadvantages:
- It is usually impossible to prevent other components from being affected when one component's size or position is modified.
- Most of the code is not reusable — minor changes in the interface may sometimes require major changes in the code.
- It can be time-consuming, especially when designing more complex interfaces.
This prompts us to create a layout system with the following objectives:
- The code should be reusable.
- Changing one part of the interface should have minimal impact on other components.
- The positioning of components within the interface should be automatically calculated.
One implementation of such a system is introduced in this article using a container — the CBox Class.
3. The CBox Class
An instance of the CBox class acts as a container or box — controls are added to that box, and CBox would automatically calculate the positioning of the controls within its allocated space. A typical instance of the CBox class would have the following layout:
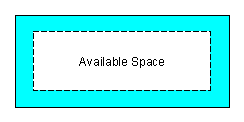
Figure 1. CBox Layout
The outer box represents the size of the entire container, while the dotted box inside it represents the boundaries of the padding. The blue area represents the padding space. The remaining white space would be the entire space available for positioning the controls inside the container.
Depending on the complexity of the panel, the CBox class can be used in various ways. For example, it is possible for a container (CBox) to hold another container holding a set of controls. Or a container containing a control and another container. However, using containers only as siblings in a given parent container is highly recommended.
We construct CBox by extending CWndClient (without the scrollbars), as shown in the following snippet:
#include <Controls\WndClient.mqh>
//+------------------------------------------------------------------+
//|                                                                  |
//+------------------------------------------------------------------+
class CBox : public CWndClient
  {
public:
                     CBox();
                    ~CBox();
   virtual bool      Create(const long chart,const string name,const int subwin,
                           const int x1,const int y1,const int x2,const int y2);
  };
//+------------------------------------------------------------------+
//|                                                                  |
//+------------------------------------------------------------------+
CBox::CBox()
  {
  }
//+------------------------------------------------------------------+
//|                                                                  |
//+------------------------------------------------------------------+
CBox::~CBox()
  {
  }
//+------------------------------------------------------------------+
//|                                                                  |
//+------------------------------------------------------------------+
bool CBox::Create(const long chart,const string name,const int subwin,
                  const int x1,const int y1,const int x2,const int y2)
  {
   if(!CWndContainer::Create(chart,name,subwin,x1,y1,x2,y2))
      return(false);
   if(!CreateBack())
      return(false);
   if(!ColorBackground(CONTROLS_DIALOG_COLOR_CLIENT_BG))
      return(false);
   if(!ColorBorder(clrNONE))
      return(false);
   return(true);
  }
//+------------------------------------------------------------------+
It is also possible for the CBox class to directly inherit from CWndContainer. However, doing this would deprive the class of some useful features, such as the background and border. Alternatively, a much simpler version may be achieved by directly extending from CWndObj, but you would need to add an instance of CArrayObj as one of its private or protected members and recreate the class methods involving the objects to be stored on that instance.
3.1. Layout Styles
CBox has two layout styles: vertical style and horizontal style.
A horizontal style would have the following basic layout:

Figure 2. Horizontal Style (Centered)
A vertical style would have the following basic layout:
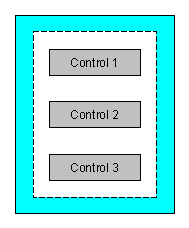
Figure 3. Vertical Style (Centered)
CBox would use a horizontal style by default.
Using a combination of these two layouts (possibly using multiple containers), it is possible to recreate virtually any type of GUI panel design. Furthermore, placing controls within containers would allow for a segmented design. That is, it allows one to customize the sizes and positioning of the controls in a given container, without affecting those held by other containers.
In order to implement horizontal and vertical styles in CBox, we would need to declare an enumeration, which we will then store as one of the members of the said class:
enum LAYOUT_STYLE
  {
   LAYOUT_STYLE_VERTICAL,
   LAYOUT_STYLE_HORIZONTAL
  };
3.2. Calculating Space Between Controls
CBox would maximize the available space allocated within, and will use it to position the controls it contains evenly, as shown in earlier figures.
Looking at the figures above, we can then derive the formula for calculating the space between controls in a given CBox container, using the pseudocode below:
for horizontal layout:
x space = ((available space x)-(total x size of all controls))/(total number of controls + 1)
y space = ((available space y)-(y size of control))/2

for vertical layout:
x space = ((available space x)-(x size of control))/2
y space = ((available space y)-(total y size of all controls))/(total number of controls + 1)
3.3. Alignment
The calculation of the space between controls, as mentioned in the previous section, only applies to a centered alignment. We would want the CBox class to accommodate more alignments as well, and so we will need some minor changes in the calculation.
For the horizontal alignment, the available options, aside from a centered container, are left, right, and center (no sides), as shown in the following figures:

Figure 4. Horizontal Style (Align Left)

Figure 5. Horizontal Style (Align Right)

Figure 6. Horizontal Style (Centered, No Sides)
For the vertical alignment, the available options, aside from the centered alignment, are top, bottom, center, and center (no sides), as shown below:
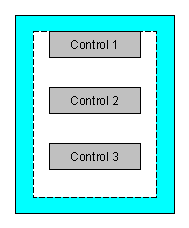
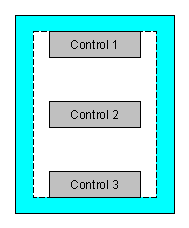
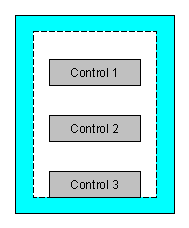
Figure 7. Vertical Style Alignments: (Left) Align Top, (Center) Align Center - No Sides, (Right) Align Bottom
Note that the CBox class should automatically calculate the x- and y-spacing between controls based on these alignments. Thus, rather than using a divisor of
(total number of controls + 1)
to get the space between controls, we use the total number of controls for skewed alignments (right, left, top, and bottom alignments) as divisor, and (total number of controls - 1) for a centered container with no margin on sides.
Similar to the layout styles, implementing alignment features to the CBox class would require enumerations. We will declare one enumeration for each alignment style, as follows:
enum VERTICAL_ALIGN
  {
   VERTICAL_ALIGN_CENTER,
   VERTICAL_ALIGN_CENTER_NOSIDES,
   VERTICAL_ALIGN_TOP,
   VERTICAL_ALIGN_BOTTOM
  };
enum HORIZONTAL_ALIGN
  {
   HORIZONTAL_ALIGN_CENTER,
   HORIZONTAL_ALIGN_CENTER_NOSIDES,
   HORIZONTAL_ALIGN_LEFT,
   HORIZONTAL_ALIGN_RIGHT
  };
3.4. Rendering Components
Normally, we create controls by specifying the x1, y1, x2, and y2 parameters, such as the following snippet when creating a button:
CButton m_button;
int x1 = currentX;
int y1 = currentY;
int x2 = currentX+BUTTON_WIDTH;
int y2 = currentY+BUTTON_HEIGHT
if(!m_button.Create(m_chart_id,m_name+"Button",m_subwin,x1,y1,x2,y2))
      return(false);
where x2 minus x1 and y2 minus y1 are equivalent to the width and height of the control, respectively. Rather than using this method, we can create the same button with CBox using a much simpler method, as shown in the following snippet:
if(!m_button.Create(m_chart_id,m_name+"Button",m_subwin,0,0,BUTTON_WIDTH,BUTTON_HEIGHT))
      return(false);
The CBox class would automatically reposition the component later in the creation of the panel window. The Pack() method, which calls the Render() method, should be invoked for repositioning of controls and containers:
bool CBox::Pack(void)
  {
   GetTotalControlsSize();
   return(Render());
  }
The Pack() method simply gets the combined size of the containers, and then calls the Render() method, where most of the action takes place. The snippet below shows the actual rendering of the controls within the container, through the Render() method:
bool CBox::Render(void)
  {
   int x_space=0,y_space=0;
   if(!GetSpace(x_space,y_space))
      return(false);
   int x=Left()+m_padding_left+
      ((m_horizontal_align==HORIZONTAL_ALIGN_LEFT||m_horizontal_align==HORIZONTAL_ALIGN_CENTER_NOSIDES)?0:x_space);
   int y=Top()+m_padding_top+
      ((m_vertical_align==VERTICAL_ALIGN_TOP||m_vertical_align==VERTICAL_ALIGN_CENTER_NOSIDES)?0:y_space);
   for(int j=0;j<ControlsTotal();j++)
     {
      CWnd *control=Control(j);
      if(control==NULL)
         continue;
      if(control==GetPointer(m_background))
         continue;
      control.Move(x,y);
      if (j<ControlsTotal()-1)
         Shift(GetPointer(control),x,y,x_space,y_space);
     }
   return(true);
  }
3.5. Component Resizing
When the size of a control is larger than the available space within its container, the control should be resized in order to fit the available space. Otherwise, the control will spill over the container, causing issues in the appearance of the entire panel. This approach is also convenient when you wanted a certain control to maximize its space and take the entire width or height of the client area, or its container. If the width or height of a given control exceeds the width or height of the container minus the padding (both sides), the control will be resized to the maximum width or maximum height available.
Note that CBox would not resize the container when the total size of all the controls it holds exceeds the available space. In this case, either the size of the main dialog window (CDialog or CAppDialog), or that of the individual controls would need to be manually adjusted.
3.6. Recursive Rendering
For a simple usage of CBox, a single call to the Pack() method would be sufficient. However, for nested containers, the same method will need to be called so that all containers would be able to position their individual controls or containers. We can prevent this by adding a method to the function to implement the same method to its own controls if and only if the graphical control in question is an instance of the CBox class or any layout class. To do this, first, we define a macro and assign it a unique value:
#define CLASS_LAYOUT 999
Then, we override the Type() method of the CObject class so that it returns the value of the macro we just prepared:
virtual int Type() const {return CLASS_LAYOUT;}
Finally, within the Pack() method of the CBox class, we will perform the rendering method to its child containers that are instances of a layout class:
for(int j=0;j<ControlsTotal();j++)
     {
      CWnd *control=Control(j);
      if(control==NULL)
         continue;
      if(control==GetPointer(m_background))
         continue;
      control.Move(x,y);

      //call control Pack() method if it is a layout class
      if(control.Type()==CLASS_LAYOUT)
        {
         CBox *container=control;
         container.Pack();
        }

      if (j<ControlsTotal()-1)
         Shift(GetPointer(control),x,y,x_space,y_space);
     }
The rendering method begins by calculating the available space for the controls within the container. These values are stored in m_total_x and m_total_y, respectively. The next task is to calculate the space between the controls, based on the layout style and alignment. The last step is to implement the actual repositioning of the controls within the container.
CBox keeps a tally of controls to be repositioned, as there are objects within the container that do not require repositioning, such as the CWndClient native background object, or possibly some other controls should CBox be extended.
CBox also keeps the minimum control size within the container (except the background), defined by m_min_size (struct CSize). Its purpose is to keep the controls uniformly stacked within the container, whether horizontally or vertically. Its definition is rather counter-intuitive, since this is actually the size of the largest control. However, here we define it as a minimum, since CBox would assume that this size is the minimum size, and would calculate the available space based on this size.
Note that the Shift() method follows a routine similar to the usual implementation of control positioning (absolute positioning). The rendering methods keep references to both of the x- and y- coordinates which are remembered and updated as CBox repositions each control. However, with CBox, this is done automatically, leaving the developer of the panel to simply set the actual size for each control to be used.
4. Implementation in a Dialog Window
When using CBox, we are practically replacing the functionality of the native client area of CDialog or CAppDialog, m_client_area, which is an instance of CWndClient. Thus, we have at least three options in this case:
- Extend/Rewrite CAppDialog or CDialog to have CBox replace the client area.
- Use containers and add them on the client area.
- Use a main CBox container to host other small containers.
Using the first option may take a lot of effort, as we will need to rewrite the dialog objects to make it use the new client area object. Alternatively, the dialog objects can be extended to use the custom container class, but will leave us with an instance of CWndClient (m_client_area) unused, taking memory space unnecessarily.
The second option is also feasible. We simply place controls within CBox containers, and then use pixel-positioning in order to add them to the client area. But this option does not fully utilize the potential of the CBox class, which is to design panels without having to be bothered about the positioning of individual controls and containers.
The third option is recommended. That is, we create a main CBox container to hold all other smaller containers and controls. This main container would occupy the width of the entire native client area, and will be added to it as its only child. This would make the native client area a bit redundant, but at least, it is still being used. Furthermore, we can avoid a great deal of coding/recoding using this option.
5. Examples
5.1. Example #1: A Simple Pip Value Calculator
Now, we use the CBox class to implement a simple panel: a pip value calculator. The pip value calculator dialog would contain three fields of type CEdit, namely:
- name of symbol or instrument;
- size of 1 pip for the input symbol or instrument;
- value of 1 pip for the symbol or instrument.
This gives us a total of 7 different controls, including the labels (CLabel) for each field, and a button (CButton) for executing a calculation. A screen shot of the calculator is shown below:
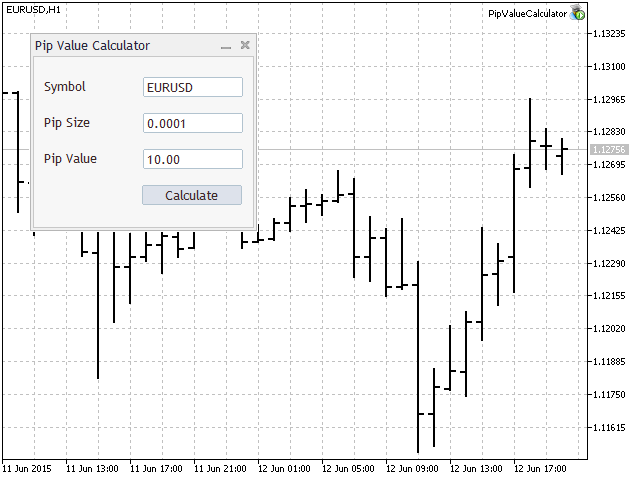
Figure 8. Pip Value Calculator
By looking at the calculator panel, we can deduct that it will use 5 different CBox containers. There should be 3 horizontal containers for each of the fields, and another horizontal container, aligned right, for the button. All these containers will be packaged inside the main container with a vertical style. And finally, this main container should be attached to the client area of the CAppDialog instance. The following figure shows the layout of the containers. The violet boxes represent the horizontal rows. The white boxes represent the essential controls, while the large gray box containing all the smaller boxes is the main box window.
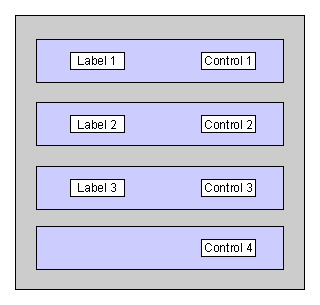
Figure 9. Pip Value Calculator layout
Notice that using CBox containers, we do not declare any macros for gaps and indentations. Rather we simply declare macros for control sizes, configure each CBox instance, and let them arrange the controls accordingly.
To construct this panel, first we begin by creating a header file, 'PipValueCalculator.mqh', which should be on the same folder as the main source file that we will prepare later (PipValueCalculator.mq5). We include in this file the CBox class header file, as well as other includes that we need for this panel. We would also require the CSymbolInfo class, which we will use for the actual calculation of pip value for any given symbol:
#include <Trade\SymbolInfo.mqh>
#include <Layouts\Box.mqh>
#include <Controls\Dialog.mqh>
#include <Controls\Label.mqh>
#include <Controls\Button.mqh>
The next step is to specify the width and height for the controls that we will use. It is possible to specify a certain size for each control, but for this panel, we will use a generic control size. That is, all essential controls will have the same width and height:
#define CONTROL_WIDTH   (100)
#define CONTROL_HEIGHT  (20)
Now, we move on to creating the actual panel class object. This is done in the usual way, by having a new class inherit from CAppDialog:
class CPipValueCalculatorDialog : public CAppDialog
The initial structure of the class will look similar to the following:
class CPipValueCalculatorDialog : public CAppDialog
  {
protected:
//protected class members here
public:
                     CPipValueCalculatorDialog();
                    ~CPipValueCalculatorDialog();

protected:
//protected class methods here
  };
//+------------------------------------------------------------------+
//|                                                                  |
//+------------------------------------------------------------------+
CPipValueCalculatorDialog::CPipValueCalculatorDialog(void)
  {
  }
//+------------------------------------------------------------------+
//|                                                                  |
//+------------------------------------------------------------------+
CPipValueCalculatorDialog::~CPipValueCalculatorDialog(void)
  {
  }
From the code snippet above, we now have a starting template for the pip value calculator panel class (actually, this can be reused to create similar panels). Now, we proceed with the creation of the main container class member, which will serve as the parent container of all other CBox containers found on the panel:
class CPipValueCalculatorDialog : public CAppDialog
  {
protected:
   CBox              m_main;
//more code here...
We have defined the main CBox container for the panel, but not the actual function for creating it. To do this, we add another class method to the panel class, as shown in the following:
// start of class definition
// ...
public:
                     CPipValueCalculatorDialog();
                    ~CPipValueCalculatorDialog();
protected:
   virtual bool      CreateMain(const long chart,const string name,const int subwin);
// the rest of the definition
// ...
Then, outside the class, we define the actual body of the class method (similar to how the the body of the class constructor and destructor are defined):
bool CPipValueCalculatorDialog::CreateMain(const long chart,const string name,const int subwin)
  {
   //create main CBox container
   if(!m_main.Create(chart,name+"main",subwin,0,0,CDialog::m_client_area.Width(),CDialog::m_client_area.Height()))
      return(false);

   //apply vertical layout
   m_main.LayoutStyle(LAYOUT_STYLE_VERTICAL);

   //set padding to 10 px on all sides
   m_main.Padding(10);
   return(true);
  }
We use CDialog::m_client_area.Width() and CDialog::m_client_area.Height() to specify the width and height of the container. That is, it takes the entire space of the panel client area. We also apply some modifications to the container: the application of a vertical style, and setting the padding to 10 pixels on all sides. These functions are provided by the CBox Class.
Now that we have defined the main container class member and how it should be created, we then create the members for the rows as shown in Fig. 9. For the topmost row, which is the row for the symbol, we declare them by first creating the container, and then the essential controls contained within it, just below the declaration for the main container class member shown in the previous snippet:
CBox              m_main;
CBox              m_symbol_row;   //row container
CLabel            m_symbol_label; //label control
CEdit             m_symbol_edit;  //edit control
Similar to the main container, we also define a function for the creation of the actual row container:
bool CPipValueCalculatorDialog::CreateSymbolRow(const long chart,const string name,const int subwin)
  {
   //create CBox container for this row (symbol row)
   if(!m_symbol_row.Create(chart,name+"symbol_row",subwin,0,0,CDialog::m_client_area.Width(),CONTROL_HEIGHT*1.5))
      return(false);

   //create label control
   if(!m_symbol_label.Create(chart,name+"symbol_label",subwin,0,0,CONTROL_WIDTH,CONTROL_HEIGHT))
      return(false);
   m_symbol_label.Text("Symbol");

   //create edit control
   if(!m_symbol_edit.Create(chart,name+"symbol_edit",subwin,0,0,CONTROL_WIDTH,CONTROL_HEIGHT))
      return(false);
   m_symbol_edit.Text(m_symbol.Name());

   //add the essential controls to their parent container (row)
   if(!m_symbol_row.Add(m_symbol_label))
      return(false);
   if(!m_symbol_row.Add(m_symbol_edit))
      return(false);
   return(true);
  }
In this function, we first create the symbol row container. Notice that we use the entire width of the client area as its width, while making its height 50% larger than the control height we defined earlier.
After the creation of the row, we then create the individual controls. This time, they use the control width and height macros we defined earlier. Also notice how we create these controls:
Create(chart,name+"symbol_edit",subwin,0,0,CONTROL_WIDTH,CONTROL_HEIGHT))
The values in red are the x1 and y1 coordinates. This means that at creation, all controls are placed at the upper left hand side of the chart. These are then rearranged as soon as we call the Pack() method of CBox.
We have created the row container. We have also created the essential controls within the container. The next step was to add the controls we just created to the row container, represented in the last several lines of the function:
if(!m_symbol_row.Add(m_symbol_label))
   return(false);
if(!m_symbol_row.Add(m_symbol_edit))
   return(false);
For the other rows (pip size, pip value, and button rows), we implement roughly the same method as we have done for the symbol row.
The creation of the main container and other child rows is needed when using the CBox class. Now, we move on to more familiar ground, which is the creation of the panel object itself. This is done (whether or not using CBox) by overriding the virtual method Create() of the CAppDialog class. It is under this method where the two methods we defined earlier will finally make sense, since we will invoke those methods here:
bool CPipValueCalculatorDialog::Create(const long chart,const string name,const int subwin,const int x1,const int y1,const int x2,const int y2)
  {
   //create CAppDialog panel
   if(!CAppDialog::Create(chart,name,subwin,x1,y1,x2,y2))
      return(false);

   //create main CBox container using the function we defined earlier
   if(!CreateMain(chart,name,subwin))
      return(false);

   //create symbol row CBox container using the function we defined earlier
   if(!CreateSymbolRow(chart,name,subwin))
      return(false);

   //add the symbol row CBox container as a child of the main CBox container
   if(!m_main.Add(m_symbol_row))
      return(false);

   //render the main CBox container and all its child containers (recursively)
   if (!m_main.Pack())
      return(false);

   //add the main CBox container as the only child of the panel client area
   if (!Add(m_main))
      return(false);
   return(true);
  }
Don't forget to declare the overridden Create() method in the CPipValueCalculatorDialog class, as follows:
public:
                     CPipValueCalculatorDialog();
                    ~CPipValueCalculatorDialog();
   virtual bool      Create(const long chart,const string name,const int subwin,const int x1,const int y1,const int x2,const int y2);
As shown in the code above, it should be a public class method, since we will call it outside the class. To be more specific, this will be needed in the main source file: PipValueCalculator.mq5:
#include "PipValueCalculator.mqh"
CPipValueCalculatorDialog ExtDialog;
//+------------------------------------------------------------------+
//| Expert initialization function                                   |
//+------------------------------------------------------------------+
int OnInit()
  {
//---
//--- create application dialog
   if(!ExtDialog.Create(0,"Pip Value Calculator",0,50,50,279,250))
      return(INIT_FAILED);
//--- run application
   if(!ExtDialog.Run())
      return(INIT_FAILED);
//--- ok
   return(INIT_SUCCEEDED);
  }
//+------------------------------------------------------------------+
//| Expert deinitialization function                                 |
//+------------------------------------------------------------------+
void OnDeinit(const int reason)
  {
//---
   ExtDialog.Destroy(reason);
  }
//+------------------------------------------------------------------+
//| Expert tick function                                             |
//+------------------------------------------------------------------+
void OnTick()
  {
//---
  }
//+------------------------------------------------------------------+
void OnChartEvent(const int id,
                  const long &lparam,
                  const double &dparam,
                  const string &sparam)
  {
    //commented for now, to be discussed later in the section
    //ExtDialog.ChartEvent(id,lparam,dparam,sparam);
  }
//+------------------------------------------------------------------+
This code is very similar to what we usually see on panel main source files, except for three things:
- We add 'PipValueCalculator.mqh' as a header file, rather than the include file for CAppDalog. 'PipValueCalculator.mqh' already includes the header file for it, so there is no longer any need to include it in the main source file. 'PipValueCalculator.mqh' is also responsible for including the CBox class header file.
- We declare ExtDialog as an instance of the class we defined in 'PipValueCalculator.mqh' (PipValueCalculator class).
- We specify a custom size for the panel that is more suited to it, as defined in ExtDialog.Create().
When compiled with only the symbol row, the panel would look similar to the following screenshot:
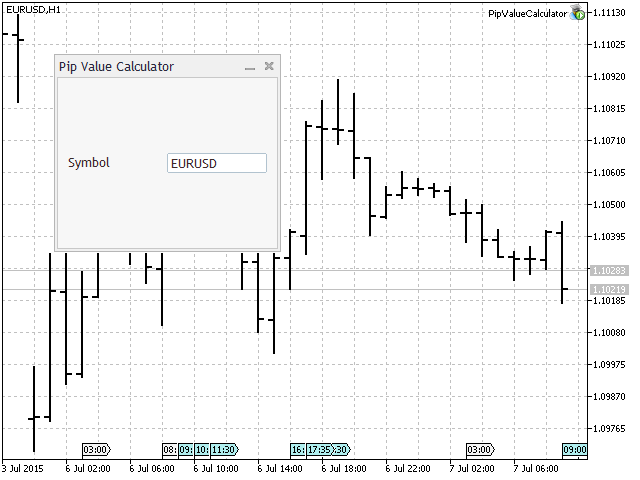
Figure 10. Pip Value Calculator panel with one row
The main container has a vertical layout and is aligned center, while the symbol row shown as a horizontal layout (also centered horizontally and vertically). To make this panel resemble the one shown in Fig. 8, we need to add the other three rows, using basically the same method we implemented for the creation of the symbol row. One exception is the button row, which only contains a single essential control (button), and should be aligned right:
m_button_row.HorizontalAlign(HORIZONTAL_ALIGN_RIGHT);
The handling of events is beyond the scope of this article, but for the sake of completeness for this example, we will discuss it briefly here. We begin by declaring a new class member for the PipValueCalculator class, m_symbol. We also include two additional members, m_digits_adjust and m_points_adjust, which will be used later to convert size in points to pips.
CSymbolInfo      *m_symbol;
int               m_digits_adjust;
double            m_points_adjust;
We initialize m_symbol either in the class constructor or in Create() method, using the following code:
if (m_symbol==NULL)
      m_symbol=new CSymbolInfo();
if(m_symbol!=NULL)
{
   if (!m_symbol.Name(_Symbol))
      return(false);
}
If the symbol pointer is null, we create a new instance of CSymbolInfo. If it is not null, we assign the symbol name equal to the chart symbol name.
The next step would be to define a click event handler for the button. This is implemented by the OnClickButton() class method. We define its body as follows:
void CPipValueCalculatorDialog::OnClickButton()
  {
   string symbol=m_symbol_edit.Text();
   StringToUpper(symbol);
   if(m_symbol.Name(symbol))
     {
      m_symbol.RefreshRates();
      m_digits_adjust=(m_symbol.Digits()==3 || m_symbol.Digits()==5)?10:1;
      m_points_adjust=m_symbol.Point()*m_digits_adjust;
      m_pip_size_edit.Text((string)m_points_adjust);
      m_pip_value_edit.Text(DoubleToString(m_symbol.TickValue()*(StringToDouble(m_pip_size_edit.Text()))/m_symbol.TickSize(),2));
     }
   else Print("invalid input");
  }
The class method calculates the pip value by first getting the value of the m_symbol_edit control. It then passes the name of the symbol to an instance of the CSymbolInfo class. The said class gets the tick value of the chosen symbol, which is then adjusted by a certain multiplier in order to compute for the value of 1 pip.
The final step to enable event handling for the class is the definition of the event handler (also within the PipValueCalculator class). Under the public methods of the class, insert this line of code:
virtual bool OnEvent(const int id,const long &lparam,const double &dparam,const string &sparam);
Then, we define the body of class method outside the class, using the following snippet:
EVENT_MAP_BEGIN(CPipValueCalculatorDialog)
   ON_EVENT(ON_CLICK,m_button,OnClickButton)
EVENT_MAP_END(CAppDialog)
5.2. Example #2: Reconstructing the Controls Example
The Controls panel example is automatically installed after a fresh installation of MetaTrader. On the navigator window, it can be found under Expert Advisors\Examples\Controls. A screenshot of this panel is shown below:
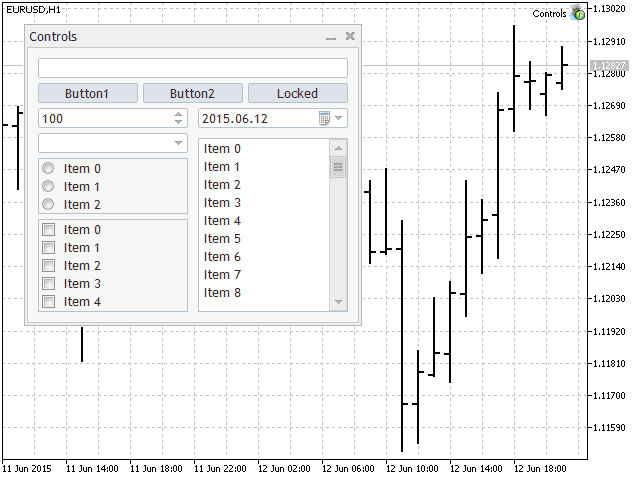
Figure 11. Controls Dialog (Original)
The layout of the dialog window shown above is detailed in the following figure. To reconstruct the panel using CBox instances, we are seeing 4 main horizontal rows (in violet) for the following set of controls:
- the Edit control;
- the three Button controls;
- the SpinEdit and the DatePicker;
- the ComboBox, RadioGroup and CheckGroup (Column 1) and the ListView (Column 2).
The last horizontal container is a special case, since it is a nested horizontal container holding two other containers (columns 1 and 2, in green). These containers should have vertical layouts.
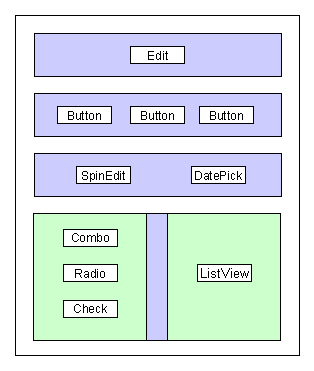
Figure 12. Controls Dialog layout
When reconstructing the Controls dialog, any lines of code invoking the Add() method, should be removed, except for the main container, which would act as the sole child of the dialog client area. Meanwhile, the other controls and containers should be added to their designated parent containers from the deepest levels up to the main container and then finally to the native client area.
Once installed, compile and execute. Everything should work fine, except for the date picker, whose increment, decrement, and list buttons would refuse to work. This is due to the fact that the drop list of the CDatePicker class is set on the background of the other containers. To resolve this issue, look for the CDatePicker class file located at %Data Folder%\MQL5\Include\Controls\DatePicker.mqh. Find the ListShow() method and at the beginning of that function, insert this line of code:
BringToTop();
Recompile and test. This would make the drop list of the Date Picker to be placed on the foreground, and given priority for click events whenever it is shown. Here is a snippet of the entire function:
bool CDatePicker::ListShow(void)
  {
   BringToTop();
//--- set value
   m_list.Value(m_value);
//--- show the list
   return(m_list.Show());
  }
A screenshot of the reconstructed Controls dialog is shown below:
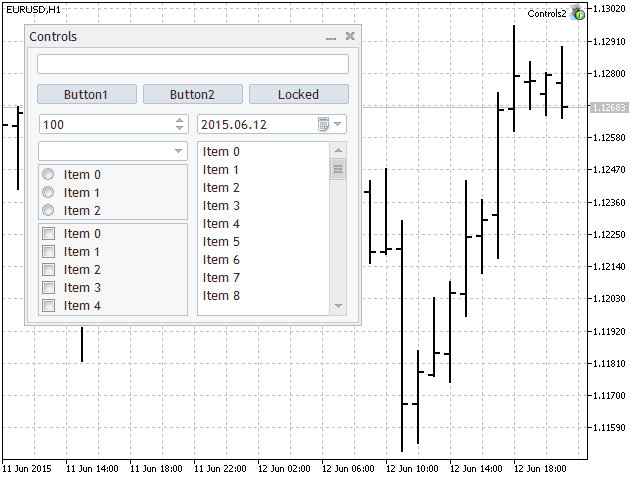
Figure 13. Controls Dialog (Using CBox)
Focusing on the big picture, it looks nearly identical to the original. But there is a striking difference, which was made incidentally — column 1 is perfectly aligned with column 2. In the original, we can see that the CheckGroup is stacked uniformly with the ListView on the bottom. However, on the top, the ComboBox is not aligned with the top of the ListView. Of course, the coordinates can be repositioned on the original panel, but this would require the adjustment not just of the pixel coordinates for the ComboBox, but the coordinates of the RadioGroup and the gaps between the three controls as well. Using a CBox container, on the other hand, only required setting the top and bottom padding to zero, and using the correct alignment.
This does not mean, however, that using CBox or layouts is superior in terms of precision. Although admittedly less precise than encoding exact coordinates for controls, using containers and layouts would still be able to provide a decent level of precision, while at the same time making GUI design a bit easier.
6. Advantages and Disadvantages
Advantages:
- Its code is reusable — you can reuse CBox or any layout class across different applications and dialogs.
- It is scalable — although using it may make the source code longer in small applications, its benefits can be more appreciated in more complex panels and dialogs.
- Segmentation of control sets — it allows you to modify a set of controls without affecting much the positioning of other controls.
- Automated positioning — indents, gaps, and spacings are not needed to be manually encoded, these are automatically calculated by the layout class.
Disadvantages:
- Additional controls will need to be created for the containers, as well as the creation of additional functions that utilize them.
- Less precise — the positioning is limited to the layouts and alignment options available.
- Can become problematic or too complex when used to contain controls with varying sizes — in this case, either the differences in the sizes can be kept at a minimum, or make use of nested containers.
7. Conclusion
In this article, we have considered the possibility of using layouts and containers in the design of graphical panels. This approach has allowed us to automate the process of positioning various controls using layout and alignment styles. It can make designing graphical panels easier, and in some cases, reduce coding time.
The CBox class is an auxiliary control that acts as a container for essential controls in a GUI panel. In this article, we have demonstrated its operation and how it can be used in real applications. Although less precise than absolute positioning, it can still provide a level of precision that would prove to be convenient in many applications.
 Statistical Verification of the Labouchere Money Management System
 Drawing Dial Gauges Using the CCanvas Class
 Tips for Selecting a Trading Signal to Subscribe. Step-By-Step Guide
- Free trading apps
- Over 8,000 signals for copying
- Economic news for exploring financial markets
You agree to website policy and terms of use
Hello. Very nice class but if we put radiogroup or checkgeoup inside a box, it does not appear
Hello,
It is possible to show a radiogroup or checkgroup. I have some GUIs that do this. Perhaps there are other problems, such as not adding to the CBOx container or the container being too small. During development, I set the background (main and containers) to some color to make it easier to see where the boundaries lie. I can help you further if you can show the code, at least for the Create() function of the main dialog.
This code doesn't compile. Build 1702.
'pipvaluecalculator.mq5' pipvaluecalculator.mq5 1 1
...
'm_client_area' - private member access error PipValueCalculator.mqh 118 60
'm_client_area' - private member access error PipValueCalculator.mqh 118 91
'm_client_area' - private member access error PipValueCalculator.mqh 129 72
'm_client_area' - private member access error PipValueCalculator.mqh 148 75
'm_client_area' - private member access error PipValueCalculator.mqh 168 77
'm_client_area' - private member access error PipValueCalculator.mqh 187 72
6 error(s), 0 warning(s) 7 1
As a side note, unless I missed it, you should specify where to place the files. We need to try and look at the code to know we need to create a "Layouts" folder in Include and to place Box.mqh file inside it.
I am using the build 1755.
Now the member m_client_area on class CDialog on Controls\Dialog.mqh is private and new methods were created to get Width and Height properties.
Kode ini tidak dikompilasi Bangun 1702
'pipvaluecalculator.mq5' pipvaluecalculator.mq5 1 1
...
'm_client_area' - kesalahan akses anggota pribadi PipValueCalculator.mqh 118 60
'm_client_area' - kesalahan akses anggota pribadi PipValueCalculator.mqh 118 91
'm_client_area' - kesalahan akses anggota pribadi PipValueCalculator.mqh 129 72
'm_client_area' - kesalahan akses anggota pribadi PipValueCalculator.mqh 148 75
'm_client_area' - kesalahan akses anggota pribadi PipValueCalculator.mqh 168 77
'm_client_area' - kesalahan akses anggota pribadi PipValueCalculator.mqh 187 72
6 error (s), 0 warning (s) 7 1
Jadi catatan, kecuali jika saya melewatkannya, anda harus menentukan di mana tempat file-file tersebut. Sebagai catatan, kecuali jika saya melewatkannya, Anda harus menentukan di mana menempatkan file-file tersebut. Kita perlu mencoba dan melihat kode untuk mengetahui bahwa kita perlu membuat folder "Layouts" di Include dan menempatkan file Box.mqh di dalamnya.Kita perlu mencoba dan melihat kode untuk mengetahui bahwa kita perlu membuat folder "Layouts" di Include dan menempatkan file Box.mqh di dalamnya.