
Gráficos na Biblioteca DoEasy (Parte 78): princípios de animação dentro da biblioteca Corte de imagens

Sumário
- Ideia
- Aprimorando as classes da biblioteca
- Classe para copiar e colar partes de uma imagem
- Teste
- O que vem agora?
Ideia
Qualquer interface gráfica a priori implica a presença de imagens não estáticas. Por exemplo, os dados exibidos em tabelas podem mudar ao longo do tempo, os elementos da interface gráfica podem reagir à interação do usuário, que pode querer, entre outras coisas, usar efeitos visuais variados, etc.
Em nossa biblioteca, também criaremos métodos para gerar diversos efeitos visuais, equiparemos a biblioteca da capacidade de trabalhar com animação de sprites. Esta última é baseada no uso de uma sequência mutável de imagens estáticas - quadro a quadro, como num filme.
A classe CCanvas permite desenhar imagens na tela. A partir de uma série de imagens desenhadas e salvas em matrizes, podemos construir uma determinada sequência que acabará por ser uma imagem animada. Mas se apenas desenharmos cada imagem na tela, uma por uma, elas simplesmente se sobreporão, originando uma sobreposição caótica de pixels de imagens diferentes, como, por exemplo, nesta imagem (nesse caso, simplesmente exibimos o texto em diferentes locais do objeto-forma):
![]()
Para evitar que isso aconteça, antes de exibir o texto na tela, primeiro precisamos apagar completamente a imagem anterior, redesenhar o plano de fundo e, em seguida, exibir o texto nele (como fizemos num dos artigos anteriores - colocamos o texto numa forma que exibia o método de âncora de texto). Essa ideia é sólida, mas apenas enquanto o tamanho e a complexidade da forma redesenhada forem pequenos. Na verdade, também podemos: pré-salvar na memória (na matriz) aquela parte do fundo na qual iremos sobrepor o texto, sobrepor o texto, e depois, quando for necessário mover o texto para novas coordenadas, apagar na matriz o texto desenhado com a imagem de fundo salva anteriormente (isso restaurará o fundo) e, em seguida, desenhar o texto num novo local (antes disso, salvando na matriz parte do fundo do local aonde iremos mover o texto). Assim, lembraremos constantemente o fundo da parte da forma onde a imagem será sobreposta e, em seguida, restaurá-lo-emos se a imagem precisar ser alterada.
Esta é a unidade básica de ações por trás da ideia de animação de sprites que iremos gerar na biblioteca:
- Salvamos o fundo nas coordenadas desejadas
- Exibimos a imagem nessas coordenadas
- Ao redesenhar a imagem, restauramos o fundo (que apagará a imagem desenhada)
Para isso, hoje criaremos uma pequena classe na qual: serão armazenadas as coordenadas/dimensões da imagem, será criado um método para salvar numa matriz uma parte da imagem de fundo com essas coordenadas e com as dimensões especificadas. Também precisaremos de um segundo método que restaurará o fundo salvo na matriz (neste caso, as dimensões e coordenadas já estarão salvas nas variáveis de classe quando o fundo for salvo na matriz).
Para que criar uma classe em vez de dois métodos desse tipo para um objeto-forma? A resposta é simples, caso precisemos exibir apenas um texto ou uma imagem animada, então, sim, bastarão esses dois métodos. Mas se precisarmos exibir vários textos em diferentes locais da forma, já a classe será mais útil, uma vez que para cada imagem animada específica, teremos nossas próprias instâncias da classe que podrão ser controladas separadamente.
Dada abordagem nos permitirá desenhar algo a partir da imagem já desenhada no fundo. Para isso, salvaremos não apenas o fundo, mas também a imagem desenhada nele, que por sua vez poderá ser removida dele.
Com base nesta ideia, criaremos uma classe para gerar, armazenar e exibir animações de sprites no objeto-forma - cada instância da classe conterá uma sequência de imagens que poderão ser adicionadas dinamicamente a uma lista, manipuladas por imagens, etc.
Aprimorando as classes da biblioteca
Como de costume, no início do arquivo \MQL5\Include\DoEasy\Data.mqh adicionamos os índices das novas mensagens:
//--- CChartObjCollection
   MSG_CHART_COLLECTION_TEXT_CHART_COLLECTION,        // Chart collection
   MSG_CHART_COLLECTION_ERR_FAILED_CREATE_CHART_OBJ,  // Failed to create a new chart object
   MSG_CHART_COLLECTION_ERR_FAILED_ADD_CHART,         // Failed to add a chart object to the collection
   MSG_CHART_COLLECTION_ERR_CHARTS_MAX,               // Cannot open new chart. Number of open charts at maximum
   MSG_CHART_COLLECTION_CHART_OPENED,                 // Chart opened
   MSG_CHART_COLLECTION_CHART_CLOSED,                 // Chart closed
   MSG_CHART_COLLECTION_CHART_SYMB_CHANGED,           // Chart symbol changed
   MSG_CHART_COLLECTION_CHART_TF_CHANGED,             // Chart timeframe changed
   MSG_CHART_COLLECTION_CHART_SYMB_TF_CHANGED,        // Chart symbol and timeframe changed

//--- CGCnvElement
   MSG_CANV_ELEMENT_ERR_EMPTY_ARRAY,                  // Error! Empty array

//--- CForm
   MSG_FORM_OBJECT_TEXT_NO_SHADOW_OBJ_FIRST_CREATE_IT,// No shadow object. Create it using the CreateShadowObj() method
   MSG_FORM_OBJECT_ERR_FAILED_CREATE_SHADOW_OBJ,      // Failed to create new shadow object
   MSG_FORM_OBJECT_ERR_FAILED_CREATE_PC_OBJ,          // Failed to create new pixel copier object
   MSG_FORM_OBJECT_PC_OBJ_ALREADY_IN_LIST,            // Pixel copier object with ID already present in the list
   MSG_FORM_OBJECT_PC_OBJ_NOT_EXIST_LIST,             // No pixel copier object with ID in the list

//--- CShadowObj
   MSG_SHADOW_OBJ_IMG_SMALL_BLUR_LARGE,               // Error! Image size too small or blur too extensive

  };
//+------------------------------------------------------------------+
e os textos que correspondem aos índices recém-adicionados:
//--- CChartObjCollection
   {"Коллекция чартов","Chart collection"},
   {"Не удалось создать новый объект-чарт","Failed to create new chart object"},
   {"Не удалось добавить объект-чарт в коллекцию","Failed to add chart object to collection"},
   {"Нельзя открыть новый график, так как количество открытых графиков уже максимальное","You cannot open a new chart, since the number of open charts is already maximum"},
   {"Открыт график","Open chart"},
   {"Закрыт график","Closed chart"},
   {"Изменён символ графика","Changed chart symbol"},
   {"Изменён таймфрейм графика","Changed chart timeframe"},
   {"Изменён символ и таймфрейм графика","Changed the symbol and timeframe of the chart"},

//--- CGCnvElement
   {"Ошибка! Пустой массив","Error! Empty array"},

//--- CForm
   {"Отсутствует объект тени. Необходимо сначала его создать при помощи метода CreateShadowObj()","There is no shadow object. You must first create it using the CreateShadowObj () method"},
   {"Не удалось создать новый объект для тени","Failed to create new object for shadow"},
   {"Не удалось создать новый объект-копировщик пикселей","Failed to create new pixel copier object"},
   {"В списке уже есть объект-копировщик пикселей с идентификатором ","There is already a pixel copier object in the list with ID "},
   {"В списке нет объекта-копировщика пикселей с идентификатором ","No pixel copier object with ID "},

//--- CShadowObj
   {"Ошибка! Размер изображения очень маленький или очень большое размытие","Error! Image size is very small or very large blur"},

  };
//+---------------------------------------------------------------------+
Visto que, mais tarde, desenharemos imagens ou texto (em objetos-formas prontos herdados quer de um objeto-elemento gráfico quer de outros objetos das nossas interfaces gráficas), sempre precisaremos dispor da aparência inicial do objeto em questão para que a qualquer momento possamos restaurá-lo à sua forma original.
Claro, podemos redesenhá-lo novamente, mas será muito mais rápido apenas copiar uma matriz para outra.
Para fazer isso, no arquivo \MQL5\Include\DoEasy\Objects\Graph\GCnvElement.mqh da classe do objeto-elemento gráfico devemos fazer algumas alterações.
Na seção protegida da classe declaramos a matriz em que serão salvos - logo sua criação - todos os pixels do objeto inicial (sua aparência), bem como um método que salvará o recurso gráfico da instância da classe CCanvas nesta matriz:
//+------------------------------------------------------------------+
//| Class of the graphical element object                            |
//+------------------------------------------------------------------+
class CGCnvElement : public CGBaseObj
  {
protected:
   CCanvas           m_canvas;                                 // CCanvas class object
   CPause            m_pause;                                  // Pause class object
   bool              m_shadow;                                 // Shadow presence
   color             m_chart_color_bg;                         // Chart background color
   uint              m_data_array[];                           // Array for storing resource data copy
//--- Return the cursor position relative to the (1) entire element and (2) the element's active area
   bool              CursorInsideElement(const int x,const int y);
   bool              CursorInsideActiveArea(const int x,const int y);
//--- Create (1) the object structure and (2) the object from the structure
   virtual bool      ObjectToStruct(void);
   virtual void      StructToObject(void);

//--- Save the graphical resource to the array
   bool              ResourceCopy(const string source);

private:
Assim, sacrificando uma pequena quantidade de memória, podemos, se necessário, restaurar rapidamente a aparência de qualquer elemento da interface do programa à sua forma original, simplesmente copiando uma matriz para outra.
Para sabermos sempre em que coordenadas foi exibido o último texto desenhado (o que nos tornará mais fácil encontrar as coordenadas em que necessitamos inserir o fundo inicial apagado por este texto), na secção privada da classe vamos declarar dois variáveis para armazenar as coordenadas X e as coordenadas Y do último texto desenhado:
   long              m_long_prop[ORDER_PROP_INTEGER_TOTAL];    // Integer properties
   double            m_double_prop[ORDER_PROP_DOUBLE_TOTAL];   // Real properties
   string            m_string_prop[ORDER_PROP_STRING_TOTAL];   // String properties

   ENUM_TEXT_ANCHOR  m_text_anchor;                            // Current text alignment
   int               m_text_x;                                 // Text last X coordinate
   int               m_text_y;                                 // Text last Y coordinate
   color             m_color_bg;                               // Element background color
   uchar             m_opacity;                                // Element opacity

//--- Return the index of the array the order's (1) double and (2) string properties are located at
Na seção pública da classe, escrevemos um método que retorne um ponteiro para a instância atual da classe e declaramos um método para salvar a imagem na matriz especificada:
//--- Return the flag of the object supporting this property
   virtual bool      SupportProperty(ENUM_CANV_ELEMENT_PROP_INTEGER property)          { return true;    }
   virtual bool      SupportProperty(ENUM_CANV_ELEMENT_PROP_DOUBLE property)           { return false;   }
   virtual bool      SupportProperty(ENUM_CANV_ELEMENT_PROP_STRING property)           { return true;    }

//--- Return itself
   CGCnvElement     *GetObject(void)                                                   { return &this;   }

//--- Compare CGCnvElement objects with each other by all possible properties (for sorting the lists by a specified object property)
   virtual int       Compare(const CObject *node,const int mode=0) const;
//--- Compare CGCnvElement objects with each other by all properties (to search equal objects)
   bool              IsEqual(CGCnvElement* compared_obj) const;

//--- (1) Save the object to file and (2) upload the object from the file
   virtual bool      Save(const int file_handle);
   virtual bool      Load(const int file_handle);

//--- Create the element
   bool              Create(const long chart_id,
                            const int wnd_num,
                            const string name,
                            const int x,
                            const int y,
                            const int w,
                            const int h,
                            const color colour,
                            const uchar opacity,
                            const bool redraw=false);

//--- Return the pointer to a canvas object
   CCanvas          *GetCanvasObj(void)                                                { return &this.m_canvas;                        }
//--- Set the canvas update frequency
   void              SetFrequency(const ulong value)                                   { this.m_pause.SetWaitingMSC(value);            }
//--- Update the coordinates (shift the canvas)
   bool              Move(const int x,const int y,const bool redraw=false);

//--- Save an image to the array
   bool              ImageCopy(const string source,uint &array[]);
O método que permite a uma classe retornar um ponteiro para si mesma será necessário para que o ponteiro para essa classe possa ser transferido para a classe-copiador de pixeis que consideraremos a seguir. Além disso, será necessário um método que replique o recurso gráfico da instância CCanvas para copiar rapidamente a aparência da forma para a matriz dentro de qualquer programa baseado nesta biblioteca.
No bloco de código de métodos para trabalhar com texto, adicionamos dois métodos para retornar as coordenadas X e Y do último texto desenhado:
//+------------------------------------------------------------------+
//| Methods of working with text                                     |
//+------------------------------------------------------------------+
//--- Return (1) alignment type (anchor method), the last (2) X and (3) Y text coordinate
   ENUM_TEXT_ANCHOR  TextAnchor(void)                       const { return this.m_text_anchor;                                         }
   int               TextLastX(void)                        const { return this.m_text_x;                                              }
   int               TextLastY(void)                        const { return this.m_text_y;                                              }
//--- Set the current font
Os métodos simplesmente retornam os valores das variáveis correspondentes.
Para que esses valores estejam sempre atualizados, no método que exibe o texto com a fonte atual, escrevemos nessas variáveis as coordenadas passadas em argumentos do método:
//--- Display the text in the current font
   void              Text(int         x,                          // X coordinate of the text anchor point
                          int         y,                          // Y coordinate of the text anchor point
                          string      text,                       // Display text
                          const color clr,                        // Color
                          const uchar opacity=255,                // Opacity
                          uint        alignment=0)                // Text anchoring method
                       {
                        this.m_text_anchor=(ENUM_TEXT_ANCHOR)alignment;
                        this.m_text_x=x;
                        this.m_text_y=y;
                        this.m_canvas.TextOut(x,y,text,::ColorToARGB(clr,opacity),alignment);
                       }
O texto desenhado pode ter nove pontos de ancoragem:
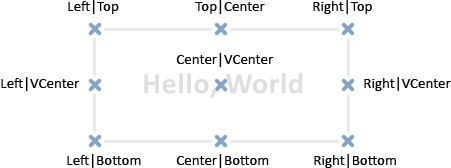
Por exemplo, se o ponto de ancoragem do texto estiver na parte inferior direita (Right|Bottom), esta será a coordenada XY inicial. Em nossa biblioteca, todas as coordenadas iniciais correspondem ao canto superior esquerdo do retângulo (Left|Top) Se salvarmos a imagem com as coordenadas iniciais do texto, então o texto ficará na parte inferior direita da imagem salva, o que não nos permitirá salvar corretamente a área do fundo em que o texto estará sobreposto.
Por isso, precisamos calcular os deslocamentos das coordenadas do retângulo de contorno do texto, onde é necessário salvar o fundo na matriz para sua posterior restauração. Também podemos calcular a largura e a altura do texto com antecedência - antes de desenhar o texto. Basta especificar o próprio texto, para o método TextSize() da classe CCanvas nos retornar a largura e a altura do retângulo à direita.
Na seção pública da classe, declaramos um método que retorna os deslocamentos das coordenadas X e Y, dependendo de como o texto está alinhado:
//--- Return coordinate offsets relative to the text anchor point
   void              TextGetShiftXY(const string text,            // Text for calculating the size of its outlining rectangle
                                    const ENUM_TEXT_ANCHOR anchor,// Text anchor point, relative to which the offsets are calculated
                                    int &shift_x,                 // X coordinate of the rectangle upper left corner
                                    int &shift_y);                // Y coordinate of the rectangle upper left corner

  };
//+------------------------------------------------------------------+
//| Parametric constructor                                           |
//+------------------------------------------------------------------+
O método será discutido a seguir.
No construtor paramétrico da classe inicializamos as coordenadas do último texto desenhado:
//+------------------------------------------------------------------+
//| Parametric constructor                                           |
//+------------------------------------------------------------------+
CGCnvElement::CGCnvElement(const ENUM_GRAPH_ELEMENT_TYPE element_type,
                           const int      element_id,
                           const int      element_num,
                           const long     chart_id,
                           const int      wnd_num,
                           const string   name,
                           const int      x,
                           const int      y,
                           const int      w,
                           const int      h,
                           const color    colour,
                           const uchar    opacity,
                           const bool     movable=true,
                           const bool     activity=true,
                           const bool     redraw=false) : m_shadow(false)
  {
   this.m_chart_color_bg=(color)::ChartGetInteger(chart_id,CHART_COLOR_BACKGROUND);
   this.m_name=this.m_name_prefix+name;
   this.m_chart_id=chart_id;
   this.m_subwindow=wnd_num;
   this.m_type=element_type;
   this.SetFont("Calibri",8);
   this.m_text_anchor=0;
   this.m_text_x=0;
   this.m_text_y=0;
   this.m_color_bg=colour;
   this.m_opacity=opacity;
   if(this.Create(chart_id,wnd_num,this.m_name,x,y,w,h,colour,opacity,redraw))
     {
      this.SetProperty(CANV_ELEMENT_PROP_NAME_RES,this.m_canvas.ResourceName()); // Graphical resource name
      this.SetProperty(CANV_ELEMENT_PROP_CHART_ID,CGBaseObj::ChartID());         // Chart ID
      this.SetProperty(CANV_ELEMENT_PROP_WND_NUM,CGBaseObj::SubWindow());        // Chart subwindow index
      this.SetProperty(CANV_ELEMENT_PROP_NAME_OBJ,CGBaseObj::Name());            // Element object name
      this.SetProperty(CANV_ELEMENT_PROP_TYPE,element_type);                     // Graphical element type
      this.SetProperty(CANV_ELEMENT_PROP_ID,element_id);                         // Element ID
      this.SetProperty(CANV_ELEMENT_PROP_NUM,element_num);                       // Element index in the list
      this.SetProperty(CANV_ELEMENT_PROP_COORD_X,x);                             // Element's X coordinate on the chart
      this.SetProperty(CANV_ELEMENT_PROP_COORD_Y,y);                             // Element's Y coordinate on the chart
      this.SetProperty(CANV_ELEMENT_PROP_WIDTH,w);                               // Element width
      this.SetProperty(CANV_ELEMENT_PROP_HEIGHT,h);                              // Element height
      this.SetProperty(CANV_ELEMENT_PROP_ACT_SHIFT_LEFT,0);                      // Active area offset from the left edge of the element
      this.SetProperty(CANV_ELEMENT_PROP_ACT_SHIFT_TOP,0);                       // Active area offset from the upper edge of the element
      this.SetProperty(CANV_ELEMENT_PROP_ACT_SHIFT_RIGHT,0);                     // Active area offset from the right edge of the element
      this.SetProperty(CANV_ELEMENT_PROP_ACT_SHIFT_BOTTOM,0);                    // Active area offset from the bottom edge of the element
      this.SetProperty(CANV_ELEMENT_PROP_MOVABLE,movable);                       // Element moveability flag
      this.SetProperty(CANV_ELEMENT_PROP_ACTIVE,activity);                       // Element activity flag
      this.SetProperty(CANV_ELEMENT_PROP_RIGHT,this.RightEdge());                // Element right border
      this.SetProperty(CANV_ELEMENT_PROP_BOTTOM,this.BottomEdge());              // Element bottom border
      this.SetProperty(CANV_ELEMENT_PROP_COORD_ACT_X,this.ActiveAreaLeft());     // X coordinate of the element active area
      this.SetProperty(CANV_ELEMENT_PROP_COORD_ACT_Y,this.ActiveAreaTop());      // Y coordinate of the element active area
      this.SetProperty(CANV_ELEMENT_PROP_ACT_RIGHT,this.ActiveAreaRight());      // Right border of the element active area
      this.SetProperty(CANV_ELEMENT_PROP_ACT_BOTTOM,this.ActiveAreaBottom());    // Bottom border of the element active area
     }
   else
     {
      ::Print(CMessage::Text(MSG_LIB_SYS_FAILED_CREATE_ELM_OBJ),this.m_name);
     }
  }
//+------------------------------------------------------------------+
No construtor protegido da classe, inicializamos essas variáveis da mesma maneira:
//+------------------------------------------------------------------+
//| Protected constructor                                            |
//+------------------------------------------------------------------+
CGCnvElement::CGCnvElement(const ENUM_GRAPH_ELEMENT_TYPE element_type,
                           const long    chart_id,
                           const int     wnd_num,
                           const string  name,
                           const int     x,
                           const int     y,
                           const int     w,
                           const int     h) : m_shadow(false)
  {
   this.m_chart_color_bg=(color)::ChartGetInteger(chart_id,CHART_COLOR_BACKGROUND);
   this.m_name=this.m_name_prefix+name;
   this.m_chart_id=chart_id;
   this.m_subwindow=wnd_num;
   this.m_type=element_type;
   this.SetFont("Calibri",8);
   this.m_text_anchor=0;
   this.m_text_x=0;
   this.m_text_y=0;
   this.m_color_bg=NULL_COLOR;
   this.m_opacity=0;
   if(this.Create(chart_id,wnd_num,this.m_name,x,y,w,h,this.m_color_bg,this.m_opacity,false))
     {
      ...
Agora, demos uma olhada na implementação dos métodos acima declarados.
Implementação do método que salva a imagem numa matriz:
//+------------------------------------------------------------------+
//| Save the image to the array                                      |
//+------------------------------------------------------------------+
bool CGCnvElement::ImageCopy(const string source,uint &array[])
  {
   ::ResetLastError();
   int w=0,h=0;
   if(!::ResourceReadImage(this.NameRes(),array,w,h))
     {
      CMessage::ToLog(source,MSG_LIB_SYS_FAILED_GET_DATA_GRAPH_RES,true);
      return false;
     }
   return true;
  }
//+------------------------------------------------------------------+
Ao método são passados o nome do método/função a partir do qual foi chamado (isso é necessário para entender onde ocorre o erro, se houver) e uma referência à matriz em que os dados do recurso gráfico (pixels da imagem) devem estar escritos.
Com ajuda da função ResourceReadImage() lemos na matriz os dados do recurso gráfico criado pela classe CCanvas e que contém a imagem da forma. Se houver um erro ao ler o recurso, exibiremos uma mensagem sobre isso e retornamos false. Se tudo correr bem, retornamos true, enquanto todos os pixels da imagem armazenada no recurso serão gravados na matriz passada ao método.
Método que salva o recurso gráfico na matriz:
//+------------------------------------------------------------------+
//| Save the graphical resource to the array                         |
//+------------------------------------------------------------------+
bool CGCnvElement::ResourceCopy(const string source)
  {
   return this.ImageCopy(DFUN,this.m_data_array);
  }
//+------------------------------------------------------------------+
O método retorna o resultado da chamada do método acima. Isto é, ele não é diferente, exceto que neste caso os dados do recurso gráfico não são escritos na matriz passada por referência, mas, sim, na matriz especial que declaramos anteriormente para armazenar uma cópia da imagem de todo o objeto-forma.
Método que retorna deslocamentos de coordenadas em relação ao ponto de ancoragem do texto:
//+------------------------------------------------------------------+
//| Return coordinate offsets relative to the text anchor point      |
//+------------------------------------------------------------------+
void CGCnvElement::TextGetShiftXY(const string text,const ENUM_TEXT_ANCHOR anchor,int &shift_x,int &shift_y)
  {
   int tw=0,th=0;
   this.TextSize(text,tw,th);
   switch(anchor)
     {
      case TEXT_ANCHOR_LEFT_TOP :
        shift_x=0; shift_y=0;
        break;
      case TEXT_ANCHOR_LEFT_CENTER :
        shift_x=0; shift_y=-th/2;
        break;
      case TEXT_ANCHOR_LEFT_BOTTOM :
        shift_x=0; shift_y=-th;
        break;
      case TEXT_ANCHOR_CENTER_TOP :
        shift_x=-tw/2; shift_y=0;
        break;
      case TEXT_ANCHOR_CENTER :
        shift_x=-tw/2; shift_y=-th/2;
        break;
      case TEXT_ANCHOR_CENTER_BOTTOM :
        shift_x=-tw/2; shift_y=-th;
        break;
      case TEXT_ANCHOR_RIGHT_TOP :
        shift_x=-tw; shift_y=0;
        break;
      case TEXT_ANCHOR_RIGHT_CENTER :
        shift_x=-tw; shift_y=-th/2;
        break;
      case TEXT_ANCHOR_RIGHT_BOTTOM :
        shift_x=-tw; shift_y=-th;
        break;
      default:
        shift_x=0; shift_y=0;
        break;
     }
  }
//+------------------------------------------------------------------+
Aqui primeiro obtemos o tamanho do texto passado para o método (os tamanhos serão escritos nas variáveis declaradas) e, em seguida, calculamos quantos pixels deslocar as coordenadas X e Y em relação às coordenadas iniciais do texto dependendo do modo de ancoragem do texto que é passado para o método.
Agora podemos finalizar a classe do objeto-sombra. Como acabamos de adicionar métodos para ler um recurso gráfico e uma matriz constante na qual podemos armazenar uma cópia de tal recurso, é levantada a questão de remover variáveis, matrizes e blocos de código desnecessários da classe do objeto-sombra.
No arquivo \MQL5\Include\DoEasy\Objects\Graph\ShadowObj.mqh fazemos modificações.
Do método de desfoque por Gauss removemos a matriz e variáveis desnecessárias:
//+------------------------------------------------------------------+
//| Gaussian blur                                                    |
//| https://www.mql5.com/en/articles/1612#chapter4                   |
//+------------------------------------------------------------------+
bool CShadowObj::GaussianBlur(const uint radius)
  {
//---
   int n_nodes=(int)radius*2+1;
   uint res_data[];              // Array for storing graphical resource data
   uint res_w=this.Width();      // Graphical resource width
   uint res_h=this.Height();     // Graphical resource height

//--- Read graphical resource data. If failed, return false
No bloco de leitura dos dados do recurso gráfico substituímos as linhas para chamada do método escrito por nós acima:
//--- Read graphical resource data. If failed, return false
   ::ResetLastError();
   if(!::ResourceReadImage(this.NameRes(),res_data,res_w,res_h))
     {
      CMessage::OutByID(MSG_LIB_SYS_FAILED_GET_DATA_GRAPH_RES);
      return false;
     }
//--- Check the blur amount. If the blur radius exceeds half of the width or height, return 'false'

//--- Read graphical resource data. If failed, return false
   if(!CGCnvElement::ResourceCopy(DFUN))
      return false;
Em todo o código, em vez das variáveis excluídas res_w e res_h vamos usar os métodos da classe do objeto-elemento gráfico Width() e Height(), e em vez da matriz res_data vamos usar uma m_data_array, que agora é usada para armazenar uma cópia do recurso gráfico.
Em geral, todas as modificações resultaram apenas na substituição de variáveis desnecessárias e excluídas por métodos de classes do objeto-elemento gráfico:
//+------------------------------------------------------------------+
//| Gaussian blur                                                    |
//| https://www.mql5.com/en/articles/1612#chapter4                   |
//+------------------------------------------------------------------+
bool CShadowObj::GaussianBlur(const uint radius)
  {
//---
   int n_nodes=(int)radius*2+1;
//--- Read graphical resource data. If failed, return false
   if(!CGCnvElement::ResourceCopy(DFUN))
      return false;

//--- Check the blur amount. If the blur radius exceeds half of the width or height, return 'false'
   if((int)radius>=this.Width()/2 || (int)radius>=this.Height()/2)
     {
      ::Print(DFUN,CMessage::Text(MSG_SHADOW_OBJ_IMG_SMALL_BLUR_LARGE));
      return false;
     }

//--- Decompose image data from the resource into a, r, g, b color components
   int  size=::ArraySize(this.m_data_array);
//--- arrays for storing A, R, G and B color components
//--- for horizontal and vertical blur
   uchar a_h_data[],r_h_data[],g_h_data[],b_h_data[];
   uchar a_v_data[],r_v_data[],g_v_data[],b_v_data[];

//--- Change the size of component arrays according to the array size of the graphical resource data
   if(::ArrayResize(a_h_data,size)==-1)
     {
      CMessage::ToLog(DFUN,MSG_LIB_SYS_FAILED_ARRAY_RESIZE);
      ::Print(DFUN_ERR_LINE,": \"a_h_data\"");
      return false;
     }
   if(::ArrayResize(r_h_data,size)==-1)
     {
      CMessage::ToLog(DFUN,MSG_LIB_SYS_FAILED_ARRAY_RESIZE);
      ::Print(DFUN_ERR_LINE,": \"r_h_data\"");
      return false;
     }
   if(::ArrayResize(g_h_data,size)==-1)
     {
      CMessage::ToLog(DFUN,MSG_LIB_SYS_FAILED_ARRAY_RESIZE);
      ::Print(DFUN_ERR_LINE,": \"g_h_data\"");
      return false;
     }
   if(ArrayResize(b_h_data,size)==-1)
     {
      CMessage::ToLog(DFUN,MSG_LIB_SYS_FAILED_ARRAY_RESIZE);
      ::Print(DFUN_ERR_LINE,": \"b_h_data\"");
      return false;
     }
   if(::ArrayResize(a_v_data,size)==-1)
     {
      CMessage::ToLog(DFUN,MSG_LIB_SYS_FAILED_ARRAY_RESIZE);
      ::Print(DFUN_ERR_LINE,": \"a_v_data\"");
      return false;
     }
   if(::ArrayResize(r_v_data,size)==-1)
     {
      CMessage::ToLog(DFUN,MSG_LIB_SYS_FAILED_ARRAY_RESIZE);
      ::Print(DFUN_ERR_LINE,": \"r_v_data\"");
      return false;
     }
   if(::ArrayResize(g_v_data,size)==-1)
     {
      CMessage::ToLog(DFUN,MSG_LIB_SYS_FAILED_ARRAY_RESIZE);
      ::Print(DFUN_ERR_LINE,": \"g_v_data\"");
      return false;
     }
   if(::ArrayResize(b_v_data,size)==-1)
     {
      CMessage::ToLog(DFUN,MSG_LIB_SYS_FAILED_ARRAY_RESIZE);
      ::Print(DFUN_ERR_LINE,": \"b_v_data\"");
      return false;
     }
//--- Declare the array for storing blur weight ratios and,
//--- if failed to get the array of weight ratios, return 'false'
   double weights[];
   if(!this.GetQuadratureWeights(1,n_nodes,weights))
      return false;

//--- Set components of each image pixel to the color component arrays
   for(int i=0;i<size;i++)
     {
      a_h_data[i]=GETRGBA(this.m_data_array[i]);
      r_h_data[i]=GETRGBR(this.m_data_array[i]);
      g_h_data[i]=GETRGBG(this.m_data_array[i]);
      b_h_data[i]=GETRGBB(this.m_data_array[i]);
     }

//--- Blur the image horizontally (along the X axis)
   uint XY; // Pixel coordinate in the array
   double a_temp=0.0,r_temp=0.0,g_temp=0.0,b_temp=0.0;
   int coef=0;
   int j=(int)radius;
   //--- Loop by the image width
   for(int Y=0;Y<this.Height();Y++)
     {
      //--- Loop by the image height
      for(uint X=radius;X<this.Width()-radius;X++)
        {
         XY=Y*this.Width()+X;
         a_temp=0.0; r_temp=0.0; g_temp=0.0; b_temp=0.0;
         coef=0;
         //--- Multiply each color component by the weight ratio corresponding to the current image pixel
         for(int i=-1*j;i<j+1;i=i+1)
           {
            a_temp+=a_h_data[XY+i]*weights[coef];
            r_temp+=r_h_data[XY+i]*weights[coef];
            g_temp+=g_h_data[XY+i]*weights[coef];
            b_temp+=b_h_data[XY+i]*weights[coef];
            coef++;
           }
         //--- Save each rounded color component calculated according to the ratios to the component arrays
         a_h_data[XY]=(uchar)::round(a_temp);
         r_h_data[XY]=(uchar)::round(r_temp);
         g_h_data[XY]=(uchar)::round(g_temp);
         b_h_data[XY]=(uchar)::round(b_temp);
        }
      //--- Remove blur artifacts to the left by copying adjacent pixels
      for(uint x=0;x<radius;x++)
        {
         XY=Y*this.Width()+x;
         a_h_data[XY]=a_h_data[Y*this.Width()+radius];
         r_h_data[XY]=r_h_data[Y*this.Width()+radius];
         g_h_data[XY]=g_h_data[Y*this.Width()+radius];
         b_h_data[XY]=b_h_data[Y*this.Width()+radius];
        }
      //--- Remove blur artifacts to the right by copying adjacent pixels
      for(int x=int(this.Width()-radius);x<this.Width();x++)
        {
         XY=Y*this.Width()+x;
         a_h_data[XY]=a_h_data[(Y+1)*this.Width()-radius-1];
         r_h_data[XY]=r_h_data[(Y+1)*this.Width()-radius-1];
         g_h_data[XY]=g_h_data[(Y+1)*this.Width()-radius-1];
         b_h_data[XY]=b_h_data[(Y+1)*this.Width()-radius-1];
        }
     }

//--- Blur vertically (along the Y axis) the image already blurred horizontally
   int dxdy=0;
   //--- Loop by the image height
   for(int X=0;X<this.Width();X++)
     {
      //--- Loop by the image width
      for(uint Y=radius;Y<this.Height()-radius;Y++)
        {
         XY=Y*this.Width()+X;
         a_temp=0.0; r_temp=0.0; g_temp=0.0; b_temp=0.0;
         coef=0;
         //--- Multiply each color component by the weight ratio corresponding to the current image pixel
         for(int i=-1*j;i<j+1;i=i+1)
           {
            dxdy=i*(int)this.Width();
            a_temp+=a_h_data[XY+dxdy]*weights[coef];
            r_temp+=r_h_data[XY+dxdy]*weights[coef];
            g_temp+=g_h_data[XY+dxdy]*weights[coef];
            b_temp+=b_h_data[XY+dxdy]*weights[coef];
            coef++;
           }
         //--- Save each rounded color component calculated according to the ratios to the component arrays
         a_v_data[XY]=(uchar)::round(a_temp);
         r_v_data[XY]=(uchar)::round(r_temp);
         g_v_data[XY]=(uchar)::round(g_temp);
         b_v_data[XY]=(uchar)::round(b_temp);
        }
      //--- Remove blur artifacts at the top by copying adjacent pixels
      for(uint y=0;y<radius;y++)
        {
         XY=y*this.Width()+X;
         a_v_data[XY]=a_v_data[X+radius*this.Width()];
         r_v_data[XY]=r_v_data[X+radius*this.Width()];
         g_v_data[XY]=g_v_data[X+radius*this.Width()];
         b_v_data[XY]=b_v_data[X+radius*this.Width()];
        }
      //--- Remove blur artifacts at the bottom by copying adjacent pixels
      for(int y=int(this.Height()-radius);y<this.Height();y++)
        {
         XY=y*this.Width()+X;
         a_v_data[XY]=a_v_data[X+(this.Height()-1-radius)*this.Width()];
         r_v_data[XY]=r_v_data[X+(this.Height()-1-radius)*this.Width()];
         g_v_data[XY]=g_v_data[X+(this.Height()-1-radius)*this.Width()];
         b_v_data[XY]=b_v_data[X+(this.Height()-1-radius)*this.Width()];
        }
     }

//--- Set the twice blurred (horizontally and vertically) image pixels to the graphical resource data array
   for(int i=0;i<size;i++)
      this.m_data_array[i]=ARGB(a_v_data[i],r_v_data[i],g_v_data[i],b_v_data[i]);
//--- Display the image pixels on the canvas in a loop by the image height and width from the graphical resource data array
   for(int X=0;X<this.Width();X++)
     {
      for(uint Y=radius;Y<this.Height()-radius;Y++)
        {
         XY=Y*this.Width()+X;
         this.m_canvas.PixelSet(X,Y,this.m_data_array[XY]);
        }
     }
//--- Done
   return true;
  }
//+------------------------------------------------------------------+
Agora estamos prontos para criar uma classe, cujo objeto nos permitirá controlar o desenho de elementos gráficos na tela para que posteriormente possamos restaurar facilmente o fundo da imagem sobre a qual será sobreposto o novo desenho. Este será o link a partir do qual podemos criar uma classe para trabalhar com animação de sprites.
Classe para copiar e colar partes de uma imagem
A classe de objeto-forma menor objeto na hierarquia de herança em que podemos trabalhar com animação.
Como a classe para salvar e restaurar uma parte da imagem será pequena, vamos colocá-la diretamente no arquivo da classe do objeto-forma \MQL5\Include\DoEasy\Objects\Graph\Form.mqh. Vamos chamar a classe de copiador de pixeis, o que descreve claramente sua essência.
Cada objeto da classe-copiador de pixeis terá seu próprio identificador, com ele será possível determinar com qual desenho está trabalhando o objeto, e será possível acessar o objeto da classe requerida pelo seu identificador para que seja possível usar separadamente cada objeto animado. Por exemplo, se precisamos gerenciar e alterar simultaneamente três imagens, duas das quais são texto e outra, uma imagem, então, ao criar um objeto-copiador para cada imagem, basta atribuir a eles diferentes identificadores - text1 = ID0, text2 = ID1, imagem = ID2, e assim em cada um dos objetos serão armazenados todos os outros parâmetros para trabalhar com ela, isto é:
- a matriz de pixels em que será salva aquela parte da imagem de fundo na qual a imagem é sobreposta,
- as coordenadas X e Y do canto superior esquerdo da área retangular da parte do fundo em que a imagem é sobreposta,
- a largura e altura da área retangular,
- e a largura e a altura calculadas desta área.
Precisamos da largura e altura calculadas para saber exatamente que dimensões terá a área retangular de cópia caso esse retângulo ultrapasse a área da forma cujos pixels devem ser salvos. Desse modo, ao restaurar o fundo, já não precisaremos recalcular a largura e a altura da área de fundo retangular realmente copiada, senão que simplesmente usaremos os valores já calculados armazenados nas variáveis ºdo objeto.
Na seção privada da classe declaramos um ponteiro para a classe do objeto-elemento gráfico (vamos passá-lo para o objeto recém-criado da classe-copiador de pixeis para que possamos usar os dados da forma em que criaremos a instância do objeto-copiador), a matriz na qual escreveremos a parte da imagem da forma que precisará ser salva e restaurada, bem como todas as variáveis descritas acima:
//+------------------------------------------------------------------+
//|                                                         Form.mqh |
//|                                  Copyright 2021, MetaQuotes Ltd. |
//|                             https://mql5.com/en/users/artmedia70 |
//+------------------------------------------------------------------+
#property copyright "Copyright 2021, MetaQuotes Ltd."
#property link      "https://mql5.com/en/users/artmedia70"
#property version   "1.00"
#property strict    // Necessary for mql4
//+------------------------------------------------------------------+
//| Include files                                                    |
//+------------------------------------------------------------------+
#include "GCnvElement.mqh"
#include "ShadowObj.mqh"
//+------------------------------------------------------------------+
//| Pixel copier class                                               |
//+------------------------------------------------------------------+
class CPixelCopier : public CObject
  {
private:
   CGCnvElement     *m_element;                             // Pointer to the graphical element
   uint              m_array[];                             // Pixel array
   int               m_id;                                  // ID
   int               m_x;                                   // X coordinate of the upper left corner
   int               m_y;                                   // Y coordinate of the upper left corner
   int               m_w;                                   // Copied image width
   int               m_h;                                   // Copied image height
   int               m_wr;                                  // Calculated copied image width
   int               m_hr;                                  // Calculated copied image height
public:
Na seção pública da classe, escrevemos o método para comparar dois objetos-copiadores, os métodos para definir e obter as propriedades do objeto, os construtores de classe - padrão e paramétrico, e declaramos dois métodos, um para salvar parte do fundo e outro para restaurá-lo:
public:
//--- Compare CPixelCopier objects by a specified property (to sort the list by an object property)
   virtual int       Compare(const CObject *node,const int mode=0) const
                       {
                        const CPixelCopier *obj_compared=node;
                        return(mode==0 ? (this.ID()>obj_compared.ID() ? 1 : this.ID()<obj_compared.ID() ? -1 : 0) : WRONG_VALUE);
                       }

//--- Set the properties
   void              SetID(const int id)                       { this.m_id=id;      }
   void              SetCoordX(const int value)                { this.m_x=value;    }
   void              SetCoordY(const int value)                { this.m_y=value;    }
   void              SetWidth(const int value)                 { this.m_w=value;    }
   void              SetHeight(const int value)                { this.m_h=value;    }
//--- Get the properties
   int               ID(void)                            const { return this.m_id;  }
   int               CoordX(void)                        const { return this.m_x;   }
   int               CoordY(void)                        const { return this.m_y;   }
   int               Width(void)                         const { return this.m_w;   }
   int               Height(void)                        const { return this.m_h;   }
   int               WidthReal(void)                     const { return this.m_wr;  }
   int               HeightReal(void)                    const { return this.m_hr;  }

//--- Copy the part or the entire image to the array
   bool              CopyImgDataToArray(const uint x_coord,const uint y_coord,uint width,uint height);
//--- Copy the part or the entire image from the array to the canvas
   bool              CopyImgDataToCanvas(const int x_coord,const int y_coord);

//--- Constructors
                     CPixelCopier (void){;}
                     CPixelCopier (const int id,
                                   const int x,
                                   const int y,
                                   const int w,
                                   const int h,
                                   CGCnvElement *element) : m_id(id), m_x(x),m_y(y),m_w(w),m_wr(w),m_h(h),m_hr(h) { this.m_element=element; }
                    ~CPixelCopier (void){;}
  };
//+------------------------------------------------------------------+
Consideremos os métodos com mais detalhes.
Método que compara dois objetos-copiadores:
//--- Compare CPixelCopier objects by a specified property (to sort the list by an object property)
   virtual int       Compare(const CObject *node,const int mode=0) const
                       {
                        const CPixelCopier *obj_compared=node;
                        return(mode==0 ? (this.ID()>obj_compared.ID() ? 1 : this.ID()<obj_compared.ID() ? -1 : 0) : WRONG_VALUE);
                       }
Neste caso, tudo é padrão, como em outras classes da biblioteca. Se o modo de comparação (mode) for igual a 0 (por padrão), serão comparados os identificadores de dois objetos - o atual e aquele cujo o ponteiro foi passado ao método. Se o identificador do objeto atual for maior do que o que está sendo comparado, será retornado 1, se for menor, -1, já se for igual, 0. Em todos os outros casos (se mode != 0), será devolvido -1. Isto é, este método atualmente só pode comparar identificadores de objetos.
Na lista de inicialização do construtor paramétrico da classe, todas as variáveis-membros da classe recebem os valores passados nos argumentos, já no corpo da classe a variável-ponteiro para a classe do objeto-elemento gráfico recebe o valor do ponteiro que também foi passado nos argumentos:
CPixelCopier (const int id,
              const int x,
              const int y,
              const int w,
              const int h,
              CGCnvElement *element) : m_id(id), m_x(x),m_y(y),m_w(w),m_wr(w),m_h(h),m_hr(h) { this.m_element=element; }
Agora, o objeto-copiador recém-criado "saberá" qual objeto o criou e terá acesso a seus métodos e parâmetros.
Método que copia para a matriz parte ou toda a imagem:
//+------------------------------------------------------------------+
//| Copy part or all of the image to the array                       |
//+------------------------------------------------------------------+
bool CPixelCopier::CopyImgDataToArray(const uint x_coord,const uint y_coord,uint width,uint height)
  {
//--- Assign coordinate values, passed to the method, to the variables
   int x1=(int)x_coord;
   int y1=(int)y_coord;
//--- If X coordinates goes beyond the form on the right or Y coordinate goes beyond the form at the bottom,
//--- there is nothing to copy, the copied area is outside the form. Return 'false'
   if(x1>this.m_element.Width()-1 || y1>this.m_element.Height()-1)
      return false;
//--- Assign the width and height values of the copied area to the variables
//--- If the passed width and height are equal to zero, assign the form width and height to them
   this.m_wr=int(width==0  ? this.m_element.Width()  : width);
   this.m_hr=int(height==0 ? this.m_element.Height() : height);
//--- If X and Y coordinates are equal to zero (the upper left corner of the form), as well as the width and height are equal to the form width and height,
//--- the copied area is equal to the entire form area. Copy the entire form (returning it from the method) using the ImageCopy() method
   if(x1==0 && y1==0 && this.m_wr==this.m_element.Width() && this.m_hr==this.m_element.Height())
      return this.m_element.ImageCopy(DFUN,this.m_array);

//--- Calculate the right X coordinate and lower Y coordinate of the rectangle area
   int x2=int(x1+this.m_wr-1);
   int y2=int(y1+this.m_hr-1);
//--- If the calculated X coordinate goes beyond the form, the right edge of the form will be used as the coordinate
   if(x2>=this.m_element.Width()-1)
      x2=this.m_element.Width()-1;
//--- If the calculated Y coordinate goes beyond the form, the bottom edge of the form will be used as the coordinate
   if(y2>=this.m_element.Height()-1)
      y2=this.m_element.Height()-1;
//--- Calculate the copied width and height
   this.m_wr=x2-x1+1;
   this.m_hr=y2-y1+1;
//--- Define the necessary size of the array, which is to store all image pixels with calculated width and height
   int size=this.m_wr*this.m_hr;
//--- If failed to set the array size, inform of that and return 'false'
   if(::ArrayResize(this.m_array,size)!=size)
     {
      CMessage::ToLog(DFUN,MSG_LIB_SYS_FAILED_ARRAY_RESIZE,true);
      return false;
     }
//--- Set the index in the array for recording the image pixel
   int n=0;
//--- In a loop by the calculated height of the copied area, starting from the specified Y coordinate
   for(int y=y1;y<y1+this.m_hr;y++)
     {
      //--- in a loop by the calculated width of the copied area, starting from the specified X coordinate
      for(int x=x1;x<x1+this.m_wr;x++)
        {
         //--- Copy the next image pixel to the array and increase the array index
         this.m_array[n]=this.m_element.GetCanvasObj().PixelGet(x,y);
         n++;
        }
     }
//--- Successful - return 'true'
   return true;
  }
//+------------------------------------------------------------------+
Cada linha do método é detalhada nos comentários do código. Resumindo, se as coordenadas iniciais da área copiada estão fora da forma, não haverá nada para copiar e retornaremos false. Se as coordenadas iniciais da área copiada coincidirem com as da forma e, ademais, a largura e a altura da área copiada forem iguais a zero ou coincidirem com as da forma, copiaremos toda imagem da forma. Se for necessário salvar apenas uma parte da imagem, primeiro calcularemos a largura e a altura copiadas para que não ultrapassem as da forma e, depois, copiaremos todos os pixels da imagem da forma que conseguem entrar na área copiada.
Método que copia da matriz para a tela parte ou toda a imagem:
//+------------------------------------------------------------------+
//| Copy the part or the entire image from the array to the canvas   |
//+------------------------------------------------------------------+
bool CPixelCopier::CopyImgDataToCanvas(const int x_coord,const int y_coord)
  {
//--- If the array of saved pixels is empty, inform of that and return 'false'
   int size=::ArraySize(this.m_array);
   if(size==0)
     {
      CMessage::ToLog(DFUN,MSG_CANV_ELEMENT_ERR_EMPTY_ARRAY,true);
      return false;
     }
//--- Set the index of the array for reading the image pixel
   int n=0;
//--- In a loop by the previously calculated height of the copied area, starting from the specified Y coordinate
   for(int y=y_coord;y<y_coord+this.m_hr;y++)
     {
      //--- in a loop by the previously calculated width of the copied area, starting from the specified X coordinate
      for(int x=x_coord;x<x_coord+this.m_wr;x++)
        {
         //--- Restore the next image pixel from the array and increase the array index
         this.m_element.GetCanvasObj().PixelSet(x,y,this.m_array[n]);
         n++;
        }
     }
   return true;
  }
//+------------------------------------------------------------------+
A lógica do método também é descrita em detalhes nos comentários do código. Neste caso, ao contrário do método que salva uma parte da imagem, já não precisamos calcular as coordenadas e tamanhos da área copiada, uma vez que todos eles são salvos nas variáveis da classe após o primeiro método funcionar. Só precisamos - num loop pela altura - copiar para a tela cada linha da área restaurada pixel por pixel, restabelecendo assim a parte da imagem que foi salva pelo método anterior.
Agora precisamos acessar a classe recém-escrita desde a classe do objeto-forma.
Visto que criaremos dinamicamente o número necessário de objetos-copiadores, na classe do objeto-forma precisamos declarar uma lista desses objetos. Cada objeto-copiador recém-criado será adicionado a ela. Assim, podemos usá-la para obter ponteiros para os objetos necessários e trabalhar com eles.
Na seção privada da classe declaramos esta lista:
//+------------------------------------------------------------------+
//| Form object class                                                |
//+------------------------------------------------------------------+
class CForm : public CGCnvElement
  {
private:
   CArrayObj         m_list_elements;                          // List of attached elements
   CArrayObj         m_list_pc_obj;                            // List of pixel copier objects
   CShadowObj       *m_shadow_obj;                             // Pointer to the shadow object
   color             m_color_frame;                            // Form frame color
   int               m_frame_width_left;                       // Form frame width to the left
   int               m_frame_width_right;                      // Form frame width to the right
   int               m_frame_width_top;                        // Form frame width at the top
   int               m_frame_width_bottom;                     // Form frame width at the bottom
Como não podemos ter vários objetos-copiadores com os mesmos identificadores, precisamos de um método que retorne um sinalizador indicando que o objeto com o identificador especificado existe na lista. Declaramos este método:
//--- Create a shadow object
   void              CreateShadowObj(const color colour,const uchar opacity);

//--- Return the flag indicating the presence of the copier object with the specified ID in the list
   bool              IsPresentPC(const int id);

public:
Na seção pública da classe, escrevemos um método que retorna um ponteiro para o objeto-forma atual e um método que retorna uma lista de objetos-copiadores:
public:
   //--- Constructors
                     CForm(const long chart_id,
                           const int subwindow,
                           const string name,
                           const int x,
                           const int y,
                           const int w,
                           const int h);
                     CForm(const int subwindow,
                           const string name,
                           const int x,
                           const int y,
                           const int w,
                           const int h);
                     CForm(const string name,
                           const int x,
                           const int y,
                           const int w,
                           const int h);
                     CForm() { this.Initialize(); }
//--- Destructor
                    ~CForm();

//--- Supported form properties (1) integer and (2) string ones
   virtual bool      SupportProperty(ENUM_CANV_ELEMENT_PROP_INTEGER property) { return true;                   }
   virtual bool      SupportProperty(ENUM_CANV_ELEMENT_PROP_STRING property)  { return true;                   }

//--- Return (1) itself, the list of (2) attached objects, (3) pixel copier objects and (4) the shadow object
   CForm            *GetObject(void)                                          { return &this;                  }
   CArrayObj        *GetList(void)                                            { return &this.m_list_elements;  }
   CArrayObj        *GetListPC(void)                                          { return &this.m_list_pc_obj;    }
   CGCnvElement     *GetShadowObj(void)                                       { return this.m_shadow_obj;      }
Em seguida, declaramos um método que cria um novo objeto-copiador de pixeis de imagem:
//--- Create a new pixel copier object
   CPixelCopier     *CreateNewPixelCopier(const int id,const int x_coord,const int y_coord,const int width,const int height);

//--- Draw an object shadow
   void              DrawShadow(const int shift_x,const int shift_y,const color colour,const uchar opacity=127,const uchar blur=4);
Antes do bloco de código com métodos de acesso simplificado às propriedades do objeto, vamos escrever um bloco de código para trabalhar com pixels de imagem:
//+------------------------------------------------------------------+
//| Methods of working with image pixels                             |
//+------------------------------------------------------------------+
//--- Return the pixel copier object by ID
   CPixelCopier     *GetPixelCopier(const int id);
//--- Copy the part or the entire image to the array
   bool              ImageCopy(const int id,const uint x_coord,const uint y_coord,uint &width,uint &height);
//--- Copy the part or the entire image from the array to the canvas
   bool              ImagePaste(const int id,const uint x_coord,const uint y_coord);

//+------------------------------------------------------------------+
Fora do corpo da classe, vamos escrever a implementação dos métodos declarados.
Método que retorna o sinalizador que indica se o objeto-copiador com o identificador especificado existe na lista:
//+------------------------------------------------------------------+
//| Return the flag indicating the presence                          |
//| of the copier object with the specified ID in the list           |
//+------------------------------------------------------------------+
bool CForm::IsPresentPC(const int id)
  {
   for(int i=0;i<this.m_list_pc_obj.Total();i++)
     {
      CPixelCopier *pc=this.m_list_pc_obj.At(i);
      if(pc==NULL)
         continue;
      if(pc.ID()==id)
         return true;
     }
   return false;
  }
//+------------------------------------------------------------------+
Aqui, num loop simples ao longo da lista de objetos-copiadores, obtemos o próximo objeto e, se seu identificador for igual ao passado para o método, retornamos true. No final do loop, devolvemos false.
Método que cria um novo objeto-copiador de pixeis de imagem:
//+------------------------------------------------------------------+
//| Create a new pixel copier object                                 |
//+------------------------------------------------------------------+
CPixelCopier *CForm::CreateNewPixelCopier(const int id,const int x_coord,const int y_coord,const int width,const int height)
  {
//--- If the object with such an ID is already present, inform of that in the journal and return NULL
   if(this.IsPresentPC(id))
     {
      ::Print(DFUN,CMessage::Text(MSG_FORM_OBJECT_PC_OBJ_ALREADY_IN_LIST),(string)id);
      return NULL;
     }
//--- Create a new copier object with the specified parameters
   CPixelCopier *pc=new CPixelCopier(id,x_coord,y_coord,width,height,CGCnvElement::GetObject());
//--- If failed to create an object, inform of that and return NULL
   if(pc==NULL)
     {
      ::Print(DFUN,CMessage::Text(MSG_FORM_OBJECT_ERR_FAILED_CREATE_PC_OBJ));
      return NULL;
     }
//--- If failed to add the created object to the list, inform of that, remove the object and return NULL
   if(!this.m_list_pc_obj.Add(pc))
     {
      ::Print(DFUN,CMessage::Text(MSG_LIB_SYS_FAILED_OBJ_ADD_TO_LIST)," ID: ",id);
      delete pc;
      return NULL;
     }
//--- Return the pointer to a newly created object
   return pc;
  }
//+------------------------------------------------------------------+
Toda a lógica do método está descrita nos comentários ao código. De qualquer forma, na discussão do artigo podem ser feitas todas as perguntas que surgirem.
Método que retorna um ponteiro para um objeto-copiador de pixeis por identificador:
//+------------------------------------------------------------------+
//| Return the pixel copier object by ID                             |
//+------------------------------------------------------------------+
CPixelCopier *CForm::GetPixelCopier(const int id)
  {
   for(int i=0;i<this.m_list_pc_obj.Total();i++)
     {
      CPixelCopier *pc=m_list_pc_obj.At(i);
      if(pc==NULL)
         continue;
      if(pc.ID()==id)
         return pc;
     }
   return NULL;
  }
//+------------------------------------------------------------------+
Aqui, também, tudo é simples, num loop ao longo da lista de objetos-copiadores, obtemos um ponteiro para o próximo objeto e, se seu identificador corresponder ao necessário, retornamos o ponteiro. No final do loop, retornamos NULL - o objeto com o identificador especificado não foi encontrado na lista.
Método que copia para a matriz parte ou toda a imagem:
//+------------------------------------------------------------------+
//| Copy part or all of the image to the array                       |
//+------------------------------------------------------------------+
bool CForm::ImageCopy(const int id,const uint x_coord,const uint y_coord,uint &width,uint &height)
  {
   CPixelCopier *pc=this.GetPixelCopier(id);
   if(pc==NULL)
     {
      pc=this.CreateNewPixelCopier(id,x_coord,y_coord,width,height);
      if(pc==NULL)
         return false;
     }
   return pc.CopyImgDataToArray(x_coord,y_coord,width,height);
  }
//+------------------------------------------------------------------+
Aqui, obtemos um ponteiro para o objeto-copiador por identificador. Se o objeto não for encontrado, imprimimos isso e devolvemos false. Se o ponteiro para o objeto for recebido com sucesso, retornamos o resultado do método CopyImgDataToArray() da classe do objeto-copiador que consideramos acima.
Método que copia da matriz para a tela parte ou toda a imagem:
//+------------------------------------------------------------------+
//| Copy the part or the entire image from the array to the canvas   |
//+------------------------------------------------------------------+
bool CForm::ImagePaste(const int id,const uint x_coord,const uint y_coord)
  {
   CPixelCopier *pc=this.GetPixelCopier(id);
   if(pc==NULL)
     {
      ::Print(DFUN,CMessage::Text(MSG_FORM_OBJECT_PC_OBJ_NOT_EXIST_LIST),(string)id);
      return false;
     }
   return pc.CopyImgDataToCanvas(x_coord,y_coord);
  }
//+------------------------------------------------------------------+
A lógica do método é idêntica à anterior, exceto que agora não salvamos a área numa matriz, mas a restauramos a partir da matriz.
Estamos prontos para testar o funcionamento do objeto-copiador de pixeis de imagem.
Teste
Precisamos testar e ter certeza de que o objeto-copiador funciona corretamente. No início do artigo, apresentei uma imagem GIF que mostrava claramente como cada imagem desenhada contra o fundo do objeto-forma era sobreposta às anteriores. Agora, precisamos do copiador de pixeis para, primeiro, salvar o fundo sobre o qual será colocado o texto e, antes de desenhar o novo texto (isto é, mover visualmente o texto desenhado para um novo lugar), restaurar o fundo no qual foi desenhado o texto (substituindo-o assim), salvar parte da imagem de fundo nas novas coordenadas e exibir o texto a seguir. Repetiremos o mesmo procedimento para cada um dos nove textos exibidos, textos esses que terão diferentes pontos de ancoragem e serão exibidos nos lados da forma que corresponderão aos pontos de ancoragem do texto. Assim, verificaremos também que cálculo dos deslocamentos das coordenadas da parte salva da imagem sob o texto estarão corretos.
Para o teste, vamos pegar o Expert Advisor do artigo anterior e salvá-lo na nova pasta \MQL5\Experts\TestDoEasy\Part78\ com o novo nome TestDoEasyPart78.mq5.
O Expert Advisor exibe três formas no gráfico. Na forma mais inferior é desenhado um fundo com um preenchimento de gradiente vertical. Aqui também desenharemos outra forma, a quarta, nela faremos um preenchimento de gradiente horizontal. Exibiremos os textos em teste nesta forma.
No campo das variáveis globais do Expert Advisor indicamos a necessidade de criar quatro objetos-forma:
//+------------------------------------------------------------------+
//|                                             TestDoEasyPart78.mq5 |
//|                                  Copyright 2021, MetaQuotes Ltd. |
//|                             https://mql5.com/en/users/artmedia70 |
//+------------------------------------------------------------------+
#property copyright "Copyright 2021, MetaQuotes Ltd."
#property link      "https://mql5.com/en/users/artmedia70"
#property version   "1.00"
//--- includes
#include <Arrays\ArrayObj.mqh>
#include <DoEasy\Services\Select.mqh>
#include <DoEasy\Objects\Graph\Form.mqh>
//--- defines
#define        FORMS_TOTAL (4)   // Number of created forms
//--- input parameters
sinput   bool              InpMovable     =  true;          // Movable forms flag
sinput   ENUM_INPUT_YES_NO InpUseColorBG  =  INPUT_YES;     // Use chart background color to calculate shadow color
sinput   color             InpColorForm3  =  clrCadetBlue;  // Third form shadow color (if not background color)
//--- global variables
CArrayObj      list_forms;
color          array_clr[];
//+------------------------------------------------------------------+
Ao criar a forma, no manipulador OnInit() calcularemos as coordenadas da nova forma dependendo das coordenadas da anterior. Depois de criar cada forma consecutiva, não é necessário redesenhar todo o gráfico, por isso, excluímos das linhas especificadas a transferência - para os métodos - da atualização das formas (anteriormente, passávamos explicitamente o valor true) Agora vamos passar este valor no final - após a criação completa da última forma - num novo bloco de código para criar a quarta forma:
//+------------------------------------------------------------------+
//| Expert initialization function                                   |
//+------------------------------------------------------------------+
int OnInit()
  {
//--- Set the permissions to send cursor movement and mouse scroll events
   ChartSetInteger(ChartID(),CHART_EVENT_MOUSE_MOVE,true);
   ChartSetInteger(ChartID(),CHART_EVENT_MOUSE_WHEEL,true);
//--- Set EA global variables
   ArrayResize(array_clr,2);
   array_clr[0]=C'26,100,128';      // Original ≈Dark-azure color
   array_clr[1]=C'35,133,169';      // Lightened original color
//--- Create the specified number of form objects
   list_forms.Clear();
   int total=FORMS_TOTAL;
   for(int i=0;i<total;i++)
     {
      int y=40;
      if(i>0)
        {
         CForm *form_prev=list_forms.At(i-1);
         if(form_prev==NULL)
            continue;
         y=form_prev.BottomEdge()+10;
        }
      //--- When creating an object, pass all the required parameters to it
      CForm *form=new CForm("Form_0"+(string)(i+1),300,y,100,(i<2 ? 70 : 30));
      if(form==NULL)
         continue;
      //--- Set activity and moveability flags for the form
      form.SetActive(true);
      form.SetMovable(false);
      //--- Set the form ID equal to the loop index and the index in the list of objects
      form.SetID(i);
      form.SetNumber(0);   // (0 - main form object) Auxiliary objects may be attached to the main one. The main object is able to manage them
      //--- Set the partial opacity for the middle form and the full one for the rest
      uchar opacity=(i==1 ? 250 : 255);
      //--- Set the form style and its color theme depending on the loop index
      if(i<2)
        {
         ENUM_FORM_STYLE style=(ENUM_FORM_STYLE)i;
         ENUM_COLOR_THEMES theme=(ENUM_COLOR_THEMES)i;
         //--- Set the form style and theme
         form.SetFormStyle(style,theme,opacity,true,false);
        }
      //--- If this is the first (top) form
      if(i==0)
        {
         //--- Draw a concave field slightly shifted from the center of the form downwards
         form.DrawFieldStamp(3,10,form.Width()-6,form.Height()-13,form.ColorBackground(),form.Opacity());
         form.Update();
        }
      //--- If this is the second form
      if(i==1)
        {
         //--- Draw a concave semi-transparent "tainted glass" field in the center
         form.DrawFieldStamp(10,10,form.Width()-20,form.Height()-20,clrWheat,200);
         form.Update();
        }
      //--- If this is the third form
      if(i==2)
        {
         //--- Set the opacity of 200
         form.SetOpacity(200);
         //--- The form background color is set as the first color from the color array
         form.SetColorBackground(array_clr[0]);
         //--- Form outlining frame color
         form.SetColorFrame(clrDarkBlue);
         //--- Draw the shadow drawing flag
         form.SetShadow(true);
         //--- Calculate the shadow color as the chart background color converted to the monochrome one
         color clrS=form.ChangeColorSaturation(form.ColorBackground(),-100);
         //--- If the settings specify the usage of the chart background color, replace the monochrome color with 20 units
         //--- Otherwise, use the color specified in the settings for drawing the shadow
         color clr=(InpUseColorBG ? form.ChangeColorLightness(clrS,-20) : InpColorForm3);
         //--- Draw the form shadow with the right-downwards offset from the form by three pixels along all axes
         //--- Set the shadow opacity to 200, while the blur radius is equal to 4
         form.DrawShadow(3,3,clr,200,4);
         //--- Fill the form background with a vertical gradient
         form.Erase(array_clr,form.Opacity());
         //--- Draw an outlining rectangle at the edges of the form
         form.DrawRectangle(0,0,form.Width()-1,form.Height()-1,form.ColorFrame(),form.Opacity());
         //--- Display the text describing the gradient type and update the form
         form.Text(form.Width()/2,form.Height()/2,TextByLanguage("V-Градиент","V-Gradient"),C'211,233,149',255,TEXT_ANCHOR_CENTER);
         form.Update();
        }
      //--- If this is the fourth (bottom - tested) form
      if(i==3)
        {
         //--- Set the opacity of 200
         form.SetOpacity(200);
         //--- The form background color is set as the first color from the color array
         form.SetColorBackground(array_clr[0]);
         //--- Form outlining frame color
         form.SetColorFrame(clrDarkBlue);
         //--- Draw the shadow drawing flag
         form.SetShadow(true);
         //--- Calculate the shadow color as the chart background color converted to the monochrome one
         color clrS=form.ChangeColorSaturation(form.ColorBackground(),-100);
         //--- If the settings specify the usage of the chart background color, replace the monochrome color with 20 units
         //--- Otherwise, use the color specified in the settings for drawing the shadow
         color clr=(InpUseColorBG ? form.ChangeColorLightness(clrS,-20) : InpColorForm3);
         //--- Draw the form shadow with the right-downwards offset from the form by three pixels along all axes
         //--- Set the shadow opacity to 200, while the blur radius is equal to 4
         form.DrawShadow(3,3,clr,200,4);
         //--- Fill the form background with a horizontal gradient
         form.Erase(array_clr,form.Opacity(),false);
         //--- Draw an outlining rectangle at the edges of the form
         form.DrawRectangle(0,0,form.Width()-1,form.Height()-1,form.ColorFrame(),form.Opacity());

         //--- Display the text describing the gradient type and update the form
         //--- Specify the text parameters (text coordinates in the center of the form) and the anchor point (located at the center as well)
         string text=TextByLanguage("H-Градиент","H-Gradient");
         int text_x=form.Width()/2;
         int text_y=form.Height()/2;
         ENUM_TEXT_ANCHOR anchor=TEXT_ANCHOR_CENTER;

         //--- Find out the width and height of the outlining text rectangle (to be used as the size of the saved area)
         int text_w=0,text_h=0;
         form.TextSize(text,text_w,text_h);
         //--- Calculate coordinate offsets for the saved area depending on the text anchor point
         int shift_x=0,shift_y=0;
         form.TextGetShiftXY(text,anchor,shift_x,shift_y);

         //--- If a background area with calculated coordinates and size under the future text is successfully saved
         if(form.ImageCopy(0,text_x+shift_x,text_y+shift_y,text_w,text_h))
           {
            //--- Draw the text and update the form together with redrawing a chart
            form.Text(text_x,text_y,text,C'211,233,149',255,anchor);
            form.Update(true);
           }
        }
      //--- Add objects to the list
      if(!list_forms.Add(form))
        {
         delete form;
         continue;
        }
     }
//---
   return(INIT_SUCCEEDED);
  }
//+------------------------------------------------------------------+
Aqui, cada linha de código para criar a nova forma é comentada em detalhes. A chave é que depois de gerar a forma e antes de desenhar nela o texto, precisamos salvar aquela parte do fundo em que estará localizado o texto. Já depois, em outro manipulador, precisamos, primeiro, restaurar o fundo da forma apagando o texto com ele e, só então, exibir os textos em novos locais, preservando o fundo sob eles da mesma forma e restaurando-o com cada novo movimento do texto para novas coordenadas.
Faremos tudo isso no manipulador OnChartEvent() num novo bloco de código:
//+------------------------------------------------------------------+
//| ChartEvent function                                              |
//+------------------------------------------------------------------+
void OnChartEvent(const int id,
                  const long &lparam,
                  const double &dparam,
                  const string &sparam)
  {
//--- If clicking an object
   if(id==CHARTEVENT_OBJECT_CLICK)
     {
      //--- If the clicked object belongs to the EA
      if(StringFind(sparam,MQLInfoString(MQL_PROGRAM_NAME))==0)
        {
         //--- Get the object ID from it
         int form_id=(int)StringToInteger(StringSubstr(sparam,StringLen(sparam)-1))-1;
         //--- Find this form object in the loop by all forms created in the EA
         for(int i=0;i<list_forms.Total();i++)
           {
            CForm *form=list_forms.At(i);
            if(form==NULL)
               continue;
            //--- If the clicked object has the ID of 3 and the form has the same ID
            if(form_id==3 && form.ID()==3)
              {
               //--- Set the text parameters
               string text=TextByLanguage("H-Градиент","H-Gradient");
               //--- Get the size of the future text
               int text_w=0,text_h=0;
               form.TextSize(text,text_w,text_h);
               //--- Get the anchor point of the last drawn text (this is the form which contained the last drawn text)
               ENUM_TEXT_ANCHOR anchor=form.TextAnchor();
               //--- Get the coordinates of the last drawn text
               int text_x=form.TextLastX();
               int text_y=form.TextLastY();
               //--- Calculate the coordinate offset of the saved rectangle area depending on the text anchor point
               int shift_x=0,shift_y=0;
               form.TextGetShiftXY(text,anchor,shift_x,shift_y);
               //--- Set the text anchor initial point (0 = LEFT_TOP) out of nine possible ones
               static int n=0;
               //--- If the previously copied form background image is successfully restored when creating the form object in OnInit()
               if(form.ImagePaste(0,text_x+shift_x,text_y+shift_y))
                 {
                  //--- Depending on the n variable, set the new text anchor point
                  switch(n)
                    {
                     case 0 : anchor=TEXT_ANCHOR_LEFT_TOP;     text_x=1;               text_y=1;               break;
                     case 1 : anchor=TEXT_ANCHOR_CENTER_TOP;   text_x=form.Width()/2;  text_y=1;               break;
                     case 2 : anchor=TEXT_ANCHOR_RIGHT_TOP;    text_x=form.Width()-2;  text_y=1;               break;
                     case 3 : anchor=TEXT_ANCHOR_LEFT_CENTER;  text_x=1;               text_y=form.Height()/2; break;
                     case 4 : anchor=TEXT_ANCHOR_CENTER;       text_x=form.Width()/2;  text_y=form.Height()/2; break;
                     case 5 : anchor=TEXT_ANCHOR_RIGHT_CENTER; text_x=form.Width()-2;  text_y=form.Height()/2; break;
                     case 6 : anchor=TEXT_ANCHOR_LEFT_BOTTOM;  text_x=1;               text_y=form.Height()-2; break;
                     case 7 : anchor=TEXT_ANCHOR_CENTER_BOTTOM;text_x=form.Width()/2;  text_y=form.Height()-2; break;
                     case 8 : anchor=TEXT_ANCHOR_RIGHT_BOTTOM; text_x=form.Width()-2;  text_y=form.Height()-2; break;
                     default: anchor=TEXT_ANCHOR_CENTER;       text_x=form.Width()/2;  text_y=form.Height()/2; break;
                    }
                  //--- According to the new anchor point, get the new offsets of the saved area coordinates
                  form.TextGetShiftXY(text,anchor,shift_x,shift_y);
                  //--- If the background area is successfully saved at new coordinates
                  if(form.ImageCopy(0,text_x+shift_x,text_y+shift_y,text_w,text_h))
                    {
                     //--- Draw the text in new coordinates and update the form
                     form.Text(text_x,text_y,text,C'211,233,149',255,anchor);
                     form.Update();
                    }
                  //--- Increase the object click counter (and also the pointer to the text anchor point),
                  //--- and if the value exceeds 8, reset the value to zero (from 0 to 8 = nine anchor points)
                  n++;
                  if(n>8) n=0;
                 }
              }
           }
        }
     }
  }
//+------------------------------------------------------------------+
Tudo é descrito com detalhes suficientes nos comentários do código. Todas as perguntas podem ser feitas na discussão do artigo.
Vamos compilar o Expert Advisor e executá-lo no gráfico.
Clicamos na forma inferior com o mouse e nos certificamos de que tudo funciona conforme o esperado:
O que vem agora?
No próximo artigo, continuaremos a desenvolver na biblioteca esta ideia sobre animação e começaremos a trabalhar com animação de sprites.
Todos os arquivos da versão atual da biblioteca e o arquivo do EA de teste para MQL5 estão anexados abaixo. Você pode baixá-los e testar tudo sozinho.
Se você tiver perguntas, comentários e sugestões, poderá expressá-los nos comentários do artigo.
*Artigos desta série:
Gráficos na biblioteca DoEasy (Parte 73): objeto-forma de um elemento gráfico
Gráficos na biblioteca DoEasy (Parte 74): elemento gráfico básico baseado na classe CCanvas
Gráficos na biblioteca DoEasy (Parte 75): métodos para trabalhar com primitivas e texto num elemento gráfico básico
Gráficos na biblioteca DoEasy (Parte 76): objeto Forma e temas de cores predefinidos
Gráficos na biblioteca DoEasy (Parte 77): classe do objeto Sombra
Traduzido do russo pela MetaQuotes Ltd.
Artigo original: https://www.mql5.com/ru/articles/9612
 Padrões com exemplos (Parte I): Topo múltiplo
- Aplicativos de negociação gratuitos
- 8 000+ sinais para cópia
- Notícias econômicas para análise dos mercados financeiros
Você concorda com a política do site e com os termos de uso