
소스 코드의 트레이싱, 디버깅, 및 구조 분석
들어가며
이 문서에서 실행 도중 콜 스택을 만드는 방법 중 하나에 대해 알려드릴 것입니다. 이하의 기능들이 이 문서에서 다뤄졌습니다:
- 사용된 클래스, 기능 및 파일의 구조 만들기.
- 모든 과거 스택을 유지하는 콜 스택 생성하기. 스택들을 호출하는 시퀀스.
- 실행 중 Watch 패러미터 상태 보기.
- 코드 실행을 스텝 별로 분석하기
- 획득한 스택을 그룹으로 묶고 정리하여 "극단적인" 정보를 얻기.
개발의 핵심 원칙
공통 접근방식은 구조물의 표현 방법으로 선택되며, 트리 구조의 형태로 표시됩니다. 이 목적을 위해 두개의 정보 클래스가 필요합니다. CNode - 스택에 관한 모든 정보를 쓸 "노드". CTreeCtrl - 모든 노드를 처리할 "트리". 그리고 트레이서 본체 - CTraceCtrl, 트리를 처리하는데에 씁니다.
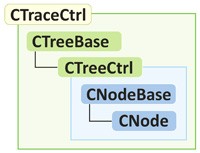
CNodeBase와 CTreeBase 클래스들은 노드와 트리 작업에 관한 기본 속성들과 메소드들을 다룹니다.
상속받은 클래스 CNode는 CNodeBase의 기본 기능의 연장선상으로,CTreeBase 클래스는 자식 클래스 CNode와 작업합니다. 이는 CNodeBase가 다른 표준 노드들의 부모이면서 서열과 상속의 편의성을 위해 독립된 클래스이기 때문에 성립되는 것입니다.
표준 라이브러리의 CTreeNode 와는 달리 CNodeBase 클래스는 노드들을 가리키는 포인터 어레이를 가지고 있어 이 노드에서 뻗어져나오는 "가지"의 수는 무한합니다.
CNodeBase 및 CNode 클래스
class CNode; // forward declaration
//------------------------------------------------------------------    class CNodeBase
class CNodeBase
  {
public:
   CNode   *m_next[]; // list of nodes it points to
   CNode   *m_prev; // parent node
   int     m_id; // unique number
   string  m_text; // text

public:
          CNodeBase() { m_id=0; m_text=""; } // constructor
          ~CNodeBase(); // destructor
  };

//------------------------------------------------------------------    class CNode
class CNode : public CNodeBase
  {
public:
   bool    m_expand; // expanded
   bool    m_check; // marked with a dot
   bool    m_select; // highlighted

   //--- run-time information
   int     m_uses; // number of calls of the node
   long    m_tick; // time spent in the node
   long    m_tick0; // time of entering the node
   datetime    m_last; // time of entering the node
   tagWatch   m_watch[]; // list of name/value parameters
   bool    m_break; // debug-pause

   //--- parameters of the call
   string   m_file; // file name
   int      m_line; // number of row in the file
   string   m_class; // class name
   string   m_func; // function name
   string   m_prop; // add. information

public:
           CNode(); // constructor
           ~CNode(); // destructor
   void    AddWatch(string watch,string val);
  };
첨부된 파일에서 모든 클래스의 구현을 찾을 수 있습니다. 이 기사에서는 헤더와 중요한 함수만 보이려고 합니다.
분류에 따르면, CTreeBase는 비순환 그래프에서 유래되었으며 이를 나타냅니다. 파생 클래스 CTreeCtrl 는 CNode를 사용하며 모든 기능성을 제공합니다: CNode 노드들을 추가하고, 변화시키고, 삭제하는 것.
CTreeCtrl 및 CNode는 표준 라이브러리의 해당 클래스를 성공적으로 대체할 수 있습니다. 기능이 약간 더 풍부하기 때문입니다.
CTreeBase 및 CTreeCtrl 클래스
//------------------------------------------------------------------    class CTreeBase
class CTreeBase
  {
public:
   CNode   *m_root; // first node of the tree
   int     m_maxid;    // counter of ID

   //--- base functions
public:
           CTreeBase(); // constructor
           ~CTreeBase(); // destructor
   void    Clear(CNode *root=NULL); // deletion of all nodes after a specified one
   CNode   *FindNode(int id,CNode *root=NULL); // search of a node by its ID starting from a specified node
   CNode   *FindNode(string txt,CNode *root=NULL); // search of a node by txt starting from a specified node
   int     GetID(string txt,CNode *root=NULL); // getting ID for a specified Text, the search starts from a specified node
   int     GetMaxID(CNode *root=NULL); // getting maximal ID in the tree
   int     AddNode(int id,string text,CNode *root=NULL); // adding a node to the list, search is performed by ID starting from a specified node
   int     AddNode(string txt,string text,CNode *root=NULL); // adding a node to the list, search is performed by text starting from a specified node
   int     AddNode(CNode *root,string text); // adding a node under root
  };

//------------------------------------------------------------------    class CTreeCtrl
class CTreeCtrl : public CTreeBase
  {
   //--- base functions
public:
          CTreeCtrl() { m_root.m_file="__base__"; m_root.m_line=0;
                        m_root.m_func="__base__"; m_root.m_class="__base__"; } // constructor
          ~CTreeCtrl() { delete m_root; m_maxid=0; } // destructor
   void    Reset(CNode *root=NULL); // reset the state of all nodes
   void    SetDataBy(int mode,int id,string text,CNode *root=NULL); // changing text for a specified ID, search is started from a specified node
   string  GetDataBy(int mode,int id,CNode *root=NULL); // getting text for a specified ID, search is started from a specified node

   //--- processing state
public:
   bool    IsExpand(int id,CNode *root=NULL); // getting the m_expand property for a specified ID, search is started from a specified node
   bool    ExpandIt(int id,bool state,CNode *root=NULL); // change the m_expand state, search is started from a specified node
   void    ExpandBy(int mode,CNode *node,bool state,CNode *root=NULL); // expand node of a specified node

   bool    IsCheck(int id,CNode *root=NULL); // getting the m_check property for a specified ID, search is started from a specified node
   bool    CheckIt(int id,bool state,CNode *root=NULL); // change the m_check state to a required one starting from a specified node
   void    CheckBy(int mode,CNode *node,bool state,CNode *root=NULL); // mark the whole tree

   bool    IsSelect(int id,CNode *root=NULL); // getting the m_select property for a specified ID, search is started from a specified node
   bool    SelectIt(int id,bool state,CNode *root=NULL); // change the m_select state to a required one starting from a specified node
   void    SelectBy(int mode,CNode *node,bool state,CNode *root=NULL); // highlight the whole tree

   bool    IsBreak(int id,CNode *root=NULL); // getting the m_break property for a specified ID, search is started from a specified node
   bool    BreakIt(int id,bool state,CNode *root=NULL); // change the m_break state, search is started from a specified node
   void    BreakBy(int mode,CNode *node,bool state,CNode *root=NULL); // set only for a selected one

   //--- operations with nodes
public:
   void    SortBy(int mode,bool ascend,CNode *root=NULL); // sorting by a property
   void    GroupBy(int mode,CTreeCtrl *atree,CNode *node=NULL); // grouping by a property
  };
이 아키텍쳐는 두개의 클래스로 마무리됩니다: CTraceCtrl - 이 클래스의 인스턴스는 트레이싱에 직접적으로 이용됩니다. 필요한 함수 구축에 CTreeCtrl 클래스의 인스턴스 3개가 들어있으며; 임시 컨테이너 CIn 클래스가 있습니다. 이는 CTraceCtrl에 새 노드들을 추가하는 보조 클래스에 지나지 않습니다.
CTraceCtrl 및 CIn 클래스
class CTraceView; // provisional declaration
//------------------------------------------------------------------    class CTraceCtrl
class CTraceCtrl
  {
public:
   CTreeCtrl   *m_stack; // object of graph
   CTreeCtrl   *m_info; // object of graph
   CTreeCtrl   *m_file; // grouping by files
   CTreeCtrl   *m_class; // grouping by classes
   CTraceView  *m_traceview; // pointer to displaying of class

   CNode   *m_cur; // pointer to the current node
           CTraceCtrl() { Create(); Reset(); } // tracer created
           ~CTraceCtrl() { delete m_stack; delete m_info; delete m_file; delete m_class; } // tracer deleted
   void    Create(); // tracer created
   void    In(string afile,int aline,string aname,int aid); // entering a specified node
   void    Out(int aid); // exit from a specified node
   bool    StepBack(); // exit from a node one step higher (going to the parent)
   void    Reset() { m_cur=m_stack.m_root; m_stack.Reset(); m_file.Reset(); m_class.Reset(); } // resetting all nodes
   void    Clear() { m_cur=m_stack.m_root; m_stack.Clear(); m_file.Clear(); m_class.Clear(); } // resetting all nodes

public:
   void    AddWatch(string name,string val); // checking the debug mode for a node
   void    Break(); // pause for a node
  };

//------------------------------------------------------------------    CIn
class CIn
  {
public:
   void In(string afile,int aline,string afunc)
     {
      if(NIL(m_trace)) return; // exit if there is no graph
      if(NIL(m_trace.m_tree)) return;
      if(NIL(m_trace.m_tree.m_root)) return;
      if(NIL(m_trace.m_cur)) m_trace.m_cur=m_trace.m_tree.m_root;
      m_trace.In(afile,aline,afunc,-1); // entering the next one
     }
   void ~CIn() { if(!NIL(m_trace)) m_trace.Out(-1); } // exiting higher
  };
CIn 클래스 모델 작업
이 클래스는 스택 트리를 만드는 역할을 맡고있습니다.
CTraceCtrl 함수를 이용해서 그래프를 형성합니다:
void In(string afile, int aline, string aname, int aid); // entering a specified node
void Out(int aid);  // exit before a specified node
다시 말해 트리를 형성하려면 In-Out-In-Out-In-In-Out-Out의 사전 콜 등이 형성된다는 것입니다.
In-Out 페어는 다음과 같이 작동합니다:
1. "{" 괄호 직후에 블록에 진입 (함수, 사이클, 조건, 등.).
블록 진입 후 CIn의 새 인스턴스가 생성됩니다. 기존 노드들에서 이미 시작된 CTraceCtrl 를 받습니다. CTraceCtrl::In 함수가 CIn에서 호출되어 스택 안에 새로운 노드를 만듭니다. 새 노드들은 현재 노드인 CTraceCtrl::m_cur 아래에 생깁니다. 파일 이름, 행 번호, 클래스 이름, 기능, 현재 시간 등 입력에 대한 실제 정보가 모두 기재되어 있습니다.
2. "}" 괄호를 만나면 블록에서 이탈합니다.
블록에서 이탈할 때 MQL은 소멸자 CIn::~CIn를 호출합니다. 소멸자 안에선 CTraceCtrl::Out 이 호출됩니다. 현 노드 CTraceCtrl::m_cur 의 포인터는 트리 안에서 1단계 높게 호출됩니다 . 새 노드에 대해 소멸자가 호출되지 않으면 노드는 트리에 유지됩니다.
스택 형성 스키마
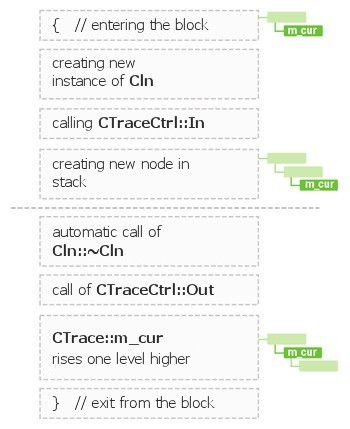
트리 안에서 어떠한 콜에 대한 정보를 담아 콜 스택을 만드는 것은 CIn 컨테이너 안에서 이루어집니다.
매크로를 통해 콜을 더욱 쉽게 만들기
CIn 객체 생성에 코드를 길게 쓰는 것을 방지하려면 콜을 매크로로 전환하는 편이 편합니다:#define _IN CIn _in; _in.In(__FILE__, __LINE__, __FUNCTION__)보시다시피 CIn 객체가 생성되었고, 우리는 노드에 진입합니다.
MQL은 지역 변수 이름이 전역 변수와 동일한 경우 경고를 제공하므로 다음 형식의 다른 변수 이름으로 3-4개의 유사 정의를 생성하는 것이 좋습니다(더 정확하고 명확함).
#define _IN1    CIn _in1; _in1.In(__FILE__, __LINE__, __FUNCTION__)
#define _IN2    CIn _in2; _in2.In(__FILE__, __LINE__, __FUNCTION__)
#define _IN3    CIn _in3; _in3.In(__FILE__, __LINE__, __FUNCTION__)
하위 블록으로 깊게 들어감에 따라 _INx 매크로를 사용합니다.
bool CSampleExpert::InitCheckParameters(int digits_adjust)
  { _IN;
//--- initial data checks
   if(InpTakeProfit*digits_adjust<m_symbol.StopsLevel())
     { _IN1;
      printf("Take Profit must be greater than %d",m_symbol.StopsLevel());
411 빌드의 매크로들이 나타남에 따라 #define을 통해 패러미터 패싱을 쓸 수 있습니다.
CTraceCtrl 클래스 내에서 다음의 매크로 정의를 볼 수 있는 이유입니다:
#define NIL(p) (CheckPointer(p)==POINTER_INVALID)포인터의 정상성 체크 역시 단축시킵니다
예를들어 이 라인을 보면:
if (CheckPointer(m_tree))==POINTER_INVALID || CheckPointer(m_cur))==POINTER_INVALID) return;
더 짧은 버전으로 줄어듭니다:
if (NIL(m_tree) || NIL(m_cur)) return;
파일을 트레이싱에 대응하게 준비하기
스택을 관리하고 얻기 위해선 세가지 단계를 밟아야 합니다.
1. 필요한 파일을 추가합니다#include <Trace.mqh>표준 라이브러리 전체는 CObject 클래스에 기반을 두고 있습니다. 그러므로 만약에 이 클래스가 당신의 파일 안에서 기반 클래스로 사용되고 있을 경우 Trace.mqh 를 Object.mqh에만 연결해도 됩니다.
2. _IN 매크로를 필요한 블록에 배치하기 (탐색/교체 를 쓸 수 있습니다)
_IN 매크로를 쓰는 예시:bool CSampleExpert::InitCheckParameters(int digits_adjust) { _IN; //--- initial data checks if(InpTakeProfit*digits_adjust<m_symbol.StopsLevel()) { _IN1; printf("Take Profit must be greater than %d",m_symbol.StopsLevel());
3. OnInit, OnTime, OnDeinit 함수 안에서 각각 글로벌 객체 CTraceCtrl 의 추가, 수정, 삭제가 이루어집니다. 아래에서 삽입용 레디메이드 코드를 찾을 수 있습니다:
메인 코드에서의 트레이서 임베딩
//------------------------------------------------------------------    OnInit
int OnInit()
  {
   //****************
   m_traceview= new CTraceView; // created displaying of the graph
   m_trace= new CTraceCtrl; // created the graph
   m_traceview.m_trace=m_trace; // attached the graph
   m_trace.m_traceview=m_traceview; // attached displaying of the graph
   m_traceview.Create(ChartID()); // created chart
   //****************
   // remaining part of your code…
   return(0);
  }
//------------------------------------------------------------------    OnDeinit
void OnDeinit(const int reason)
  {
   //****************
   delete m_traceview;
   delete m_trace;
   //****************
   // remaining part of your code…
  }
//------------------------------------------------------------------    OnTimer
void OnTimer()
  {
   //****************
   if (m_traceview.IsOpenView(m_traceview.m_chart)) m_traceview.OnTimer();
   else { m_traceview.Deinit(); m_traceview.Create(ChartID()); } // if the window is accidentally closed
   //****************
   // remaining part of your code…
  }
//------------------------------------------------------------------    OnChartEvent
void OnChartEvent(const int id, const long& lparam, const double& dparam, const string& sparam)
  {
   //****************
   m_traceview.OnChartEvent(id, lparam, dparam, sparam);
   //****************
   // remaining part of your code…
  }
트레이스 표시 클래스
이제 스택이 정리되었습니다. 이제 얻은 정보를 표시해봅시다.
이를 위해선 2개의 클래스를 생성해야합니다. CTreeView – 는 트리 표시용, 그리고 CTraceView – 트리와 스택에 관련된 추가 정보의 표시 및 관리용 양쪽 클래스 모두 기반 클래스 CView에서 파생되었습니다.
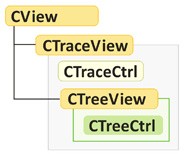
CTreeView 및 CTraceView 클래스
//------------------------------------------------------------------    class CTreeView
class CTreeView: public CView
  {
   //--- basic functions
public:
           CTreeView(); // constructor
           ~CTreeView(); // destructor
   void    Attach(CTreeCtrl *atree); // attached the tree object for displaying it
   void    Create(long chart,string name,int wnd,color clr,color bgclr,color selclr,
                    int x,int y,int dx,int dy,int corn=0,int fontsize=8,string font="Arial");

   //--- functions of processing of state
public:
   CTreeCtrl        *m_tree; // pointer to the tree object to be displayed
   int     m_sid; // last selected object (for highlighting)
   int     OnClick(string name); // processing the event of clicking on an object

   //--- functions of displaying
public:
   int     m_ndx, m_ndy; // size of margins from button for drawing
   int     m_bdx, m_bdy; // size of button of nodes
   CScrollView       m_scroll;
   bool    m_bProperty; // show properties near the node

   void    Draw(); // refresh the view
   void    DrawTree(CNode *first,int xpos,int &ypos,int &up,int &dn); // redraw
   void    DeleteView(CNode *root=NULL,bool delparent=true); // delete all displayed elements starting from a specified node
  };

//------------------------------------------------------------------    class CTreeView
class CTraceView: public CView
  {
   //--- base functions
public:
           CTraceView() { }; // constructor
           ~CTraceView() { Deinit(); } // destructor
   void    Deinit(); // full deinitialization of representation
   void    Create(long chart); // create and activate the representation

   //--- function of processing of state
public:
   int     m_hagent; // handler of the indicator-agent for sending messages
   CTraceCtrl   *m_trace; // pointer to created tracer
   CTreeView    *m_viewstack; // tree for displaying the stack
   CTreeView    *m_viewinfo; // tree for displaying of node properties
   CTreeView    *m_viewfile; // tree for displaying of the stack with grouping by files
   CTreeView    *m_viewclass; // tree for displaying of stack with grouping by classes
   void    OnTimer(); // handler of timer
   void    OnChartEvent(const int,const long&,const double&,const string&); // handler of event

   //--- functions of displaying
public:
   void    Draw(); // refresh objects
   void    DeleteView(); // delete the view

   void    UpdateInfoTree(CNode *node,bool bclear); // displaying the window of detailed information about a node
   string  TimeSeparate(long time); // special function for transformation of time into string
  };
스택을 최적의 변형으로 별도의 하위 창에 표시하기로 선택했습니다.
CTraceView 클래스는 CTraceView::Create 함수에서 생성되며, 차트 창이 생기고 다른 모든 객체가 그 안에 그려집니다 CTraceView는 다른 창의 Expert Advisor를 통해 생성되어 작업하긴 하지만. 이는 추적된 프로그램의 소스 코드 작동에 방해가 되는 것을 방지하고 엄청난 양의 정보에 의해 자체 정보를 차트에 표시하는 것을 방지하기 위해 수행됩니다.
그러나 두 윈도우 간의 상호 작용을 가능하게 하려면 윈도우에 인디케이터를 추가해야 합니다. 그러면 사용자의 모든 이벤트가 추적된 프로그램과 함께 기본 윈도우로 전송됩니다.
해당 인디케이터는 같은 함수 CTraceView::Create에서 생성됩니다. 외부 패러미터는 하나뿐입니다. 즉, 모든 이벤트를 전송할 차트의 ID입니다.
TraceAgent 인디케이터
#property indicator_chart_window
input long cid=0; // чарт получателя
//------------------------------------------------------------------    OnCalculate
int OnCalculate(const int rates_total, const int prev_calculated, const int begin, const double& price[])
{ return(rates_total); }
//------------------------------------------------------------------    OnChartEvent
void OnChartEvent(const int id,const long& lparam,const double& dparam,const string& sparam)
  {
    EventChartCustom(cid, (ushort)id, lparam, dparam, sparam);
  }
결과적으로 스택을 상당히 구조적으로 표현할 수 있게되었습니다.
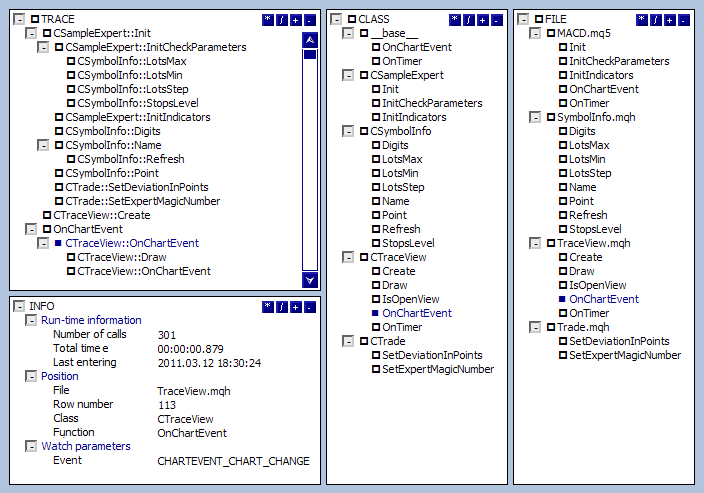
왼쪽에 표시된 TRACE 트리에서 초기 스택이 표시됩니다.
아래의 INFO 창에는 선택된 노드 (이 예시의 경우엔 CTraceView::OnChartEvent) 에 대한 구체적인 정보가 담겨있습니다 . 두개의 인접한 창에 같은 스택의 트리가 표시되지만 하나는 클래스에 따라(중앙의 CLASS 트리) 그룹되며 다른 쪽은 파일에 따라 (우측의 FILE 트리) 표시됩니다.
클래스 및 파일 트리는 스택의 메인 트리와의 동기화 메커니즘과 편리한 제어 수단을 내장하고 있습니다. 예를 들어 클래스 트리에서 클래스 이름을 누르면 스택 트리와 파일 트리에서 이 클래스의 모든 기능이 선택됩니다. 이와 마찬가지로 파일 이름을 클릭하면 해당 파일의 모든 함수와 클래스가 선택됩니다.
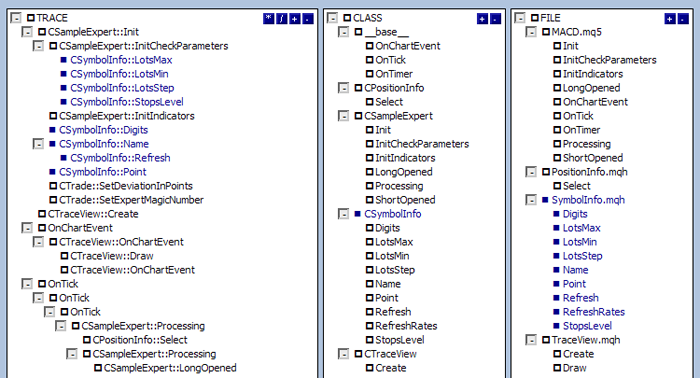
스택 다루기
- Watch 패러미터 추가하기
눈치 채셨겠다시피 CNode 노드의 패러미터에는 구조의 어레이인 tagWatch가 포함되어 있습니다. 이는 정보를 표현하기 쉽게 만들기 위해서 만들어졌습니다 변수의 값이나 표현식이 들어있습니다.
Watch 값의 구조
//------------------------------------------------------------------    struct tagWatch
struct tagWatch
{
    string m_name;     // name
    string m_val;    // value
};
기존 노드에 새 Watch 값을 추가하기 위해서는 CTrace::AddWatch 함수를 호출하고 _WATCH 매크로를 사용해야 합니다.
#define _WATCH(w, v) if (!NIL(m_trace) && !NIL(m_trace.m_cur)) m_trace.m_cur.AddWatch(w, string(v));
추가 값(노드와 같음)에 대한 특별한 제한은 이름이 겹치지않게 제어하는 것이 목적입니다. 이는 Watch 값의 이름이 CNode::m_watch[] 어레이에 추가되기 전에 고유성을 체크받는다는 의미입니다. 어레이에 동일한 이름의 값이 포함된 경우 새 값이 추가되지 않지만 기존 값의 값이 업데이트됩니다.
추적된 Watch 값은 정보 창에 표시됩니다

- 코드 실행을 스텝 별로 분석하기
MQL5에서 제공하는 또 다른 편리한 기능은 실행 중 코드의 강제 차단을 구성하는 것입니다.
일시 중지는 간단한 무한 루프 while (true)를 사용하여 구현됩니다. MQL5이 이에 관해 상당히 편한 점은 이 루프에서 빠져나가는 부분입니다 - 그냥 빨간버튼을 누르면 되기 때문입니다. 실행 중에 브레이크 포인트를 만들려면 CTrace::Break 함수를 활용하십시오.
브레이크 포인트를 구현하기 위한 함수
//------------------------------------------------------------------    Break
void CTraceCtrl::Break() // checking the debug mode of a node
  {
   if(NIL(m_traceview)) return; // check of validity
   m_stack.BreakBy(TG_ALL,NULL,false); // removed the m_break flags from all nodes
   m_cur.m_break=true; // activated only at the current one
   m_traceview.m_viewstack.m_sid=m_cur.m_id; // moved selection to it
   m_stack.ExpandBy(TG_UP,m_cur,true,m_cur); // expand parent node if they are closed
   m_traceview.Draw(); // drew everything
   string name=m_traceview.m_viewstack.m_name+string(m_cur.m_id)+".dbg"; // got name of the BREAK button
   bool state=ObjectGetInteger(m_traceview.m_chart,name,OBJPROP_STATE);
   while(!state) // button is not pressed, execute the loop
     {
      Sleep(1000); // made a pause
      state=ObjectGetInteger(m_traceview.m_chart,name,OBJPROP_STATE);  // check its state
      if(!m_traceview.IsOpenView()) break; // if the window is closed, exit
      m_traceview.Draw(); // drew possible changes
     }
   m_cur.m_break=false; // removed the flag
   m_traceview.Draw(); // drew the update
  }
이러한 중단점을 충족하면 스택 트리가 동기화되어 이 매크로라는 함수를 표시합니다. 노드가 닫히면 부모 노드가 확장되어 노드가 표시됩니다. 필요한 경우 트리를 위 또는 아래로 스크롤하여 노드를 가시 영역으로 가져옵니다.

CTraceCtrl::Break에서 이탈하려면 노드 이름 근처에 위치한 빨간 버튼을 누르면 됩니다.
마치며
이제 흥미로운 "장난감"이 준비되었습니다. 이 문서를 쓰는 동안 저는 CTraceCtrl 와 함께 작업하는 많은 바리에이션들을 시도했고 MQL5가 Expert Advisors를 통제하고 운영을 정리하는 독특한 관점을 가지고 있는지 확인했습니다. 트레이서 개발에 사용되는 기능은 어떤 것도 MQL4에서 사용할 수 없으며, 이는 MQL5의 장점과 그 뛰어난 가능성을 다시 한 번 입증하는 것입니다.
첨부된 코드에서는 서비스 라이브러리와 함께 기사에 설명된 모든 클래스를 찾을 수 있습니다(핵심이 아니므로 최소 필수 클래스 세트만). 덤으로 레디메이드 예제를 첨부해두었습니다 - _IN 매크로가 준비된 표준 라이브러리의 업데이트버전 파일들입니다. 우리가 Expert Advisor를 통해 시행한 모든 실험은 MetaTrader 5의 표준 딜리버리 - MACD Sample.mq5에 포함되어 있습니다.
MetaQuotes 소프트웨어 사를 통해 러시아어가 번역됨.
원본 기고글: https://www.mql5.com/ru/articles/272
 통계적 추정
 MQL5 에서의 통계적 확률 분산
 MetaTrader 5에서 자동 정리 기능 맵 (코호넨 맵) 이용하기
 선형 회귀 예시를 통한 인디케이터 가속 그 3가지 방법