
Creating an MQL5-Telegram Integrated Expert Advisor (Part 7): Command Analysis for Indicator Automation on Charts
Introduction
In this article, we will build on the progress made in the previous part (Part 6), where we integrated responsive inline buttons to enhance bot interaction. Now, our focus shifts to automating the addition of indicators on MetaTrader 5 charts using commands sent from Telegram. We will create a system where the Expert Advisor captures user-defined indicator parameters via Telegram, parses the data, and applies the specified indicators to trading charts in real-time.
The following topics will guide us step-by-step through the implementation of this indicator automation process:
- Overview of Telegram Indicator-Based Trading: We will explore how traders can use Telegram commands to control indicators on MetaTrader 5.
- Parsing and Processing Telegram Indicator Commands: This section will detail how to properly extract and process indicator parameters from Telegram messages.
- Executing Indicators in MQL5: We will demonstrate how to use parsed commands to add and automate indicators directly within MetaTrader 5.
- Testing the Indicator Trading System: A thorough testing process will ensure the smooth operation of the system for accurate indicator automation.
- Conclusion: Finally, we will recap the entire process and discuss key takeaways.
By the end of this article, you will have a fully functional Telegram-to-MetaTrader 5 indicator automation system, capable of receiving and processing commands from Telegram to apply technical indicators seamlessly in MQL5. Let's get started!
Overview of Telegram Indicator-Based Trading
In this section, we delve into the use of Telegram for sending indicator commands that can automate chart analysis. Many traders are leveraging Telegram to interact with bots and Expert Advisors (EAs) that allow them to add, modify, or remove technical indicators directly on MetaTrader 5. These commands typically include key information like the type of indicator, timeframe, period, and price application—essential for chart analysis. However, when handled manually, applying these indicators can be prone to delays or errors, especially in fast-moving markets.
By automating the process of applying indicators through Telegram commands, traders can enhance their technical analysis without the hassle of manual chart management. When properly integrated, these Telegram commands can be parsed and converted into executable instructions in MetaTrader 5, enabling indicators to be added to charts in real-time. This ensures not only accuracy but also a more efficient trading workflow, allowing traders to focus on interpreting the results rather than managing the setup. A typical visualization of the indicator commands is as shown below:
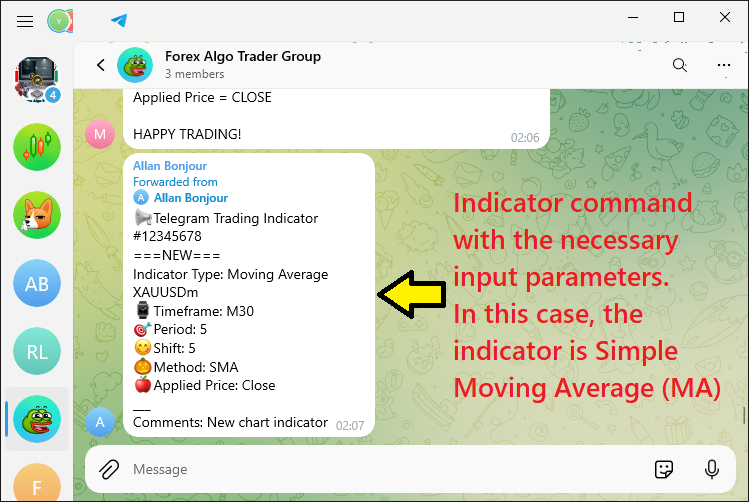
The result is a system that bridges the gap between Telegram and MetaTrader 5, empowering traders to streamline their chart analysis, minimize mistakes, and take full advantage of real-time market opportunities through automated indicator management.
Parsing and Processing Telegram Indicator Commands
The first thing we need to do is capture the Telegram-provided indicator commands, followed by encoding, parsing, and processing them in MetaQuotes Language 5 (MQL5) so that we can interpret them and apply the corresponding indicators to MetaTrader 5 charts. For the encoding and parsing part, we have already introduced the necessary classes in part 5 of this series. However, in this part, we will revisit these classes to ensure clarity, especially since part 6 focused on different functionalities such as inline buttons. The code snippet responsible for parsing and processing Telegram indicator commands is provided below:
//+------------------------------------------------------------------+
//|   Class_Bot_EA                                                   |
//+------------------------------------------------------------------+
class Class_Bot_EA{
   private:
      string            member_token;         //--- Stores the bot’s token.
      string            member_name;          //--- Stores the bot’s name.
      long              member_update_id;     //--- Stores the last update ID processed by the bot.
      CArrayString      member_users_filter;  //--- An array to filter users.
      bool              member_first_remove;  //--- A boolean to indicate if the first message should be removed.

   protected:
      CList             member_chats;         //--- A list to store chat objects.

   public:
      void Class_Bot_EA();   //--- Declares the constructor.
      ~Class_Bot_EA(){};    //--- Declares the destructor.
      int getChatUpdates(); //--- Declares a function to get updates from Telegram.
      void ProcessMessages(); //--- Declares a function to process incoming messages.
};


void Class_Bot_EA::Class_Bot_EA(void){ //--- Constructor
   member_token=NULL; //--- Initialize the bot's token as NULL.
   member_token=getTrimmedToken(InpToken); //--- Assign the trimmed bot token from InpToken.
   member_name=NULL; //--- Initialize the bot's name as NULL.
   member_update_id=0; //--- Initialize the last update ID to 0.
   member_first_remove=true; //--- Set the flag to remove the first message to true.
   member_chats.Clear(); //--- Clear the list of chat objects.
   member_users_filter.Clear(); //--- Clear the user filter array.
}
//+------------------------------------------------------------------+
int Class_Bot_EA::getChatUpdates(void){
   //--- Check if the bot token is NULL
   if(member_token==NULL){
      Print("ERR: TOKEN EMPTY"); //--- Print an error message if the token is empty
      return(-1); //--- Return with an error code
   }

   string out; //--- Variable to store the response from the request
   string url=TELEGRAM_BASE_URL+"/bot"+member_token+"/getUpdates"; //--- Construct the URL for the Telegram API request
   string params="offset="+IntegerToString(member_update_id); //--- Set the offset parameter to get updates after the last processed ID

   //--- Send a POST request to get updates from Telegram
   int res=postRequest(out, url, params, WEB_TIMEOUT);
   // THIS IS THE STRING RESPONSE WE GET // "ok":true,"result":[]}

   //--- If the request was successful
   if(res==0){
      //Print(out); //--- Optionally print the response

      //--- Create a JSON object to parse the response
      CJSONValue obj_json(NULL, jv_UNDEF);
      //--- Deserialize the JSON response
      bool done=obj_json.Deserialize(out);
      //--- If JSON parsing failed
      // Print(done);
      if(!done){
         Print("ERR: JSON PARSING"); //--- Print an error message if parsing fails
         return(-1); //--- Return with an error code
      }

      //--- Check if the 'ok' field in the JSON is true
      bool ok=obj_json["ok"].ToBool();
      //--- If 'ok' is false, there was an error in the response
      if(!ok){
         Print("ERR: JSON NOT OK"); //--- Print an error message if 'ok' is false
         return(-1); //--- Return with an error code
      }

      //--- Create a message object to store message details
      Class_Message obj_msg;

      //--- Get the total number of updates in the JSON array 'result'
      int total=ArraySize(obj_json["result"].m_elements);
      //--- Loop through each update
      for(int i=0; i<total; i++){
         //--- Get the individual update item as a JSON object
         CJSONValue obj_item=obj_json["result"].m_elements[i];

         //--- Extract message details from the JSON object
         obj_msg.update_id=obj_item["update_id"].ToInt(); //--- Get the update ID
         obj_msg.message_id=obj_item["message"]["message_id"].ToInt(); //--- Get the message ID
         obj_msg.message_date=(datetime)obj_item["message"]["date"].ToInt(); //--- Get the message date

         obj_msg.message_text=obj_item["message"]["text"].ToStr(); //--- Get the message text
         obj_msg.message_text=decodeStringCharacters(obj_msg.message_text); //--- Decode any HTML entities in the message text

         //--- Extract sender details from the JSON object
         obj_msg.from_id=obj_item["message"]["from"]["id"].ToInt(); //--- Get the sender's ID
         obj_msg.from_first_name=obj_item["message"]["from"]["first_name"].ToStr(); //--- Get the sender's first name
         obj_msg.from_first_name=decodeStringCharacters(obj_msg.from_first_name); //--- Decode the first name
         obj_msg.from_last_name=obj_item["message"]["from"]["last_name"].ToStr(); //--- Get the sender's last name
         obj_msg.from_last_name=decodeStringCharacters(obj_msg.from_last_name); //--- Decode the last name
         obj_msg.from_username=obj_item["message"]["from"]["username"].ToStr(); //--- Get the sender's username
         obj_msg.from_username=decodeStringCharacters(obj_msg.from_username); //--- Decode the username

         //--- Extract chat details from the JSON object
         obj_msg.chat_id=obj_item["message"]["chat"]["id"].ToInt(); //--- Get the chat ID
         obj_msg.chat_first_name=obj_item["message"]["chat"]["first_name"].ToStr(); //--- Get the chat's first name
         obj_msg.chat_first_name=decodeStringCharacters(obj_msg.chat_first_name); //--- Decode the first name
         obj_msg.chat_last_name=obj_item["message"]["chat"]["last_name"].ToStr(); //--- Get the chat's last name
         obj_msg.chat_last_name=decodeStringCharacters(obj_msg.chat_last_name); //--- Decode the last name
         obj_msg.chat_username=obj_item["message"]["chat"]["username"].ToStr(); //--- Get the chat's username
         obj_msg.chat_username=decodeStringCharacters(obj_msg.chat_username); //--- Decode the username
         obj_msg.chat_type=obj_item["message"]["chat"]["type"].ToStr(); //--- Get the chat type

         //--- Update the ID for the next request
         member_update_id=obj_msg.update_id+1;

         //--- If it's the first update, skip processing
         if(member_first_remove){
            continue;
         }

         //--- Filter messages based on username
         if(member_users_filter.Total()==0 || //--- If no filter is applied, process all messages
            (member_users_filter.Total()>0 && //--- If a filter is applied, check if the username is in the filter
            member_users_filter.SearchLinear(obj_msg.from_username)>=0)){

            //--- Find the chat in the list of chats
            int index=-1;
            for(int j=0; j<member_chats.Total(); j++){
               Class_Chat *chat=member_chats.GetNodeAtIndex(j);
               if(chat.member_id==obj_msg.chat_id){ //--- Check if the chat ID matches
                  index=j;
                  break;
               }
            }

            //--- If the chat is not found, add a new chat to the list
            if(index==-1){
               member_chats.Add(new Class_Chat); //--- Add a new chat to the list
               Class_Chat *chat=member_chats.GetLastNode();
               chat.member_id=obj_msg.chat_id; //--- Set the chat ID
               chat.member_time=TimeLocal(); //--- Set the current time for the chat
               chat.member_state=0; //--- Initialize the chat state
               chat.member_new_one.message_text=obj_msg.message_text; //--- Set the new message text
               chat.member_new_one.done=false; //--- Mark the new message as not processed
            }
            //--- If the chat is found, update the chat message
            else{
               Class_Chat *chat=member_chats.GetNodeAtIndex(index);
               chat.member_time=TimeLocal(); //--- Update the chat time
               chat.member_new_one.message_text=obj_msg.message_text; //--- Update the message text
               chat.member_new_one.done=false; //--- Mark the new message as not processed
            }
         }

      }
      //--- After the first update, set the flag to false
      member_first_remove=false;
   }
   //--- Return the result of the POST request
   return(res);
}
Here, we introduce the "Class_Bot_EA" and implement its "getChatUpdates" function to handle incoming updates from Telegram. In the constructor, we initialize the bot's token, name, and other pertinent variables. We also set a flag to determine if we should delete the first message and clear some old data, including the chat list and any user filters.
The "getChatUpdates" function builds a URL for the Telegram API that gets us updates for the specified bot. The last processed update ID is used as an offset in the URL, which means we will not get any updates that are already processed. After we build the URL, we send a POST request to the API and handle the response from the server. Since we expect JavaScript Object Notation (JSON) data back from the server, we check for errors by trying to parse the data. If parsing fails or if the "ok" field in the JSON response is false, we print an error message and return an error code.
After we successfully respond, we pull the pertinent information from the message—update ID, message ID, sender info, and chat details—that let us know what went down in the conversation. We then look at the list of chats we have so far and see where this new piece of info fits. If the chat connected to this new message isn't in the list, we add it. If it is in the list, we update its information with the new message.
At last, we take care of the user-defined message filtering and the handling of each chat's state. After necessary updates have been completed, we ensure that each chat's last processed message is up to date. Finally, we return the result of our POST request, indicating either success or a correspondingly described error.
This is all that we need to process the received commands. We then need to interpret the received indicator commands, identify the requested indicator and add them to the chart automatically for further analysis. This is done in the next section.
Executing Indicators in MQL5
To process the received indicator commands, we will call the function responsible for message processing so that we process the messages as a whole, and then interpret the message details in segments. The following function is applicable.
void Class_Bot_EA::ProcessMessages(void){

//...

}
It is now in this function that the real processing starts. The first thing we need to do is loop through all the messages received and process them individually. This is important because the provider could have sent the signals simultaneously and in bulk for several trading symbols, say "AUDUSD, EURUSD, GBPUSD, XAUUSD, XRPUSD, USDKES, USDJPY, EURCHF" and many more. We achieve this via the following logic.
   //--- Loop through all chats
   for(int i=0; i<member_chats.Total(); i++){
      Class_Chat *chat=member_chats.GetNodeAtIndex(i); //--- Get the current chat
      if(!chat.member_new_one.done){ //--- Check if the message has not been processed yet
         chat.member_new_one.done=true; //--- Mark the message as processed
         string text=chat.member_new_one.message_text; //--- Get the message text

         //...

      }
   }
First, we loop through the stored chats within the "member_chats" list. Each chat object is retrieved with the "GetNodeAtIndex" function. We check whether the message associated with that chat has been dealt with by evaluating a flag in the "member_new_one" structure. If the message has yet to be acted upon, the "done" flag is set to "true," which means the same message won't be handled multiple times.
Next, we extract the contents of the message. They are stored in the "message_text" field of the "member_new_one" structure. Thus, we can work with the text directly without worrying about what has already been processed.
The first thing we need to do now is get the command details for analysis. Here is the logic.
         string user_text = text;
         Print("USER'S PLAIN TEXT IS AS BELOW:\n",user_text);

         StringToUpper(user_text);
         Print("USER'S TRANSFORMED UPPERCASE TEXT IS AS BELOW:\n",user_text);
Here, we first store the incoming message text from the variable "text" into a new variable called "user_text." This allows us to work with the message content without modifying the original variable. We then print the user's plain message text using the "Print" function, which outputs the message to the MetaTrader 5 terminal for logging purposes.
Next, we convert the entire "user_text" string to uppercase using the StringToUpper function. This transforms all the characters in the message to their uppercase equivalents. This is necessary because we will equalize the message characters and it will be easier working with that. After the transformation, we again print the updated message to the terminal, showing the transformed uppercase version of the user's input. This process allows us to see both the original and modified versions of the message for further handling or response. When we run the program again, we get the following output in the log section.
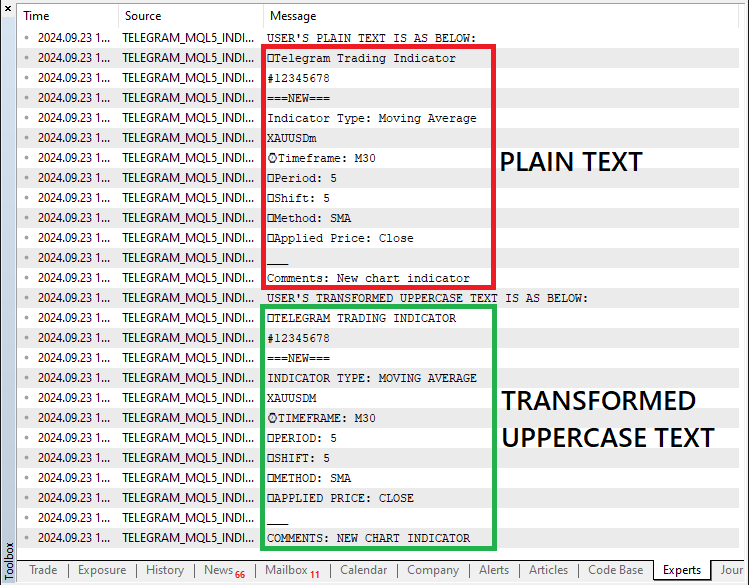
After transforming the signal message to uppercase, we then need to initialize variables that will hold our data as below:
         // MOVING AVERAGE
         //--- Initialize variables to hold extracted data
         string indicator_type = NULL;
         string indicator_symbol = NULL;
         string indicator_timeframe = NULL;
         long indicator_period = 0;
         long indicator_shift = 0;
         string indicator_method = NULL;
         string indicator_app_price = NULL;
We first start with the Moving Average indicator. We initialize several variables that will hold the extracted data for configuring a Moving Average (MA) indicator in MetaTrader 5 based on user input from Telegram. Here's what each variable represents:
- indicator_type: The type of indicator, in this case, is a Moving Average.
- indicator_symbol: The symbol (currency pair or asset) on which the indicator will be applied.
- indicator_timeframe: The timeframe for the chart (e.g., M1, H1, D1) where the indicator will be plotted.
- indicator_period: The number of periods (or bars) the Moving Average will consider in its calculation.
- indicator_shift: The offset or shift value to move the indicator forward or backward on the chart.
- indicator_method: The calculation method for the MA (e.g., SMA, EMA).
- indicator_app_price: The applied price used for the MA calculation (e.g., closing price, opening price).
To extract the data elements related to an indicator, we will then need to split the message by lines and loop via each line looking for the details. This implementation is achieved via the logic below.
         //--- Split the message by lines
         string lines[];
         StringSplit(user_text,'\n',lines);
         Print("SPLIT TEXT SEGMENTS IS AS BELOW:");
         ArrayPrint(lines,0,",");
Here, we split the user’s transformed message into individual lines to make it easier to extract relevant indicator information. We first declare an array called "lines" to hold each line of the message once it's split. Then, we apply the StringSplit function, using the newline character ('\n') as the delimiter to break the message into separate lines. This function forever populates the "lines" array with each portion of the text that was separated by a new line.
Once the message is split, we print the resulting segments using the ArrayPrint function, which outputs each line as an individual element. This step is mandatory for visualizing the structure of the message, and ensuring the splitting process worked correctly. By organizing the message in this way, we can more easily process each line to extract critical elements like the trading symbol, indicator type, and other details. To get the details, we thus need to loop via each line.
         //--- Iterate over each line to extract information
         for (int i=0; i<ArraySize(lines); i++){
            StringTrimLeft(lines[i]);
            StringTrimRight(lines[i]);

            string selected_line = lines[i];
            Print(i,". ",selected_line);

            //...

         }
We iterate over the "lines" array to extract specific indicator information from each line of the split message. We use a for loop to go through every element in the array, ensuring that each line is processed individually. At the start of the loop, we apply the StringTrimLeft and StringTrimRight functions to each line to remove any leading or trailing whitespace characters. This ensures that no extra spaces interfere with the parsing process.
We then assign each trimmed line to the "selected_line" variable, which holds the current line being processed. By having each line neatly trimmed and stored in the "selected_line" variable, we can perform further operations, such as checking if the line contains specific trading signals or commands. To confirm that we have the correct information, we print each line, and below is the output.
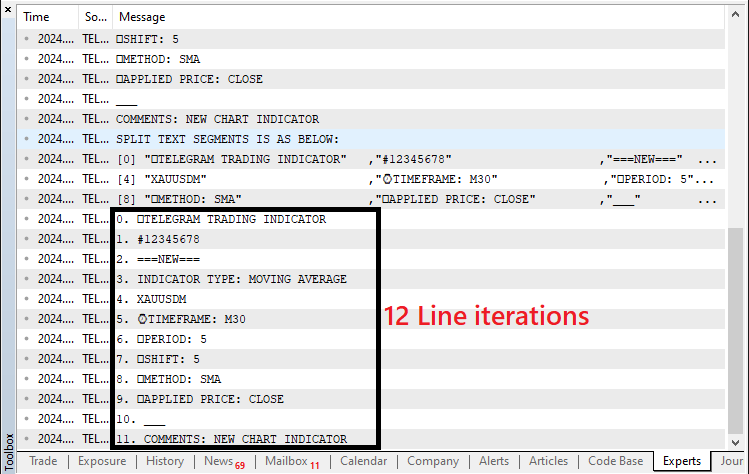
That was a success. We can proceed to look for specific details in the selected line. Let us start by looking for the type of trading technical indicator. We will first look for the moving average indicator type text, that is, "INDICATOR TYPE".
            if (StringFind(selected_line,"INDICATOR TYPE") >= 0){
               indicator_type = StringSubstr(selected_line,16);
               Print("Line @ index ",i," Indicator Type = ",indicator_type); //--- Print the extracted details
            }
Here, we process the user's Telegram message to extract the indicator type. We use the StringFind function to search the current line ("selected_line") for the text "INDICATOR TYPE." If this text is found, the function returns the starting position of the match, which is a value greater than or equal to zero. Once a match is detected, we extract the indicator type using the StringSubstr function, which retrieves a substring from the position after "INDICATOR TYPE" (starting at index 16) to the end of the line. The extracted value is stored in the "indicator_type" variable. Finally, we print out the index of the line and the extracted "indicator_type" using the Print function to confirm that the data has been successfully retrieved. When we run this, we get the following output.
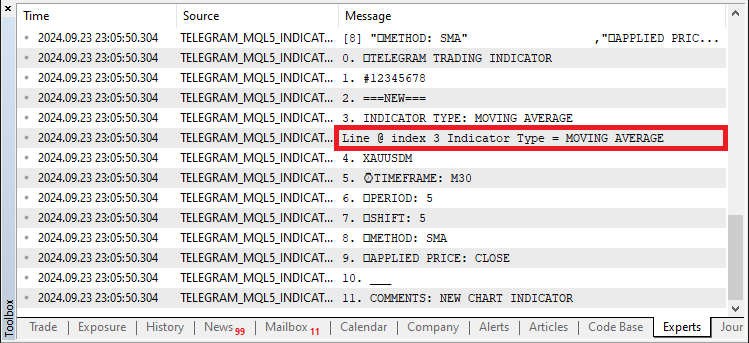
We can see that we have successfully looped via all the command segments and identified the indicator name. Next, we need to identify the symbol. A similar but a bit more complex logic will be used.
            //--- Check for symbol in the list of available symbols and assign it
            for(int k = 0; k < SymbolsTotal(true); k++) { //--- Loop through all available symbols
               string selected_symbol = SymbolName(k, true); //--- Get the symbol name
               if (StringCompare(selected_line,selected_symbol,false) == 0){ //--- Compare the line with the symbol name
                  indicator_symbol = selected_symbol; //--- Assign the symbol if a match is found
                  Print("Line @ index ",i," SYMBOL = ",indicator_symbol); //--- Print the found symbol
               }
            }
In this block of code, we check the user's input against the list of available trading symbols and assign the correct one to the "indicator_symbol" variable. First, we use the SymbolsTotal function, which returns the total number of symbols currently available on the platform. The argument "true" specifies that we want the number of visible symbols. We then loop through all the available symbols using a for loop with the variable "k" as the index.
Inside the loop, we use the SymbolName function to get the name of the symbol at index "k." The second argument, "true," indicates that we want the symbol's name in its short form. After retrieving the symbol name and storing it in the "selected_symbol" variable, we use the StringCompare function to compare this "selected_symbol" with the user's input ("selected_line"). The "false" argument indicates that the comparison should be case-insensitive.
If the function returns zero, it means the two strings match, and we assign "selected_symbol" to the "indicator_symbol" variable. Finally, we print out the index of the line and the matched "indicator_symbol" using the Print function to confirm that we've correctly identified and assigned the symbol from the user's input. This does not contain any extra text and thus we directly search. Upon run, we will not get any results with the current code snippet because the extracted text and the default symbols are not similar in that they are case sensitive, that is "XAUUSDM" is not equal to "XAUUSDm". Here is the symbol name we have:
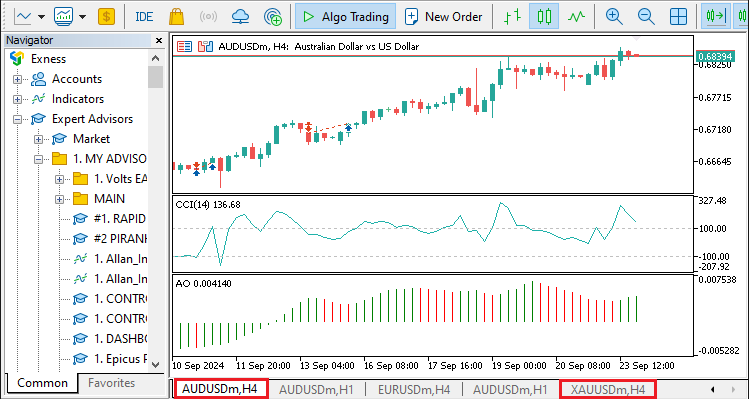
Thus, we need to transform the default system symbol to uppercase to make the comparison. The new updated code snippet is as below:
            //--- Check for symbol in the list of available symbols and assign it
            for(int k = 0; k < SymbolsTotal(true); k++) { //--- Loop through all available symbols
               string selected_symbol = SymbolName(k, true); //--- Get the symbol name
               StringToUpper(selected_symbol);
               if (StringCompare(selected_line,selected_symbol,false) == 0){ //--- Compare the line with the symbol name
                  indicator_symbol = selected_symbol; //--- Assign the symbol if a match is found
                  Print("Line @ index ",i," SYMBOL = ",indicator_symbol); //--- Print the found symbol
               }
            }
With the new transform we can proceed to make the comparison and the results we get are as below:
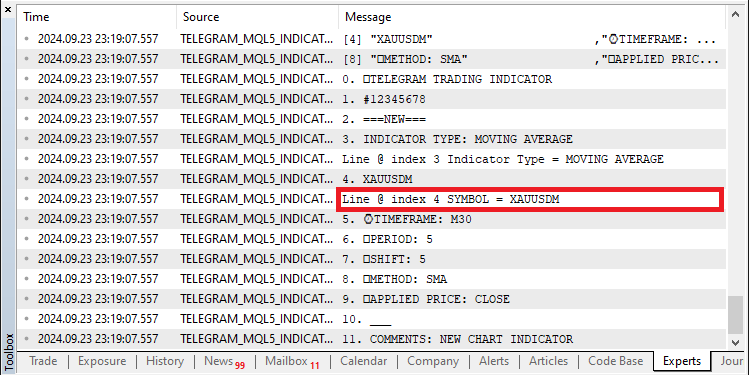
That was a success. To get the other details, we employ a similar logic.
            if (StringFind(selected_line,"TIMEFRAME") >= 0){
               indicator_timeframe = StringSubstr(selected_line,12);
               Print("Line @ index ",i," Indicator Timeframe = ",indicator_timeframe); //--- Print the extracted details
            }
            if (StringFind(selected_line,"PERIOD") >= 0){
               indicator_period = StringToInteger(StringSubstr(selected_line,9));
               Print("Line @ index ",i," Indicator Period = ",indicator_period);
            }
            if (StringFind(selected_line,"SHIFT") >= 0){
               indicator_shift = StringToInteger(StringSubstr(selected_line,8));
               Print("Line @ index ",i," Indicator Shift = ",indicator_shift);
            }
            if (StringFind(selected_line,"METHOD") >= 0){
               indicator_method = StringSubstr(selected_line,9);
               Print("Line @ index ",i," Indicator Method = ",indicator_method);
            }
            if (StringFind(selected_line,"APPLIED PRICE") >= 0){
               indicator_app_price = StringSubstr(selected_line,16);
               Print("Line @ index ",i," Indicator Applied Price = ",indicator_app_price);
            }
         }
When we run this, we get the following output.
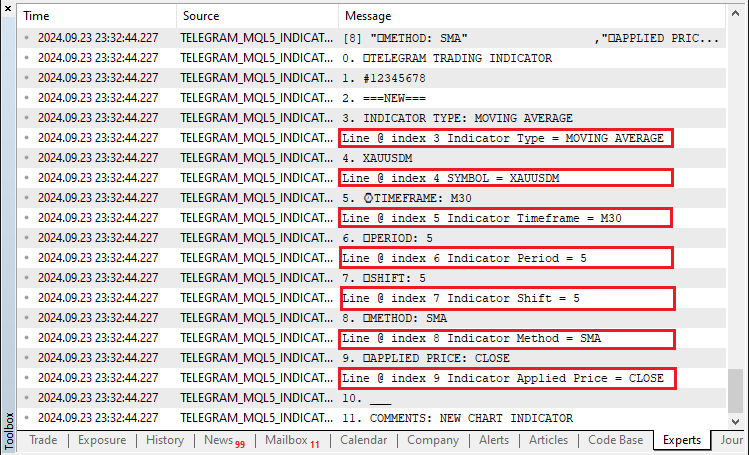
To view the data in a more structured manner, we can print all the acquired extracted information as below:
         //--- Final data
         Print("\nFINAL EXTRACTED DATA:"); //--- Print the final data for confirmation

         Print("Type = ",indicator_type);
         Print("Symbol = ",indicator_symbol);
         Print("Timeframe = ",indicator_timeframe);
         Print("Period = ",indicator_period);
         Print("Shift = ",indicator_shift);
         Print("Method = ",indicator_method);
         Print("Applied Price = ",indicator_app_price);
We print the final extracted data to confirm that the variables have been populated correctly. First, we use the "Print" function to display a header message: "\nFINAL EXTRACTED DATA:". This serves as a visual cue in the logs, marking where the processed data is about to be shown.
After that, we sequentially print the values of each of the key variables—"indicator_type", "indicator_symbol", "indicator_timeframe", "indicator_period", "indicator_shift", "indicator_method", and "indicator_app_price". Each call to Print outputs the name of the variable and its current value. This is important for debugging and verification, as it ensures that the data parsed from the user's input (e.g., the type of indicator, the symbol, the timeframe, etc.) has been accurately captured before the system proceeds with adding the indicator to the chart in MetaTrader 5. The output we get is visualized below:

Perfect! Now since we have all the necessary details required in a Moving Average indicator, we can proceed to adding it to the chart. However before we add it, we can counter-check that we have the correct indicator as instructed from Telegram. We achieve this via the use of an if statement.
         if (indicator_type=="MOVING AVERAGE"){
                //...
         }
After confirming the indicator, we then can proceed to convert the extracted inputs into their respective data type structures. Note that the current values we have are in either string or integer data types. The system will not, for example, understand that the user's moving average method "SMA" input is meant to be "SIMPLE MOVING AVERAGE" under the ENUM_MA_METHOD enumeration as below.

Thus, we need to further explain that to the program. To go systematically, we will start with the most obvious, which is the timeframe.
            //--- Convert timeframe to ENUM_TIMEFRAMES
            ENUM_TIMEFRAMES timeframe_enum = _Period;
            if (indicator_timeframe == "M1") {
               timeframe_enum = PERIOD_M1;
            } else if (indicator_timeframe == "M5") {
               timeframe_enum = PERIOD_M5;
            } else if (indicator_timeframe == "M15") {
               timeframe_enum = PERIOD_M15;
            } else if (indicator_timeframe == "M30") {
               timeframe_enum = PERIOD_M30;
            } else if (indicator_timeframe == "H1") {
               timeframe_enum = PERIOD_H1;
            } else if (indicator_timeframe == "H4") {
               timeframe_enum = PERIOD_H4;
            } else if (indicator_timeframe == "D1") {
               timeframe_enum = PERIOD_D1;
            } else if (indicator_timeframe == "W1") {
               timeframe_enum = PERIOD_W1;
            } else if (indicator_timeframe == "MN1") {
               timeframe_enum = PERIOD_MN1;
            } else {
               Print("Invalid timeframe: ", indicator_timeframe);
            }
In this section, we convert the user-provided timeframe from the extracted "indicator_timeframe" string into the corresponding MetaTrader 5 enumeration "ENUM_TIMEFRAMES." This step is crucial because MetaTrader 5 uses predefined timeframes such as "PERIOD_M1" for 1-minute charts, "PERIOD_H1" for 1-hour charts, and so on. These timeframes are defined as part of the "ENUM_TIMEFRAMES" type.
We begin by initializing the variable "timeframe_enum" to the current chart's timeframe, which is represented by _Period. This serves as a fallback default in case the user-provided timeframe is invalid.
Next, we use a series of conditional if-else statements to check the value of the "indicator_timeframe" string. Each condition compares the extracted string to known timeframe identifiers, such as "M1" (1 minute), "H1" (1 hour), etc. If a match is found, the corresponding "ENUM_TIMEFRAMES" value (like "PERIOD_M1" or "PERIOD_H1") is assigned to the "timeframe_enum" variable.
If none of the conditions match, the final else block is triggered, printing an error message to the log that indicates an "Invalid timeframe" along with the value of "indicator_timeframe." This helps to ensure that only valid timeframes are passed to MetaTrader 5 during the indicator creation process. Similarly, we transform the other variables into their respective forms.
            //--- Convert MA method to ENUM_MA_METHOD
            ENUM_MA_METHOD ma_method = MODE_SMA;
            if (indicator_method == "SMA") {
               ma_method = MODE_SMA;
            } else if (indicator_method == "EMA") {
               ma_method = MODE_EMA;
            } else if (indicator_method == "SMMA") {
               ma_method = MODE_SMMA;
            } else if (indicator_method == "LWMA") {
               ma_method = MODE_LWMA;
            } else {
               Print("Invalid MA method: ", indicator_method);
            }

            //--- Convert applied price to ENUM_APPLIED_PRICE
            ENUM_APPLIED_PRICE app_price_enum = PRICE_CLOSE;

            if (indicator_app_price == "CLOSE") {
               app_price_enum = PRICE_CLOSE;
            } else if (indicator_app_price == "OPEN") {
               app_price_enum = PRICE_OPEN;
            } else if (indicator_app_price == "HIGH") {
               app_price_enum = PRICE_HIGH;
            } else if (indicator_app_price == "LOW") {
               app_price_enum = PRICE_LOW;
            } else if (indicator_app_price == "MEDIAN") {
               app_price_enum = PRICE_MEDIAN;
            } else if (indicator_app_price == "TYPICAL") {
               app_price_enum = PRICE_TYPICAL;
            } else if (indicator_app_price == "WEIGHTED") {
               app_price_enum = PRICE_WEIGHTED;
            } else {
               Print("Invalid applied price: ", indicator_app_price);
            }
Once the transform process is done, we can now proceed to create the indicator handle which we will use to add the indicator to the chart.
int handle_ma = iMA(indicator_symbol,timeframe_enum,(int)indicator_period,(int)indicator_shift,ma_method,app_price_enum);
Here, we create a handle for the Moving Average (MA) indicator using the iMA function. This function generates an indicator handle based on the parameters we have extracted and processed earlier. The handle will allow us to reference and manipulate the indicator on the chart later in the code. We pass several arguments to the "iMA" function, each corresponding to a parameter that we have gathered from the Telegram command:
- "indicator_symbol": This specifies the financial instrument (e.g., EURUSD) for which the indicator will be applied.
- "timeframe_enum": This argument refers to the timeframe (e.g., M1 for 1 minute, H1 for 1 hour) that was previously converted from the user's input.
- "(int)indicator_period": This converts the extracted "indicator_period" from a long data type to an integer, representing the number of periods for the MA.
- "(int)indicator_shift": Similarly, this casts "indicator_shift" to an integer, defining how many bars to shift the indicator on the chart.
- "ma_method": This specifies the method of calculation for the MA, such as simple moving average (SMA) or exponential moving average (EMA), based on the user's input.
- "app_price_enum": This indicates the applied price type (e.g., close price or open price) on which the MA will be calculated.
The result of the "iMA" function is stored in the variable "handle_ma." If the function successfully creates an indicator handle, "handle_ma" will contain a valid reference. If the creation fails, it will return INVALID_HANDLE, indicating that there was an issue with one or more parameters. Since we know that INVALID HANDLE is a failure representation, we can proceed to use it for further processing.
            if (handle_ma != INVALID_HANDLE){
               Print("Successfully created the indicator handle!");

                //...

            }
            else if (handle_ma == INVALID_HANDLE){
               Print("Failed to create the indicator handle!");
            }
Here, we check whether the Moving Average (MA) indicator handle has been successfully created by verifying the value of "handle_ma." If the handle is valid, the iMA function will return a value that is not equal to INVALID_HANDLE. In that case, we print a message indicating success: "Successfully created the indicator handle!". This means that all parameters (symbol, timeframe, period, method, etc.) were correctly interpreted and the MA indicator is ready to be used on the chart.
If the handle creation fails, meaning "handle_ma" is equal to INVALID_HANDLE, we print an error message: "Failed to create the indicator handle!". This condition indicates that something went wrong during the indicator creation process—such as an invalid symbol, incorrect timeframe, or any other incorrect parameter. This error handling helps us ensure that the system can detect issues and provide informative feedback during the indicator setup process. Then we can proceed to open a chart with the specified symbol and timeframe, ensure it is synchronized with the latest data, and adjust its settings for clarity.
               long chart_id=ChartOpen(indicator_symbol,timeframe_enum);
               ChartSetInteger(ChartID(),CHART_BRING_TO_TOP,true);
               // update chart
               int wait=60;
               while(--wait>0){//decrease the value of wait by 1 before loop condition check
                  if(SeriesInfoInteger(indicator_symbol,timeframe_enum,SERIES_SYNCHRONIZED)){
                     break; // if prices up to date, terminate the loop and proceed
                  }
               }

               ChartSetInteger(chart_id,CHART_SHOW_GRID,false);
               ChartSetInteger(chart_id,CHART_SHOW_PERIOD_SEP,false);
               ChartRedraw(chart_id);

               Sleep(7000);
First, we use the ChartOpen function to open a new chart based on the "indicator_symbol" and "timeframe_enum", which we previously extracted from the Telegram command. The chart ID is returned and stored in the variable "chart_id." To bring this chart to the front in MetaTrader 5, we use the ChartSetInteger function, passing the chart ID along with the constant "CHART_BRING_TO_TOP" to ensure the chart is visible for interaction.
Next, we implement a synchronization check to make sure the price data for the chart is fully updated. This is done by looping up to 60 times using the SeriesInfoInteger function to check if the price data series is synchronized. If synchronization occurs before the loop completes, we break out early. After confirming the data is up to date, we move on to customize the chart's appearance. The grid and period separators are hidden using the ChartSetInteger function, where we pass "CHART_SHOW_GRID" and "CHART_SHOW_PERIOD_SEP" as false, creating a cleaner chart view.
After these adjustments, the chart is forced to refresh visually using the ChartRedraw function. Finally, a 7-second pause is added with the Sleep function to give the chart and data time to fully load before proceeding with any further operations. This entire process ensures that the chart is ready for interaction and display, with updated data and a clean visual setup. After all that, we can then continue to add the indicator to the chart.
               if (ChartIndicatorAdd(chart_id,0,handle_ma)) {
                  Print("SUCCESS. Indicator added to the chart.");
                  isIndicatorAddedToChart = true;
               }
               else {
                  Print("FAIL: Indicator not added to the chart.");
               }
Here, we add the previously created Moving Average (MA) indicator to the chart that we opened earlier. We achieve this by using the ChartIndicatorAdd function, where we pass the "chart_id", a zero (which indicates that we are adding the indicator to the main chart), and the "handle_ma," which represents the handle of the MA indicator we created. If the addition is successful, we print a success message stating, "SUCCESS. Indicator added to the chart", and set the boolean variable "isIndicatorAddedToChart" to true, indicating that the indicator is now active on the chart. We defined the boolean variable and initialized it to false outside the "if" statement as shown.
bool isIndicatorAddedToChart = false;
Conversely, if the addition fails, we print a failure message stating, "FAIL: Indicator not added to the chart". This check is crucial because it ensures that we can confirm whether the indicator is successfully applied to the chart, which is essential for subsequent trading operations and visual analysis. By handling both outcomes, we maintain transparency in our process and are informed about the state of the indicator on the chart. If we create and add the indicator to the chart, we can then inform the user of the success in the same code structure.
         if (isIndicatorAddedToChart){
            string message = "\nSUCCESS! THE INDICATOR WAS ADDED TO THE CHART WITH THE FOLLOWING DETAILS:\n"; //--- Prepare success message
            message += "\nType = "+indicator_type+"\n";
            message += "Symbol = "+indicator_symbol+"\n";
            message += "Timeframe = "+indicator_timeframe+"\n";
            message += "Period = "+IntegerToString(indicator_period)+"\n";
            message += "Shift = "+IntegerToString(indicator_shift)+"\n";
            message += "Applied Price = "+indicator_app_price+"\n";
            message+="\nHAPPY TRADING!"; //--- Add final message line
            Print(message); //--- Print the message in the terminal
            sendMessageToTelegram(chat.member_id,message,NULL); //--- Send the success message to Telegram
         }
Here, we check if the indicator was successfully added to the chart by evaluating the boolean variable "isIndicatorAddedToChart." If this condition is true, we proceed to prepare a success message that details the indicator's configuration. We start by initializing a string variable named "message" with a success message header: "\nSUCCESS! THE INDICATOR WAS ADDED TO THE CHART WITH THE FOLLOWING DETAILS:\n". We then concatenate various pieces of information about the indicator, including its type, symbol, timeframe, period, shift, and applied price. For the numeric values, we use the IntegerToString function to ensure they are converted to string format for proper concatenation.
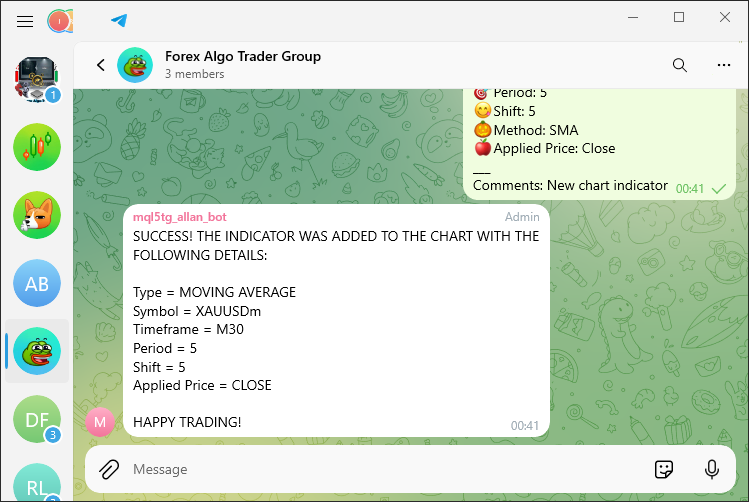
After compiling all this information, we add a final line to the message, stating "\nHAPPY TRADING!" to convey a positive sentiment. We then use the Print function to output the complete message to the terminal, providing a clear confirmation of the indicator's addition and its details. Finally, we call the "sendMessageToTelegram" function to send the same success message to Telegram, ensuring that the relevant chat, identified by "chat.member_id," is notified about the successful operation. When we run this we get the following output.
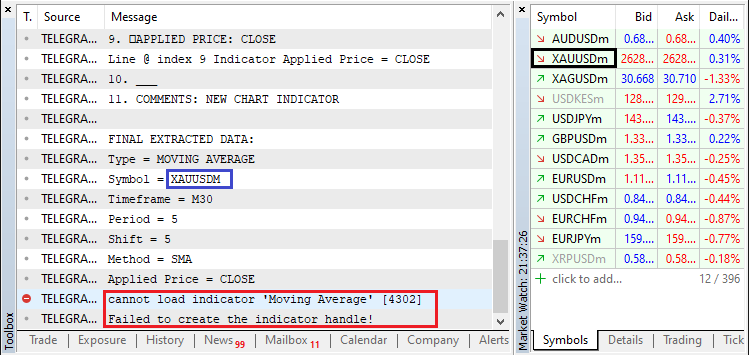
We can see that despite having the symbol in the market watch, we still return an error message. That is because we interfered with the correct structure of the symbol name by transforming everything to uppercase. To get back the correct structure while still maintaining the correct symbol interpretation and comparison, we can use a vast full of options but the easiest one is directly appending the initial symbol name back to the holder variable as shown.
            //--- Check for symbol in the list of available symbols and assign it
            for(int k = 0; k < SymbolsTotal(true); k++) { //--- Loop through all available symbols
               string selected_symbol = SymbolName(k, true); //--- Get the symbol name
               StringToUpper(selected_symbol);
               if (StringCompare(selected_line,selected_symbol,false) == 0){ //--- Compare the line with the symbol name
                  indicator_symbol = SymbolName(k, true); //--- Assign the symbol if a match is found
                  Print("Line @ index ",i," SYMBOL = ",indicator_symbol); //--- Print the found symbol
               }
            }
The only change that happened in the snippet is shown and highlighted in yellow color. When we re-run, we get the correct output as below:
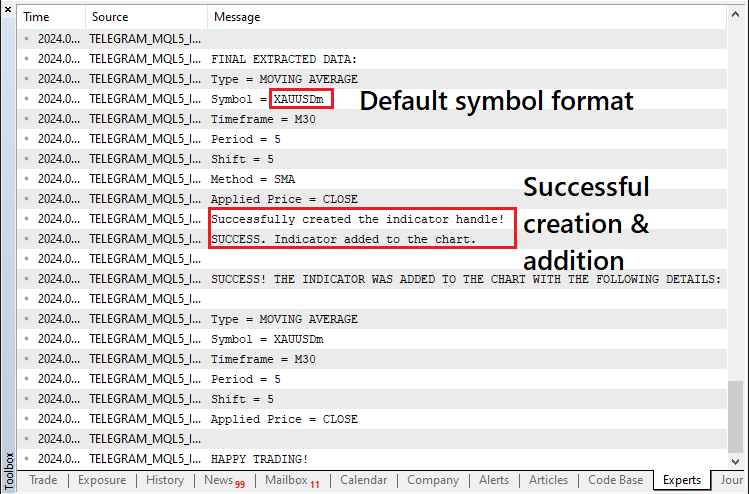
Up to this point, we have successfully added the indicator to the chart. On Telegram, we get the success response as visualized below:
On the trading terminal, a new chart is opened and the indicator is added. Below is a visual confirmation.
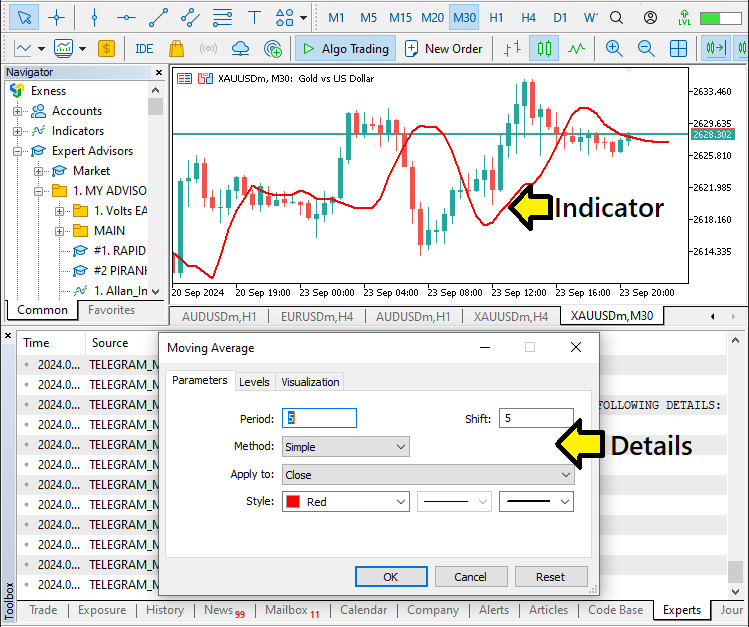
Up to this point, we can say that we achieved our objective of automatically adding Moving Average technical indicators to the charts. A similar methodology can be applied to other indicators, such as the Awesome Oscillator. By following the same format for identifying the command, extracting relevant parameters, and executing the addition of the indicator, we can seamlessly integrate various indicators into our trading system, maintaining consistency and efficiency throughout the implementation. We however need to test the implementation and confirm that everything works fine. This is done in the next section.
Testing the Indicator Trading System
In this section, we will focus on validating the functionality of our Indicator Trading System. Testing involves verifying that the indicators are correctly configured and respond appropriately to the commands received from Telegram. We will examine the process of adding indicators to the chart, ensuring that all parameters are accurately set and that the indicators are displayed correctly on the charts.
To provide a clear view of this process, we have included a video demonstrating the setup and configuration of indicators in MetaTrader 5, more particularly Moving Average, highlighting how the system functions and confirming its readiness for real trading scenarios, as below.
Conclusion
In conclusion, in this article, we have demonstrated how to parse and process indicator commands received via Telegram to automate the addition of indicators to your MetaTrader 5 charts. By implementing these techniques, we have streamlined the process, enhancing trading efficiency and reducing the potential for human error.
With the knowledge gained from this implementation, you are equipped to develop more sophisticated systems that incorporate additional indicators and commands. This foundation will empower you to refine your trading strategies, adapt to changing market conditions, and ultimately improve your trading performance. We do hope you found the article easy to understand and that it provided the insights needed to enhance your trading systems. Should you have any questions or need further clarification, feel free to explore additional resources or experiment with the concepts shared through this series. Happy trading!
Warning: All rights to these materials are reserved by MetaQuotes Ltd. Copying or reprinting of these materials in whole or in part is prohibited.
This article was written by a user of the site and reflects their personal views. MetaQuotes Ltd is not responsible for the accuracy of the information presented, nor for any consequences resulting from the use of the solutions, strategies or recommendations described.
 HTTP and Connexus (Part 2): Understanding HTTP Architecture and Library Design
 Building A Candlestick Trend Constraint Model (Part 9): Multiple Strategies Expert Advisor (I)
 Risk manager for algorithmic trading
 Example of new Indicator and Conditional LSTM
- Free trading apps
- Over 8,000 signals for copying
- Economic news for exploring financial markets
You agree to website policy and terms of use