
Using cloud storage services for data exchange between terminals
Introduction
Cloud technologies are becoming more popular in the modern world. We are able to use paid or free storage services of various sizes. But is it possible to use them in practical trading? This article proposes a technology for exchanging data between terminals using cloud storage services.
You may ask, why we need a cloud storage for this when we already have solutions for a direct connection between terminals. But I think, this approach has a number of advantages. First, a provider remains anonymous: users get access to a cloud server instead of the provider's PC. Thus, the provider's computer is protected from virus attacks, and it does not have to be permanently connected to the internet. It should connect only to send messages to the server. Second, a cloud may contain virtually unlimited number of providers. And third, as their number of users increases, providers do not have to improve their computing capacities.
Let's use the free cloud storage of 15 GB provided by Google as an example. This is more than enough for our objectives.
1. A bit of theory
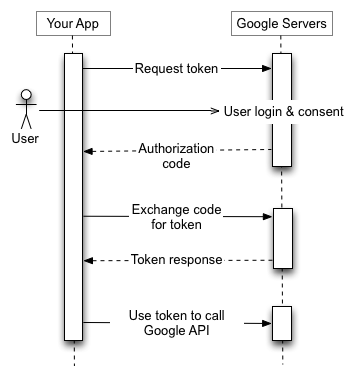
Authorization in Google Drive is arranged via the OAuth 2.0 protocol. This is an open authorization protocol that allows third-party applications and websites to have limited access to protected resources of authorized users without the need to pass credentials. The basic OAuth 2.0 access scenario consists of 4 stages.
- First, you need to get data for authorization (client's ID and secret). These data are generated by the website and, accordingly, are known to the site and the application.
- Before the application can access the personal data, it should receive an access token. One such token can provide different access levels defined by the 'scope' variable. When the access token is requested, the application can send one or more values in the 'scope' parameter. To create this request, the application can use the system browser and web service requests. Some requests require an authentication step, at which users log in with their account. After logging in, users are asked if they are ready to grant permissions requested by the application. The process is called the user consent. If the user grants consent, the authorization server provides the application the authorization code allowing the application to get the access token. If the user does not grant permission, the server returns an error.
- After the application receives the access token, it sends it in the HTTP authorization header. Access points are only valid for the set of operations and resources described in the request's 'scope' parameter. For example, if the access token for Google Drive has been released, it does not provide access to Google contacts. However, the application can send this access token to Google Drive several times to perform allowed operations.
- Tokens have a limited lifespan. If an application needs access after the access token has expired, it can receive an update token that allows the application to receive new access tokens.
2. Arranging access to Google Drive
To work with Google Drive, we need a Google account.
Before developing the application code, let's perform the preparatory work on Google website. To do this, go to the developers console (log in to your account again to access it).
Create a new project for the application. Go to the project panel ("Select a project" button or Ctrl + O). Create a new project (+).
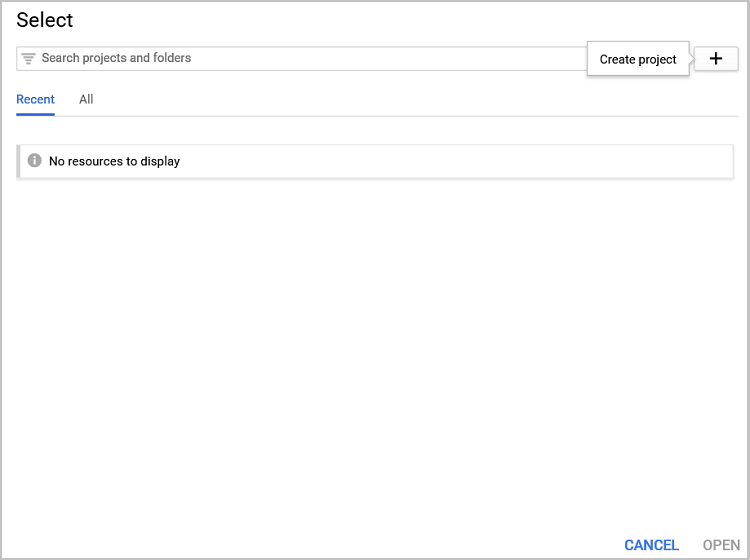
In the newly opened page, set the project name, agree with the terms of use and confirm creation.

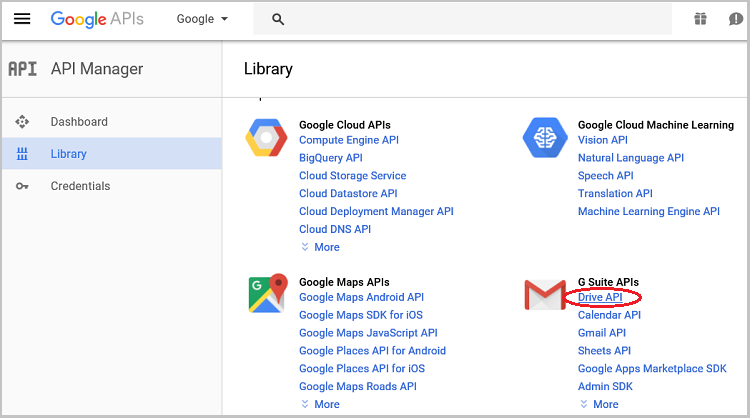
Select the new project from the panel and connect Google Drive API to it. To do this, select Drive API in the manager's API library and activate the API on a new page by clicking Enable.
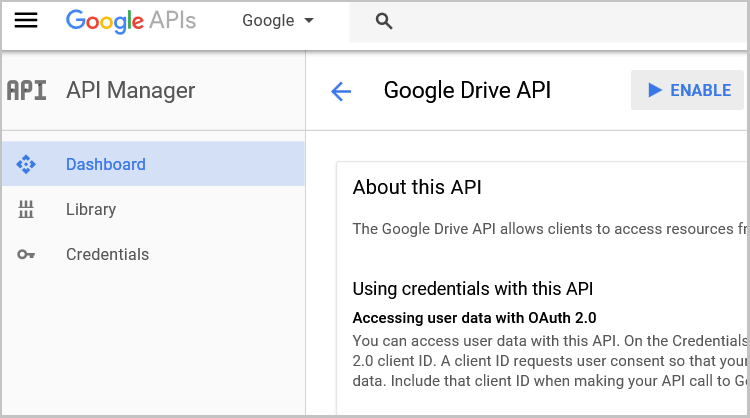
The new page prompts us to create credentials to use the API. Click "Create credentials" to do that.

Google console offers the wizard for selecting the authentication type, but we do not need it. Click "client ID". Next, Google again warns us of the need to configure the access confirmation page. Click "Configure consent screen" to do this.

In the newly opened page, leave all fields as default, filling only "Product name shown to users". Next, set the application type as "Other", specify the client name and click "Create". The service generates "client ID" and "client secret" codes. You can copy them but this is not necessary: you can download them as a json file. Click "Ok" and download the json file with data for accessing the local disk.
After that, our preparatory work on the service side is complete and we can start developing our applications.
3. Creating a bridge between local applications and Google Drive
To solve this task, I have developed a separate program (a kind of a bridge) that receives requests and data from a MetaTrader EA or indicator, processes them, interacts with Google Drive and returns data back to MetaTrader applications. The advantage of this approach, is, first, that Google provides libraries for working with Google Drive on C#. This greatly facilitates the development. Second, using a third-party application saves the terminal from "resource consuming" exchange operations with an external service. Third, this unbinds our application from the platform and makes it cross-platform with the ability to work with both MetaTrader 4 and MetaTrader 5 applications.
As I said earlier, the bridge application is to be developed in C# using Google libraries. Let's create the Windows Form project in VisualStudio and add the Google.Apis.Drive.v3 library to it using NuGet.
Next, let's create the GoogleDriveClass class to work with Google Drive:
class GoogleDriveClass
    {
        static string[] Scopes = { DriveService.Scope.DriveFile };  //Array for working with class
        static string ApplicationName = "Google Drive Bridge";      //Application name
        public static UserCredential credential = null;             //Authorization keys
        public static string extension = ".gdb";                    //Extension for saved files
    }
First, let's create the function for logging in to the service. It is to apply the previously saved json file with access codes. In my case, it is "client-secret.json". If you have saved a file under a different name, specify it in the function code. After loading the log in data, the asynchronous authorization function on the service is called. In case of a successful log in, the token is saved in the credential object for later access. When working in C#, do not forget about processing exceptions: in case of an exception, the credential object is reset.
        public bool Authorize()
        {
            using (System.IO.FileStream stream =
                     new System.IO.FileStream("client-secret.json", System.IO.FileMode.Open, System.IO.FileAccess.Read))
            {
                try
                {
                    string credPath = System.Environment.CurrentDirectory.ToString();
                    credPath = System.IO.Path.Combine(credPath, "drive-bridge.json");

                    credential = GoogleWebAuthorizationBroker.AuthorizeAsync(
                        GoogleClientSecrets.Load(stream).Secrets,
                        GoogleDriveClass.Scopes,
                        "example.bridge@gmail.com",
                        CancellationToken.None,
                        new FileDataStore(credPath, true)).Result;
                }
                catch (Exception)
                {
                    credential = null;
                }

            }
            return (credential != null);
        }
When working with Google Drive, our "bridge" should perform two functions: writing data to disk and reading the necessary file from it. Let us consider them in more detail. To implement such seemingly simple functions, we need to write a number of procedures. The reason is that the Google Drive file system is different from the one we are accustomed to. Here, the names and file extensions exist as separate entries only to maintain the customary presentation. In fact, when saving, each file is assigned a unique ID, under which it is stored. Thus, users can save an unlimited number of files with the same name and extension. Therefore, before accessing the file, we need to know its cloud store ID. To do this, load the list of all files on the disk and compare their names one-by-one with the specified one.
The GetFileList function is responsible for obtaining the file list. It returns the Google.Apis.Drive.v3.Data.File class list. Let's use the Google.Apis.Drive.v3.DriveService class from the previously downloaded libraries to receive the file list from Google Drive. When initializing the class, we pass to it the token obtained when logging in together with our project name. The resulting list is stored in the returned result variable. In case of exceptions, the variable is reset to zero. The file list is requested and processed as the necessity arises in other functions of our application.
using File = Google.Apis.Drive.v3.Data.File;
        public IList<File> GetFileList()
        {
            IList<File> result = null;
            if (credential == null)
                this.Authorize();
            if (credential == null)
            {
                return result;
            }
            // Create Drive API service.
            using (Google.Apis.Drive.v3.DriveService service = new Google.Apis.Drive.v3.DriveService(new BaseClientService.Initializer()
            {
                HttpClientInitializer = credential,
                ApplicationName = ApplicationName,
            }))
            {
                try
                {
                    // Define parameters of request.
                    FilesResource.ListRequest listRequest = service.Files.List();
                    listRequest.PageSize = 1000;
                    listRequest.Fields = "nextPageToken, files(id, name, size)";

                    // List files.
                    result = listRequest.Execute().Files;
                }
                catch (Exception)
                {
                    return null;
                }
            }
            return result;
        }
3.1. Writing data to the cloud storage
Create the FileCreate function to write a file to the cloud storage. The function input parameters are the file name and contents. It is to return the logical value of the operation result and file ID on the disk in case it has been successfully created. The already familiar Google.Apis.Drive.v3.DriveService class is to be responsible for creating the file, while the Google.Apis.Drive.v3.FilesResource.CreateMediaUpload class is to be used to send a request. In the file parameters, we indicate that this is to be a simple text file and give permission to copy it.
       public bool FileCreate(string name, string value, out string id)
        {
            bool result = false;
            id = null;
            if (credential == null)
                this.Authorize();
            if (credential == null)
            {
                return result;
            }
            using (var service = new Google.Apis.Drive.v3.DriveService(new BaseClientService.Initializer()
            {
                HttpClientInitializer = credential,
                ApplicationName = ApplicationName,
            }))

            {
                var body = new File();
                body.Name = name;
                body.MimeType = "text/json";
                body.ViewersCanCopyContent = true;

                byte[] byteArray = Encoding.Default.GetBytes(value);
                using (var stream = new System.IO.MemoryStream(byteArray))
                {
                    Google.Apis.Drive.v3.FilesResource.CreateMediaUpload request = service.Files.Create(body, stream, body.MimeType);
                    if (request.Upload().Exception == null)
                    { id = request.ResponseBody.Id; result = true; }
                }
            }
            return result;
        }
The next step after creating the file is the update function. Let's recall the objectives of our application and the features of the Google Drive file system. We are developing the application for exchanging data between several terminals located on different PCs. We do not know at what time and to how many terminals our information is required. But the features of the cloud file system allow us to create several files with the same names and extensions. This enables us to first create a new file with new data and delete the obsolete data from the cloud storage afterwards. This is what the FileUpdate function does. Its input parameters are the name of the file and its contents, and it returns a logical value of the operation result.
At the beginning of the function, we declare the new_id text variable and call the previously created FileCreate function which in turn creates a new data file in the cloud and returns the new file ID to our variable.
Then we get the list of all files in the cloud from the GetFileList function and compare them with the name and ID of the newly created file one-by-one. All unnecessary duplicates are removed from the storage. Here we again use the already known Google.Apis.Drive.v3.DriveService class, while requests are sent using the Google.Apis.Drive.v3.FilesResource.DeleteRequest class.
        public bool FileUpdate(string name, string value)
        {
            bool result = false;
            if (credential == null)
                this.Authorize();
            if (credential == null)
            {
                return result;
            }

            string new_id;
            if (FileCreate(name, value, out new_id))
            {
                IList<File> files = GetFileList();
                if (files != null && files.Count > 0)
                {
                    result = true;
                    try
                    {
                        using (var service = new DriveService(new BaseClientService.Initializer()
                        {
                            HttpClientInitializer = credential,
                            ApplicationName = ApplicationName,
                        }))
                        {
                            foreach (var file in files)
                            {
                                if (file.Name == name && file.Id != new_id)
                                {
                                    try
                                    {
                                        Google.Apis.Drive.v3.FilesResource.DeleteRequest request = service.Files.Delete(file.Id);
                                        string res = request.Execute();
                                    }
                                    catch (Exception)
                                    {
                                        continue;
                                    }
                                }
                            }
                        }
                    }
                    catch (Exception)
                    {
                        return result;
                    }
                }
            }
            return result;
        }
3.2. Reading data from the cloud storage
We have already created functions for writing data to the cloud storage. Now it is time to read them back. As we remember, before downloading the file, we need to get its ID in the cloud. This is the objective of the GetFileID function. Its input parameter is a name of the necessary file, while the return value is its ID. The logical construction of the function is simple: we receive the list of files from the GetFileList function and look for the first file with the necessary name simply by sorting files. Most likely, it will be the oldest file. There is a risk that just at this time, a new file with the necessary parameters is saved or an error occurs during its download. Let's accept these risks in order to obtain complete data. The latest changes are downloaded during the next update. As we remember, all unnecessary duplicates are removed from the FileUpdate function after a new data file is created.
        public string GetFileId(string name)
        {
            string result = null;
            IList<File> files = GetFileList();

            if (files != null && files.Count > 0)
            {
                foreach (var file in files)
                {
                    if (file.Name == name)
                    {
                        result = file.Id;
                        break;
                    }
                }
            }
            return result;
        }
After obtaining the file ID, we are able to retrieve from it the data we need. To do this, we need the FileRead function, to which the necessary file ID is passed, while the function returns its contents. If unsuccessful, the function returns an empty string. As before, we need the Google.Apis.Drive.v3.DriveService class to create a connection and the Google.Apis.Drive.v3.FilesResource.GetRequest class to create a request.
        public string FileRead(string id)
        {
            if (String.IsNullOrEmpty(id))
            {
                return ("Errore. File not found");
            }
            bool result = false;
            string value = null;
            if (credential == null)
                this.Authorize();
            if (credential != null)
            {
                using (var service = new DriveService(new BaseClientService.Initializer()
                {
                    HttpClientInitializer = credential,
                    ApplicationName = ApplicationName,
                }))
                {
                    Google.Apis.Drive.v3.FilesResource.GetRequest request = service.Files.Get(id);
                    using (var stream = new MemoryStream())
                    {
                        request.MediaDownloader.ProgressChanged += (IDownloadProgress progress) =>
                        {
                            if (progress.Status == DownloadStatus.Completed)
                                result = true;
                        };
                        request.Download(stream);

                        if (result)
                        {
                            int start = 0;
                            int count = (int)stream.Length;
                            value = Encoding.Default.GetString(stream.GetBuffer(), start, count);
                        }
                    }
                }
            }
            return value;
        }
3.3. Creating a block of interaction with terminal applications
Now that we have connected our application to the Google Drive cloud storage, it is time to connect it to MetaTrader applications as well. After all, this is its main objective. I decided to establish this connection using named pipes. Working with them has already been described on the website, and MQL5 language already features the CFilePipe class for working with this connection type. This will make our work easier when creating applications.
The terminal allows launching multiple applications. Therefore, our "bridge" should be able to handle several connections at the same time. Let's use the asynchronous multi-threaded programming model for that.
We should define the format of messages transmitted between the bridge and the application. To read a file from the cloud, we should pass the command and the file name. To write a file to the cloud, we should send the command, the file name and its contents. Since the data is transmitted as a single thread in the pipe, it is reasonable to pass the entire information in a single string. I apply ";" as a field separator in the string.
First, let's declare the global variables:
- Drive — previously created class for working with a cloud storage;
- numThreads — set the number of simultaneous threads;
- pipeName — string variable storing the name of our pipes;
- servers — array of operational threads.
        GoogleDriveClass Drive = new GoogleDriveClass();
        private static int numThreads = 10;
        private static string pipeName = "GoogleBridge";
        static Thread[] servers;
Create the function for launching the PipesCreate operational threads. In this function, we initialize the array of our threads and launch them in a loop. When launching each thread, the ServerThread function is called to initialize the functions in our threads.
        public void PipesCreate()
        {
            int i;
            servers = new Thread[numThreads];

            for (i = 0; i < numThreads; i++)
            {
                servers[i] = new Thread(ServerThread);
                servers[i].Start();
            }
        }
Also, a named pipe is created and the asynchronous function of waiting for a client connection to the pipe is launched at the start of each thread. When connecting the client to the pipe, the Connected function is called. To achieve this, we create the AsyncCallback asyn_connected delegate. If an exception occurs, the thread is restarted.
        private void ServerThread()
        {
            NamedPipeServerStream pipeServer =
                new NamedPipeServerStream(pipeName, PipeDirection.InOut, numThreads, PipeTransmissionMode.Message, PipeOptions.Asynchronous);

            int threadId = Thread.CurrentThread.ManagedThreadId;
            // Wait for a client to connect
            AsyncCallback asyn_connected = new AsyncCallback(Connected);
            try
            {
                pipeServer.BeginWaitForConnection(asyn_connected, pipeServer);
            }
            catch (Exception)
            {
                servers[threadId].Suspend();
                servers[threadId].Start();
            }
        }
When a client connects to a named pipe, we check the state of the pipe and, in case of an exception, restart the thread. If the connection is stable, we start the function of reading the request from the application. If the reading function returns false, restart the connection.
        private void Connected(IAsyncResult pipe)
        {
            if (!pipe.IsCompleted)
                return;
            bool exit = false;
            try
            {
                NamedPipeServerStream pipeServer = (NamedPipeServerStream)pipe.AsyncState;
                try
                {
                    if (!pipeServer.IsConnected)
                        pipeServer.WaitForConnection();
                }
                catch (IOException)
                {
                    AsyncCallback asyn_connected = new AsyncCallback(Connected);
                    pipeServer.Dispose();
                    pipeServer = new NamedPipeServerStream(pipeName, PipeDirection.InOut, numThreads, PipeTransmissionMode.Message, PipeOptions.Asynchronous);
                    pipeServer.BeginWaitForConnection(asyn_connected, pipeServer);
                    return;
                }
                while (!exit && pipeServer.IsConnected)
                {
                    // Read the request from the client. Once the client has
                    // written to the pipe its security token will be available.

                    while (pipeServer.IsConnected)
                    {
                        if (!ReadMessage(pipeServer))
                        {
                            exit = true;
                            break;
                        }
                    }
                    //Wait for a client to connect
                    AsyncCallback asyn_connected = new AsyncCallback(Connected);
                    pipeServer.Disconnect();
                    pipeServer.BeginWaitForConnection(asyn_connected, pipeServer);
                    break;
                }
            }
            finally
            {
                exit = true;
            }
        }
The ReadMessage function reads and processes the request from applications. A reference to the thread object is passed to the function as a parameter. The result of the function is the logical value of the operation. First, the function reads the application request from the named pipe and divides it into fields. Then it recognizes the command and performs the necessary actions.
The function features three commands:
- Close — close the current connection;
- Read — read the file from the cloud;
- Write — write the file to the cloud.
To close the current connection, the function should simply return false. The Connected function that called it does all the rest.
To execute the file read request, we should define the file ID and read its contents using the GetFileID and FileRead functions described above.
After executing the file write function, call the previously created FileUpdate function.
Of course, do not forget about exception handling. In case of an exception, log in to Google again.
        private bool ReadMessage(PipeStream pipe)
        {
            if (!pipe.IsConnected)
                return false;

            byte[] arr_read = new byte[1024];
            string message = null;
            int length;
            do
            {
                length = pipe.Read(arr_read, 0, 1024);
                if (length > 0)
                    message += Encoding.Default.GetString(arr_read, 0, length);
            } while (length >= 1024 && pipe.IsConnected);
            if (message == null)
                return true;

            if (message.Trim() == "Close\0")
                return false;

            string result = null;
            string[] separates = { ";" };
            string[] arr_message = message.Split(separates, StringSplitOptions.RemoveEmptyEntries);
            if (arr_message[0].Trim() == "Read")
            {
                try
                {
                    result = Drive.FileRead(Drive.GetFileId(arr_message[1].Trim() + GoogleDriveClass.extension));
                }
                catch (Exception e)
                {
                    result = "Error " + e.ToString();
                    Drive.Authorize();
                }
                return WriteMessage(pipe, result);
            }

            if (arr_message[0].Trim() == "Write")
            {
                try
                {
                    result = (Drive.FileUpdate(arr_message[1].Trim() + GoogleDriveClass.extension, arr_message[2].Trim()) ? "Ok" : "Error");
                }
                catch (Exception e)
                {
                    result = "Error " + e.ToString();
                    Drive.Authorize();
                }

                return WriteMessage(pipe, result);
            }
            return true;
        }
After processing the requests, we should return the result of the operation to the application. Let's create the WriteMessage function. Its parameters are a reference to the object of the current named pipe and a message sent to the application. The function returns the logical value about the operation result.
        private bool WriteMessage(PipeStream pipe, string message)
        {
            if (!pipe.IsConnected)
                return false;
            if (message == null || message.Count() == 0)
                message = "Empty";
            byte[] arr_bytes = Encoding.Default.GetBytes(message);
            try
            {
                pipe.Flush();
                pipe.Write(arr_bytes, 0, arr_bytes.Count());
                pipe.Flush();
            }
            catch (IOException)
            {
                return false;
            }
            return true;
        }
Now that we have described all the necessary functions, it is time to run the PipesCreate function. I created the Windows Form project, so I run this function from the Form1 function.
        public Form1()
        {
            InitializeComponent();
            PipesCreate();
        }
All we have to do now is re-compile the project and copy the json file with the cloud storage access data to the application folder.
4. Create MetaTrader applications
Let us turn to practical application of our program. First, I suggest that you write a program for copying simple graphical objects.
4.1. Class for working with graphical objects
What object data should we pass in order to recreate it on another chart? Probably, these should be the object type and its name for identification. We will also need the object color and its coordinates. The first question is how many coordinates we should pass and what their values are. For example, when passing a data on a vertical line, it is enough to pass a date. When dealing with a horizontal line, we should pass a price. For a trend line, we need two pairs of coordinates — date, price and line direction (right/left). Different objects have both common and unique parameters. However, in MQL5, all objects are created and changed using four functions: ObjectCreate, ObjectSetInteger, ObjectSetDouble and ObjectSetString. We will follow the same path and pass the parameter type, property and value.
Let's create the enumeration of the parameter types.
enum ENUM_SET_TYPE
  {
   ENUM_SET_TYPE_INTEGER=0,
   ENUM_SET_TYPE_DOUBLE=1,
   ENUM_SET_TYPE_STRING=2
  };
Create the CCopyObject class for processing the object data. A string parameter is passed to it during initialization. Subsequently, it identifies the objects created by our class on the chart. We will save this value to the s_ObjectsID class variable.
class CCopyObject
  {
private:
   string            s_ObjectsID;

public:
                     CCopyObject(string objectsID="CopyObjects");
                    ~CCopyObject();
  };
//+------------------------------------------------------------------+
//|                                                                  |
//+------------------------------------------------------------------+
CCopyObject::CCopyObject(string objectsID="CopyObjects")
  {
   s_ObjectsID = (objectsID==NULL || objectsID=="" ? "CopyObjects" : objectsID);
  }
4.1.1. Block of functions for collecting the object data
Create the CreateMessage function. Its parameter is the ID of the necessary chart. The function returns a text value to be sent to the cloud storage containing the list of the object parameters and their values. The returned string should be structured so that this data can then be read. Let's agree that the data on each object is put in curly brackets, the "|" sign is used as a separator between the parameters and the "=" sign separates the parameter and its value. At the beginning of the description of each object, its name and type are indicated, and the object description function corresponding to its type is called afterwards.
string CCopyObject::CreateMessage(long chart)
  {
   string result = NULL;
   int total = ObjectsTotal(chart, 0);
   for(int i=0;i<total;i++)
     {
      string name = ObjectName(chart, i, 0);
      switch((ENUM_OBJECT)ObjectGetInteger(chart,name,OBJPROP_TYPE))
        {
         case OBJ_HLINE:
           result+="{NAME="+name+"|TYPE="+IntegerToString(OBJ_HLINE)+"|"+HLineToString(chart, name)+"}";
           break;
         case OBJ_VLINE:
           result+="{NAME="+name+"|TYPE="+IntegerToString(OBJ_VLINE)+"|"+VLineToString(chart, name)+"}";
           break;
         case OBJ_TREND:
           result+="{NAME="+name+"|TYPE="+IntegerToString(OBJ_TREND)+"|"+TrendToString(chart, name)+"}";
           break;
         case OBJ_RECTANGLE:
           result+="{NAME="+name+"|TYPE="+IntegerToString(OBJ_RECTANGLE)+"|"+RectangleToString(chart, name)+"}";
           break;
        }
     }
   return result;
  }
For example, the HLineToString function is called to describe a horizontal line. Chart ID and object name are used as its parameters. The function is to return the structured string with the object parameter. For example, for a horizontal line, the passed parameters are price, color, line width and whether the line is displayed in front of the chart or in the background. Do not forget to set the parameter type from the previously created enumeration before the parameter property.
string CCopyObject::HLineToString(long chart,string name)
  {
   string result = NULL;
   if(ObjectFind(chart,name)!=0)
      return result;

   result+=IntegerToString(ENUM_SET_TYPE_DOUBLE)+"="+IntegerToString(OBJPROP_PRICE)+"=0="+DoubleToString(ObjectGetDouble(chart,name,OBJPROP_PRICE,0))+"|";
   result+=IntegerToString(ENUM_SET_TYPE_INTEGER)+"="+IntegerToString(OBJPROP_COLOR)+"=0="+IntegerToString(ObjectGetInteger(chart,name,OBJPROP_COLOR,0))+"|";
   result+=IntegerToString(ENUM_SET_TYPE_INTEGER)+"="+IntegerToString(OBJPROP_STYLE)+"=0="+IntegerToString(ObjectGetInteger(chart,name,OBJPROP_STYLE,0))+"|";
   result+=IntegerToString(ENUM_SET_TYPE_INTEGER)+"="+IntegerToString(OBJPROP_BACK)+"=0="+IntegerToString(ObjectGetInteger(chart,name,OBJPROP_BACK,0))+"|";
   result+=IntegerToString(ENUM_SET_TYPE_INTEGER)+"="+IntegerToString(OBJPROP_WIDTH)+"=0="+IntegerToString(ObjectGetInteger(chart,name,OBJPROP_WIDTH,0))+"|";
   result+=IntegerToString(ENUM_SET_TYPE_STRING)+"="+IntegerToString(OBJPROP_TEXT)+"=0="+ObjectGetString(chart,name,OBJPROP_TEXT,0)+"|";
   result+=IntegerToString(ENUM_SET_TYPE_STRING)+"="+IntegerToString(OBJPROP_TOOLTIP)+"=0="+ObjectGetString(chart,name,OBJPROP_TOOLTIP,0);
   return result;
  }
Similarly, create the functions for describing other object types. In my case, these are VLineToString for a vertical line, TrendToString for a trend line and RectangleToString for a rectangle. The codes of these functions can be found in the attached class code.
4.1.2. Function for plotting objects on a chart
We have created the function for data collection. Now, let's develop the function that reads the messages and plots objects on the chart: DrawObjects. Its parameters are the chart ID and a received message. The function returns the logical value of the operation execution.
The function algorithm includes several stages:
-
dividing a string message into an array of strings by objects;
-
dividing each object array element into the array of parameters;
-
look for the name and the object type in the array of parameters. Add our ID to the name;
-
looking for an object with the obtained name on the chart; if the object is not in the main subwindow or its type is different from the one specified in the message, it is removed;
-
creating a new object on the chart if there is no object yet or it has been removed at the previous stage;
-
transfer the object properties received in the message to the object on our chart (using the additional CopySettingsToObject function);
-
remove unnecessary objects from the chart (performed by the additional DeleteExtraObjects function).
bool CCopyObject::DrawObjects(long chart,string message)
  {
   //--- Split message to objects
   StringTrimLeft(message);
   StringTrimRight(message);
   if(message==NULL || StringLen(message)<=0)
      return false;
   StringReplace(message,"{","");
   string objects[];
   if(StringSplit(message,'}',objects)<=0)
      return false;
   int total=ArraySize(objects);
   SObject Objects[];
   if(ArrayResize(Objects,total)<0)
      return false;

   //--- Split every object message to settings
   for(int i=0;i<total;i++)
     {
      string settings[];
      int total_settings=StringSplit(objects[i],'|',settings);
      //--- Search name and type of object
      int set=0;
      while(set<total_settings && Objects[i].name==NULL && Objects[i].type==-1)
        {
         string param[];
         if(StringSplit(settings[set],'=',param)<=1)
           {
            set++;
            continue;
           }
         string temp=param[0];
         StringTrimLeft(temp);
         StringTrimRight(temp);
         if(temp=="NAME")
           {
            Objects[i].name=param[1];
            StringTrimLeft(Objects[i].name);
            StringTrimRight(Objects[i].name);
            Objects[i].name=s_ObjectsID+Objects[i].name;
           }
         if(temp=="TYPE")
            Objects[i].type=(int)StringToInteger(param[1]);
         set++;
        }
      //--- if name or type of object not found go to next object
      if(Objects[i].name==NULL || Objects[i].type==-1)
         continue;
      //--- Search object on chart
      int subwindow=ObjectFind(chart,Objects[i].name);
      //--- if object found on chat but it not in main subwindow or its type is different we delete this oject from chart
      if(subwindow>0 || (subwindow==0 && ObjectGetInteger(chart,Objects[i].name,OBJPROP_TYPE)!=Objects[i].type))
        {
         if(!ObjectDelete(chart,Objects[i].name))
            continue;
         subwindow=-1;
        }
      //--- if object doesn't found create it on chart
      if(subwindow<0)
        {
         if(!ObjectCreate(chart,Objects[i].name,(ENUM_OBJECT)Objects[i].type,0,0,0))
            continue;
         ObjectSetInteger(chart,Objects[i].name,OBJPROP_HIDDEN,true);
         ObjectSetInteger(chart,Objects[i].name,OBJPROP_SELECTABLE,false);
         ObjectSetInteger(chart,Objects[i].name,OBJPROP_SELECTED,false);
        }
      //---
      CopySettingsToObject(chart,Objects[i].name,settings);
     }
   //---
   DeleteExtraObjects(chart,Objects);
   return true;
  }
The function of assigning properties received in a message to a chart object is universal and applicable to any object types. The chart ID, the object name and a string array of parameters are passed to it as parameters. Each array element is divided into an operation type, a property, a modifier and a value. The obtained values are assigned to the object through a function corresponding to the type of operation.
bool CCopyObject::CopySettingsToObject(long chart,string name,string &settings[])
  {
   int total_settings=ArraySize(settings);
   if(total_settings<=0)
      return false;

   for(int i=0;i<total_settings;i++)
     {
      string setting[];
      int total=StringSplit(settings[i],'=',setting);
      if(total<3)
         continue;
      switch((ENUM_SET_TYPE)StringToInteger(setting[0]))
        {
         case ENUM_SET_TYPE_INTEGER:
           ObjectSetInteger(chart,name,(ENUM_OBJECT_PROPERTY_INTEGER)StringToInteger(setting[1]),(int)(total==3 ? 0 : StringToInteger(setting[2])),StringToInteger(setting[total-1]));
           break;
         case ENUM_SET_TYPE_DOUBLE:
           ObjectSetDouble(chart,name,(ENUM_OBJECT_PROPERTY_DOUBLE)StringToInteger(setting[1]),(int)(total==3 ? 0 : StringToInteger(setting[2])),StringToDouble(setting[total-1]));
           break;
         case ENUM_SET_TYPE_STRING:
           ObjectSetString(chart,name,(ENUM_OBJECT_PROPERTY_STRING)StringToInteger(setting[1]),(int)(total==3 ? 0 : StringToInteger(setting[2])),setting[total-1]);
           break;
        }
     }
   return true;
  }
After plotting the objects on the chart, we need to compare the objects present on the chart with the ones passed in the message. "Unnecessary" objects containing the necessary ID but not present in the message are removed from the chart (these are the objects removed by the provider). The DeleteExtraObjects function is responsible for that. Its parameters are the chart ID and the array of structures containing the object name and type.
void CCopyObject::DeleteExtraObjects(long chart,SObject &Objects[])
  {
   int total=ArraySize(Objects);
   for(int i=0;i<ObjectsTotal(chart,0);i++)
     {
      string name=ObjectName(chart,i,0);
      if(StringFind(name,s_ObjectsID)!=0)
         continue;
      bool found=false;
      for(int obj=0;(obj<total && !found);obj++)
        {
         if(name==Objects[obj].name && ObjectGetInteger(chart,name,OBJPROP_TYPE)==Objects[obj].type)
           {
            found=true;
            break;
           }
        }
      if(!found)
        {
         if(ObjectDelete(chart,name))
            i--;
        }
     }
   return;
  }
4.2. Provider application
We are gradually approaching the conclusion. Let's create the provider application that is to collect object data and send them to the cloud storage. Let's execute it in the form of an Expert Advisor. There is only one external parameter: the SendAtStart logical variable that defines whether the data should be sent immediately after downloading the application to the terminal.
sinput bool SendAtStart = true; //Send message at Init
Include the necessary libraries in the application header. These are the class for working with graphical objects described above and the base class for working with named pipes. Also, specify the pipe name the application is connected to.
#include <CopyObject.mqh>
#include <Files\FilePipe.mqh>

#define                     Connection       "\\\\.\\pipe\\GoogleBridge"
In the global variables, declare the class for working with graphical objects, string variable for saving the last sent message and the uchar array the command for closing the connection to the cloud storage is written to.
CCopyObject *CopyObjects;
string PrevMessage;
uchar Close[];
In the OnInit function, initialize global variables and launch the function for sending data to the cloud storage if necessary.
int OnInit()
  {
//---
   CopyObjects = new CCopyObject();
   PrevMessage="Init";
   StringToCharArray(("Close"),Close,0,WHOLE_ARRAY,CP_UTF8);
   if(SendAtStart)
      SendMessage(ChartID());
//---
   return(INIT_SUCCEEDED);
  }
In the OnDeinit function, delete the object class for working with graphical objects.
void OnDeinit(const int reason)
  {
//---
   if(CheckPointer(CopyObjects)!=POINTER_INVALID)
      delete CopyObjects;
  }
The function for sending info messages to the cloud storage is called from the OnChartEvent function when an object is created, modified or removed from the chart.
void OnChartEvent(const int id,
                  const long &lparam,
                  const double &dparam,
                  const string &sparam)
  {
//---
   int count=10;
   switch(id)
     {
      case CHARTEVENT_OBJECT_CREATE:
      case CHARTEVENT_OBJECT_DELETE:
      case CHARTEVENT_OBJECT_CHANGE:
      case CHARTEVENT_OBJECT_DRAG:
      case CHARTEVENT_OBJECT_ENDEDIT:
        while(!SendMessage(ChartID()) && !IsStopped() && count>=0)
           {
            count--;
            Sleep(500);
           }
        break;
     }
  }
The main operations are performed in the SendMessage function applying the chart ID as an input. Its algorithm can be divided into several stages:
-
checking the status of the class for working with graphical objects and re-initializing it if necessary;
-
generating the message to be sent to the cloud using the previously created CreatMessage function, exiting the function if the message is empty or equal to the last sent one;
-
creating the file name for sending to the cloud based on the chart symbol;
-
establishing connection to our bridge application via the named pipe;
-
passing an order to send a message to the cloud storage with the specified file name via the open connection;
-
sending an order to close the connection to the cloud and breaking the named pipe to the bridge application after receiving a response about the send order execution;
-
removing the objects of working with named pipes before exiting the application.
bool SendMessage(long chart)
  {
   Comment("Sending message");
   if(CheckPointer(CopyObjects)==POINTER_INVALID)
     {
      CopyObjects = new CCopyObject();
      if(CheckPointer(CopyObjects)==POINTER_INVALID)
         return false;
     }
   string message=CopyObjects.CreateMessage(chart);
   if(message==NULL || PrevMessage==message)
      return true;

   string Name=SymbolInfoString(ChartSymbol(chart),SYMBOL_CURRENCY_BASE)+SymbolInfoString(ChartSymbol(chart),SYMBOL_CURRENCY_PROFIT);
   CFilePipe *pipe=new CFilePipe();
   int handle=pipe.Open(Connection,FILE_WRITE|FILE_READ);
   if(handle<=0)
     {
      Comment("Pipe doesn't found");
      delete pipe;
      return false;
     }
   uchar iBuffer[];
   int size=StringToCharArray(("Write;"+Name+";"+message),iBuffer,0,WHOLE_ARRAY,CP_UTF8);
   if(pipe.WriteArray(iBuffer)<=0)
     {
      Comment("Error of sending request");
      pipe.Close();
      delete pipe;
      return false;
     }
   ArrayFree(iBuffer);
   uint res=0;
   do
     {
      res=pipe.ReadArray(iBuffer);
     }
   while(res==0 && !IsStopped());

   if(res>0)
     {
      string result=CharArrayToString(iBuffer,0,WHOLE_ARRAY,CP_UTF8);
      if(result!="Ok")
        {
         Comment(result);
         pipe.WriteArray(Close);
         pipe.Close();
         delete pipe;
         return false;
        }
     }
   PrevMessage=message;
   pipe.WriteArray(Close);
   pipe.Close();
   delete pipe;
   Comment("");
   return true;
  }
4.3. User application
As a conclusion, let's create a user application that is to receive data from the cloud storage, as well as create and modify graphical objects on the chart. Like in the previous application, we should include the necessary libraries in the header and specify the name of the used pipe.
#include <CopyObject.mqh>
#include <Files\FilePipe.mqh>

#define                     Connection       "\\\\.\\pipe\\GoogleBridge"
The application is to feature three external parameters: time in seconds indicating the periodicity of the cloud storage data update, objects ID on the chart and the logical value indicating the need to remove all created objects from the chart when the application is closed.
sinput int        RefreshTime =  10; //Time to refresh data, sec
sinput string     ObjectsID   =  "GoogleDriveBridge";
sinput bool       DeleteAtClose = true;   //Delete objects from chart at close program
In the global variables (just like in the provider application), declare the class for working with graphical objects, string variable for saving the last received message and the uchar array the command for closing the connection to the cloud storage is written to. In addition, add the logic variable about the state of the timer and variables to store the time of the last update and displaying the last comment on the chart.
CCopyObject *CopyObjects;
string PrevMessage;
bool timer;
datetime LastRefresh,CommentStart;
uchar Close[];
In the OnInit function, initialize the global variables and timer.
int OnInit()
  {
//---
   CopyObjects = new CCopyObject(ObjectsID);
   PrevMessage="Init";
   timer=EventSetTimer(1);
   if(!timer)
     {
      Comment("Error of set timer");
      CommentStart=TimeCurrent();
     }
   LastRefresh=0;
   StringToCharArray(("Close"),Close,0,WHOLE_ARRAY,CP_UTF8);

//---
   return(INIT_SUCCEEDED);
  }
In the OnDeinit deinitialization function, delete the object class for working with graphical objects, stop the timer, clear the comments and (if necessary) remove the objects created by the application from the chart.
void OnDeinit(const int reason)
  {
//---
   if(CheckPointer(CopyObjects)!=POINTER_INVALID)
      delete CopyObjects;
   EventKillTimer();
   Comment("");
   if(DeleteAtClose)
     {
      for(int i=0;i<ObjectsTotal(0,0);i++)
        {
         string name=ObjectName(0,i,0);
         if(StringFind(name,ObjectsID,0)==0)
           {
            if(ObjectDelete(0,name))
               i--;
           }
        }
     }
  }
In the OnTick function, check the timer status and re-activate it if needed.
void OnTick()
  {
//---
   if(!timer)
     {
      timer=EventSetTimer(1);
      if(!timer)
        {
         Comment("Error of set timer");
         CommentStart=TimeCurrent();
        }
      OnTimer();
     }
  }
In the OnTimer function, clear the comments that are present on the chart longer than 10 seconds and call the function for reading the data file from the cloud storage (ReadMessage). After the data has been loaded successfully, the time of the last data update is changed.
void OnTimer()
  {
//---
   if((TimeCurrent()-CommentStart)>10)
     {
      Comment("");
     }
   if((TimeCurrent()-LastRefresh)>=RefreshTime)
     {
      if(ReadMessage(ChartID()))
        {
         LastRefresh=TimeCurrent();
        }
     }
  }
The basic actions for loading data from the cloud storage and plotting objects on the chart are performed in the ReadMessage function. The function has only one parameter — chart ID the function works with. The operations performed in the function can be divided into several stages:
-
generating the file name by the chart symbol for reading from the cloud;
-
opening a named pipe for connecting to the bridge application;
-
sending a data reading request from the cloud storage specifying the required file;
-
reading the request processing result;
-
sending an order to close the connection to the cloud and breaking the named pipe to the bridge application;
-
comparing the obtained result with the previous message. If the data are similar, exit the function;
-
passing the obtained message to the DrawObjects function of the graphical elements processing class object;
-
saving the successfully processed message in the PrevMessage variable for the subsequent comparison with the obtained data.
bool ReadMessage(long chart)
  {
   string Name=SymbolInfoString(ChartSymbol(chart),SYMBOL_CURRENCY_BASE)+SymbolInfoString(ChartSymbol(chart),SYMBOL_CURRENCY_PROFIT);
   CFilePipe *pipe=new CFilePipe();
   if(CheckPointer(pipe)==POINTER_INVALID)
      return false;

   int handle=pipe.Open(Connection,FILE_WRITE|FILE_READ);
   if(handle<=0)
     {
      Comment("Pipe doesn't found");
      CommentStart=TimeCurrent();
      delete pipe;
      return false;
     }
   Comment("Send request");
   uchar iBuffer[];
   int size=StringToCharArray(("Read;"+Name+";"),iBuffer,0,WHOLE_ARRAY,CP_UTF8);
   if(pipe.WriteArray(iBuffer)<=0)
     {
      pipe.Close();
      delete pipe;
      return false;
     }
   Sleep(10);
   ArrayFree(iBuffer);
   Comment("Read message");

   uint res=0;
   do
     {
      res=pipe.ReadArray(iBuffer);
     }
   while(res==0 && !IsStopped());

   Sleep(10);
   Comment("Close connection");
   pipe.WriteArray(Close);
   pipe.Close();
   delete pipe;
   Comment("");

   string result=NULL;
   if(res>0)
     {
      result=CharArrayToString(iBuffer,0,WHOLE_ARRAY,CP_UTF8);
      if(StringFind(result,"Error",0)>=0)
        {
         Comment(result);
         CommentStart=TimeCurrent();
         return false;
        }
     }
   else
     {
      Comment("Empty message");
      return false;
     }

   if(result==PrevMessage)
      return true;

   if(CheckPointer(CopyObjects)==POINTER_INVALID)
     {
      CopyObjects = new CCopyObject();
      if(CheckPointer(CopyObjects)==POINTER_INVALID)
         return false;
     }
   if(CopyObjects.DrawObjects(chart,result))
     {
      PrevMessage=result;
     }
   else
     {
      return false;
     }
   return true;
  }
5. First launch of the applications
After so much work, it is time to look at the results. Launch the bridge application. Make sure that the client-secret.json file containing the data (received from the Google service) for connecting to the cloud storage is located in the application folder. Then run one of the MetaTrader applications. When accessing the cloud for the first time, the bridge application launches the default internet application with the Google account sign-in page.
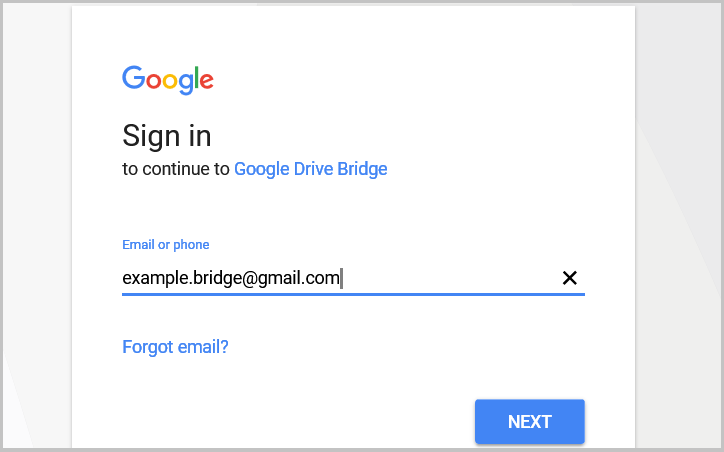
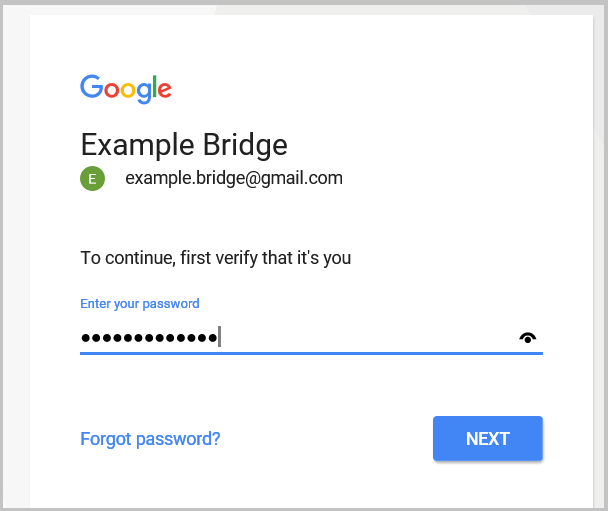
Enter the email address you provided when registering your Google account and go to the next page (NEXT button). On the next page, enter the password for accessing the account.
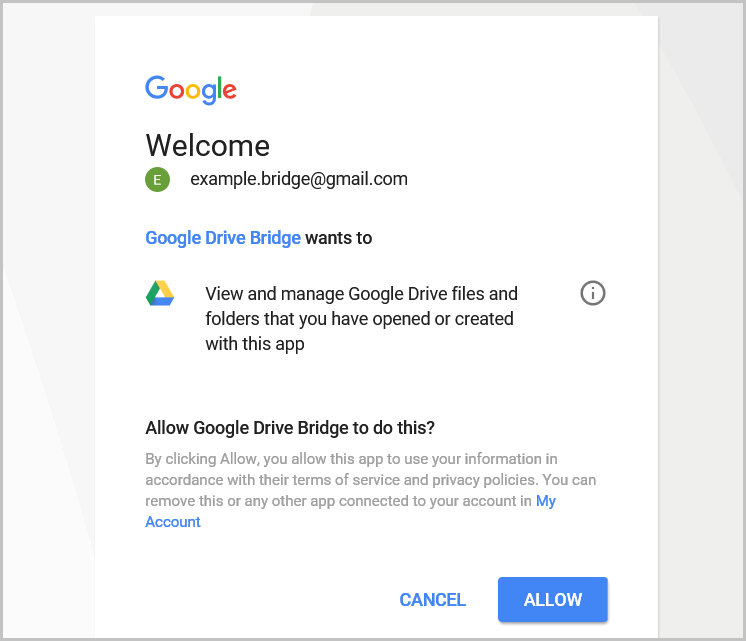
On the next page, Google will ask you to confirm the application's access rights to the cloud storage. Review the requested access rights and confirm them (ALLOW button).
The drive-bridge.json subfolder is created in the bridge application directory. It stores the file containing the access token of the cloud storage. In the future, when replicating the application on other computers, this subdirectory should also be copied together with the bridge program. This relieves us from the necessity to repeat the procedure and transfer the cloud storage access data to third parties.

Conclusion
In this article, we examined using a cloud storage for practical purposes. The bridge application is a universal tool for uploading data to the cloud storage and loading it back into our applications. The proposed solution for transmitting graphical objects allows you to share your technical analysis results with your colleagues in real time. Perhaps, someone will decide to provide trading signals or arrange training courses on technical analysis of charts this way.
I wish you all successful trading.
Translated from Russian by MetaQuotes Ltd.
Original article: https://www.mql5.com/ru/articles/3331
Warning: All rights to these materials are reserved by MetaQuotes Ltd. Copying or reprinting of these materials in whole or in part is prohibited.
This article was written by a user of the site and reflects their personal views. MetaQuotes Ltd is not responsible for the accuracy of the information presented, nor for any consequences resulting from the use of the solutions, strategies or recommendations described.
 Deep Neural Networks (Part III). Sample selection and dimensionality reduction
 Cross-Platform Expert Advisor: Custom Stops, Breakeven and Trailing
 Creating and testing custom symbols in MetaTrader 5
- Free trading apps
- Over 8,000 signals for copying
- Economic news for exploring financial markets
You agree to website policy and terms of use
Could you tell me where to get the CopyObject.mqh library you are using?
I apologise, I missed it when I was attaching files to the article. The library is in the attachment.
Regards,
Dmitry.
I apologise, I missed it when I was attaching files to the article. The library is in the attachment.
Regards,
Dmitry.
Good day,
If we are talking about push notifications, I haven't asked myself this question and haven't looked for such a feature in Google. If we are talking about checking for file updates in the application-bridge, then for such an implementation we will have to organise constant updates in the application, save which client needs which files and keep the pipe connection open all the time (because mql5 can connect to a pipe connection, but cannot create it). This option will be even more labour-intensive for the PC processor.
Regards,
Dmitry.
Google has such a possibility, I've seen implementations in Java. However, in this case, this mechanism (push notifications) may be too slow. Especially if we are talking about something like a copier.
I had in mind some analogue to Windows' "file system change notifications". I thought that perhaps the implementation of such a mechanism is already somewhere in the API.
Everything works, lines are copied, but only with your account, I change your client_secret.json file to my own, the Google account access identification application itself does not start and as a consequence no token is created in drive-bridge.json
Delete the existing drive-bridge.json
Google has such a feature, I've seen implementations in Java. However, in this case, this mechanism (push notifications) may be too slow. Especially if we are talking about something like a copier.
I had in mind some analogue to Windows' "file system change notifications". I thought that perhaps the implementation of such a mechanism is already somewhere in the API.
I have not seen such an implementation.