グラフィカルインタフェースIII:シンプルボタンと多機能ボタンのグループ(チャプター 2)
コンテンツ
はじめに
シリーズ第一弾のグラフィカルインタフェース I: ライブラリストラクチャの準備(チャプター 1)ではライブラリの目的が詳しく考察されました。記事への完全なリンクのリストは各章の末尾でみられます。そこではまた、開発の現段階でのライブラリの完全版をダウンロードすることができます。ファイルはアーカイブと同じディレクトリに配置される必要があります。
シリーズの最初の章は、シンプルボタンと多機能ボタンについてでした。2番目の記事は相互接続されたボタンのグループに専念します。これらは、アプリケーション内でユーザーがセット(グループ)のうちオプションのいずれかを選択することができる際の要素の作成を可能にします。
シンプルボタンのグループを作成するクラスの開発
シンプルボタンのグループは要するにOBJ_BUTTON型のグラフィックオブジェクトの配列です。そのようなコントロールの違いとなる特性は、グループでは一つのボタンのみが同時に押すことができることです。この段階では、このコントロールのクラスは、2つの方法で作成できます。
- すでに実装されたCSimpleButton型のコントロールからのグループ作成
- CButton型のプリミティブオブジェクトからのグループ作成
2つ目のオプションはCSimpleButton型のコントロールのそれぞれがポインタベースにアクセスするための追加的なメソッドの作成を必要としないので、もっと簡単です。それを使用します。
すべてのコントロールが含まれているControlsフォルダにCButtonsGroupクラスを持つButtonsGroup.mqhファイルを作成しWndContainer.mqhファイルに含みます。以前に開発されたコントロールのすべてで示されているように、このクラスには仮想メソッドとフォームのポインタが必要です。ここでは、それらを議論せずに、その構築のためのプロパティとメソッドの説明に直行します。
一部のプロパティはグループ内の各ボタンに共通しますが、ユニークなものもあります。下記はボタンの外観に関連するプロパティの2つのグループです。
ボタンの一般的なプロパティは下記のとおりです。
- 高さ
- ブロックされたボタンの色
- 利用可能とブロック状態でのフレームの色
- 異なる状態でのテキストの色
- 左マウスクリックの優先順位
ボタンのユニークなプロパティは下記のとおりです。
- ボタン状態(押されている/押されていない)
- フォームのエッジポイントからのマージン
- テキスト
- 幅
- 異なる状態にあるボタンの色
- ボタンのグラデーション
各ボタンのマージンは、任意の順序でボタンを配置することを可能にします。

図1。 グループ内のボタンを配置する例
下のコードにあるようにCButton型のオブジェクトの動的配列とボタンのユニークなプロパティを宣言します。
//+------------------------------------------------------------------+
//| シンプルボタンのグループを作成するクラス                     |
//+------------------------------------------------------------------+
class CButtonsGroup : public CElement
  {
private:
   //--- ボタン作成のためのオブジェクト
   CButton           m_buttons[];
   //--- ボタンのグラデーション
   struct ButtonsGradients
     {
      color             m_buttons_color_array[];
     };
   ButtonsGradients  m_buttons_total[];
   //--- ボタンプロパティ:
   //    ボタンのユニークなプロパティの配列
   bool              m_buttons_state[];
   int               m_buttons_x_gap[];
   int               m_buttons_y_gap[];
   string            m_buttons_text[];
   int               m_buttons_width[];
   color             m_buttons_color[];
   color             m_buttons_color_hover[];
   color             m_buttons_color_pressed[];
   //--- ボタンの縦幅
   int               m_button_y_size;
   //--- ブロックされたボタンの色
   color             m_back_color_off;
   //--- アクティブとブロック状態でのフレームの色
   color             m_border_color;
   color             m_border_color_off;
   //--- テキストの色
   color             m_text_color;
   color             m_text_color_off;
   color             m_text_color_pressed;
   //--- マウスの左クリックのプロパティ
   int               m_buttons_zorder;
   //---
public:
   //--- ボタンの数
   int               ButtonsTotal(void)                       const { return(::ArraySize(m_buttons));  }
   //--- (1) ボタンの縦幅
   void              ButtonYSize(const int y_size)                  { m_button_y_size=y_size;          }
   //--- (1) ブロックされたボタンとフレームの背景色 ((2) 利用可能/(3) ブロック)
   void              BackColorOff(const color clr)                  { m_back_color_off=clr;            }
   void              BorderColor(const color clr)                   { m_border_color=clr;              }
   void              BorderColorOff(const color clr)                { m_border_color_off=clr;          }
   //--- テキストの色
   void              TextColor(const color clr)                     { m_text_color=clr;                }
   void              TextColorOff(const color clr)                  { m_text_color_off=clr;            }
   void              TextColorPressed(const color clr)              { m_text_color_pressed=clr;        }
  };
動的配列のサイズはその作成(チャートへの取り付け)前にボタンのグループを形成する時に定義されます。CButtonsGroup::AddButton()メソッドが呼び出されるたびに配列には1要素が追加され、この要素には受け渡されたパラメータが格納されます。
class CButtonsGroup : public CElement
  {
public:
   //--- 作成前に指定されたプロパティを持つボタンを追加する
   void              AddButton(const int x_gap,const int y_gap,const string text,const int width,
                               const color button_color,const color button_color_hover,const color button_color_pressed);
  };
//+------------------------------------------------------------------+
//| ボタンを追加する                                                    |
//+------------------------------------------------------------------+
void CButtonsGroup::AddButton(const int x_gap,const int y_gap,const string text,const int width,
                              const color button_color,const color button_color_hover,const color pressed_button_color)
  {
//--- 配列サイズを1要素で増やす
   int array_size=::ArraySize(m_buttons);
   ::ArrayResize(m_buttons,array_size+1);
   ::ArrayResize(m_buttons_total,array_size+1);
   ::ArrayResize(m_buttons_state,array_size+1);
   ::ArrayResize(m_buttons_x_gap,array_size+1);
   ::ArrayResize(m_buttons_y_gap,array_size+1);
   ::ArrayResize(m_buttons_text,array_size+1);
   ::ArrayResize(m_buttons_width,array_size+1);
   ::ArrayResize(m_buttons_color,array_size+1);
   ::ArrayResize(m_buttons_color_hover,array_size+1);
   ::ArrayResize(m_buttons_color_pressed,array_size+1);
//--- 受け取ったパラメータの値を格納する
   m_buttons_x_gap[array_size]         =x_gap;
   m_buttons_y_gap[array_size]         =y_gap;
   m_buttons_text[array_size]          =text;
   m_buttons_width[array_size]         =width;
   m_buttons_color[array_size]         =button_color;
   m_buttons_color_hover[array_size]   =button_color_hover;
   m_buttons_color_pressed[array_size] =pressed_button_color;
   m_buttons_state[array_size]         =false;
  }
ボタングループの作成時には、グラフィカル・インタフェースを作成するプロセスが停止され、以前にボタンが CButtonsGroup::AddButtonメソッドを使用して追加されなかった場合は、関連するメッセージが操作ログに出力されます。以下のコードのCButtonsGroup::CreateButtons()メソッドの短縮版で示されるように、ボタンはループで作成されます。
class CButtonsGroup : public CElement
  {
public:
   //--- ボタン作成メソッド
   bool              CreateButtonsGroup(const long chart_id,const int subwin,const int x,const int y);
   //---
private:
   bool              CreateButtons(void);
  };
//+------------------------------------------------------------------+
//| ボタンを作成する                                                  |
//+------------------------------------------------------------------+
bool CButtonsGroup::CreateButtons(void)
  {
//--- 座標
   int l_x =m_x;
   int l_y =m_y;
//--- ボタンの数を取得する
   int buttons_total=ButtonsTotal();
//--- グループにボタンがない場合は報告する
   if(buttons_total<1)
     {
      ::Print(__FUNCTION__," > This method is to be called "
              "if a group contains at least one button!Use the CButtonsGroup::AddButton() method");
      return(false);
     }
//--- 指定された数のボタンを作成する
   for(int i=0; i<buttons_total; i++)
     {
      //--- オブジェクト名の形成
      //--- 座標の計算
      //--- ボタンを設定する
      //--- プロパティを設定する
      //--- パネルの端からのマージン、座標とサイズを格納する
      //--- グラデーション配列を初期化する
      //--- オブジェクトポインタを格納する
     }
//---
   return(true);
  }
このタイプのボタングループのために2つのモードを作成してみましょう。これを設定するには、以下のコードに示すようにクラスに指定されたフィールドやメソッドを追加します。デフォルト値はfalseとなり、これは、グループのボタンが1つも押されていないモードが有効になっていることを意味しますデフォルト値のtrueはグループ内のボタンがいつも1つは押されていることを意味します。
class CButtonsGroup : public CElement
  {
public:
   //--- ラジオボタンモード
   bool              m_radio_buttons_mode;
   //---
public:
   //--- ラジオボタンモードのインストール
   void              RadioButtonsMode(const bool flag)              { m_radio_buttons_mode=flag;       }
  };
他のコントロールと同様に、このクラスにもコントロールをブロックするためのメソッドが必要です。このタイプのボタングループのでは、以前に押されたボタンのブロックを解除するとき その状態に対応した外観の復元を確認することが重要です。
class CButtonsGroup : public CElement
  {
private:
   //--- 使用可能/ブロック
   bool              m_buttons_group_state;
   //---
public:
   //--- ボタングループの一般的な状態(使用可能/ブロック)
   bool              ButtonsGroupState(void)                  const { return(m_buttons_group_state);   }
   void              ButtonsGroupState(const bool state);
  };
//+------------------------------------------------------------------+
//| ボタンの状態を変える                                    |
//+------------------------------------------------------------------+
void CButtonsGroup::ButtonsGroupState(const bool state)
  {
   m_buttons_group_state=state;
//---
   int buttons_total=ButtonsTotal();
   for(int i=0; i<buttons_total; i++)
     {
      m_buttons[i].State(false);
      m_buttons[i].Color((state)?m_text_color : m_text_color_off);
      m_buttons[i].BackColor((state)?m_buttons_color[i]: m_back_color_off);
      m_buttons[i].BorderColor((state)?m_border_color : m_border_color_off);
     }
//--- ブロックされる前に押されたらボタンを押す
   if(m_buttons_group_state)
     {
      if(m_selected_button_index!=WRONG_VALUE)
        {
         m_buttons_state[m_selected_button_index]=true;
         m_buttons[m_selected_button_index].Color(m_text_color_pressed);
         m_buttons[m_selected_button_index].BackColor(m_buttons_color_pressed[m_selected_button_index]);
        }
     }
  }
押したときにボタンの状態を切り替えるメソッドが必要です。強調されたボタンのテキストとインデックスを保存/取得するためのフィールドやメソッドも必要です。
下記のコードでは、ボタンの状態を切り替えるためのメソッドの初めにグループ内のボタンの数のチェックがあります。ボタンが全く存在しないことが判明した場合、該当するメッセージが操作ログに出力されます。メソッドは終了しません。プログラムは実行を続けm_buttons_state[] 配列範囲超過のエラーが発生します。これは、アプリケーションの開発者は、このようなエラーを回避するために、グループに少なくとも1つのボタンを追加しなければならないことを意味します。 少なくとも1つのボタンがある場合は、チェックの後で、プログラムは、配列の範囲が超えられた場合、渡されたインデックスを調整します。その後、ボタンの状態は、指定されたインデックスによって変更されます。その後、押されたボタン以外のすべてのボタンはグループモードを考慮して反復して押されてない状態になります(該当する色が設定されます)。言い換えれば、少なくとも1つのボタンが押されなければならないときにラジオボタンモードが有効になっている場合、現在のインデックスと渡されたインデックスの等しさが反復的にチェックされます。すべてのボタンが押されていない状態になれるときにこのモードが有効な場合は、ボタンの現在の状態がチェックされます。条件が満たされた場合には、押されたボタンのフラグがモードに関係なく設定されます。そのフィールドは、強調表示されたボタンのテキストやインデックスが保存されるクラスでのメソッドの終了時に、このフラグによって対応する値を取得します。押されたボタンがある場合、空の値("" およびWRONG_VALUE).が設定されます。
class CButtonsGroup : public CElement
  {
private:
   //--- 強調表示されたボタンの(1) テキストと (2) インデックス
   string            m_selected_button_text;
   int               m_selected_button_index;
   //---
public:
   //--- 強調表示されたボタンの(1) テキストと (2) インデックスを返す
   string            SelectedButtonText(void)                 const { return(m_selected_button_text);  }
   int               SelectedButtonIndex(void)                const { return(m_selected_button_index); }
   //--- 指定されたインデックスでボタンの状態を切り替える
   void              SelectionButton(const int index);
  };
//+------------------------------------------------------------------+
//|  指定されたインデックスでボタンの状態を切り替える                  |
//+------------------------------------------------------------------+
void CButtonsGroup::SelectionButton(const int index)
  {
//--- グループでの押されたボタンのチェック
   bool check_pressed_button=false;
//--- ボタンの数を取得する
   int buttons_total=ButtonsTotal();
//--- グループにボタンがない場合は報告する
   if(buttons_total<1)
     {
      ::Print(__FUNCTION__," > This method is to be called "
              "if a group contains at least one button!Use the CButtonsGroup::AddButton() method");
     }
//--- 配列の範囲を超えた場合、インデックス値を調整する
   int correct_index=(index>=buttons_total)?buttons_total-1 : (index<0)?0 : index;
//--- 反対のためのボタンの状態を変更する
   m_buttons_state[correct_index]=(m_buttons_state[correct_index])?false : true;
//--- ボタンのグループで反復する
   for(int i=0; i<buttons_total; i++)
     {
      //--- モードによってチェックされる
      bool condition=(m_radio_buttons_mode)?(i==correct_index) : (i==correct_index && m_buttons_state[i]);
      //--- 条件が満たされていればボタンを押す
      if(condition)
        {
         if(m_radio_buttons_mode)
            m_buttons_state[i]=true;
         //--- 押されたボタンがある
         check_pressed_button=true;
         //--- 色を設定する
         m_buttons[i].Color(m_text_color_pressed);
         m_buttons[i].BackColor(m_buttons_color_pressed[i]);
         CElement::InitColorArray(m_buttons_color_pressed[i],m_buttons_color_pressed[i],m_buttons_total[i].m_buttons_color_array);
        }
      //--- 条件が満たされていない場合ボタンを押されていない状態にする
      else
        {
         //--- 無効な状態と色を設定する
         m_buttons_state[i]=false;
         m_buttons[i].Color(m_text_color);
         m_buttons[i].BackColor(m_buttons_color[i]);
         CElement::InitColorArray(m_buttons_color[i],m_buttons_color_hover[i],m_buttons_total[i].m_buttons_color_array);
        }
      //--- ボタンの普通の状態をゼロにする
      m_buttons[i].State(false);
     }
//--- 押されたボタンがある場合、テキストとインデックスを格納する
   m_selected_button_text  =(check_pressed_button) ?m_buttons[correct_index].Description() : "";
   m_selected_button_index =(check_pressed_button) ?correct_index : WRONG_VALUE;
  }
グループボタンの押下の処理にはCButtonsGroup::OnClickButton()メソッドを作成します。前に考察された多くのメソッドと同様に、以下のチェックが行われます。
- 名前
- 識別子。オブジェクト名から識別子を抽出するにはCButtonsGroup::IdFromObjectName()メソッドを使用します。メソッドのコードは前に考察された多くのメソッドと同様なので、ここでは説明されません。
- 現在の状態(使用可能/ブロック)
チェックがすべて合格してプログラムがメソッドを終了していない場合、グループ内のボタンの状態の切り替えは以前に考察されCButtonsGroup::SelectionButton()メソッドで行われます。このメソッドの終わりで、押されたボタンに関するデータを含むメッセージがイベントストリームに送信されます。このメッセージは、カスタムクラスで受信することができます。
class CButtonsGroup : public CElement
  {
private:
   //--- ボタンの押下を処理する
   bool              OnClickButton(const string clicked_object);
   //---  オブジェクト名からボタン名を抽出する                     |
   int               IdFromObjectName(const string object_name);
  };
//+------------------------------------------------------------------+
//| チャートイベントハンドラ                                              |
//+------------------------------------------------------------------+
void CButtonsGroup::OnEvent(const int id,const long &lparam,const double &dparam,const string &sparam)
  {
//--- オブジェクトのマウス左クリックイベントの処理
   if(id==CHARTEVENT_OBJECT_CLICK)
     {
      if(OnClickButton(sparam))
         return;
     }
  }
//+------------------------------------------------------------------+
//| グループでのボタンの押下                                     |
//+------------------------------------------------------------------+
bool CButtonsGroup::OnClickButton(const string pressed_object)
  {
//--- 押されたのがメニュー項目でなかった場合は終了する
   if(::StringFind(pressed_object,CElement::ProgramName()+"_buttons_",0)<0)
      return(false);
//---  オブジェクト名から識別子を取得する                     |
   int id=IdFromObjectName(pressed_object);
//--- 識別子が一致しない場合は終了する
   if(id!=CElement::Id())
      return(false);
//--- インデックスのチェック
   int check_index=WRONG_VALUE;
//--- 押下がこのグループのボタンに対してであったかどうかをチェックする
   int buttons_total=ButtonsTotal();
//--- ボタンがブロックされている場合は終了する
   if(!m_buttons_group_state)
     {
      for(int i=0; i<buttons_total; i++)
         m_buttons[i].State(false);
      //---
      return(false);
     }
//--- 押下された場合はインデックスを格納する
   for(int i=0; i<buttons_total; i++)
     {
      if(m_buttons[i].Name()==pressed_object)
        {
         check_index=i;
         break;
        }
     }
//--- このグループノンボタンが押されなかった場合は終了する
   if(check_index==WRONG_VALUE)
      return(false);
//--- ボタンの状態を切り替える
   SelectionButton(check_index);
//--- それについてシグナルを送信する
   ::EventChartCustom(m_chart_id,ON_CLICK_BUTTON,CElement::Id(),m_selected_button_index,m_selected_button_text);
   return(true);
  }
ここで、グループボタンのマウスカーソルの位置への反応とカーソルがボタンの上をホバーした際のマウスの左ボタンの状態への反応を設定する必要がありますこれにはCButtonsGroup::CheckPressedOverButton()メソッドを書きます。このメソッドはCHARTEVENT_MOUSE_MOVEイベントの処理時にコントロールハンドラで呼び出されます。メソッドが呼び出される前に、以下のチェックが行われます。(1)コントロールが表示されているかどうか、(2)それが利用可能かどうか(3)フォームが利用可能かどうか、(4)マウスの左ボタンが押されたかどうか。
class CButtonsGroup : public CElement
  {
private:
   //--- グループボタンで押下された左マウスボタンをチェックする
   void              CheckPressedOverButton(void);
  };
//+------------------------------------------------------------------+
//| チャートイベントハンドラ                                              |
//+------------------------------------------------------------------+
void CButtonsGroup::OnEvent(const int id,const long &lparam,const double &dparam,const string &sparam)
  {
//--- カーソル移動イベントの処理
   if(id==CHARTEVENT_MOUSE_MOVE)
     {
      //--- コントロールが隠れている場合は終了する
      if(!CElement::IsVisible())
         return;
      //--- ボタンがブロックされている場合は終了する
      if(!m_buttons_group_state)
         return;
      //--- フォーカスを定義する
      int x=(int)lparam;
      int y=(int)dparam;
      int buttons_total=ButtonsTotal();
      for(int i=0; i<buttons_total; i++)
        {
         m_buttons[i].MouseFocus(x>m_buttons[i].X() && x<m_buttons[i].X2() &&
                                 y>m_buttons[i].Y() && y<m_buttons[i].Y2());
        }
      //--- フォームがブロックされている場合は終了する
      if(m_wnd.IsLocked())
         return;
      //--- マウスボタンが押されていない場合は終了する
      if(sparam!="1")
         return;
      //--- グループボタンで押下された左マウスボタンをチェックする
      CheckPressedOverButton();
      return;
     }
  }
//+------------------------------------------------------------------+
// グループボタンで押下された左マウスボタンをチェックする
//+------------------------------------------------------------------+
void CButtonsGroup::CheckPressedOverButton(void)
  {
   int buttons_total=ButtonsTotal();
//--- マウスの左ボタンを押されあた場所に応じて色を設定する
   for(int i=0; i<buttons_total; i++)
     {
      //--- フォーカスがある場合は押されたボタンの色
      if(m_buttons[i].MouseFocus())
         m_buttons[i].BackColor(m_buttons_color_pressed[i]);
      //--- フォーカスがない場合
      else
        {
         //--- ...グループボタンが押されていない場合は背景色を割り当てる
         if(!m_buttons_state[i])
            m_buttons[i].BackColor(m_buttons_color[i]);
        }
     }
  }
テストアプリケーションでシンプルボタンのグループをテストするための準備が整いました。以前にテストしたEAのコピーを作成します。メインメニューとそのコンテキストメニュー以外のすべてのコントロールを削除します。このプログラムは、本稿のさまざまなボタンのグループをテストに使用します。
ボタングループのCButtonsGroupクラスインスタンスをカスタムクラスに作成します。作成とフォームの端からのマージンのためにCProgram::CreateButtonsGroup1()メソッドを宣言します。
class CProgram : public CWndEvents
  {
private:
   //--- シンプルボタンのグループ
   CButtonsGroup     m_buttons_group1;
   //---
private:
   //--- シンプルボタンのグループ
#define BUTTONS_GROUP1_GAP_X (7)
#define BUTTONS_GROUP1_GAP_Y (50)
   bool              CreateButtonsGroup1(void);
  };
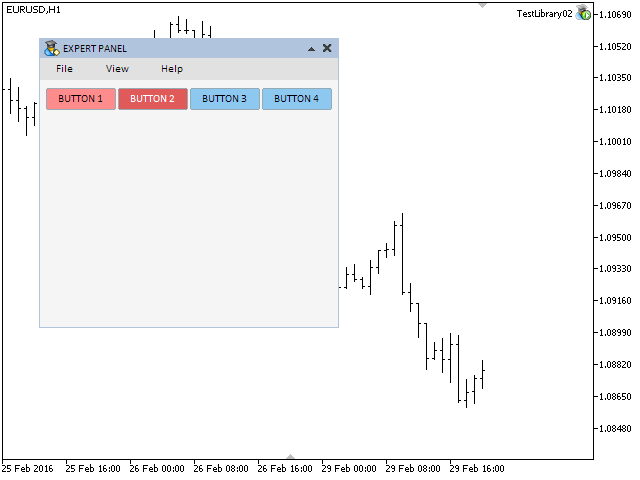
4つのボタンのグループを作成します。それらを横に並べます。この例では、2つのボタンを赤にして、もう2つのボタンを青色にします。CProgram::CreateButtonsGroup1()メソッドの実装は下記のコードに見られます。ボタングループの作成後にボタンの1つを即時強調表示するにはCButtonsGroup::SelectionButton() public メソッドを使います。
//+------------------------------------------------------------------+
//| シンプルボタンのグループを作成するクラス                     |
//+------------------------------------------------------------------+
bool CProgram::CreateButtonsGroup1(void)
  {
//--- ウィンドウポインタを格納する
   m_buttons_group1.WindowPointer(m_window);
//--- 座標
   int x =m_window.X()+BUTTONS_GROUP1_GAP_X;
   int y =m_window.Y()+BUTTONS_GROUP1_GAP_Y;
//--- プロパティ
   int    buttons_x_gap[]         ={0,72,144,216};
   string buttons_text[]          ={"BUTTON 1","BUTTON 2","BUTTON 3","BUTTON 4"};
   int    buttons_width[]         ={70,70,70,70};
   color  buttons_color[]         ={C'195,0,0',C'195,0,0',clrRoyalBlue,clrRoyalBlue};
   color  buttons_color_hover[]   ={C'255,51,51',C'255,51,51',C'85,170,255',C'85,170,255'};
   color  buttons_color_pressed[] ={C'135,0,0',C'135,0,0',C'50,100,135',C'50,100,135'};
//--- 優先順位の設定
   m_buttons_group1.TextColor(clrWhite);
   m_buttons_group1.TextColorPressed(clrGold);
//--- グループに4つのボタンを追加する
   for(int i=0; i<4; i++)
      m_buttons_group1.AddButton(buttons_x_gap[i],0,buttons_text[i],buttons_width[i],
                                 buttons_color[i],buttons_color_hover[i],buttons_color_pressed[i]);
//--- ボタンのグループを作成する
   if(!m_buttons_group1.CreateButtonsGroup(m_chart_id,m_subwin,x,y))
      return(false);
//--- グループの2番目のボタンを強調表示する
   m_buttons_group1.SelectionButton(1);
//--- オブジェクトをオブジェクトグループの共通配列に追加する
   CWndContainer::AddToElementsArray(0,m_buttons_group1);
   return(true);
  }
ファイルをコンパイルしてEAをチャートに読み込むと、下のスクリーンショットのような結果が見えるはずです。

図2。シンプルボタンのグループのテスト
ボタンの最初のグループはこれで終わりです。CButtonsGroupクラスの完全なバージョンは本稿末尾でダウンロードすることができます。次に考慮するコントロールは、ラジオボタンのグループです。
ラジオボタンのグループを作成するクラスの開発
フォームポインタの格納/取得のための標準的な仮想メソッドを含むCRadioButtonsクラスを持ったRadioButtons.mqhファイルを作成します。上記で他のコントロールのクラスの例を参照することができます。RadioButtons.mqhファイルをライブラリに含みます(WndContainer.mqh)。
ラジオ項目は3つのプリミティブオブジェクトで構成されます。
- 背景
- アイコン
- テキストラベル

図3。ラジオボタンの複合部分
シンプルボタンのグループとは異なり、ラジオボタンのグループは1つのモードしか持っていません。このコントロールのすべてのボタンを同時に押すことはできないからです。このグループ内の一つのボタンは常に押されています。グループの背景色は、通常、グループが取り付けられているフォームの背景と同じです。基本的に、それはラジオボタン(高い優先順位)の押下のフォーカスを識別し、追跡するために使用されています。このバージョンでは、カーソルがボタンの背景の領域に入って出たときのテキストラベルの色の変化のみが設定できます。下図のように、ラジオボタンのユニークまたは共通のプロパティのリストは、シンプルボタンのプロパティのリストとは異なります。
共通プロパティ:
- 背景とフレームの色
- テキストの色
- 縦幅
- (1)アクティブ(2)無効(3)ブロックされた状態のためのボタンアイコン
- マウスの左クリックのプロパティ
ユニークなプロパティ
- テキスト
- 幅
- 状態。グループ内では1つのボタンのみが押下できます。
- マージン。シンプルボタンと同様に、ラジオボタンがは任意の順序(モザイク、水平、垂直等)で配置することができます。
- テキストラベルのグラデーション
どのように見えるかはCRadioButtonsクラスのコードでわかります。ユニークプロパティのサイズの決定と値の書き込みはカスタムクラスでのコントロール作成の前に CRadioButtons::AddButton() public メソッドで実行されます。ボタンが追加されなかった場合、グラフィカル・インターフェースの作成が終了します。これは、シンプルボタンのグループを作成するクラスの開発で示されているのでここで多くの時間を費やすつもりはありません。
//+------------------------------------------------------------------+
//| ラジオボタンのグループを作成するクラス                      |
//+------------------------------------------------------------------+
class CRadioButtons : public CElement
  {
private:
   //--- テキストラベルのグラデーション
   struct LabelsGradients
     {
      color             m_labels_color_array[];
     };
   LabelsGradients   m_labels_total[];
   //--- ボタンプロパティ:
   //    マウスの左クリックの(1) 色と (2) 優先順位
   color             m_area_color;
   int               m_area_zorder;
   //--- ボタンのユニークなプロパティの配列
   bool              m_buttons_state[];
   int               m_buttons_x_gap[];
   int               m_buttons_y_gap[];
   int               m_buttons_width[];
   string            m_buttons_text[];
   //--- ボタンの縦幅
   int               m_button_y_size;
   //--- ボタンのアクティブとブロック状態を示すアイコン
   string            m_icon_file_on;
   string            m_icon_file_off;
   string            m_icon_file_on_locked;
   string            m_icon_file_off_locked;
   //--- テキストの色
   color             m_text_color;
   color             m_text_color_off;
   color             m_text_color_hover;
   //--- マウスの左クリックのプロパティ
   int               m_buttons_zorder;
   //---
public:
   //--- アクティブ、無効とブロックされた状態でのボタンのアイコンを設定
   void              IconFileOn(const string file_path)           { m_icon_file_on=file_path;         }
   void              IconFileOff(const string file_path)          { m_icon_file_off=file_path;        }
   void              IconFileOnLocked(const string file_path)     { m_icon_file_on_locked=file_path;  }
   void              IconFileOffLocked(const string file_path)    { m_icon_file_off_locked=file_path; }
   //--- (1) 背景色 (2) テキストの色
   void              AreaColor(const color clr)                   { m_area_color=clr;                 }
   void              TextColor(const color clr)                   { m_text_color=clr;                 }
   void              TextColorOff(const color clr)                { m_text_color_off=clr;             }
   void              TextColorHover(const color clr)              { m_text_color_hover=clr;           }

   //--- 作成前に指定されたプロパティを持つボタンを追加する
   void              AddButton(const int x_gap,const int y_gap,const string text,const int width);
  };
その後、プリミティブオブジェクトのクラスとメソッドのインスタンスの作成に必要な配列を作成する必要があります。シンプルボタンのグループと同様に、ラジオボタンは、ループ内で作成されます。しかしここではループはメインメソッドの中にありオブジェクト名の形成に使われるインデックスは、オブジェクト作成メソッドに受け渡されます。
class CRadioButtons : public CElement
  {
private:
   //--- ボタン作成のためのオブジェクト
   CRectLabel        m_area[];
   CBmpLabel         m_icon[];
   CLabel            m_label[];
   //---
public:
   //--- ボタン作成メソッド
   bool              CreateRadioButtons(const long chart_id,const int window,const int x,const int y);
   //---
private:
   bool              CreateArea(const int index);
   bool              CreateRadio(const int index);
   bool              CreateLabel(const int index);
   //---
public:
   //--- ボタンの数
   int               RadioButtonsTotal(void)                const { return(::ArraySize(m_icon));      }
  };
//+------------------------------------------------------------------+
//| ボタンオブジェクトのグループを作成する                            |
//+------------------------------------------------------------------+
bool CRadioButtons::CreateRadioButtons(const long chart_id,const int window,const int x,const int y)
  {
//--- フォームポインタがなければ終了する
   if(::CheckPointer(m_wnd)==POINTER_INVALID)
     {
      ::Print(__FUNCTION__," > Before creating a group of radio buttons, the class must be passed "
              "the form pointer: CButtonsGroup::WindowPointer(CWindow &object)");
      return(false);
     }
//--- 変数の初期化
   m_id       =m_wnd.LastId()+1;
   m_chart_id =chart_id;
   m_subwin   =window;
   m_x        =x;
   m_y        =y;
//--- グループ内のボタンの数を取得する
   int radio_buttons_total=RadioButtonsTotal();
//--- グループにボタンがない場合は報告する
   if(radio_buttons_total<1)
     {
      ::Print(__FUNCTION__," > This method is to be called "
              "if a group contains at least one button!Use the CRadioButtons::AddButton() method");
      return(false);
     }
//--- ボタンのグループを設定する
   for(int i=0; i<radio_buttons_total; i++)
     {
      CreateArea(i);
      CreateRadio(i);
      CreateLabel(i);
      //--- フォーカスをゼロにする
      m_area[i].MouseFocus(false);
     }
//--- ダイアログウィンドウか最小化されたウィンドウの場合は要素を非表示にする
   if(m_wnd.WindowType()==W_DIALOG || m_wnd.IsMinimized())
      Hide();
//---
   return(true);
  }
このクラスには、コントロールの状態(利用可能/ブロック)を変更するためのメソッドと、指定されたインデックスによってボタンの状態を切り替えるメソッドが必要です。ラジオ項目のグループは1つのモードしかもっていないので、これらのメソッドはCButtonsGroupクラスよりわずかに簡潔です。本稿添付ファイルではこれらのメソッドを学ぶことができます。加えて、このクラスは、シンプルボタンのクラスのように、強調表示されたボタンのテキストとインデックスを取得するためのメソッドを必要とします。
class CButtonsGroup : public CElement
  {
private:
   //--- 強調表示されたボタンの(1) テキストと (2) インデックス
   string            m_selected_button_text;
   int               m_selected_button_index;
   //--- 使用可能/ブロック
   bool              m_buttons_group_state;
   //---
public:
   //--- ボタングループの一般的な状態(使用可能/ブロック)
   bool              ButtonsGroupState(void)                  const { return(m_buttons_group_state);   }
   void              ButtonsGroupState(const bool state);
   //--- 強調表示されたボタンの(1) テキストと (2) インデックスを返す
   string            SelectedButtonText(void)                 const { return(m_selected_button_text);  }
   int               SelectedButtonIndex(void)                const { return(m_selected_button_index); }
   //--- 指定されたインデックスでボタンの状態を切り替える
   void              SelectionButton(const int index);
  };
フォーム上のテキストラベルのように見えるコントロールの押下についてのメッセージの送信には新しいON_CLICK_LABEL 識別子を使用します。これをDefines.mqhファイルに追加します。
#define ON_CLICK_LABEL (10) // テキストラベルの押下
グループボタンの押下を処理するメソッドの実施は以下に示されます。(1)コントロールタイプへの所属(2)識別子(3)可用性へのチェックに合格したのち、押されたボタンのインデックスはループ内で正確な名前で識別されます。このグループのボタンが押されボタンが現在強調表示されていない場合切り替えが実行されメッセージが創始されますカスタムクラスで受信されます。
class CButtonsGroup : public CElement
  {
private:
   //--- ボタンの押下を処理する
   bool              OnClickButton(const string pressed_object);
   //--- ラジオボタン名からの識別子の取得
   int               IdFromObjectName(const string object_name);
  };
//+------------------------------------------------------------------+
//| チャートイベントハンドラ                                              |
//+------------------------------------------------------------------+
void CRadioButtons::OnEvent(const int id,const long &lparam,const double &dparam,const string &sparam)
  {
//--- オブジェクトのマウス左クリックイベントの処理
   if(id==CHARTEVENT_OBJECT_CLICK)
     {
      //--- ボタンの状態を切り替える
      if(OnClickButton(sparam))
         return;
     }
  }
//+------------------------------------------------------------------+
//| ラジオボタンの押下                                       |
//+------------------------------------------------------------------+
bool CRadioButtons::OnClickButton(const string pressed_object)
  {
//--- 押されたのがメニュー項目でなかった場合は終了する
   if(::StringFind(pressed_object,CElement::ProgramName()+"_radio_area_",0)<0)
      return(false);
//--- オブジェクト名から識別子とインデックスを取得する
   int id=IdFromObjectName(pressed_object);
//--- 押されたのがこのコンテキストメニューが属する項目に対してでない場合は終了する
   if(id!=CElement::Id())
      return(false);
//--- インデックスのチェック
   int check_index=WRONG_VALUE;
//--- ボタンがブロックされている場合は終了する
   if(!m_radio_buttons_state)
      return(false);
//--- 押下された場合はインデックスを格納する
   int radio_buttons_total=RadioButtonsTotal();
   for(int i=0; i<radio_buttons_total; i++)
     {
      if(m_area[i].Name()==pressed_object)
        {
         check_index=i;
         break;
        }
     }
//--- このグループのボタンが押されず
//   または押されたのがすでに強調表示されたラジオボタンの場合は終了する
   if(check_index==WRONG_VALUE || check_index==m_selected_button_index)
      return(false);
//--- ボタンの状態を切り替える
   SelectionRadioButton(check_index);
//--- それについてシグナルを送信する
   ::EventChartCustom(m_chart_id,ON_CLICK_LABEL,CElement::Id(),check_index,m_selected_button_text);
   return(true);
  }
テストの準備がそろいました。4グループのラジオボタン(CRadioButtons)とシンプルボタンのグループ(CButtonsGroup)を、シンプルボタンのグループのテストに使われたEAに追加します。
class CProgram : public CWndEvents
  {
private:
   //--- ラジオボタングループ1
   CRadioButtons     m_radio_buttons1;
   //--- シンプルボタンのグループ2
   CButtonsGroup     m_buttons_group2;
   //--- ラジオボタングループ2~4
   CRadioButtons     m_radio_buttons2;
   CRadioButtons     m_radio_buttons3;
   CRadioButtons     m_radio_buttons4;
   //---
private:
   //--- ラジオボタングループ1
#define RADIO_BUTTONS1_GAP_X     (7)
#define RADIO_BUTTONS1_GAP_Y     (75)
   bool              CreateRadioButtons1();
   //--- シンプルボタンのグループ2
#define BUTTONS_GROUP2_GAP_X     (7)
#define BUTTONS_GROUP2_GAP_Y     (100)
   bool              CreateButtonsGroup2(void);
   //--- ラジオボタングループ2~4
#define RADIO_BUTTONS2_GAP_X     (7)
#define RADIO_BUTTONS2_GAP_Y     (125)
   bool              CreateRadioButtons2();
#define RADIO_BUTTONS3_GAP_X     (105)
#define RADIO_BUTTONS3_GAP_Y     (125)
   bool              CreateRadioButtons3();
#define RADIO_BUTTONS4_GAP_X     (203)
#define RADIO_BUTTONS4_GAP_Y     (125)
   bool              CreateRadioButtons4();
  };
//+------------------------------------------------------------------+
//| 取引パネルを作成する                                        |
//+------------------------------------------------------------------+
bool CProgram::CreateTradePanel(void)
  {
//--- コントロールフォームの作成
//--- コントロールの作成
//    メインメニュー
//--- コンテキストメニュー
//--- シンプルボタンのグループ1
//--- ラジオボタングループ1
   if(!CreateRadioButtons1())
      return(false);
//--- シンプルボタンのグループ2
   if(!CreateButtonsGroup2())
      return(false);
   //--- ラジオボタングループ2~4
   if(!CreateRadioButtons2())
      return(false);
   if(!CreateRadioButtons3())
      return(false);
   if(!CreateRadioButtons4())
      return(false);
//--- チャートの再描画
   m_chart.Redraw();
   return(true);
  }
ここでは、例として、それらのいずれかのメソッドの実装を使用します。残りで異なるのはパラメータ値のみです。
//+------------------------------------------------------------------+
//| ラジオボタングループ1を作成する                                 |
//+------------------------------------------------------------------+
bool CProgram::CreateRadioButtons1(void)
  {
//--- パネルオブジェクトを受け渡す
   m_radio_buttons1.WindowPointer(m_window);
//--- 座標
   int x =m_window.X()+RADIO_BUTTONS1_GAP_X;
   int y =m_window.Y()+RADIO_BUTTONS1_GAP_Y;
//--- プロパティ
   int    buttons_x_offset[] ={0,98,196};
   int    buttons_y_offset[] ={0,0,0};
   string buttons_text[]     ={"Radio Button 1","Radio Button 2","Radio Button 3"};
   int    buttons_width[]    ={92,92,92};
//---
   for(int i=0; i<3; i++)
      m_radio_buttons1.AddButton(buttons_x_offset[i],buttons_y_offset[i],buttons_text[i],buttons_width[i]);
//--- ボタンのグループを作成する
   if(!m_radio_buttons1.CreateRadioButtons(m_chart_id,m_subwin,x,y))
      return(false);
//--- グループの2番目のボタンを強調表示する
   m_radio_buttons1.SelectedRadioButton(1);
//--- ラジオボタンをブロックする
   m_radio_buttons1.RadioButtonsState(false);
//--- オブジェクトをオブジェクトグループの共通配列に追加する
   CWndContainer::AddToElementsArray(0,m_radio_buttons1);
   return(true);
  }
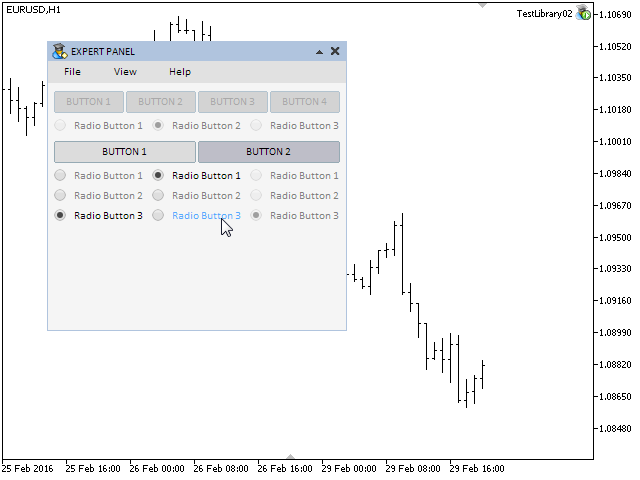
後一つのCButtonsGroup型のボタングループに2つのボタンを作成しましょう。イラストのために2番目のボタンが1番目のシンプル/ラジオボタンのグループをブロックし1番目のものがそれを利用可能にするとしましょう。
//+------------------------------------------------------------------+
//| イベントハンドラ                                                    |
//+------------------------------------------------------------------+
void CProgram::OnEvent(const int id,const long &lparam,const double &dparam,const string &sparam)
  {
//--- ボタン押下イベント
   if(id==CHARTEVENT_CUSTOM+ON_CLICK_BUTTON)
     {
      ::Print("id: ",id,"; lparam: ",lparam,"; dparam: ",dparam,"; sparam: ",sparam);
      //--- 2番目のグループの識別子かシンプルボタンと
      //    グループで強調表示されたボタンのテキストがメッセージの文字列パラメータに一致した場合
      if(lparam==m_buttons_group2.Id() && sparam==m_buttons_group2.SelectedButtonText())
        {
         //--- これが最初のボタンのインデックスである場合は指定したコントロールのブロックを解除する
         if((int)dparam==0)
           {
            m_buttons_group1.ButtonsGroupState(true);
            m_radio_buttons1.RadioButtonsState(true);
           }
         //--- これが2番目のボタンのインデックスである場合は指定したコントロールをブロックする
         else
           {
            m_buttons_group1.ButtonsGroupState(false);
            m_radio_buttons1.RadioButtonsState(false);
           }
        }
      return;
     }
  }
ファイルをコンパイルしてプログラムをチャートに読み込みます。開発の現段階では、以下のスクリーンショットに示されたような結果が得られるはずです。

図4。ラジオボタンコントロールのテスト
ラジオボタンコントロールのグループを作成するためのクラスの開発がこれで終了です。ファイルの完全なバージョンは本稿添付のファイルでダウンロードできます。
アイコンボタンのグループを作成するクラスの開発
アイコンボタンコントロールを作成するCIconButtonクラスはすでに作成しました。ここで、このようなボタングループの作成を可能にするコントロールを実装します。以前に作成したコントロールクラスが位置するControlsフォルダに、CIconButtonsGroupクラスを持った IconButtonsGroup.mqhファイルを作成し、標準的な仮想メソッドを宣言/実装します。このファイルをライブラリのWndContainer.mqhに含みます。
CIconButtonsGroupクラスは実質的にはCButtonsGroupとCRadioButtonsクラスで考慮されたメソッドの組み合わせなので、ここではその詳細は説明されません。ラジオボタンのCRadioButtonsクラスと同じように、ボタングループのオブジェクトはコントロール作成のメインメソッドのprivateメソッドで反復して作成されます。これらのメソッドの唯一のパラメータは、グラフィカルオブジェクトの名前を形成するために使用されるインデックスです。このグループのボタンは、カーソルはが上で移動されたときに背景色とテキストを変更するように手配することができます。
イベントの取扱いに関するメソッドは、既に本稿に記載されています。それらはこのタイプのボタングループでは同じなのでここではコードでCIconButtonsGroupクラスの内容のみを示します。クラス本体の外側にあるメソッドの実装は、本稿添付のファイルに記載されています。
//+------------------------------------------------------------------+
//| アイコンボタンのグループを作成するクラス                     |
//+------------------------------------------------------------------+
class CIconButtonsGroup : public CElement
  {
private:
   //--- コントロールが接続されるフォームへのポインタ
   CWindow          *m_wnd;
   //--- ボタン作成のためのオブジェクト
   CButton           m_buttons[];
   CBmpLabel         m_icons[];
   CLabel            m_labels[];
   //--- テキストラベルのグラデーション
   struct IconButtonsGradients
     {
      color             m_back_color_array[];
      color             m_label_color_array[];
     };
   IconButtonsGradients   m_icon_buttons_total[];
   //--- ボタンプロパティ:
   //    ボタンのユニークなプロパティの配列
   bool              m_buttons_state[];
   int               m_buttons_x_gap[];
   int               m_buttons_y_gap[];
   string            m_buttons_text[];
   int               m_buttons_width[];
   string            m_icon_file_on[];
   string            m_icon_file_off[];
   //--- ボタンの縦幅
   int               m_buttons_y_size;
   //--- 異なるモードでの背景色
   color             m_back_color;
   color             m_back_color_off;
   color             m_back_color_hover;
   color             m_back_color_pressed;
   //--- フレームの色
   color             m_border_color;
   color             m_border_color_off;
   //--- アイコンのマージン
   int               m_icon_x_gap;
   int               m_icon_y_gap;
   //--- テキストとテキストラベルマージン
   int               m_label_x_gap;
   int               m_label_y_gap;
   //--- 異なるモードでのテキストラベルの色
   color             m_label_color;
   color             m_label_color_off;
   color             m_label_color_hover;
   color             m_label_color_pressed;
   //--- 強調表示されたボタンの(1) テキストと (2) インデックス
   string            m_selected_button_text;
   int               m_selected_button_index;
   //--- クリックできないオブジェクトの一般的なプロパティ
   int               m_zorder;
   //--- マウスの左クリックのプロパティ
   int               m_buttons_zorder;
   //--- 使用可能/ブロック
   bool              m_icon_buttons_state;
   //---
public:
                     CIconButtonsGroup(void);
                    ~CIconButtonsGroup(void);
   //--- ボタン作成メソッド
   bool              CreateIconButtonsGroup(const long chart_id,const int window,const int x,const int y);
   //---
private:
   bool              CreateButton(const int index);
   bool              CreateIcon(const int index);
   bool              CreateLabel(const int index);
   //---
public:
   //--- (1) フォームポインタの格納 (2) ボタンの縦幅 (3) ボタン数
   //    (4) ボタンの一般的な状態(使用可能/ブロック)
   void              WindowPointer(CWindow &object)               { m_wnd=::GetPointer(object);      }
   void              ButtonsYSize(const int y_size)               { m_buttons_y_size=y_size;         }
   int               IconButtonsTotal(void)                 const { return(::ArraySize(m_icons));    }
   bool              IconButtonsState(void)                 const { return(m_icon_buttons_state);    }
   void              IconButtonsState(const bool state);
   //--- ボタンの背景色
   void              BackColor(const color clr)                   { m_back_color=clr;                }
   void              BackColorOff(const color clr)                { m_back_color_off=clr;            }
   void              BackColorHover(const color clr)              { m_back_color_hover=clr;          }
   void              BackColorPressed(const color clr)            { m_back_color_pressed=clr;        }
   //--- アイコンのマージン
   void              IconXGap(const int x_gap)                    { m_icon_x_gap=x_gap;              }
   void              IconYGap(const int y_gap)                    { m_icon_y_gap=y_gap;              }
   //--- テキストラベルのマージン
   void              LabelXGap(const int x_gap)                   { m_label_x_gap=x_gap;             }
   void              LabelYGap(const int y_gap)                   { m_label_y_gap=y_gap;             }
   //--- 強調表示されたボタンの(1) テキストと (2) インデックスを返す
   string            SelectedButtonText(void)               const { return(m_selected_button_text);  }
   int               SelectedButtonIndex(void)              const { return(m_selected_button_index); }
   //--- 指定されたインデックスによってラジオボタンの状態を切り替える
   void              SelectedRadioButton(const int index);

   //--- 作成前に指定されたプロパティを持つボタンを追加する
   void              AddButton(const int x_gap,const int y_gap,const string text,
                               const int width,const string icon_file_on,const string icon_file_off);
   //--- 色の変更
   void              ChangeObjectsColor(void);
   //---
public:
   //--- チャートイベントハンドラ
   virtual void      OnEvent(const int id,const long &lparam,const double &dparam,const string &sparam);
   //--- タイマー
   virtual void      OnEventTimer(void);
   //--- コントロールの移動
   virtual void      Moving(const int x,const int y);
   //--- (1)表示 (2)非表示 (3)リセット (4)削除
   virtual void      Show(void);
   virtual void      Hide(void);
   virtual void      Reset(void);
   virtual void      Delete(void);
   //--- マウスの左クリックの優先順位の(1)設定と(2)リセット
   virtual void      SetZorders(void);
   virtual void      ResetZorders(void);
   //---
private:
   //--- ボタンの押下を処理する
   bool              OnClickButton(const string pressed_object);
   //--- グループボタンで押下された左マウスボタンをチェックする
   void              CheckPressedOverButton(void);
   //--- ラジオボタン名からの識別子の取得
   int               IdFromObjectName(const string object_name);
  };
このコントロールをテストしましょう。例として、アイコンボタンのグループを先にCButtonsGroupとCRadioButtons型のボタンをテストしたEAのフォームに作成します。そのために、以下のコードに示されたようにカスタムクラスへのコードの行を追加します。
class CProgram : public CWndEvents
  {
private:
   //--- アイコンボタンのグループ1
   CIconButtonsGroup m_icon_buttons_group1;
   //---
private:
   //--- アイコンボタンのグループ1
#define IBUTTONS_GROUP1_GAP_X    (7)
#define IBUTTONS_GROUP1_GAP_Y    (190)
   bool              CreateIconButtonsGroup1(void);
  };
//+------------------------------------------------------------------+
//| 取引パネルを作成する                                        |
//+------------------------------------------------------------------+
bool CProgram::CreateTradePanel(void)
  {
//--- コントロールフォームの作成
//--- コントロールの作成
//    メインメニュー
//--- コンテキストメニュー
//--- シンプルボタンのグループ1
//--- ラジオボタングループ1
//--- シンプルボタンのグループ2
//--- ラジオボタングループ2~4
//--- アイコンボタンのグループ1
   if(!CreateIconButtonsGroup1())
      return(false);
//--- チャートの再描画
   m_chart.Redraw();
   return(true);
  }
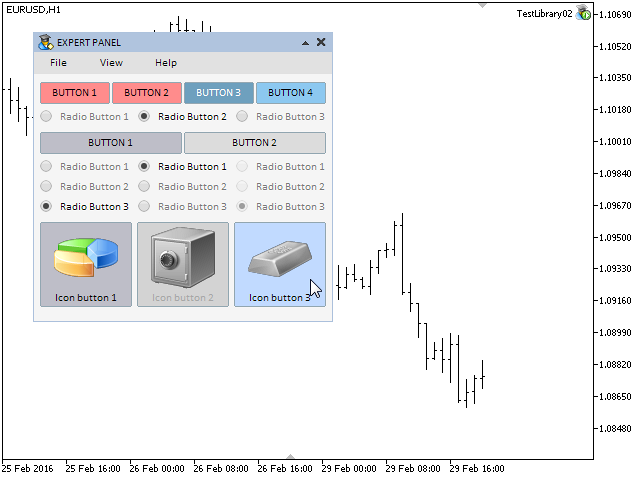
ファイルをコンパイルしてプログラムをチャートに読み込みます。結果は以下のスクリーンショットのようなはずです。

図5。アイコンボタンのグループのテスト
アイコンボタンコントロールのグループを作成するためのクラスの開発は完了です。ファイルの完全なバージョンは本稿添付のファイルでダウンロードできます。
おわりに
これで、MetaTrader取引ターミナルのグラフィカルインタフェース作成ライブラリの開発に関するシリーズの第3部を終わります。現在、ライブラリの構造は下の図に示されている通りです。

図6。開発の現段階でのライブラリの構造
シリーズの次の(第四部)では、ライブラリを開発していきます。次のトピックが検討されます。:
- マルチウィンドウモード
- グラフィカルオブジェクトのマウスの左クリックの優先順位を管理するシステム
- ステータスバーとツールチップ情報インタフェース要素
以下の現在の開発段階でのライブラリファイルと記事で考察されたプログラム(EA、インディケータ、スクリプト)の写真やファイルのアーカイブは MetaTrader ターミナルのテストのためにダウンロードできます。それらのファイルの資料を使用についてご質問がある場合は、以下のリストにある記事のいずれかでライブラリの開発の詳細をご参照になるるか、本稿へのコメント欄でご質問ください。
第三部の記事(チャプター)のリスト:
MetaQuotes Ltdによってロシア語から翻訳されました。
元の記事: https://www.mql5.com/ru/articles/2298
 グラフィカルインタフェース III: シンプルなボタンと多機能ボタン(チャプター 1)
 テクニカル分析におけるトーマス・デマーク
- 無料取引アプリ
- 8千を超えるシグナルをコピー
- 金融ニュースで金融マーケットを探索
