Manuale MQL5: Expert Advisor multivaluta: approccio semplice, accurato e rapido
Introduzione
Questo articolo descriverà l'implementazione di un approccio semplice, adatto a un Expert Advisor multivaluta. Ciò significa che sarai in grado di impostare l'Expert Advisor per testare/tradare in condizioni identiche ma con parametri diversi per ogni simbolo. Ad esempio creeremo un pattern per due simboli ma in modo tale da poter aggiungere ulteriori simboli, se necessario, apportando piccole modifiche al codice.
Un modello multi-valuta può essere implementato in MQL5 in diversi modi:
Possiamo utilizzare uno schema in cui un Expert Advisor è guidato dal tempo, essendo in grado di eseguire controlli più accurati agli intervalli di tempo specificati nelle OnTimer().
In alternativa, come in tutti gli Expert Advisor introdotti nei precedenti articoli della serie, la verifica può essere effettuata nelle OnTick() nel qual caso l'Expert Advisor dipenderà dai tick per il simbolo corrente sul quale lavora. Quindi, se c'è una barra completata su un altro simbolo, mentre non c'è ancora un segno di spunta per il simbolo corrente, l'Expert Advisor eseguirà un controllo solo una volta che c'è un nuovo segno di spunta per il simbolo corrente.
C'è ancora un'altra opzione interessante suggerita dal suo autore Konstantin Gruzdev (Lizar). Impiega un modello di eventi: utilizzando le OnChartEvent(), un Expert Advisor ottiene eventi che vengono riprodotti da agenti indicatori situati sui grafici dei simboli coinvolti nel test/trading. Gli agenti indicatori possono riprodurre nuovi eventi barra e segno di spunta dei simboli a cui sono collegati. Questo tipo di indicatore (EventsSpy.mq5) può essere scaricato alla fine dell'articolo. Ne avremo bisogno per il funzionamento dell'Expert Advisor.
Sviluppo di Expert Advisor
L'Expert Advisor presentato nell'articolo "MQL5 Cookbook: Utilizzo degli indicatori per impostare le condizioni di trading in Expert Advisor" servirà come modello. Ho già cancellato da esso tutto ciò che aveva a che fare con il pannello informativo e ho anche semplificato la condizione di apertura della posizione come implementato nel precedente articolo intitolato "Ricettario MQL5: Sviluppo di un framework per un sistema di trading basato sulla strategia a triplo schermo". Poiché intendiamo creare un Expert Advisor per due simboli, ognuno di essi avrà bisogno del proprio set di parametri esterni:
//--- External parameters of the Expert Advisor
sinput long   MagicNumber           = 777;      // Magic number
sinput int    Deviation             = 10;       // Slippage
//---
sinput string delimeter_00=""; // --------------------------------
sinput string Symbol_01             = "EURUSD"; // Symbol 1
input  int    IndicatorPeriod_01    = 5;        // |     Indicator period
input  double TakeProfit_01         = 100;      // |     Take Profit
input  double StopLoss_01           = 50;       // |     Stop Loss
input  double TrailingStop_01       = 10;       // |     Trailing Stop
input  bool   Reverse_01            = true;     // |     Position reversal
input  double Lot_01                = 0.1;      // |     Lot
input  double VolumeIncrease_01     = 0.1;      // |     Position volume increase
input  double VolumeIncreaseStep_01 = 10;       // |     Volume increase step
//---
sinput string delimeter_01=""; // --------------------------------
sinput string Symbol_02             = "NZDUSD"; // Symbol 2
input  int    IndicatorPeriod_02    = 5;        // |     Indicator period
input  double TakeProfit_02         = 100;      // |     Take Profit
input  double StopLoss_02           = 50;       // |     Stop Loss
input  double TrailingStop_02       = 10;       // |     Trailing Stop
input  bool   Reverse_02            = true;     // |     Position reversal
input  double Lot_02                = 0.1;      // |     Lot
input  double VolumeIncrease_02     = 0.1;      // |     Position volume increase
input  double VolumeIncreaseStep_02 = 10;       // |     Volume increase step
I parametri esterni verranno inseriti in array le cui dimensioni dipenderanno dal numero di simboli utilizzati. Il numero di simboli utilizzati nell'Expert Advisor sarà determinato dal valore della costante NUMBER_OF_SYMBOLS che dobbiamo creare all'inizio del file:
//--- Number of traded symbols
#define NUMBER_OF_SYMBOLS 2
//--- Name of the Expert Advisor
#define EXPERT_NAME MQL5InfoString(MQL5_PROGRAM_NAME)
Creiamo gli array che saranno necessari per memorizzare i parametri esterni:
//--- Arrays for storing external parameters
string Symbols[NUMBER_OF_SYMBOLS];            // Symbol
int    IndicatorPeriod[NUMBER_OF_SYMBOLS];    // Indicator period
double TakeProfit[NUMBER_OF_SYMBOLS];         // Take Profit
double StopLoss[NUMBER_OF_SYMBOLS];           // Stop Loss
double TrailingStop[NUMBER_OF_SYMBOLS];       // Trailing Stop
bool   Reverse[NUMBER_OF_SYMBOLS];            // Position reversal
double Lot[NUMBER_OF_SYMBOLS];                // Lot
double VolumeIncrease[NUMBER_OF_SYMBOLS];     // Position volume increase
double VolumeIncreaseStep[NUMBER_OF_SYMBOLS]; // Volume increase step
Le funzioni di inizializzazione dell'array verranno inserite nel file include InitArrays.mqh. Per inizializzare l'array Symbols[], creeremo la funzione GetSymbol(). Otterrà il nome del simbolo dai parametri esterni e se tale simbolo è disponibile nell'elenco dei simboli sul server, verrà selezionato nella finestra Market Watch. Oppure, se sul server non è possibile trovare il simbolo richiesto, la funzione restituirà una stringa vuota e il Journal of Expert Advisors verrà aggiornato di conseguenza.
Di seguito è riportato il codice della funzione GetSymbol():
//+------------------------------------------------------------------+
//| Adding the specified symbol to the Market Watch window           |
//+------------------------------------------------------------------+
string GetSymbolByName(string symbol)
  {
   string symbol_name="";   // Symbol name on the server
//--- If an empty string is passed, return the empty string
   if(symbol=="")
      return("");
//--- Iterate over the list of all symbols on the server
   for(int s=0; s<SymbolsTotal(false); s++)
     {
      //--- Get the symbol name
      symbol_name=SymbolName(s,false);
      //--- If the required symbol is available on the server
      if(symbol==symbol_name)
        {
         //--- Select it in the Market Watch window
         SymbolSelect(symbol,true);
         //--- Return the symbol name
         return(symbol);
        }
     }
//--- If the required symbol cannot be found, return the empty string
   Print("The "+symbol+" symbol could not be found on the server!");
   return("");
  }
L'array Symbols[] verrà inizializzato nella funzione GetSymbols():
//+------------------------------------------------------------------+
//| Filling the array of symbols                                     |
//+------------------------------------------------------------------+
void GetSymbols()
  {
   Symbols[0]=GetSymbolByName(Symbol_01);
   Symbols[1]=GetSymbolByName(Symbol_02);
  }
Inoltre, lo implementeremo in modo tale che un valore vuoto nei parametri esterni di un determinato simbolo indichi che il blocco corrispondente non sarà coinvolto nel test/negoziazione. Ciò è necessario per poter ottimizzare i parametri per ciascun simbolo separatamente, escludendo completamente il resto.
Tutti gli altri array di parametri esterni vengono inizializzati allo stesso modo. In altre parole, dobbiamo creare una funzione separata per ogni array. I codici di tutte queste funzioni sono forniti di seguito:
//+------------------------------------------------------------------+
//| Filling the indicator period array                               |
//+------------------------------------------------------------------+
void GetIndicatorPeriod()
  {
   IndicatorPeriod[0]=IndicatorPeriod_01;
   IndicatorPeriod[1]=IndicatorPeriod_02;
  }
//+------------------------------------------------------------------+
//| Filling the Take Profit array                                    |
//+------------------------------------------------------------------+
void GetTakeProfit()
  {
   TakeProfit[0]=TakeProfit_01;
   TakeProfit[1]=TakeProfit_02;
  }
//+------------------------------------------------------------------+
//| Filling the Stop Loss array                                      |
//+------------------------------------------------------------------+
void GetStopLoss()
  {
   StopLoss[0]=StopLoss_01;
   StopLoss[1]=StopLoss_02;
  }
//+------------------------------------------------------------------+
//| Filling the Trailing Stop array                                  |
//+------------------------------------------------------------------+
void GetTrailingStop()
  {
   TrailingStop[0]=TrailingStop_01;
   TrailingStop[1]=TrailingStop_02;
  }
//+------------------------------------------------------------------+
//| Filling the Reverse array                                        |
//+------------------------------------------------------------------+
void GetReverse()
  {
   Reverse[0]=Reverse_01;
   Reverse[1]=Reverse_02;
  }
//+------------------------------------------------------------------+
//| Filling the Lot array                                            |
//+------------------------------------------------------------------+
void GetLot()
  {
   Lot[0]=Lot_01;
   Lot[1]=Lot_02;
  }
//+------------------------------------------------------------------+
//| Filling the VolumeIncrease array                                 |
//+------------------------------------------------------------------+
void GetVolumeIncrease()
  {
   VolumeIncrease[0]=VolumeIncrease_01;
   VolumeIncrease[1]=VolumeIncrease_02;
  }
//+------------------------------------------------------------------+
//| Filling the VolumeIncreaseStep array                             |
//+------------------------------------------------------------------+
void GetVolumeIncreaseStep()
  {
   VolumeIncreaseStep[0]=VolumeIncreaseStep_01;
   VolumeIncreaseStep[1]=VolumeIncreaseStep_02;
  }
Creiamo ora una funzione che ci aiuterà a inizializzare comodamente tutti gli array di parametri esterni contemporaneamente: la funzione InitializeInputParameters():
//+------------------------------------------------------------------+
//| Initializing external parameter arrays                           |
//+------------------------------------------------------------------+
void InitializeInputParameters()
  {
   GetSymbols();
   GetIndicatorPeriod();
   GetTakeProfit();
   GetStopLoss();
   GetTrailingStop();
   GetReverse();
   GetLot();
   GetVolumeIncrease();
   GetVolumeIncreaseStep();
  }
Dopo l'inizializzazione degli array di parametri esterni, possiamo procedere alla parte principale. Alcune procedure come ottenere le maniglie degli indicatori, i loro valori e le informazioni sui prezzi, così come il controllo della nuova barra, ecc., verranno eseguite in loop consecutivamente per ciascun simbolo. Questo è il motivo per cui i valori dei parametri esterni sono stati organizzati in array. Quindi tutto sarà fatto nei loop come segue:
//--- Iterate over all symbols
for(int s=0; s<NUMBER_OF_SYMBOLS; s++)
  {
//--- If trading for this symbol is allowed
   if(Symbols[s]!="")
     {
      //--- The rest of the code
     }
  }
Ma prima di iniziare a modificare le funzioni esistenti e a crearne di nuove, creiamo anche gli array che saranno richiesti in quel modello.
Avremo bisogno di due array per gli handle degli indicatori:
//--- Array of indicator agent handles
int spy_indicator_handles[NUMBER_OF_SYMBOLS];
//--- Array of signal indicator handles
int signal_indicator_handles[NUMBER_OF_SYMBOLS];
Questi due array verranno prima inizializzati su valori non validi:
//+------------------------------------------------------------------+
//| Initializing arrays of indicator handles                         |
//+------------------------------------------------------------------+
void InitializeArrayHandles()
  {
   ArrayInitialize(spy_indicator_handles,INVALID_HANDLE);
   ArrayInitialize(signal_indicator_handles,INVALID_HANDLE);
  }
Ora sarà possibile accedere a matrici di dati sui prezzi e valori degli indicatori utilizzando Strutture e :
//--- Data arrays for checking trading conditions
struct PriceData
  {
   double            value[];
  };
PriceData open[NUMBER_OF_SYMBOLS];      // Opening price of the bar
PriceData high[NUMBER_OF_SYMBOLS];      // High price of the bar
PriceData low[NUMBER_OF_SYMBOLS];       // Low price of the bar
PriceData close[NUMBER_OF_SYMBOLS];     // Closing price of the bar
PriceData indicator[NUMBER_OF_SYMBOLS]; // Array of indicator values
Ora, se hai bisogno di ottenere il valore dell'indicatore sull'ultima barra completata del primo simbolo nell'elenco, dovresti scrivere qualcosa del genere:
double indicator_value=indicator[0].value[1];
Abbiamo anche bisogno di creare array invece delle variabili che sono state precedentemente utilizzate nella funzione CheckNewBar():
//--- Arrays for getting the opening time of the current bar
struct Datetime
  {
   datetime          time[];
  };
Datetime lastbar_time[NUMBER_OF_SYMBOLS];
//--- Array for checking the new bar for each symbol
datetime new_bar[NUMBER_OF_SYMBOLS];
Quindi abbiamo organizzato gli array. Ora dobbiamo modificare una serie di funzioni in base alle modifiche apportate sopra. Iniziamo con la funzione GetIndicatorHandles():
//+------------------------------------------------------------------+
//| Getting indicator handles                                        |
//+------------------------------------------------------------------+
void GetIndicatorHandles()
  {
//--- Iterate over all symbols
   for(int s=0; s<NUMBER_OF_SYMBOLS; s++)
     {
      //--- If trading for this symbol is allowed
      if(Symbols[s]!="")
        {
         //--- If the handle is yet to be obtained
         if(signal_indicator_handles[s]==INVALID_HANDLE)
           {
            //--- Get the indicator handle
            signal_indicator_handles[s]=iMA(Symbols[s],_Period,IndicatorPeriod[s],0,MODE_SMA,PRICE_CLOSE);
            //--- If the indicator handle could not be obtained
            if(signal_indicator_handles[s]==INVALID_HANDLE)
               Print("Failed to get the indicator handle for the symbol "+Symbols[s]+"!");
           }
        }
     }
  }
Ora, indipendentemente dal numero di simboli utilizzati nei test/trading, il codice della funzione rimarrà lo stesso.
Allo stesso modo, creeremo un'altra funzione, GetSpyHandles(), per ottenere handle di agenti indicatori che trasmetteranno tick da altri simboli. Ma prima, aggiungeremo un'ulteriore enumerazione di tutti gli eventi per simbolo, ENUM_CHART_EVENT_SYMBOL, disposti come flag nel file Enums.mqh:
//+------------------------------------------------------------------+
//| New bar and tick events from all symbols and time frames         |
//+------------------------------------------------------------------+
enum ENUM_CHART_EVENT_SYMBOL
  {
   CHARTEVENT_NO         = 0,          // Events are disabled - 0
   CHARTEVENT_INIT       = 0,          // Initialization event - 0
   //---
   CHARTEVENT_NEWBAR_M1  = 0x00000001, // New bar event on a minute chart (1)
   CHARTEVENT_NEWBAR_M2  = 0x00000002, // New bar event on a 2-minute chart (2)
   CHARTEVENT_NEWBAR_M3  = 0x00000004, // New bar event on a 3-minute chart (4)
   CHARTEVENT_NEWBAR_M4  = 0x00000008, // New bar event on a 4-minute chart (8)
   //---
   CHARTEVENT_NEWBAR_M5  = 0x00000010, // New bar event on a 5-minute chart (16)
   CHARTEVENT_NEWBAR_M6  = 0x00000020, // New bar event on a 6-minute chart (32)
   CHARTEVENT_NEWBAR_M10 = 0x00000040, // New bar event on a 10-minute chart (64)
   CHARTEVENT_NEWBAR_M12 = 0x00000080, // New bar event on a 12-minute chart (128)
   //---
   CHARTEVENT_NEWBAR_M15 = 0x00000100, // New bar event on a 15-minute chart (256)
   CHARTEVENT_NEWBAR_M20 = 0x00000200, // New bar event on a 20-minute chart (512)
   CHARTEVENT_NEWBAR_M30 = 0x00000400, // New bar event on a 30-minute chart (1024)
   CHARTEVENT_NEWBAR_H1  = 0x00000800, // New bar event on an hour chart (2048)
   //---
   CHARTEVENT_NEWBAR_H2  = 0x00001000, // New bar event on a 2-hour chart (4096)
   CHARTEVENT_NEWBAR_H3  = 0x00002000, // New bar event on a 3-hour chart (8192)
   CHARTEVENT_NEWBAR_H4  = 0x00004000, // New bar event on a 4-hour chart (16384)
   CHARTEVENT_NEWBAR_H6  = 0x00008000, // New bar event on a 6-hour chart (32768)
   //---
   CHARTEVENT_NEWBAR_H8  = 0x00010000, // New bar event on a 8-hour chart (65536)
   CHARTEVENT_NEWBAR_H12 = 0x00020000, // New bar event on a 12-hour chart (131072)
   CHARTEVENT_NEWBAR_D1  = 0x00040000, // New bar event on a daily chart (262144)
   CHARTEVENT_NEWBAR_W1  = 0x00080000, // New bar event on a weekly chart (524288)
   //---
   CHARTEVENT_NEWBAR_MN1 = 0x00100000, // New bar event on a monthly chart (1048576)
   CHARTEVENT_TICK       = 0x00200000, // New tick event (2097152)
   //---
   CHARTEVENT_ALL        = 0xFFFFFFFF  // All events are enabled (-1)
  };
Questa enumerazione è necessaria per lavorare con l'indicatore personalizzato EventsSpy.mq5 (il file è allegato all'articolo) nella funzione GetSpyHandles() il cui codice è fornito di seguito:
//+------------------------------------------------------------------+
//| Getting agent handles by the specified symbols                   |
//+------------------------------------------------------------------+
void GetSpyHandles()
  {
//--- Iterate over all symbols
   for(int s=0; s<NUMBER_OF_SYMBOLS; s++)
     {
      //--- If trading for this symbol is allowed
      if(Symbols[s]!="")
        {
         //--- If the handle is yet to be obtained
         if(spy_indicator_handles[s]==INVALID_HANDLE)
           {
            //--- Get the indicator handle
            spy_indicator_handles[s]=iCustom(Symbols[s],_Period,"EventsSpy.ex5",ChartID(),0,CHARTEVENT_TICK);
            //--- If the indicator handle could not be obtained
            if(spy_indicator_handles[s]==INVALID_HANDLE)
               Print("Failed to install the agent on "+Symbols[s]+"");
           }
        }
     }
  }
Si prega di notare l'ultimo parametro nella funzione iCustom(): in questo caso, l'identificatore CHARTEVENT_TICK è stato utilizzato per ottenere eventi tick. Ma se è necessario, può essere modificato per ottenere i nuovi eventi della barra. Ad esempio, se utilizzi la riga come mostrato di seguito, Expert Advisor otterrà nuovi eventi barra su intervalli di tempo di un minuto (M1) e un'ora (H1):
handle_event_indicator[s]=iCustom(Symbols[s],_Period,"EventsSpy.ex5",ChartID(),0,CHARTEVENT_NEWBAR_M1|CHARTEVENT_NEWBAR_H1);
Per ottenere tutti gli eventi (tick e bar events su tutti i time frame), è necessario specificare l'identificatore CHARTEVENT_ALL.
Tutti gli array sono inizializzati nelle OnInit():
//+------------------------------------------------------------------+
//| Expert initialization function                                   |
//+------------------------------------------------------------------+
void OnInit()
  {
//--- Initialization of arrays of external parameters
   InitializeInputParameters();
//--- Initialization of arrays of indicator handles
   InitializeArrayHandles();
//--- Get agent handles
   GetSpyHandles();
//--- Get indicator handles
   GetIndicatorHandles();
//--- Initialize the new bar
   InitializeArrayNewBar();
  }
Come già accennato all'inizio dell'articolo, gli eventi dagli agenti indicatori vengono ricevuti nelle OnChartEvent(). Di seguito è riportato il codice che verrà utilizzato in questa funzione:
//+------------------------------------------------------------------+
//| Chart events handler                                             |
//+------------------------------------------------------------------+
void OnChartEvent(const int id,         // Event identifier
                  const long &lparam,   // Long type event parameter
                  const double &dparam, // Double type event parameter
                  const string &sparam) // String type event parameter
  {
//--- If this is a custom event
   if(id>=CHARTEVENT_CUSTOM)
     {
      //--- Exit if trading is not allowed
      if(CheckTradingPermission()>0)
         return;
      //--- If there was a tick event
      if(lparam==CHARTEVENT_TICK)
        {
         //--- Check signals and trade on them
         CheckSignalsAndTrade();
         return;
        }
     }
  }
Nella funzione CheckSignalAndTrade() (la riga evidenziata nel codice sopra), avremo un ciclo in cui tutti i simboli verranno alternativamente controllati per il nuovo evento bar e segnali di trading come implementato in precedenza nelle OnTick() funzione:
//+------------------------------------------------------------------+
//| Checking signals and trading based on the new bar event          |
//+------------------------------------------------------------------+
void CheckSignalsAndTrade()
  {
//--- Iterate over all specified symbols
   for(int s=0; s<NUMBER_OF_SYMBOLS; s++)
     {
      //--- If trading for this symbol is allowed
      if(Symbols[s]!="")
        {
         //--- If the bar is not new, proceed to the next symbol
         if(!CheckNewBar(s))
            continue;
         //--- If there is a new bar
         else
           {
            //--- Get indicator data. If there is no data, proceed to the next symbol
            if(!GetIndicatorsData(s))
               continue;
            //--- Get bar data
            GetBarsData(s);
            //--- Check the conditions and trade
            TradingBlock(s);
            //--- Trailing Stop
            ModifyTrailingStop(s);
           }
        }
     }
  }
Tutte le funzioni che utilizzavano i parametri esterni, così come i dati dei simboli e degli indicatori, devono essere modificate in conformità con tutte le modifiche di cui sopra. A tal fine, dovremmo aggiungere il numero del simbolo come primo parametro e sostituire tutte le variabili e gli array all'interno della funzione con i nuovi array descritti sopra.
A titolo illustrativo, di seguito sono forniti i codici rivisti delle funzioni CheckNewBar(), TradingBlock() e OpenPosition().
Il codice della funzione CheckNewBar():
//+------------------------------------------------------------------+
//| Checking for the new bar                                         |
//+------------------------------------------------------------------+
bool CheckNewBar(int number_symbol)
  {
//--- Get the opening time of the current bar
//    If an error occurred when getting the time, print the relevant message
   if(CopyTime(Symbols[number_symbol],Period(),0,1,lastbar_time[number_symbol].time)==-1)
      Print(__FUNCTION__,": Error copying the opening time of the bar: "+IntegerToString(GetLastError()));
//--- If this is a first function call
   if(new_bar[number_symbol]==NULL)
     {
      //--- Set the time
      new_bar[number_symbol]=lastbar_time[number_symbol].time[0];
      Print(__FUNCTION__,": Initialization ["+Symbols[number_symbol]+"][TF: "+TimeframeToString(Period())+"]["
            +TimeToString(lastbar_time[number_symbol].time[0],TIME_DATE|TIME_MINUTES|TIME_SECONDS)+"]");
      return(false);
     }
//--- If the time is different
   if(new_bar[number_symbol]!=lastbar_time[number_symbol].time[0])
     {
      //--- Set the time and exit
      new_bar[number_symbol]=lastbar_time[number_symbol].time[0];
      return(true);
     }
//--- If we have reached this line, then the bar is not new, so return false
   return(false);
  }
Il codice della funzione TradingBlock():
//+------------------------------------------------------------------+
//| Trading block                                                    |
//+------------------------------------------------------------------+
void TradingBlock(int symbol_number)
  {
   ENUM_ORDER_TYPE      signal=WRONG_VALUE;                 // Variable for getting a signal
   string               comment="hello :)";                 // Position comment
   double               tp=0.0;                             // Take Profit
   double               sl=0.0;                             // Stop Loss
   double               lot=0.0;                            // Volume for position calculation in case of position reversal
   double               position_open_price=0.0;            // Position opening price
   ENUM_ORDER_TYPE      order_type=WRONG_VALUE;             // Order type for opening a position
   ENUM_POSITION_TYPE   opposite_position_type=WRONG_VALUE; // Opposite position type
//--- Find out if there is a position
   pos.exists=PositionSelect(Symbols[symbol_number]);
//--- Get the signal
   signal=GetTradingSignal(symbol_number);
//--- If there is no signal, exit
   if(signal==WRONG_VALUE)
      return;
//--- Get symbol properties
   GetSymbolProperties(symbol_number,S_ALL);
//--- Determine values for trade variables
   switch(signal)
     {
      //--- Assign values to variables for a BUY
      case ORDER_TYPE_BUY  :
         position_open_price=symb.ask;
         order_type=ORDER_TYPE_BUY;
         opposite_position_type=POSITION_TYPE_SELL;
         break;
         //--- Assign values to variables for a SELL
      case ORDER_TYPE_SELL :
         position_open_price=symb.bid;
         order_type=ORDER_TYPE_SELL;
         opposite_position_type=POSITION_TYPE_BUY;
         break;
     }
//--- Get the Take Profit and Stop Loss levels
   sl=CalculateStopLoss(symbol_number,order_type);
   tp=CalculateTakeProfit(symbol_number,order_type);
//--- If there is no position
   if(!pos.exists)
     {
      //--- Adjust the volume
      lot=CalculateLot(symbol_number,Lot[symbol_number]);
      //--- Open a position
      OpenPosition(symbol_number,lot,order_type,position_open_price,sl,tp,comment);
     }
//--- If the position exists
   else
     {
      //--- Get the position type
      GetPositionProperties(symbol_number,P_TYPE);
      //--- If the position is opposite to the signal and the position reversal is enabled
      if(pos.type==opposite_position_type && Reverse[symbol_number])
        {
         //--- Get the position volume
         GetPositionProperties(symbol_number,P_VOLUME);
         //--- Adjust the volume
         lot=pos.volume+CalculateLot(symbol_number,Lot[symbol_number]);
         //--- Reverse the position
         OpenPosition(symbol_number,lot,order_type,position_open_price,sl,tp,comment);
         return;
        }
      //--- If the signal is in the direction of the position and the volume increase is enabled, increase the position volume
      if(!(pos.type==opposite_position_type) && VolumeIncrease[symbol_number]>0)
        {
         //--- Get the Stop Loss of the current position
         GetPositionProperties(symbol_number,P_SL);
         //--- Get the Take Profit of the current position
         GetPositionProperties(symbol_number,P_TP);
         //--- Adjust the volume
         lot=CalculateLot(symbol_number,VolumeIncrease[symbol_number]);
         //--- Increase the position volume
         OpenPosition(symbol_number,lot,order_type,position_open_price,pos.sl,pos.tp,comment);
         return;
        }
     }
  }
Il codice della funzione OpenPosition():
//+------------------------------------------------------------------+
//| Opening a position                                               |
//+------------------------------------------------------------------+
void OpenPosition(int symbol_number,
                  double lot,
                  ENUM_ORDER_TYPE order_type,
                  double price,
                  double sl,
                  double tp,
                  string comment)
  {
//--- Set the magic number in the trading structure
   trade.SetExpertMagicNumber(MagicNumber);
//--- Set the slippage in points
   trade.SetDeviationInPoints(CorrectValueBySymbolDigits(Deviation));
//--- Instant Execution and Market Execution mode
//    *** Starting with build 803, Stop Loss and Take Profit ***
//    *** can be set upon opening a position in the SYMBOL_TRADE_EXECUTION_MARKET mode ***
   if(symb.execution_mode==SYMBOL_TRADE_EXECUTION_INSTANT ||
      symb.execution_mode==SYMBOL_TRADE_EXECUTION_MARKET)
     {
      //--- If the position failed to open, print the relevant message
      if(!trade.PositionOpen(Symbols[symbol_number],order_type,lot,price,sl,tp,comment))
         Print("Error opening the position: ",GetLastError()," - ",ErrorDescription(GetLastError()));
     }
  }
Quindi, ogni funzione ora riceve il numero del simbolo (symbol_number). Si prega di notare anche la modifica introdotta nella build 803:
I codici rivisti delle altre funzioni si trovano nei file allegati. Tutto ciò che dobbiamo fare ora è ottimizzare i parametri ed eseguire i test.
Ottimizzazione dei parametri e test Expert Advisor
Ottimizzeremo prima i parametri per il primo simbolo e poi per il secondo. Cominciamo con EURUSD.
Di seguito sono riportate le impostazioni dello Strategy Tester:

Fig. 1. Impostazioni del tester di strategia.
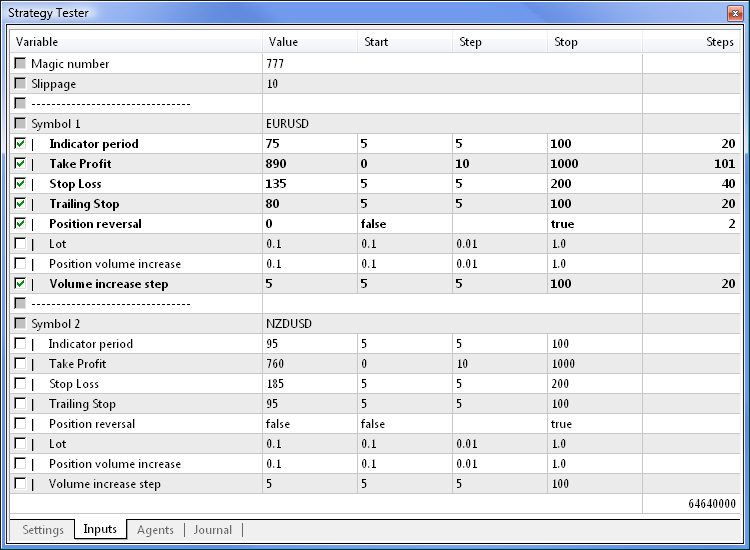
Le impostazioni dell'Expert Advisor devono essere effettuate come mostrato di seguito (per comodità, i file .set contenenti le impostazioni per ogni simbolo sono allegati all'articolo). Per escludere un determinato simbolo dall'ottimizzazione, è sufficiente lasciare vuoto il campo del parametro del nome del simbolo. Anche l'ottimizzazione dei parametri eseguita separatamente per ciascun simbolo accelererà il processo di ottimizzazione.

Fig. 2. Impostazioni Expert Advisor per l'ottimizzazione dei parametri: EURUSD.
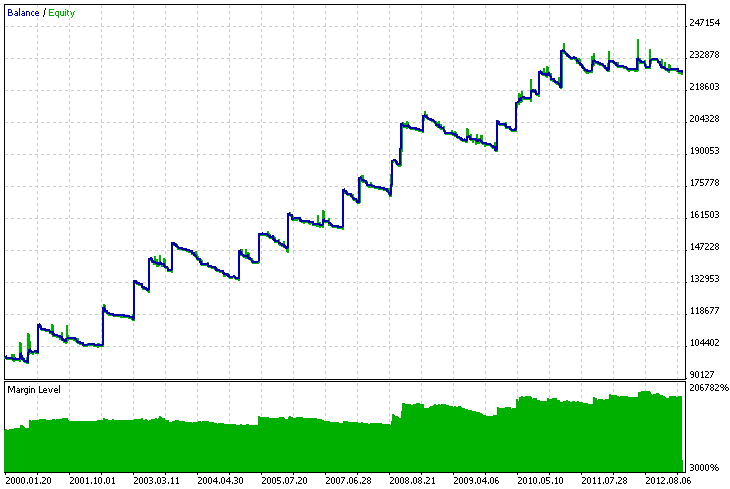
L'ottimizzazione richiederà circa un'ora su un processore dual-core. I risultati del test del fattore di recupero massimo sono mostrati di seguito:

Fig. 3. Risultati del test del fattore di recupero massimo per EURUSD.
Ora imposta NZDUSD come secondo simbolo. Per l'ottimizzazione, lasciare vuota la riga con il nome del simbolo per il primo blocco di parametri.
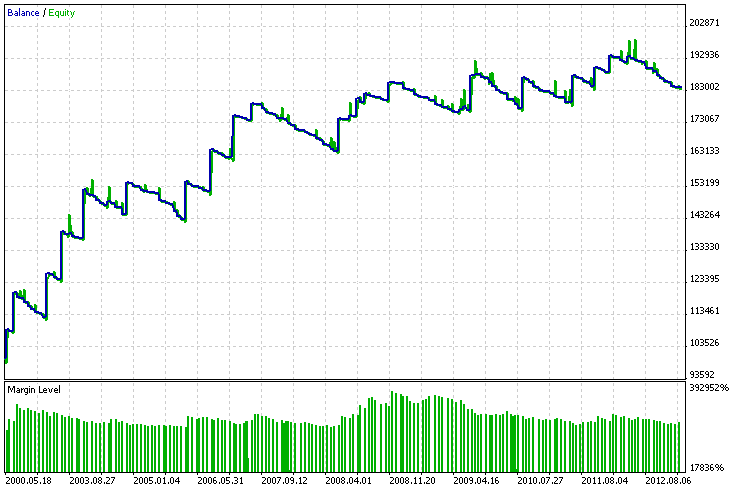
I risultati per NZDUSD sono sembrati essere i seguenti:

Fig. 4. Risultati del test del fattore di recupero massimo per NZDUSD.
Ora possiamo testare due simboli insieme. Nelle impostazioni di Strategy Tester, puoi impostare qualsiasi simbolo su cui viene lanciato l'Expert Advisor poiché i risultati saranno identici. Può anche essere un simbolo che non è coinvolto nel trading/test.
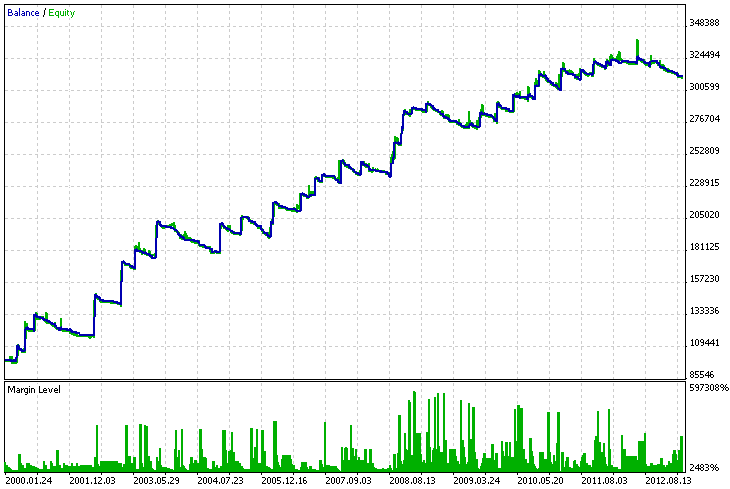
Di seguito sono riportati i risultati per due simboli testati insieme:

Fig. 5. Risultati del test per due simboli: EURUSD e NZDUSD.
Conclusione
Questo è tutto. I codici sorgente sono allegati di seguito e possono essere scaricati per uno studio più dettagliato di quanto sopra. Per fare pratica, prova a selezionare uno o più simboli o cambia le condizioni di apertura della posizione usando altri indicatori.
Dopo aver estratto i file dall'archivio, posizionare la cartella MultiSymbolExpert nella directory MetaTrader 5\MQL5\Experts. Inoltre, l'indicatore EventsSpy.mq5 deve essere inserito nella directory MetaTrader 5\MQL5\Indicators.
Tradotto dal russo da MetaQuotes Ltd.
Articolo originale: https://www.mql5.com/ru/articles/648
Avvertimento: Tutti i diritti su questi materiali sono riservati a MetaQuotes Ltd. La copia o la ristampa di questi materiali in tutto o in parte sono proibite.
Questo articolo è stato scritto da un utente del sito e riflette le sue opinioni personali. MetaQuotes Ltd non è responsabile dell'accuratezza delle informazioni presentate, né di eventuali conseguenze derivanti dall'utilizzo delle soluzioni, strategie o raccomandazioni descritte.
- App di trading gratuite
- Oltre 8.000 segnali per il copy trading
- Notizie economiche per esplorare i mercati finanziari
Accetti la politica del sito e le condizioni d’uso
L'articolo è chiaro e facile da seguire e fornisce le impostazioni nei file .set. Ho avuto un problema con le modalità di esecuzione dei simboli, in particolare con la condizione che controllava se era istantanea o di mercato e solo dopo permetteva l'apertura degli ordini, che ho dovuto rimuovere, ma tutto ha funzionato bene.
Ho una domanda. Ho visto diversi approcci avanzati, come questo, che sono costruiti da zero trascurando la struttura Expert, ExpertSignal, ExpertTrade...., anche se spendono molto codice (e tempo, suppongo) per replicare alcune delle sue caratteristiche. Qualcuno potrebbe darmi una giustificazione, per favore?
Ciao a tutti!
Sto cercando di testare questo EA ma ho appena ricevuto il seguente messaggio in Strategy Tester: "Errore nell'apertura della posizione: 4753 - 1 La posizione non è stata trovata". Non capisco perché. Questo accade quando la funzione "trade.PositionOpen" viene eseguita alla riga 159 del file "TradeFunctions.mqh". Qualcuno può darmi una mano per favore?
Potreste dirmi dove avviene l'inversione di posizione come descritto dall'autore? Ecco il suo codice con la descrizione
guardare la funzione OpenPosition(symbol_number,lot,order_type,position_open_price,sl,tp,comment);
È solo un blocco! Non c'è inversione... lo stesso vale per l'incremento del lotto! Puoi spiegarmi, forse mi sbaglio?Potreste dirmi dove avviene l'inversione di posizione come descritto dall'autore? Ecco il suo codice con la descrizione
Guardate la funzione OpenPosition(symbol_number,lot,order_type,position_open_price,sl,tp,comment);
È solo un blocco! Non c'è inversione... lo stesso vale per l'incremento del lotto! Puoi spiegarmi, forse mi sbaglio?Esistono due tipi di conti di trading: netting e hedge.
Esistono due tipi di conti di trading: di compensazione e di copertura.
Ottenuto! Grazie!