MQL5 クックブック: マルチ通貨 Expert Advisor - シンプル、かしこい、迅速なアプローチ
はじめに
本稿ではマルチ通貨 Expert Advisorに適切なシンプルなアプローチの実装について述べます。これは理想的な条件下でありながら各シンボルに対して異なるパラメータでExpert Advisor を検証/トレーディングする設定を可能にするということです。例として2個のシンボルに対するパターンを作成しますが、コードに少し変更を加えるだけで必要に応じてそれ以外のシンボルも追加できるようにしておきます。
MQL5 にマルチ通貨パターンを実装する方法は数多くあります。
Expert Advisor が時間によって導かれるパターンを利用することができます。このパターンでは OnTimer() 関数で指定される時間間隔によってより正確な確認ができます。
またシリーズの先行記事で取り入れられているすべての Expert Advisor 同様、動作してい対象の現在シンボルに対するティックに依存する場合、確認はOnTick()関数で行われます。別のシンボルに完了したバーがあれば、一方現シンボルに対するティックがまだなくても Expert Advisor は現シンボルに対する新規ティックがあるか一度だけ確認を行います。
著者 Konstantin Gruzdev (Lizar)によって提案される興味深いオプションがまだもう一つあります。それは次のようなイベントモデルを採用します。OnChartEvent() 関数を用いて Expert Advisor は検証/トレードに関わるシンボルチャート上にあるインディケータエージェントによって再生されるイベントを取得します。インディケータエージェントは新規バーとアタッチされるシンボルのティックイベントを再生します。この種のインディケータ(EventsSpy.mq5)は本稿末尾でダウンロードすることができます。それは Expert Advisorの処理に必要となります。
Expert Advisor の作成
記事 "MQL5 Cookbook: Using Indicators to Set Trading Conditions in Expert Advisors" で取り上げられている Expert Advisor はテンプレートの役目を果たします。私はすでにそれから情報パネルに関するものをすべて削除しました。また先行記事 "MQL5 Cookbook: Developing a Framework for a Trading System Based on the Triple Screen Strategy"で実装されているポジションオープンの条件を簡素化しました。2個のシンボルについて Expert Advisor を作成したいので、それぞれの外部パラメータセットが必要となります。
//--- External parameters of the Expert Advisor
sinput long   MagicNumber           = 777;      // Magic number
sinput int    Deviation             = 10;       // Slippage
//---
sinput string delimeter_00=""; // --------------------------------
sinput string Symbol_01             = "EURUSD"; // Symbol 1
input  int    IndicatorPeriod_01    = 5;        // |     Indicator period
input  double TakeProfit_01         = 100;      // |     Take Profit
input  double StopLoss_01           = 50;       // |     Stop Loss
input  double TrailingStop_01       = 10;       // |     Trailing Stop
input  bool   Reverse_01            = true;     // |     Position reversal
input  double Lot_01                = 0.1;      // |     Lot
input  double VolumeIncrease_01     = 0.1;      // |     Position volume increase
input  double VolumeIncreaseStep_01 = 10;       // |     Volume increase step
//---
sinput string delimeter_01=""; // --------------------------------
sinput string Symbol_02             = "NZDUSD"; // Symbol 2
input  int    IndicatorPeriod_02    = 5;        // |     Indicator period
input  double TakeProfit_02         = 100;      // |     Take Profit
input  double StopLoss_02           = 50;       // |     Stop Loss
input  double TrailingStop_02       = 10;       // |     Trailing Stop
input  bool   Reverse_02            = true;     // |     Position reversal
input  double Lot_02                = 0.1;      // |     Lot
input  double VolumeIncrease_02     = 0.1;      // |     Position volume increase
input  double VolumeIncreaseStep_02 = 10;       // |     Volume increase step
外部パラメータはサイズが使用されているシンボル数に依存する配列内に入れられます。Expert Advisor で使用されるシンボル数はファイルの冒頭で作成する必要のなる定数 NUMBER_OF_SYMBOLS の値によって決められます。
//--- Number of traded symbols
#define NUMBER_OF_SYMBOLS 2
//--- Name of the Expert Advisor
#define EXPERT_NAME MQL5InfoString(MQL5_PROGRAM_NAME)
外部パラメータ格納に必要な配列を作成します。
//--- Arrays for storing external parameters
string Symbols[NUMBER_OF_SYMBOLS];            // Symbol
int    IndicatorPeriod[NUMBER_OF_SYMBOLS];    // Indicator period
double TakeProfit[NUMBER_OF_SYMBOLS];         // Take Profit
double StopLoss[NUMBER_OF_SYMBOLS];           // Stop Loss
double TrailingStop[NUMBER_OF_SYMBOLS];       // Trailing Stop
bool   Reverse[NUMBER_OF_SYMBOLS];            // Position reversal
double Lot[NUMBER_OF_SYMBOLS];                // Lot
double VolumeIncrease[NUMBER_OF_SYMBOLS];     // Position volume increase
double VolumeIncreaseStep[NUMBER_OF_SYMBOLS]; // Volume increase step
配列初期化関数はインクルードファイル InitArrays.mqh に入れます。Symbols[] 配列を初期化するために GetSymbol()関数を作成します。それは外部パラメータからシンボル名を取得し、そのシンボルがサーバーのシンボルリストで使用可能であれば銘柄ウィンドウで選択されます。それ以外、必要なシンボルがサーバー上に見つからなければこの関数は空の文字列を返し、Expert Advisors の「ジャーナル」が適切に更新されます。
以下は GetSymbol() 関数のコードです。
//+------------------------------------------------------------------+
//| Adding the specified symbol to the Market Watch window           |
//+------------------------------------------------------------------+
string GetSymbolByName(string symbol)
  {
   string symbol_name="";   // Symbol name on the server
//--- If an empty string is passed, return the empty string
   if(symbol=="")
      return("");
//--- Iterate over the list of all symbols on the server
   for(int s=0; s<SymbolsTotal(false); s++)
     {
      //--- Get the symbol name
      symbol_name=SymbolName(s,false);
      //--- If the required symbol is available on the server
      if(symbol==symbol_name)
        {
         //--- Select it in the Market Watch window
         SymbolSelect(symbol,true);
         //--- Return the symbol name
         return(symbol);
        }
     }
//--- If the required symbol cannot be found, return the empty string
   Print("The "+symbol+" symbol could not be found on the server!");
   return("");
  }
Symbols[] 配列は GetSymbols() 関数内で初期化されます。
//+------------------------------------------------------------------+
//| Filling the array of symbols                                     |
//+------------------------------------------------------------------+
void GetSymbols()
  {
   Symbols[0]=GetSymbolByName(Symbol_01);
   Symbols[1]=GetSymbolByName(Symbol_02);
  }
また、特定シンボルの外部パラメータの空の値が対応するブロックが検証/トレードの対象ではないことを示すように実装します。これは各シンボルに対し個別にパラメータを最適化し、同時に残りのシンボルを完全に除外するために必要です。
外部パラメータのその他配列はすべて同じ方法で初期化されます。すなわち、各配列に対して個別の関数を作成する必要があるのです。以下はこれらすべての関数のコードです。
//+------------------------------------------------------------------+
//| Filling the indicator period array                               |
//+------------------------------------------------------------------+
void GetIndicatorPeriod()
  {
   IndicatorPeriod[0]=IndicatorPeriod_01;
   IndicatorPeriod[1]=IndicatorPeriod_02;
  }
//+------------------------------------------------------------------+
//| Filling the Take Profit array                                    |
//+------------------------------------------------------------------+
void GetTakeProfit()
  {
   TakeProfit[0]=TakeProfit_01;
   TakeProfit[1]=TakeProfit_02;
  }
//+------------------------------------------------------------------+
//| Filling the Stop Loss array                                      |
//+------------------------------------------------------------------+
void GetStopLoss()
  {
   StopLoss[0]=StopLoss_01;
   StopLoss[1]=StopLoss_02;
  }
//+------------------------------------------------------------------+
//| Filling the Trailing Stop array                                  |
//+------------------------------------------------------------------+
void GetTrailingStop()
  {
   TrailingStop[0]=TrailingStop_01;
   TrailingStop[1]=TrailingStop_02;
  }
//+------------------------------------------------------------------+
//| Filling the Reverse array                                        |
//+------------------------------------------------------------------+
void GetReverse()
  {
   Reverse[0]=Reverse_01;
   Reverse[1]=Reverse_02;
  }
//+------------------------------------------------------------------+
//| Filling the Lot array                                            |
//+------------------------------------------------------------------+
void GetLot()
  {
   Lot[0]=Lot_01;
   Lot[1]=Lot_02;
  }
//+------------------------------------------------------------------+
//| Filling the VolumeIncrease array                                 |
//+------------------------------------------------------------------+
void GetVolumeIncrease()
  {
   VolumeIncrease[0]=VolumeIncrease_01;
   VolumeIncrease[1]=VolumeIncrease_02;
  }
//+------------------------------------------------------------------+
//| Filling the VolumeIncreaseStep array                             |
//+------------------------------------------------------------------+
void GetVolumeIncreaseStep()
  {
   VolumeIncreaseStep[0]=VolumeIncreaseStep_01;
   VolumeIncreaseStep[1]=VolumeIncreaseStep_02;
  }
それではすべての外部パラメータを同時に都合よく初期化するのに役立つ関数 InitializeInputParameters() を作成しましょう。
//+------------------------------------------------------------------+
//| Initializing external parameter arrays                           |
//+------------------------------------------------------------------+
void InitializeInputParameters()
  {
   GetSymbols();
   GetIndicatorPeriod();
   GetTakeProfit();
   GetStopLoss();
   GetTrailingStop();
   GetReverse();
   GetLot();
   GetVolumeIncrease();
   GetVolumeIncreaseStep();
  }
外部パラメータ配列の初期化に続き、主要部分に進んでいくことができます。インディケータハンドル、その値、価格情報を取得するなどいくつかの手順は、新規バーを確認するなどのようにシンボルごとに連続してループで実行します。これは外部パラメータ値が配列で作成されているためです。よってすべては次のようにループで行われます。
//--- Iterate over all symbols
for(int s=0; s<NUMBER_OF_SYMBOLS; s++)
  {
//--- If trading for this symbol is allowed
   if(Symbols[s]!="")
     {
      //--- The rest of the code
     }
  }
ただ既存の関数を変更して新しい関数を作成する前に、そのパターンで必要になる配列も作成します。
インディケータハンドルに対しては配列が2つ必要です。
//--- Array of indicator agent handles
int spy_indicator_handles[NUMBER_OF_SYMBOLS];
//--- Array of signal indicator handles
int signal_indicator_handles[NUMBER_OF_SYMBOLS];
これら2つの配列は最初に無効な値に対して初期化されます。
//+------------------------------------------------------------------+
//| Initializing arrays of indicator handles                         |
//+------------------------------------------------------------------+
void InitializeArrayHandles()
  {
   ArrayInitialize(spy_indicator_handles,INVALID_HANDLE);
   ArrayInitialize(signal_indicator_handles,INVALID_HANDLE);
  }
価格データとインディケータ値の配列はストラクチャを用いてアクセスされます。
//--- Data arrays for checking trading conditions
struct PriceData
  {
   double            value[];
  };
PriceData open[NUMBER_OF_SYMBOLS];      // Opening price of the bar
PriceData high[NUMBER_OF_SYMBOLS];      // High price of the bar
PriceData low[NUMBER_OF_SYMBOLS];       // Low price of the bar
PriceData close[NUMBER_OF_SYMBOLS];     // Closing price of the bar
PriceData indicator[NUMBER_OF_SYMBOLS]; // Array of indicator values
リストの最初のシンボルの最終完了のインディケータ値を取得する必要があれば、以下のようなものを書きます。
double indicator_value=indicator[0].value[1];
またCheckNewBar() 関数で前に使用された変数の代わりに配列を作成する必要があります。
//--- Arrays for getting the opening time of the current bar
struct Datetime
  {
   datetime          time[];
  };
Datetime lastbar_time[NUMBER_OF_SYMBOLS];
//--- Array for checking the new bar for each symbol
datetime new_bar[NUMBER_OF_SYMBOLS];
配列を整理します。上記変更に従って多くの関数を変更する必要があります。GetIndicatorHandles() 関数から始めます。
//+------------------------------------------------------------------+
//| Getting indicator handles                                        |
//+------------------------------------------------------------------+
void GetIndicatorHandles()
  {
//--- Iterate over all symbols
   for(int s=0; s<NUMBER_OF_SYMBOLS; s++)
     {
      //--- If trading for this symbol is allowed
      if(Symbols[s]!="")
        {
         //--- If the handle is yet to be obtained
         if(signal_indicator_handles[s]==INVALID_HANDLE)
           {
            //--- Get the indicator handle
            signal_indicator_handles[s]=iMA(Symbols[s],_Period,IndicatorPeriod[s],0,MODE_SMA,PRICE_CLOSE);
            //--- If the indicator handle could not be obtained
            if(signal_indicator_handles[s]==INVALID_HANDLE)
               Print("Failed to get the indicator handle for the symbol "+Symbols[s]+"!");
           }
        }
     }
  }
検証/トレードに使用されるシンボル数に関わらず、これで関数のコードは変わりません。
同様にべつの関数 GetSpyHandles()を作成します。これはティックと他のシンボルからは真するインディケータエージェントのハンドルを取得します。その前にシンボルごとに Enums.mqhファイルにフラグとして整理されるすべてのイベントの列挙 ENUM_CHART_EVENT_SYMBOLをもう一つ追加します。
//+------------------------------------------------------------------+
//| New bar and tick events from all symbols and time frames         |
//+------------------------------------------------------------------+
enum ENUM_CHART_EVENT_SYMBOL
  {
   CHARTEVENT_NO         = 0,          // Events are disabled - 0
   CHARTEVENT_INIT       = 0,          // Initialization event - 0
   //---
   CHARTEVENT_NEWBAR_M1  = 0x00000001, // New bar event on a minute chart (1)
   CHARTEVENT_NEWBAR_M2  = 0x00000002, // New bar event on a 2-minute chart (2)
   CHARTEVENT_NEWBAR_M3  = 0x00000004, // New bar event on a 3-minute chart (4)
   CHARTEVENT_NEWBAR_M4  = 0x00000008, // New bar event on a 4-minute chart (8)
   //---
   CHARTEVENT_NEWBAR_M5  = 0x00000010, // New bar event on a 5-minute chart (16)
   CHARTEVENT_NEWBAR_M6  = 0x00000020, // New bar event on a 6-minute chart (32)
   CHARTEVENT_NEWBAR_M10 = 0x00000040, // New bar event on a 10-minute chart (64)
   CHARTEVENT_NEWBAR_M12 = 0x00000080, // New bar event on a 12-minute chart (128)
   //---
   CHARTEVENT_NEWBAR_M15 = 0x00000100, // New bar event on a 15-minute chart (256)
   CHARTEVENT_NEWBAR_M20 = 0x00000200, // New bar event on a 20-minute chart (512)
   CHARTEVENT_NEWBAR_M30 = 0x00000400, // New bar event on a 30-minute chart (1024)
   CHARTEVENT_NEWBAR_H1  = 0x00000800, // New bar event on an hour chart (2048)
   //---
   CHARTEVENT_NEWBAR_H2  = 0x00001000, // New bar event on a 2-hour chart (4096)
   CHARTEVENT_NEWBAR_H3  = 0x00002000, // New bar event on a 3-hour chart (8192)
   CHARTEVENT_NEWBAR_H4  = 0x00004000, // New bar event on a 4-hour chart (16384)
   CHARTEVENT_NEWBAR_H6  = 0x00008000, // New bar event on a 6-hour chart (32768)
   //---
   CHARTEVENT_NEWBAR_H8  = 0x00010000, // New bar event on a 8-hour chart (65536)
   CHARTEVENT_NEWBAR_H12 = 0x00020000, // New bar event on a 12-hour chart (131072)
   CHARTEVENT_NEWBAR_D1  = 0x00040000, // New bar event on a daily chart (262144)
   CHARTEVENT_NEWBAR_W1  = 0x00080000, // New bar event on a weekly chart (524288)
   //---
   CHARTEVENT_NEWBAR_MN1 = 0x00100000, // New bar event on a monthly chart (1048576)
   CHARTEVENT_TICK       = 0x00200000, // New tick event (2097152)
   //---
   CHARTEVENT_ALL        = 0xFFFFFFFF  // All events are enabled (-1)
  };
この列挙はカスタムインディケータEventsSpy.mq5 (ファイルは本稿に添付があります)と GetSpyHandles() 関数内で連携するために必要です。この関数のコードは以下に記載しています。
//+------------------------------------------------------------------+
//| Getting agent handles by the specified symbols                   |
//+------------------------------------------------------------------+
void GetSpyHandles()
  {
//--- Iterate over all symbols
   for(int s=0; s<NUMBER_OF_SYMBOLS; s++)
     {
      //--- If trading for this symbol is allowed
      if(Symbols[s]!="")
        {
         //--- If the handle is yet to be obtained
         if(spy_indicator_handles[s]==INVALID_HANDLE)
           {
            //--- Get the indicator handle
            spy_indicator_handles[s]=iCustom(Symbols[s],_Period,"EventsSpy.ex5",ChartID(),0,CHARTEVENT_TICK);
            //--- If the indicator handle could not be obtained
            if(spy_indicator_handles[s]==INVALID_HANDLE)
               Print("Failed to install the agent on "+Symbols[s]+"");
           }
        }
     }
  }
iCustom() 関数の最後のパラメータに注意が必要です。この場合、ティックイベント取得に識別子 CHARTEVENT_TICK が使用sれています。ただ必要に応じ、それは新規バーイベント取得のために変更可能です。たとえば下記のような行にすれば、 Expert Advisor は分足(M1)および時間足(H1)のタイムフレームで新規バーイベントを取得します。
handle_event_indicator[s]=iCustom(Symbols[s],_Period,"EventsSpy.ex5",ChartID(),0,CHARTEVENT_NEWBAR_M1|CHARTEVENT_NEWBAR_H1);
イベントをすべて(全タイムフレームでのティックイベントとバーイベント)取得するには識別 CHARTEVENT_ALL を指定する必要があります。
すべての配列は OnInit() 関数で初期化されます。
//+------------------------------------------------------------------+
//| Expert initialization function                                   |
//+------------------------------------------------------------------+
void OnInit()
  {
//--- Initialization of arrays of external parameters
   InitializeInputParameters();
//--- Initialization of arrays of indicator handles
   InitializeArrayHandles();
//--- Get agent handles
   GetSpyHandles();
//--- Get indicator handles
   GetIndicatorHandles();
//--- Initialize the new bar
   InitializeArrayNewBar();
  }
本稿冒頭ですでに述べたように、インディケータエージェントからのイベントは OnChartEvent() 関数で受け取られます。以下はこの関数で使用されるコードです。
//+------------------------------------------------------------------+
//| Chart events handler                                             |
//+------------------------------------------------------------------+
void OnChartEvent(const int id,         // Event identifier
                  const long &lparam,   // Long type event parameter
                  const double &dparam, // Double type event parameter
                  const string &sparam) // String type event parameter
  {
//--- If this is a custom event
   if(id>=CHARTEVENT_CUSTOM)
     {
      //--- Exit if trading is not allowed
      if(CheckTradingPermission()>0)
         return;
      //--- If there was a tick event
      if(lparam==CHARTEVENT_TICK)
        {
         //--- Check signals and trade on them
         CheckSignalsAndTrade();
         return;
        }
     }
  }
CheckSignalAndTrade() 関数(上記コードで強調表示されている行)では、すべてのシンボルが交代でOnTick() 関数で前に実装されている新規バーイベントとトレードシグナルについて確認されるループを持ちます。
//+------------------------------------------------------------------+
//| Checking signals and trading based on the new bar event          |
//+------------------------------------------------------------------+
void CheckSignalsAndTrade()
  {
//--- Iterate over all specified symbols
   for(int s=0; s<NUMBER_OF_SYMBOLS; s++)
     {
      //--- If trading for this symbol is allowed
      if(Symbols[s]!="")
        {
         //--- If the bar is not new, proceed to the next symbol
         if(!CheckNewBar(s))
            continue;
         //--- If there is a new bar
         else
           {
            //--- Get indicator data. If there is no data, proceed to the next symbol
            if(!GetIndicatorsData(s))
               continue;
            //--- Get bar data
            GetBarsData(s);
            //--- Check the conditions and trade
            TradingBlock(s);
            //--- Trailing Stop
            ModifyTrailingStop(s);
           }
        }
     }
  }
外部パラメータ、またシンボルとインディケータデータを使用する関数はすべて上記の全変更に従い変更される必要があります。このために最初のパラメータとしてシンボル番号を追加し、関数内のすべての変数と配列を上に述べられている新しい配列と置き換えます。
完全な解説、関数 CheckNewBar()、TradingBlock()、OpenPosition()の改定版コードは以下に記載します。
CheckNewBar() 関数コード
//+------------------------------------------------------------------+
//| Checking for the new bar                                         |
//+------------------------------------------------------------------+
bool CheckNewBar(int number_symbol)
  {
//--- Get the opening time of the current bar
//    If an error occurred when getting the time, print the relevant message
   if(CopyTime(Symbols[number_symbol],Period(),0,1,lastbar_time[number_symbol].time)==-1)
      Print(__FUNCTION__,": Error copying the opening time of the bar: "+IntegerToString(GetLastError()));
//--- If this is a first function call
   if(new_bar[number_symbol]==NULL)
     {
      //--- Set the time
      new_bar[number_symbol]=lastbar_time[number_symbol].time[0];
      Print(__FUNCTION__,": Initialization ["+Symbols[number_symbol]+"][TF: "+TimeframeToString(Period())+"]["
            +TimeToString(lastbar_time[number_symbol].time[0],TIME_DATE|TIME_MINUTES|TIME_SECONDS)+"]");
      return(false);
     }
//--- If the time is different
   if(new_bar[number_symbol]!=lastbar_time[number_symbol].time[0])
     {
      //--- Set the time and exit
      new_bar[number_symbol]=lastbar_time[number_symbol].time[0];
      return(true);
     }
//--- If we have reached this line, then the bar is not new, so return false
   return(false);
  }
TradingBlock() 関数コード
//+------------------------------------------------------------------+
//| Trading block                                                    |
//+------------------------------------------------------------------+
void TradingBlock(int symbol_number)
  {
   ENUM_ORDER_TYPE      signal=WRONG_VALUE;                 // Variable for getting a signal
   string               comment="hello :)";                 // Position comment
   double               tp=0.0;                             // Take Profit
   double               sl=0.0;                             // Stop Loss
   double               lot=0.0;                            // Volume for position calculation in case of position reversal
   double               position_open_price=0.0;            // Position opening price
   ENUM_ORDER_TYPE      order_type=WRONG_VALUE;             // Order type for opening a position
   ENUM_POSITION_TYPE   opposite_position_type=WRONG_VALUE; // Opposite position type
//--- Find out if there is a position
   pos.exists=PositionSelect(Symbols[symbol_number]);
//--- Get the signal
   signal=GetTradingSignal(symbol_number);
//--- If there is no signal, exit
   if(signal==WRONG_VALUE)
      return;
//--- Get symbol properties
   GetSymbolProperties(symbol_number,S_ALL);
//--- Determine values for trade variables
   switch(signal)
     {
      //--- Assign values to variables for a BUY
      case ORDER_TYPE_BUY  :
         position_open_price=symb.ask;
         order_type=ORDER_TYPE_BUY;
         opposite_position_type=POSITION_TYPE_SELL;
         break;
         //--- Assign values to variables for a SELL
      case ORDER_TYPE_SELL :
         position_open_price=symb.bid;
         order_type=ORDER_TYPE_SELL;
         opposite_position_type=POSITION_TYPE_BUY;
         break;
     }
//--- Get the Take Profit and Stop Loss levels
   sl=CalculateStopLoss(symbol_number,order_type);
   tp=CalculateTakeProfit(symbol_number,order_type);
//--- If there is no position
   if(!pos.exists)
     {
      //--- Adjust the volume
      lot=CalculateLot(symbol_number,Lot[symbol_number]);
      //--- Open a position
      OpenPosition(symbol_number,lot,order_type,position_open_price,sl,tp,comment);
     }
//--- If the position exists
   else
     {
      //--- Get the position type
      GetPositionProperties(symbol_number,P_TYPE);
      //--- If the position is opposite to the signal and the position reversal is enabled
      if(pos.type==opposite_position_type && Reverse[symbol_number])
        {
         //--- Get the position volume
         GetPositionProperties(symbol_number,P_VOLUME);
         //--- Adjust the volume
         lot=pos.volume+CalculateLot(symbol_number,Lot[symbol_number]);
         //--- Reverse the position
         OpenPosition(symbol_number,lot,order_type,position_open_price,sl,tp,comment);
         return;
        }
      //--- If the signal is in the direction of the position and the volume increase is enabled, increase the position volume
      if(!(pos.type==opposite_position_type) && VolumeIncrease[symbol_number]>0)
        {
         //--- Get the Stop Loss of the current position
         GetPositionProperties(symbol_number,P_SL);
         //--- Get the Take Profit of the current position
         GetPositionProperties(symbol_number,P_TP);
         //--- Adjust the volume
         lot=CalculateLot(symbol_number,VolumeIncrease[symbol_number]);
         //--- Increase the position volume
         OpenPosition(symbol_number,lot,order_type,position_open_price,pos.sl,pos.tp,comment);
         return;
        }
     }
  }
OpenPosition() 関数コード
//+------------------------------------------------------------------+
//| Opening a position                                               |
//+------------------------------------------------------------------+
void OpenPosition(int symbol_number,
                  double lot,
                  ENUM_ORDER_TYPE order_type,
                  double price,
                  double sl,
                  double tp,
                  string comment)
  {
//--- Set the magic number in the trading structure
   trade.SetExpertMagicNumber(MagicNumber);
//--- Set the slippage in points
   trade.SetDeviationInPoints(CorrectValueBySymbolDigits(Deviation));
//--- Instant Execution and Market Execution mode
//    *** Starting with build 803, Stop Loss and Take Profit ***
//    *** can be set upon opening a position in the SYMBOL_TRADE_EXECUTION_MARKET mode ***
   if(symb.execution_mode==SYMBOL_TRADE_EXECUTION_INSTANT ||
      symb.execution_mode==SYMBOL_TRADE_EXECUTION_MARKET)
     {
      //--- If the position failed to open, print the relevant message
      if(!trade.PositionOpen(Symbols[symbol_number],order_type,lot,price,sl,tp,comment))
         Print("Error opening the position: ",GetLastError()," - ",ErrorDescription(GetLastError()));
     }
  }
これで各関数はシンボル番号を得ます(symbol_number)。ビルド 803で行われた変更にも注意を払ってください。
その他関数の改定済みコードは添付ファイルにあります。ここで必要なのはパラメータの最適化と検証を行うことだけです。
パラメータの最適化と Expert Advisorの検証
まず最初のシンボルに対してパラメータを最適化し、それから2番目のシンボルに対して最適化を行います。EURUSDから始めます。
以下がストラレジーテスタの設定です。

図1 ストラレジーテスタ設定
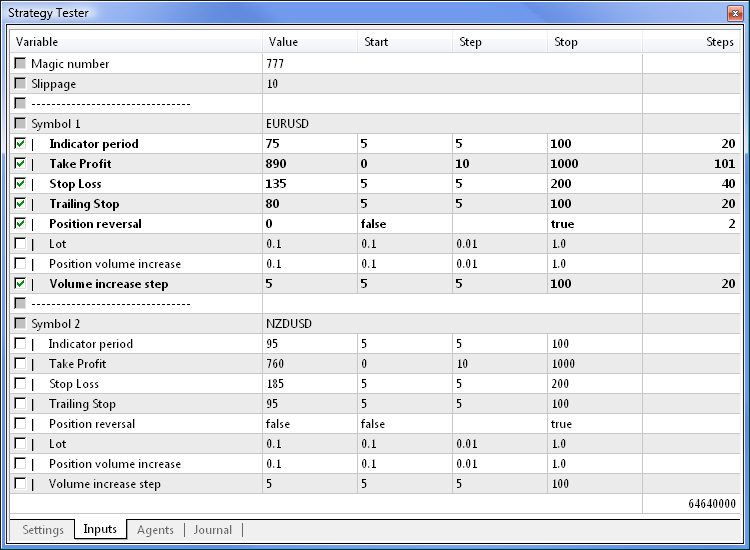
Expert Advisor の設定は以下に示されるように行う必要があります(便宜上各シンボルに対する設定を持つ .set ファイルを本稿に添付しています)。最適化から特定シンボルを除外するにはそのシンボル名パラメータフィールドを空のままにしておくだけです。それぞれのシンボルに対して行われるパラメータの最適化は最適化プロセスをスピードアップします。

図2 パラメータ最適化のためのExpert Advisor 設定: EURUSD
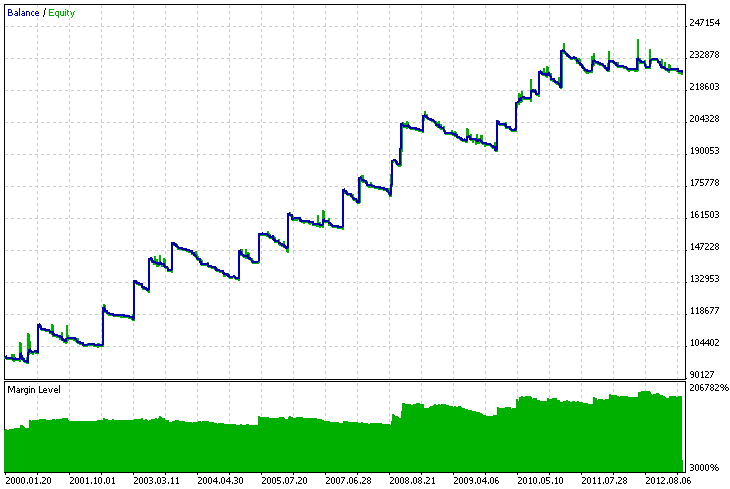
デュアルコアプロセッサの場合、最適化は約1時間かかります。最大リカバリーファクター検証結果を以下に表示します。

図3 EURUSDに対する最大リカバリーファクター検証結果
そして2番目のシンボルをして NZDUSD を設定します。最適化のためには最初のパラメータのシンボル名を持つラインブロック空のままにしておきます。
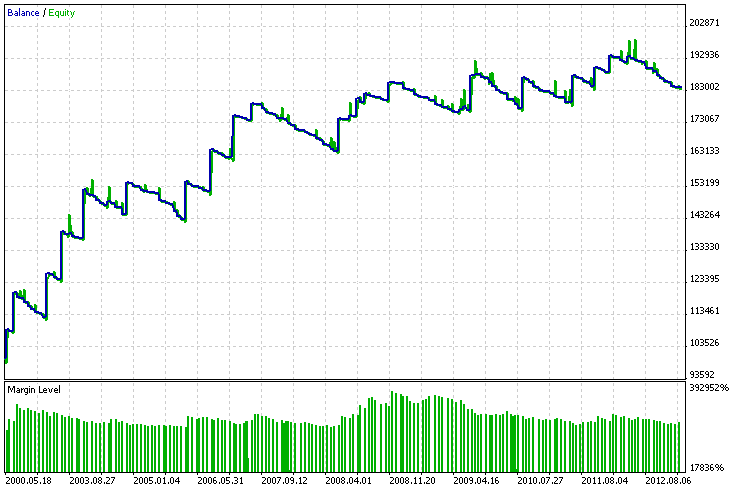
NZDUSD に対する結果は以下のようなものです。

図4 NZDUSDに対する最大リカバリーファクター検証結果
ここで2つのシンボルを一緒に検証することができます。ストラテジーテスタ設定では、Expert Advisor を起動する対象シンボルを任意に設定することができます。なぜなら結果は同様だからです。トレード/検証対称でないシンボルでもありえます。
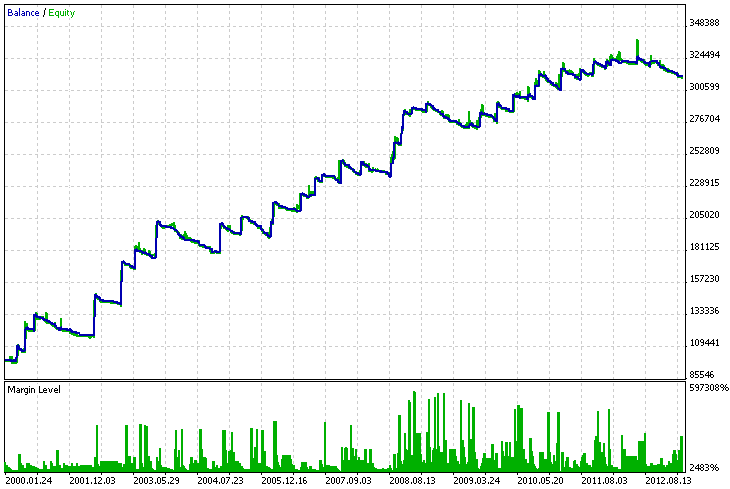
以下が一緒に検証された2つのシンボルに対する結果です。

図5 2つのシンボルに対する結果:EURUSD および NZDUSD
おわりに
これでおしまいです。以下にソースコードを添付しております。上記について詳しく調査するのにダウンロードしていただけます。練習のためにシンボルを1個以上選択するか他のインディケータを用いてポジションをオープンする条件を変更してみてください。
このファイルをアーカイブから抽出したら、MetaTrader 5\MQL5\ExpertsディレクトリのMultiSymbolExpert フォルダに入れます。その後、EventsSpy.mq5 インディケータは MetaTrader 5\MQL5\Indicators ディレクトリに入れる必要があります。
MetaQuotes Ltdによってロシア語から翻訳されました。
元の記事: https://www.mql5.com/ru/articles/648
警告: これらの資料についてのすべての権利はMetaQuotes Ltd.が保有しています。これらの資料の全部または一部の複製や再プリントは禁じられています。
この記事はサイトのユーザーによって執筆されたものであり、著者の個人的な見解を反映しています。MetaQuotes Ltdは、提示された情報の正確性や、記載されているソリューション、戦略、または推奨事項の使用によって生じたいかなる結果についても責任を負いません。
- 無料取引アプリ
- 8千を超えるシグナルをコピー
- 金融ニュースで金融マーケットを探索
.setファイルでの設定を提供している。私はシンボルの執行モード、特に即時か成行かをチェックする条件に問題がありました。
質問があります。Expert、ExpertSignal、ExpertTrade......の機能の一部を複製するために多くのコード(と時間)を費やしているにもかかわらず、提供されているExpert、ExpertSignal、ExpertTrade......の構造を無視してゼロから構築されている、このようなさまざまな高度なアプローチを数多く見てきました。どなたかこのことを正当化していただける方はいらっしゃいませんか?
皆さん、こんにちは!
このEAをテストしようとしているのですが、Strategy Testerで以下のメッセージが表示されました:「ポジションを開くのにエラーが発生しました:4753 - 1 ポジションが見つかりません。なぜでしょうか?これは、ファイル "TradeFunctions.mqh "の159行目の "trade.PositionOpen "関数が実行されたときに起こります。どなたか教えてください。
著者が説明したように、ポジションの反転が どこで行われるのか教えてください。以下は彼のコードです。
OpenPosition(symbol_number,lot,order_type,position_open_price,sl,tp,comment) 関数を見てください;
これは単なるロックだ!ロットの増加も同じです!私が間違っているのでしょうか?著者が説明したように、ポジションの反転が どこで行われるのか教えてください。以下は彼のコードです。
OpenPosition(symbol_number,lot,order_type,position_open_price,sl,tp,comment) 関数を見てください;
これは単なるロックだ!ロットの増加も同じです!私が間違っているのかもしれませんが、説明していただけますか?取引口座にはネッティングとヘッジの2種類があります。
取引口座には、ネッティングとヘッジの2種類がある。
了解ありがとうございました!