MultiSymbol and TF Chart Integrated
- Indicators
- Martin Alejandro Bamonte
- Version: 1.0
- Activations: 10
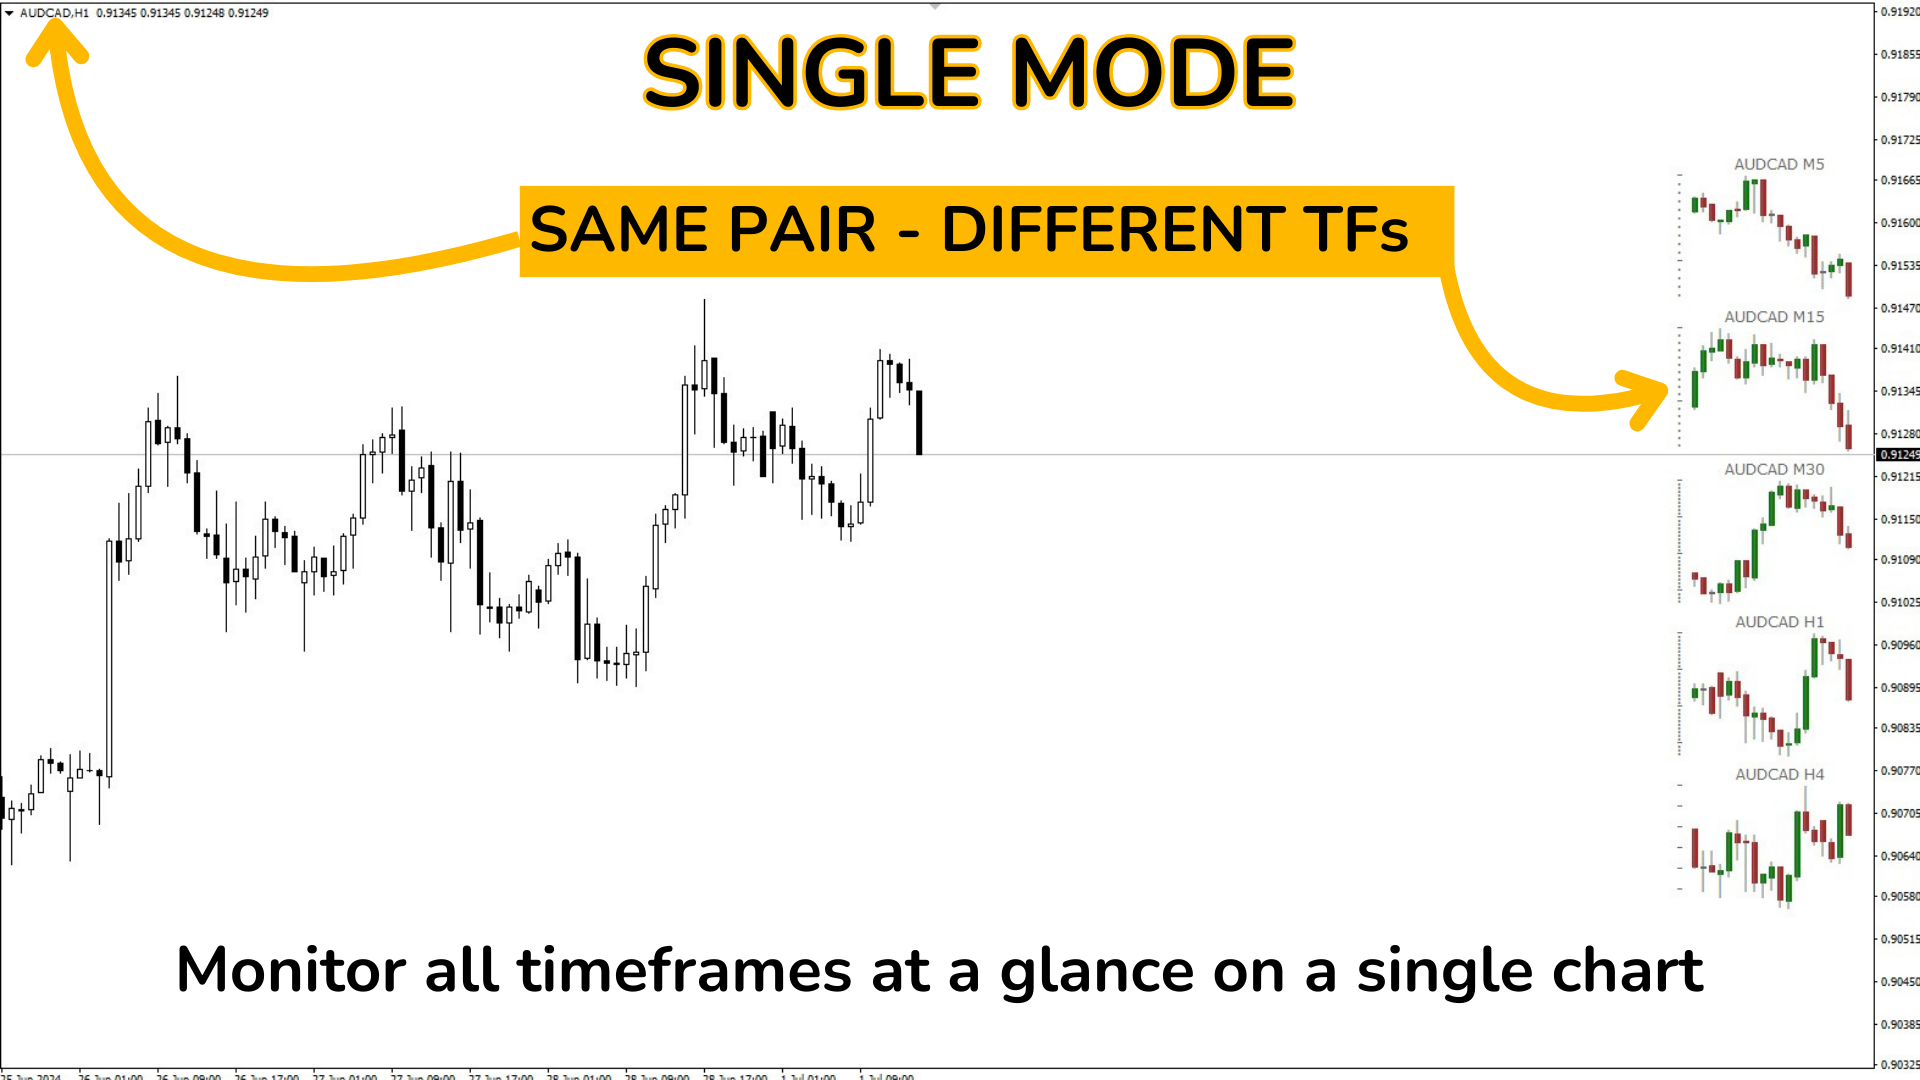
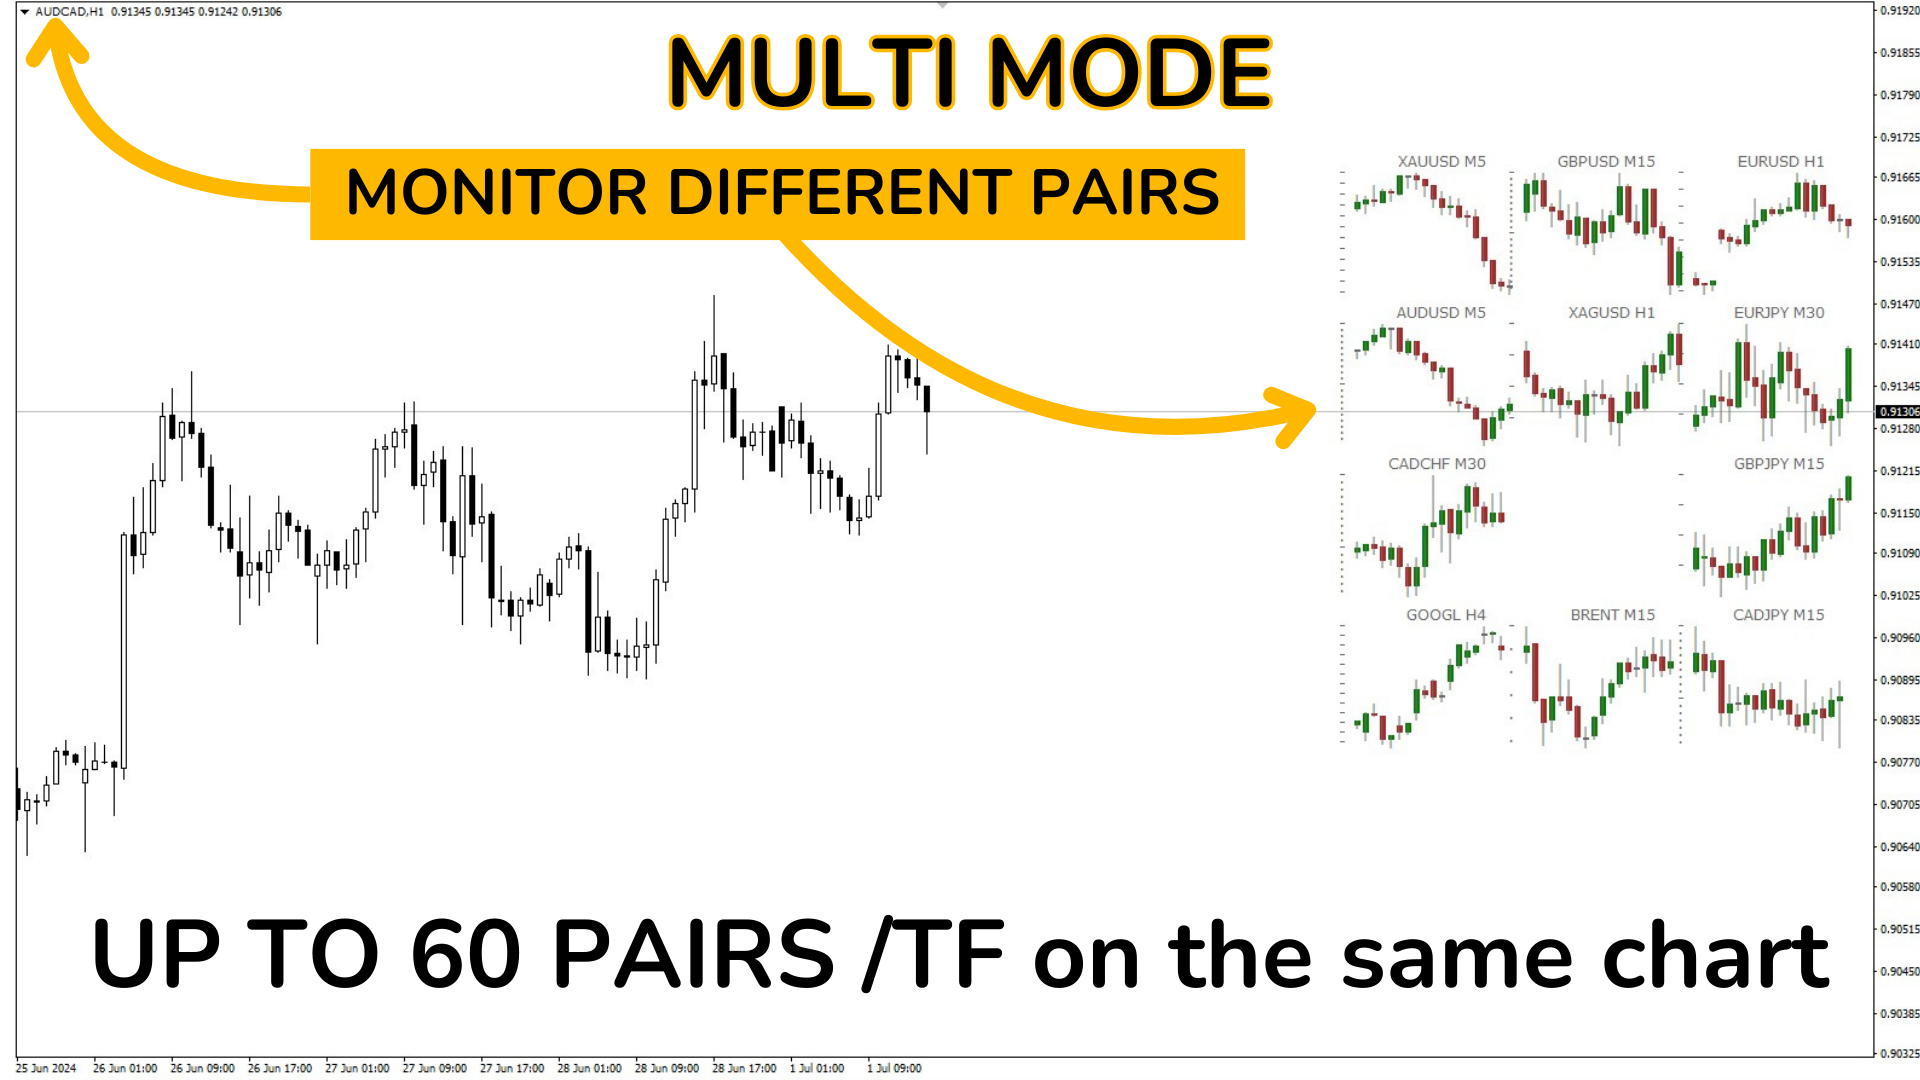
The "MultiSymbol & TF Chart Integrated" indicator is designed to provide a comprehensive market view quickly, allowing you to monitor up to 60 currency pairs in your preferred time frames on a single chart (multiple mode) or view the pair you are trading on all TFs (simple mode).
Main Advantages:
Complete Monitoring: Allows real-time monitoring of all desired pairs on a single chart at a glance.
Time-Saving: Avoids the need to switch between charts, seeing the behavior of each pair in real time.
Trend Analysis: Perfect for trend-following traders, allowing you to see higher time frames to confirm trends before making decisions.
Extreme Customization: Adjust every aspect of the indicator to your specific needs.
Extreme Customization:
Highly Configurable Indicator Parameters:
Symbols and Time Frames:
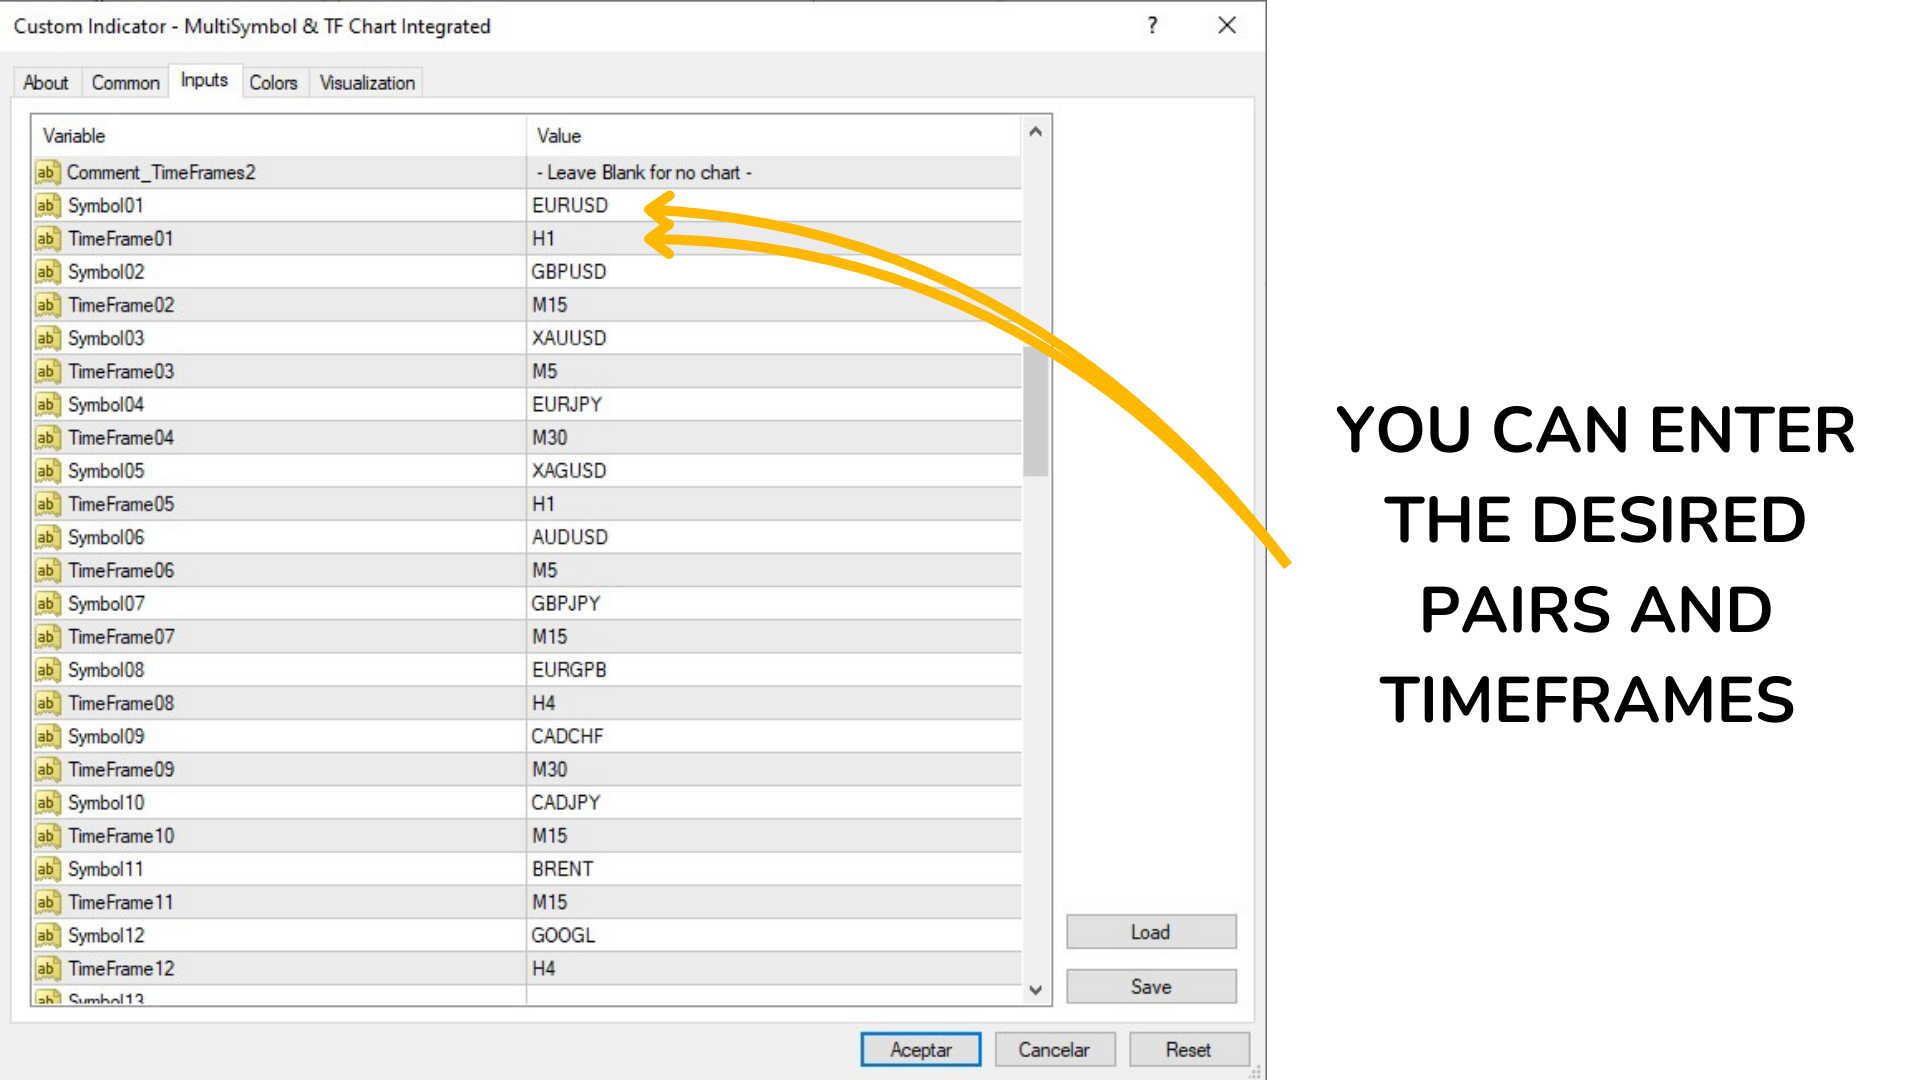
- Allows configuring up to 60 different symbols.
- Each symbol can have its own time frame (e.g., M1, M5, M15, M30, H1, H4, D1, W1, MN1).
Display Mode:
- Simple Mode: Configure a single chart with a specific time frame.
- Multiple Mode: Configure multiple charts with different symbols and time frames.
Color Configuration:
- Customizable colors for bullish and bearish candles.
- Colors of the candle wicks.
- Color of the price scale.
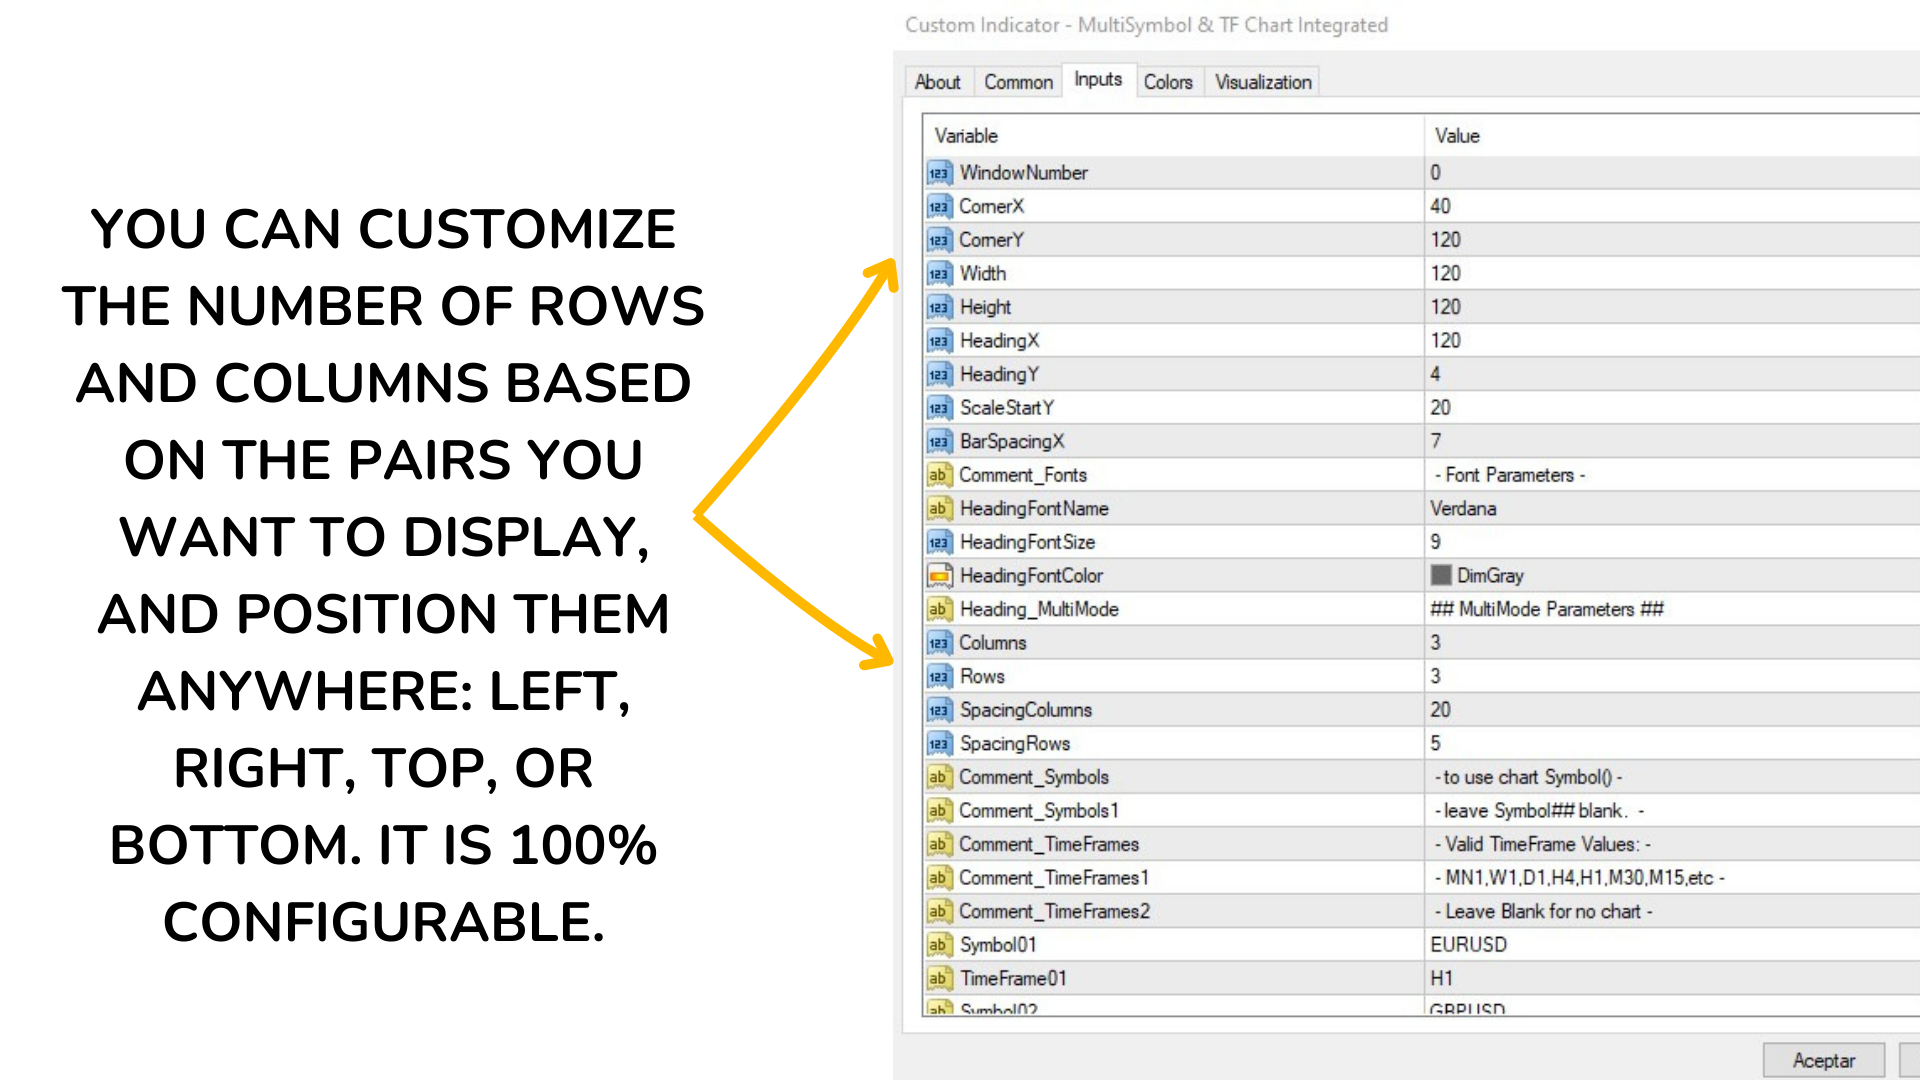
Scaling and Positioning:
- Auto-scaling of charts based on the price range and ATR.
- Positioning of charts using pixel parameters.
- Number of rows and columns for chart layout.
- Spacing between columns and rows.
- Initial position (X, Y) in the chart window.
- Chart size in pixels (width and height).
Font Configuration:
- Font name and size for headings and labels.
- Font color for headings.
Bar Configuration:
- Number of bars to display on each chart.
- Pixel distance between bars.
The "MultiSymbol & TF Chart Integrated" indicator is an essential tool for any trader looking to maximize their time, quickly glancing at all desired pairs and trading on the one that best suits their strategy. Its high customization and ease of use make it an ideal choice for traders of all levels.
Use the guide to adjust the parameters according to your specific needs:
Detailed Description of the Indicator's External Parameters:
Simple Mode
Heading_SingleMode: ## Single Mode Parameters ##
- Description: Title for the simple mode parameters (single chart).
Comment_TimeFrame: - MN1,W1,D1,H4,H1,M30,M15,etc -
- Description: Comment indicating valid time frames.
TimeFrame: H4
- Description: Defines the time frame for the chart in simple mode. You can use values like MN1 (monthly), W1 (weekly), D1 (daily), H4 (4 hours), etc.
Comment_Corner: - TopLeft=0,TR=1,BL=2,BR=3 -
- Description: Comment explaining the values for the chart position in the window.
Corner: 1
- Description: Defines the corner of the window where the chart will be located. Possible values: 0 (Top left corner), 1 (Top right corner), 2 (Bottom left corner), 3 (Bottom right corner).
Multiple Mode
Heading_ChartParam: ## Chart Parameters ##
- Description: Title for the multiple mode parameters (several charts).
MultiMode: true
- Description: Enables (true) or disables (false) multiple mode.
CandleMode: false
- Description: Defines whether candles (true) or bars (false) are shown.
BarsToDisplay: 18
- Description: Number of bars or candles to display on each chart.
AutoScale: true
- Description: Enables (true) or disables (false) auto-scaling of the charts based on the price range and ATR (Average True Range).
ATRBars: 20
- Description: Number of bars to consider for ATR calculation.
ATRPixelsY: 30
- Description: Number of vertical pixels assigned to the ATR for scaling.
Color Configuration
WickColor: DimGray
- Description: Color of the candle wicks.
BullBarColor: Green
- Description: Color of the bullish candles or bars.
BearBarColor: FireBrick
- Description: Color of the bearish candles or bars.
ScaleColor: DimGray
- Description: Color of the price scale.
Positioning
Comment_Positioning: - Positioning (in Pixels) -
- Description: Comment indicating that the following parameters are for pixel positioning.
WindowNumber: 0
- Description: Number of the window where the chart will be displayed. Usually, 0 is the main window.
CornerX: 40
- Description: Initial X position of the chart in pixels.
CornerY: 120
- Description: Initial Y position of the chart in pixels.
Width: 120
- Description: Width of the chart in pixels.
Height: 120
- Description: Height of the chart in pixels.
Font Configuration
HeadingFontName: Verdana
- Description: Font name used for headings and labels.
HeadingFontSize: 9
- Description: Font size for headings and labels.
HeadingFontColor: DimGray
- Description: Font color for headings.
Multiple Mode Configuration
Heading_MultiMode: ## MultiMode Parameters ##
- Description: Title for the specific parameters of multiple mode.
Columns: 3
- Description: Number of columns for the charts.
Rows: 3
- Description: Number of rows for the charts.
SpacingColumns: 20
- Description: Pixel spacing between chart columns.
SpacingRows: 5
- Description: Pixel spacing between chart rows.
Symbols and Time Frames (60 in total)
Symbol01: EURUSD
- Description: Symbol for the first chart. You can configure up to 60 different symbols.
TimeFrame01: H1
- Description: Time frame for the first chart. Each symbol can have its own time frame.
These parameters are repeated up to Symbol60 and TimeFrame60, which by default will be empty, and each trader can configure them according to their needs.
The "MultiSymbol & TF Chart Integrated" indicator is highly configurable and allows traders to fully customize the display of multiple symbols and time frames on a single chart, facilitating technical analysis and improving decision-making efficiency.