
Where is the Turn in Price? You do know what people who trade as a hobby are called, right? We call them “donors”

our stop would go above the zone in which we entered. Here it would have been about 17 pips. Using our 3:1 ratio, we need to find a reasonable profit target of at least 3 times that, or 51 pips. The blue box shows a small demand zone fulfilling our 3:1 ratio, while the green box give us a target of 72 pips, giving us a potential 4:1 trade.
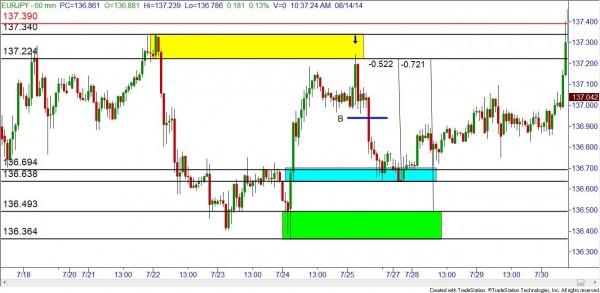
So the turn in price would have been in the supply zone, at the blue
arrow giving us a simple 3:1 reward to risk ratio, if not better if the
trade kept running. But where do most new traders look to enter? The
interesting this is that many trading books teach traders to take what
we call a “break-out” trade. This is where price breaks down below a
support level, or above a resistance level. This is usually far, far
away from the turn in price! The short blue line marked “B” is a common
entry used by new traders. In this example, the trade would have
worked out entering there, but where would the stop go? If done
properly, the stop would still be in the same place as the trade
entered at the supply zone. What happens to the reward to risk ratio
when entering at the breakout price? Entering there at approximately
136.95 would have given you a 44 pip stop, and a profit target of 26
pips at the blue box and 45 at the green. Over time, this strategy will
make you a very frustrated, unsuccessful trader.
Trading at or near the turn in price gives you better reward to risk
ratios, and combined with proper trade management, can turn trading
into a career instead of a hobby.


