Testing the attention mechanism
Unlike the LSTM recurrent block discussed earlier, the attention block works only with current data. Therefore, to create a more representative sample between weight updates during the training of a neural network, we will use random patterns from the general training dataset. We used this approach when testing the fully connected perceptron and the convolutional model. In such a situation, it will be quite logical to take the convolution_test.mq5 script we used for testing the convolutional mode, re-save it with a new name attention_test.mq5, and make changes to the description of the created model accordingly.
Note that many changes were required to create the test script. We have removed the description blocks of the convolutional and pooling layers from the script. Instead of them, right after the input data, we will add a description of our attention block. To do this, as with any other neural layer, we will create a new instance of the CLayerDescription neural layer description class and immediately check the result of the operation based on the obtained pointer to the object. Next, we need to provide descriptions for the created neural layer.
In the type field, we will pass the defNeuronAttention constant, which corresponds to the attention block to be created.
In the count field, we must specify the number of elements of the sequence to be analyzed. We request it from the user when running the script and save it to the BarsToLine variable. Therefore, in the description of the neural layer, we can pass the value of the variable.
The window parameter was used to specify the size of the source data window when describing the convolutional layer. Here we will use it to specify the size of the description vector for one element of the input data sequence. Even though the descriptions are slightly different, the functions are similar. However, unlike the convolutional layer, we will not specify the step of the window, since in this case, it will be equal to the window itself. The number of neurons used to describe one candlestick is also requested from the user in the script parameters. This value is stored in the NeuronsToBar variable. As in the previous field case, we simply pass the value from the variable to the specified field.
The Self-Attention algorithm does not provide data resizing. At the output of the block, we obtain a tensor of the same size as the original data. It turns out that the window_out field in the description of the neural layer will remain unclaimed. But we'll use it to specify the size of the key vector of a single element in the Key tensor. In practice, the size of the key is not always different from the size of the vector describing one element. Dimensionality reduction is employed when the size of the description vector for a single element is large to conserve computational resources during the calculation of the dependency coefficient matrix. In our case, when the description vector of one candlestick is only four elements, we will not lower the dimension and pass to the window_out field the value of the NeuronsToBar variable.
Additionally, we will specify the optimization method and its parameters. In the test case, I used the Adam method, as I did in all previous tests.
bool CreateLayersDesc(CArrayObj &layers)
|
After specifying all the parameters, we add the object to the dynamic array of neural layer descriptions. And, of course, we check the results of the operations. The rest of the script code remained unchanged.
As you can see, when using our library, changing the model configuration is not a very complex procedure. Thus, you will always be able to configure and test various architectural solutions to solve a specific task without making changes to the logic of the main program.
Testing the new model using the attention block was carried out while preserving all the other conditions used to test the previous models. This approach allows the accurate evaluation of how changes in the model architecture affect the training result.
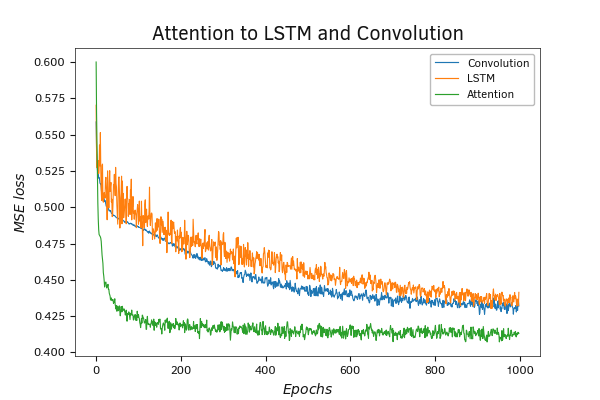
The very first testing showed the superiority of the model with the attention mechanism over the previously considered models. On the training graph, the model using a single attention layer shows faster convergence compared to models using a convolutional layer and a recurrent LSTM block.

Testing the model using the attention block

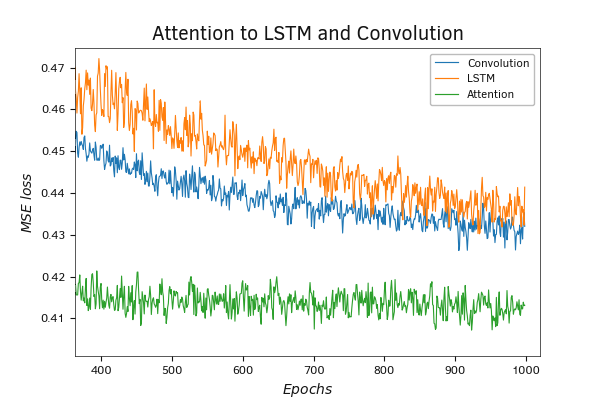
Testing the model using the attention block
When we scale up the learning curve graph, we can see that the model using the attention method demonstrates lower error throughout the entire training process.
At the same time, it should be noted that using an attention block in this form is rarely encountered in practice. The architecture that has gained the most widespread use is the multi-head attention, which we will explore in the next section.