Timezone Converter
- Utilitaires
- Alexander Martinez
- Version: 3.0
- Mise à jour: 5 juillet 2022
- Activations: 5
Le convertisseur de fuseau horaire convertit automatiquement l'heure d'un graphique en votre heure locale et l'affiche pour vous .
Instructions pour le chargement automatique d'un fichier prédéfini :
Cette fonctionnalité est utile si vous ne souhaitez pas que l'indicateur continue de fonctionner, mais que vous souhaitez tout de même le personnaliser et que ces personnalisations s'appliquent lorsque vous ajoutez l'indicateur.
- Chargez l'indicateur, allez dans les propriétés de l'indicateur et cliquez sur l'onglet "Inputs"
- Personnalisez les paramètres à votre guise
- Lorsque vous avez terminé, cliquez sur "Enregistrer", montez une fois dans l'arborescence des répertoires de dossiers, puis naviguez jusqu'au dossier "Fichiers> Convertisseur de fuseau horaire"
- Entrez un nom pour le fichier prédéfini et cliquez sur "Enregistrer".
À partir de maintenant, chaque fois que vous chargez l'indicateur, vos paramètres personnalisés seront automatiquement appliqués.
Dans le cas où vous souhaiteriez modifier les paramètres prédéfinis, vous devrez soit :
a) les recharger via l'onglet "Entrées" de l'indicateur en cliquant sur "Charger", puis appliquer les modifications souhaitées, et enregistrer à nouveau le fichier
b) supprimez le fichier du dossier Timezone Converter et répétez les instructions ci-dessus
Instructions pour définir manuellement le décalage du courtier local :
Dans le cas où la fonction de décalage Autodetect Local-Broker ne fonctionne pas pour vous, vous pouvez définir manuellement le décalage vous-même.- Calculez le nombre d'heures dont vous avez besoin pour passer du fuseau horaire de votre courtier à votre fuseau horaire local
- Ouvrez l'indicateur du convertisseur de fuseau horaire sur votre graphique
- Entrez la différence de fuseau horaire à partir de l'étape 1 dans le paramètre "Manual Broker-Local Offset (Heures)"
- Cliquez sur OK"
Des astuces:
- Attribuez un raccourci clavier à l'indicateur pour un accès rapide et facile. Ma préférence personnelle est Alt+A
- Consultez l' onglet "Quoi de neuf" pour voir les nouvelles fonctionnalités de la version 3.0 !
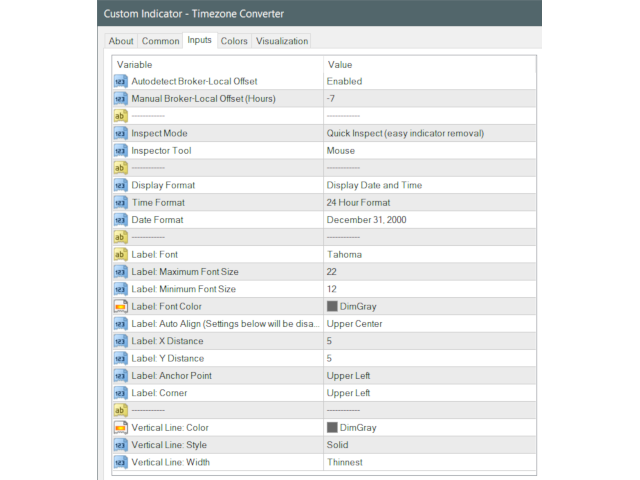
Paramètres:
| Paramètre | La description |
|---|---|
| Autodetect Broker-Local Offset | Activer/désactiver la capacité de détecter le décalage entre vous et votre courtier |
| Courtier manuel-décalage local (heures) | Si la détection automatique ne fonctionne pas, vous pouvez entrer le décalage manuellement |
| Mode d'inspection | Choisissez entre Aucun (Rester sur le graphique) ou Inspection rapide (Suppression facile de l'indicateur). L'inspection rapide est utile si vous ne souhaitez vérifier l'heure qu'une seule fois |
| Outil Inspecteur | Choisissez entre la ligne verticale ou la souris pour convertir l'heure |
| Format d'affichage | Choisissez entre l'affichage de l'heure ou la date et l'heure |
| Format de l'heure | Choisissez entre l'affichage de l'heure AM/PM ou 24 heures |
| Format de date | Choisissez entre plusieurs formats pour afficher la date |
| Libellé : Police | Police pour l'étiquette d'heure/date |
| Libellé : taille de police maximale | La taille maximale de la police lorsque la taille de la fenêtre du graphique est suffisamment grande |
| Libellé : taille de police minimale | La taille minimale de la police lorsque la taille de la fenêtre du graphique est réduite |
| Libellé : Couleur de la police | Couleur de l'étiquette heure/date |
| Libellé : Alignement automatique (les paramètres ci-dessous seront ignorés) | L'étiquette de date/heure sera automatiquement alignée sur la zone spécifiée sur le graphique. Choisissez Désactivé si vous souhaitez définir manuellement les coordonnées de l'étiquette. |
| Étiquette : Distance X | Définissez manuellement la distance X de l'étiquette |
| Étiquette : Distance Y | Définissez manuellement la distance Y de l'étiquette |
| Étiquette : Point d'ancrage | Définir manuellement le point d'ancrage de l'étiquette |
| Étiquette : Coin | Définir manuellement le coin de l'étiquette |
| Ligne verticale : Couleur | La couleur de l'outil Inspecteur de lignes verticales |
| Ligne verticale : Style | Le style de l'outil Inspecteur de lignes verticales |
| Ligne verticale : largeur | La largeur de l'outil Inspecteur de lignes verticales |


There are many uses for this, but I mainly use it to check my historic pop-up alerts which are in local time, not broker time. No need to do head calcs to analyse what the pop-up alert was about. I use the vertical line option to pinpoint the action at that specific time of the alert. Included in my default template.