Trabajo finalizado
Tarea técnica
Indicator Modification Requirements:
1) Set Zone Types
a) Zone Level Colours = This is how its done on the last version
b) Zone Heat Map Colour = This will be based on the 3 Heat Map Zone Colours
2) Support Zone 1 Colour
3) Support Zone 2 Colour
4) Support Zone 3 Colour
5) Resistance Zone 1 Colour
6) Resistance Zone 2 Colour
7) Resistance Zone 3 Colour
8) Use Zone Notifications = Yes/No
9) Set Support Zone 1 Sound Alert File
10) Set Support Zone 2 Sound Alert File
11) Set Support Zone 3 Sound Alert File
12) Set Resistance Zone 1 Sound Alert File
13) Set Resistance Zone 2 Sound Alert File
14) Set Resistance Zone 3 Sound Alert File
Example:
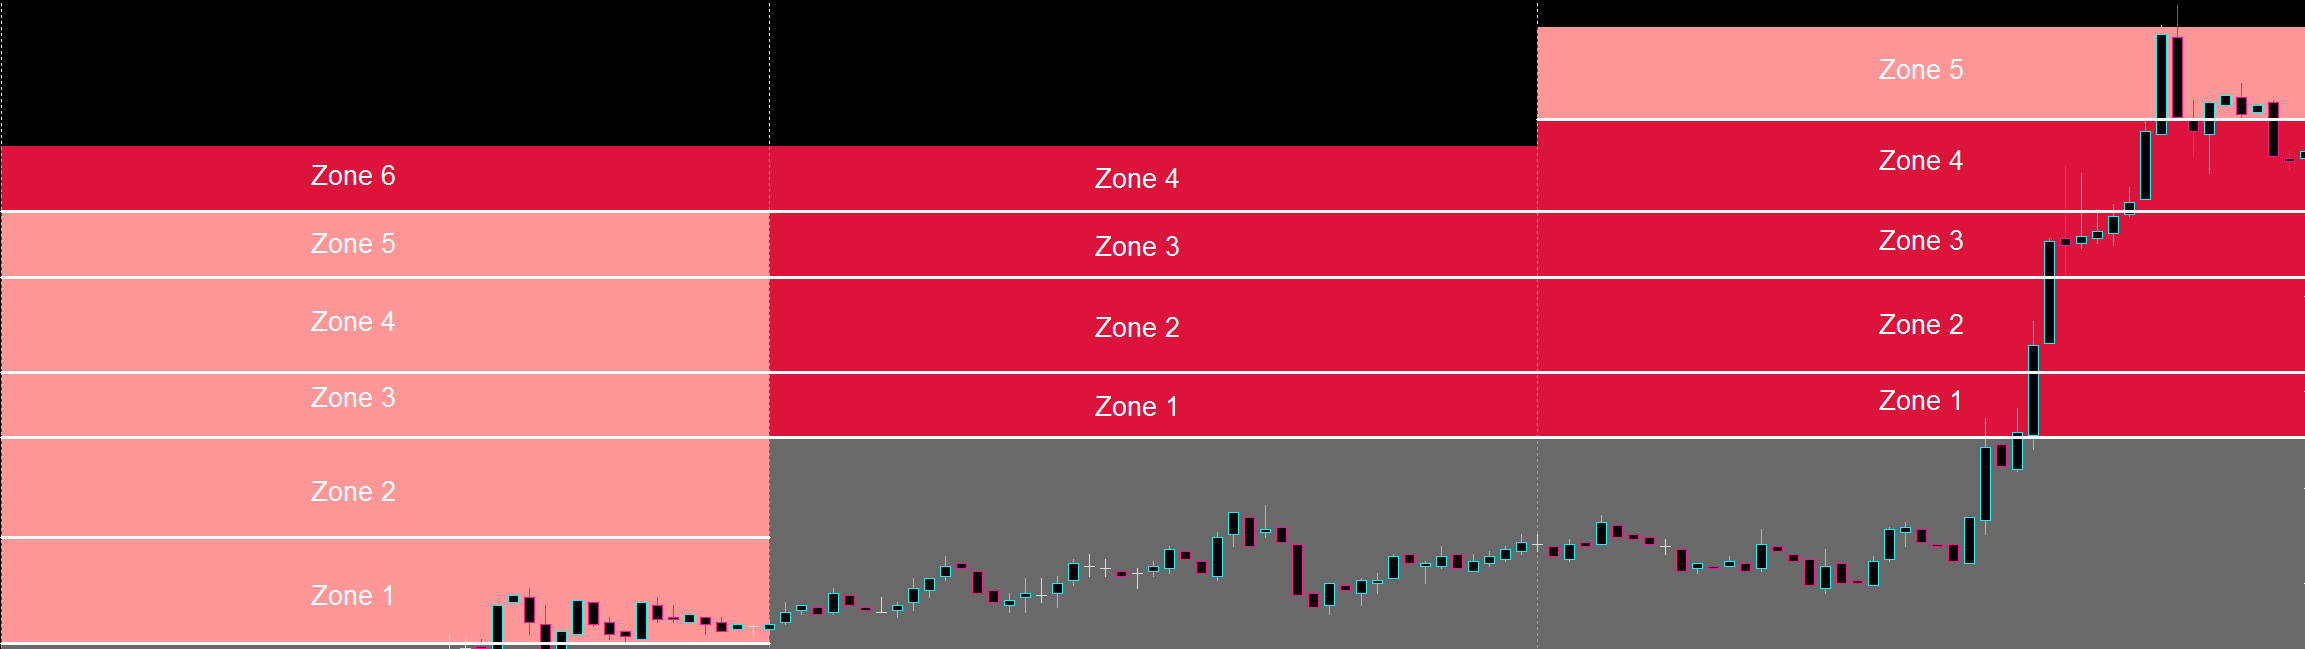
We normally can have neither 4 Zones, 5 Zones or 6 Zones above the Pivot Zone for a Trading Day.
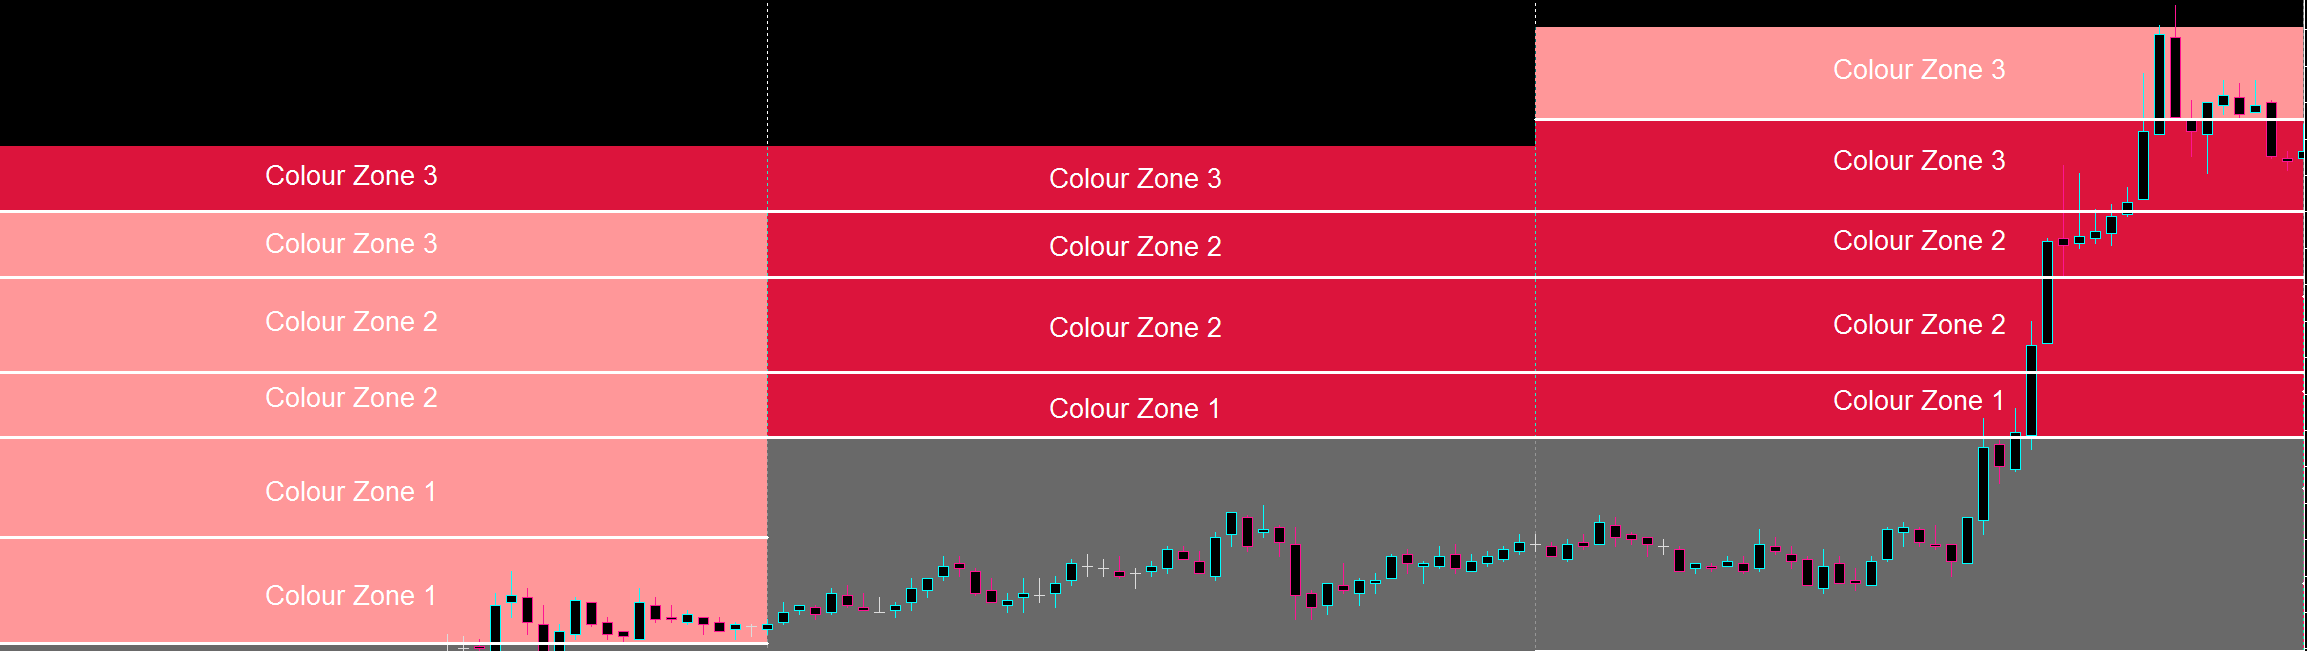
Here's an example of how the Heat Map Zones will be allocated for each each type of Zone Amounts.
Support Heat Map Colour Example:
1) If we have 6 Zones below the Pivot Zone, then the first Two Zones will be Support Zone 1 Colour, followed by the next two zones being Support Zone 2 Colour and the last two zones being the Support Zone 3 Colour.
2) If we have 5 Zones below the Pivot Zone, then the first Zone will be Support Zone 1 Colour, followed by the next two zones being Support Zone 2 Colour and the last two zones being the Support Zone 3 Colour.
3) If we have 4 Zones below the Pivot Zone, then the first Zone will be Support Zone 1 Colour, followed by the next two zones being Support Zone 2 Colour and the last zone being Support Zone 3 Colour
Resistance Heat Map Colour Example:
1) If we have 6 Zones above the Pivot Zone, then the first Two Zones will be Resistance Zone 1 Colour, followed by the next two zones being Resistance Zone 2 Colour and the last two zones being the Resistance Zone 3 Colour.
2) If we have 5 Zones above the Pivot Zone, then the first Zone will be Resistance Zone 1 Colour, followed by the next two zones being Resistance Zone 2 Colour and the last two zones being the Resistance Zone 3 Colour.
3) If we have 4 Zones above the Pivot Zone, then the first Zone will be Resistance Zone 1 Colour, followed by the next two zones being Resistance Zone 2 Colour and the last zone being Resistance Zone 3 Colour.
Popup and Mobile Notifications for the Heat Map Colour Zones:
EURUSD | REACHED | SUPPORT ZONE 1 | 1.1200 | 12:00
EURUSD | REACHED | SUPPORT ZONE 2 | 1.1200 | 12:00
EURUSD | REACHED | SUPPORT ZONE 3 | 1.1200 | 12:00
EURUSD | REACHED | RESISTANCE ZONE 1 | 1.1200 | 12:00
EURUSD | REACHED | RESISTANCE ZONE 2 | 1.1200 | 12:00
EURUSD | REACHED | RESISTANCE ZONE 3 | 1.1200 | 12:00
EURUSD | PRE-ALERT | SUPPORT ZONE 1 | 1.1200 | 12:00
EURUSD | PRE-ALERT | SUPPORT ZONE 2 | 1.1200 | 12:00
EURUSD | PRE-ALERT | SUPPORT ZONE 3 | 1.1200 | 12:00
EURUSD | PRE-ALERT | RESISTANCE ZONE 1 | 1.1200 | 12:00
EURUSD | PRE-ALERT | RESISTANCE ZONE 2 | 1.1200 | 12:00
EURUSD | PRE-ALERT | RESISTANCE ZONE 3 | 1.1200 | 12:00
------------------------------------------------------------------------------------------------------------------------------------------------------------------------------------------------------------------------------------------------------------------------------------------------------
1) Use ATR Zone Filter
2) Set ATR Zone Period
3) Set ATR Zone Timeframe
This Filter will be based on the ATR Amount, so for example if the ATR value is 0.0040 this means that it will only show the Zones / Lines which are not within a 40 pips distance from the Opening Price.
------------------------------------------------------------------------------------------------------------------------------------------------------------------------------------------------------------------------------------------------------------------------------------------------------
1) Use Retouched Notifications
2) Set Retouch Zone Amount
The Retouched Notifications will be used so that the Indicator can reactivate the reached Confirmed Zones one more time. So lets now put it into an example if Support Zone 1 has been reached and the "Set Retouch Zone Amount" is set on 2, then this means once Support Zone 3 is touched then only Support Zone 1 can be reactivated again.
Plus the Notification should be different for the Retouched Notifications.
EURUSD | RETOUCHED | NORMAL ZONE | 1.1200 | 12:00
EURUSD | RETOUCHED | STRONG ZONE | 1.1200 | 12:00
EURUSD | RETOUCHED | EXTREME ZONE | 1.1200 | 12:00
EURUSD | RETOUCHED | SUPPORT ZONE 1 | 1.1200 | 12:00
EURUSD | RETOUCHED | SUPPORT ZONE 2 | 1.1200 | 12:00
EURUSD | RETOUCHED | SUPPORT ZONE 3 | 1.1200 | 12:00
EURUSD | RETOUCHED | RESISTANCE ZONE 1 | 1.1200 | 12:00
EURUSD | RETOUCHED | RESISTANCE ZONE 2 | 1.1200 | 12:00
EURUSD | RETOUCHED | RESISTANCE ZONE 3 | 1.1200 | 12:00
------------------------------------------------------------------------------------------------------------------------------------------------------------------------------------------------------------------------------------------------------------------------------------------------------