Crowdsourced GUI. Open beta testing. - page 4
You are missing trading opportunities:
- Free trading apps
- Over 8,000 signals for copying
- Economic news for exploring financial markets
Registration
Log in
You agree to website policy and terms of use
If you do not have an account, please register
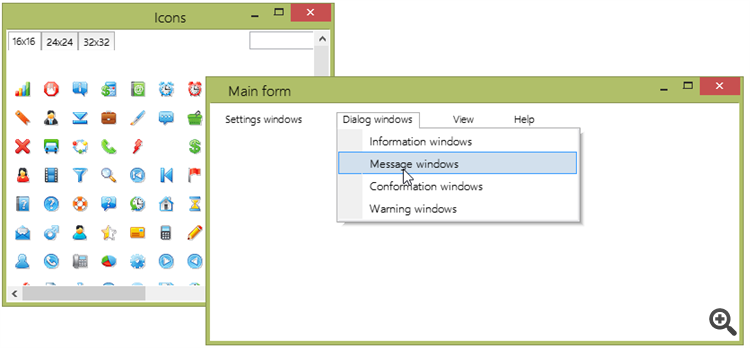
The constructor is equipped with standard tools - windows for selecting colours, icons, fonts, sounds and frames. A double-click on a chart brings up a menu. The tools are called through it.
The Icons window is dynamic. You can test it. It is still a bit buggy, but the basic features are there.
Here is another file with cyber-code. Creates menu windows in a dynamic window.
PS. Do not forget that lists and dynamic windows can be scrolled with the wheel.You can scroll horizontally with the scroll wheel if you put your cursor on a horizontal scroll bar, slider or button.
There are still quite a few bugs, but I'll fix them in time.
You can scroll horizontally with the scroll wheel if you put your cursor on a horizontal scroll bar, slider or button.
There are still quite a few bugs, but I'll fix them in time.
And I've told Peter more than once - there has to be either a justification for increasing income (efficiency of work), or at least a "dramatisation of the idea", a beautifully presented illustration, a "wrapper", so to speak...
At most, what I heard from Peter - "the future is for semi-automatic systems", when the trade is, in fact, manual, but according to data provided by a complex GUI-interface.
But, at least some proof of this assertion was not provided.
This is in general the problem of all local GUI creators - they create their own interface libraries (and rather complex) without any reference to the real purpose of the forum participants. As it is, all these ideas will remain only the ideas of their creators.
I do not have to go far - the TC-League - a project that really shows the possibilities of earnings, and which I actually use in my real trading - causes very little interest. What can I say about projects that do not show any real profit, no real increase in efficiency?
You can connect your images to BUTTON, CELL, I_BUTTON, TB_BUTTON, CHECKBOX, D_BUTTON and other elements.
To do this, at the bottom of kib-source file write your resource connection as shown on the picture below. The size of the element will be stretched to fit the picture (if it's bigger). (But it can be overridden if needed).
The pictures are set for different states:
Images can be selected from the Icons constructor window. (Only name of icon should be corrected. It is slightly broken because of slashes).
zy. In new version I have corrected icon window. It is static and you can copy icon names from upper text field.
.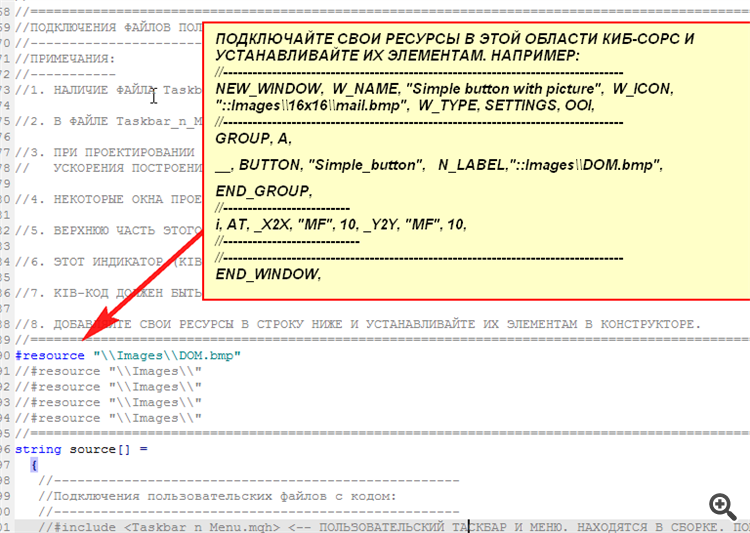
Below in the file is an example how to set the icon of simple button for neutral.
PS. The pictures that are in the icon window are already integrated. You just need to copy their names (in their entirety) from the input box at the top and assign them to the element.
Try tables.
All kinds of elements can be integrated. Checkboxes, sliders, progress bars, input fields with and without buttons, normal cells and cells with preset text, normal buttons and radio buttons, drop-down lists... All automatically.
You can color individual columns, rows, set zebra style, assign colours for zebra style... Columns can be made stretchable in width and columns can be set to rotate (swap columns).
You can set icons for cells, row and column headers and customize their sizes. Soon it will be possible to collapse parts of the table.
Not everything works perfectly yet.
Bugs are normal.
Thank you, Vladislav. (Somehow missed your post.) Focused on the next post.))
Greetings Peter, I downloaded the files and do not understand how to work with it, please tell me how to construct a menu, for example, as in the thumbnail, show the sequence of actions, and then I think I will figure out and myself complete what I need
Greetings Peter, I downloaded the files and do not understand how to work with it, please tell me how to construct a menu, for example, as in the sketch, show the sequence of actions, and then I think that I will figure out and myself finish what I need
Hi Rafil. OK. I'll make a simple template. I'll just finish upgrading the builder and the engine. Just give it some time.
I have accelerated the construction of the interface in the constructor by a factor of 10. This was the speed originally, but then accidentally added a brake. Found it, removed it, now it flies.
Rafil, here's your template:
Below is your code file.
ZS. If you don't mind, I'll post the code for others.