

How to Install Demo
- Open the MT4/MT5 platform Select ‘File’ from the main menu
- Click on ‘Open Data Folder’ to bring up a new folder panel
- Select the ‘MQL4/5’ folder, followed by the ‘Experts’ folder
- Drag and drop (or Copy) your EA file(s) into this folder
- Restart MetaTrader for your changes to take affect
Setup and User Guide for Local Trade Clone MT4 and Local Trade Clone MT5
If you want to copy between both MT4 and MT5 you will need to purchase a copy of both EA's
Setup Master Account
The master account should be set up first.
If it is the first time running the EA on this Master then this will add the account to the Master Account List
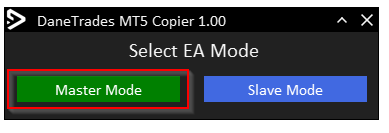
- Run the EA and choose Master Mode
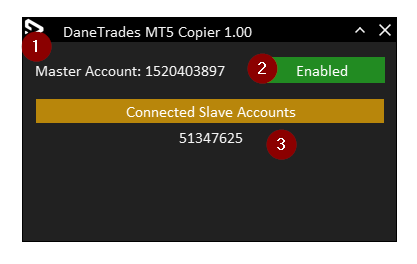
- The Master Account Number the EA is connected to
- Select Enable to switch ON copying
- Connected slave accounts. Here you will see the current slaves that are switched on.
Setup Slave Account
The Slave account should be set up after the master is connected.
If the Master Account has not been running you may not see it in the Master Account List. Turn the Master on and restart the Slave EA
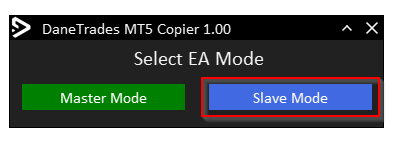
- Run the EA and choose Slave Mode
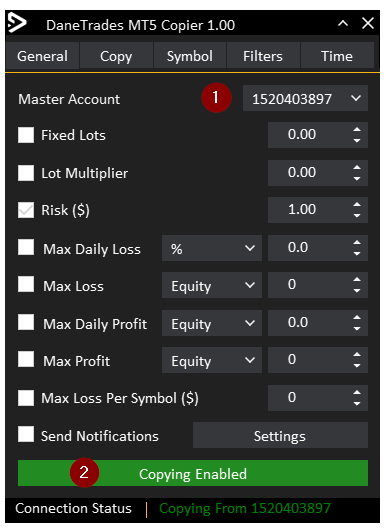
- Choose the Master Account you wish to copy from the dropdown list.
- Turn on copying by selecting the copy button.
While copying the EA Interface will be disabled. To enable again, first stop copying.
General Settings
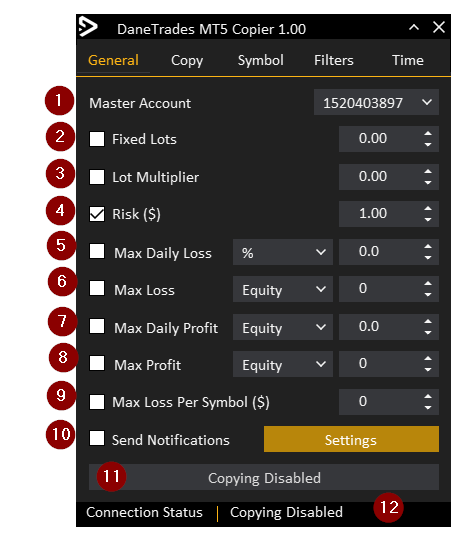
- Displays a list of master accounts
- Fixed Lots – If you want every trade to be copied using a fixed lot then check this option
- Lot multiplier – If a Lot multiplier is set to 1 this means the lot size will be copied exactly how it is in the Master Account. If this is set to 0.5 then lot size will be half of the Master Account. If it is set to 2 then lot size will be double the Master Account. If you have a 10k Master account and you are copying to a 1k Slave account, this is 10x smaller. So lot multiplier should be set to 0.1 to keep the same risk.
- Risk ($) – This is set by default. Sets the Risk % based on Balance of the Slave account
- Max Daily Loss – Includes closed trades and running open trades and can be set in % of account or Monetary value ($). Once this loss has been reached for the day all trades will be closed. No more trades will be copied to MatchTrader. Max Daily Loss is reset at the end of the trading day and is tied to broker time.
- Max Loss – Set a max loss based on a specific Equity or Balance. For example, Account Size = $50,000 and a Max Loss value = $45,000. When the account reaches $45,000 in equity or balance all trades will be closed
- Max Daily Profit – Includes closed trades and running open trades and can be set in % of account or Monetary value ($). Once this profit has been reached for the day all trades will be closed. No more trades will be copied to the Slave. Max Daily Profit is reset at the end of the trading day and is tied to broker time.
- Max Profit – Set a max profit based on a specific Equity or Balance. For example, Account Size = $50,000 and a Max Profit value = $55,000. When the Slave account reaches $55,000 in equity or balance all trades will be closed
- Max Loss Per Symbol – Set a max loss per Trade. If a trade reaches this value the trade will be closed
- Send notifications. Tick to enable. Select the settings to open a new window for the Notification Settings
- Copy Button - When copying is disabled it will be Grey and display 'Copying Disabled'. Once enabled it will be Green and display ' Copying Enabled'
- Status bar - Displays the status of the Copier. If it is copying it will display the account it is connected to
Notification Settings
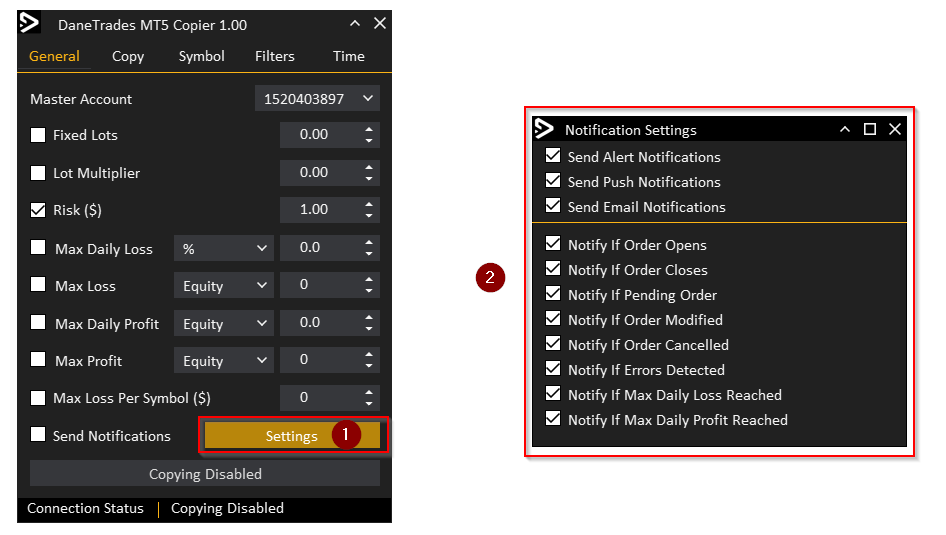
First Setup Notifications for Email and Push following this link
- Notify Settings button opens the notification window
- Notification settings
- Send Alert - Sends alert on the terminal
- Send Push - Sends notification to mobile setup in tools > Options
- Send Email - Sends email to email setup in Tools > Options
- Notify Settings for various actions
Copy Settings
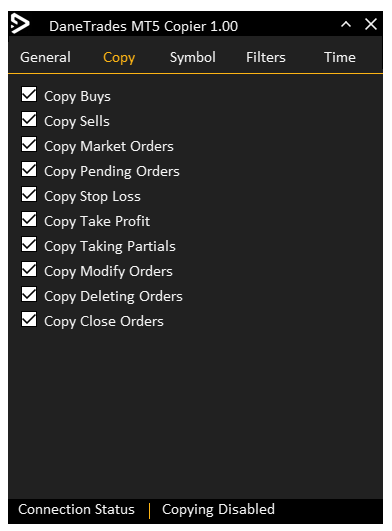
- Copy Buy trades
- Copy Sell Trades
- Copy Market Orders
- Copy Pending Orders
- Copy Stop Loss
- Copy Take Profit
- Copy Taking Partials
- Copy Modification to orders
- Copy Deleting Orders (Pending Orders)
- Copy Close Orders (Market Orders)
Symbol Settings
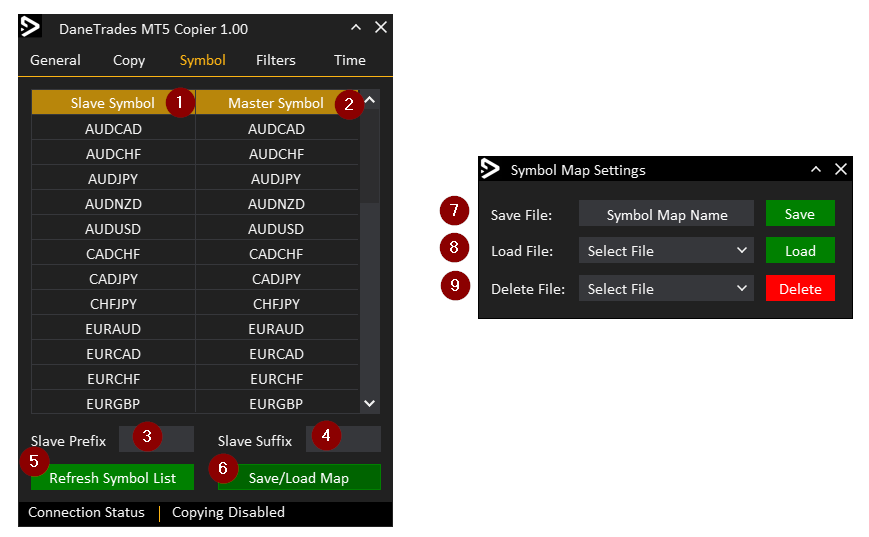
- Symbols that exist in your Market Watch List on the Slave. You need to add the symbols you want copied into your market watch list. If you add new symbols while the EA is running you will need to click Refresh Symbol List to refresh
- Symbols that exist on the Master Account. Sometimes there are more than one entry for the symbol in Master. If that is the case double click on the symbol name to get a drop down box. You can change the symbol if it appears in the list.
- Slave Prefix – If your Slave brokers symbols use a Prefix such as cGBPUSD then you will need to enter ‘c’ in the Prefix. Then click Update symbols to map them. Prefix must be added exactly as it appears in your broker
- Slave Suffix – If your Slave brokers symbols use a Suffix such as GBPUSD.i then you will need to enter ‘.i’ in the Suffix. Then click Update symbols to map them. Suffix must be added exactly as it appears in your broker
- Refresh Symbol List – Updates the symbol list according to your Market Watch and your Symbol Prefix and Suffix
- Opens window to save and load symbol maps
- Save Symbol Map. Give it a name and click save to save the current symbol map
- Load Symbol Map. Select the symbol map from the drop down list and click Load to Load the Symbol Map
- Delete Symbol Map. Select the symbol map from the drop down list and click delete to delete the Symbol Map
Filter Settings
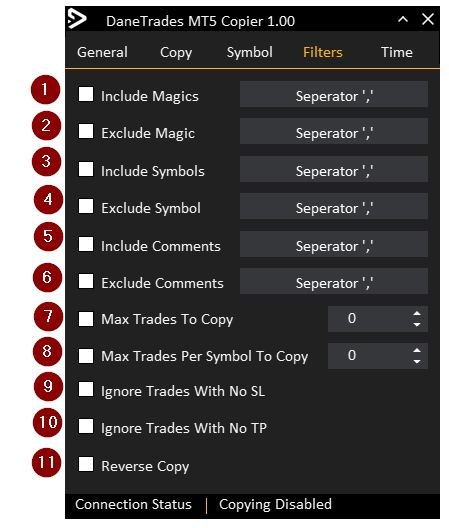
- Include Magic – If this is enabled only Trades with these Magic Numbers will be copied. Everything else will be ignored. To add more than one use a comma to separate them e.g 12345,223344,333444
- Exclude Magic – If this is enabled Trades with Magic Numbers matching one in this list will be ignored. Everything else will be copied. To add more than one use a comma to separate them e.g 12345,223344,333444
- Include Symbol – If this is enabled only Trades matching these Symbols will be copied. Everything else will be ignored. To add more than one use a comma to separate them e.g GBPUSD,EURUSD,US30
- Exclude Symbol – If this is enabled Trades matching these Symbols in the list will be ignored . Everything else will be copied. To add more than one use a comma to separate them e.g GBPUSD,EURUSD,US30
- Include Comments – If this is enabled only Trades with these Comments will be copied. Everything else will be ignored. To add more than one use a comma to separate them e.g Trade EA 1, Trade EA 2, Trade EA 3
- Exclude Comments – If this is enabled Trades with Comments matching one in this list will be ignored. Everything else will be copied. To add more than one use a comma to separate them e.g Trade EA 1, Trade EA 2, Trade EA 3
- Max Trades To Copy - This limits how many positions can be open at one time. If set to 5 then 5 positions can be opened. Any more signals will be ignored until a position is closed
- Max Trades Per Symbol To Copy - This limits how many positions can be opened per symbol. If it is set 2 and 2 positions are opened on GBPUSD. No other positions on GBPUSD will be opened. Positions on all other symbols will still be copied.
- Ignore Trades With No SL – If Enabled then any trade that does not have a SL (Set to 0) will NOT be copied
- Ignore Trades With No TP – If Enabled then any trade that does not have a TP (Set to 0) will NOT be copied
- Reverse Copy – Reverses the trades. Buys To Sells, Sells To Buys. Buy Limit To Sell Stop, Buy Stop To Sell Limit, Sell Limit To Buy Stop, Sell Stop To Buy Limit. Warning: If you reverse copy trades and then turn it off or vice versa, the trades being copied will no longer be managed!
Time Settings
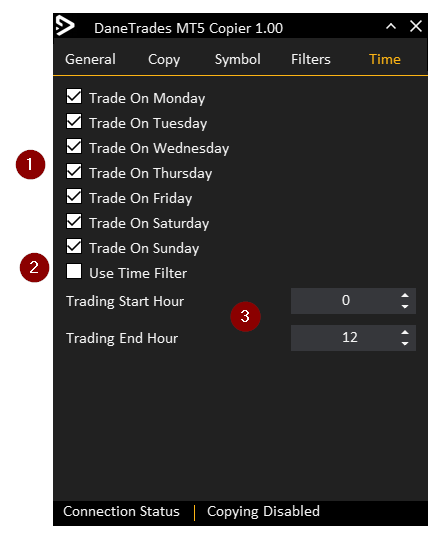
- Choose what days to copy trades on.
- Use time filter - Only copy positions between the start and end hour
- Set the start and end hour for the time window you want to copy in


