

Manual for version v1.11-beta(2024.08.29)
by Wiesław Golec
| 1 | How to install an Expert Advisor (EA) | 3 |
| 2 | How to install a Set file | 6 |
| 3 | How to enable auto trading | 9 |
| 4 | EA and his Strategies | 13 |
| 5 | General Settings | 17 |
| 6 | Entry and Exit Settings | 18 |
| 7 | Lots Settings | 19 |
| 8 | Profit and Loss Settings | 20 |
| 9 | Dynamic Distance Settings | 21 |
| 10 | De-Risk Settings | 21 |
| 11 | Margin Protection Algorithm Settings | 22 |
| 12 | Drawdown Reduction Algorithm | 23 |
| 13 | Hedging Drawdown Reduction Algorithm | 24 |
| 14 | Re-entry Settings | 25 |
| 15 | Regression Auto Channel (RAC) strategy settings | 26 |
| 16 | MACD Direction Index (MACD-DI) strategy settings | 26 |
| 17 | Momentum Direction Index (MDI) strategy settings | 26 |
| 18 | Traders Direction Index (TDI) strategy settings | 26 |
| 19 | Spearman Rank Correlation (SRC) strategy settings | 26 |
| 20 | Volume Zone Oscillator (VZO) strategy settings | 26 |
| 21 | Additional strategy settings | 27 |
| 22 | Trading Hour settings | 27 |
| 23 | UI settings | 28 |
| 24 | Debug Settings | 28 |
| 25 | Recommended set files | 29 |
| 25 | General knowledge and Information | 29 |
1. How to install an Expert Advisor (EA)
a) Buy and download your EA
b) In your MetaTrader click on “File” and choose “Open Data Folder”.

c) Click on “MQL4” or “MQL5” directory (depends which version of MetaTrader you use)
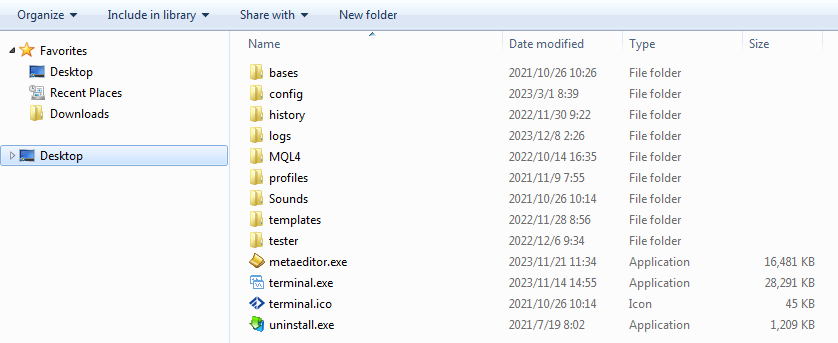
d) Copy (or Move) your EA into “Experts” directory

e) Right click on “Expert Advisors” in the navigator list of Meta Trader terminal and choose the “Refresh” option.
g) EA is now installed and ready to be used.
2. How to install a Set file
a) Download your set files
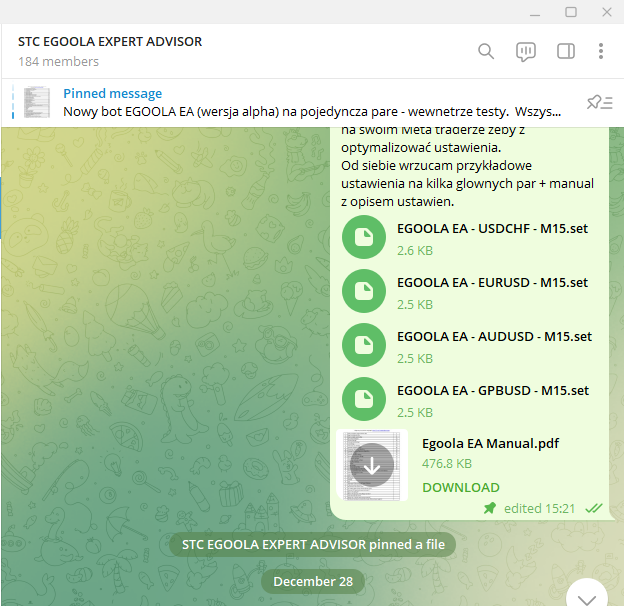
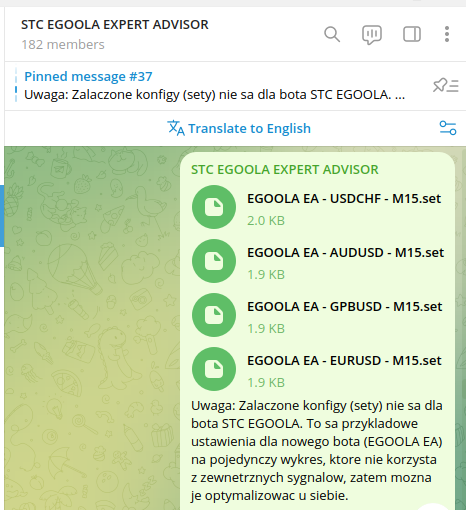
You can find set files in “Recommended Set Files” part of this manual. There are also a lot set files in the telegram group.
b) In your MetaTrader click on “File” and choose “Open Data Folder”.

c) Click on “MQL4” or “MQL5” directory (depends which version of MetaTrader you use)

d) Copy (or Move) your Set files into “Presets” directory
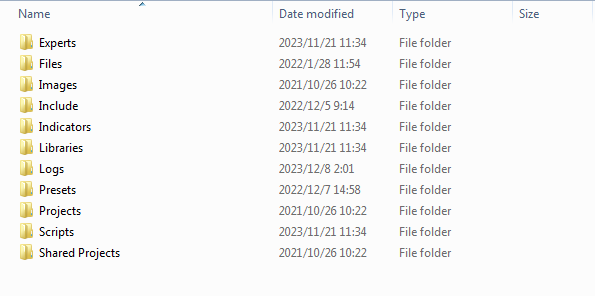
e) Your set files are now installed and ready to be used.
3. How to enable auto trading
There are two places where you must check that your EA is switched on.
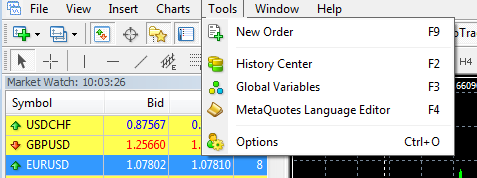
a) In your MetaTrader click on “Tools” and choose “Options”.
b) In “Options” choose “Expert Advisors” Tab and set like on screenshot below:
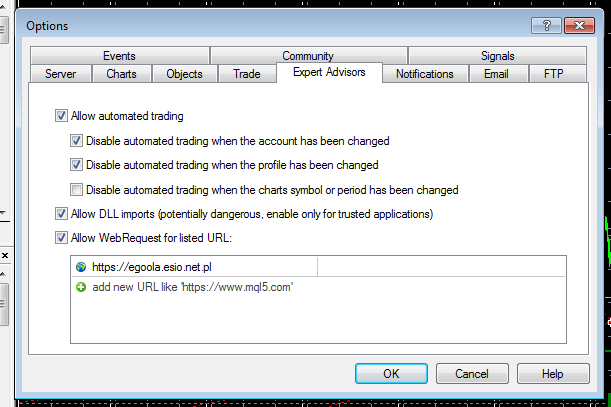
Make sure “Allow automated trading” is ticked.
“Auto Trading” button should be green now.

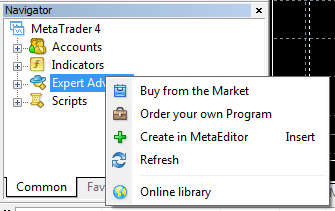
c) Drag EA from “Expert Advisors” in the navigator list on the chart.
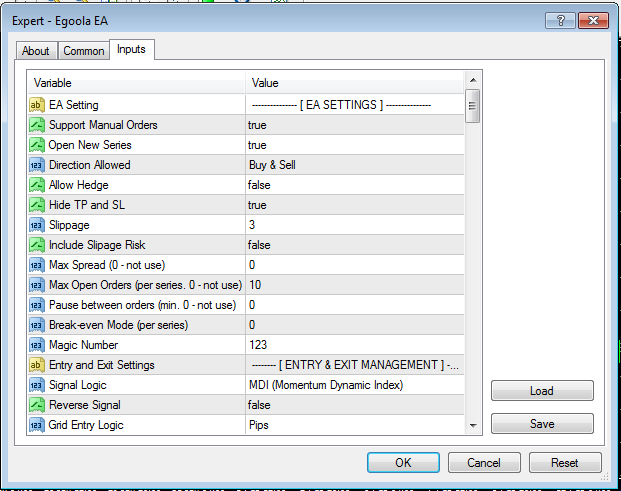
d) Select the “Inputs” tab and click on the “Load” button to choose your set file.
d) Now choose the “Common“ tab and make sure that “Allow live trading” is ticked and “positions” are set to “Long & Short”.
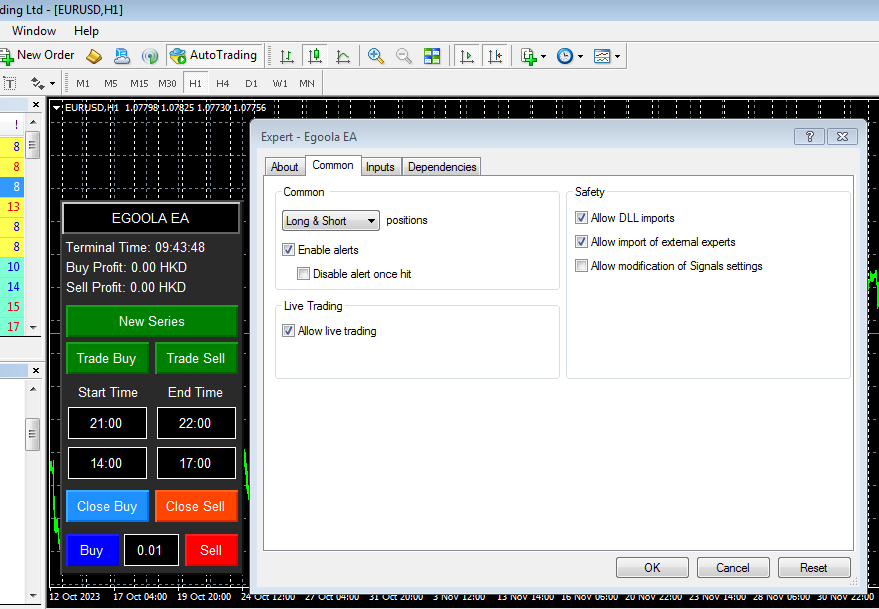
Additionally make sure that your “Initial Lots Size” is small enough for your deposit and “Use Money Management” is set to “false”. It is best to start with 0.01 lots size.
4. EA and Strategies
This EA contains 6 trading strategies which can generate signals together to confirm each other or independently.
a) Regression Auto Channel (RAC) – the strategy tries to detect trend direction by drawing channels using multiple algorithm (auto detect best fit).
b) MACD Direction Index (MACD-DI) – the strategy tries to detect opposite volume increase which may indicate a potential trend change or pullback.
c) Momentum Direction Index (MDI) – the strategy generates signals in the “overbought” and “oversold” zones, which may indicate a potential trend change or pullback.
d) Traders Direction Index (TDI) - depending on the settings, the strategy can generate signals in the "overbought" and "oversold" zones, which may indicate a potential change in the trend or pullback, or wait for confirmation of a change or continuation of the trend. It also allows you to ignore signals during the consolidation periods aka squeezes.
e) Spearman Rank Correlation (SRC) – the strategy generates signals in the “overbought” and “oversold” zones, which may indicate a potential trend change or pullback.
f) Volume Zone Oscillator (VZO) – the strategy tries to detect volume direction changes which may indicate a potential trend change or pullback
All strategies but RAC (which use lagging indicator) use leading indicators which mean they are trying to predict potential future outcomes.
Recommended pairs: EURUSD, GBPUSD, AUDUSD, and USDCHF on a 15/30 min time frame.
Work on any pairs but it’s not recommended to run EA on a timeframe lower than 5 min.
Risk:
Aggressive – For single pair on every 1000 USD “Initial Lots Size” increase by 0.01
Moderate – For single pair on every 3000 USD “Initial Lots Size” increase by 0.01
Conservative – For single pair on every 5000 USD “Initial Lots Size” increase by 0.01
It is not recommended to run EA on multiple pairs. Especially with higher than Conservative risk.
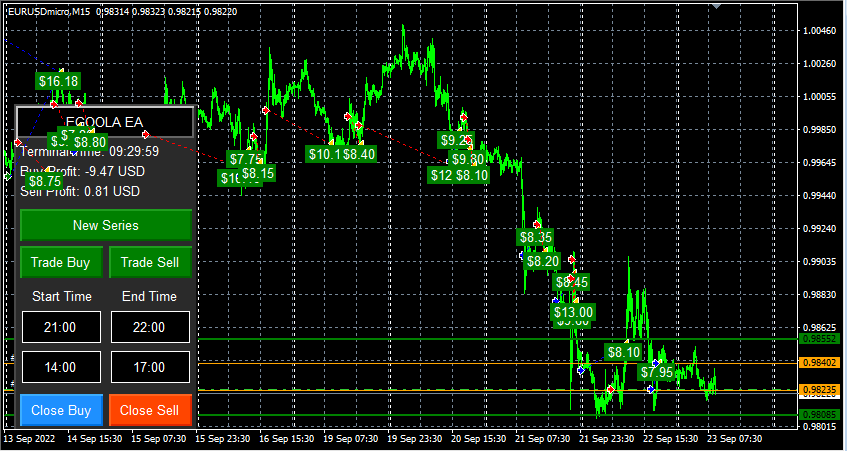
Example of Egoola EA trades
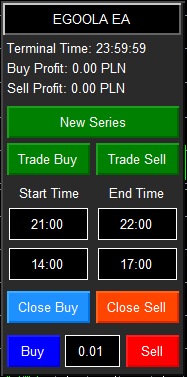
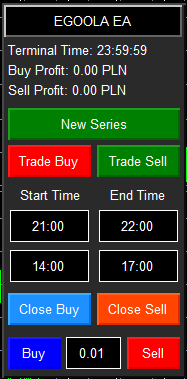
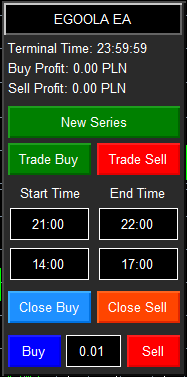
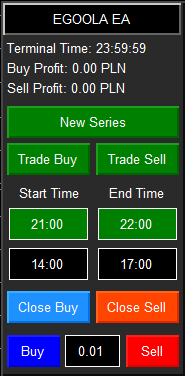
Functions of front panel on chart:
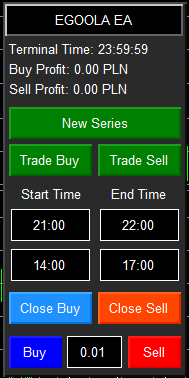
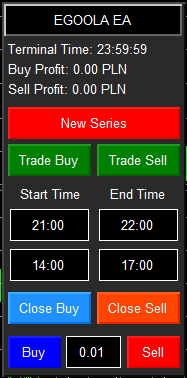
| | “New Series”. If you click on this button and there are trades open the EA will still enter new orders until the current series of transactions are closed, after closing it, it will not open new orders again. If there are no open trades and you click on this button it will not start a new cycle. |
| | “Trade Buy”. If you click this button and it goes red EA won’t open new buy positions (even there are some existing already) until you enable it back. |
| | “Trade Sell”. If you click this button and it goes red EA won’t open new buy positions (even there are some existing already) until you enable it back. |
| | “Trading Hours”. If the “Use Trade Time 1” option is enabled in your EA then you can control trading time from the panel. If you change hours and values are valid then input fields become green. If the color becomes red then values are invalid and need to be corrected. Same for “Use Trade Time 2” option.
|
| | “Close Buy” closes all open buy positions. “Close Sell” closes all open sell positions. |
| | “Buy” immediately opens a new buy position with selected lots size. “Sell” immediately opens a new sell position with selected lots size. |


5. General Settings
| Support Manual Orders | If enabled EA will include manually opened positions in his management. It will close it if it reaches the “Take Profit” amount set in EA. It will also continue to open new positions and continue increasing lots size based on manual entry. |
| Open New Series | If enabled we allow EA to open new series. |
| Direction Allowed | Trading direction allowed (Sells only, Buy only, both or none) |
| Allow Hedge | Allow to trade both direction simultaneously |
| Hide TP and SL | Use virtual SL and TP. |
| Slippage | Max Allowed Slippage for Position opening |
| Include Slippage Risk | If enabled we will include slippage risk in Break-even, Take Profit and Stop Loss ranges |
| Max Spread (0 - not use) | Max Spread allowed for opening new positions. 0 to disable |
| Max Open Orders (per series) | Max allowed open orders (if “Allow Hedge” is enabled then this limit is per direction series) |
| Pause between orders (min. 0 - not use) | If set then EA will set delay between opening new positions in the same direction regardless of incoming signal. |
| Break-even Mode (per series) | From what number of positions EA will try to close them on Break-Even (if “Allow Hedge” is enabled then each direction series is treated separately) |
| Magic Number | EA instance identification number (must be unique) |
6. Entry and Exit Settings
| Signal Logic | Strategy for signals: MACD-DI, MDI, TDI, SRC or VZO. They can be used in groups, all together or any single. |
| Reverse Signal | Reverse incoming signal logic (will treat sell signal as buy) |
| Grid Entry Logic | Here we set conditions on how we open additional entries. If it’s just pips distance based (“Pips” option), or pips distance + next candle (“Next Candle” option) or on new signal only if pips distance condition is met (“Next Signal” option). |
| Allow Close Signals | Here we can set if we want to accept close signals from indicators. If true positions will be closed on such signals if they are in profit. |
| Accept Close signal when in Loss | Here we can set if we also want to accept a close signal in loss. By default this is disabled. |
| Allow Multiple Entry on Single Candle | Allow for multiple entries on a single candle. Useful when used together with “Re-Entry on Take Profit”. It allows scalping the whole trend without additional delays on small timeframes. |
7. Lots Settings
| Use Money Management | If enabled Ea will calculate “Initial Lots Size” based on “Auto lot” setting. |
| Auto lot | Used for calculating “Initial Lots Size” based on the amount of “Free Margin” available for each 0.01 lots size. |
| Initial Lots Size | Initial (Fixed) Lots size. |
| Lots Multiplier | Lots size multiplier for subsequent positions. |
| Lots Multiplier Logic | “Exponential”, “Additional” or “Fibonacci sequence” If set to “Additional” next lots will be calculated as “Actual Lots size” plus “Lots Multiplier”. If set to “Exponential” next lots will be calculated as “Actual Lots size” multiplied by “Lots Multiplier”. If set to “Fibonacci sequence” , the next “Lots Multiplier” will be calculated based on the next number in the fibonacci sequence. |
| Lots Multiplier Delay | Here we can set delay before we start to increase lots size for subsequent positions. Disabled if set to 0. |
| Max Lot for Multiplier | Max available lots size for opening positions. |
| Total Aggregate Lot Exposure | Maximum total aggregate lots exposure in open positions (per series). Disabled if set to 0. |
| Force Min Lots Step | Force minimum lot size increases by volume step size on every subsequent position. |
8. Profit and loss Settings
| Stop Loss in Pips (per series) | Stop Loss in pips calculated for series (all buys or all sales positions) |
| Take Profit in Pips (per series) | Take Profit in pips calculated for series (all buys or all sales positions) |
| Equity Stop Loss (in money) | Equity Stop Loss. If set EA will close all positions if the loss amount in all open positions reaches this number. Disabled if set to 0. |
| Equity Take Profit (in money) | Equity Take Profit. If set EA will close all positions if profit amount in open positions reach this number. Disabled if set to 0. |
| Disable New Series on Equity Stop Loss | If enabled EA will auto disable opening new series when Equity Stop Loss (in money) is triggered. |
| Equity Stop Loss New Series Disable Period (0 - permanent) | If set, EA will disable “New Series” only for a number of hours set. After this time passes, EA will re-enable “New Series”. If set to 0 EA will never enable “New Series” automatically. You will have manually enabled it via the UI Panel. |
| Trail Start. pips (0 - not use) | Trailing Stop Loss in pips. EA will start to trail stop loss if series (all buys or sells positions) reach this distance from break even. |
| Trail Step. pips | Trailing Step in pips. Trailing distance between Stop Loss and current price. |
9. Distance Management
| Grid Distance | Min distance between subsequent positions per series. |
| Distance Multiplier | This setting is used to increase distance between subsequent positions by multiplier number |
| Distance Multiplier Delay | When we will begin to use Distance multipliers. |
| Use Distance based Lots Multiplier Logic coefficient | If enabled, Lots size will be adjusted depending where we open a new position. If a new position is opened late, then extra late in distance will be included In lots size. For example we get late in opening position by 2 grid distances. Then this new position which is late will have lots size multiplied by missing distance gap. So if normally the next lot would be 0.02 if we got late by 2 grid distances then this lot will become 0.04 (default lot 0.02 multiplied by 2). |
10. De-Risk Settings
| De-Risk Algo | Enable de-risking algo |
| De-Risk Trigger on Profit | Allow to trigger only if profit below this amount (prevent closing profitable positions) |
| De-Risk on Aggregate Lot Exposure | Allow to trigger only if aggregate lot exposure is bigger than this setting |
| Order Number for De-Risk | Allow to trigger only if number of orders is bigger than this number |
| Maximum Hedge Order Number before De-risk | Allow to trigger only if number of hedge orders is lower than this number |
| Maximum De-Risk Hedge Aggregate Lot Exposure | Allow to trigger only if aggregate hedge lot exposure is lower than this setting |
| Percent Profit for De-Risk Algo | Profits in percent which will be used to close positions when “De-Risk Algo” closes are triggered. |
Example for settings:
Initial Lots Size = 0.01
De-Risk Algo = true
De-Risk Trigger on Profit = 10
De-Risk on Aggregate Lot Exposure = 0.10
Order Number for De-Risk Algo = 2
Percent Profit for De-Risk Algo = 0
Let’s assume we have 2 positions open (0.05 and 0.07) with total aggregate lot 0.12. Profit in these positions is currently positive but less than 10 (De-Risk Trigger on Profit) . EA will then close all these positions (0.05 + 0.07) with break even profit 0 (Percent Profit for De-Risk Algo) and replace them with new single entry and lot based on Initial Lots Size. This would not trigger if positions are in profit for more than De-Risk Trigger on Profit setting. EA will let the profit grow.
11. Margin Protection Algorithm Settings
| Margin Protection Algo Min Level (0 - not use) | Enable minimal margin level protection algo |
| Margin Protection Algo Trigger | “Oldest Position” or “Oldest Series” If set to “Oldest Position” EA will close oldest position if margin level drop below “Margin Protection Algo Min Level” If set to “Oldest Series” EA will close oldest series if margin level drop below “Margin Protection Algo Min Level” |
12. Drawdown Settings
| Drawdown Reduction Algo | Enable Drawdown Reduction Algorithm |
| Order Number for Drawdown Reduction Algo | Number of Opened Positions (per series) when “Drawdown Reduction Algorithm” begins to work. |
| Percent Profit for Drawdown Reduction Algo | Profits in percent which will be used to close positions when “Drawdown Reduction Algorithm” closes are triggered. |
Example for settings:
Drawdown Reduction Algo = true
Order Number for Drawdown Reduction Algo = 8
Percent Profit for Drawdown Reduction Algo = 3
If the first buy position at 0.01 lots went negative and the grid has reached the 8th position, it will wait for the market to retrace until the 8th position goes in the money for the same amount as the 1st position is negative. The EA will then close both the 1st and 8th position simultaneously and therefore canceled the loss out at plus 3% more profit than the loss, leaving the rest of the trades open to either hit TP or if the market reaches the 8th trade again it will repeat the same action. This strategy is to lower the draw down while the EA is waiting for the market to retrace and hit TP of the whole series.
13. Hedge Drawdown Settings
| Hedge Drawdown Reduction Algo Lots Size | What lots size should we use when open hedge position: “Default lots size” – standard lot like described in “Lots settings”. “Opposite entry biggest” – hedge entry lots size will be equal to opposite entry biggest (should be last open position). “Opposite entries total” – hedge entry lots size will be set to the total lots size of all opposite positions. |
| Hedge Drawdown Reduction Algo | Enable Hedge Drawdown Reduction Algorithm |
| Hedge Order Number for Drawdown Reduction Algo | Number of Opened Hedge Positions (per series) when “Drawdown Reduction Algorithm” begins to work. |
| Hedge Percent Profit for Drawdown Reduction Algo | Profits in percent which will be used to close positions when “Hedge Drawdown Reduction Algorithm” closes are triggered. |
Example for settings:
Hedge Drawdown Reduction Algo = true
Hedge Order Number for Drawdown Reduction Algo = 8
Hedge Percent Profit for Drawdown Reduction Algo = 3
Example: First buy position at 0.01 lots went negative and the grid has reached the 8th position. Ea opened multiple 2 hedge (sell) positions. Market is continuing going down and all sell positions get in profit for amount bigger than the highest buy entry (0.01) lots. The EA will then close all sell positions and the 1st buy position simultaneously and therefore canceled the loss out at plus 3% more profit than the loss, leaving the rest of the trades open to either hit TP or it will repeat the same action. This strategy is to lower the draw down while the EA is waiting for the market to retrace and hit TP of the whole basket.
14. Re-entry settings
| Re-entry on Take Profit. | If the number of closing positions on take profit is lower or equal than this number EA will automatically re-entry in the same direction if Trading Hours conditions are met. 0 to disable |
| Allow Re-entry on Take Profit outside Trade Time | Allow automatic re-entry on Take Profit outside of Trading Hours conditions. |
| Increase Lots Size when Re-entry on Take Profit | Increase re-entry lots size base on “Lots multiplier” setting on consecutive wins |
| Reset Lots Increase after consecutive wins (0 - no reset) | Reset re-entry lots increase back to default. |
| Re-entry on Break-even | If the number of closing positions on break-even is lower or equal than this number EA will automatically re-entry in the same direction if Trading Hours conditions are met. 0 to disable |
| Direction of re-entry on Break-even | Direction of re-entry on Break-even: |
| Allow Re-entry on Break-Even outside Trade Time | Allow automatic re-entry on Break-Even outside of Trading Hours conditions. |
| Auto Hedge Entry | Allow to auto open hedge entry if the number of opposite series reaches this number. 0 to disable. |
| Allow Auto Hedge Entry outside Trade Time | If Enabled Allow to open hedge entry regardless of Trade Time conditions. |
15. Regression Auto Channel (RAC) strategy settings
16. MACD Direction Index (MACD-DI) strategy settings
17. Momentum Direction Index (MDI) strategy settings
18. Traders Direction Index (TDI) strategy settings
19. Spearman Rank Correlation (SRC) strategy settings
20. Volume Zone Oscillator (VZO) strategy settings
21. Additional strategy settings
| Processed Bars | Max number of bars checked backward by all indicators. This number shouldn't be smaller than any indicator “Period” + “Deviation” setting. If this number is too big it will slow down back testing by a lot. |
| Signal On Current Candle | If true, signals will be generated on the current candle, which is not confirmed and will be repainted. Use it only if you know what you are doing. |
| Cross only signals | If set to true signals will be generated only when levels/thresholds are crossed (meaning waiting for confirmation). This is a very conservative setting and decreases the number of signals by a lot. |
22. Trading sessions.
| Use Trade Time 1 | Enable 1st Trading Hours (Trading Session) limitations. EA will open initial positions only in this time range. |
| Timer 1 Start Hour (0-24) | Begin Hour of 1st Trading Sessions. |
| Timer 1 Start Min (0-59) | Begin Minutes of 1st Trading Sessions. |
| Timer 1 End Hour (0-24) | End Hour of 1st Trading Sessions. |
| Timer 1 End Min (0-59) | End Minutes of 1st Trading Sessions. |
| Use Trade Time 2 | Enable 2nd Trading Hours (Trading Session) limitations. EA will open initial positions only in this time range. |
| Timer 2 Start Hour (0-24) | Begin Hour of 2nd Trading Sessions. |
| Timer 2 Start Min (0-59) | Begin Minutes of 2nd Trading Sessions. |
| Timer 2 End Hour (0-24) | End Hour of 2nd Trading Sessions. |
| Timer 2 End Min (0-59) | End Minutes of 2nd Trading Sessions. |
23. UI settings
| Confirm UI button press | If enabled each time we push any button on the UI it will popup a confirmation message box to confirm action. |
| Plot Trades On Chart | If this option is enabled, the EA will draw historical trades on the chart even if they have been closed manually (but were previously opened by the EA). Additionally with "Support Manual Orders" setting enabled, it will also include manually opened positions. |
| Plot Profits On Chart | If this option is enabled, the EA will display profits and losses on the chart every time positions are closed by the EA. Additionally, if the “Plot Trades On Chart” setting is active, it will also include trades plotted by it. |
| Move Panel X Position | Adjust Trading Panel Position X (Horizontal coordinate). Allow moving Trading Panel horizontally (left and right). |
| Move Panel Y Position | Adjust Trading Panel Position Y (Vertical coordinate). Allow moving Trading Panel vertically (up and down). |
| Break Even Level Color | Break-even level line color |
| Take Profit Level Color | Take Profit level line color |
| Stop Loss Level Color | Stop Loss level line color |
| Trailing Stop Begin Level Color | Begin Trailing Stop level line color |
| Enable UI for Visual Testing | By default UI is disabled in back testing as it slows down the whole process. But it can be enabled back for Visual backtesting with this setting. |
24. Debug Settings
| Event Execution Timer | Here we can set how often in milliseconds we refresh the Trading Panel UI. |
| Debug Level | Here we can define which level of messages you want to see. Used for debugging only as it generates a ton of logs. |
25. Recommended set files.
You can find recommended files in the telegram group.
26. General knowledge and Information
TODO…


