How to Install Demo
- Open the MT4/MT5 platform Select ‘File’ from the main menu
- Click on ‘Open Data Folder’ to bring up a new folder panel
- Select the ‘MQL4/5’ folder, followed by the ‘Experts’ folder
- Drag and drop (or Copy) your EA file(s) into this folder
- Restart MetaTrader for your changes to take affect
MT4/MT5 TO TELEGRAM SENDER
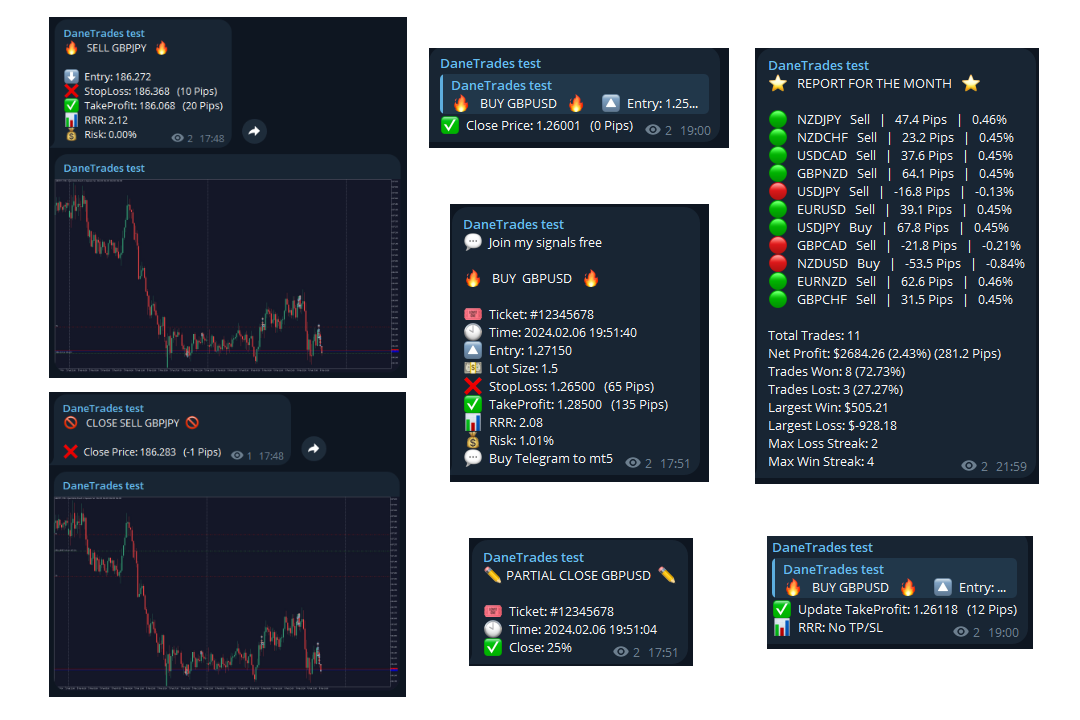
MT4/MT5 To Telegram Features
- Fully Customise signal to your preference with a huge number of options
- Add your own custom messages before or after your signal. This can be tags, links, channels or anything else
- Add, remove, customise emojis in the signal. Or you can remove them all.
- Filter trades to send by Symbol or Magic Number
- Exclude Sending specific symbols
- Exclude sending specific magic numbers
- Customise which trade details to send with the signal
- Send Screenshots with the signals
- Customise which signal types to send
- Send Daily, Weekly, Monthly and Custom time reports of the signal performance
Getting Started
Create and Setup a Telegram Bot
- Log into your Telegram account and search for ‘BotFather’. Start a new conversation with BotFather.
- Send /newbot to create a new Telegram bot. Click on ‘Applications’ and then ‘New Application’.
- When asked, enter a name for the bot.
- Give the Telegram bot a unique username. Note that the bot name must end with the word "bot" (case-insensitive).
- Copy and save the Telegram bot's access token to enter into the EA.
Add Bot As Admin
- Go to the channel you want to copy signals to
- Go To channel settings and Manage Channel
- Click on Administrator and select Add administrators
- Search for the bot you created
- Add the bot to the Channel as an administrator
Get Telegram Chat ID
- Go to the group or channel where you want the EA to send messages.
- Add your newly created bot to the group/channel and make it an admin. Group Info > Manage Group > Administrations > Add Administrators > Your Bot > Save
- Send any message in the group/channel i.e "Test". This message is needed to get the group/channel ID.
- Replace the <Token> part in the following URL with the Token you got from BotFather. https://api.telegram.org/bot<token>/getUpdates
- Open the URL in your browser. If on the new page it only displays: {"ok":true, "result":[]}, Send a new message to the group/channel and refresh the page.
- Search for the part "chat":{id": and copy the ID. The ID should look something like this: -1001953462522 or this: 505207706.
- Copy the Chat ID
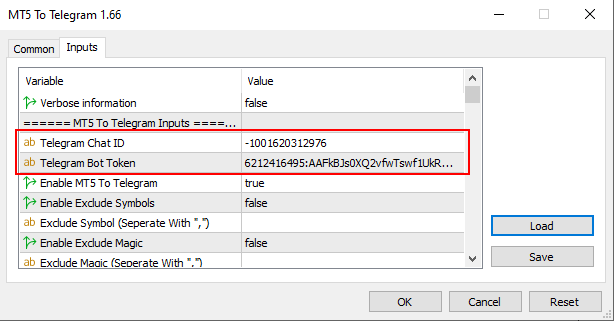
Enter the Chat ID and Bot Token Into the EA inputs. You can then choose to Save your settings. Once saved press OK
Add Telegram Webrequest URL
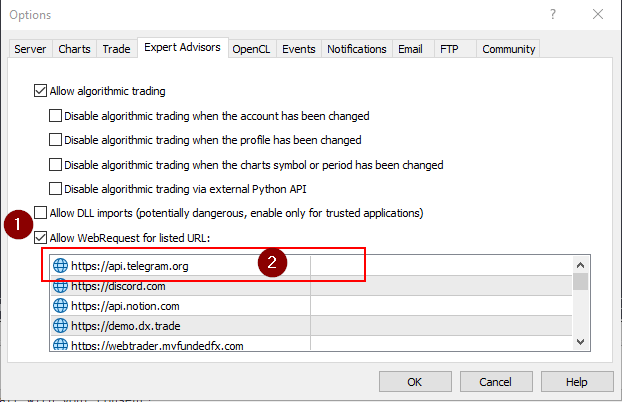
In the MetaTrader terminal go to Tools > Expert Advisors and enable 'Allow webrequest for URL'.
Add 'https://api.telegram.org to the list
Enable MT4/MT5 To Telegram
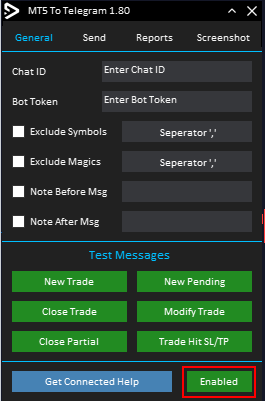
You must first enable the Sender by pressing the ‘Disable’ button and turn it into a green 'Enabled' button on the bottom right of the panel
General Tab
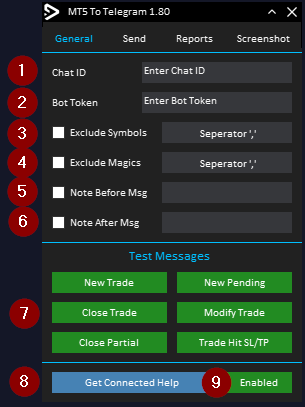
- Chat ID for the telegram channel
- Bot token for the telegram channel
- Exclude Symbols - Choose which symbols to not send
- Exclude Magic - Choose which EA to not send signals from using the magic number
- Include a note or custom message at the top of New and Pending Order signals Only
- Include a note or custom message at the bottom of all signals
- Test messages to send to check connection and template settings
- Help on how to get connected
- Enable the EA
Send Tab
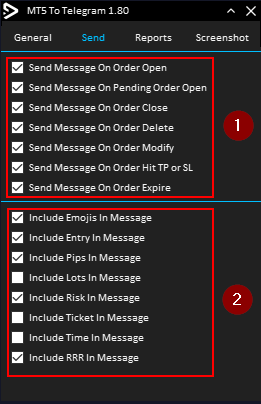
- Choose when to send a signal. You can pick from 7 options which can trigger the signal
- What to include in the signal. These are basic customisation settings. More can be found in the EA inputs before you load it
Reports Tab
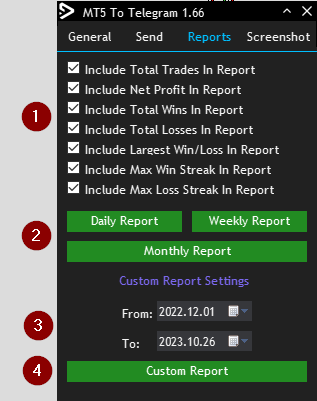
- Choose what data to include in the report
- Send daily, weekly or monthly report
- Choose a custom date for the data to send
- Custom Report - Send the data between the dates selected in step 3
Screenshot Tab
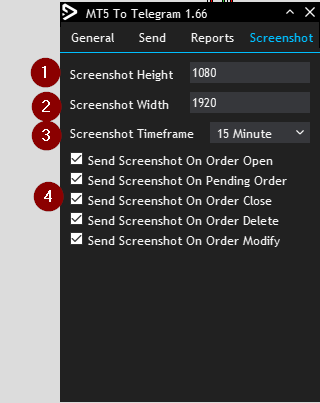
- Screenshot Height in Pixels
- Screenshot Width in Pixels
- Screenshot Timeframe
- When to send the screenshot. Select with actions trigger a screenshot
Customise Signal Template
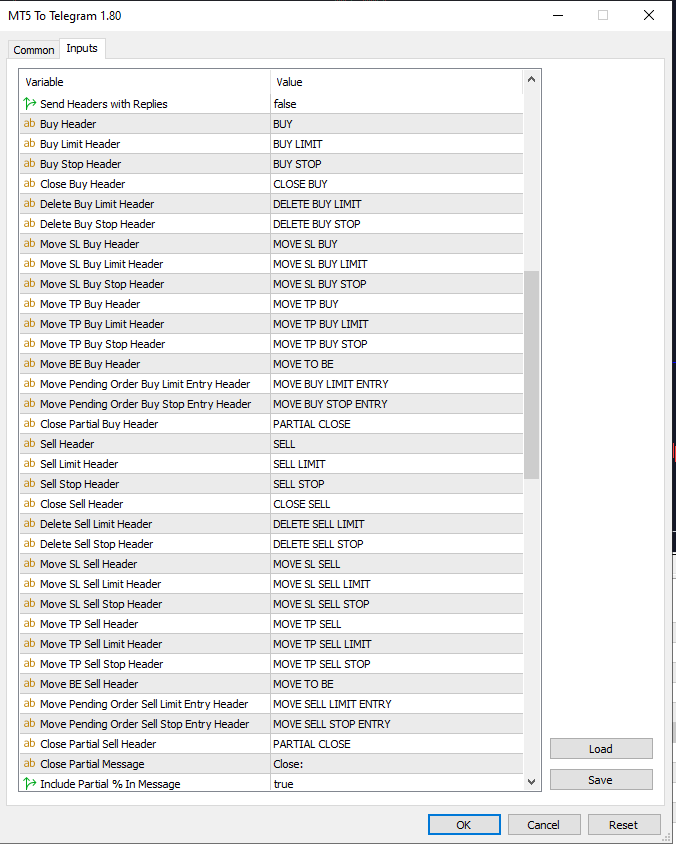
In the inputs is where you will customise the format of the signals sent


![[$9,496] in 5 Days Using 'Supply Demand EA ProBot' (Live Results) [$9,496] in 5 Days Using 'Supply Demand EA ProBot' (Live Results)](https://c.mql5.com/6/965/splash-preview-761070-1740062258.png)