
How to Create Your Own Trailing Stop
Introduction
Before we begin with the article subject, I think it's a good idea to dot the i's and cross the t's. Once again we define the terms "position" and "order":
- Position - is a trade obligation, i.e. number of bought or sold contracts for a financial instrument. There can be only one position per one instrument.
- Order - is an instruction for broker to buy or sell a financial instrument. There are several types of orders: market and pending, as well as stop orders (Stop Loss and Take Profit).

Figure 1. Positions and Orders.
This article focuses on the trailing Stop Loss level for positions. For pending orders this operation does not make sense, because you can move directly to the order price. And when it turns into a position (or its part), then this material will be handy .
Trade position can be closed not only by pressing the "Close" button in position dialog box (Figure 2).

Figure 2. Closing a position using the "Close" button in position dialog box. 1 - open the position context menu, 2 - select "Close position"
3 - click "Close" button.
In addition, the position can be closed automatically when the price reaches a predetermined level of profit (Take Profit), or level of loss (Stop Loss). Unlike closing position using the "Close" button, closing by Stop Loss and Take Profit is done not from terminal (by trader or expert), but by the broker. Thus, closing position is fully guaranteed, regardless of the connection and power supply. This makes the use of Stop Loss practically obligatory element in trader's work.
The only action that trader should make - is to give an order for broker to set the level of protective stop. In other words, you must set Stop Loss on position (or open position with this level set). Setting the Stop Loss is done using the "Modify" context menu command in terminal. In the list of positions select a position, right click and choose "Modify or Delete". Then in position dialog box you need to enter the necessary level of Stop Loss and click "Modify" (Figure 3).

Figure 3. Setting the Stop Loss Level of Position. 1 - open the position context menu, 2 - click "Modify or Delete", 3 - set value, 4 - click "Modify."
Stop Loss level of position is shown on the price chart along with the level of its opening (Figure 4).
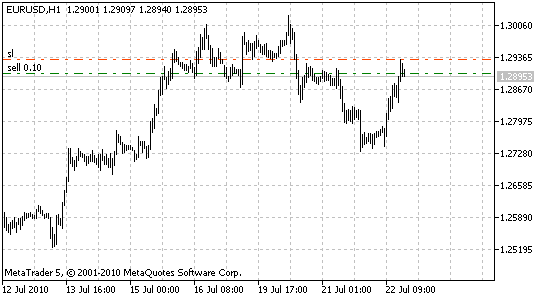
Figure 4. Position with Stop Loss. The level is marked with red dotted line labeled with sl in its the left edge.
You can not only install Stop Loss for position, but also periodically change its value. For example, you can pull it up when price changes to the profitable direction, thereby reducing the possible loss. Such pulling of protective level is known as trailing stop.
There are plenty of trailing stop variants: you can simply pull Stop Loss after price at a given distance. You can begin to move Stop Loss not immediately, but when position reaches a certain profitability then it is immediately moved to the level of break-even. This variant is standard and built into MetaTrader 5 Client Terminal. To use the standard trailing stop right-click position and choose "Trailing Stop" (Figure 5).
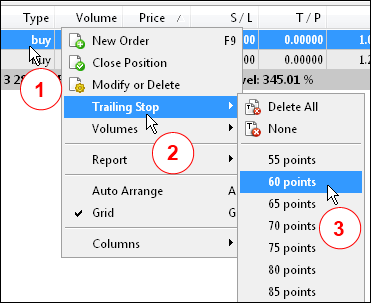
Figure 5. Enabling the standard trailing stop in terminal. 1 - open the position context menu, 2 - click "Trailing Stop", 3 - select value (or set value).
The command of setting value (Custom) is at the bottom of the context menu, and is not shown on the image.
In addition to direct price monitoring, trailing stop can work on the basis of some technical indicator. For example, based on moving averages, that allows not to react to short-term price changes, based on Ichimoku indicator or more appropriate; and even on indicator Parabolic SAR (Stop And Reverse) that is not initially designed for this purpose. See Figure 6.
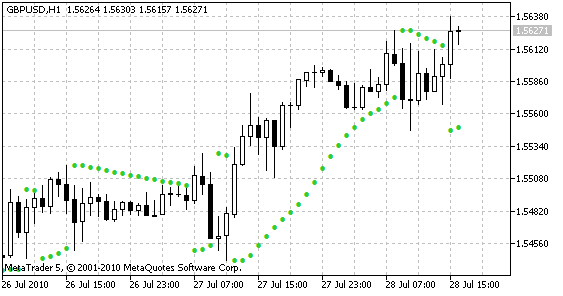
Figure 6. Parabolic SAR Indicator.
In MQL4 procedural programming a trailing stop has been usually created as a separate function or has been integrated into other functions. For example, in the MACD Sample expert, included in MetaTrader 4, the trailing stop function is integrated with the function of market closing of orders:
for(cnt=0;cnt<total;cnt++)
  {
   OrderSelect(cnt,SELECT_BY_POS,MODE_TRADES);
   if(OrderType()<=OP_SELL &&         // check for opened position
      OrderSymbol()==Symbol())        // check for symbol
     {
      if(OrderType()==OP_BUY)         // long position is opened
        {
         // should it be closed?
         if(MacdCurrent>0 && MacdCurrent<SignalCurrent && MacdPrevious>SignalPrevious &&
            MacdCurrent>(MACDCloseLevel*Point))
           {
            OrderClose(OrderTicket(),OrderLots(),Bid,3,Violet); // close position
            return(0); // exit
           }
         // check for trailing stop
         if(TrailingStop>0)
           {

            if(Bid-OrderOpenPrice()>Point*TrailingStop)
              {
               if(OrderStopLoss()<Bid-Point*TrailingStop)
                 {
                  OrderModify(OrderTicket(),OrderOpenPrice(),Bid-Point*TrailingStop,OrderTakeProfit(),0,Green);
                  return(0);
                 }
              }
           }
        }
      else // go to short position
        {
         // should it be closed?
         if(MacdCurrent<0 && MacdCurrent>SignalCurrent &&
            MacdPrevious<SignalPrevious && MathAbs(MacdCurrent)>(MACDCloseLevel*Point))
           {
            OrderClose(OrderTicket(),OrderLots(),Ask,3,Violet); // close position
            return(0); // exit
           }
         // check for trailing stop
         if(TrailingStop>0)
           {

            if((OrderOpenPrice()-Ask)>(Point*TrailingStop))
              {
               if((OrderStopLoss()>(Ask+Point*TrailingStop)) || (OrderStopLoss()==0))
                 {
                  OrderModify(OrderTicket(),OrderOpenPrice(),Ask+Point*TrailingStop,OrderTakeProfit(),0,Red);
                  return(0);
                 }
              }
           }
        }
     }
  }
MQL5 as Object-Oriented Language gives much more possibilities in designing of experts. It allows you to create versatile and multi-functional classes that later can be quickly and easily integrated in almost any expert. In this article we are going to develop such a class.
1. Creating a Base Class of Trailing Stop
As mentioned above, there is a huge number of trailing stops, but they all have common functional aspects:
- Determining type (direction) of position
- Determining current Stop Loss level of position
- Calculating new Stop Loss level
- Checking for need to change current Stop Loss level
- Modification Stop Loss level of position
The type of trailing stop will determine only the value of calculated Stop Loss level. Thus, the basic functionality of trailing stop will be included in the base class. For functionality, that depends on the type of trailing stop, subclasses will be created. Applying to the methods of these subclasses will be made through virtual methods of base class.
Since we are planning to use technical indicators, to ensure their stable operation it is required to provide periodical appliance to them. For this purpose we will use timer. We also plan to turn on/turn off trailing stop (when using class as part of mechanical trade system), and the turn it on/off using graphical object - button (when using class as part of auxiliary experts). According to these functional requirements the base class will have the following set of methods:
class CTrailingStop
  {
protected:
public:
   void CTrailingStop(){};
   void ~CTrailingStop(){};
   void Init(){};                   // Initialization of class
   bool StartTimer(){};             // Start timer
   void StopTimer(){};              // Stop timer
   void On(){};                     // Turn on trailing stop
   void Off(){};                    // Turn off trailing stop
   bool DoStoploss(){};             // Main method of controlling level of Stop Loss position
   void EventHandle(){};            // Method of processing chart events (pressing button to turn on trailing stop)
   void Deinit(){};                 // Deinitialization
   virtual bool Refresh(){};        // Refresh indicator
   virtual void Setparameters(){};  // Setting parameters and loading indicator
   virtual int Trend(){};           // Trend shown by indicator
   virtual double BuyStoploss(){};  // Stop Loss value for the Buy position
   virtual double SellStoploss(){}; // Stop Loss value for the Sell position
  };
When calling the Init() method it will accept general parameters that don't depend on the type of used trailing stop. The method will set the trailing stop mode and prepare variables with some market parameters.
- StartTimer() - will be used to start timer, required for periodic addressing to indicators and for forced keeping them in terminal cache.
- Stoptimer() - will be used to stop timer on ending expert's work.
- On() - enabling trailing stop and setting button to pressed mode (if button is used).
- Off() - disabling trailing stop and setting button to depressed mode (if button is used).
- DoStoploss() - Main method of controlling level of Stop Loss position
- EventHandle() - used for processing chart events, particularly to respond for pressing the button and turning on/off the trailing stop, depending on button position.
- Deinit() - runs when expert finishes its work, ensures the release of indicator handle.
- Refresh() - provides refreshing of indicator values. This method is needed to determine the current values of indicator before calculating Stop Loss values. Also, this method is used independently - it is periodically called by timer to keep indicators in working condition.
- SetParameters() - when you call this method it accepts indicator parameters, the indicator is loaded with the specified parameters.
- Trend() - method of finding trend, shown by indicator. If indicator shows the up direction, it returns value 1, if down - it returns -1.
- The BuyStoploss() and SellStoploss() methods will return the new values of Stop Loss for buy and sell positions, calculated by indicator.
1.1. Init() method
The Init() method is the first method, called after creating an instance of class. It accepts general parameters, independent of trailing stop type: symbol, timeframe, trailing stop mode (by ticks or by bars), to attach or not to attach indicator to chart, create or or not to create button. Then it accepts button properties: X coordinate of button, Y coordinate of button, button color, button caption color.
Parameters, needed for further work, are stored in class variables. In addition, when Init() method works, it determine main unchanging market parameters, required for trailing stop: the number of digits after the comma and the value of point. Finally, depending on the type of trailing stop, the name of the button and its caption are formed. If it is set to use a button, it is created.
In the "protected" section let's declare all the necessary variables:
protected:
string m_symbol;             // symbol
ENUM_TIMEFRAMES m_timeframe; // timeframe
bool m_eachtick;             // work on each tick
bool m_indicator;            // show indicator on chart
bool m_button;               // show "turn on/turn off" button
int m_button_x;              // x coordinate of button
int m_button_y;              // y coordinate of button
color m_bgcolor;             // button color
color m_txtcolor;            // button caption color
int m_shift;                 // bar shift
bool m_onoff;                // turned on/turned off
int m_handle;                // indicator handle
datetime m_lasttime;         // time of trailing stop last execution
MqlTradeRequest m_request;   // trade request structure
MqlTradeResult m_result;     // structure of trade request result
int m_digits;                // number of digits after comma for price
double m_point;              // value of point
string m_objname;            // button name
string m_typename;           // name of trailing stop type
string m_caption;            // button caption
Now let's write the Init() method itself:
//--- Trailing stop initialization method
void Init(string             symbol,
          ENUM_TIMEFRAMES timeframe,
          bool   eachtick  =   true,
          bool   indicator =  false,
          bool   button    =  false,
          int    button_x  =      5,
          int    button_y  =     15,
          color  bgcolor   = Silver,
          color  txtcolor  =   Blue)
  {
//--- set parameters
   m_symbol    = symbol;    // symbol
   m_timeframe = timeframe; // timeframe
   m_eachtick  = eachtick;  // true - work on each tick, false - false - work once per bar
//--- set bar, from which indicator value is used
   if(eachtick)
     {
      m_shift=0; // created bar in per tick mode
     }
   else
     {
      m_shift=1; // created bar in per bar mode
     }
   m_indicator = indicator; // true - attach indicator to chart
   m_button    = button;    // true - create button to turn on/turn off trailing stop
   m_button_x  = button_x;  // x coordinate of button
   m_button_y  = button_y;  // y coordinate of button
   m_bgcolor   = bgcolor;   // button color
   m_txtcolor  = txtcolor;  // button caption color
//--- get unchanged market history
   m_digits=(int)SymbolInfoInteger(m_symbol,SYMBOL_DIGITS); // number of digits after comma for price
   m_point=SymbolInfoDouble(m_symbol,SYMBOL_POINT);         // value of point
//--- creating button name and button caption
   m_objname="CTrailingStop_"+m_typename+"_"+symbol;        // button name
   m_caption=symbol+" "+m_typename+" Trailing";             // button caption
//--- filling the trade request structure
   m_request.symbol=m_symbol;                               // preparing trade request structure, setting symbol
   m_request.action=TRADE_ACTION_SLTP;                      // preparing trade request structure, setting type of trade action
//--- creating button
   if(m_button)
     {
      ObjectCreate(0,m_objname,OBJ_BUTTON,0,0,0);                 // creating
      ObjectSetInteger(0,m_objname,OBJPROP_XDISTANCE,m_button_x); // setting x coordinate
      ObjectSetInteger(0,m_objname,OBJPROP_YDISTANCE,m_button_y); // setting y coordinate
      ObjectSetInteger(0,m_objname,OBJPROP_BGCOLOR,m_bgcolor);    // setting background color
      ObjectSetInteger(0,m_objname,OBJPROP_COLOR,m_txtcolor);     // setting caption color
      ObjectSetInteger(0,m_objname,OBJPROP_XSIZE,120);            // setting width
      ObjectSetInteger(0,m_objname,OBJPROP_YSIZE,15);             // setting height
      ObjectSetInteger(0,m_objname,OBJPROP_FONTSIZE,7);           // setting font size
      ObjectSetString(0,m_objname,OBJPROP_TEXT,m_caption);        // setting button caption
      ObjectSetInteger(0,m_objname,OBJPROP_STATE,false);          // setting button state, turned off by default
      ObjectSetInteger(0,m_objname,OBJPROP_SELECTABLE,false);     // user can't select and move button, only click it
      ChartRedraw();                                              // chart redraw
     }
//--- setting state of trailing stop
   m_onoff=false;                                                 // state of trailing stop - turned on/turned off, turned off by default
  };
You can see that when creating button name and caption, the m_typename variable is used, that was not initialized with any value. Assigning a value to it will be done in the subclass constructors. So when using different methods of trailing stop it will have a different value, corresponding to the type of used trailing stop.
1.2. StartTimer() method
The StartTimer() method starts the common timer of expert.
//--- Start timer
bool StartTimer()
  {
   return(EventSetTimer(1));
  };
When using timer, you must add the call of Refresh() method into OnTimer() function for periodical appealing to indicator.
1.3. StopTimer() method
The StartTimer() method stops timer of an expert.
//--- Stop timer
void StopTimer()
  {
   EventKillTimer();
  };
When expert finishes its work, this method stops the timer, if you've used it. This method will be called when running the Deinit() method of a class.
1.4. On() method
The On() method turns on trailing stop. Turning on is done by assigning variable m_onoff with value true. If button is set to be used in class initialization, then it is pressed.
//--- Turn on trailing stop
void On()
  {
   m_onoff=true;
   if(m_button)
     { // if button is used, it is "pressed"
      if(!ObjectGetInteger(0,m_objname,OBJPROP_STATE))
        {
         ObjectSetInteger(0,m_objname,OBJPROP_STATE,true);
        }
     }
  }
1.5. Off() method
The Off() method turns off trailing stop. Turning off is done by assigning variable m_onoff with value false. If button is set to be used in class initialization, then it is depressed.
//--- Turn off trailing stop
void Off()
  {
   m_onoff=false;
   if(m_button)
     { // if button is used, it is "depressed"
      if(ObjectGetInteger(0,m_objname,OBJPROP_STATE))
        {
         ObjectSetInteger(0,m_objname,OBJPROP_STATE,false);
        }
     }
  }
1.6. EventHandle() method
The EventHandle() method will be called from the OnChartEvent() function, and accordingly it will be accept all the parameters passed to the OnChartEvent() function.
//--- Method of tracking button state - turned on/turned off
void EventHandle(const int id,const long  &lparam,const double &dparam,const string &sparam)
  {
   if(id==CHARTEVENT_OBJECT_CLICK && sparam==m_objname)
     { // there is an event with button
      if(ObjectGetInteger(0,m_objname,OBJPROP_STATE))
        { // check button state
         On(); // turn on
        }
      else
        {
         Off(); // turn off
        }
     }
  }
If the CHARTEVENT_OBJECT_CLICK event occurs, and this event occurs with button that has the m_objname name (object name, with which the event occurred, is passed in the sparam variable), then depending on the state of button either On() or Off() method is executed.
1.7. Deinit() method
The Deinit() method must be called when expert finishes its work. This method stops the timer, releases indicator handle and deletes button, if it was used.
//--- Method of deinitialization
void Deinit()
  {
   StopTimer();                  // stop timer
   IndicatorRelease(m_handle);   // release indicator handle
   if(m_button)
     {
      ObjectDelete(0,m_objname); // delete button
      ChartRedraw();             // chart redraw
     }
  }
The Refresh(), SetParameters(), Trend(), BuyStoploss() and SellStoploss() virtual methods will be discussed later - when we will create trailing stop subclasses. Now let's consider the main method of base class - the DoStoploss() method.
1.8. DoStoploss() method
The DoStoploss() method is the main working method, which must be called from the OnTick() function on each tick. If the value of m_onoff variable is false (trailing stop turned off), then method immediately finishes its work.
if(!m_onoff)
  {
   return(true);// if trailing stop is turned off
  }
Further, if trailing stop is working in per bar mode, then the time is checked - comparing the time of created bar with time of last successful execution of function. If the time matches, then method finishes its work.
datetime tm[1];
// get the time of last bar in per bar mode
if(!m_eachtick)
  {
   // if unable to copy time, finish method, repeat on next tick
   if(CopyTime(m_symbol,m_timeframe,0,1,tm)==-1)
     {
      return(false);
     }
   // if the bar time is equal to time of method's last execution - finish method
   if(tm[0]==m_lasttime)
     {
      return(true);
     }
  }
If trailing stop is turned on and time check has been passed, then the main part of method is executed - indicator values are refreshed (the Refresh() method is called).
if(!Refresh())
  { // get indicator values
   return(false);
  }
Then, depending on value returned by the Trend() method, trailing stop for either buy or sell position is executed.
// depending on trend, shown by indicator, do various actions
switch (Trend())
  {
   // Up trend
   case 1:
      // code of trailing stop for the buy position
      break;
   // Down trend
   case -1:
      // code of trailing stop for the sell position
      break;
  }
Consider its work on the example of the buy position.
if(PositionSelect(m_symbol,1000))
  {   //--- select position. if succeeded, then position exists
   if(PositionGetInteger(POSITION_TYPE)==POSITION_TYPE_BUY)
     {//--- if position is buy

      //--- get Stop Loss value for the buy position
      sl=BuyStoploss();
      //--- find out allowed level of Stop Loss placement for the buy position
      double minimal=SymbolInfoDouble(m_symbol,SYMBOL_BID)-m_point*SymbolInfoInteger(m_symbol,SYMBOL_TRADE_STOPS_LEVEL);
      //--- value normalizing
      sl=NormalizeDouble(sl,m_digits);
      //--- value normalizing
      minimal=NormalizeDouble(minimal,m_digits);
      //--- if unable to place Stop Loss on level, obtained from indicator,
      //    this Stop Loss will be placed on closest possible level
      sl=MathMin(sl,minimal);
      //--- value of Stop Loss position
      double possl=PositionGetDouble(POSITION_SL);
      //--- value normalizing
      possl=NormalizeDouble(possl,m_digits);
      if(sl>possl)
        {//--- if new value of Stop Loss if bigger than current value of Stop Loss,
         //    an attempt to move Stop Loss on a new level will be made
         //--- filling request structure
         m_request.sl=sl;
         //--- filling request structure
         m_request.tp=PositionGetDouble(POSITION_TP);
         //--- request
         OrderSend(m_request,m_result);
         if(m_result.retcode!=TRADE_RETCODE_DONE)
           {//--- check request result
            //--- log error message
            printf("Unable to move Stop Loss of position %s, error #%I64u",m_symbol,m_result.retcode);
            //--- unable to move Stop Loss, finishing
            return(false);
           }
        }
     }
  }
If the position can be selected, its type is checked. If the type of position corresponds to the trend, then, using the BuyStoploss() method, we get the required value of Stop Loss (into the sl variable). Next, determine the allowed level, on which the Stop Loss can be set. If the calculated level is closer than allowed, adjust the value of the sl variable. Then we get the current value of Stop Loss position (into the possl variable), and compare values of the sl and possl variables. If the new value of Stop Loss id better than the current value - modify position.
Before modification fill out the sl and tp fields of the MqlTradeRequest structure. The m_request.sl variable is assigned with the required value of Stop Loss, the m_request.tp variable - with the existing value of Take Profit (leave it unchanged). The rest of the fields are being filled when Init() method is executed. After filling the structure the OrderSend() function is called.
Upon finishing its work the value of m_result.retcode variable is checked. If the value is not equal to TRADE_RETCODE_DONE, then for some reason it was unable to perform action, requested by the OrderSend() function. At the same time in a log message with the number of errors and completion of the method is executed. If the OrderSend() function is finished successfully, then remember the time of bar, on which the last work of DoStoploss() method was made. In the case of error, even in per bar mode, on the next tick an attempt to retry the method will be made. Attempts will continue for as long as it completes its work successfully.
Below is the entire code of the DoStopLoss() method.
bool DoStoploss()
  {
//--- if trailing stop is turned off
   if(!m_onoff)
     {
      return(true);
     }
   datetime tm[1];
//--- get the time of last bar in per bar mode
   if(!m_eachtick)
     {
      //--- if unable to copy time, finish method, repeat on next tick
      if(CopyTime(m_symbol,m_timeframe,0,1,tm)==-1)
        {
         return(false);
        }
      //--- if the bar time is equal to time of method's last execution - finish method
      if(tm[0]==m_lasttime)
        {
         return(true);
        }
     }
//--- get indicator values
   if(!Refresh())
     {
      return(false);
     }
   double sl;
//--- depending on trend, shown by indicator, do various actions
   switch(Trend())
     {
      //--- Up trend
      case 1:
         //--- select position. if succeeded, then position exists
         if(PositionSelect(m_symbol))
           {
            //--- if position is buy
            if(PositionGetInteger(POSITION_TYPE)==POSITION_TYPE_BUY)
              {
               //--- get Stop Loss value for the buy position
               sl=BuyStoploss();
               //--- find out allowed level of Stop Loss placement for the buy position
               double minimal=SymbolInfoDouble(m_symbol,SYMBOL_BID)-m_point*SymbolInfoInteger(m_symbol,SYMBOL_TRADE_STOPS_LEVEL);
               //--- value normalizing
               sl=NormalizeDouble(sl,m_digits);
               //--- value normalizing
               minimal=NormalizeDouble(minimal,m_digits);
               //--- if unable to place Stop Loss on level, obtained from indicator,
               //    this Stop Loss will be placed on closest possible level
               sl=MathMin(sl,minimal);
               //--- value of Stop Loss position
               double possl=PositionGetDouble(POSITION_SL);
               //--- value normalizing
               possl=NormalizeDouble(possl,m_digits);
               //--- if new value of Stop Loss if bigger than current value of Stop Loss,
               //    an attempt to move Stop Loss on a new level will be made
               if(sl>possl)
                 {
                  //--- filling request structure
                  m_request.sl=sl;
                  //--- filling request structure
                  m_request.tp=PositionGetDouble(POSITION_TP);
                  //--- request
                  OrderSend(m_request,m_result);
                  //--- check request result
                  if(m_result.retcode!=TRADE_RETCODE_DONE)
                    {
                     //--- log error message
                     printf("Unable to move Stop Loss of position %s, error #%I64u",m_symbol,m_result.retcode);
                     //--- unable to move Stop Loss, finishing
                     return(false);
                    }
                 }
              }
           }
         break;
         //--- Down trend
      case -1:
         if(PositionSelect(m_symbol))
           {
            if(PositionGetInteger(POSITION_TYPE)==POSITION_TYPE_SELL)
              {
               sl=SellStoploss();
               //--- adding spread, since Sell is closing by the Ask price
               sl+=(SymbolInfoDouble(m_symbol,SYMBOL_ASK)-SymbolInfoDouble(m_symbol,SYMBOL_BID));
               double minimal=SymbolInfoDouble(m_symbol,SYMBOL_ASK)+m_point*SymbolInfoInteger(m_symbol,SYMBOL_TRADE_STOPS_LEVEL);
               sl=NormalizeDouble(sl,m_digits);
               minimal=NormalizeDouble(minimal,m_digits);
               sl=MathMax(sl,minimal);
               double possl=PositionGetDouble(POSITION_SL);
               possl=NormalizeDouble(possl,m_digits);
               if(sl<possl || possl==0)
                 {
                  m_request.sl=sl;
                  m_request.tp=PositionGetDouble(POSITION_TP);
                  OrderSend(m_request,m_result);
                  if(m_result.retcode!=TRADE_RETCODE_DONE)
                    {
                     printf("Unable to move Stop Loss of position %s, error #%I64u",m_symbol,m_result.retcode);
                     return(false);
                    }
                 }
              }
           }
         break;
     }
//--- remember the time of method's last execution
   m_lasttime=tm[0];
   return(true);
  }
Note the differences in code for the buy and sell positions. For the sell position, the value returned by SellStoploss() increases by the value of spread, because the sell position is closed by the Ask price. Accordingly, the countdown of Stop Loss minimal level for the buy is done from the Bid price, for the sell - from Ask price.
For now we've finished with creation of trailing stop base class. Let's proceed with creation of subclasses.
2. Trailing Stop Subclass for Parabolic SAR Indicator
Virtual methods of CTrailingStop class already tell you the contents of a subclass - SetParameters(), Refresh(), Trend(), BuyStoploss(), SellStoploss() methods and class constructor to set the name of trailing stop. The class will be named as CParabolicStop. Since this class is a subclass of CTrailingStop, this will be mentioned in its declaration.
class CParabolicStop: public CTrailingStop
With this declaration, calling virtual methods of the CParabolicStop class will run inherited methods of base class.
Let's consider in details all methods of subclass.
2.1. CParabolicStop() method
This method has the same name as the class itself, this method is called a constructor. It is executed automatically when class is loaded, before any other methods of class. In the CParabolicStop() method the name of trailing stop is assigned to the m_typename variable. This variable is used to create button name and caption (in the Init() method of base class).
void CParabolicStop()
  {
   m_typename="SAR"; // setting name of trailing stop type
  };
2.2. SetParameters() method
When calling the SetParameters() method it accepts indicator parameters, and indicator is loaded with these parameters. If the m_indicator parameter is set the Init() method of base class, then indicator is attached to chart (ChartIndicatorAdd() function).
// Method of setting parameters and loading the indicator
bool SetParameters(double sarstep=0.02,double sarmaximum=0.2)
  {
   m_handle=iSAR(m_symbol,m_timeframe,sarstep,sarmaximum); // loading indicator
   if(m_handle==-1)
     {
      return(false); // if unable to load indicator, method returns false
     }
   if(m_indicator)
     {
      ChartIndicatorAdd(0,0,m_handle); // attach indicator to chart
     }

   return(true);
  }
2.3. Refresh() method
The Refresh() method gets new price and refreshes indicator values. In the "protected" section of class there is the pricebuf array for price value and the indbuf array - for indicator values. Both arrays have size of one element - should be only one price value and one value of indicator from the forming or formed bar (depending on the m_shift parameter, set in when base class initialization).
// Method of getting indicator values
bool Refresh()
  {
   if(CopyBuffer(m_handle,0,m_shift,1,indbuf)==-1)
     {
      return(false); // if unable to copy value to array, return false
     }

   if(CopyClose(m_symbol,m_timeframe,m_shift,1,pricebuf)==-1)
     {
      return(false); // if unable to copy value to array, return false
     }
   return(true);
  }
2.4. Trend() method
The Trend() method checks the price location relative to the indicator line. If the price is above the line, then this is the up trend, and method returns value 1. If the price is below the indicator line, then this is the down trend, and method returns value -1. Not excluded the case (rare, but possible), when the price is equal to indicator line. In this case, value 0 will be returned.
// Method of finding trend
int Trend()
  {
   if(pricebuf[0]>indbuf[0])
     { // price is higher than indicator line, up trend
      return(1);
     }
   if(pricebuf[0]<indbuf[0])
     { // price is lower than indicator line, down trend
      return(-1);
     }
   return(0);
  }
2.5. BuyStoploss() and SellStoploss() methods
Since the Parabolic SAR indicator has only one line, both methods are identical. They return the value obtained from the Refresh() method.
// Method of finding out Stop Loss level for buy
virtual double BuyStoploss()
  {
   return(indbuf[0]);
  };
// Method of finding out Stop Loss level for sell
virtual double SellStoploss()
  {
   return(indbuf[0]);
  };
For now the trailing stop is ready. It has only one class yet, but it can be already used. Save it as a separate include file in the .\MQL5\Include folder under the Sample_TrailingStop.mqh name (file is attached to the article).
3. Adding Trailing Stop for Parabolic into Expert
Let's try to add trailing stop into some expert, such as My_First_EA from the Step-By-Step Guide to writing an Expert Advisor in MQL5 for Beginners article.
3.1. Open the My_First_EA expert in MetaEditor and save it as My_First_EA_SARTrailing.
3.2. Include trailing stop file. In the upper part of the expert code (preferably before declaration of external variables) add the line:
#include <Sample_TrailingStop.mqh> // include Trailing Stop class
3.3. After external variables create an instance of the CParabolicStop class, named as Trailing.
CParabolicStop Trailing; // create class instance
3.4. In the OnInit() function initialize the class and set its parameters. First, declare external variables with indicator parameters:
input double TrailingSARStep=0.02;
input double TrailingSARMaximum=0.2;
Then add code to the OnInit() function.
Trailing.Init(_Symbol,PERIOD_CURRENT,true,true,false); // Initialize (set basic parameters)
if(!trailing.setparameters(TrailingSARStep,TrailingSARMaximum))
  { // Set parameters of used trailing stop type
   Alert("trailing error");
   return(-1);
  }
Trailing.StartTimer(); // Start timer
Trailing.On();         // Turn on
3.5. In the expert code find the OnTimer() function. The OnTimer() function is not used in My_First_EA, so add it, and in to it add the call of Refresh().
void OnTimer()
  {
   Trailing.Refresh();
  }
3.6. At the top of the OnTick() function add the call of the DoStoploss() method.
3.7. Compile expert and try to test it. Test results of the expert are shown on Figure 7 (without trailing stop) and on Figure 8 (with trailing stop).
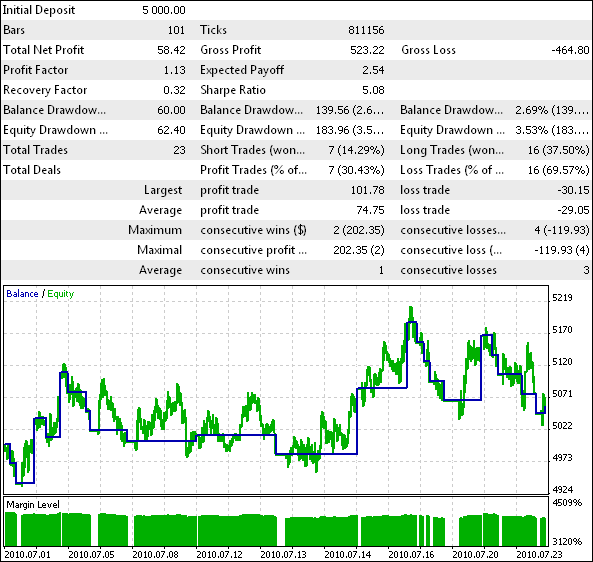
Figure 7. Test Results of the Expert without Trailing Stop.

Figure 8. Test Results of the Expert with Trailing Stop.
The effectiveness of using trailing stop is obvious.
My_First_EA_SARTrailing.mq5 file is attached to the article.
4. Trailing Stop Subclass for NRTR
The NRTR indicator (Nick Rypock Trailing Reverse) by its name and appearance (Figure 9) makes an interest to try to create a trailing stop on it.
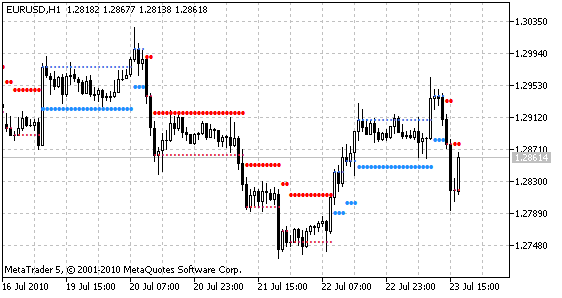
Figure 9. NRTR Indicator.
The indicator draws the base line (the line of support or resistance) and the target line. When price exceeds the target line, the base line is transferred in the direction of price movement, minor oscillations of price are ignored. When price intersects the base line - it is considered as a change of trend, thus changing the location of the base line and the target line regarding to price. Support line and target line in the up trend are painted with blue, in the down trend - with red.
Create another trailing stop, now for NRTR indicator.
Declare another class CNRTRStop included in the CNRTRStop base class.
class CNRTRStop: public CTrailingStop
Trailing Stop for NRTR subclass will have exactly the same set of methods as the Trailing Stop for Parabolic, except the constructor - now it will be named as CNRTRStop().
4.1. CNRTRStop() method
Now in the class constructor the m_typename variable is assigned with value NRTR, according with to used indicator.
void CNRTRStop()
  {
   m_typename="NRTR"; // setting name of trailing stop type
  };
4.2. SetParameters() method
When calling the SetParameters() method it accepts indicator parameters and it is loaded. Then, depending on the basic parameters of trailing stop, indicator will be attached to the chart.
// Method of setting parameters and loading the indicator
bool SetParameters(int period,double k)
  {
   m_handle=iCustom(m_symbol,m_timeframe,"NRTR",period,k); // loading indicator
   if(m_handle==-1)
     { // if unable to load indicator, method returns false
      return(false);
     }
   if(m_indicator)
     {

      ChartIndicatorAdd(0,0,m_handle); // attach indicator to chart
     }
   return(true);
  }
4.3. Refresh() method
The Refresh() method copies two buffers of the NRTR indicator - support line buffer and resistance line buffer.
 // Method of getting indicator values
bool Refresh()
  {
   if(CopyBuffer(m_handle,0,m_shift,1,sup)==-1)
     {
      return(false); // if unable to copy value to array, return false
     }

   if(CopyBuffer(m_handle,1,m_shift,1,res)==-1)
     {
      return(false); // if unable to copy value to array, return false
     }

   return(true);
  }
In the "protected" section of class there are two declared arrays: double sup[] and double res[].
protected:
double sup[1]; // value of support level
double res[1]; // value of resistance level
4.4. Trend() method
The Trend() method checks which of the lines currently exists. If it is the support line, it means that the indicator shows the up trend. The method itself returns value 1. If it is the resistance line, then the method returns -1.
// Method of finding trend
int Trend()
  {
   if(sup[0]!=0)
     { // there is support line, then it is up trend
      return(1);
     }
   if(res[0]!=0)
     { // there is resistance line, then it is down trend
      return(-1);
     }

   return(0);
  }
4.5. BuyStoploss() method
The BuyStoploss() method returns the value of support line.
// Method of finding out Stop Loss level for buy
double BuyStoploss()
  {
   return(sup[0]);
  }
4.6. SellStoploss() method
The SellStoploss() method returns the value of resistance line.
// Method of finding out Stop Loss level for sell
double SellStoploss()
  {
   return(res[0]);
  }
Now the trailing stop class is complete.
5. Adding Trailing Stop for NRTR into Expert
Just as with trailing stop for Parabolic, let's add the My_First_EA trailing stop for NRTR into expert.
5.1. Open the My_First_EA_SARTrailing expert in MetaEditor and save it as My_First_EA_NRTRTrailing.
5.2. Replace the external parameters of trailing stop for Parabolic with parameters of trailing stop for NRTR.
input int TrailingNRTRPeriod = 40;
input double TrailingNRTRK   =  2;
5.3. Instead of creating an instance of the CParabolicStop class create an instance of the CNRTRStop class. The code is located after external variables.
CNRTRStop Trailing; // create class instance
5.4. In the OnInit() function replace parameters of the SetParameters() method call with the NRTR parameters.
Trailing.SetParameters(TrailingNRTRPeriod,TrailingNRTRK)
5.5. Compile expert and try to test it.
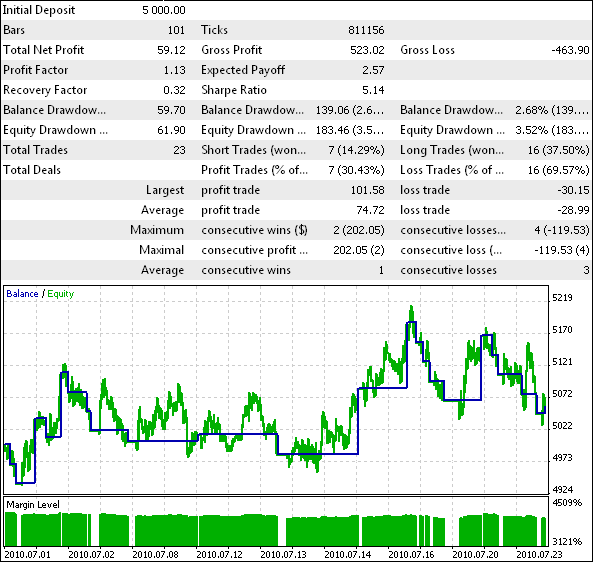
Figure 10. Test Results of the Expert with Trailing Stop for NRTR.
The working results of the Expert Advisor (Figure 10) with a trailing stop strategy compared to the work of an expert without it (Fig. 7) is almost unchanged. Use of the trailing stop for Parabolic proved more effective for this expert. It can be concluded that the arsenal of a certain number of trailing stops can be very useful when developing experts - to make experiments and select the most suitable type of trailing stop.
My_First_EA_NRTRTrailing.mq5 file is attached to the article.
6. Expert-Assistant
When a base class of trailing stop was created, it was intended to control trailing stop turning on/turning off via the button. Let's create an expert-assistant to follow positions on the various symbols with different types of trailing stop. The expert will not open positions, but will only follow the open ones.
6.1. In MetaEditor create new expert named Sample_TrailingStop.
6.2. Include the Sample_TrailingStop.mqh file.
#include <Sample_TrailingStop.mqh> // include Trailing Stop class
6.3. Declare external parameters for indicators.
input double SARStep=0.02;     // Step of Parabolic
input double SARMaximum=0.02;  // Maximum of Parabolic
input int NRTRPeriod=40;       // NRTR period
input double NRTRK=2;          // NRTR factor
6.4. Declare array of symbols, on which the expert will be able to work.
string Symbols[]={"EURUSD","GBPUSD","USDCHF","USDJPY"};
6.5. Declare arrays to load classes.
CParabolicStop *SARTrailing[];
CNRTRStop *NRTRTrailing[];
6.6. In the OnInit() function resize arrays to load classes, according to size of the Symbols array.
ArrayResize(SARTrailing,ArraySize(Symbols));  // resize according to number of used symbols
ArrayResize(NRTRTrailing,ArraySize(Symbols)); // resize according to number of used symbols
6.7. In loop for each element of array load class instance.
for(int i=0;i<ArraySize(Symbols);i++)
  { // for all symbols
   SARTrailing[i]=new CParabolicStop(); // create CParabolicStop class instance
   SARTrailing[i].Init(Symbols[i],PERIOD_CURRENT,false,true,true,5,15+i*17,Silver,Blue);    // initialization of CParabolicStop class instance
   if(!SARTrailing[i].SetParameters(SARStep,SARMaximum))
     { // setting parameters of CParabolicStop class instance
      Alert("trailing error");
      return(-1);
     }
   SARTrailing[i].StartTimer();         // start timer
//----
   NRTRTrailing[i]=new CNRTRStop();     // create CNRTRStop class instance
   NRTRTrailing[i].Init(Symbols[i],PERIOD_CURRENT,false,true,true,127,15+i*17,Silver,Blue); // initialization of CNRTRStop class instance
   if(!NRTRTrailing[i].SetParameters(NRTRPeriod,NRTRK))
     { // setting parameters of CNRTRcStop class instance
      Alert("trailing error");
      return(-1);
     }
   NRTRTrailing[i].StartTimer();        // start timer
  }
Note: when calling the Init() methods buttons coordinates are calculated. On the left there will be power buttons of trailing stop for Parabolic, on the right - for NRTR.
6.8. Int the OnTick() function add call of the DoStoploss() method for each instance of trailing stop.
for(int i=0;i<ArraySize(Symbols);i++)
  {
   SARTrailing[i].DoStoploss();
   NRTRTrailing[i].DoStoploss();
  }
6.9. Add chart events handling.
void OnChartEvent(const int         id,
                  const long   &lparam,
                  const double &dparam,
                  const string &sparam
                  )
  {
   for(int i=0;i<ArraySize(Symbols);i++)
     {
      SARTrailing[i].EventHandle(id,lparam,dparam,sparam);
      NRTRTrailing[i].EventHandle(id,lparam,dparam,sparam);
     }

  }
6.10. In the Deinit() function deinitialize all class instances and delete them.
for(int i=0;i<ArraySize(Symbols);i++)
  {
   SARTrailing[i].Deinit();
   NRTRTrailing[i].Deinit();
   delete(SARTrailing[i]);  // delete object
   delete(NRTRTrailing[i]); // delete object
  }
Compile, attach expert to the chart. Indicators and buttons appear on the chart (Figure 11) - Expert Advisor is ready to work.
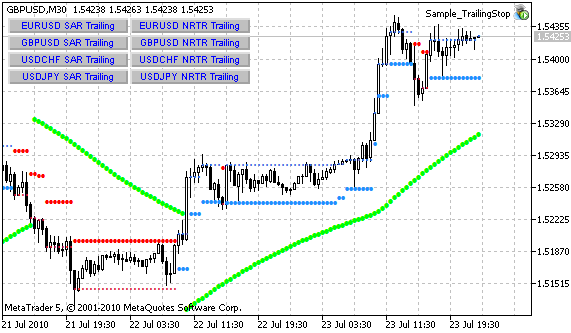
Figure 11. Buttons and Indicators on the Chart After Starting the Sample_TrailingStop.
Just press the button to follow the corresponding position when it is opened.
Sample_TrailingStop.mq5 file is attached to the article.
Conclusion
Let's review the order of using the CTrailingStop class when creating a mechanical trading system:
1. Include the Sample_TrailingStop.mqh file.
2. Declare external variables with indicator parameters of used trailing stop.
3. Create the class instance.
4. Add call of the Init(), SetParameters(), StartTimer() and On() methods from the OnInit() function.
5. Add call of the Refresh() method from the OnTimer() function.
6. Add call of the DoStopLoss() method from the OnTick() function.
7. Add call of the Deinit() method from the OnDeinit() function.
Seven steps, less than 5 minutes, and your Expert Advisor has a function of trailing stop!
Translated from Russian by MetaQuotes Ltd.
Original article: https://www.mql5.com/ru/articles/134
Warning: All rights to these materials are reserved by MetaQuotes Ltd. Copying or reprinting of these materials in whole or in part is prohibited.
This article was written by a user of the site and reflects their personal views. MetaQuotes Ltd is not responsible for the accuracy of the information presented, nor for any consequences resulting from the use of the solutions, strategies or recommendations described.
 Interview with Leonid Velichkovsky: "The Biggest Myth about Neural Networks is Super-Profitability" (ATC 2010)
 MetaTrader 5 and MATLAB Interaction
 The Prototype of a Trading Robot
 Limitations and Verifications in Expert Advisors
- Free trading apps
- Over 8,000 signals for copying
- Economic news for exploring financial markets
You agree to website policy and terms of use
Look like this is a dead discussion but I will put my comments in.
There are a couple of errors found during compiling that need to be resolved.
In the ZeroMemory request on line 116 the compiler says
'ZeroMemory' - unexpected toke, probably type is mission?
'mrequest' - declaration without type
This looks like the mrequest was not properly declared with a type......Not sure how to fix this.
Also,
return value of "OrderSend" should be checked. on line215 and 262
This looks like it might be returning a value it should not.
Any help in fixing these two issues would be most appreciated.
Chris
Really want to understand what is written in the comments ?
class CTrailingStop{
Really want to understand what the comments say ?
Regards, Vladimir.