
MQL4 Language for Newbies. Difficult Questions in Simple Phrases.

Introduction
This is the second article from the series "MQL4 Language for Newbies". The first article "MQL4 Language for Newbies. Introduction" described what can be done using MQL4, we learned to write simple scripts, studied out what a variable is, learned to work with variables, analysed functions, arrays, built-in arrays and variables, cycles 'for' and simple and complex conditions. Now we will examine more complex and advanced constructions of the language, learn new options and see, how they can be applied in everyday practice. You will get acquainted with a new cycle type 'while', new condition type 'switch', operators 'break' and 'continue'. Besides you will learn to write your own functions and work with multidimensional arrays. And for a dessert I have prepared an explanation about a preprocessor.
Advice
Do not start reading this article not having fully understood the first one. You
will make a lot of errors and still will understand nothing. This article is based
on the old material, so do not hurry! And I want to make you easy - the difficulties
that you will meet when learning the new material, are deceitful. The time will
come, when you will not have to think over how the cycles are written, what conditions
to put - everything will be done mechanically. The more you work with MQL4 language,
the easier it will be for you to use it.
New Type of Cycles - while
I would like to mention, that the cycle 'for', described in the previous article, is a universal one and can substitute for any other cycle type that we will learn now. But it is not always convenient and suitable. Sometimes it is more efficient to use while. Soon you will understand, the use of which cycle type is more rational. Let's make a task in two ways: let's find a total volume of all bars, using both cycles and see the difference:
// using the cycle for
double sum = 0.0;

for(int a = 0; a < Bars; a++)
    sum += Volume[a];

// now using while, the result is the same
double sum = 0.0;
int a = 0;

while(a < Bars)
  {
    sum += Volume[a];
    a++;
  }
while(condition of cycle fulfillment)
  {
    code;
  }
Here is an easier example:
while(I havent eaten up the apple) // condition
  {
    // what to do, if the condition is not fulfilled
bite more;
  }
New Type of Conditions - switch
Like in case with cycles, it should be noted that switch can be substituted by a combination of familiar to you conditions 'if' and 'else'. The construction 'switch' is used when you need to perform some actions depending on the value of a variable. This is like an ordinary mode switch in a microwave oven. For example, imagine that you write an Expert Advisor, and it changes its behaviour depending on the market situation. Let a variable int marketState be responsible for it. It may take the following meanings:
- 1 - uptrend
- 2 - downtrend
- 3 - flat
No matter how this position is defined, our task is to realize some kind of mechanism,
so that depending on the market situation the Expert Advisor performed corresponding
actions. Well, you know how to do this. The most evident variant is the following:
if(marketState == 1)
  {
    // trading strategy for an uptrend
  }
else
    if(marketState == 2)
      {
        // strategy for a downtrend
      }
    else
        if(marketState == 3)
          {
            // strategy for a flat
          }
        else
          {
            // error: this state is not supported!
          }
Here are some peculiarities:
- all conditions are conducted with one and the same variable;
- all conditions come to comparing the variable to one of the meanings that the variable
can accept.
So, all this refers also to the switch structure. Here is a code, using switch, the result is the same:
switch(marketState)
  {
    case 1:  // trading strategy for an uptrend
             break;
    case 2:  // strategy for a downtrend
             break;
    case 3:  // strategy for a flat
             break;
    default: // error: this state is not supported!
             break;
  }
Note, that first we define, what variable will be compared:
// switch - key word, marketState -
// a variable for comparison
switch(marketState)
and then indicate, what should be done in specific cases:
case 1:                        // case - key word;
   // trading strategy         // if marketState is equal to 1, then
   // for an uptrend           // perform this code
   break;                      // key word that indicates
                               // the end of actions in this case

case 2:                        // if marketState is equal to 2, then
    // startegy for            // perform this
    // a downtrend
    break;                     // end

case 3:                        // identical
    // strategy for flat
    break;

default:                       // otherwise, perform this
    // error: this
    // state is not
    // supported!
    break;
In a general view switch has the following form:
switch(a variable for comparison)
  {
    case [a variable value]:
    // a code for this case
    break;

    case [another value of the variable]
    // a code for this case
    break;

    default:
    // a code for all other cases
    break;
  }
Use switch, when comparing one variable to several values, and a certain code block corresponds to a value. In other cases use a common combination of 'if' and 'else' conditions. Sometimes you need to perform a code in several values of a variable. For example, if marketState == 1 or 2, then perform a certain code. This is how it can be done using switch:
switch(marketState)
  {
    case 1:  // if marketState is equal to 1
    case 2:  // or if marketState is equal to 2, then
             // perform this
             break;

    default: // in any other case perform
             // this code
             break;
  }
Operators: continue and break
We have just seen the operator break. It is used to escape from the body of switch. Besides you can use it for escaping from a cycle. For example, if you don't need the execution of a cycle in some conditions. Suppose we need to find the amount of first bars, needed to enclose 1000 points. We can write the following code:
int a = 0;
double volume = 0.0;

while(volume < 1000.0)
  {
    volume += Volume[a]; // equivalent to volume = volume + Volume[a];
    a++;
  }

// now variable "a" includes the amount of bars, the volume of their sums
// is no less than 1000 points
Now let's write an analogous code, using the operator break:
int a = 0;
double volume = 0.0;

while(a < Bars)
  {
    // if the volume is exceeds 1000 points, then
    if(volume > 1000.0) // exit the cycle
        break;

    volume += Volume[a];
    a++;
  }
You see, the operator break is easy-to-use and allows to avoid unwanted cycle iterations. One more useful operator continue is intended for 'omitting' unwanted iterations. Suppose we need to calculate a total volume, but we mustn't take into account the volume of bars in the moments of important news. As you know, important news involve large volumes of points. Let's pretend to be naive children and suppose that the bar volume 50 points and more is news. To solve this task, let's use the continue operator:
int a = -1;
double volume = 0.0;

while(a < Bars)
  {
    a++;
    // if the volume exceeds 50 points, then it must
    // be news, omit it
    if(Volume[a] > 50.0)
        continue;
    volume += Volume[a];
  }
You see, the use of the continue operator is quite trivial, but sometimes it may help you. It is clear, that this script is intended for small timeframes.
Writing Own Functions
But why do we need them? The fact is, that very often you can find duplication of your code. I.e. you will use one and the same set of instructions in different cases. To save your time and strength you can write this duplicated code into a separate function. And when you need it, you can simply write the name of the function and it will do everything for you. Let's view how it works. Suppose you need to find the color of a candlestick. It is known that a white candlestick is the one that closed higher than opening, the black one - vice verse. Let's write a code for determining a color of a candlestick:
bool color; // as there are only 2 variants
            // (white or black candlestick),
            // then suppose that the velue
            // false corresponds to a black
            // candlestick, and true - white

if(Close[0] > Open[0])
    color = true;      // white candlestick

if(Open[0] > Close[0])
    color = false;     // black candlestick
That is all, now the variable color contains the color of the last candlestick. To determine the color of another candlestick, for example, the last but one, you need to change the index 0 to 1. But aren't you going to put this code everytime you need to find the color of a candlestick? And what if there are dozens of such cases? That is why we need functions. Let's think, how it should work. Such function should accept one argument - the index of a candlestick, which color you need to determine, and return the color - a variable of bool type. Let's imagine that the function is written and we activate it:
bool color; // here will be the color of a wanted candlestick

color = GetColor(0);
As you have guessed, our function is named GetColor. In this function call we wanted to find the color of the last candlestick. That is why the only argument is equal to zero. The function returns the color of a candlestick, so we make an assignment at once. It is a very important moment! A variable is created inside the function, then its value will replace the function call. Ultimately the function call and the code of the function determining, described above, will give the same result - the variable color will contain the color of the last candlestick, but using functions we spend less strength.
And now let's unexpectedly get back to the code of an empty script. The fact is, that it already contains a full description of the function start(). The most interesting thing is that all this time you've been writing scripts in this function! When you start your script, the terminal activates the function start(). Let's examine the code of an empty script:
int start()
This line is very important! It includes the name of the function, i.e. a keyword, which you will write in order to activate this function. In our case it is 'start'. It also contains type of a return value - int. It means, that after the performance of the function it will return us some value of int type. The brackets contain list of arguments, but in our case the function does not accept any parameters.
Then in bracers you see the function description, i.e. a code that will be performed at function call:
{
    //----
    // a code that will be performed
    // at the function call.
    //----
    return(0);
  }
It is clear that we wrote a code in the body of start() function. At the end of the function we see the operator return, which returns the function value. In our case it returns zero.
Now look at the general form of writing a function:
[type of return value] [function name] ([list of arguments])
  {
    // function code
    return([a value, which the function returns]);
  }
Now let's go back to our candlesticks and GetColor function. Look at the code of this function:
bool GetColor(int index)
  {
    bool color;
    if(Close[index] > Open[index])
        color = true;      // white candlestick
    if(Open[index] > Close[index])
        color = false;     // black candlestick
    return(color);
  }
Let's dwell on the first line:
bool GetColor(int index)
Here we have: bool - type of a return value; GetColor - function name; int - type of argument; index - argument name. Note, we use index inside the function body, but in the function call this name is never mentioned. For example:
bool lastColor = GetColor(0);
Then:
{
   bool color;
   if(Close[index]>Open[index])
       color=true;      // white candlestick
   if(Open[index]>Close[index])
       color=false;     // black candlestick
This function body is a general code, which will be performed at each function call. After that:
return(color);
}
The operator return indicates, what the function should return. The return value should correspond to the type, determined at the very beginning. If needed, you may use several operators 'return' in one function, for example:
bool GetColor(int index)
  {
   if(Close[index] > Open[index])
       return(true);      // white candlestick
   if(Open[index] > Close[index])
       return(false);     // black candlestick
  }
It is clear, that the use of several return operators allowed to avoid the variable color. Besides, in the operator return you may use even logical expressions:
return(Close[index] > Open[index]);
It is possible, because the operators of comparison also return variables of bool
type (true or false) like some other common functions. Looks like difficult, but
soon you will get used to it.
Now let's get back to a list of arguments. Only the argument int index is used in our function. If you need to use several arguments, enumerate them comma separated:
bool SomeСomplicatedFunction(int fistArgument, int secondArgument,
                             sting stringArgument)
In order to refer to the arguments, use their names like in the previous function. When a function call with several arguments, pay attention to sequence of arguments order: do not mix anything! If the function should not return any value, use the keyword void, to indicate it. Note, that the return operator in this case is not used:
void function()
  {
    // code
  }
One more detail: you may set the values for the function arguments on default. What is this? Suppose you have written a complex function that includes 5 arguments,
which influence its behaviour. But several last arguments almost always are used
with the same values. Only for two dozens of function call you need to use different
values. In order not to indicate each time the values of the last arguments, which
are almost always the same, default values of arguments are used. In such a case
you simply omit the last arguments, as if they do not exist, though actually they
are used, but the values are assigned on default. When you meet that special case,
you indicate all the arguments. Let's see how we can declare a function with default
arguments:
void someFunction(int argument1, int argument2,
                  int specialArgument = 1)
  {
    // code
  }
You see, everything is easy: we assign a needed value to a needed argument and now it can be omitted at function call:
someFunction(10,20);   // we omitted the last argument, but
                       // actually it is assigned a value by default

someFunction(10,20,1); // this activation is fully identical to the previous one

someFunction(10,20,2); // here we indicate another value,
                       // it is a rare case
You can indicate as much default values of arguments as you want. But remember an important rule: they all should be placed at the end. For example:
void someFunction(int argument1, int argument2,
                  int specialArgument = 1)   // all right

void someFunction(int argument1, int argument2 = 10,
                  int specialArgument=1)     // all right

void someFunction(int argument1, int argument2 = 10,
                  int specialArgument)     // wrong! default
                                           // values must stay
                                           // at the end of the
                                           // list of arguments

void someFunction(int argument1 = 0, int argument2 = 10,
                  int specialArgument = 1) // you can assign
                                           // default values
                                           // to all arguments
Multidimensional Arrays
You will often use arrays during programming, and in major cases one-dimensional arrays will be enough. But in some cases you will need two-dimensional, three-dimensional arrays. Now you will learn to use them.
To begin with, let's visually present one-dimensional arrays, revise declaration, initialization, indexes and value:
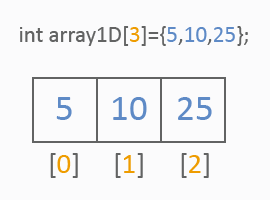
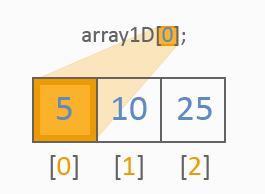
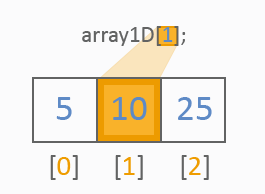
Any one-dimensional array can be presented as a row of values of one type. Look,
how different references to a one-dimensional array will be processed:
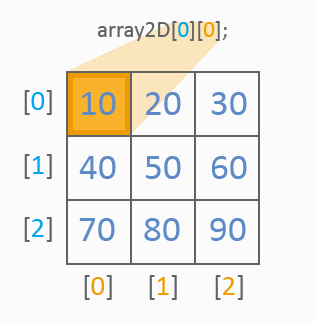
Two-dimensional arrays are like common tables, look:
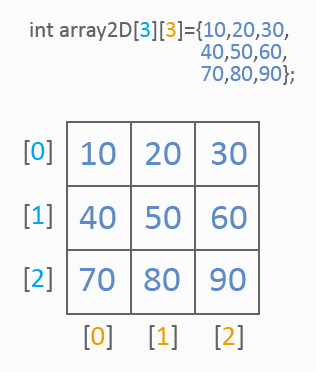
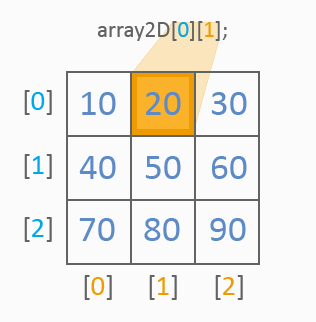
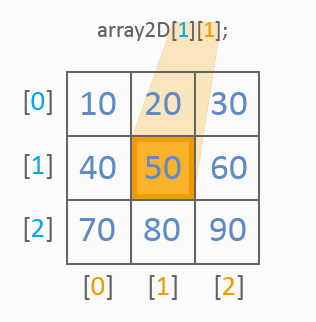
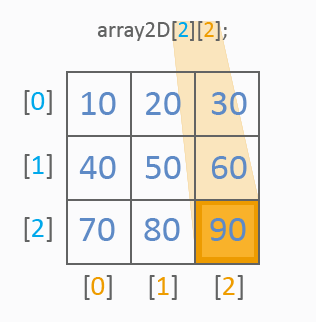
As seen from the picture, two-dimensional arrays already have two indexes for reference to the value: the first index determines a row, the second index - a column. Like in one-dimensional arrays, a list of values is used for initialization. This is how the values of the table cells are referred to:
You see, everything is clear. Let's see, how we can go through all values of a two-dimensional array. 2 cycles should be used:
int array2D[3][3]={10,20,30,
                   40,50,60,
                   70,80,90};

for(int y=0;y<3;y++)
   for(int x=0;x<3;x++)
      MessageBox("array2D["+y+"]["+x+"]="+array2D[y][x]);
In this example the referencing goes downwards from left to right. Just for training try to change the direction, for example upwards.
Three-dimensional arrays differ only in the presence of one more index for referencing to cells values. A three-dimensional array can be easily presented as several tables (two-dimensional arrays). This is how we can go through all the elements of a three-dimensional array:
int array3D[3][3][3] = {11, 12, 13,
                        14, 15, 16,
                        17, 18, 19,

                        21, 22, 23,
                        24, 25, 26,
                        27, 28, 29,

                        31, 32, 33,
                        34, 35, 36,
                        37, 38, 39};

for(int z = 0; z < 3; z++)
    for(int y = 0; y < 3; y++)
        for(int x = 0; x < 3; x++)
            MessageBox("array3D["+z+"]["+y+"]["+x+"]=" +
                       array3D[z][y][x]);
Thoroughly study out two- and tree-dimensional arrays - it is very important. Once again very attentively look through the explanatory pictures. A lot of different tasks are solved using arrays, so devote enough time to them and they will be very useful for you in future. If you understand the principle of working with arrays, you will have no trouble working with any n-dimensional array.
Some Functions for Working with Arrays
Let's start with simple functions.
int ArraySize(object array[]);
This function returns the amount of elements that the array contains. It works with all types. For example:
// create two different arrays
int arrayInt[] = {1, 2, 3, 4};
double arrayDouble[] = {5.9, 2.1, 4.7};
// here store the amount of elements
int amount;

amount = ArraySize(arrayInt);      // note:
                                   // to define a specific
                                   // array, you need to indicate
                                   // only its name.
                                   // Now amount is equal to 4


amount = ArraySize(arrayDouble);   // amount is equal to 3
Next function:
int ArrayInitialize(object array[],double value);ArrayInitialize
assigns a value to all array elements, returns the amount of elements, to which a value was assigned. Use this function with arrays of int and double type.
Next:
int ArrayMaximum(double array[], int count = WHOLE_ARRAY,
                 int start = 0);
int ArrayMinimum(double array[], int count = WHOLE_ARRAY,
                 int start = 0);
These two functions return the index of a maximal and minimal cell value. To use
them, simply indicate in what array they should be looked for:
int array[] = {10, 100, 190, 3, 1};
// will be returned 1, because array[1] - maximal value
ArrayMaximum(array);
// will be returned 4, because array[4] - minimal value
ArrayMinimum(array);
Next:
int ArrayDimension(object array[]);
Using these functions you can determine the dimensionality of an array, I.e. you can determine, whether it is one-dimensional, two-dimensional or n-dimensional. For example:
int array1D[15];
int array4D[3][3][3];

ArrayDimension(array1D); // get 1
ArrayDimension(array3D); // 3
Here are more complex and useful functions:
int ArraySort(double&array[], int count = WHOLE_ARRAY, int start = 0,
              int sort_dir = MODE_ASCEND);
This function sorts elements. If you do not directly indicate the arguments on default, for example this way:
int array[5] = {1, 10, 5, 7, 8};

ArraySort(array);
elements will be sorted ascending. You can use additional parameters to specify the function behaviour:
- int count - the number of elements that should be sorted
- int start - the index of an element, from which the sorting should be started
- int sort_dir - the direction of sorting (ascending - MODE_ASCEND or descending - MODE_DESCEND)
Here you should wonder: what is MODE_ASCEND and MODE_DESCEND?? According to int, it must be an integer! Don't be nervous, everything will strighten out in the next part - "Preprocessor". For example, if you need to sort descending 5 elements starting from the second, indicate something like this:
ArraySort(array, 5, 1, MODE_DESCEND);
And the last function for today:
int ArrayCopy(object&dest[], object source[], int start_dest = 0,
              int start_source=0, int count=WHOLE_ARRAY);
It is used for copying one array into another. Let's view the obligatory parameters:
- dest[] - into which array to copy
- source[] - from which array to copy
Optional parameters:
- start_dest - index of an array element, into which the copying is performed
- start_source - index of an array element, from which the copying is performed
- int count - the amount of elements for copying
The function returns the amount of copied elements. Use ArrayCopy very carefully: make sure that arrays have enough capacity, when you copy in them!
Preprocessor
What is this? Preprocessor is a special mechanism, intended for processing a source code. I.e. first the preprocessor prepares a code and then conveys it for compilation. Today we will learn one more useful option - constants.
What is the main point? To understand this, let's remember an example from the part about switch:
switch(marketState)
  {
    case 1:
    // trading strategy for an uptrend
    break;

    case 2:
    // strategy for a downtrend
    break;

    case 3:
    // strategy for a flat
    break;

    default:
    // error: this state is not supported!
    break;
  }
Here we activated a mechanism, that acts in different ways depending on the market state. Remember? So, it would be easier and more discriptive to write something like TREND_UP, TREND_DOWN, FLAT instead of 1, 2 and 3:
switch(marketState)
  {
    case TREND_UP:
    // trading strategy for an uptrend
    break;

    case TREND_DOWN:
    // strategy for a downtrend
    break;

    case FLAT:
    // strategy for a flat
    break;

    default:
    // error: this state is not supported!
    break;
  }
In this case a source code appears much easier to understand and more vivid, doesn't it? So, constants allow to substitute TREND_UP, TREND_DOWN and FLAT by corresponding values 1, 2 and 3 before the compilation. All you need is to indicate, what the preprocessor should change. It is done by means of the preprocessor directives, which start from a special symbol "#". The preprocessor directives should be placed in the beginning of a source file together with other directives. Let's look at a complete example of using constants:
//+------------------------------------------------------------------+
//|                                                 preprocessor.mq4 |
//|         Copyright © 2007, Antonio Banderass. All rights reserved |
//|                                               banderassa@ukr.net |
//+------------------------------------------------------------------+
#property copyright "Copyright © 2007, Antonio Banderass. All rights reserved"
#property link      "banderassa@ukr.net"

#define TREND_UP   1
#define TREND_DOWN 2
#define FLAT       3

//+------------------------------------------------------------------+
//| script program start function                                    |
//+------------------------------------------------------------------+
int start()
  {
   MessageBox("TREND_UP=" + TREND_UP + " TREND_DOWN=" + TREND_DOWN +
              " FLAT=" + FLAT);

   return(0);
  }
Note, that we have placed the constants declaration in the beginning of the file, under other preprocessor directives. Let's examine the declaration more closely:
#define TREND_UP 1
First we write the key word #define. It shows to the preprocessor that after that comes constant declaration. Then we write the name of the constant, its identifier, i.e. a word, through which you will refer to the constant value. In our case it is TREND_UP. The value - 1 comes after that. Now when the preprocessor sees TREND_UP in the source code, it will replace it by 1, the same is with all other constants. Here is the source code of our example before processing by a preprocessor:
int start()
  {
   MessageBox("TREND_UP=" + TREND_UP + " TREND_DOWN=" +
              TREND_DOWN + " FLAT=" + FLAT);
   return(0);
  }
and after:
int start()
  {
   MessageBox("TREND_UP=" + 1 + " TREND_DOWN=" + 2 +
              " FLAT=" + 3);
   return(0);
  }
Now you should understand, what MODE_ASCEND and MODE_DESCEND from the previous part mean. They are constants with correspondent values.
Conclusion
So, you have learned a lot of new material from this article: new cycle type - while;
new condition type - switch; operators break and continue. You learned to write
own functions and work with multi-dimensional arrays, learned how to use constants.
All this is your main instrument, a basis for writing more advanced things, like
user's indicators and expert advisors. That is why make sure, that you have thoroughly
studied out the material of the article, because it is very important and will
be constantly used in future.
 ZUP - Universal ZigZag with Pesavento Patterns. Part 1
 Running MetaTrader 4 Client Terminal on Linux-Desktop
 The Basic of Coding A Hedge Expert Advisor
 MQL4 Language for Newbies. Introduction
- Free trading apps
- Over 8,000 signals for copying
- Economic news for exploring financial markets
You agree to website policy and terms of use
hi author,
you had a typo in ArrayDimension section :
Thank you.
Keep the good work.