
Developing a Replay System — Market simulation (Part 09): Custom events

Introduction
In the previous article, Developing a Replay System — Market simulation (Part 08): Locking the indicator, I showed you how to lock the control indicator. Although we have succeeded in achieving this goal, there are still some aspects that need to be addressed. If you looked closely, you probably noticed that each time we change the starting point of replay/simulation, we get a quick presentation of the trading bars being built. This, in a way, is not really problematic, it may even be interesting for some, and not so much for others. Now we will try to please Greeks and Trojans. Let's see how to implement the replay/simulator service, so that it works best for you. In other words, you will be able to see the bars being built, or not.
Please the Greeks and the Trojans
The first step is to add a new variable or parameter to the service file:
input string            user00 = "Config.txt";  //Replay configuration file
input ENUM_TIMEFRAMES   user01 = PERIOD_M5;     //Starting time
input bool              user02 = true;          //Visualize construction of bars
This is where we begin the process of allowing the user to make a decision. As we said before, there are people who enjoy watching bars being created, while others don't care.
After completing this step, we will pass this parameter to the C_Replay class in the next step:
while ((ChartSymbol(id) != "") && (GlobalVariableGet(def_GlobalVariableReplay, Info.u_Value.df_Value)) && (!_StopFlag))
{
        if (!Info.s_Infos.isPlay)
        {
                if (!bTest) bTest = true;
        }else
        {
                if (bTest)
                {
                        delay = ((delay = Replay.AdjustPositionReplay(user02)) >= 0 ? 3 : delay);
                        bTest = false;
                        t1 = GetTickCount64();
                }else if ((GetTickCount64() - t1) >= (uint)(delay))
                {
                        if ((delay = Replay.Event_OnTime()) < 0) break;
                        t1 = GetTickCount64();
                }
        }
}
Now we can proceed to the C_Replay class and start working on it. Although this task seems simple on the surface, it implies obstacles and challenges. Until now, market replay data was based on traded ticks and the chart was plotted using 1-minute bars. So it's not just about adding or removing bars. We must treat the various elements in such a way that they are uniform. Not an easy task, is it? However, I enjoy solving problems and this problem seems quite interesting.
The first step is to create one-minute bars while we are reading the file of traded ticks, but there is another aspect that needs to be taken into account. We should be very careful. Here's how we'll approach this challenge. From the very beginning, we will introduce a new set of variables into the system.
struct st00
{
        MqlTick  Info[];
        MqlRates Rate[];
        int      nTicks,
                 nRate;
}m_Ticks;
This set will contain 1-minute bars, which we will plot simultaneously with reading the tick file. Looking at the code up to this point, we will notice that the Event_OnTime function, present in the C_Replay class, has the ability to plot one-minute bars based on the values of traded ticks. However, we cannot call this function to perform this task for us. In fact, we could do this with some caution: at the end of the process, we could delete all the bars created in the replay service. This way the system will be ready for use. However, the way Event_OnTime works results in a small delay on each call, while the number of calls associated with traded ticks is usually relatively large. We'll have to take a slightly different approach.
As we already mentioned, we will have to look for a slightly different approach. Thus, we've got the following function:
inline bool BuiderBar1Min(MqlRates &rate, const MqlTick &tick)
                {
                        if (rate.time != macroRemoveSec(tick.time))
                        {
                                rate.real_volume = (long) tick.volume_real;
                                rate.tick_volume = 0;
                                rate.time = macroRemoveSec(tick.time);
                                rate.open = rate.low = rate.high = rate.close = tick.last;

                                return true;
                        }
                        rate.close = tick.last;
                        rate.high = (rate.close > rate.high ? rate.close : rate.high);
                        rate.low = (rate.close < rate.low ? rate.close : rate.low);
                        rate.real_volume += (long) tick.volume_real;

                        return false;
                }
What we're doing here is essentially the same thing that Event_OnTime would do. However, we will do this tick by tick. Here is a brief explanation of what is happening: When the time indicated on the tick differs from the time recorded on the bar, we will have an initial bar construction. We'll return "true" to tell the caller that a new bar will be created, allowing it to make any necessary changes. On subsequent calls, we will adjust the values accordingly. In this case, we will return "false" to indicate that no new bar was created. The function itself is quite simple, but you need careful when using it.
First, make sure that you initialize the array correctly. Let's look at where this is done.
bool SetSymbolReplay(const string szFileConfig)
{
        int     file;
        string  szInfo;
        bool    isBars = true;

        if ((file = FileOpen("Market Replay\\" + szFileConfig, FILE_CSV | FILE_READ | FILE_ANSI)) == INVALID_HANDLE)
        {
                MessageBox("Failed to load the\nconfiguration file.", "Market Replay", MB_OK);
                return false;
        }
        Print("Loading data for replay. Please wait....");
        ArrayResize(m_Ticks.Rate, 540);
        m_Ticks.nRate = -1;
        m_Ticks.Rate[0].time = 0;
        while ((!FileIsEnding(file)) && (!_StopFlag))
        {
                szInfo = FileReadString(file);
                StringToUpper(szInfo);
                if (szInfo == def_STR_FilesBar) isBars = true; else
                if (szInfo == def_STR_FilesTicks) isBars = false; else
                if (szInfo != "") if (!(isBars ? LoadPrevBars(szInfo) : LoadTicksReplay(szInfo)))
                {
                        if (!_StopFlag)
                                MessageBox(StringFormat("File %s from%s\ncould not be loaded.", szInfo, (isBars ? def_STR_FilesBar : def_STR_FilesTicks), "Market Replay", MB_OK));
                        FileClose(file);
                        return false;
                }
        }
        FileClose(file);
        return (!_StopFlag);
}
If this is not done correctly and in advance, you will not be able to use the bar creation function correctly. Then the next question arises: Why do we specify the value -1 at the index of the first array? Shouldn't 0 be the starting value? Yes, it's 0, but we start with -1 for the first call, which will always be true. If it started at 0, we would have to run an additional test immediately after calling the bar build. However, when set to -1, this additional check becomes unnecessary. It is important to note that we initialize the array with 540 positions, which corresponds to the number of 1-minute bars typically present on a typical trading day on Brazilian Stock Exchange (B3).
Once this step is completed, we can move on to the reading traded ticks.
bool LoadTicksReplay(const string szFileNameCSV)
{
        int     file,
                old;
        string  szInfo = "";
        MqlTick tick;
        MqlRates rate;

        if ((file = FileOpen("Market Replay\\Ticks\\" + szFileNameCSV + ".csv", FILE_CSV | FILE_READ | FILE_ANSI)) != INVALID_HANDLE)
        {
                ArrayResize(m_Ticks.Info, def_MaxSizeArray, def_MaxSizeArray);
                ArrayResize(m_Ticks.Rate, 540, 540);
                old = m_Ticks.nTicks;
                for (int c0 = 0; c0 < 7; c0++) szInfo += FileReadString(file);
                if (szInfo != def_Header_Ticks)
                {
                        Print("File ", szFileNameCSV, ".csv is not a file a traded ticks.");
                        return false;
                }
                Print("Loading replay ticks. Please wait...");
                while ((!FileIsEnding(file)) && (m_Ticks.nTicks < (INT_MAX - 2)) && (!_StopFlag))
                {
                        ArrayResize(m_Ticks.Info, (m_Ticks.nTicks + 1), def_MaxSizeArray);
                        szInfo = FileReadString(file) + " " + FileReadString(file);
                        tick.time = macroRemoveSec(StringToTime(StringSubstr(szInfo, 0, 19)));
                        tick.time_msc = (int)StringToInteger(StringSubstr(szInfo, 20, 3));
                        tick.bid = StringToDouble(FileReadString(file));
                        tick.ask = StringToDouble(FileReadString(file));
                        tick.last = StringToDouble(FileReadString(file));
                        tick.volume_real = StringToDouble(FileReadString(file));
                        tick.flags = (uchar)StringToInteger(FileReadString(file));
                        if ((m_Ticks.Info[old].last == tick.last) && (m_Ticks.Info[old].time == tick.time) && (m_Ticks.Info[old].time_msc == tick.time_msc))
                                m_Ticks.Info[old].volume_real += tick.volume_real;
                        else
                        {
                                m_Ticks.Info[m_Ticks.nTicks] = tick;
                                if (tick.volume_real > 0.0)
                                {
                                        m_Ticks.nRate += (BuiderBar1Min(rate, tick) ? 1 : 0);
                                        rate.spread = m_Ticks.nTicks;
                                        m_Ticks.Rate[m_Ticks.nRate] = rate;
                                        m_Ticks.nTicks++;
                                }
                                old = (m_Ticks.nTicks > 0 ? m_Ticks.nTicks - 1 : old);
                        }
                }
                if ((!FileIsEnding(file)) && (!_StopFlag))
                {
                        Print("Too many data in the tick file.\nCannot continue...");
                        return false;
                }
        }else
        {
                Print("Tick file ", szFileNameCSV,".csv not found...");
                return false;
        }
        return (!_StopFlag);
};
Here's one important detail: the initial and reserve values will need to be adjusted in case the number of minute bars is greater than what is specified here. This value is suitable for the trading period from 9:00 to 18:00, which corresponds to 540 minutes, but if this period is longer, you need to increase it in advance. However, it is important to note that the times to consider should be the opening and closing times of the trading session. This refers to the traded tick file, not the bar file. This is due to the fact that bars are generated based on a tick file and if this session is different in a particular file, then problems may arise during execution (RUN TIME ). We use this value since the trading session in the B3 exchange is typically 540 minutes.
Now we can go ahead and present a file of traded ticks. This way we will capture one tick at a time and build 1-minute bars. However, it is important to note the following: bars will only be generated if there is some trading volume; otherwise, the tick represents some adjustment to the asset's BID or ASK and is therefore not taken into account. Note: We will deal with such situations in the near future, as we intend to adapt the system for the Forex market. But for now, let's skip it.
Since we are not using the spread value in the replay/simulation, it will be used for a more meaningful purpose. However, please note that this is not the spread value. Therefore, if some indicator requires a correct spread value, then you will need to use a different approach. The variable that will be used to store the spread can be used to store the value of the position of the counter. This will prove to be very useful in the near future.
Now that everything is set up correctly, we can save the 1-minute bar data and move on to the next step: this is due to the absence of other changes to the reading system. There is therefore no need to comment further on the reading order.
Let us now look at the main function.
int AdjustPositionReplay(const bool bViewBuider)
{
        u_Interprocess Info;
        MqlRates       Rate[1];
        int            iPos = (int)((m_ReplayCount * def_MaxPosSlider * 1.0) / m_Ticks.nTicks);
        datetime       dt_Local;

        Info.u_Value.df_Value = GlobalVariableGet(def_GlobalVariableReplay);
        if (Info.s_Infos.iPosShift == iPos) return 0;
        iPos = (int)(m_Ticks.nTicks * ((Info.s_Infos.iPosShift * 1.0) / def_MaxPosSlider));
        if (iPos < m_ReplayCount)
        {
                dt_Local = m_dtPrevLoading;
                m_ReplayCount = 0;
                if (!bViewBuider) for (int c0 = 1; (c0 < m_Ticks.nRate) && (m_Ticks.Rate[c0 - 1].spread < iPos); c0++)
                {
                        dt_Local = m_Ticks.Rate[c0].time;
                        m_ReplayCount = m_Ticks.Rate[c0 - 1].spread;
                }
                CustomRatesDelete(def_SymbolReplay, dt_Local, LONG_MAX);
                if (m_dtPrevLoading == 0)
                {
                        Rate[0].close = Rate[0].open = Rate[0].high = Rate[0].low = m_Ticks.Info[m_ReplayCount].last;
                        Rate[0].tick_volume = 0;
                        Rate[0].time = m_Ticks.Info[m_ReplayCount].time - 60;
                        CustomRatesUpdate(def_SymbolReplay, Rate, 1);
                }
        }
        for (iPos = (iPos > 0 ? iPos - 1 : 0); (m_ReplayCount < iPos) && (!_StopFlag); m_ReplayCount++) Event_OnTime();
        return Event_OnTime();
}
This function is not completely finished and will continue to change. However, to avoid confusion in future explanations, I will outline what was added or removed during the development of this article. This way, the reader will have a better understanding of what is happening, and if you want to make changes, it will be easier to do so. You just need to go back to these articles and review what is actually going on in each of the points discussed. Remember that everything not mentioned here has already been covered in previous articles.
The first step you is to declare a local variable to set the internal time position inside the function. With this setting, we won't have to restart replay from the beginning if we move forward and then decide to go back a little. We'll get to that point soon. After doing some calculations to determine whether the current position should move forward or backward, we find the first action to take. If the position needs to go back, these two lines initiate replay/simulation at the start of the action. However, this may not be necessary. If you or the user indicate that you do not want to watch the formation of bars as they are being created, we will enter a short loop to check the contents of all 1-minute bars recorded when reading traded ticks.
Now there is an issue that may not seem very clear at the moment. When converting traded ticks into 1-minute bars, we get the relative position of the counter and at the same time have the new bar opening time. This information is useful and necessary, allowing us to clear all bars that appear after the specified time. The counter value is unlikely to be identical to the new relative positioning value requested by the user. So, the system will make a small adjustment to match the positions, but this adjustment is made very quickly. Thus, the creation of a bar will be almost invisible.
However, as mentioned eralier, this function is not complete yet. The described operation will only be used if the user makes a regression from the current counter position. IN case the user advances from the counter position, we wills till have the bar creation effect. Since we want to please everyone, both the Greeks and the Trojans, we have to correct this small mishap, so that the creation of the bars is not visible in advance. It is not very complicated. Let's compare the above code which does not the advancement system with the below code which includes it:
int AdjustPositionReplay(const bool bViewBuider)
{
#define macroSearchPosition     {                                                                                               \
                dt_Local = m_dtPrevLoading; m_ReplayCount = count = 0;                                                          \
                if (!bViewBuider) for (count = 1; (count < m_Ticks.nRate) && (m_Ticks.Rate[count - 1].spread < iPos); count++)  \
                        { dt_Local = m_Ticks.Rate[count].time;  m_ReplayCount = m_Ticks.Rate[count - 1].spread; }               \
                                }

        u_Interprocess  Info;
        MqlRates        Rate[def_BarsDiary];
        int             iPos = (int)((m_ReplayCount * def_MaxPosSlider * 1.0) / m_Ticks.nTicks),
                        count;
        datetime        dt_Local;

        Info.u_Value.df_Value = GlobalVariableGet(def_GlobalVariableReplay);
        if (Info.s_Infos.iPosShift == iPos) return 0;
        iPos = (int)(m_Ticks.nTicks * ((Info.s_Infos.iPosShift * 1.0) / (def_MaxPosSlider + 1)));
        if (iPos < m_ReplayCount)
        {
                macroSearchPosition;
                CustomRatesDelete(def_SymbolReplay, dt_Local, LONG_MAX);
                if (m_dtPrevLoading == 0)
                {
                        Rate[0].close = Rate[0].open = Rate[0].high = Rate[0].low = m_Ticks.Info[m_ReplayCount].last;
                        Rate[0].tick_volume = 0;
                        Rate[0].time = m_Ticks.Info[m_ReplayCount].time - 60;
                        CustomRatesUpdate(def_SymbolReplay, Rate, 1);
                }
        }if ((iPos > m_ReplayCount) && (!bViewBuider))
        {
                macroSearchPosition;
                CustomRatesUpdate(def_SymbolReplay, m_Ticks.Rate, count);
        }
        for (iPos = (iPos > 0 ? iPos - 1 : 0); (m_ReplayCount < iPos) && (!_StopFlag); m_ReplayCount++) Event_OnTime();
        return Event_OnTime();
}
Dow you see the difference? If you're thinking about the macro, forget it because it's only there to save us from having to repeat the same code in two different places. In fact, there is practically no difference. Perhaps the only thing that's different is the line that will add extra bars. If you apply the replay system, you will notice that the advance and retreat points are unlikely to coincide with the close of one bar and the opening of the next one. This is because there will always be a remainder that will correspond to this line. However, due to the speed of this setting, you are unlikely to notice this refinement.
Alerting the user
Our replay system is at the point where we should start incorporating some additions that weren't previously necessary. One of these additions is to notify the user when there is no more data in the system to simulate or continue the replay. Without this warning, the user may assume that the system simply crashed or some unusual situation occurred. To prevent such assumptions, let's start by adding some additional information. The first step is a warning that there is no more data to use. To understand how to do this, let's look at the code below:
void OnStart()
{
        ulong t1;
        int delay = 3;
        long id = 0;
        u_Interprocess Info;
        bool bTest = false;

        Replay.InitSymbolReplay();
        if (!Replay.SetSymbolReplay(user00))
        {
                Finish();
                return;
        }
        Print("Wait for permission from [Market Replay] indicator to start replay ...");
        id = Replay.ViewReplay(user01);
        while ((!GlobalVariableCheck(def_GlobalVariableReplay)) && (!_StopFlag) && (ChartSymbol(id) != "")) Sleep(750);
        if ((_StopFlag) || (ChartSymbol(id) == ""))
        {
                Finish();
                return;
        }
        Print("Permission granted. The replay service can now be used...");
        t1 = GetTickCount64();
        while ((ChartSymbol(id) != "") && (GlobalVariableGet(def_GlobalVariableReplay, Info.u_Value.df_Value)) && (!_StopFlag))
        {
                if (!Info.s_Infos.isPlay)
                {
                        if (!bTest) bTest = true;
                }else
                {
                        if (bTest)
                        {
                                if ((delay = Replay.AdjustPositionReplay(user02)) < 0) AlertToUser(); else
                                {
                                        delay = (delay >= 0 ? 3 : delay);
                                        bTest = false;
                                        t1 = GetTickCount64();
                                }
                        }else if ((GetTickCount64() - t1) >= (uint)(delay))
                        {
                                if ((delay = Replay.Event_OnTime()) < 0) AlertToUser();
                                t1 = GetTickCount64();
                        }
                }
        }
        Finish();
}
//+------------------------------------------------------------------+
void AlertToUser(void)
{
        u_Interprocess Info;

        Info.u_Value.df_Value = GlobalVariableGet(def_GlobalVariableReplay);
        Info.s_Infos.isPlay = false;
        GlobalVariableSet(def_GlobalVariableReplay, Info.u_Value.df_Value);
        MessageBox("No more data to use in replay-simulation", "Service Replay", MB_OK);
}
//+------------------------------------------------------------------+
void Finish(void)
{
        Replay.CloseReplay();
        Print("The replay service completed...");
}
//+------------------------------------------------------------------+
There are two cases when you can create such a warning. The first one occurs during normal replay execution, which is the most common case. However, there is another option: when the user adjusts the position to the end of the scrollbar.
int AdjustPositionReplay(const bool bViewBuider)
{

// ... Code ...

        iPos = (int)(m_Ticks.nTicks * ((Info.s_Infos.iPosShift * 1.0) / (def_MaxPosSlider + 1)));

// ...  Rest of the code ...
Regardless of this, the answer will always be the same. We take the value contained in the global terminal variable and use it to indicate that we are in pause mode. Then we record it again and show a window that reports what happened. Basically this is what we will do, but it will be very useful. This way the poor user will find out what happened.
Adding a Please Wait warning
Now that our replay system has given the user the ability to indicate whether he wants to see the bar building process, there is a small problem if he actually wants to monitor the bar building process. This is the reason for this topic.
When we want to see bars building while waiting for the replay service to reach the correct position, we get the impression that we can stop or start progress at any time. This is because we have play and pause buttons. However, we can't actually do either of those things until the replay service reaches the correct position to release the system. And it is in these situations that we can get a little confused, because we are not quite sure what exactly is happening. But if you replace this presented button with another one indicating the need to wait, the situation changes. Right?
However, it is not enough to simply add a button. We need to perform some additional steps that will allow the service to tell the control indicator what should or should not be displayed. Let's start by adding a new variable to the InterProcess.mqh header file.
#property copyright "Daniel Jose"
//+------------------------------------------------------------------+
#define def_GlobalVariableReplay        "Replay Infos"
#define def_GlobalVariableIdGraphics    "Replay ID"
#define def_SymbolReplay                "RePlay"
#define def_MaxPosSlider                400
#define def_ShortName                   "Market Replay"
//+------------------------------------------------------------------+
union u_Interprocess
{
        union u_0
        {
                double  df_Value;       // The value of the terminal's global variable...
                ulong   IdGraphic;      // Contains the asset chart ID....
        }u_Value;
        struct st_0
        {
                bool    isPlay;         // Specifies if we are in the play or pause mode ...
                bool    isWait;         // Asks the user to wait...
                ushort  iPosShift;      // A value between 0 and 400 ...
        }s_Infos;
};
//+------------------------------------------------------------------+
This value, which will be transferred between the service and the indicator, will have priority over other controls. Thus, if it needs to be displayed, the control indicator will not be able to do anything else. We have already defined the variable, now we need to go to the replay service and add the necessary code to communicate with the control indicator. To do this, we need to add some code to the C_Replay class. It is not very difficult.
int AdjustPositionReplay(const bool bViewBuider)
{
#define macroSearchPosition     {                                                                                               \
                dt_Local = m_dtPrevLoading; m_ReplayCount = count = 0;                                                          \
                if (!bViewBuider) for (count = 1; (count < m_Ticks.nRate) && (m_Ticks.Rate[count - 1].spread < iPos); count++)  \
                        { dt_Local = m_Ticks.Rate[count].time;  m_ReplayCount = m_Ticks.Rate[count - 1].spread; }               \
                                }

        u_Interprocess  Info;
        MqlRates        Rate[def_BarsDiary];
        int             iPos = (int)((m_ReplayCount * def_MaxPosSlider * 1.0) / m_Ticks.nTicks),
                        count;
        datetime        dt_Local;

        Info.u_Value.df_Value = GlobalVariableGet(def_GlobalVariableReplay);
        if (Info.s_Infos.iPosShift == iPos) return 0;
        iPos = (int)(m_Ticks.nTicks * ((Info.s_Infos.iPosShift * 1.0) / (def_MaxPosSlider + 1)));
        if (iPos < m_ReplayCount)
        {
                macroSearchPosition;
                CustomRatesDelete(def_SymbolReplay, dt_Local, LONG_MAX);
                if (m_dtPrevLoading == 0)
                {
                        Rate[0].close = Rate[0].open = Rate[0].high = Rate[0].low = m_Ticks.Info[m_ReplayCount].last;
                        Rate[0].tick_volume = 0;
                        Rate[0].time = m_Ticks.Info[m_ReplayCount].time - 60;
                        CustomRatesUpdate(def_SymbolReplay, Rate, 1);
                }
        }if ((iPos > m_ReplayCount) && (!bViewBuider))
        {
                macroSearchPosition;
                CustomRatesUpdate(def_SymbolReplay, m_Ticks.Rate, count);
        }
        if (bViewBuider)
        {
                Info.s_Infos.isWait = true;
                GlobalVariableSet(def_GlobalVariableReplay, Info.u_Value.df_Value);
        }
        for (iPos = (iPos > 0 ? iPos - 1 : 0); (m_ReplayCount < iPos) && (!_StopFlag); m_ReplayCount++) Event_OnTime();
        Info.u_Value.df_Value = GlobalVariableGet(def_GlobalVariableReplay);
        Info.s_Infos.isWait = false;
        GlobalVariableSet(def_GlobalVariableReplay, Info.u_Value.df_Value);
        return Event_OnTime();
}
This point is usually not reached and occurs only at the moment when something really needs to be done. If the user wants to visualize the bars displayed on the chart, we will send a signal so that the indicator shows that the service will not be available for some time. We record this in the global terminal variable so that the indicator can interpret this value. The service will then perform the task for which it is actually intended. Shortly after this we release the indicator completely unconditionally.
After this, we can move on to the control indicator code to analyze what is happening. Some might think that it would take a lot of code to make things work here. However, as you can see, I will do all the work with a minimum amount of code. To simplify things, how about a little abstraction? To do this, we will start by adding the following line to the C_Control.mqh header file.
enum EventCustom {Ev_WAIT_ON, Ev_WAIT_OFF};
Actually, we are adding an extra layer of abstraction to simplify what we do next. Don't forget about the image we'll be using, it's added in the following snippet:
#define def_ButtonPlay  "Images\\Market Replay\\Play.bmp"
#define def_ButtonPause "Images\\Market Replay\\Pause.bmp"
#define def_ButtonLeft  "Images\\Market Replay\\Left.bmp"
#define def_ButtonRight "Images\\Market Replay\\Right.bmp"
#define def_ButtonPin   "Images\\Market Replay\\Pin.bmp"
#define def_ButtonWait  "Images\\Market Replay\\Wait.bmp"
#resource "\\" + def_ButtonPlay
#resource "\\" + def_ButtonPause
#resource "\\" + def_ButtonLeft
#resource "\\" + def_ButtonRight
#resource "\\" + def_ButtonPin
#resource "\\" + def_ButtonWait
The use of an image here really simplifies things. Remember that we only want to indicate to the user that the service is running and that it will not be able to respond to any other request during this operation.
Next in the class file, we add a private internal variable to control internal actions.
class C_Controls
{
        private :
//+------------------------------------------------------------------+
                string  m_szBtnPlay;
                long    m_id;
                bool    m_bWait;
                struct st_00
                {
                        string  szBtnLeft,
                                szBtnRight,
                                szBtnPin,
                                szBarSlider;
                        int     posPinSlider,
                                posY;
                }m_Slider;
//+------------------------------------------------------------------+
By adding this variable, we already have an idea of the state of the replay/simulation service. However, it needs to be initialized in the appropriate place and the best option is the class constructor.
C_Controls() : m_id(0), m_bWait(false)
        {
                m_szBtnPlay             = NULL;
                m_Slider.szBarSlider    = NULL;
                m_Slider.szBtnPin       = NULL;
                m_Slider.szBtnLeft      = NULL;
                m_Slider.szBtnRight     = NULL;
        }
Note that we need to initialize its value with "false" since the replay/simulation service will always start freely and be able to respond to any command. Even if this initialization happens here, we will take care of the correct state in other calls. But this will suffice for our purposes for now.
Now we need to analyze the following: which event do we really want to lock? Every time we move the replay position forward or backward, we see the button change from "play" to "pause" and we want to block the user's access to that button. A simple click will cause the control indicator to request action from the replay/simulation service. Although the service will not respond while it is in the phase where it is busy preparing for replay/simulation.
If you look at the code, you can notice that the system always reacts to events; in other words, this is the event-based system. That's why we created the EventCustom enumeration to support an event-based system. We're not going to change that. In fact, we shouldn't even consider making such a change, since it would force us to use several more complex approaches than using events. However, simply adding an enumeration indicating the presence of events is not the solution. Let's see what we need to do. We're changing the DispatchMessage procedure so that if the service is busy, pressing the play/pause button will not generate an event. This can be easily implemented by adding the following check:
void DispatchMessage(const int id, const long &lparam, const double &dparam, const string &sparam)
        {
                u_Interprocess Info;
                static int six = -1, sps;
                int x, y, px1, px2;

                switch (id)
                {

// ... Internal code ...

                        case CHARTEVENT_OBJECT_CLICK:
                                if (m_bWait) break;
                                if (sparam == m_szBtnPlay)
                                {
                                        Info.s_Infos.isPlay = (bool) ObjectGetInteger(m_id, m_szBtnPlay, OBJPROP_STATE);
                                        if (!Info.s_Infos.isPlay) CreteCtrlSlider(); else
                                        {
                                                RemoveCtrlSlider();
                                                m_Slider.szBtnPin = NULL;
                                        }
                                        Info.s_Infos.iPosShift = (ushort) m_Slider.posPinSlider;
                                        GlobalVariableSet(def_GlobalVariableReplay, Info.u_Value.df_Value);
                                        ChartRedraw();
                                }else   if (sparam == m_Slider.szBtnLeft) PositionPinSlider(m_Slider.posPinSlider - 1);
                                else if (sparam == m_Slider.szBtnRight) PositionPinSlider(m_Slider.posPinSlider + 1);
                                break;

// ... The rest of the code ....
By adding this test line we prevent the indicator from sending requests to the service while it is busy. However, this still doesn't completely solve our problem because the user might not like it when they click the Play/Pause button but nothing changes. We must take other actions. In addition, we still have not been able to correctly set the value of the variable being tested.
This part may seem a little confusing, but all we're really going to do is change the value of the m_bWait variable and check it. This will allow us to determine which images should be plotted. The goal is for the play/pause button to change to a different image while the service is busy, and revert to the traditional play/pause button when the service is disabled. We will use a simple approach:
void CreateBtnPlayPause(bool state)
{
        m_szBtnPlay = def_PrefixObjectName + "Play";
        CreateObjectBitMap(5, 25, m_szBtnPlay, (m_bWait ? def_ButtonWait : def_ButtonPause), (m_bWait ? def_ButtonWait : def_ButtonPlay));
        ObjectSetInteger(m_id, m_szBtnPlay, OBJPROP_STATE, state);
}
Note that we are simply checking the variable. Depending on its value, we will use a play/pause button or a button that will represent the wait signal. But how to operate this button? Will it constantly read the value of a global variable from the terminal? There will be something similar. Remember this: Every time the service adds a new record to a market replay asset, this will be reflected in the indicator. Thus, MetaTrader 5 will generate an event that will launch the OnCalculate function. This is where we come into play, but we will not constantly monitor the indicator. We'll do it in a more elegant way. To understand the flow, look at the image below, which shows the call flow in the code:
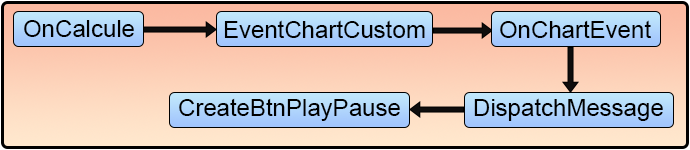
This is exactly the sequence of actions that will be performed to correctly control the button on the control indicator. The CreateBtnPlayPause procedure has already been presented before, so I think it's pretty self-explanatory. We are now going to look at other points of this diagram. The OnCalculate procedure includes a more difficult logic and requires the understanding of the steps performed in DispatchMessage.
So let's move to the basic code of handling custom events. Let's look at the following code:
void DispatchMessage(const int id, const long &lparam, const double &dparam, const string &sparam)
{
        u_Interprocess Info;
        static int six = -1, sps;
        int x, y, px1, px2;

        switch (id)
        {
                case (CHARTEVENT_CUSTOM + Ev_WAIT_ON):
                        m_bWait = true;
                        CreateBtnPlayPause(true);
                        break;
                case (CHARTEVENT_CUSTOM + Ev_WAIT_OFF):
                        m_bWait = false;
                        Info.u_Value.df_Value = GlobalVariableGet(def_GlobalVariableReplay);
                        CreateBtnPlayPause(Info.s_Infos.isPlay);
                        break;

// ... The rest of the code ...
When DispatchMessage is called by the control indicator's OnChartEvent, the data will be passed to allow processing both event messages provided by the MetaTrader 5 platform and custom events triggered by our code at specific points. We'll discuss custom events later. The function will look for matching code if the Ev_WAIT_ON custom event is used. This will tell us that the service is busy, causing the variable m_bWait to be true. Next, we call the creation of the "play/pause" button, which will actually plot an image indicating the busy state. When the Ev_WAIT_OFF custom event is triggered, we want to indicate the current state of the service, that is, whether it is in play or pause mode. Therefore, the m_bWait variable will receive a value that indicates that the service is available to accept requests. We also need to get data from the global terminal variable, which will contain the current state of the service. Next we call a function that creates a play/pause button so the user can interact with the system.
This approach is quite intuitive, and I think everyone can understand the idea. The big question is: How will these events be triggered? Will we have extremely complex and difficult to understand code? No, the way to trigger events in MQL5 is quite simple, as is the way to analyze and process the mentioned custom events. In the above code, you can see how to handle two custom events. Now let's look at how to trigger these events. When we trigger a custom event, we are actually calling the OnChartEvent function. This function will always be called when an event occurs, either a custom event or one originating from MetaTrader 5. The function called will always be the same. Now look at the code for this function on the command line:
void OnChartEvent(const int id, const long &lparam, const double &dparam, const string &sparam)
{
        Control.DispatchMessage(id, lparam, dparam, sparam);
}
That is, when an event is fired, its processing is delegated to the C_Control class, and the DispatchMessage function is executed. Have you noticed how everything works? If the code contained in the DispatchMessage function were inside the event handling function, the result would be the same. However, please note that the OnChartEvent function takes 4 parameters, while the function that triggers custom events will use more parameters. In fact, there are 5 parameters used to trigger custom events. This way we can distinguish custom events from events coming from MetaTrader 5. If you pay attention, you will notice that the value used at the time of selection is the sum of the value indicated in the EventCustom enumeration, with other data CHARTEVENT_CUSTOM. This way we get the correct value.
But how is this value created? How can we generate custom events using MQL5? To understand this, look at the main code of our control indicator: the OnCalcule function. It is shown below:
int OnCalculate(const int rates_total, const int prev_calculated, const int begin, const double &price[])
{
        static bool bWait = false;
        u_Interprocess Info;

        Info.u_Value.df_Value = GlobalVariableGet(def_GlobalVariableReplay);
        if (!bWait)
        {
                if (Info.s_Infos.isWait)
                {
                        EventChartCustom(m_id, Ev_WAIT_ON, 0, 0, "");
                        bWait = true;
                }
        }else if (!Info.s_Infos.isWait)
        {
                EventChartCustom(m_id, Ev_WAIT_OFF, 0, Info.u_Value.df_Value, "");
                bWait = false;
        }

        return rates_total;
}
Let's understand how the above code works. The first thing to note is that this code is an event handler that will be called by MetaTrader 5. That is, every time the asset price changes or the asset receives a new traded tick, the OnCalcule function will be automatically called by MetaTrader 5. Thus, we don't need a timer inside the indicator. In fact, you should avoid using timers in indicators (as much as possible), since they affect not only the indicator in question, but also all others. Therefore, we are going to use this call of the MetaTrader 5 platform to check what is happening with the service. Note that the service will send input data to the replay/simulation resource and therefore indirectly call the OnCalcule function.
Conclusion
I hope you get the general idea as it is the basis for everything else. So, every time we call OnCalcule, we will write the value present in the terminal global variable and check whether the local static variable is true or not. If its value is not true, we will check if the service is busy. If this condition is met, we will create a special event to report this. Immediately after this, we will change the value of a local static variable to indicate that the control indicator knows that the replay/simulation service is busy. So the next time we call OnCalcule, we check if the replay/simulation service is free to do its activity. Once this happens, we trigger a special event indicating that the service is ready to receive control indicator requests. And the loop will repeat as long as the local static variable is true.
Now notice that we are using something common to trigger custom events, namely the EventChartCustom function. Here we are limited only by the current chart and control indicator. However, we can trigger events for any chart, indicator, and even for an Expert Advisor. To do this, you need to correctly fill in the parameters of the EventChartCustom function. If we do this, then everything else will be entrusted to the MetaTrader 5 platform, and we will only have to process the custom event at the moment either in the indicator or in the Expert Advisor. This is a little-explored aspect, and from what I've noticed, people sometimes believe that the MetaTrader 5 platform is not capable of performing certain actions.
In the next video I will demonstrate the system at its current stage of development. I hope you enjoy the series of articles and I hope that they will help you better study the MetaTrader 5 platform, as well as the capabilities that the MQL5 language offers.
Translated from Portuguese by MetaQuotes Ltd.
Original article: https://www.mql5.com/pt/articles/10919
 Developing a Replay System — Market simulation (Part 10): Using only real data for Replay
- Free trading apps
- Over 8,000 signals for copying
- Economic news for exploring financial markets
You agree to website policy and terms of use
The video reminded (not an advert) a long time ago, as it too uses custom characters in dynamics with speed control.
Perhaps the author will see the usefulness in some use cases for his project.
The video reminded me (not an advert) of an old work, as it also uses custom characters in the dynamics with speed control.
Perhaps the author will see the usefulness in some use cases for his project.
Thanks for the advice. But the proposal of this system I'm showing is a bit broader than that. And I'm aiming for a different type of goal, different from that of a strategy tester.