
Developing an Expert Advisor from scratch (Part 30): CHART TRADE as an indicator?

Introduction
In a previous article Development of a trading EA from scratch (Part 29), we have removed Chart Trade from the EA. Previously, we did the same to some other thinks, like Volume At Price and Times & Trade, to improve the EA performance and reliability. By removing Chart Trade from the EA, we are left with only the basic order system. Although this may seem insufficient to some users, the EA can actually do all the work. But there are people who like to enter and exit trades in the market, but they don't like to place them as pending and they to wait for the price to reach a certain level in order to enter or exit the trade.
When we use the MetaTrader 5 platform with the asset we are trading (I mention this because we can use the cross order system, which we discussed in Part 11 of this series), we will have access to QUICK TRADING with buttons that place market orders. They are available in the upper left corner. They appear something like this:
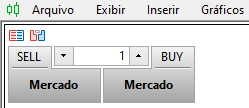
These buttons work like the basic Chart Trading, but they cannot be used for the cross order system, as they will not be visible at all. So in this case, we will have to get back to our Chart Trade. But it will no longer be used inside the EA and will not be part of the EA code. From now on Chart Trade will be just an indicator.
Why do we need to do so to the Chart Trading? The reason is that the EA should only be responsible for the trading system, and everything that is not part of this system should somehow be removed from the EA code. This may seem meaningless now, but soon it will become clearer since I am already preparing a continuation of this article where I will explain the exact reason for this phenomenon.
It could even make the Chart Trading will be used as a script, but this would have a drawback: every time we change the chart timeframe, the script would close so that we would have to run it again manually.
This is not the case if we use it as an indicator. One of the reasons is that the Chart Trade will not affect the execution thread of indicators, so the EA will be free, being focused on its code and only on what concerns the management of orders and positions.
Although we won't have all the controls and all the information of the original version, this Chart Trade as an indicator is much simpler and it still works. The MetaTrader 5 system is highly functional and yet simple. However, it does not provide access to certain information which we are going to have on our Chart Trade.
So, let's get started — the topic is going to be very interesting.
2.0. Developing a Chart Trade indicator
To build this indicator, we have to make quite a lot changes. We will implement these changes in order to return the Chart Trade to the chart without making it part of the EA code.
At first glance, it may seem that the code shown below would be enough for the Chart Trade to be at least compiled. But no, as it is intrinsically linked to several things that we must turn off. We do not completely delete it since we may want to return it back inside the EA some day.
#property copyright "Daniel Jose"
#property indicator_chart_window
#property indicator_plots 0
//+------------------------------------------------------------------+
#include <NanoEA-SIMD\SubWindow\C_TemplateChart.mqh>
//+------------------------------------------------------------------+
C_TemplateChart Chart;
C_Terminal                      Terminal;
//+------------------------------------------------------------------+
int OnInit()
{
        Chart.AddThese("IDE(,,170, 240)");

        return INIT_SUCCEEDED;
}
//+------------------------------------------------------------------+
int OnCalculate(const int rates_total, const int prev_calculated, const int begin, const double &price[])
{
        return rates_total;
}
//+------------------------------------------------------------------+
If you try to compile this code, you will get a lot of errors, but we will fix them one by one to keep the code compatible with the EA, while adapting it for use as an indicator.
The first thing we need to do is isolate the system which creates or manages subwindows. Since Chart Trade will not use these subwindows, there is no need to have this code embedded in the indicator. It's pretty easy to do. We need to edit the C_Chart_IDE.mqh so that it looks as follows:
#ifdef def_INTEGRATION_CHART_TRADER
        #include <NanoEA-SIMD\SubWindow\C_SubWindow.mqh>
        #include <NanoEA-SIMD\Trade\Control\C_IndicatorTradeView.mqh>
#else
        #include <NanoEA-SIMD\SubWindow\C_ChartFloating.mqh>
        #include <NanoEA-SIMD\Auxiliar\C_Terminal.mqh>
#endif
//+------------------------------------------------------------------+
#ifdef def_INTEGRATION_CHART_TRADER
        class C_Chart_IDE : public C_SubWindow
#else
        class C_Chart_IDE : public C_ChartFloating
#endif
Thus, we completely isolate the system from the subwindows, while avoiding any connection between Chart Trade and the EA's order display system. Note that this will be controlled by the def_INTEGRATION_CHART_TRADER definition, but since this definition is only used in the EA, anything inside it will not be compiled into the indicator.
Since the indicator will not use subwindows, we should also work around a few things. One of them is shown below:
                bool Create(bool bFloat)
                        {
                                m_CountObject = 0;
                                if ((m_fp = FileOpen("Chart Trade\\IDE.tpl", FILE_BIN | FILE_READ)) == INVALID_HANDLE) return false;
                                FileReadInteger(m_fp, SHORT_VALUE);

                                for (m_CountObject = eRESULT; m_CountObject <= eEDIT_STOP; m_CountObject++) m_ArrObject[m_CountObject].szName = "";
                                m_SubWindow = ((m_IsFloating = bFloat) ? 0 : GetIdSubWinEA());
                                m_szLine = "";
                                while (m_szLine != "</chart>")

// ... Rest of the code...
The GetIdSubWinEA function returns the number of the window in which the indicator is located. This call is performed in multiple different points. There are two solutions to this. The first solution is to have the following modification of the above function at each point where the call occurs.
                bool Create(bool bFloat)
                        {
                                m_CountObject = 0;
                                if ((m_fp = FileOpen("Chart Trade\\IDE.tpl", FILE_BIN | FILE_READ)) == INVALID_HANDLE) return false;
                                FileReadInteger(m_fp, SHORT_VALUE);

                                for (m_CountObject = eRESULT; m_CountObject <= eEDIT_STOP; m_CountObject++) m_ArrObject[m_CountObject].szName = "";
#ifdef def_INTEGRATION_CHART_TRADER
                                m_SubWindow = ((m_IsFloating = bFloat) ? 0 : GetIdSubWinEA());
#else
                                m_SubWindow = 0;
#endif

// ... The rest of the code...
This would solve the problem, but then we would have to make so many changes that after a while the code would become too difficult to understand, because there would be too many of these conditional compilation directives. I have a much simpler, but equally effective solution: in order to "emulate" this and any other call through the definition, we can simply add the following snippet into the system code.
#ifndef def_INTEGRATION_CHART_TRADER
        #define GetIdSubWinEA() 0
        #define ExistSubWin() false
#endif
This code will solve the call problem. This will be enough (with a few more details) to make the indicator compilable.
The second biggest problem is related to the functions involved in mouse events, not the mouse itself but the C_Mouse class.
The thing to understand is that when Chart Trade was part of the EA, it was possible to access mouse positions (among other things), but if we just add the C_Mouse class to the indicator, then we will have a conflict of interest between the indicator and the EA. I will not show now how the conflict is solved. We will take a different direction, but only temporarily, until everything is resolved and until we get at least some functionality of the original Chart Trade.
For this purpose, we need to move some things from the C_Mouse class to our new indicator. But don't worry, it's a small thing. The first change occurs in the C_TemplateChart class — we will make the following change in its DispatchMessage function:
void DispatchMessage(int id, long lparam, double dparam, string sparam)
{
        datetime dt;
        double p;

        C_Chart_IDE::DispatchMessage(id, lparam, dparam, sparam);
        switch (id)
        {
                case CHARTEVENT_MOUSE_MOVE:
#ifdef def_INTEGRATION_CHART_TRADER
                        Mouse.GetPositionDP(dt, p);
#else
                        {
                                int w;
                                ChartXYToTimePrice(Terminal.Get_ID(), (int)lparam, (int)dparam, w, dt, p);
                        }
#endif
                        for (int c0 = 0; c0 < m_Counter; c0++)  if (m_Info[c0].szVLine != "")

// ... Rest of the code...
By adding the highlighted section, we already get the functionality as if the C_Mouse class still existed. The next change will be in the C_ChartFloating class where we make something similar to what we had earlier. But the code is a bit different:
void DispatchMessage(int id, long lparam, double dparam, string sparam)
{
        int mx, my;
        datetime dt;
        double p;
        static int six = -1, siy = -1, sic = -1;

        switch (id)
        {
                case CHARTEVENT_MOUSE_MOVE:
#ifdef def_INTEGRATION_CHART_TRADER
                        Mouse.GetPositionXY(mx, my);
                        if ((Mouse.GetButtonStatus() & 0x01) == 1)
#else
                        mx = (int)lparam;
                        my = (int)dparam;
                        if (((uint)sparam & 0x01) == 1)
#endif
                        {
                                if (sic == -1)  for (int c0 = m_MaxCounter - 1; (sic < 0) && (c0 >= 0); c0--)

// ... Rest of the code...
Now we can compile the indicator after which we get the result shown in the video below:
Although the EA is not yet fully functional, we need to take the following decision: either Chart Trade will have the same capabilities as the EA or they can be reduced to have something in between what it was before and what is currently provided in MetaTrader 5. Since my position is quite radical, I am going to leave Chart Trade with almost the same features it had in the EA. You can reduce them if you wish.
Having made this decision, we can move on to the next topic since Chart Trade has just become an indicator.
2.1. How to make the Chart Trade indicator functional
Now things will get more difficult. So, let's see how to make this indicator functional so that we can send orders, close positions, and even report the results of transactions. In fact, this is not as difficult as it seems at first glance, because the MetaTrader 5 platform offers a path to follow, so that this can be done with minimal effort.
Here we will do the same as in the Part 16, in which we used some of the features of MetaTrader 5 to create an internal client-server system (inside the platform) to transfer data between different processes. We will do here something similar, only the simulation will be slightly different, since we need two-way communication, and it must remain invisible to the user.
The method we are going to use is not the only one possible. There are other ways, such as using a DLL to enable this transfer. However, we will be using MetaTrader 5 variables as they are by far the easiest to navigate, maintain and modify as needed.
Now that we have decided to take this path, there is the second important decision: who will be the server and who will be the client? This decision will affect how the system will actually be implemented. Anyway, we will already have our messaging protocol the implementation of which is shown below:
#property copyright "Daniel Jose"
//+------------------------------------------------------------------+
#define def_GlobalVariableLeverage      (_Symbol + "_Leverage")
#define def_GlobalVariableTake          (_Symbol + "_Take")
#define def_GlobalVariableStop          (_Symbol + "_Stop")
#define def_GlobalVariableResult        (_Symbol + "_Result")
#define def_GlobalVariableButton        (_Symbol + "_ButtonState")
//+------------------------------------------------------------------+
#define def_ButtonDTSelect              0x01
#define def_ButtonSWSelect              0x02
#define def_ButtonBuyMarket             0x04
#define def_ButtonSellMarket            0x08
#define def_ButtonClosePosition         0x10
//+------------------------------------------------------------------+
This is all. We actually don't need to determine who will be the client and who will be the server, since we have already defined the message protocol. This protocol must be defined from the very beginning since this will make it easier to develop everything else.
Please note that we will use 5 variables for each asset for which the Chart Trade EA set is present. The variable names will depend on the asset to which to which the set is linked so that we can use the set for several assets at the same time.
Here comes an important question: who will do the work of the server? It will be responsible for the creation of such variables. Personally, I find it more practical to use the EA as a server and leave Chart Trade as a client. The idea is to always have the EA on the chart while Chart Trade will be there at specific times when needed. Thus, the EA will be responsible for the creation of 4 out of 5 variables since one of them will be responsible for informing which button was pressed. So, this is the responsibility of Chart Trade.
Based on all this, the data flow looks like this:
- The EA will create global variables that will contain initial values indicating leverage, take profit and stop loss. Eventually, it will also create the variable that will inform about the result of the day, so that Chart Trade can show it to the user and there is no need to look got this information elsewhere.
- Chart Trade will create a variable representing the button press value. This variable will tell the EA what to do, such as to close an open position or to execute market buy or sell. This variable will only exist during this period and will cease to exist as soon as the request is completed by the EA.
The flow is simple, but it guarantees that Chart Trade can interact with the EA including the ability of the system to send orders and to close positions, as it was done before.
To ensure that the Chart Trade will only exist on the chart when the EA is present, we need to add some checks. There is no point in having the Chart Trade on the chart if the EA is not available to send orders. These checks include the following two moments:
- The first is done when the indicator is initialized
- The second is done when any event occurs on the chart
Let's see this in the code, so it will be easier for you to understand the process. During initialization, the following code is executed:
#define def_SHORTNAME "CHART TRADE"
//+------------------------------------------------------------------+
int OnInit()
{
        long lparam = 0;
        double dparam = 0.0;
        string sparam = "";

        IndicatorSetString(INDICATOR_SHORTNAME, def_SHORTNAME);
        if(!GlobalVariableGet(def_GlobalVariableLeverage, dparam)) return INIT_FAILED;
        Terminal.Init();
        Chart.AddThese("IDE(,,170, 215)");
        Chart.InitilizeChartTrade(dparam * Terminal.GetVolumeMinimal(), GlobalVariableGet(def_GlobalVariableTake), GlobalVariableGet(def_GlobalVariableStop), true);
        OnChartEvent(CHARTEVENT_OBJECT_ENDEDIT, lparam, dparam, sparam);

        return INIT_SUCCEEDED;
}
The highlighted line will evaluate one of the global variables, in this case the one that indicates the leverage level. If this variable is missing, initialization will fail. Remember that the EA is responsible for creating this variable, not Chart Trade, so this way the indicator will know whether the EA is present or not on the chart, and when the EA completes its work, it will remove this variable from MetaTrader 5, forcing Chart Trade to be deleted as well. This is done at the second point, where we check the same condition — whether the global leverage variable is available or not.
void OnChartEvent(const int id, const long &lparam, const double &dparam, const string &sparam)
{
        if (!GlobalVariableCheck(def_GlobalVariableLeverage)) OnDeinit(REASON_INITFAILED);
        Chart.DispatchMessage(id, lparam, dparam, sparam);
}
The point indicated above will be implemented with a relatively high frequency. Although it is tempting to place an OnTime event system in an indicator, this is not advisable: all indicators use the same operating thread, and placing an OnTime event in one indicator will affect all the others, if this is not done with extreme care.
If you think that the above check disturbs the general performance of the platform, you can place it inside an OnTime event, but be aware of the consequences.
Regardless of who triggers the removal of the Chart Trade indicator from the chart, it will happen at the same point, which can be seen below:
void OnDeinit(const int reason)
{
        if (reason == REASON_INITFAILED)
        {
                Print("Unable to use Chart Trade. The EA is not on the chart of this asset...");
                if (!ChartIndicatorDelete(0, 0, def_SHORTNAME))
                        Print("Unable to delete Chart Trade from the chart.");
        }
}
The selected line will remove the indicator from the chart. In case of failure, a relevant message will be shown. These messages can be seen in the toolbox as shown below:
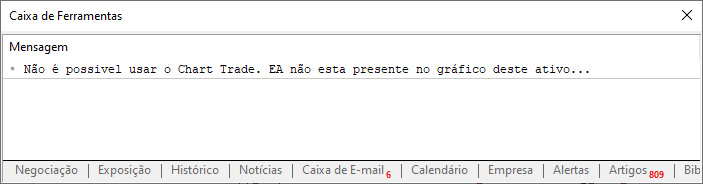
In this way, you must always be aware of any information present in this window.
There is one last function missing before we move on to a deeper analysis of the changes made in the C_Chart_IDE class. This function is as follows:
int OnCalculate(const int rates_total, const int prev_calculated, const int begin, const double &price[])
{
        double value;

        if (GlobalVariableGet(def_GlobalVariableResult, value))
        {
                GlobalVariableDel(def_GlobalVariableResult);
                Chart.DispatchMessage(CHARTEVENT_CHART_CHANGE, 0, value, C_Chart_IDE::szMsgIDE[C_Chart_IDE::eROOF_DIARY]);
        }

        return rates_total;
}
What this function does is watch global variables. Thus, from time to time, when closing a position, the EA will create a global variable, the name of which is defined in def_GlobalVariableResult. Once this variable is created and its name matches the one observed by Chart Trade, the value of this variable will be captured and the variable will be deleted immediately. This is done to avoid the situation when the EA sends the update before the processing is completed causing this update to be lost. However, by capturing the value before deletion, we can send it to the Chart Trade class responsible for handling messages, so that the value passed by the EA will be shown in Chart Trade as soon as possible.
This completes the initial part in which we make the Chart Trade indicator functional. The second part concerns the buttons. We need to make them functional too. This can be easily done in the function processing messages in the C_Chart_IDE function.:
// ... Previous code ...

case CHARTEVENT_OBJECT_CLICK:
        if (StringSubstr(sparam, 0, StringLen(def_HeaderMSG)) != def_HeaderMSG)
	{
		Resize(-1);
		return;
	}
	sparam = StringSubstr(sparam, 9, StringLen(sparam));
	StringToUpper(sparam);
#ifdef def_INTEGRATION_CHART_TRADER
	if ((sparam == szMsgIDE[eBTN_SELL]) || (sparam == szMsgIDE[eBTN_BUY]))
		TradeView.ExecuteOrderInMarket(m_BaseFinance.Leverange, m_BaseFinance.FinanceTake, m_BaseFinance.FinanceStop, sparam == szMsgIDE[eBTN_BUY], m_BaseFinance.IsDayTrade);
	if (sparam == szMsgIDE[eBTN_CANCEL])
	{
		TradeView.CloseAllsPosition();
		ObjectSetInteger(Terminal.Get_ID(), m_ArrObject[eBTN_CANCEL].szName, OBJPROP_STATE, false);
	}
#else
	{
		union u00
		{
			double Value;
			ulong c;
		}u_local;

		u_local.c = 0;
		if (sparam == szMsgIDE[eBTN_BUY]) u_local.c = (m_BaseFinance.IsDayTrade ? def_ButtonDTSelect : def_ButtonSWSelect) + def_ButtonBuyMarket; else
		if (sparam == szMsgIDE[eBTN_SELL]) u_local.c = (m_BaseFinance.IsDayTrade ? def_ButtonDTSelect : def_ButtonSWSelect) + def_ButtonSellMarket; else
		if (sparam == szMsgIDE[eBTN_CANCEL])
		{
			u_local.c = def_ButtonClosePosition;
			ObjectSetInteger(Terminal.Get_ID(), m_ArrObject[eBTN_CANCEL].szName, OBJPROP_STATE, false);
		}
                if (u_local.Value > 0) GlobalVariableSet(def_GlobalVariableButton, u_local.Value);
	}
#endif
	if (sparam == szMsgIDE[eCHECK_DAYTRADE]) InitilizeChartTrade(0, 0, 0, m_BaseFinance.IsDayTrade ? false : true);
	break;

//... Rest of the code...
Note the fragment contains two codes. The blue code is used when Chart Trade is embedded in the EA. The green one is used when Chart Trade is present as an indicator.
We are interested in the green code. It will create a global variable and set the button states. Thus, if a trader closes a position, then the value corresponding to the close button will be placed in the variable. But if you submit a market order, this value will be different and will now be a combination of two other values: one indicates whether the order is Buy or Sell, while the other indicates whether you want to make a Day Trade or a longer one. This is all that Chart Trade will tell the EA.
IMPORTANT: This system is self-exclusive, i.e. if you click on the Sell button and then click the Buy button before the EA does anything, the EA will actually buy because the value indicating sell will be lost due to the new buy value. Furthermore, if you request either sell or buy while there is already an open position, and if you press cancel before the EA makes the relevant trade, the position will be closed.
Now we can move on to the EA code to see how it works in the new model.
2.2. Modifying the EA code to receive messages from Chart Trade
This part is pretty easy as all we have to do is adjust a few small details. However, remember the following: after loading the EA and Chart Trade, do not change global variables or data contained in the EA. Use the order system for this or Chart Trade itself, otherwise you may have problems. Some problems have solutions, others don't. So just in case, you use the tools that are available, don't try to complicate your life.
In the previous article (Part 29), while promoting the removal of Chart Trade, we made some changes and part of them will be undone. We won't need to change anything else related to this question. But, as mentioned earlier, some things are fixable and some are not, so in the next topic of this article, we will eliminate some small problems in the relationship between Chart Trade and the Expert Advisor.
Let's first look at what we will have to undo and activate in the EA so that there is some level of communication between the EA and Chart Trade.
First, let's change the following:
input int       user20      = 1;        //Leverage
input double    user21      = 100;      //Take Profit
input double    user22      = 81.74;    //Stop Loss
input bool      EA_user23   = true;     //Day Trade ?
The value that indicates whether the EA will prefer to open long or short trades remains unchanged. This will have to be done in Chart Trade or in a pending order which you place on the chart. I've already shown you how to do this in previous articles, so let's get on with the coding work. Let's add the following changes in the OnInit event:
int OnInit()
{
        if (!TerminalInfoInteger(TERMINAL_TRADE_ALLOWED))
        {
                Sound.PlayAlert(C_Sounds::TRADE_ALLOWED);
                return INIT_FAILED;
        }

        Terminal.Init();

#ifdef def_INTEGRATION_TAPE_READING
        VolumeAtPrice.Init(user32, user33, user30, user31);
        TimesAndTrade.Init(user41);
        EventSetTimer(1);
#endif

        Mouse.Init(user50, user51, user52);

#ifdef def_INTEGRATION_CHART_TRADER
        static string   memSzUser01 = "";
        if (memSzUser01 != user01)
        {
                Chart.ClearTemplateChart();
                Chart.AddThese(memSzUser01 = user01);
        }
        Chart.InitilizeChartTrade(EA_user20 * Terminal.GetVolumeMinimal(), EA_user21, EA_user22, EA_user23);
        TradeView.Initilize();
   OnTrade();
#else
        GlobalVariableTemp(def_GlobalVariableLeverage);
        GlobalVariableTemp(def_GlobalVariableTake);
        GlobalVariableTemp(def_GlobalVariableStop);
        GlobalVariableTemp(def_GlobalVariableResult);
        GlobalVariableSet(def_GlobalVariableLeverage, user20 * Terminal.GetVolumeMinimal());
        GlobalVariableSet(def_GlobalVariableTake, user21);
        GlobalVariableSet(def_GlobalVariableStop, user22);
        TradeView.Initilize();
        GlobalVariableSet(def_GlobalVariableResult, TradeView.GetFinanceRoof());
#endif

        return INIT_SUCCEEDED;
}
As you can see, we add here global variables that will be used for communication. As we already mentioned, the EA must always start before Chart Trade, otherwise we will not be able to initialize the indicator. Please note that the values that will initially be used by Chart Trade are specified in the EA. The initialization will be completed, even if there were previous trades: the accumulated value is also transferred to Chart Trade again.
Pay attention to an important detail: the variables created are of a temporary type, since we do not want these variables to be saved in case of the EA data dump, as they are of no use after a certain time. Even if something happens and the platform shuts down, these variables will no longer exist.
Another addition to be implemented is shown below:
void OnDeinit(const int reason)
{
        Mouse.Destroy();
        TradeView.Finish();
#ifndef def_INTEGRATION_CHART_TRADER
        GlobalVariableDel(def_GlobalVariableLeverage);
        GlobalVariableDel(def_GlobalVariableTake);
        GlobalVariableDel(def_GlobalVariableStop);
        GlobalVariableDel(def_GlobalVariableResult);
        GlobalVariableDel(def_GlobalVariableButton);
#endif
#ifdef def_INTEGRATION_TAPE_READING
        EventKillTimer();
#endif
}
Even though the variables are temporary, we still ask the EA to forcibly remove them. This will ensue that the Chart Trade will no longer remain on the chart. There is a small problem with this OnDeinit event, but we will cover it in the next topic. Now let's look at another point that is rather interesting. This can be done in two different ways, while the results will be ALMOST identical. I say ALMOST identical, since there are minor differences that could make a difference. (Sorry for the pun)
The Chart Trade has some buttons and they send messages to the EA through a global variable. Here is the function inside the EA that adequately responds to these clicks:
inline void ChartTrade_ClickButton(void)
{
        union u00
        {
                double Value;
                ulong c;
        }u_local;

        if (GlobalVariableGet(def_GlobalVariableButton, u_local.Value))
        {
                GlobalVariableDel(def_GlobalVariableButton);

                if (u_local.c == def_ButtonClosePosition) TradeView.CloseAllsPosition(); else
                        TradeView.ExecuteOrderInMarket(GlobalVariableGet(def_GlobalVariableLeverage), GlobalVariableGet(def_GlobalVariableTake), GlobalVariableGet(def_GlobalVariableStop), ((u_local.c & def_ButtonBuyMarket) == def_ButtonBuyMarket), ((u_local.c & def_ButtonDTSelect) == def_ButtonDTSelect));
                TradeView.Initilize();
        }
}
The function is declared as inline, i.e. it must be placed by the compiler in the position where it is declared. This will make it run as quickly as possible.
A very important detail: where do we place this function? Let's think about it. We have a check here so it won't run all the time. So, we have two possibilities. The first one is to place the function inside the OnTick event, the second - inside the OnTime event. The selection must be based on certain logic, otherwise there can be problems.
So let's think: If we put this function in the OnTick event, it will be executed on every new tick coming from the trading server into the platform. This seems a good solution as the function will not be executed many times, but only at certain times. But this creates a problem: In case the volatility of the asset we are trading is very low, the frequency of OnTick events will also be very low, and this means that we may have problems with the triggering of the event by a click on the Chart Trade.
Here is the second option. Placing the function in OnTime will ensure that the function will be executed since the OnTime event will trigger with a certain regularity. But when we do this, we must remember that we will no longer be able to use the OnTime event for anything else, other than observing the global variables.=
At this stage, we have made a very good choice, as the EA will only watch the market. Over the next few articles, you will see that this will become more and more obvious. Then it's a good idea to put a function inside the OnTime event. But now the question is: the OnTime event only fires every second, doesn't it?
Actually, most often it fires once a second, but we can set a shorter period using the EventSetMillisecondTimer function. Thus, we can fire the event in less than 1 second. I believe that 500 ms would be enough for the most cases, so we will have the following line in the EA's OnInit event:
#else
        GlobalVariableTemp(def_GlobalVariableLeverage);
        GlobalVariableTemp(def_GlobalVariableTake);
        GlobalVariableTemp(def_GlobalVariableStop);
        GlobalVariableTemp(def_GlobalVariableResult);
        GlobalVariableSet(def_GlobalVariableLeverage, user20 * Terminal.GetVolumeMinimal());
        GlobalVariableSet(def_GlobalVariableTake, user21);
        GlobalVariableSet(def_GlobalVariableStop, user22);
        TradeView.Initilize();
        GlobalVariableSet(def_GlobalVariableResult, TradeView.GetFinanceRoof());
        EventSetMillisecondTimer(500);
#endif
Do not forget to close this event in the OnDeinit function, for which we simply add the following line in the event:
void OnDeinit(const int reason)
{
        EventKillTimer();
Now let's see what the OnTime event looks like. It is a super simple code, where only the highlighted line is actually compiled.
void OnTimer()
{
#ifndef def_INTEGRATION_CHART_TRADER
        ChartTrade_ClickButton();
#endif

#ifdef def_INTEGRATION_TAPE_READING
        VolumeAtPrice.Update();
        TimesAndTrade.Connect();
#endif
}
Is that all? No, there is another small problem. Let's remember that we have changed the EA's initialization variables and want to retrieve data from Chart Trade every time a new pending order is placed on the chart. For this purpose, we need to add one small detail in the C_IndicatorTradeView class code. It is shown below:
        case CHARTEVENT_MOUSE_MOVE:
                Mouse.GetPositionDP(dt, price);
                mKeys   = Mouse.GetButtonStatus();
                bEClick  = (mKeys & 0x01) == 0x01;    //Left mouse button click
                bKeyBuy  = (mKeys & 0x04) == 0x04;    //SHIFT pressed
                bKeySell = (mKeys & 0x08) == 0x08;    //CTRL pressed
                if (bKeyBuy != bKeySell)
                {
                        if (!bMounting)
                        {
#ifdef def_INTEGRATION_CHART_TRADER
                                m_Selection.bIsDayTrade = Chart.GetBaseFinance(m_Selection.vol, valueTp, valueSl);
#else
                                m_Selection.vol = GlobalVariableGet(def_GlobalVariableLeverage) * Terminal.GetVolumeMinimal();
                                valueTp = GlobalVariableGet(def_GlobalVariableTake);
                                valueSl = GlobalVariableGet(def_GlobalVariableStop);
                                m_Selection.bIsDayTrade = EA_user23;
#endif
The highlighted codes now capture the values that are in the global variables, so whatever is in the Chart Trade will be put into the order system. The only detail is that all pending orders will follow the time specified by the EA, but this can be changed directly on the chart. For further details please see Developing an Expert Advisor from scratch (Part 27), in which I showed how to modify pending orders directly on the chart, without having to go through Chart Trade.
There is also a small modification in the sound system. The sounds were added in the C_Router class to ensure notification about position opening and closing if we are working via Chart Trade. If you want to remove or change something in the sound system, you should remember that there are other points to consider.
Before we finish, let's remember that the OnDeinit event has a problem that we were going to fix. So let's move on to the next topic and fix this.
2.3. Preventing Chart Trade from exiting the chart prematurely
When we do anything, like change the chart timeframe or the EA parameters (it can be anything), MetaTrader 5 generates an OnDeinit event. The triggering of this event means that things need to be reanalyzed to make sure everything continues to work as it should.
In most cases, triggering of this event does not cause any problems. But since we create a client-server system and use global variables to find out if the server (the EA) has stopped running, we will have to understand how to get around certain situations.
The function that handles the original OnDeinit event looks like this:
void OnDeinit(const int reason)
{
        EventKillTimer();
        Mouse.Destroy();
        TradeView.Finish();
#ifndef def_INTEGRATION_CHART_TRADER
        GlobalVariableDel(def_GlobalVariableLeverage);
        GlobalVariableDel(def_GlobalVariableTake);
        GlobalVariableDel(def_GlobalVariableStop);
        GlobalVariableDel(def_GlobalVariableResult);
        GlobalVariableDel(def_GlobalVariableButton);
#endif
#ifdef def_INTEGRATION_TAPE_READING
        EventKillTimer();
#endif
}
The highlighted line will remove the global variable, exactly the one we use in the Chart Trade indicator to check if the EA is on the chart or not. This check is performed in the following code:
void OnChartEvent(const int id, const long &lparam, const double &dparam, const string &sparam)
{
        if (!GlobalVariableCheck(def_GlobalVariableLeverage)) OnDeinit(REASON_INITFAILED);
        Chart.DispatchMessage(id, lparam, dparam, sparam);
}
That is, every time something happens in the EA which activates the OnDeinit event, this variable will be deleted. And before the EA re-creates the variable, the indicator may already be removed from the chart, which can be really strange. At some points it will happen and ate others it won't. So, we have to somehow ensure that everything works as expected.
I found a solution to this problem in the documentation. This can be seen in the section Codes of deinitialization reasons. Looking at these codes, we can configure the OnDeinit event handling function so that the variables are not deleted until the EA is removed from the chart.
So the solution and the new processing code will be like this:
void OnDeinit(const int reason)
{
        EventKillTimer();
        Mouse.Destroy();
        TradeView.Finish();
#ifndef def_INTEGRATION_CHART_TRADER
        switch (reason)
        {
                case REASON_CHARTCHANGE:
                        break;
                default:
                        GlobalVariableDel(def_GlobalVariableLeverage);
                        GlobalVariableDel(def_GlobalVariableTake);
                        GlobalVariableDel(def_GlobalVariableStop);
                        GlobalVariableDel(def_GlobalVariableResult);
                        GlobalVariableDel(def_GlobalVariableButton);
        };
#endif
#ifdef def_INTEGRATION_TAPE_READING
        EventKillTimer();
#endif
}
Now, if we change only the chart timeframe or plotting way, we will no longer have the inconvenience associated with the disappearance of the Chart Trade indicator from the chart. In any other situation it may be removed from the chart, since we do not have the real assurance that everything will work out. Because of this, once the EA and the Chart Trade have been loaded, it will no longer make sense to modify the EA parameters.
Conclusion
See what a little creativity can do? Sometimes we have to solve problems that seem unfixable. But by studying the documentation, we can find the solution, so it is essential to always check the documentation and understand it to be able to put ideas into practice.
Translated from Portuguese by MetaQuotes Ltd.
Original article: https://www.mql5.com/pt/articles/10653
 Neural networks made easy (Part 30): Genetic algorithms
 Neural networks made easy (Part 29): Advantage Actor-Critic algorithm
- Free trading apps
- Over 8,000 signals for copying
- Economic news for exploring financial markets
You agree to website policy and terms of use