Gold Hourly Breakout EA
- 유틸리티
- Nicolae Stelian Raiu
- 버전: 100.2
- 활성화: 5
The EA (Expert Advisor) is only attached to the pair it is intended for XAUUSD/GOLD, in the TF (TimeFrame) M5! 🕒
Use Guide Complete in this Link
PLEASE READ
PLEASE READ
How the Strategy Works!This strategy is created based on intelligent analyses and strategic mathematical placements of transactions so that the daily success rate is very high with a REAL percentage of 98-99%, counting the days won in relation to the days lost.
The strategy begins by placing two Stop orders (a Buy Stop and a Sell Stop) at a carefully chosen distance based on the hourly analysis ("Hour A" and "Hour B" are also very important), and at the designated "Open Hour" carefully selected and discovered in extensive testing. These transactions are placed, and when one of these orders is activated, the other pending order is automatically deleted. Thus, we have only one transaction active, and if it reaches TP, the trading day ends with the targeted profit in the account! 🎯
If this transaction reaches SL, then the second transaction comes into play, which enters at the SL spot of the first transaction and has a shorter TP distance and a larger lot calculated so that it recovers the loss of the first transaction and brings in the surplus profit aimed for the daily target necessary. Usually, in 22 trading days on average, we have 18 days through which TP is reached with just a single order and 4 days where we have the 2nd order as a recovery! 📈
The strategy will never use more than 2 orders per day! It does not multiply indefinitely! If both orders hit SL then we declare a lost day and the transactions stop there! (this happens in 2% of cases) We do not take on other unnecessary risks, the strategy is not based on endless recovery but on the meticulous placement of the first transaction so that it reaches TP as quickly as possible.
The strategy is based especially on the first transaction which has a success rate of approximately 80%, and the second transaction can be optional at your choice, and this increases the success rate to 98%, therefore it is recommended to use this one as well !
So, we cannot lose more than we choose to risk, we will see below exactly how it works and the presentation of all entries from the EA.
Also, there are no transactions from one day to the next, all have a daily "Open Hour" at the same time depending on the pair and "Close Hour" likewise. For example, for XAUUSD transactions will be placed before the opening of the London Session and closed at the end of the session, and for US30 transactions will open before the NY session and close at the end of it! Usually, transactions are finalized in the first hours after placement, very rarely do they reach the closing hour without being already finalized!
We can see how wonderful the intelligent and strategic placement of transactions is so that we win most of the time! 🚀
After attaching the EA to the chart ( TimeFrame M5 ), it's necessary to adjust the input times according to UTC!
How do we do this?
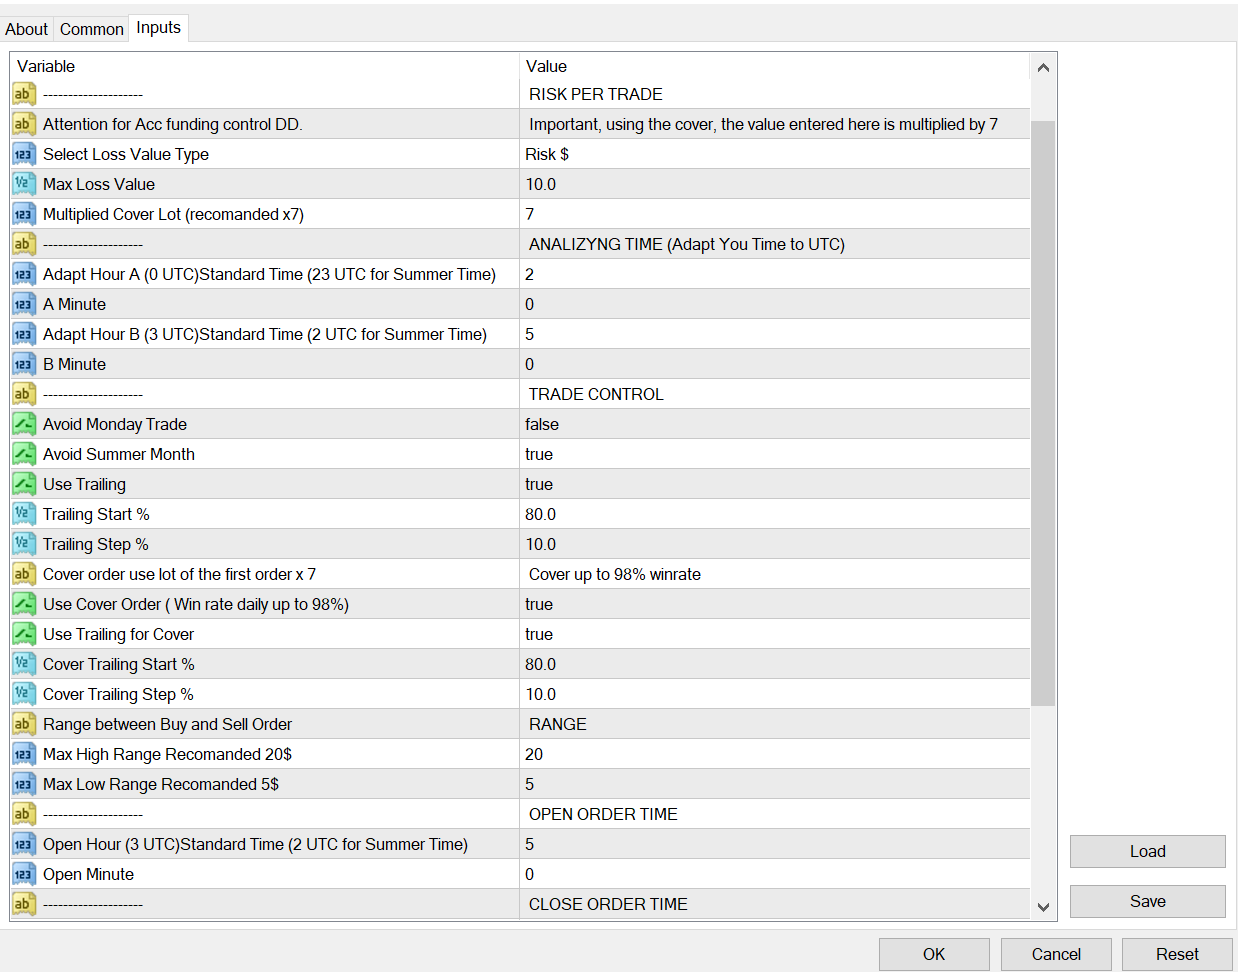
We can see in the EA input for each pair that next to each Variable, the required UTC time for operation is listed.
We only need to adjust Hour A, Hour B, Open Hour, and Close Hour; the minutes always remain by default! ⏰
To correctly synchronize the times, it's necessary to check the current time of our broker in the Market Watch section (see in the attached image),
and then depending on the required UTC time which is listed in the input and in the chart created below for Standard UTC or UTC Summer DSL (check which period of the year we are in, when we switch to summer time we use UTC Summer, and after October we use Standard UTC)
If you use a broker like mine (SwitchMarket) that uses GMT+2 (Standard) or GMT+3 (Summer DST), then run in default mode because these hours are added in the input to synchronize with UTC time.
In the input, we have the option to select the risk of the first transaction in percentages (Risk %) or dollars (Risk $) (Recommended) under "Select Loss Value Type"! And in the "Max Loss Value" section, we enter the sum or percentages we choose!
This means that in the case of the SL (Stop Loss) of the first transaction, we will only lose the amount registered here!
The value of the profit will be RR 1 / 0.5, meaning half of the sum risked minus the broker's fees, for example, if we risk $10, we will have a profit of approximately $4-5 depending on the broker 💵, and in case a second cover transaction is needed (its purpose is to recover the first loss and to bring the daily target) 🎯.
The second transaction, if used (usually in a month out of 22 trading days on average, 18 days are concluded using just the first transaction, and 4 by activating the second cover transaction) will have an RR 1 / 0.25, using a larger lot and a shorter TP distance thus it will reach TP in 98% of cases (SL of both transactions in the US30 history happened only 3 times in the last 2 years) 📉📈. Thus in the second transaction in our example, we will have a risk of $70 and a profit of 0.25 meaning approximately $18 which means that we will recover the first transaction's loss of $10 and will have a profit of $7-8 hence we reached the daily target!
A major advantage is that the EA automatically calculates the lot size based on the sum you chose as a risk in the input, so in the case of SL, you do not lose more than you choose to risk! You can choose this in percentages or in dollars!
It is recommended to use risk input by selecting "$" dollars, because by always using a fixed amount, the risk will remain the same, and implicitly, recovery in the case of SL will be exact. Using percentages, the risk increases along with the account size. After both SLs, depending on the percentage used, the amount at risk decreases, so the recovery period can be extended. Therefore, by using a fixed amount, mathematically, the profit and loss will be fixed, making it easy to calculate and predict the number of days needed for recovery in the case of SL for both orders.
Thus, management becomes so simple and easy to apply both in personal accounts and in funded accounts. Also, when entering this value, it is recommended not to exceed the account margin depending on the broker, so that the cover order can be placed.
📊💡
Be mindful of the risk level you choose so that it aligns with the margin of your account. An overly high risk assigned to a transaction can prevent the placement of the cover order due to a margin call. Consequently, choose the risk level considering the cover order and your account type based on its size and leverage so that everything can proceed smoothly.
Also, the EA automatically takes the minimum or maximum lot size accepted by the broker so that the order is placed within their requirements! 🤖✅
The first order can also be used alone because the strategy is profitable as seen in the history on average 18 days out of 22 end with just the first transaction without the need for the second one (my recommendation is to use the cover order since the possibility of both hitting SL is very rare) 🔍📊.
Even if this happens, recovery will be quick in just a few days, being used on both pairs recovery will be done in approximately 7-8 days ( we will see exactly how by viewing the exemplary message of a Simulation presented at the end of the guide (Is recommended to use risk input by selecting "$" dollars) ), so how is it to have the TP target reached every day and to have only a few lost days a year? Which we will recover quickly!
Therefore, the mathematical placement is astonishing as it allows us to profit from market conditions! 🚀
In the input, you have the option to select if you want this in the section "Use Cover Order" selecting "true" by default or "false" ✅❌.
Also in the input you have the possibility to change the value with which the lot of the Cover order is multiplied by "Multiplied Cover Lot", this value is set by default x 7, a value that is also calculated to recover the loss of the first order and to bring the daily target as a surplus . You can choose to modify this so that you only partially recover.
Activating it is recommended, as I've mentioned, because it creates an even higher success rate, ensuring that each day brings us to our daily target, knowing that the risk percentage is very low!
Also, we must be aware that the SL value of this cover order is the Risk initially added in the input multiplied by approximately 7 , as specified in the variables (example: if we've added $5 in Max Loss Value, then the maximum loss of the first order will be $5, and the maximum loss of the cover order will be 7x, i.e., $35 in case of SL).
But this should not scare us since we've seen that the risk is minimal; it should only help us to know how much we can risk so that we fit into using a funded account! At the end of the description, I also attach an example of management so that you can use the strategy in a funded account (Bonus) and a simulation of the risk and profit calculation generated by the EA. 💡📈
Another advantage is the Trailing function, as this feature can be customized to activate at the percentage value set by the user in the "Trailing Start" input and then follow the market with a step back using "Trailing Step". The greatest advantage of this function is that it changes both SL and TP to be able to follow the market if it continues correctly, widening the distances from the current price as the market continues. This allows the transaction's profit to be increased if the market maintains the correct direction, as it no longer has a fixed SL and TP but is dynamic, following the market!
The function comes activated by default but it is not mandatory to use it; however, it can create an even higher success rate, knowing that in history, transactions that eventually hit SL were initially close to TP! If you wish to not use it, you can do so by selecting "Use Trailing" to "False". 💡📊
From tests, it is recommended to use the percentages in the default mode, but they can be adjusted according to your preferences.
Simulate!
Let's simulate an example to see the profit generated and the risk assumed:
We use an Initial Risk on the first order of $50
We know from the 2-year statistics that out of a total of 22 trading days per month, we have an average of 18 days gained through the first order and 4 through the activation of the second order
Using only the first order, you get the profit like this, having, as we saw, in 18 days with a RR 1/0.5, which is about $25 in our case:
18 x $25 = $450
And in 4 days we have SL for the first order
4 x $50 = $200
So if we choose to use only the first order we will have a monthly profit in our example of $250
However, using the second order (Cover Order) intelligently, the data of the problem changes by substantially increasing the winning rate!
The risk for Cover Order as we have seen is the initial risk x 7, in our case for this second order the risk will be 7 x $50 = $350
Using the cover order, you get the profit like this, having as we saw on average 4 days in which this order is activated and here the TP distance being even shorter as we saw above and to increase the probability that the TP will be quickly reached, because that's what we need, we will have a RR 1/0.25 which is about $77.5 Profit in our case
Thus, in the 4 days on average when this order is used, the remaining profit will be
$27.5, so by rounding I basically made the daily target
Thus we will have 22 days x $25 = Total Profit $550
It's just an example, you can choose any amount you want as risk according to your budget
If in the example above we used an account of $1000 then a profit of 55% would result in a month with a maximum risk in 18 days of 5% and in 4 days of 35%
Using the strategy in the same account with both pairs doubles these numbers!
As you have seen, the strategy works in different time intervals for US30 and XAUUSD, usually the XAUUSD transactions are already completed when the ones from US30 are placed, if it is not completed then they are interspersed only for about 2 hours, that is why they can use both pairs successfully in the same account, with optimal management if you use funded accounts as in the example that will be presented below
These numbers can be slightly different due to broker fees or using BE which, as we have seen, can stop the transaction at 75% of the TP distance!
=======================================================
Now let's consider a negative scenario that happens in 2% of cases:
Both trades hit SL on the same day!
Risking $50 on the first order and $350 on the second will result in a maximum possible risk of $400
In this case we will need on average 16 days to recover this loss, i.e. $400 : $25 (daily target in our case) = 16 days
And if we also use the XAUUSD pair with the special strategy for it, then the recovery period decreases to 8 days!
If we use all 4 pairs (XAUUSD, US30, USDZAR , USDJPY), the numbers become even larger, and the recovery is faster depending on the chosen input settings (Trailing, Multiply Cover, broker fees).
So what happens if we hit both SL? we need 8 days on average for recovery, it's not much if we consider the winning rate!
In these 2 years since this strategy has been used on US30, 3 such scenarios have happened (2 of them closed at closing time with a minus smaller than the total risk, i.e., a small loss), but it doesn't matter the gloomy scenario, so basically in 2 years it took 48 days of recovery and in the rest of the days of Profit, Profit, Profit, day by day for 2 years until now 01.02.2024 the moment of creating this course
It is amazing!
Mathematics and its intelligent use help us to be a Winning Trader in 98% of cases! 🚀📈💰
It is recommended to use risk input by selecting "$" dollars, because by always using a fixed amount, the risk will remain the same, and implicitly, recovery in the case of SL will be exact. Using percentages, the risk increases along with the account size. After both SLs, depending on the percentage used, the amount at risk decreases, so the recovery period can be extended. Therefore, by using a fixed amount, mathematically, the profit and loss will be fixed, making it easy to calculate and predict the number of days needed for recovery in the case of SL for both orders.
Funded AccountNow let's see how we effectively use the strategy in financing accounts to have access to more capital and consequently a higher monthly profit.
As we know, most of the financing firms use some limits regarding DD (DrawDown) and Profit.
The most common figures in the market are these:
- maximum daily DD = 5%
- Profit Target Challenge = 8%
Let's take an example of a usual account of $10,000
- We have a DD Limit of $500
- We have a Target Profit of $800
In order to fit within the daily limit of DD, we must take into account how much we risk in both transactions so as not to exceed this limit!
In order not to exceed this limit, we must use a risk/transaction of 0.6% which in our account is $60
So, using $60 (0.6%), we will fall within the 5% limit in case both orders hit the SL, because:
- 0.6% SL of the first order
+
- 4.2% (0.6% x 7 (we know this is the risk of the cover order))
=
- 4.8% Daily Maximum Risk ($480)
So as we can see by doing this even if we hit both SLs on the same day we would not exceed the daily limit and thus protect the account!
Let's see how much we earn monthly using this risk per transaction:
- On average, we have 22 trading days per month, and we know that we have a RR of 1/0.5 (this is where taxes are deducted, but they are a little significant)
So in our case, RR (Risk/Reward) is of $60/$30
- 22 x $30 = $660/month / pairs
We see that in our example we need about 27 days to pass the challenge, and as we know most financing companies no longer have the time limit for passing the challenge. After passing it we ensure a monthly profit of approximately $660
This is just a simple example of how we can gain access to larger funded funds so that the return on the strategy is higher!
Good money management will always be in our favor! 💼📈💰