당사 팬 페이지에 가입하십시오
- 조회수:
- 32917
- 평가:
- 게시됨:
- 2013.03.18 10:46
- 업데이트됨:
- 2016.11.22 07:32
-
이 코드를 기반으로 한 로봇이나 지표가 필요하신가요? 프리랜스로 주문하세요 프리랜스로 이동
The real author:
The indicator which fixes Pin Bars in the chart. You can read about Pin Bars here.
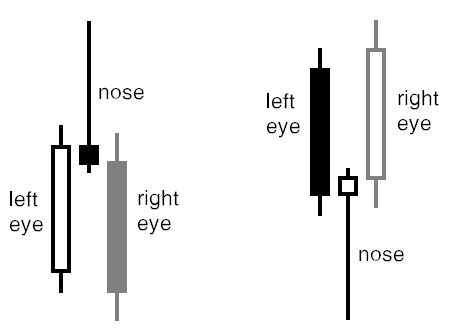
Pin Bar's pattern consists of three bars: "left eye", "nose" and "right eye". The "left eye" must be the growing bar for the bearish Pin Bar or falling bar for the bullish Pin Bar. "Nose" must be opened and closed inside the "left eye", but its maximum (or minimum for the bullish pattern) must protuberate far from the maximum (or minimum) of the left eye. Open and close levels of the "nose" must be located in the upper quarter of the bar:

Fig.1 Pin Bar Pattern
An additional condition for a good pattern is the presence of strong support/resistance lines behind the "eyes" or near the tip of the "nose". The stronger these levels, the more exact the pattern.
Entry conditions:
- An aggressive entry point is the price rollback out of the close level of the "left eye".
- Conservative point is the price fall below the"nose" level (higher for the bullish pattern).
Exit conditions:
- Conservative Stop Loss can be set behind the proximate support/resistance level and "eyes". It would be less conservative approach to place Stop Loss on the tip of the "nose" (in this case profit/risk ratio is affected).
- Conservative Take Profit can be set immediately behind the minimum of the "left eye" (maximum, for the bullish pattern). Aggressive level of Take Profit can be set further on the next support/resistance level.
Indicator input parameters:
input bool UseAlerts=true; // Permission for alerts
input bool UseEmailAlerts=false; // Permission for email alerts
input double MaxNoseBodySize = 0.33; // maximum allowed ratio of Nose body to the whole bar length
input double NoseBodyPosition = 0.4; // extreme position of Nose body inside the bar. The upper part is for the bullish figure, the lower is for the bearish one
input bool   LeftEyeOppositeDirection=true; // Left eye must be bearish for the bullish Pin Bar and bullish for the bearish Pin Bar
input bool   NoseSameDirection=false; // Nose must be of the same direction as the figure itself
input bool   NoseBodyInsideLeftEyeBody=false; // Nose body must be placed in Left eye body
input double LeftEyeMinBodySize=0.1; // minimum Left eye body size relative to bar length
input double NoseProtruding=0.5; // minimum protuberance of Nose relative to bar length
input double NoseBodyToLeftEyeBody=1; // maximum Nose body size relative to Left eye body
input double NoseLengthToLeftEyeLength=0; // minimum Nose length relative to Left eye
input double LeftEyeDepth=0.1; //  minimum Left eye depth relative to its length. Depth — length of the part of bar behind Nose

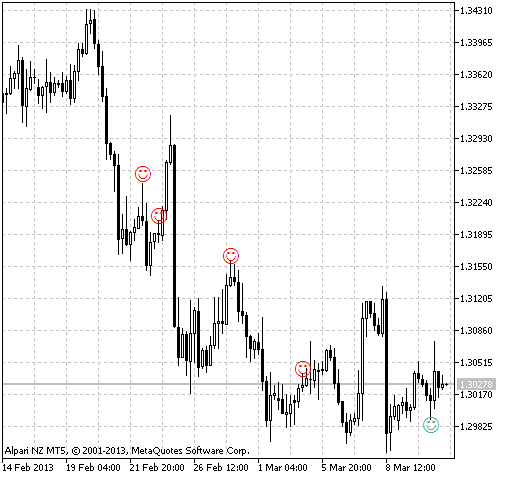
Fig.2 The Pinbar Detector indicator
MetaQuotes Ltd에서 러시아어로 번역함.
원본 코드: https://www.mql5.com/ru/code/1595
 ColorJCCX
Smoother Commodity Chanel Index.
 3rd Generation Moving Average
The Moving Average which uses quite a simple procedure on decreasing temporal lag based on the increase of the Moving Average period.
 ColorJJRSX
Smoother Relative Strength Index.
 Exp_TrendContinuation
The Expert Advisor using the TrendContinuation trend indicator.