Presentation of the Strategy:
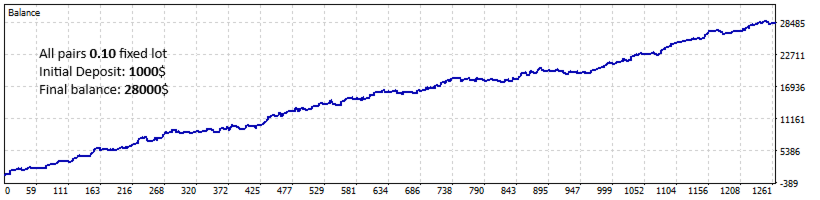
The Essence Engine operates on the principle of high reward with low risk levels. The advanced algorithm waits for confirmations from two primary indicators, followed by the main confirmation from price action. It sets the take-profit level based on previous readings and learns from historical candlestick data going back a full year. Similarly, it establishes a stop-loss level based on a year-long study, with both take-profit and stop-loss values evolving over time. These values adapt according to market conditions for each activated currency pair, as configured in the Expert Advisor's settings. The reward-to-risk ratio can exceed 3:1, providing the Expert Advisor with a broader scope to achieve advanced successes.
The four internal strategies of the Expert Advisor are designed to achieve significant gains when market conditions improve, which are constantly changing. Consequently, it may operate intermittently for two to three weeks at certain levels, then make substantial jumps before returning to an intermittent state to repeat the process. This makes it highly suitable for investment over weeks to months, delivering high returns on the initial investment rather than daily trading. (If you are looking for an Expert Advisor tailored for daily profits, this is not the one for you.)
Settings and Parameters Used:
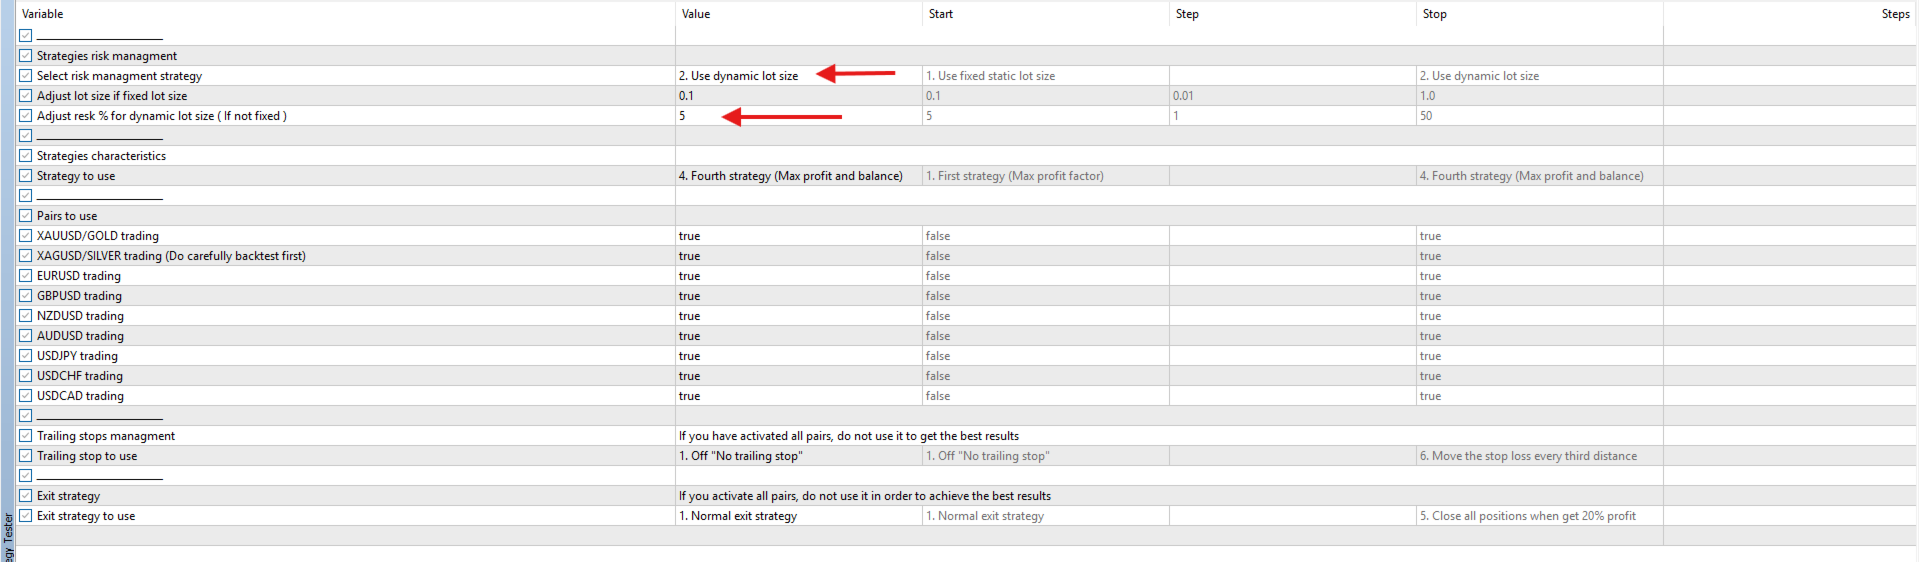
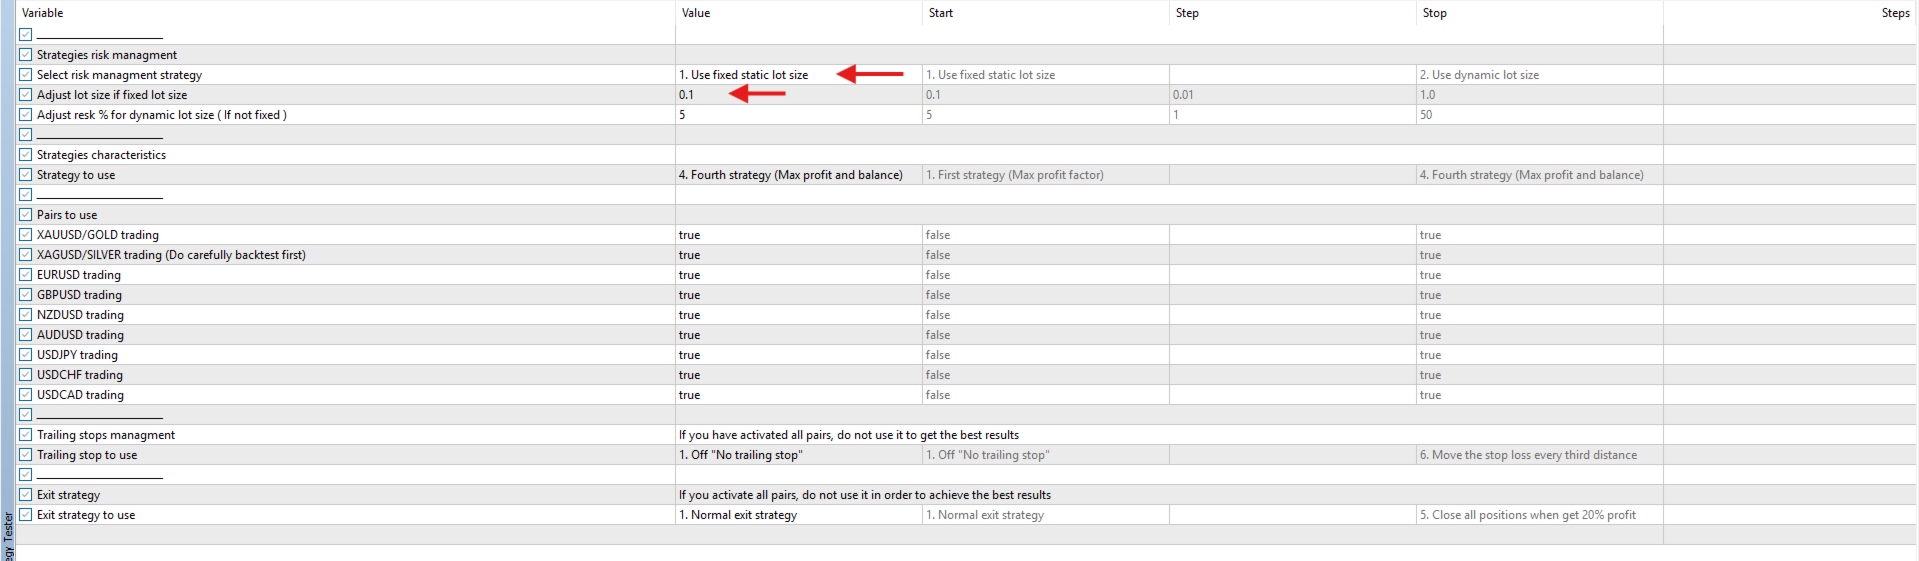
Strategies Risk Management:
- Select Risk Management Strategy: Two key options are available:
- Use Fixed Static Lot Size: This fixes the trade size regardless of capital growth, benefiting those who prefer weekly or monthly profit withdrawals without allowing the Expert Advisor to utilize increased available funds.
- Use Dynamic Lot Size: This allows the Expert Advisor to increase trade sizes as the balance grows, accelerating profit growth and affecting the smoothness of the profit growth curve, leading to upward jumps followed by downward dips, and so forth.
- Adjust Lot Size if Fixed Lot Size: Used to set a fixed contract size for trade entries (e.g., 0.10, 0.05, or 1.5), depending on your preferences and capital. It is highly recommended not to exceed 5% of your available capital when trading gold and silver.
- Adjust Risk % for Dynamic Lot Size (If Not Fixed): Determines the contract size for trade entries based on a percentage of available capital. For example, with a $1,000 balance and a 5% risk level, the Expert Advisor will enter trades with a 0.05 lot size, scaling it with the balance growth at the same percentage. It is highly recommended not to exceed 5% when trading silver.
Strategies Characteristics:
- List of Important Options (Strategy to Use):
- Option 1: First Strategy (Max Profit Factor): The algorithm learns from the past year's candlesticks to open fewer trades, aiming for the highest profit factor statistic.
- Option 2: Second Strategy (Max Trades Activities): The algorithm learns from the past year's candlesticks to open as many trades as possible with good profitability, targeting those who prefer frequent trading.
- Option 3: Third Strategy (Max Payoff per Trade): The algorithm learns from the past year's candlesticks to open positions and trades that maximize profit per trade, entering more trades than the first strategy but fewer than the second and fourth.
- Option 4: Fourth Strategy (Max Profit and Balance): Designed to achieve the highest possible income by learning from the past year and three months, maximizing profitability; this is the default strategy for the Expert Advisor.
Pairs to Use:
- Multiple options are available to activate and trade all, some, or one of the following pairs:
- XAUUSD/GOLD Trading: Well-designed strategies for trading this pair regardless of broker conditions.
- XAGUSD/SILVER Trading: Well-designed strategies for trading this pair, but note that over half of brokers have poor conditions for the silver-to-dollar pair, requiring careful backtesting before activation.
- EURUSD Trading: Well-designed strategies for trading this pair regardless of broker conditions.
- GBPUSD Trading: Well-designed strategies for trading this pair regardless of broker conditions.
- NZDUSD Trading: Well-designed strategies for trading this pair regardless of broker conditions.
- AUDUSD Trading: Well-designed strategies for trading this pair regardless of broker conditions.
- USDJPY Trading: Well-designed strategies for trading this pair regardless of broker conditions.
- USDCHF Trading: Well-designed strategies for trading this pair regardless of broker conditions, but note a significant glitch since early February 2025, limiting precise adaptive learning; careful testing is required before activation.
- USDCAD Trading: Well-designed strategies for trading this pair regardless of broker conditions.
Trailing Stops Management:
- Note: If you have activated trading on all pairs, do not use this feature, as it will significantly erode profits. When using all pairs, you may risk activating only the **Option 4: Secure Entry Point After Half Distance**, but it is best to disable the feature entirely.
- Trailing Stop to Use:
- Option 1: Off "No Trailing Stop": Highly suitable when activating multiple trading pairs; it is the default option. Perform precise backtesting if activating it for a specific pair.
- Option 2: Secure Entry Point After Quarter Distance: Moves the stop-loss to the entry level after passing a quarter of the take-profit distance. Not recommended for multiple pairs; perform precise backtesting if activating for a specific pair.
- Option 3: Secure Entry Point After One-Third Distance: Moves the stop-loss to the entry level after passing one-third of the take-profit distance. Not recommended for multiple pairs; perform precise backtesting if activating for a specific pair.
- Option 4: Secure Entry Point After Half Distance: Moves the stop-loss to the entry level after passing half the take-profit distance. Acceptable for multiple pairs but better left off; perform precise backtesting if activating for a specific pair.
- Option 5: Move the Stop Loss Every Quarter Distance: Moves the stop-loss to the entry point, then secures a quarter, half, and three-quarters of profits as the price advances toward the take-profit level. Not recommended for multiple pairs; perform precise backtesting if activating for a specific pair.
- Option 6: Move the Stop Loss Every Third Distance: Moves the stop-loss to the entry point, then secures a third and two-thirds of profits as the price advances toward the take-profit level. Not recommended for multiple pairs; perform precise backtesting if activating for a specific pair.
Exit Strategy:
- Exit Strategy to Use:
- Option 1: Normal Exit Strategy: The default option, designed to achieve take-profit even if a trade nears the stop-loss without waiting for other trades; optimal for Expert Advisor performance.
- Option 2: Close All Positions When Get 5% Profit: Closes all open trades when a 5% return on the entry amount is achieved. Not recommended when activating all trading pairs; test carefully if using for a specific pair or group.
- Option 3: Close All Positions When Get 10% Profit: Closes all open trades when a 10% return on the entry amount is achieved. Not recommended when activating all trading pairs; test carefully if using for a specific pair or group.
- Option 4: Close All Positions When Get 15% Profit: Closes all open trades when a 15% return on the entry amount is achieved. Not recommended when activating all trading pairs; test carefully if using for a specific pair or group.
- Option 5: Close All Positions When Get 20% Profit: Closes all open trades when a 20% return on the entry amount is achieved. Not recommended when activating all trading pairs; test carefully if using for a specific pair or group.
Usage Rules:
- Supported Trading Pairs: Automatically activates trading for all the following pairs (XAUUSD/GOLD, XAGUSD/SILVER, EURUSD, GBPUSD, NZDUSD, AUDUSD, USDJPY, USDCHF, USDCAD) or some or one, based on your preferences.
- Timeframe: Uses an internal timeframe unaffected by the trading pair or the chart timeframe you activate it on (e.g., can be activated on any chart like US30 or EURUSD) and automatically works only with supported pairs using its dedicated internal timeframe.
- Minimum Deposit: $100, tested efficiently on any deposit amount for optimal results.
- Reasonable Trade Entry Size: It is advised not to exceed 5% of the available balance when trading gold and silver or either.
- Account Type: Works with any hedge, ECN, or other account type, with a preference for brokers offering low or very low spreads on gold and silver.
- Settings: Do not start using the default settings immediately!! Activate the wanted pairs first by switching it to True in Inputs tab. You may also leave a comment or review, and we will send you the most suitable settings based on your requirements.