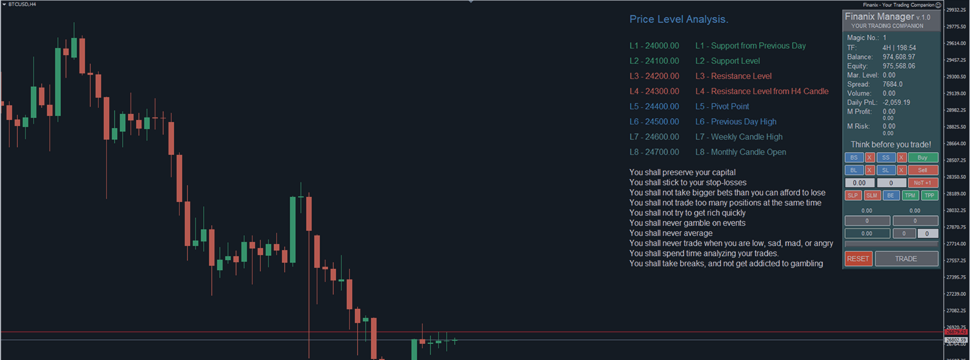
Product Link: https://www.mql5.com/en/market/product/98356?source=Site+Market+Product+Page#
Dear valued customer,
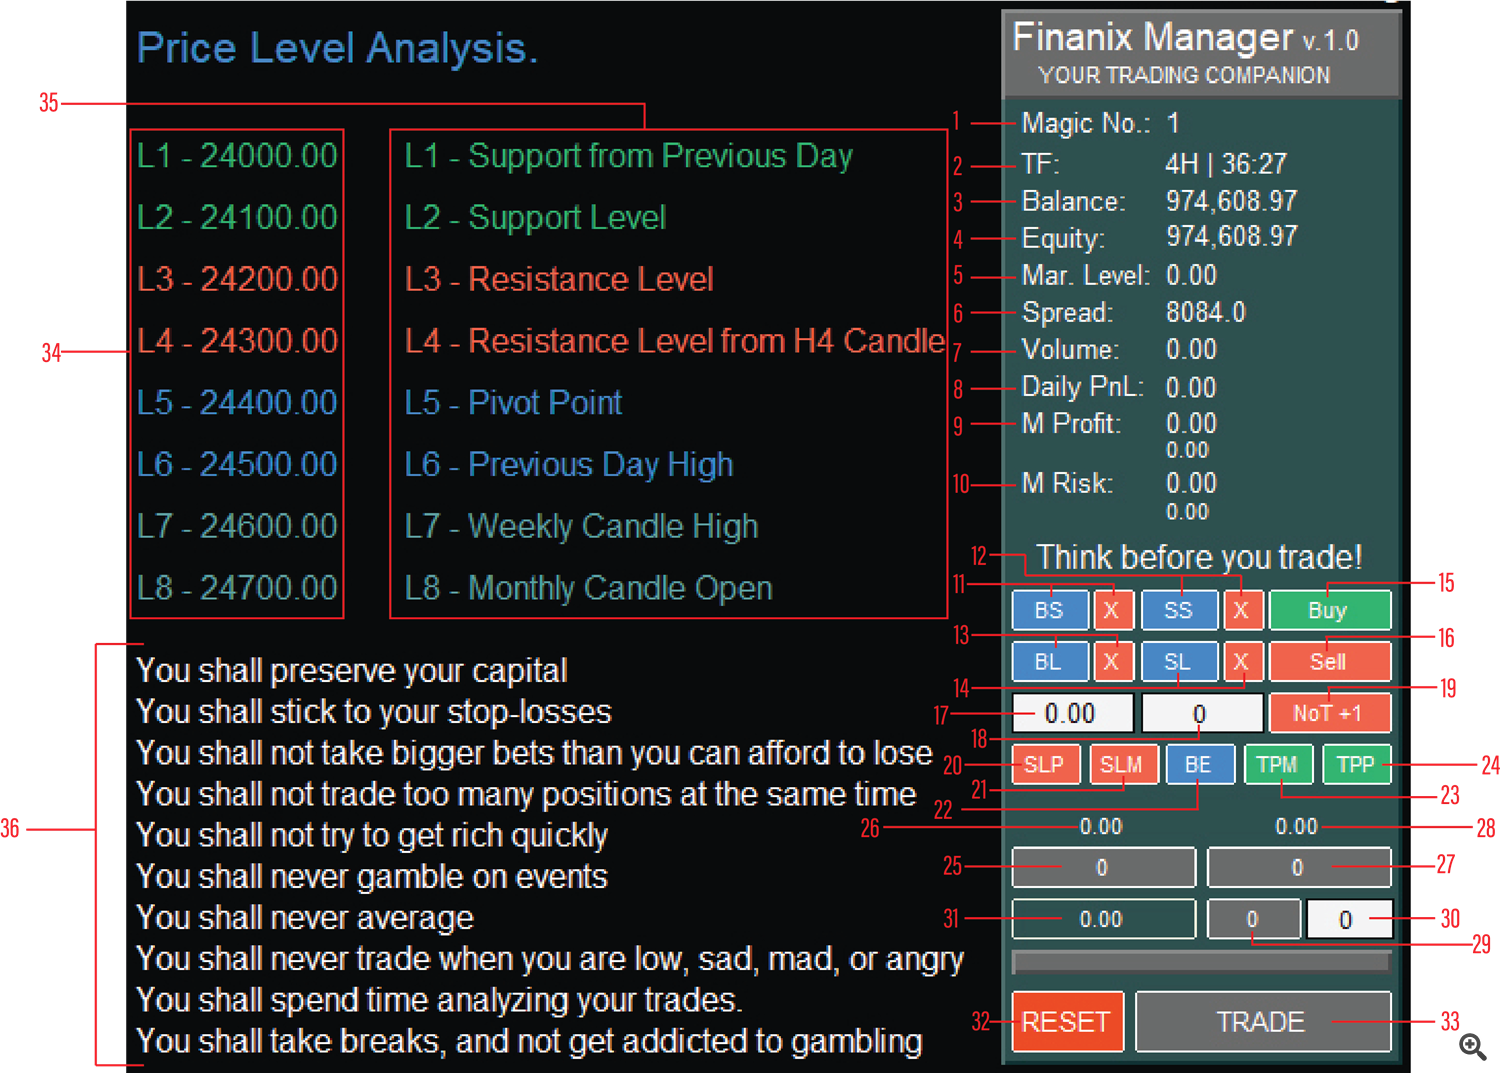
36. Extra Custom Comments - extra custom comments where you can type anything you want
Finanix Manager Universal Directive: All values relating to vertical chart distance are to be set in POINTS and not pips.
To find points, use MetaTrader's measuring tool. The number at the middle would be the point value.
Note for Manual: Numbers in parentheses which are after program functions/button names are used for easy reference to the list above for your convenience.
How to open a trade?
To open a trade, press the appropriate Buy (15) or Sell (16) button, then input your desired lots (17) and number of trades (18) in the appropriate areas. After this is accomplished, click the TRADE button (33) to place an order. After the program is done placing orders, or when you want the program to stop placing orders, click the STOP button (also 33).
How to close a trade?
To close a trade, press the appropriate close button of your choosing. Finanix Manager provides three buttons: Close All Trades (25), Close Half of All Trades (27), and Close Custom Number of Trades (29). Close All Trades closes all trades, while Close Half of All Trades closes half of all trades. If the number of trades is an odd number, the program would automatically round off the values and therefore close half including one whole number higher than the actual value. For instance, 15 trades would display on the Close Half of All Trades button as 8 trades.
How to open (and close) stop and limit orders?
Notice the BS, SS, BL, and SL buttons (11,12,13, and 14). These are the buttons you will click to open these orders. However, by default, all input values are set to zero, so before this, open the inputs tab in the program settings easily by clicking the smiley face beside the program name. Set the appropriate values needed by each respective value. Remember to set all values in points, which is the number at the middle that would appear when using the MetaTrader's measuring tool. The five variables will be further explained below under INPUTS. To close a buy or sell, limit or stop order, press the appropriate X button (11,12,13, and 14) to the right of the order label it would close. To close everything click all four X buttons, and if you just want to close buy stops, click only the X button to the right of it.
How to use BE?
For newcomers, a break even is the level at which the trade neither gains nor loses money. Luckily for you, the program can do this automatically, and upon pressing the BE button (22), all stop losses will move to the price level of or nearest to the absolute break even.
How to use SLP, SLM, TPM, and TPP?
The SLP (20), or Stop Loss Price button, when activated, will move all stop losses to a user-defined number of points from the current price level. TPP button (24), or Take Profit Price button also has the same function with SLP, but its only difference is that the orders being moved are take profit orders. The SLM (21), or Stop Loss Manual button, is used by inputting a certain price level at the Number of Trades/Level button (18). When activated, all stop losses will be moved to the user- defined price. Again, the same thing goes for the TPM button (23), or Take Profit Manual button, and the only difference are that take profit orders are being moved rather than stop loss orders.
I want to secure the profit I have in this trade successively. How do I use automatic trail stop?
There is no trail stop button on the main panel itself, but it is rather in Inputs. Go to Inputs > ====Trailing Stop (Points)====. In order to activate or deactivate the trail stop function, you can set the variable Trailing to true or false. Trail Start, the second variable, is - to put in simpler terms - how far from the entry must the price level be in points in order to activate the trail stop function, and Trail Step is the distance of the trailing stop from the current price level in points once the trail stop function is activated. Remember that the trail start value must be larger than the Trail Step value for the program to validate the query.
I messed up all the values, and I want to reset to default. How do I do this?
To reset the main panel, click the RESET button (32) and all the inputted values will reset to default. To edit the default values, go to INPUTS > ====Main Entry (Points)====. If you want to reset all values of inputs to 0 easily, click the RESET button at the lower right corner of Inputs in Program Properties. If you might use many loadouts of inputs when trading, you can save these inputs also with the save button at the lower right corner of Inputs in Program Properties.
- Magic Number - unique number that the program assigns to its orders
- Volume (Lots) - default lots
- No. of Trade - default number of orders
- Entry SL - default stop loss distance from current price level upon entering
- Entry TP - default take profit distance from current price level upon entering
- Trade Comment (Buy) - comment for buy orders
- Trade Comment (Sell) - comment for sell orders
- Stop Loss from Current Price Level (SLP) - default stop loss distance from current price level which is activated by pressing the SLP button
- BE Offset (BE) - additional number of points from break even
- Take Profit from Current Price Level (TPP) - default take profit distance from current price level which is activated by pressing the TPP button
- Trailing - activate/deactivate trailing stop function
- Start (Distance from Current Price Level) - distance from break even for initial activation of a trailing stop
- Step (Distance when the Trail Stop Activated) - distance from current price level when activating a trailing stop
- Distance from Current Price Level - buy stop distance from current price level
- Take Profit - buy stop take profit
- Stop Loss - buy stop stop loss
- Distance Between Layers - distance between layers of buy stops
- Trade Comment - comment for buy stop orders
- Distance from Current Price Level - sell stop distance from current price level
- Take Profit - sell stop take profit
- Stop Loss - sell stop stop loss
- Distance Between Layers - distance between layers of sell stops
- Trade Comment - comment for sell stop orders
- Distance from Current Price Level - buy limit distance from current price level
- Take Profit - buy limit take profit
- Stop Loss - buy limit stop loss
- Distance Between Layers - distance between layers of buy limits
- Trade Comment - comment for buy limit orders
- Distance from Current Price Level - sell limit distance from current price level
- Take Profit - sell limit take profit
- Stop Loss - sell limit stop loss
- Distance Between Layers - distance between layers of sell limits
- Trade Comment - comment for sell limit orders
- Title - change the title that is initially called Price Level Analysis
- Price Level - input price level
- Description - description of price level
- Color - color of price level
- Price Level - input price level
- Description - description of price level
- Color - color of price level
- Price Level - input price level
- Description - description of price level
- Color - color of price level
- Price Level - input price level
- Description - description of price level
- Color - color of price level
- Price Level - input price level
- Description - description of price level
- Color - color of price level
- Price Level - input price level
- Description - description of price level
- Color - color of price level
- Price Level - input price level
- Description - description of price level
- Color - color of price level
- Price Level - input price level
- Description - description of price level
- Color - color of price level
- 1 - comment 1
- 2 - comment 2
- 3 - comment 3
- 4 - comment 4
- 5 - comment 5
- 6 - comment 6
- 7 - comment 7
- 8 - comment 8
- 9 - comment 9
- 10 - comment 10
- Open - show/hide open of all trading sessions
- Close - show/hide close of all trading sessions
- Color - change color of open and close of all trading sessions
- Open - show/hide open of Sydney Trading Session
- Close - show/hide close of Sydney Trading Session
- Color - change color of open and close of Sydney Trading Session
- Open - show/hide open of Tokyo Trading Session
- Close - show/hide close of Tokyo Trading Session
- Color - change color of open and close of Tokyo Trading Session
- Open - show/hide open of London Trading Session
- Close - show/hide close of London Trading Session
- Color - change color of open and close of London Trading Session
- Open - show/hide open of New York Trading Session
- Close - show/hide close of New York Trading Session
- Color - change color of open and close of New York Trading Session
- Menu Background Color - change menu background color
- Ask & Bid Lines - show/hide ask & bid lines
- Trading Panel - show/hide trading panel
- Price Level Analysis - show/hide Price Level Analysis


![[$9,496] in 5 Days Using 'Supply Demand EA ProBot' (Live Results) [$9,496] in 5 Days Using 'Supply Demand EA ProBot' (Live Results)](https://c.mql5.com/6/965/splash-preview-761070-1740062258.png)